Do-it-yourself gazebo roof. Do-it-yourself gazebo roof How to build a wooden gazebo with a gable roof
The presence of a gazebo on the site is not a luxury, but a necessity. Drink a cup of coffee on a sunny morning, invite guests to get-togethers, or even work remotely for fresh air extremely nice!
And now the foundation is poured, the walls are ready, but which roof to choose? Not only the final cost, but also the reliability of the entire structure depends on the right decision.
Types of roofs, their advantages and disadvantages
Before you start drawing a roof project, delving into all the intricacies of calculations, it is better to decide in advance on the appropriate type of roof. Depending on the design, they are divided into:

For a do-it-yourself gazebo, single- and gable or hip structures. Other types of roofs require special skills and complex calculations, so it is recommended to trust their construction to professionals.

Pros and cons of pitched roofs
The main advantage of this type is the utmost simplicity for self-construction. There is no need to fasten the ridge, and with a gazebo width of up to 6 meters, the rafters are laid on the Mauerlat or the upper harness.

Another advantage of this solution is the price - for one pitched roof minimum materials required.
The disadvantages include increased windage. To prevent the roof from being torn off by gusts of wind, its lower edge should be located on the leeward side. It is determined quite simply - the wind most often blows from there. But with a changeable wind rose with strong gusts, a shed roof can be an unsuccessful solution. But this is a great option for an extension, because the wall of the house will protect the gazebo from the wind.
Advantages of gable and hip roofs
A gable roof is a universal option, devoid of the disadvantages of a pitched roof. Despite more complex system, even novice builders can handle its device.

In addition to resistance to gusts of wind, this design perfectly protects against slanting rain, if you move the edges of the roof away from the supporting pillars, and cover the front and back sides of the gazebo with removable screens.
Device hip roof even more difficult, since in addition to the angle of inclination of the side slopes, it is necessary to take into account the width of the laying from the side of the hip slope. But such a gazebo will protect from precipitation and resist gusts of wind from any direction.

Shed roof device
The shed roof of the gazebo is calculated based on the selected roofing materials and the maximum amount of precipitation in the region. The approximate angle of inclination can be calculated according to the diagram.

The pitch of the rafters is determined by their length and thickness. So, for three-meter rafters with a section of 8x10 cm, the pitch can be in the range of 1.1-1.35 m. For the same length, but with a section of 9x16 cm, the pitch can be increased to 1.75-2.15 m. But the rafters longer than 5 m should be extremely thick - 10x20 cm, and the distance between them cannot exceed 1.4 m.
If the walls of the gazebo are brick or concrete, then along the edge of the upper and lower walls it is necessary to fix the Mauerlat, insulated with roofing material. For a closed wooden gazebo or open on supports, the rafters can be attached directly to the top harness.
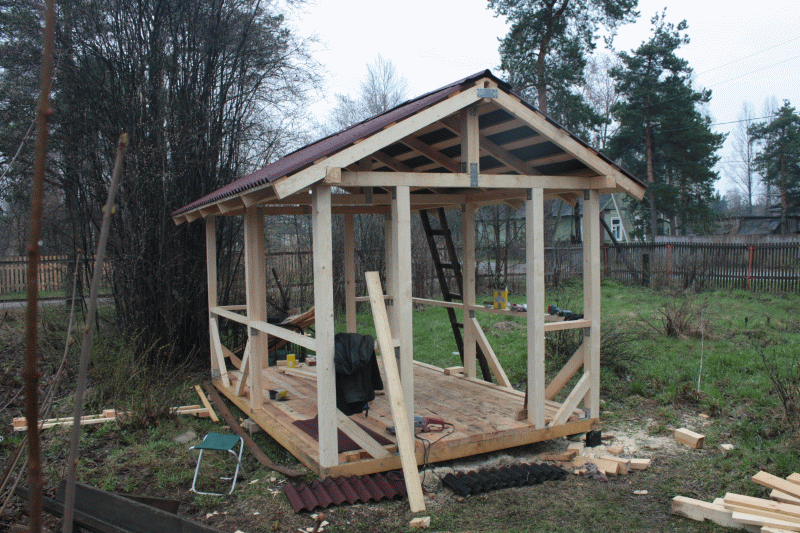
To make the device of the gazebo extremely simple, the distance between the supporting walls should not exceed 4.5 meters. Otherwise, you will have to attach supporting elements - rafter legs and racks, as in the photo.

The lathing is laid taking into account the selected roofing material. If the gazebo is planned to be open and unheated, then the device roofing cake optional, and the roof can be laid immediately on the crate. For example, for slate, the pitch of the crate should be such that the sheet goes onto two laths of the crate with a margin of 15 cm on each side.
Gable roof truss system
The principle of a gable roof is practically the same as a shed roof. The requirements for the thickness of the rafters and the pitch are the same; they are also attached to the Mauerlat or the upper trim. The main difference is the device of a gable truss frame and the presence of tightening to give the system greater rigidity and stability.

Considering small size gazebos, hanging rafters are often used. This option is suitable for runs up to 14 m long. But with a width of 6 m or more, additional supporting elements will be required - crossbars, headstocks and struts.

For ease of installation, individual elements can be assembled at the bottom, but it is necessary to think in advance how to lift them.
To cover the gazebo, it is desirable to use light roofing materials - they do not require the installation of capital structures and are extremely easy to use. Decking is the best fit for a gazebo with your own hands. At the same time, you should not be afraid of the sound of rain - contrary to popular belief, this does not in the least interfere with communication and relaxation.
How to raise the assembled elements of a gable roof onto a gazebo without the use of special equipment is shown in the video:
Coming to summer cottages or relaxing in a private house, urban residents tend to spend more time in nature, enjoying the fresh air and picturesque views. So that vacationers are not taken by surprise by the rain, and the children do not overheat in the sun, on adjoining territories equip special structures - gazebos. This is the name of small buildings equipped with a roof and everything necessary for a comfortable stay. Some arbors have a complex, intricate shape, while others prefer simple do-it-yourself designs. In this article we will understand how gazebos with a gable roof are built.
gable roof- the simplest roofing structure, which is often used for the construction of gazebos and canopies for recreation. It consists of two planes located obliquely, which are called slopes. The construction uses a gable roof with symmetrical or asymmetrical slopes, with sewn and unsewn gables. Builders prefer this type of roofing structure, as it has the following advantages:
- A light weight. The gable roof does not weigh very much, so for the construction of the gazebo it is not necessary to fill in a deep and solid foundation. In most cases, it is enough to pour 2-6 pillars of reinforced concrete to make the structure stable.
- Easy to operate. The gable roof, due to the slope of the slopes, does not require special care, since snow masses and rainwater they go off on their own. This quality of pitched roof structures is important for regions where it rains in winter. a large number of precipitation.
- Reliability. The gable type roof is more stable than the single-pitched counterparts. It has less windage, so even strong winds do not tear the roofing material from the surface.
- Affordable price. It is quite possible to build a gable roof for a gazebo with your own hands, this saves construction costs. Sheathing and rafters are made of wood, the value of which does not change over the years.


Note! If you are going to build a gazebo with your own hands, pay attention to projects with slope slopes of 25-30 degrees. Such a geometry of a gable roof does not collect a snow cap on itself, due to which the roofing material or lathing can be deformed. Keep in mind that the rougher the surface of the coating, the steeper the slopes make.
Device
A gable roof gazebo is the most common do-it-yourself design, as it uses affordable materials and tools available in every home. It consists of the following structural elements:

The device of the gable roof for the gazebo
- Pillar foundation. To fill the foundation of the gazebo with a drill, holes are made in the ground with a depth of 50-60 cm. To strengthen the base of the structure, reinforcing bars are inserted into the holes and poured cement-sand mortar. The columnar foundation completely hardens in 1-4 days.
- The bottom trim of the frame. It is made from pine timber 100x100 mm in size around the perimeter of the future gazebo. The elements are fastened together with metal corners or nails.
- Support pillars. They are made of durable timber with a thickness of 100x100 mm or 150x150 mm. When mounting with your own hands, they are installed vertically on the bottom trim. Until the poles are fixed with an upper harness, you need to strengthen them with temporary struts to maintain a vertical position.
- Upper strapping. It ties the tops of the gazebo's supporting posts together to form a rigid, stable structure. Fastening is carried out using metal corners or wooden bars.
- Railing. They are installed at a height of 100-120 cm from the floor of the gazebo. The railing is made from a bar 100x100 mm and fixed with metal corners to the support posts.
- Rafter system. The rafter system of the gable roof of the gazebo includes rafter legs, a ridge run and a crate. If the roofing has a significant weight or it is necessary to block the construction of a large area, the roof frame is reinforced with struts and puffs.

Scheme simple project gazebos with gable roofs
Important! When building a gazebo with a gable roof with your own hands, keep in mind that wood has a weak degree of resistance to moisture. Therefore, all wooden structural elements are impregnated in several layers with antiseptic compounds and coated with a protective varnish or paint.
When building a gazebo for a summer residence with their own hands, a craftsman without experience can make many annoying oversights and mistakes, the correction of which will require investment or take valuable time. In order for the result to meet your expectations, follow the following recommendations given by professional craftsmen:

Installation of a gazebo with a gable roof
Note! Experienced craftsmen recommend using lightweight materials to cover gable roofs in order to reduce the load that the structure exerts on the foundation. In order to have more light in the gazebo, you can use polycarbonate as a coating and leave the gables unsewn.
Video instruction
In the Russian expanses, where abundant snow and wind constantly measure their strength, for small architectural forms there is nothing more reliable than a roof with two slopes. The main, but not the only task in it is to protect the inner space of the gazebo from rain. But if, in addition to everything else, the gable roof of the gazebo will be built with your own hands, then the master will have a whole wealth of choice in style, design and the ability to turn such a gazebo into the brightest element of the entire site. Shall we start?
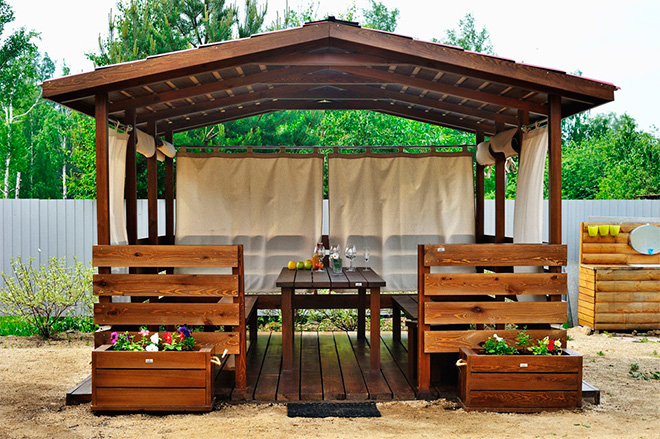
In this article we will talk about the design of gable roofs specifically for gazebos. The fact is that the gazebos themselves come in different forms. For example, for a barbecue, a rather stylish gazebo with strong walls and a properly equipped roof is usually built, and for evening gatherings with the family over fragrant tea, the “house” is simpler. Therefore, approach the issue of design thoroughly!
Choosing a style: classic, ethno or trendy minimalism?
Any gazebo can be the classic house most used to, and with unusual building style, artsy details and functional fixtures. Or maybe a real masterful masterpiece:

From simple to complex
If you are building a gazebo just for your family, simple and well performing its functions, then give preference to the simplest design. Where, in fact, there will only be a crate, roofing and rafters.
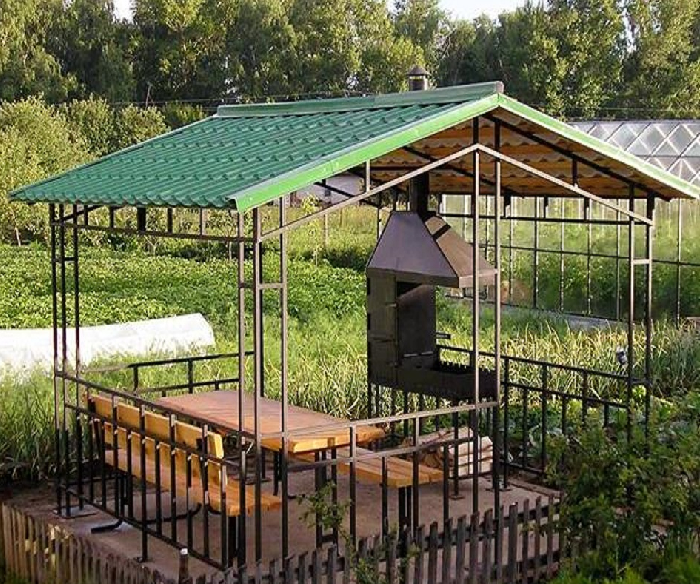
If you are interested in surprising guests with this architectural structure, you have a lot of ideas, and in the gazebo itself, in addition to the table and chairs, there will be at least a barbecue oven, then, due to the dimensions of the building itself, you will need to build a more complicated roof, designed for certain loads.
If your version of the gazebo is something in between those proposed, be guided by what the walls of the building will be like.
For example, in this version, in the gable roof of the gazebo, they also managed to make two whole windows:


Classic options
A gable roof can also be gable and not. What is a tong? This is, in fact, a closed gable. No functional feature this element does not have a roof, so you decide for yourself whether you need it. And already how difficult your gazebo will be depends on what your tastes and preferences are, what is the composition of your family and why exactly you are building this gazebo.
Here good example construction of such a gazebo:


Style decisions
Now let's talk about the design itself. So, the gable roof of the gazebo itself is often a separate architectural element of this building: the rafters are made decorative, and all visible flaws that are usually hidden remain open near such a roof and even stand out as a special element of the exterior.
For example, in Russia, the practice of carving wooden rafters, making beautiful stylistic details from them and using lighting design elements is quite popular.
When building such a roof, it is easiest to use ethnic motives. Indeed, gable roofs have long been built in Russia. The fact is that they are most adapted to strong winds and snows, while sheds are no longer so. And therefore, if you have chosen just such a design of the roof of the gazebo, you actually have a huge scope for imagination:

Here is another great performance example:

Playing with shape: symmetry and asymmetry
We can say that the classic gable roof is the simplest design of this kind. It consists of only two slopes, which are directed at a certain angle and have the same length. With an end in the form of a pediment, which usually ends with either a vertical brick wall, or a visor. On this side, most often any decorative elements are placed.
But recently, gable roofs of small architectural forms with different angles of inclination and different lengths have become more and more popular. Such designs compare favorably with the classic ones: unusual, stylish and comfortable in their own way. Here, according to the location of the ridge and the angle of both slopes, gable roofs are divided into symmetrical and asymmetric.
An asymmetrical gable roof is the same two slopes, but located at an angle. Asymmetric ones either have different lengths, or their ridge is not in the center, with some offset. Such roofs look unusual and are great for building gazebos that are unique in their design:

And this has its own meaning: with the architecture of the gable roof of a residential building, you will not play like that. After all, any ill-conceived moment in residential construction threatens subsequent major repairs, and sometimes even reconstruction. But with the top of an ordinary gazebo, you can play as much as you like: with the shape, and with asymmetry, and with decorativeness. After all, such a roof does not create a special load on the walls, and there is nothing wrong with doing something wrong in it, or it is not enough to accurately calculate the parameters of the rafters.
So, an asymmetrical roof should have a ridge and two slopes. Now think at what angle they will be located. Usually a short slope is made steeper and turns to the north, and a longer one is gentle and to the south.
Now, as for the asymmetric roof. Here you have to fiddle around a bit. First, decide where the skate will be located, make a detailed drawing. Next, consider whether different slopes can correctly transfer the load from the roof to the walls of the gazebo.
Today, gable roofs with broken slopes are also often built on gazebos. Most often, such a design is necessary in order to cover some part of the gazebo, which is adjacent to the main one. But remember that the break point is always the weak point of the roof.
We select the angle of inclination: against the wind or snow?
And now let's decide on the shape of the future pitched roof. The fact is that this design is not so simple as it seems at first glance. A gable roof can be of several types: sharp, more flat and sloping, that is, when the slopes have a different angle. And the final option will depend on your imagination and available options.
Here good example construction of a flat gable roof of the gazebo:

As for the angle of inclination of the roof of the gazebo, it also has its own requirements: no more than 25 degrees. If your plans include a small gazebo, then give preference to the simplest design, where, in fact, there will be only a crate, roofing and rafters.
If your gazebo option is something in between those proposed, be guided by what the walls of the building will be like:

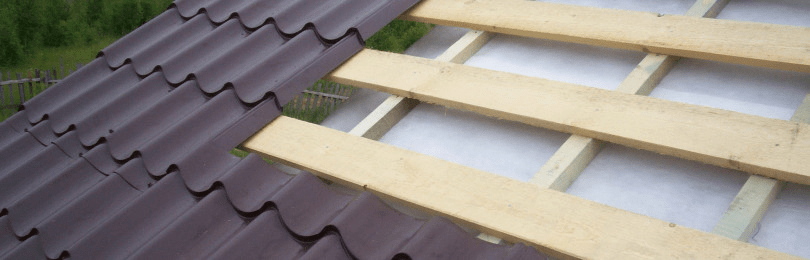
See how sparse the crate is being built for exactly the same metal tile now:

With gable roof you can’t do this at home: the step of the crate is calculated strictly according to the table. But in terms of the gazebo - another matter.
We go further. The minimum allowable slope of the gazebo roof is 12 degrees. So, if you chose a slope of about 30 degrees, then the load of the snow cover is already significantly reduced, and the load from the wind is increased. The fact is that in Russia the design of the roof of the gazebo can withstand, in addition to its own weight, temporary loads. These are snow cover, rarefaction of the wind from the leeward side and pressure from the windward side. Also, do not forget about snow removal, there is also a load from repairs, and sometimes there are such incidents as a fallen heavy tree branch. That's why in Russian regions dynamic loads on the roof range from 70 to 200 kilograms per square meter.
Let's look into this in more detail. The sharper the roof of the gazebo, the easier it will snow off and you will not need to clean it after every snowfall. But at the same time, if there are strong winds in your area, there is a risk that the roof will simply be torn off. And therefore it is better to make it gentle. You will have to choose between two evils! Why we advise you to look at the map of snow and wind loads in your area.
What is more important to you and what is better to protect your gazebo from: wind or snow? If you still have doubts and it's hard for you to decide, pay attention to what roofs of arbors your neighbors are building. Usually such a tradition exists for a reason.
Inside view: ventilation and waterproofing issues
The next step is to decide on internal device such a roof. The fact is that gazebos are usually built without an attic and rarely with any internal ventilation. Of course, it all depends on how complex the gazebo itself will be.
So, if you used a waterproofing film, and even more so a heater, ventilation must be considered. For a gazebo, the easiest option is small ventilation holes that pass between the waterproofing film and the insulation. If the gazebo is a more monumental structure with closed walls, windows and a foundation, then the ventilation of such a roof should be done the same as in a normal one, in country house, with air, or as a forced system.
Now we will explain this point to you in more detail. The weakest points of any gazebo are openness and exposure to weather from the inside. Few people during the construction of the gazebo think that snow and rainwater will be blown into it by the wind. But this is actually a problem. Therefore, the gable roof of an open gazebo must be sheathed from the inside:


Many at this stage are interested in: is waterproofing really necessary for the roof of the gazebo? We will say this: still needed. The fact is that in the gazebo as a building for relaxation there is often some kind of food: either hot tea on cozy evenings, or fragrant kebabs, from which steam emanates, and the like. All this, including the breathing of living people who are inside, creates such a physical process as "water vapor". They always rise up - in this case, directly to the rafters. And if they are not protected in any way, water vapor will saturate them and collect condensate.
Another force that acts on the roof of the gazebo is rainwater. The fact is that no matter how you choose the roofing, there is always a chance that during heavy rain the liquid can penetrate inside the rafter system. For example, for a folded roof, the weak point is the connection of sheets, and for corrugated board, it is rain and wind, which drive rainwater right under the shards. Therefore, waterproofing cannot be abandoned.
The easiest waterproofing option for a gazebo is plastic wrap. It costs a penny, serves at least 5 years and is the easiest to install. When you make the rafters, spread such a film on them and secure with a construction stepper (in extreme cases, with nails). On top, mount the crate and roofing.
The second option is a modern anti-condensate film. The essence of this invention is that condensate did not form on such a roof and then did not drip down on it in drops.
The third, more solid option is modern waterproofing membranes. This is a kind of "smart" film. Steam, which rises from the bottom up in the gazebo, easily passes through such membranes and is discharged outside. And rainwater, which falls from above, no longer seeps down to the rafters.
We build a gable roof for a gazebo: step by step
So, let's start building!
Stage I. We design
In any case, in order to build a gable roof of a gazebo, you need to make a drawing in advance. The gazebo is a small architectural form, and you should not build it by eye. And so that later ready product it was a beautiful geometric shape, not crooked and flawless, it is necessary to make a detailed drawing in advance.
Stage II. We prepare the material
For the construction of this gazebo, we need the following materials:
- Beam 150 X 150, for the bottom, top and strapping.
- Board 50 x150 for rafter boards.
- Edged inch planed for roof sheathing.
- Fasteners for all this goodness.

Stage III. We make rafters
Now prepare a template by which you can easily and quickly make high-quality rafters for the gazebo.
As for the lathing of such a roof, we initially advise you to do it correctly because, in fact, the force of snow acts on such a roof in winter, as on the roof of a residential building.


Oddly enough, sometimes a gable roof is without rafters at all. This is called rafterless, and most often it can be found in chopped wooden construction. But this is more of an exception than the rule.
And to ensure greater stability of the gazebo roof truss system, use slopes, braces and diagonal ligaments.
Stage IV. We fix the rafters on the roof
If you are building a gazebo from a bar or log, the rafters are installed a little differently. So, the rafter legs are connected with special brackets to the second upper crown, and from above - with a certain degree of freedom.
Once roof trusses will be ready, we raise them to the gazebo, fasten them to the ridge and align them with stretched threads. We remove the spacers and check the horizontal:


In this case, the roofing can be mounted on the finished roof, or directly on the roof trusses that were formed on the ground. Small parameters allow this, and it will be much easier for you.
Stage V. We pass the chimney through the roof
Here's something else you need to think about. If you are building a barbecue gazebo, it is extremely important to take care of the fire safety of the roof. First of all, it is a metal protection of wooden elements in those places where the furnace pipe passes.
Of course, if a fire starts during the preparation of kebabs, it will not be difficult to escape from an open gazebo. But, if a burning piece of rafters falls on someone's head, this does not bode well. Therefore, we will approach the matter with all responsibility. And if you learn to approach such issues competently, in compliance with all technologies, you can easily build such beautiful monumental arbors not only for yourself, but also by order:

As you can see, if you wish, you can handle everything yourself!
A gazebo in the courtyard of the house or in the country is a great place for gatherings at any time of the year. Each owner, choosing the type of gazebo that best fits into his possessions, must take into account a number of important factors, especially the weather. For our area great option there will be a gazebo with a gable roof. This type of small architectural forms during a variety of precipitation (rain, snow) keeps the interior dry. And then you can find out all the nuances of how exactly a gable roof is built for a gazebo. 
Advantages
If you are a professional builder, then any type of roof will suit you. But if you consider yourself to be the owner of the plots who want to make their yard more beautiful, then the issue of simplicity is very important. A gable roof is rightfully considered the easiest to build. Such a roof structure consists of two planes located at an angle. I usually call them stingrays.
Despite all the simplicity of execution, there are a huge number of design options for such a roof: symmetrical and asymmetrical, with sewn or non-sewn gables. This design is fairly light in weight and does not require special care, and is also more stable than its single-sided counterparts. Another huge plus of a roof with two slopes is its price, because building materials for this type are among the cheapest.
But a more important advantage is that a do-it-yourself gazebo with a gable roof will be much closer and dearer than ordered from the master. 
What to Consider
First of all, it is necessary to draw the correct drawing on paper or in a computer program. On the sketch, you can calculate the amount of materials needed for the gazebo in order to avoid unnecessary costs, as well as to avoid shortcomings and errors in future installation.
The main mistake can be the wrong degree of slope. Most often, to protect against precipitation, the slopes are placed at an angle of 25-30 degrees. Preferring a smaller slope, you should understand that all the snow that falls in the winter will most likely have to be cleared yourself. And choosing too sharp an angle, you risk creating too much wind pressure on the roof.
An important factor will be the very place where the gable gazebo will be located. Based on the weight of the structure and the place where you would like to see it (in the sun or in the shade), using improvised means, you can make sure that the chosen site for construction is correct.
Take the pegs and drive them around the perimeter where you want to place the object. Next, pull the rope taut around the structure, then place a table and chairs inside to check if all the desired items will find their place and whether they will occupy it steadily. This way, you will also be able to see where it is better to make posts and other massive details. 
The best roofing material
Building materials for summer cottages are now very popular, and therefore their range pleases with its breadth and diversity.
When choosing a material for a gable roof, consider what characteristics of the product are more important to you: economical consumption, lightness, greater strength, moisture resistance, thermal conductivity level, the presence or absence of sound insulation, etc.
For example, if you do not want to hear the sound of every drop on the roof of the gazebo during rain, then stop at bituminous materials - they have excellent sound insulation. If it's more important to you easy installation and reliability, then ondulin is suitable for erecting a roof, which also has a very attractive appearance. If you want to make from eco-friendly material - use tiles. But in the case of tiles, you need to remember that it tends to grow with moss.  Think over all the necessary qualities that your gazebo roof should have and you can easily stop at one building material.
A gable roof can be made from:
- tree
- brick
- stone
- metal
You can cover the roof:
- metal tiles, corrugated board, seam roofing
- flexible tiles, roofing material, polycarbonate
- ondulin, slate
How to build
After creating a drawing of a country gazebo and checking its location, you can get to work. If you still do not know how to make a gazebo with your own hands, then carefully study the step-by-step instructions. 
- Step 1. Lathing. Depending on the material chosen and the role that the roof will perform, a distinction is made between solid and discharged crates. The first is suitable for bituminous coatings, the second - for metal tiles.
- Step 2. Rafters. Even an inexperienced person can make rafters for a gazebo with their own hands. They can be assembled alternately or connected into one system, with further mounting on the roof.
- Step 3. Mauerlat. This is a support bar that helps distribute all the load that a gable roof receives. To strengthen the Mauerlat, several layers of waterproofing are laid between it and the wall.
- Step 4. Skate run. The installation of the skate goes immediately after the installation of waterproofing.
- Step 5. Coating. Depending on what material you have chosen for the roof for the gazebo, the installation of the finish coating may vary. detailed instructions indicated by the manufacturer of the building material on the packaging.
- Step 6 Arrangement of the gazebo from the inside. It is important to properly equip the completed and mounted project. It is necessary to provide for the presence of a table and benches or chairs, depending on the size of the internal space of the building. It is best to fix pieces of furniture on self-tapping screws - this way they will acquire the most stable position.
- Step 7. Decorate as you wish. The advantage of a gazebo that you make yourself is that you can embody any design ideas in it - from unusual paint colors to non-standard patterns carved from wood, metal or stone. The only one essential tool here is your fantasy.

Installing a chimney
If you want to make your gazebo more functional, then a chimney led through the roof will be a great start. To do this, take care of the metal protection of the wooden elements of the places where the pipe will pass.
Such an improvement will protect you and the gazebo itself during barbecue or barbecue and help to avoid a fire.
As they say: "The work of the master is afraid" and this definitely makes sense. Following step by step instructions, you can independently create a beautiful gazebo with a gable roof, which will be a great place for holidays with family and friends, as well as for ordinary gatherings on a hot summer day or a cold winter evening.

Each owner of a summer cottage decides for himself what will be design garden gazebo.
Some greatly simplify the design, while others, on the contrary, try to give the future design some kind of zest and originality.
But in any case, the garden gazebo should be reliable and durable. This is precisely the future design with gable roof.
To be able to build a gable roof with your own hands, read this article. She talks about gable gazebo.
Project options for gazebos
Arbors from each other may differ in varied parameters. Mainly:
- The form. It can be anything from round to multifaceted;
- Construction material. Arbors are made of wood, brick, metal and stone;
- Roofing system diagram. It has great diversity. In addition to gable, there can be both single-slope and, for example, arched types.
Also, a gazebo with a gable roof has its own dignity and limitations.
pros:
- Small price;
- Ease of erection;
- Small weight of a design;
- There is no need to use additional equipment.
Unfortunately, it did not go without cons:
- Compared with pitched roof required much more material;
- If the gazebo is made of wood, then it may burn;
- Significantly declining overview of the area.
Features of the gable roof truss system
If we talk about the truss system of the gable roof of the gazebo, then it can be divided into several types:
- Hanging system. This system has support beams out of stock. Installation of hanging rafters takes place in such a way that all external bearing walls structures serve as a basis for them. Mostly hanging systems are used for erection lungs structures. To ensure the rigidity of the roof, they put in the system runs, struts, crossbars and racks;
- Layered system. Such a system is needed to overlap a roof with a span of no more 7 meters. Otherwise, you will need to install additional supports.
What is better to make a roof for a gazebo
materials for roofing are soft and hard. to the last type relate:
- Plates are polymeric;
- Slate;
- Tiling;
- Fiberglass.
soft roof previously laid on a rigid base made of chipboard or plywood. To soft materials can attributed:
- Ruberoid;
- The tile is bituminous.
Important to consider specifications material from which the roof will be made. For example, a metal tile does not have such an important parameter like soundproofing. It follows from this that when suburban area it will rain, its knock on the roof will be strongly heard.
Polycarbonate also great for roofing.
It has a number of undeniable virtues:
- Great strength;
- Low thermal conductivity;
- Ease;
- economy;
- Reliability.
Of the essential shortcomings it can be distinguished that polycarbonate is fuel material. Therefore, the brazier in such a gazebo should be used extremely carefully.
For the construction of the roof, material such as ondulin is also suitable. It has a number of positive features:
- Attractive appearance ;
- Reliability;
- Ease of installation.
If you decide to make a large gazebo, then you will do without a tile roof it is forbidden. It costs quite a lot, but the end result is completely pays off.
The advantages of tiles are:
- Reliably protects from heavy rainfall;
- Full environmental friendliness.
Sometimes such roofs can overgrow moss, but this is not a strong drawback, because they can be cleaned.
You can install a gazebo with a gable roof on the patio. Read more about its construction
And in this article you can read about a carport in the country.
Stages of work
All work on the construction of a gable roof for a gazebo can be divided into several stages. They are:
- Creating a drawing. Pay attention to this stage roof construction. The drawing is the basis of your future building;
- crate and its manufacture. The type of this design also depends on what role the roof plays. If the coating is bituminous, then you need to do continuous crate. But, if the roof is made of metal tiles, then the crate needs to be discharged;
- rafters and their installation. Make them with my own hands even a novice home master will succeed. The legs of the rafters need to be knocked together at the bottom and then set them up. The section will need to be fixed to the Mauerlat - a support bar that distributes the load received from the roof to the entire supporting structure;
- Mauerlat and its strengthening. Now the Mauerlat will need to be strengthened. To do this, a couple of layers of waterproofing are laid in the gap between the wall and it. Using screws, the rafters are fixed at an angle;
- Setting up the skate. After the waterproofing work has been completed, you need to put the skate;
- Roof erection. For example, if the roof is made of polycarbonate, then it must be cut into individual modules. Remember that on the roof it is necessary to make a ramp for water;
- Internal arrangement of the gazebo. Inside the garden gazebo you need to make benches and a table. Usually they are made of wood and fixed on self-tapping screws.
As you can see, the construction of a garden gazebo with a gable roof deal almost every person. It is enough to follow the advice and recommendations.
Detailed technology for the construction of a garden gazebo with a gable roof is discussed in this video.
-
The gazebo is a comfortable place for outdoor recreation. But at the same time, it can become a real decoration of the garden or plot. Therefore, when choosing a form and material, in addition to the reliability and durability of the roof, it is necessary to take care of the aesthetic component.
When building a gazebo, you can show maximum imagination, but at the same time it should turn out to be consonant with the architecture of the main house and not stand out from the general style of landscape design.
The roof, and the gable for the gazebo is no exception, is not in vain considered the crowning creation of the gazebo. Diverse in shape: convex or flat, square, round or rectangular, two- or three-tiered, etc., it is very important that it can be covered with most various materials for roofing:
- soft self-adhesive shingles , which does not flow in the heat, does not harden and warp in the cold, lasts a long time, and is easy to install;
- metal tile, which is very durable, although it must be admitted that it is somewhat heavy and not everyone will like the noise from it during the rain;
- tree or reed giving originality to the building, etc.
But there is one small “but” at the same time - the gable design somewhat reduces the view of the surrounding panorama.
How to build a gazebo roof and where to start
A gable roof is arranged over the buildings of a rectangular plan. It consists of four rafters, drawn from the sides of the gazebo, which are connected using a horizontal crossbar. They are attached to the strapping beam, and between themselves - with slats. Both types of rafters can be used in the construction: layered and hanging. All this is determined even when designing a gable roof, since it is they who will have to take on all the main load created by the crate, roof, as well as wind pressure and the weight of snow and transfer it to the pillars of the support. In practice, a truss is a system of interconnected truss frames and such structural elements as headstocks, struts, racks, beams of the lower roof belt. The optimal size of a garden gazebo is three by three meters, it can comfortably accommodate 15 people.
Installation of the truss system
The installation method of the truss system is determined by the type of supports used (columns or walls) and the dimensions of the gazebo. When choosing a section, several factors are taken into account: the distance between them, the weight and slope of the roof, and more. To give rigidity to the structure, a crossbar is added to it.
If the whole structure is wooden, the truss frames are fixed on the upper trim, in the case of stone, the Mauerlat becomes the connecting link between the roof rafters and the walls. It is usually laid on top of a stone wall. The Mauerlat is fastened with floor beams and rafters with the help of powerful bolts, brackets or by cutting into grooves that are pre-cut in the rafter legs.
 In frame arbors, the top trim serves as a support for the layered rafters. This type is used with a span length of up to 6.5 m. If, according to the construction plan, a third, additional, support is assumed, the width that is covered with layered rafters can be increased to 10–12 m, and in the case of two supports - up to 15.
 Walls serve as a support for hanging ones, and they are supported only by the ends without intermediate supports. These are two legs that are connected to each other with a puff. It becomes a support for the rafters. Since the span is usually less than 8 m, it becomes necessary to reduce the deflection of the rafters. To do this, a crossbar is cut between the puff and their top.
Ways of fastening elements
 For fastening additional elements use bolts, brackets and other elements. For example,
- the headstock, which serves to strengthen the structure of the hanging rafters, if the span is more than 8 m, is connected to the puff with a clamp. On the puff on both sides under the base of the headstock, a metal overlay is laid and tightened with bolts.
- The ends of the rafters are cut into the top of the headstock and also strengthened using a clamp.
- The headstock and struts are connected according to the thorn-groove system - the thorn is made on the strut, and the groove is made on the headstock. The connection is additionally strengthened with brackets.
The methods of attaching layered and hanging rafters, along with similarities, also have some differences. Both those and others are attached to the puff with bolts and metal brackets. However, if it is necessary to strengthen the structure, the sub-beam or strut used for this, planed from wooden beam, are connected to the puff and rafters with nails.
In the same way, a wooden lining is attached, which fastens the truss frame with the gable roof ridge. The metal plate is fastened with bolts or screws.
The crate under the roof covering is formed from plywood and, as it is fixed to galvanized self-tapping screws, the slats that temporarily connect the rafters are removed. Covering the roof of the gazebo, you need to take care of drains that drain rainwater.
Of the many options for arranging a place to relax, a gazebo with a gable roof enjoys special attention. There are more than enough reasons for such an attitude. This is both the appearance and the reliability of the structure, but most often a roof with two slopes is chosen for a roof device for quite practical reasons.
Advantages and disadvantages of gazebos with a gable roof
You always want to give the building a more elegant look, simplify the design and at the same time make it as comfortable as possible. In terms of the design of a gazebo with a gable roof, photos can be quite attractive.

But it's not even about the elegant design. The use of a gable scheme for the roof of the gazebo provides very real advantages:
- Excellent stability of the roof frame. At right choice the angle of inclination of the slope of the gazebo will withstand even strong wind squalls;
- Efficient removal of water and snow.
Thanks to the gable scheme, the roof effectively discharges water flows to the ground at a distance of at least 0.7-0.8 m from the foundation of the gazebo. Therefore, vacationers do not experience discomfort from drops of water blown under the roof, as is often the case in buildings with flat roof. The foundation does not suffer from flooding, there are no puddles around the resting place.
Important! The gable system saves the roof and frame of the gazebo from the destructive pressure of the accumulated snow cover.
On a shed roof, a thick layer of snow can tilt or overwhelm a light structure; on a gable roof, horizontal forces are mutually compensated without causing much harm to the structure.
Disadvantages of a gable roof for a gazebo
A high gable roof can create problems for the pergola frame. For example, if the roof of the gazebo is incorrectly oriented relative to the strongest gusts of wind, or the angle of inclination is too large, then there is a danger that a strong squall will overturn the gazebo.
In addition, frame construction and stacking roofing requires a certain qualification of a carpenter and roofer. If there is at least a basic idea of how a gable roof is arranged, then in this case it is better to entrust the construction to professionals.
What materials are gazebos with a gable roof made of?
The frame of the future roof is experiencing significant loads. Therefore, for the manufacture of the frame and truss system, two types of materials are used:
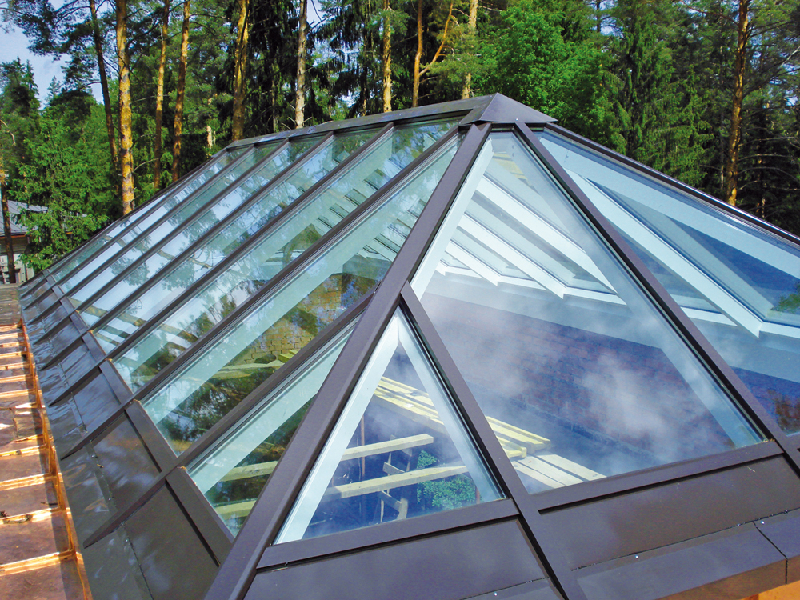
Note! From a double-glazed window and an aluminum profile, you can get a wonderful version of a winter gazebo.
As a roofing, soft bituminous tiles, ondulin, metal slate or metal tiles are used. You can try to cover the gable structure with wooden shingles.
All other coating options for a gable roof either lose in reliability or in appearance.

How to choose the material for the roof on the gable roof of the gazebo
At first glance, roofing for a light, completely windswept building is chosen for only one purpose - to provide protection from the sun and rain. This is true, but it is worth considering that the roof of a gable roof in the first place should not create additional discomfort factors.
What do we pay attention to
First of all, it is necessary to abandon such simple and reliable, at first glance, coatings as roofing felt, rolled bituminous materials, galvanized metal roofing. Metal is not the best the best way, a gable roof makes a lot of noise in the wind or in the rain, and with strong squalls, the sheets can simply be torn off the rafter frame. If the construction of a gazebo is planned for recreation in summer heat, then the metal heated in the midday sun can, on the contrary, increase the temperature under the roof.
The only exception can be a metal tile, which looks just perfect on any gable roof, regardless of the type of building, be it an ordinary gazebo, cottage, bathhouse or dog house. In this case, you have to make certain sacrifices, for example, to lay a foil heat-insulating sheet on the crate of the truss frame.

bituminous roll materials for gable roofs they are not used due to the strong smell that appears during strong sunshine. If the slope angle of the gable roof exceeds 12°, then melted bitumen may run off and even peel off the sheet, even if it was laid on mastic.
Advantages of lightweight roof types
Non-metallic profiled coatings can be considered the most optimal, for example, corrugated polycarbonate or PVC sheet, ondulin, or even ordinary asbestos-cement slate. The presence of a wavy profile somewhat complicates the assembly of a gable roof, but this type of coating significantly increases the rigidity of the slopes. You don’t have to worry too much that in winter the snow will simply push through the coating on the gazebo.
Important! The only thing that will need to be done additionally is to make a continuous crate, for example, from a tongue-and-groove board, lining or OSB.
Light types of roofing can be placed on a gable structure and without a continuous crate, but filing wooden lath only improves the appearance and makes the roof more durable.
How to calculate the angle of inclination for a rectangular gable roof on a gazebo
Each type of roofing has its own optimal angle of inclination. If you lay both slopes at small angles of inclination, then the water flow will noticeably worsen, the roof will certainly begin to leak. In addition, almost all manufacturers of roofing materials categorically do not recommend laying their coatings at angles of less than 10 o. It is especially important to observe the restrictions for roofs with shingles or covered with ondulin, if the owners do not want the protective layer to be thrown off the rafter frame in the first rain.
Raising the angle of inclination of the slopes more than 30 ° also does not make sense. Firstly, the cost of building a gazebo increases, and secondly, the windage of the structure increases.

AT roofing works the angle of inclination is often not measured in degrees, but is presented as the ratio of the height of the roof ridge to ½ the width of the base. By measuring the height and width of the roof of the gazebo and dividing, they get a fraction, which is easy to convert from the table of tangents into the value of the angle.
How to make rafters on a gable roof of a gazebo
In construction, two types of rafters are used - layered and hanging. In the first case, the force from the weight of the gable roof is transferred to the system of supports and racks located under the ridge run.
The rafters themselves with the roof rest freely on the walls of the building.

For gazebos, this option is used extremely rarely due to the difficulties in attaching a gable roof to the supporting posts of the gazebo frame. In the case of layered rafters, the bursting force from the rafter beams is fixed on the walls of the building or, as in the case of the construction of an arbor, it is compensated by a system of horizontal crossbars.
How to make a rafter block
The rafters are made from a board - forty, cut out and adjusted in size in pairs. Using the template, accurately mark the angle between the beams and the length of each of the rafter legs. Both halves are connected at the top with a half-tree lock.
Next, the assembled pair of rafters is laid on a flat horizontal platform, leveled, after which a horizontal cross member is stuffed onto the beams - a crossbar. The protrusions of the crossbar are cut off so that they do not interfere with the patching of the future crate of the gable roof.

The distance between pairs along the length of the gazebo is taken equal to 50-60 cm, for example, for a three-meter structure, 6 pairs of finished rafters will be required. With an increase in the size of the gazebo and the height of the roof, the step can be taken more. Optimal size is 70 cm.
Advice! If the strength of the locks and joints suddenly seems insufficient, then the joints and tie-in parts of the rafters can be reinforced with overhead metal plates.
How to make a gable roof for a gazebo with your own hands
Assembly roof structure start with the manufacture of the roof ridge. For its manufacture, a timber with a section of 70 x 70 mm is required, the length of the ridge run is taken equal to the longitudinal size of the gazebo.
First of all, pairs of rafters for gables are raised on the walls or the upper trim of the gazebo racks. Usually, each block is lifted by two or three, mounted on a Mauerlat and fixed on a gazebo with a pair of rails or long poles. The gable blocks are interconnected by a ridge run, and so that the temporary structure does not develop, temporary spacers are stuffed with slats.

Further, all the remaining rafters are sequentially transferred to the top of the gazebo. They are leveled and attached to the ridge and Mauerlat of the gazebo using self-tapping screws. After the gable roof frame has acquired the necessary stability, a plywood or plank crate is sewn.
Soil is applied to the gable structure and, depending on the type of roof chosen for the roof of the gazebo, the base is covered with a vapor barrier or a lining carpet for bituminous tiles.
Ondulin or metal tiles can be laid on the slopes of the gazebo with sheets across the entire width of the coating; for a bituminous or shingled roof, the laying process will have to be performed sequentially, row by row.

The gables of the roof are usually not sewn up to improve the ventilation of the under-roof space, or they are covered with several horizontal crossbars. This will help improve the look of the gazebo, and if raindrops fly under the gable roof, galvanized steel canopies can be installed on the rungs.

The simplest version of the gazebo can be built from a beam with a roof in the form of a small frame covered with polycarbonate slate. The gable frame under the roof can be assembled by welding from square pipe, just as it was done for the wooden structure.
The attractiveness of a metal frame for a gable roof lies in the fact that all its parts can be made in a workshop, and then delivered to the place of installation of the gazebo and assembled using a bolted connection. After fitting the slopes, the parts can be welded with an inverter.
The wave polycarbonate coating is mounted on a steel frame without any crate. In this way, you can assemble the roof of the gazebo in one part-time job. It is important not to forget to paint the frame and use sealing silicone washers to install the profiled polycarbonate.
It remains only to paint or varnish wooden details gazebos.
Conclusion
There are a huge number of options for making a gazebo with a gable roof. The size of the structure is chosen based on the parameters of the structure, primarily the height of the gazebo and the type of roofing used. If the base and side posts of the gazebo are made of massive timber, then the frame can be welded from a profile; in other cases, a gable truss frame is built according to the same rules as for a house or a small utility room.
Arbor in the country or in the courtyard of the house - a place for tea drinking and gatherings in summer time. In buildings slightly larger, it can be installed. Then you can think about glazing it: barbecue in winter is a rare pleasure, and the barbecue will simultaneously warm the air inside. They usually start with simpler and cheaper models: they build a gazebo with their own hands, most often there is not enough time. Hence the choice. We will talk further about how to do it correctly, about materials, methods, methods of construction.
A little theory: what are gazebos
Nothing complicated: let's talk about the types of gazebos and the materials from which they are built. First of all, buildings of this type are divided into open (summer) and closed (glazed). This does not mean at all that there are only two of these types: there are also combinations with removable glazing, and there are also awnings made of transparent film, which, if necessary, are stretched over the frame of the gazebo. Another option - some of the walls are closed, some are open. Choose the one that is closer to you.
With or without floor
More gazebos can be divided into those with and without a floor. Arbors without a floor are placed on a prepared site from paving slabs, filled with concrete, lined with paving stones, etc. Although no one bothers to build directly on the grass. Only the framework must be treated accordingly: direct contact with the soil requires enhanced protection measures. If a we are talking about a wooden arbor, it is impregnated from rot and fungal infections, if it is made of metal, it is treated with a rust preventative.
Pergolas with a floor suggest the presence of a foundation. Most often do columns. They can be folded from brick or buta, poured from concrete, put foundation blocks. If you have large flat-topped boulders to lean on, use those. But all this - if the building is light - on a frame made of wood or metal. required, albeit a shallow laying (20-30 cm below the level of the fertile layer).

This is also a gazebo made of wood, but with a wooden floor. That's why she's up on her feet. It is originally decorated top part- binding from processed thin boards looks great
If you want to tile the floor in the gazebo for the dacha, you will have to pour the insulated slab with concrete, and put frost-resistant types of tiles on it. Moreover, the insulated slab must be at least 50 cm wider in all directions than the building on it. And these 50 cm are made at a slight slope so that moisture drains. This is actually, which will not allow the soil to freeze under the gazebo. So the tile will not turn out and it will not crack.
materials
The frame of garden or country arbors is made of three materials:
- wooden bursa or round timber of small diameter;
- steel pipe (from a profile it is more convenient);
- polymer pipes (PVC).
The only material that does not require protection is polymers. They do not rot, are not affected by fungi. Some species tolerate freezing and thawing without much harm. So they can stay over the winter. That's just to make the gazebo for giving PVC pipes durable, they need a solid diameter and with a thick wall. And even in this case, you don’t need to rely on the frame: you will have to install such furniture that will not put pressure on the plastic. Well, the brazier will need to be put aside (if provided).

In order for a wooden garden gazebo to remain attractive for a long time, all the wood that will be used in construction must first be coated with a protective impregnation in one or two layers. The cheapest today are the SENEZH and Usadba impregnations, and the reviews about them and their protective properties are very good. These manufacturers also have tinting compositions.
This is the whole theory in a nutshell. There may be some other special cases: there are many materials, as well as the possibilities of their combination. The most interesting original gazebos from non-standard materials will be published at the end of the article. And now - practice.
How to make a gazebo with your own hands
Most often, we build garden arbors made of wood on our own. The second place in popularity is with metal ones. Everyone else does it infrequently. Brick and from others building materials due to being expensive pvc pipes- because there is no trust in the material.
We will analyze an example of building a frame gazebo made of wood. But even if you are going to make it out of metal or PVC, the procedure will be the same. Another principle of connecting frame materials, but otherwise, everything is the same.
When working with wood, it must first be treated with antibacterial and flame retardant (reducing the combustibility of the material) impregnations. Only after the compositions have dried can you work. If this is not done, the wood will darken very quickly and lose its attractiveness.
Drawing
Two similar projects were implemented, of the same type: a quadrangular gazebo under a gable roof, only with different sizes and they were designed in different ways. A drawing of one of them, see the photo below.

Rectangular gazebo with hipped roof(in one project, the roof was replaced with a gable roof)
Step by step instructions with photo
It all starts with site preparation. If there is sod, it is removed, and the fertile layer is also removed. If this is not done, the roots, greens and all leftovers will rot. On sandy or sandy loamy soils, screenings, crushed stone or broken construction debris are poured into the pit, everything is tamped down, covered with sand from above. On clay soils, on which water does not drain well, it is better to fill the pit and compact your own soil (clay, but without a fertile layer). Otherwise, water will accumulate and stagnate in the pit, which will lead to the appearance bad smell. Not what you need at all.
The choice of the type of foundation and the lower trim
If there is not much time, the fastest way is to install ready-made concrete blocks. More time will have to be spent if you fold brick columns, even more - pour them out of concrete. The distance between the supports should be no more than 1.5-2 meters. More specifically, it depends on the thickness of the timber from which you will make the strapping. Under a bar 100 * 100 mm, the distance is 1.5 meters, under a metal profile pipe 60 * 60 mm can be placed every 2 meters.
When all the supports are installed and level (use pegs, a stretched string and a building level), waterproofing is laid on them. This is roofing material or roofing felt, rolled up in two layers, or bituminous mastic, which is also impregnated twice on the surface. Then stacked bottom trim timber gazebos. Everything is hammered together with nails of at least 150 mm in length or connected with wood screws. For greater strength, corners are used (if you find reinforced ones - as in the photo - it will be great). Although the gazebo is built initially as a summer arbor, after some time the majority decides to glaze it. That's when a margin of safety is required.

Rack installation
At this stage of the construction of the garden gazebo, it is important to place the racks strictly vertically. enjoy building level undesirable: it has a large error, especially for household models, which are usually used by developers. Therefore, we take the good old plumb line and put it on it. Check the vertical from two adjoining sides so that the racks do not fall anywhere.
Fix the racks with jibs (see the photo). If they interfere with you in the future, you can make a temporary option, as in the photo on the left. If the sheathing below is opaque, do it thoroughly: cut down the beam at 45 ° (it is more convenient to use a miter box) and nail it with two or three nails obliquely. Check if it has gone astray after each mowing installation. These small triangles give rigidity to the whole structure and it stops staggering.

Two projects and two ways to set the corner bars correctly. On the left - temporary jibs, after installing the strapping they will be removed, on the right - permanent
Top trim and floor boards
Further, after all the racks are installed and fixed, the upper harness is mounted. There shouldn't be any problems here. To increase the reliability of the connection, use the corners. Racks, by the way, can also be fixed on the sides with corners. Especially if there are no permanent mowings. Otherwise, your design from lateral loads may develop.
After that, the floor boards are laid. It is very desirable to treat them on all sides with antibacterial impregnation for wood in direct contact with the ground. Senezh has two such squads. One of them is called "Senezh", the other "Senezh-Ultra". They differ in that "Ultra" does not stain the wood, and "Senezh" gives it a greenish color. If you cover everything with a dark stain, the greens are invisible, such a composition is not suitable for a light one.

After laying the floor, it is better to paint the boards, otherwise, by the time you finish the construction, they will get dirty. Therefore, take the time to apply varnish or oil-based tinting paints - the best option for outdoor wood. Do not confuse with oil paints! These compounds are often called wood oil, because the base is oil, to which protective substances and coloring pigments are added. As a result, the wood takes on a different shade (even pink or green, if you so desire), but the texture becomes clearer, and not painted over.
Medium strapping
The next step is to install the middle strapping, if there is one for the project. A quarter is taken out under the beam in the racks - a small recess, in this case, with a beam of 100 * 100 mm, a quarter is 25 mm.

Making a roof
While the frame of the wooden gazebo dries, you assemble the truss system. It is a triangle (see the photo below).

They are installed on the frame. This project does not include a roof overhang. Therefore, they are simply placed strictly vertically and nailed directly to the beam of the upper trim. Such a roof is easy to install, but the rain will pour heavily inside even with a slight wind.
If you do with overhangs (the roof protrudes beyond the perimeter of the gazebo), then in the beam you will have to cut out “seats” under the rafters. They look like triangles (see photo).

Two options are shown. In fact, there are more of them, but since the roof is small, the first, the simplest, will be enough. In order not to mess around with each triangle, sawing the wood at the top, make a template. Take a piece of board, cut out a hole of the desired shape, try it on, check it, adjust it. Then you just put it in turn to all the rafters, draw around with a finely sharpened pencil and cut it out. What's the best way to cut? Electric jigsaw, but you can also use a hand saw. Having prepared all the triangles, throw them up and install (with long nails obliquely from the spirit of the sides, you can still fix them with corners). Before fixing, do not forget to check the vertical and horizontal.
After installing the triangles, the crossbars are stuffed: two on both sides of the ridge, and then with a step that depends on the type and type of roofing material. Under, for example, a solid crate is generally needed. Then the entire truss system is painted. And then the roofing material is mounted (in this case, a metal profile).
Finishing
The bottom trim is nailed last. In this project, lining was used, which was then painted with wood oil.

This country gazebo is from the category of "simple, fast, cheap." Having it as an example, you can make something of your own, more, in your opinion, attractive. Here, for example, what happened according to the same project, but in a different design: sheathing of the veranda from a blockhouse, which is painted in a light color, and the frame is dark.


And also - such an option: country gazebos for this project turn out to be completely different
Several more complex projects with drawings and dimensions will be laid out below, and even more interesting photos, but without the drawings at the very bottom. Might be useful to someone...
Sketches of gazebos with drawings and dimensions
Available sizes can be scaled up or down proportionally. It is important that you understand that with a significant increase in size, a more powerful frame is required. Do not forget about this, and everything will work out for you: a gazebo made by yourself will be beautiful and reliable.
simple wooden gazebo
Almost the same project, but with different dimensions: the upper point of the roof is raised higher, which makes it visually lighter. The gazebo is also quadrangular, the roof is hipped.

When constructing such a roof, the most problematic are two places (nodes) indicated by circles. How to do them, see the photo below.


Chinese style gazebo (with drawings and dimensions)
A project with all dimensions, foundation layout, roof truss system, etc. Arranged in a photo gallery.
" data-link="file" data-itemtag="dl" data-icontag="dt" data-captiontag="dd" data-columns="0" data-size="large" data-width="600" data-auto="false" data-max-width="100%" data-ratio="1.1029411764706">
Main façade - height from floor to top rail 2.160 m Main façade without roof: vertical posts 150*150 mm  Cross section of a wooden arbor. In the photo on the right - how to make raised ends of the roof Installation of floor beams (the numbers are the designation of the material from the specification) Detailing node 2 - how to install racks How to make steps to the veranda - node 2 Attaching the truss system to the upper trim - on wooden pins
Large gazebo on the foundation
Before you build this gazebo is required. Its parameters depend on the soils, on the material that you are going to use for the frame: metal or wood, and what you are going to glaze it with. In general, the width of the tape is about 20 cm, the depth of occurrence is 20-30 cm deeper than the level of the fertile layer. On heaving soils, it is better to do the so-called.

Drawing gazebo-swing
The swing arbor requires special attention: it is fixed very firmly so that the resulting variable loads do not loosen and turn the structure over. To do this, you can extend the legs down, dig a hole under them, fill them with rubble, tamp, and then pour everything with liquid concrete. If you make the frame from a pipe, there are no questions; for a tree, you can use “P”-shaped fasteners with a pin mounted in the lower part. Here it can be bent and poured with concrete.
For even greater reliability, crossbars are attached to the legs, which turn out to be slightly recessed into the ground. They are hammered with U-shaped staples.

Photo of original wooden gazebos without drawings
This option is both stone and wood. Oprahs made of timber are installed on columns made of rubble. The style is the same - dried trees are used as supports.