Nail connection. Connecting parts with nails. Joining wooden parts by splicing
When using materials from this site - and placement of the banner is MANDATORY!!!
The materials were sent by Glebov A.A. teacher of technology and labor training, MOU "Veselolopan secondary school"
Target: teach students to choose the right nails and screws to connect the parts of the product; practice connection techniques.
Equipment: hammer, screwdriver, nails, screws, wood blanks.
During the classes
I. Repetition of the material covered.
1. Conversation on the questions:
"What types of drills do you know?
How to determine drill diameter?
2.Practical task.
"Drill a hole in the workpiece using a brace (drill).
3. Message of the topic and purpose of the lesson.
II. Presentation of the program material.
1. Illustrative story.
Teacher. Depending on the purpose, the nails differ in diameter, length, and shape of the cap.
The teacher demonstrates different kinds nails.
When connecting parts with nails, you must adhere to the basic rules:
"A thin piece is nailed to a thick one;
"the thickness of the nail should not exceed 1/4 of the thickness of the part;
"the length should correspond to 2-3 thicknesses of the part;
"distance from the edge 4 diameters;
"distance from the end is 15 diameters.
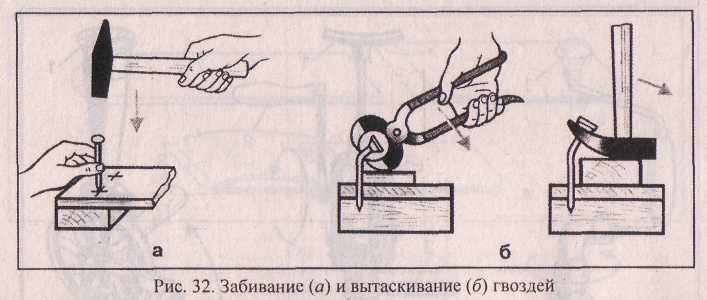
The teacher demonstrates how to hammer in a nail and pull it out if the nail is bent or crooked into the workpiece. (See Appendices, fig. 32.)
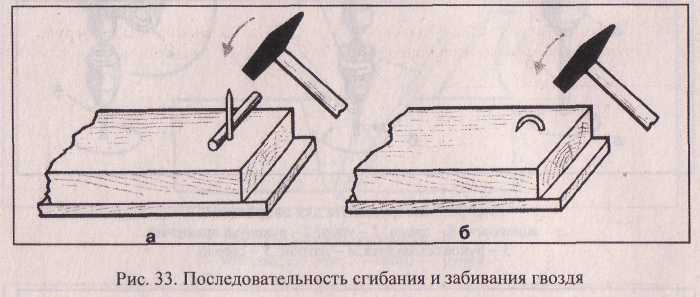
To improve the strength of the connection, the protruding nails are bent on the mandrel.
The teacher demonstrates how to perform this operation. (See Appendices, fig. 33.)
To pull out the nail, the operations are performed in the reverse order.
2.Instructing on the rules for the safe use of a hammer.
Teacher. When working with a hammer, you must follow the safety rules:
"work only with a working hammer;
"do not stand behind a comrade working with a hammer;
"hit the nail head strictly vertically;
"Do not leave a hammer on the edge of a workbench.
3.Practical work.
Completing tasks:
On unsuitable material, connect the parts with nails.
"Practice in bending nails.
"Pull out the hammered nails.
4. Explanation and development of the connection of parts with screws.
Teacher. Now let's look at the connection of parts with screws.
The screw consists of a head (semicircular, countersunk and semi- countersunk), a shaft of various lengths and thicknesses with a screw thread. (See Appendices, fig. 34.)

The teacher draws the attention of students to the types of slots of the screw head.
Teacher. When choosing the length of the screw, it must be taken into account that its length should be 2-3 times the part to be connected (top).
A hole is drilled in the upper part slightly larger than the diameter of the screw, and in the lower part - 4/5 0 of the screw.
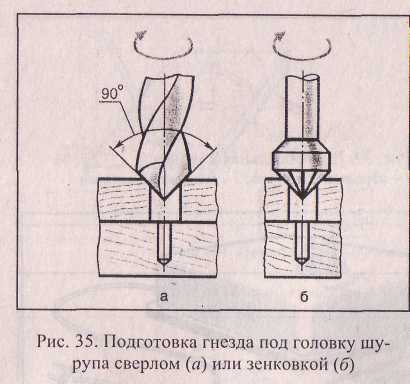
For countersunk and semi- countersunk screw heads, the hole is countersinked. (See Appendices, fig. 35.)
Screw the screw with a screwdriver clockwise. (See Appendices, fig. 36.)

The teacher demonstrates an example of connecting parts with screws.
To What do you think, which connection of parts will be more durable and reliable - nails or screws?
At the enterprises, assemblers perform the operation of screwing screws with the help of electric screwdrivers, pneumatic screwdrivers.
5. Instructing on safety rules when connecting parts with screws.
Teacher. The main safety rules are:
"do not use screws with a knocked-out slot;
"use only a working screwdriver;
"screw in the screw only at a right angle;
"when screwing in, do not touch the screw with your hands;
After screwing in, deburr the screw.
6.Practical work.
On unsuitable material, practice screwing in screws, having previously selected screws and a screwdriver.
III. Summary of the lesson.
The teacher evaluates the quality practical work, indicates typical mistakes made by students.
Lesson number 25-28. Connecting parts with nails and screws.
Liked? Please thank us! It's free for you, and it's a big help to us! Add our site to your social network:- " onclick="window.open(this.href," win2 return false >Print
Joining joinery with nails
Many wood products contain multiple details. They are interconnected different ways. The process of making parts into a whole product is called assembly. Depending on the location of the parts in the products, there are terminal and middle connections. They can be made with nails, screws or glue. In the picture below: a– end connections , b– middle .
Most joinery consists of several parts, which are often connected using nails. Depending on the purpose, nails come in different sizes (diameters and lengths) and differ in the shape of the head (cap). The nail has head, stem and tip . Nails are marked like this - first comes a number indicating the thickness of the nail shaft, and then - the length of the nail (from the tip to the head). Thickness and length values are given in millimeters. For example - 2x40, 4x100, 8x200, etc.
Types of nails
Simple nails
Special nails


Common nail with knurled head, can withstand heavy blows from a hammer
Upholstery nail for fixing upholstery of furniture and fabrics


Regular nail without head
Galvanized stainless steel outdoor nail


Plain flat head nail
Threaded nail for framing


Nail with a wide head, holds roofing felt, tin, slats on the wall
Panel nail, can be sunk in wood


Corrosion resistant lath nail designed for insulating plates
Floor nail without head, well fixed inside


Threaded (screw) nail for fixing chipboard and blockboard
Joiner's nail for fixing plywood, chipboard and joints


Nail for wooden planks and thin laths
Beam nail, designed for outdoor work

Hardened nail - driven into the walls and does not bend

Wavy nail for simple T-shaped or L-shaped joints that are not heavily loaded
Wallpaper nail for fastening fabrics
Before hammering nails, mark their locations. When connecting parts with nails, usually a thin piece is nailed to a thick one.
The thickness of the nail should not exceed 1/4 of the thickness of the part being nailed.
The length of the nail should be 2-3 times the thickness of the part to be nailed.
To prevent the part from splitting, the nail should be hammered at a distance of at least 4 nail diameters from the edge of the part and at least 15 diameters from the end.

Nails are hammered hammer.A hammer should be held so that the hand is at a distance of 20-30 mm from the end of the handle.
It is advisable to pre-pierce the place of clogging with an awl. First, hold the nail with the thumb and forefinger of the left hand and apply light blows to the nail head with a hammer (see Fig. a). After the nail has firmly entered the wood, the left hand is removed and harder blows are applied.
It doesn't always make sense to drive a nail exactly at a 90 degree angle. Although this is a common method, it does not provide a strong bond in all cases.
Connected parts when nailed, they must be in stationary . If the part wobbles or moves, the nail will most likely warp.
Nails - especially large ones - can split wood , especially if they clog at the end of a plank or board. This can be avoided if the tip of the nail is first drowned.
Too strong blows with a hammer not only drive the nail into the wood, but can cause ugly holes to appear on the surface. Therefore, it is better to use a punch at the final stage, with which to drive a nail to the surface of the tree or slightly drown it.
Small "basting" nails help to fix the connection, which are driven in before the parts are joined with the main nails. Having outlined the hole, the "basting" nail is pulled out.
Ways to drive nails
|


Wood splits less when hammering a dull nail (on the tip of the nail, they are carefully struck beforehand).
If the nail went crooked or bent when hammering, it must be pulled out. For this purpose, apply ticks or hammer with a special slot on the toe(rice. b). In order not to damage the surface of the product, a small plank is placed under the pliers or the head of the hammer.

If the ends of the nails protrude, they are bent on the mandrel, as shown in the figure. a, and driven back into the wood (Fig. b). This increases the strength of the connection.
A hammered nail is pulled out like this. Bend the bent end of the nail with a chisel. Align it with pliers or pliers. The end of the nail is knocked out with a hammer, and then pulled out by the head with tongs.

You can find some tips on using a hammer and the correct connections below.
1.
In order for a nail connection to be strong and reliable, you must determine exactly what type of nails are suitable for the job. Shops offer a large selection of nails - from "universal" to specialized, designed only for certain operations. If you want to buy several types of nails to be "armed" in case of emergency, choose "universal" nails, and purchase special ones only after you determine what kind of work you intend to do.
As important as it is to use nails according to the purpose, it is equally useful to have at your disposal not one hammer, but at least two different ones.
For most jobs, you will need a 300g carpenter's hammer. Along with this, it's good to have another lighter hammer that can drive small nails and rods, such as used in wallpaper or decorative work.
If you often do carpentry work and use thick nails, you will need a heavy hammer with a "claw". We are sure that you will soon appreciate it as extremely useful tool. So, with the help of a "claw" it is easy to pull out bent or temporarily hammered nails from a tree. For this, it is not necessary to have ticks on hand.
2. Regular wire nails vary in length and thickness of the rod. For work with parts of small and medium sizes, nails with a length of 20 to 50 mm are used. For rough work - flat head nails with a length of 60 mm or more.
steel nails 25 or 40 mm long will be required primarily for hanging pictures and other objects on the walls.
wallpaper nails have wide recessed heads, they can be used to fix wallpaper fabrics or carpets on a wooden surface.
Nails for plywood or threaded nails hold wooden materials just as strong as screws, with the only difference that they can be driven in with a hammer. For fastening soft materials(roofing, lightweight slats, gaskets, etc.) nails with very wide or decorative head mi.

3.
Even in a place hidden from the eye, nails are better if possible. drown in a tree, and level the resulting recess with carpentry or wax putty. This should be done not only for "cosmetic" purposes: with high humidity protruding nails will begin to rust, resulting in stains on the wood.
Indispensable in this case will be nails with a recessed head, which can be driven under the surface of the tree - however, the head of these nails should be narrower than the heads of ordinary nails. Wider flat heads cause depressions or waves on the surface.
Small carnations with a flattened head will be completely invisible if they are driven in in the following way: using a chisel, a thin chip is separated from the surface of the tree and folded up, then a nail is driven in and closed with this chip.

4.
Hitting the head of the nail, not the fingers, if you have a large nail in your hands, you don’t have to worry about this. However, with a small nail and an oversized hammer, you are more likely to hit your fingers. It is possible to avoid this.
Hold the small nail with pliers. The main thing is to learn how to hold the nail at the right angle. The pliers can be removed once you are sure the nail is firmly anchored into the surface.

Small carnations can also be hammered with paper.
The nail is pierced through the paper, fixed with a few gentle blows of a hammer, then the paper is carefully torn off and the nail is driven into the wood to the end.
You can only work with a serviceable tool, it must be used strictly for its intended purpose.
When working, the hammer should be kept at a distance of 20-30 mm (2-3 fingers) from the free end of the handle.
Do not leave a carpenter's hammer on the edge of a workbench.
You can not stand behind the back of a person working with a hammer.
The tip of the awl should be directed away from the worker.
To connect wooden parts to a structure, a connection with nails is used. The industry produces various types of nails. Common to them is their structure (Fig. 107).
At the same time, nails differ in the shape of the head, the length and diameter of the rod, the purpose, the material from which they are made, etc. (Fig. 108).
Nails with a flat head were widely used (Fig. 109).
Depending on these parameters, nails are used to connect thick and thin parts into a structure, for glazing windows, fastening fabric, rubber, metal and other structural elements with wood structural elements, etc. Thin nails are used to work with plywood and fiberboard .
The main tools that are used to connect parts with nails are a carpenter's hammer, tongs, tools for pulling nails (Fig. 110). When connecting parts, it should be remembered that they always connect a thinner part with a thicker one. In accordance with the dimensions of the blanks, the length and diameter of the nails are selected. The length of a nail that does not pass through should be 2 ... 4 times the thickness of a thinner part, and its diameter should be 10 times less than its thickness.
A nail is driven at a distance of at least 10 mm from the edge of the part, otherwise it may crack. If the nail needs to be hammered closer than 10 mm from the edge, a hole is drilled in the part, the diameter of which is 0.5 mm smaller than the diameter of the nail.
When hammering a nail, the hammer is held by the handle at a distance of 20 ... 30 mm from its end (Fig. 111) and strikes at the center of the nail head. At the same time, the nail is held by the rod near the head (Fig. 112).
The direction of impact must coincide with the axis of the nail, otherwise it will bend (Fig. 113).
The nail begins to be hammered with gentle hammer blows, and when it enters the workpiece by about a third of the length of the rod, the impact force is increased.
To deepen the nail head into the wood, special cylindrical devices are also used (Fig. 114).
To connect plywood parts, the places for driving nails are pierced with an awl (Fig. 115).
If parts are connected with a through passage of a nail, its length should be one third more than the thickness of the connected parts. To do this, use a nail with a flat or conical head. The part of the nail that has come through is bent across the fibers (Fig. 116).
If the direction of nailing has shifted or it is bent, it should be removed. Such a technological operation is performed with pliers, a hammer or a special tool with a slot. In order not to damage the product when removing the nail, a piece of wood or plywood is placed under these tools (Fig. 117).
When making connections with nails, the following safety rules must be observed:
1. The workplace should contain only those tools and materials that are necessary for work.
2. Only serviceable tools may be used. The hammer head should not have chips, cracks, other irregularities, and the handle should be firmly fixed in its body with a wedge (Fig. 118). material from the site
3. Nails should be placed in boxes and tools in stacks.
4. When hammering a nail, it should be held under the head with two fingers.
5. At the beginning of driving a nail, hammer blows should be performed with little effort, and then with more.
6. If the fastening of the hammer striker on the handle has loosened, it must be pushed in with blows in the opposite direction from the handle (Fig. 119).
Didn't find what you were looking for? Use the search
On this page, material on the topics:
- essay on nail
- sochenine connection with the help of nails
- presentation on connection nails
- essay about nails
- sequence of nailing parts
JOINING THE PARTS ON THE NAILS Many of the woodwork you will be making in the training workshops will contain multiple pieces. They are connected to each other in various ways. The process of connecting parts into a whole product is called assembly. Many wood products that you will make in the training workshops contain several parts. They are connected to each other in various ways. The process of connecting parts into a whole product is called assembly.
Depending on the location of the parts in the products, end and middle connections are distinguished. They can be made with nails, screws or glue. End Connections Middle Connections The industry produces nails of various thicknesses, lengths and with different heads. The main tools used to connect parts on nails are a carpenter's hammer, pliers and an awl. Carpentry Hammers Awl Pliers

When connecting parts with nails, a thin part is nailed to a thick one. In order for the connection of parts to be reliable, the length of the nail must be 23 times the thickness of the nailed part. The diameter of the nail must be less than the thickness of the part being nailed, otherwise a crack may appear in the part. The place where the nail is driven in must be at least half the thickness of the part from the edge or end of the part. It is advisable to pre-pierce it with an awl. The nail begins to be hammered with gentle hammer blows, and when it enters half of the rod, it is necessary to hit harder. Hammer blows on the nail are applied from above, directly on the hat, and not at an angle to the nail shaft. The strongest connection is obtained when the nail is driven across the fibers or at some angle to them. If the nail went askew or bent, don't worry! Such a nail must be removed with a hammer with a special slot on the toe or with pliers. Punching holes with an awl Hammering nails Hammering nails at right angles to the grain of the wood Bent nails can be straightened on a metal bar or hard board and used in further work. In order not to damage the product, a piece of wood or plywood is placed under the jaws of the pliers or the head of the hammer. Pulling out nails with pliers Pulling out nails with a hammer

ATTENTION! You can only work with a serviceable tool, it must be used strictly for its intended purpose. When working, the hammer must be kept at a distance of 2030 mm (2 3 fingers) from the free end of the handle. Do not leave a carpenter's hammer on the edge of a workbench. You can not stand behind the back of a person working with a hammer. The tip of the awl should be directed away from the worker.

CONNECTION OF PARTS ON SCREWS Over time, the nail connection weakens: the nail can swing and even fall out completely. The connection of parts on screws is much more durable. Over time, the nail connection weakens: the nail can swing and even fall out completely. The connection of parts on screws is much more durable.

A screw is a fastener that consists of a head and a threaded shank. The head of the screw has a slot for a screwdriver. The slot can be straight and cruciform. Screws differ in the type of heads, which are semicircular, countersunk and semi-secret, as well as in the length of the rod. Most often, countersunk head screws are used. Such a screw does not protrude above the surface of the part. A screw with a semicircular head A screw with a countersunk head A screw with a semi-countersunk head The screw installation sites are marked in the same way as for nails. It is difficult to drive a screw into a part, therefore, in the workpiece before installing the screws small size with an awl, make a hole to a depth equal to about 2/3 of the length of the screw. For a countersunk head, a large diameter drill widens the inlet. The screw is inserted into the hole and screwed with a screwdriver clockwise. A screwdriver is selected in such a size that the width of its working part is equal to the width of the slot. The shape of the working part of the screwdriver should be the same as that of the slot. For thick and long screws, holes are drilled with drills. Their diameter is 4/5 of the diameter of the screw shaft, the drilling depth is approximately equal to half of its length.

ATTENTION! Use only a screwdriver that fits exactly into the slot of the screw head. The screw must be screwed in at a right angle to the parts. When assembling parts, do not use screws with a knocked down slot. Screws lubricated with machine oil or soap are easier to screw into the part. The burr on the head of the screwed screw must be removed with sandpaper.


Most often, wood glue is used to obtain adhesive joints. It comes in the form of grains or dark brown tiles. Glue is prepared in a special glue pot and used hot. The glue should not be very thick and without lumps. The glue is applied with a thin layer evenly on the surface of the parts to be joined with a brush and compressed with a clamp fixture. Wooden clamp Metal clamp After exposure (its time is determined taking into account the glue used), the glued parts are released from the clamp, the remaining glue protruding from the seams is removed. Sometimes synthetic materials are also used for gluing wooden parts. universal adhesives such as PVA, "Supercement", BF, which are widely used in everyday life for gluing products from other materials. However, synthetic adhesives emit harmful fumes. Therefore, their use requires special conditions: good ventilation of the premises, the presence warm water for washing hands after work.


Finishing the final treatment of an assembled product in order to improve its appearance and protect it from moisture, insect damage, etc. Finishing a product includes several operations: cleaning surfaces, coating with dyes, applying patterns by burning, etc. These operations can be performed before assembly or after assembly of parts. Depending on the intended use of the product, some operations may not be applicable. Cleaning irregularities after sawing, as well as rounding the sharp corners of the workpiece, is carried out with a rasp or a file with a large notch. When filing left hand the worker should lie on the toe of the tool, not covering it. Press the tool only when it moves forward. Cleaning of parts with a file Cleaning of parts after manufacturing is carried out with a sandpaper. It is based on cotton fabric or thick paper, on one side of which small grains of glass or hard minerals are glued.

For convenience, a piece of sandpaper is attached to a wooden block. It is convenient to grind small parts as shown in the figure. Cleaned parts or products are often painted with cotton paint, watercolor or gouache. A special stain is also used. Sometimes wood products are varnished, it gives it a beautiful look. appearance and protects the surface from moisture. Regardless of the type of dye, it is applied with a brush or swab with a piece of cotton wrapped in gauze. Cover the surface first along the fibers, then across. Applying color with a brush Applying color with a swab


- What preparatory technological operations need to be performed to connect parts by gluing?
- What other types of connections, besides gluing, do you know? What is their essence?
- Give examples of compounds known to you and explain their common and distinctive features.
To connect wooden parts to the structure, a connection with nails is used. The industry produces various types of nails. Common to them is their structure (Fig. 107).
At the same time, nails differ in the shape of the head, the length and diameter of the rod, the purpose, the material from which they are made, etc. (Fig. 108). Nails with a flat head were widely used (Fig. 109). Depending on these parameters, nails are used to connect thick and thin parts into a structure, for glazing windows, fastening fabric, rubber, metal and other structural elements with wood structural elements, etc. Thin nails are used to work with plywood and fiberboard.

Rice. 107. Structure of a nail: a - head; b - rod; c - point

Rice. 108. Types of joiner's nails: a - with a flat head; b - with a conical head; c - with a spherical head; g - with a convex decorative head; d - spiral

Rice. 109. Types of carpenter's nails with a flat head
The main tools that are used to connect parts with nails are a carpenter's hammer, pliers, tools for pulling nails (Fig. 110). When connecting parts, remember that you always connect a thinner part with a thicker one. In accordance with the dimensions of the blanks, the length and diameter of the nails are selected. The length of a nail that does not pass through should be 2...4 times the thickness of the thinner part, and its diameter should be 10 times less than its thickness.

Rice. 110. The main tools for connecting parts with nails: a - hammers; b - ticks; c - a tool for pulling nails
A nail is driven at a distance of at least 10 mm from the edge of the part, otherwise it may crack. If the nail needs to be hammered closer than 10 mm from the edge, a hole is drilled in the part, the diameter of which is 0.5 mm smaller than the diameter of the nail. When hammering a nail, the hammer is held by the handle at a distance of 20 ... 30 mm from its end (Fig. 111) and strikes at the center of the nail head. At the same time, the nail is held by the rod near the head (Fig. 112). The direction of impact must coincide with the axis of the nail, otherwise it will bend (Fig. 113).

Rice. 111. Hammer grip

Rice. 112. Holding a nail at the beginning of hammering: a - with fingers; b - pliers

They begin to hammer the nail with gentle blows of the hammer, and when it enters the workpiece by about a third of the length of the rod, the impact force is increased. To deepen the nail head into the wood, special cylindrical devices are also used (Fig. 114). To connect plywood parts, the places for driving nails are pierced with an awl (Fig. 115). If parts are connected with a through passage of a nail, its length should be one third more than the thickness of the connected parts. To do this, use a nail with a flat or conical head. The part of the nail that has come through is bent across the fibers (Fig. 116).

Rice. 114. Deepening the head of a nail with a cylindrical device

Rice. 115. Puncture of clogging points
If the direction of the nail has shifted or is bent, it should be removed. Such a technological operation is performed with pliers, a hammer or a special tool with a slot. In order not to damage the product when removing the nail, a piece of wood or plywood is placed under these tools (Fig. 117).
When making connections with nails, the following safety rules must be observed:
- The workplace should contain only those tools and materials that are necessary for work.
- Only correct tools may be used. The hammer head should not have chips, cracks, other irregularities, and the handle should be firmly fixed in its body with a wedge (Fig. 118).
- Nails should be placed in boxes and tools in stacks.
- When hammering a nail, it should be held under the head with two fingers.
- At the beginning of driving a nail, hammer blows should be performed with little effort, and then with more.
- If the fastening of the hammer head on the handle has loosened, it must be pushed in with blows in the opposite direction from the handle (Fig. 119).

Rice. 116. Sequence of bending a nail

Rice. 117. Methods for pulling a nail: a - with pincers; b - with a hammer; in - a tool for pulling
Rice. 118. Schemes for fastening the hammer head with a wedge: a - correct; b - wrong

Rice. 119. Nozzle of the hammer striker: a - correct; b - incorrect
New terms
nail, pincers.
Fixing the material
- What is the peculiarity of connecting parts into a structure using nails?
- How to choose a nail for joining wood parts?
- What is the correct way to hold a hammer when hammering nails?
- How to properly remove a nail from a workpiece?
- What safety rules should be observed when joining parts with nails?
Test tasks
1. The end of the hammer handle should stick out of the hand at
- A 5…10 mm
B 10…15 mm
В 15…20 mm
D 20…30 mm
2. The nail is hammered into the workpiece at a distance from the edge not less than
- A 5 mm
B 10 mm
in 15 mm
D 20 mm
3. When pulling a nail, a piece of wood is placed under the pliers to
- And the nail didn't bend
B raise the tongs above the surface of the workpiece
To not spoil the surface of the workpiece
It was more convenient to work
4. The length of the nail must be greater than the thickness of the part to be nailed, in
- A 1.5 ... 2 times
B 2…4 times
5…6 times
G 10 times
5. The diameter of the nail must be less than the thickness of the part in
- A 10 times
B 2…4 times
5…6 times
G 7 times