Beautiful garden lights. Do-it-yourself garden lantern - detailed instructions with photos and videos. Criteria for selecting parts and prices
To make a street lamp for a summer residence with your own hands is within the power of any landowner. You do not need to have special knowledge and purchase expensive equipment. A homemade street lamp can be made from any material that is at hand. Well-thought-out lighting will turn an ordinary garden plot into a fairy-tale forest or a fantastic landscape. Having made a lamp for giving with your own hands, you can use it to perform a number of tasks in terms of practical landscaping. Consider what kind of lamps are for giving, what they are made of, how they are installed and used for various purposes.
Varieties of country lamps
Street lights are divided into several categories, based on the features of their device, installation location and tasks performed.
A do-it-yourself garden lamp is made from the following materials:
- metal;
- glass;
- plastic;
- wood;
- ceramics.
When choosing a material, it should be taken into account that the strength of the street lamp must be sufficient to withstand strong gusts of wind, temperature changes, precipitation and exposure to solar radiation.
In addition, when making a street lamp with your own hands, you need to remember that it must organically fit into the landscape and during daylight hours, without violating the created harmony. To achieve this, it is necessary to carry out the electrification of the territory on the basis of a well-thought-out project and strictly according to the wiring diagram.
Do-it-yourself lanterns are used to illuminate such areas:
- facade of the house;
- entrance gates and gates;
- external fence;
- garages, warehouses and sheds (security function);
- several objects and trees (decorative and festive illumination);
- recreation areas (romantic lighting);
- garden paths, streets and paths.

When making lanterns on your own, you need to provide various ways fastening and use all possible places for their placement. As a rule, on any site there are plenty of opportunities for this.
Having made a garden lamp, it can be installed as follows:
- on a pole made of metal, wood or composite material;
- on the wall of a house, garage or barn;
- in the form of a floor lamp next to the gazebo, shed and bench;
- under the garden figure;
- on the arches;
- hang from a tight rope.
When making country lanterns, you can give free rein to your imagination. They are made in the classical and modern style. An antique lantern made of non-ferrous metal or wood will perfectly decorate the patio area or indoor barbecue. To do this, you can use an old copper kettle or a samovar. What will be required in order to make a lamp for the garden with your own hands?
Tools and materials
For lighting to fulfill its role in in full need a good plan. Before you make a street lamp with your own hands, you need to go through the site and outline the installation locations lighting fixtures. After that, make a drawing with a detailed indication of the places for laying wires, mounting boxes, sockets and switches. The project will be the basis for the calculation and subsequent purchases.
In order to make a garden lantern, you must have the following tools and materials:
- roulette;
- shovel;
- level;
- Bulgarian;
- a hammer;
- screwdriver;
- mounting knife;
- soldering iron;
- insulating tape;
- fasteners (self-tapping screws, staples, nails, couplings).
Regardless of which type of lamps is chosen for arranging the garden, they need to be connected to a source of electricity. It can be an industrial network 220 V or a battery.
Wires can be pulled through the air or laid in the ground. When the decision is made in favor air version, you will need a strong cable stretched between poles, buildings and trees. Cables are attached to it, it is forbidden to pull them tight, the connection must be floating with a small allowance.
For laying wiring in the ground, you must use plastic pipes. It is best to choose products made of reinforced polypropylene. Such pipes will reliably protect the cable from moisture and mechanical stress. The pipeline is assembled using a special soldering iron.

A battery-powered chandelier is suspended in places where it is impossible or unprofitable to connect an industrial network. Power is provided by reusable batteries, disposable or.
Manufacturing of glass lanterns
It is difficult to imagine a cottage without family and friendly feasts. After such events, a lot of glass containers of various sizes, shapes and colors remain. Do not rush to throw away these containers, they can be used to make original and beautiful garden lights.
There are such options for the manufacture of glass lamps:
- Single lights. For work, bottles of dark glass are taken. Up to half they are filled with colored pebbles and coils of wire. A small bulb in the cartridge is inserted into the neck. All slots and contacts are filled with sealant. Immediately after it hardens, the flashlight can be used for its intended purpose.
- Chandeliers. Several identical bottles are prepared, their necks are plugged with stoppers from any waterproof material. After that, a circle or square is cut out of a plastic or metal plate. Holes are drilled in the base for the necks and electric wire. Bottles are inserted into the holes, an LED lamp is connected, a chain or cable is attached to hang the created chandelier.
- Volumetric lamps. For their manufacture, three-liter jars are required. Since they are absolutely transparent, it is necessary to decorate them. This is done using stained glass paints, adhesive films or strips of copper foil. The lamp holder is attached directly to the plastic or iron cover. After that, it is put on the neck or rolled up with a special key.

A good visual effect is given by combining or alternating glass vessels in one product or along the path.
Metal lamps
In any summer cottage there is always a lot of tin cans or old kitchen utensils. With a little creativity, these items can be made into bright and colorful pieces for free. original lamp. A metal lantern is a durable item that is resistant to mechanical stress, moisture and ultraviolet radiation.
Manufacturing options are as follows:
- From cans of beer or canned food. They must be wrapped with carbon paper and plain paper. A drawing of any content is applied to the workpiece - stars, insects, animals. After that, holes are made along the contour of the pattern with a drill with a drill or a hammer with a nail. The jar is covered with paint, a light source is inserted into it - and the ceiling is ready.
- From old dishes. A sieve, colander and graters are best suited for this. The presence of holes in them greatly facilitates the work. Handles are cut off from the colander, the remaining hemisphere is fixed on a rigid basis. Rust in disguise acrylic paint weather resistant. Such plafonds are decorated with tea, coffee mugs and bowls glued to silicone.
Even an old pot or pan can be turned into a lamp by perforating it with a small diameter drill. The product is decorated with silver or bronze paint.

Plafonds made of wood and twine
At any time of the year, especially in autumn, in the country you can find many branches of various configurations. Finding a rope or cord will also not be a big problem.
The ceiling is made from improvised materials in the following sequence:
- A rubber balloon is inflated, left after one of the holidays. Then its surface is smeared with petroleum jelly or vegetable oil.
- Preparations underway facing material. The branches and cord are treated with an antiseptic, impregnated with a primer from dampness and ultraviolet radiation.
- Epoxy glue is diluted in a saucepan or bowl. The cord is immersed in it. It is desirable to wrinkle it a little so that it is completely saturated with epoxy.
- A cord soaked in glue is wound around the ball, twigs are immediately applied on top of it. A day later, the ball is deflated and removed from the created rigid frame.
The created ceiling can be used in its original form, painted, varnished and covered with sparkles. If necessary, it can be cut into 2 hemispheres.
Organization of artificial lighting at their summer cottage or adjoining territory- a question that one way or another has to be solved by each owner. In principle, now you can buy anything, and the problem (by the way, concerning not only the decoration of the land allotment, as many believe, but also security) does not seem particularly difficult.
Although it is hardly worth it for an ordinary gardener to spend money on buying an appropriate device if you can make it yourself. And exactly the one you want, and not install what is in the assortment of the outlet. It remains only to figure out how and from what it is more expedient to make a garden lamp with your own hands.
The author believes that it is more useful to get acquainted with the simplest models of lamps, the manufacture of which does not present any difficulty, and from the point of view of financial costs, they are preferable. There are so many options that it’s impossible to list them, especially since our land has never been poor for various kinds of inventors and innovators. And the reader can have their own ideas. But the fact that a few examples of the original "models" will not be superfluous is for sure.

All garden lights, if they use any type of electric / light bulbs, must be rated for reduced voltage. The reasoning is clear - safety precautions. Therefore, it is necessary to think about a suitable transformer whose secondary winding delivers 12, 24 or 36 V.
The load power should also be taken into account. It depends on how many lamps can be connected to one transformer. It is clear that no one will put an individual transformer on a separate device (if there are many of them). But to choose such a sample, which has several secondary voltage leads, and “plant” a lamp on each, is quite realistic. The main thing is that the total power does not exceed this parameter Tr. In general, there is something to think about.
Naturally, we are talking about those lighting fixtures that are hung around the garden - on the branches fruit trees, various racks and so on. Lanterns mounted on the wall of the house (veranda) do not count. They tend to connect to the network ~220/50.
The reader should pay attention to the organization of "food". Traditionally cable is used; usually bipolar. But the use of this product has some limitations. In particular, in the specifics of installation, which largely depends on the type of insulation.
In this regard, fiber optic light guides are preferable for laying "lines" in the garden. Here they have no limits. Do not heat up, fireproof, absolutely tight. They can even be laid in water. It is their experts who advise fearlessly using them to illuminate garden hydraulic structures- fountains, ponds, pools. Approximate cost of 1 l.m. - within 29 - 33 rubles.
It is undesirable to mount lamps permanently. The author, as a summer resident with experience, will give his arguments, and agree with them or not - at the discretion of the reader.
 First, all work in the garden is seasonal. The pendant lamp is easy to dismantle and hide until next year, but the stationary lamp will remain for the winter. And in the spring, when there is already enough work, you will also have to deal with poles - paint, for example.
Secondly, if the wire of the low-voltage line can be put on top, along the branches, then connecting 220/50 requires following some rules. And this is both unnecessary trouble and a waste of money. On the same pipes, metal "corrugation", cable.
Thirdly, none experienced summer resident will not neglect the rules of crop rotation. And this implies regular redevelopment of the garden plot. So you have to “dance” around the permanently installed pillars, wondering how best to equip the beds in the new season and lay paths.
Variants of the simplest lamps
How to connect the wires to the cartridge, "ring" them for integrity and other elementary things, is described in detail on the site in other articles -. Without knowing this, it is better not to undertake to do anything with your own hands from what belongs to the field of electrical engineering. In fact, we are talking only about the "lampshade", that is, the body of the lamp. How and from what it can be made, we will consider.
Clay
Polymer is best suited for these purposes. Although some craftsmen adapt other plastic materials that harden after drying - putty, sealant, even "liquid nails". Although the last two options can hardly be called cheap.
Work begins with the selection (or manufacture) of a template. The criterion is simple - the geometry (shape) and dimensions of the future lamp. Packaging from juices or dairy products, plastic bottles are suitable. There is no difference what exactly to coat. But the meaning is clear.
The advantages of this technology are many. Cheapness, simplicity, high speed of production. In addition, such a lamp can either be painted (painted) as you like, or textured. For example, press beads, small pebbles into clay, apply strokes or something like that. In the process of work, fantasy itself will tell you what you can do with your own hands in terms of decoration.
Made of wood and plastic
Good combination of materials. A frame is assembled from wooden blanks, and its sheathing is made with plexiglass, acrylic plastic. Considering that they are different shades, manufacturing options are more than abundant.

If desired, you can mount the frame from an aluminum corner. A little longer in time, since you will have to drill holes and rivet (or fix with screws and nuts), but the durability of such a design will be much higher.

Plexiglas
For this option, the frame is not needed - the difficulty is only in cutting the material. And the prepared segments are easy to fasten. For example, silicone-based glue, although this is not the only way to fix plexiglass.

Despite some difficulty in cutting the material, such a lamp has many advantages. It can be given any shape, assembled from parts different colors, according to the mosaic principle. For those who like to bring their own "zest" to homemade products - that's it.
There are options for lamps, which are based on an ordinary candle. The fact that such lighting cannot be called “all-weather and permanent” is understandable. But in fairness, the reader should be shown several "models". Perhaps someone will like it.

In principle, everything that is at hand is suitable for manufacturing. A shed, a garage, a change house - there is always something in them that lies idle, but it’s a pity to throw it away. And everything else is only your own imagination and skillful hands, without any restrictions other than the above.
What lamps to use?
Only one question remained unconsidered - the type of lamps that should be used in garden lamps. Just a brief overview of some of the properties of the samples, since the author does not consider himself entitled to impose something specific on the reader. The choice of the type of product is made according to a number of parameters - the shape of the "lampshade" and the material from which it is made, the installation location, and so on. Based on this, it is not difficult to understand what exactly is most suitable.
Why you shouldn't use incandescent bulbs
Plus - "penny" cost. Here, perhaps, are all the advantages.
- Increased heating of the flask. Therefore, such a light bulb is not suitable for every lamp. It is also necessary to take into account the fact that since the device is not located in the house, but in the garden, then moisture can condense on the flask, plus - temperature drops on the street. It is not a fact that when installed in an open type lamp at the moment of switching on, the “brainchild of Ilyich” will not shatter into small pieces. Plus, devices with such lamps are not recommended to be placed in the grass, tree crowns due to the increased thermal effect on vegetation. As a result, leaf burn, for example.
- Low light output. For the so-called "flood lighting" of the site, this type of lamp is not suitable.
- fragility. The resource of such lamps (on average) is 900 hours.

It is better not to purchase lamps marked RL (mercury) and NL (sodium) for these purposes. If the flask is damaged, problems will arise, especially since we are talking about the territory on which various crops are grown.
LED samples. It can be lamps or ribbons. various types. The latter, from the point of view of the author, is even more attractive. Why?
- The mains voltage is, by definition, reduced, since such lamps are sold complete with a power supply. Therefore, the TB issue has already been resolved.
- Versatility. A garden plot is a place where a summer resident can realize any fantasy. This applies not only to the layout and selection of plants, but also to the issue of illumination. LED strip can be placed anywhere, if desired, shifted in a different way, “packed” in some kind of transparent case (lampshade), and so on. The author himself illuminates his garden plot in this way. Definitely - very convenient, rational and original.
When you need to pay attention to its characteristics. Not all modifications of LED-devices are suitable for outdoor use. It is pointless to indicate a specific brand of the sample, since it is impossible to keep track of all the new products. But the advice is clear - not everything that is commercially available is suitable for use in the garden.
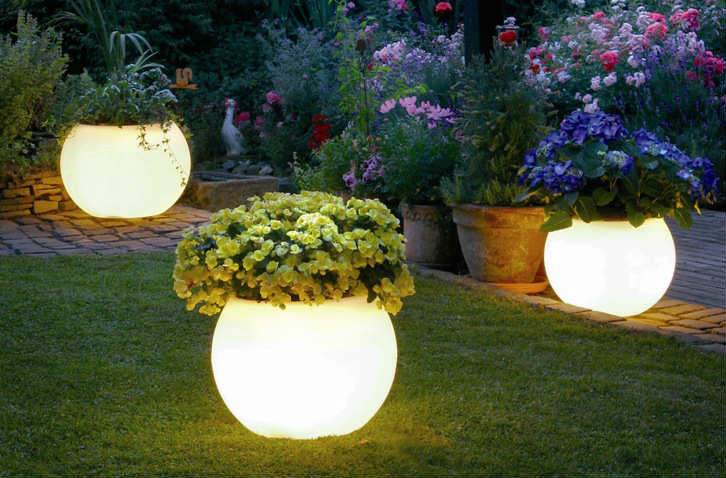
If you are thinking about organizing the lighting of your backyard, then do not rush to buy lighting fixtures in the store. DIY solar powered garden lights.
If you want to illuminate an open area, and the power supply to it is difficult, then you should think about solar-powered lamps, the batteries of which are charged by the rays of the sun. With the onset of darkness, such devices begin to work, creating a comfortable environment in your backyard. The luminaires are easy to use and install, and also attract quite affordable prices for them and a wide selection.
Solar Garden Light
This article will be of interest to those who like to create things useful in the household with their own hands. The advantages of making lamps "on your own" can be safely attributed to the fact that your model will be exclusive and quite reliable (after all, you made it yourself). Keep in mind, though, that you won't be able to save a lot of money. We will not describe expensive circuits using ready-made controllers, but will focus only on the simplest version. Almost anyone who has ever held a soldering iron in their hands can repeat it.
Schematic diagram of an easy-to-replicate luminaire
Below circuit diagram a lamp powered by sunlight is very simple, and has been repeatedly tested by numerous amateurs specializing in the manufacture useful devices with your own hands.

circuit diagram
How it works:
- During the daytime, the solar panel (S) converts the energy of light rays into electrical energy.
- The current it generates through diode D1 charges the battery (A).
- A positive potential applied to the base through the resistor R1 "holds" the transistor T1 in the closed state and the LED D2 is off.
- With a significant decrease in illumination solar panel the transistor turns on (due to the decrease in the positive potential applied to the base) and connects LED D2 to the battery. The LED starts to light up.
- Diode D1 prevents the battery from discharging through the solar panel.
- With the onset of dawn, the positive voltage coming from the "+" output of the solar panel to the base "closes" the transistor T1 and the D2 LED stops burning, and the battery starts charging again.
Criteria for selecting parts and prices
The choice of parts depends on how powerful the lamp you intend to make. We give specific ratings for a home-made lighting device with a power of 1 W and a luminous flux intensity of 110 Lm.
Since in the above diagram there are no elements for controlling the level of charge of the battery, then, first of all, you need to pay attention to the choice of a solar battery. If you choose a panel with too little current, then during daylight hours it simply will not have time to charge the battery before required capacity. Conversely, a light bar that is too powerful can recharge the battery during daylight hours and render it unusable.
Conclusion: the current generated by the panel and the battery capacity must match. For a rough calculation, you can use the ratio of 1:10. In our particular product, we use a solar panel with a voltage of 5 V and a generated current of 150 mA (120-150 rubles) and a rechargeable battery of the 18650 form factor (voltage 3.7 V; capacity 1500 mAh; cost 100-120 rubles).

Also for the manufacture we need:
- Schottky diode 1N5818 with a maximum allowable forward current of 1 A - 6-7 rubles. The choice of this particular type of rectifier part is due to the low voltage drop across it (about 0.5 V). This will allow you to use the solar panel most efficiently.
- Transistor 2N2907 with a maximum collector-emitter current up to 600 mA - 4-5 rubles.
- Powerful white LED TDS-P001L4U15 (luminous flux intensity - 110 Lm; power - 1 W; operating voltage - 3.7 V; current consumption - 350 mA) - 70-75 rubles.
Important! The operating current of LED D2 (or the total total current when using multiple emitters) must be less than the maximum allowable collector-emitter current of transistor T1. This condition is met with a margin for the parts used in the circuit: I(D2)=350 mA< Iкэ(Т1)=600 мА. Battery compartment KLS5-18650-L (FC1-5216) - 45-50 rubles. If, when installing the device, you carefully solder the wires to the battery terminals, you can refuse to purchase this structural element.
- Resistor R1 with a nominal value of 39-51 kOhm - 2-3 rubles.
- The additional resistor R2 is calculated in accordance with the characteristics of the LED used.
Purpose and calculation of an additional resistor in the LED power circuit
The battery voltage may be too high for the LED (this may lead to the failure of the latter). To compensate for its excess, we use an additional resistor R2. We calculate its face value based on the formula: U(A) = U(D2) + U(R2), where:
U(A) – battery voltage;
U(D2) - operating voltage of the LED;
U(R2) - voltage drop across the additional resistor R2.
For the TDS-P001L4U15 LED used in the above circuit with an operating voltage of 3.7 V, the use of resistor R2 is not required, since U (A) \u003d U (D2). That is, our specific scheme will look like this:

As an example of calculating additional resistors, consider a circuit with connecting two different types of LEDs: D2 - BL-L813UWC (operating voltage - 2.7 V; current consumption - 30 mA; cost - 15 rubles) and D3 - FYL-5013UWC / P (2, 2 V; 25 mA; 20 rubles).

We calculate the additional resistor R2 for the LED D2.
U(A) = U(D2) + U(R2)
U(R2) = U(A) - U(D2) = 3.7 - 2.7 = 1 V
According to Ohm's law (familiar to everyone from school):
U(R2) = R2 I, where I is the current consumed by the LED, therefore
R2 \u003d U (R2) : I \u003d 1: 0.03 \u003d 33.33 ≈ 33 ohms
Similarly, we calculate the additional resistor R3 for the LED D3:
U(R3) = U(A) - U(D3) = 3.7 - 2.2 = 1.5 V
R3 \u003d U (R3) : I \u003d 1.5: 0.025 \u003d 60 ≈ 62 ohms
On a note! After the calculations of the value of additional resistors, we round the obtained values \u200b\u200bto the nearest standard ratings.
The final circuit with two different types of emitters will look like this:

Mounting
The circuit consists of a minimum number of elements, so installation can be easily carried out in a hinged way. The length of the "legs" of the parts will be quite enough to solder without the use of additional wires. After completing the installation and checking the performance of the manufactured luminaire, all joints should be insulated with a thermal pencil or an appropriate sealant.
For those who prefer to mount components on printed circuit board, can do this using a universal circuit board suitable sizes or self made.
What is the ceiling made of?
Before telling what forms can be used in the manufacture of the ceiling, let us recall the requirements that must be observed when self-manufacturing lamp body:
The solar panel must be located outside on top of the product so that it is well lit during the daytime.
All butt joints between structural elements must be carefully sealed (circuit components are afraid of moisture).
LEDs must be placed in the transparent part of the ceiling.
Otherwise, everything will depend only on your imagination, personal preferences and the materials at hand. One of the most simple options is the use as a ceiling lamp glass jar(e.g. for storing bulk products) with a wide neck and tight lid:
- make a hole in the lid and pass the wires from the solar panel through it;
- fix the solar panel on the outside with a sealant;
- on the inner surface we mount the battery compartment and circuit elements;
- LEDs are located at the bottom of the jar.

As a practically finished case, you can successfully use a food container made of transparent plastic. Available for sale a large number of such products of various sizes and shapes (round, square, rectangular). The choice will depend on the size of the solar panel and the number of LEDs.

In custody
repeating the simplest circuit and having acquired the necessary manufacturing experience, you will be able to produce the required number of a wide variety of home-made solar-powered lamps. Such economical and mobile lighting fixtures will not only decorate your household plot, but will also greatly increase the comfort of its use at night (for example, if you place them along garden paths, above front door or at the summer gazebo).
If you have any questions on this topic, ask them to specialists and readers of our project.
(17
ratings, average: 4,26
out of 5)
 Lighting the suburban area on the street in the evening plays an important role in human life. Very nice to go out into the yard country house or cottages in the evening, and spend time not in the dark, but in comfortable and beautifully made lighting. Thanks to a high-quality and well-planned outdoor lighting system, you can enjoy the flickering of lights in street lamps at night, or sip coffee while looking at the stars.
An atmosphere that can give coziness and comfort will help to create well-chosen street lighting. It is important to correctly make street lighting, since not every lamp will cope with the conditions that nature can offer. all year round, and changing lighting after winter weather, for example, is not the most pleasant experience.
Varieties of lamps for the street

Garden lamps with their own hands, which will hang on the street, must fulfill certain functions:
- illuminate the area near the house so that households can move freely around it in the dark;
- harmoniously fit into the overall style of the suburban area.
What can you make a street lamp with your own hands
A street version of a lantern for a summer residence is a necessary element of decor for a summer cottage, but it is not always possible to buy a ready-made version. Such a purchase cannot be cheap, which means you need to learn how to make this important element yourself.
Homemade street lamp you can do it yourself from some materials:
- glass jars and bottles;
- building materials;
- tin cans;
- wood;
- plastic;
- metal.
 Street lamp made of glass jars and bottles. The main problem with a do-it-yourself bottle lamp will be the inability to scatter light, so the main task on your part will be to ensure a high level of light scattering from the light bulb. A beautiful solution for a lamp from a glass jar or a lamp from a bottle will be painting it inner walls fluorescent paint. Such paint will accumulate sunlight, and at night it will emit an unusual glow. Drawing a picture depends only on your preferences and imagination.
To make the lamp from the jar with your own hands more noble and interesting appearance, you can fill it with broken glass or wine corks, shells or decorative beads, then in the daytime, it will look like a beautiful decorative element. A jar lamp is a beautiful and elegant decor element for a summer cottage. A glowing light will become a magical element of the exterior of the cottage.
Tin can lantern. After the next gatherings with friends under a can of beer, do not rush to throw the empty container into the trash, put it aside, because it can still come out of it. With the help of an empty tin can, you can make a very unusual and beautiful garden lamp for a summer residence with your own hands.
To make a glowing street lamp from a tin can, you will need a hammer, several nails of different sizes, round wooden block and vise. Make a sketch on a piece of paper, and then transfer it to the jar itself. The drawing should not be too simple, but complex pictures are inappropriate here, it is better that the drawing closes and repeats in a circle. Then you can paint the product, install the necessary light bulb in it and hang it in the right place.
from wood. This version of a do-it-yourself street lamp is one of the simplest, since you will need a minimum of materials and forces to implement it. Take the twigs of the tree of the required size and a tight ball or ball. Twigs and twigs are glued onto the ball in a chaotic manner, tightly enough so that the structure does not fall apart and then the ball is removed, a light bulb is placed in the resulting structure and hung in the right place. Get a ball that glows in the dark. The garden is a great place for such a lamp.
From building materials. If after repair work you have some cement and plaster left, do not throw them away, now we will teach you how to make construction residues Street light.
 Take a bottle with a capacity of two liters, cut off one third from the edge, close the neck tightly. Then take a small bottle up to 0.5 liters with a closed lid. Insert a small bottle inside a large one and secure with two nails, crossing them. The neck of the small bottle should rest against the neck of the large bottle. Fill the space between the bottles with cement. After drying, you will have a concrete lantern for the garden, insert the cord and light bulb and you're done!
metal. The most reliable and durable street lamp should be made of metal. To do this, you need steel bars, a corner, welding machine, handles and stripes. This option is more time consuming, but also the most reliable in terms of durability. And a well-made forged lantern will fit into any interior and decorate it. The lantern can be hung at the entrance of the gazebo or in the center of the gazebo.
Made of plastic. A commonly used version of a do-it-yourself bottle lamp made of plastic, but it is very unreliable and short-lived. It’s worth it once to approach work with patience and make a high-quality decor element than constantly replacing street lamps with crafts from plastic bottles or cans. But the choice is yours.
Power supplies for street lamps

How to properly connect the lamp to the mains
 For homemade lighting devices most often used cable with two cores, the thickness of which is one and a half millimeters. If there are plans to create several such lighting fixtures, then you should immediately purchase a coil of wire, the length of which will be one hundred meters. The diameter of the corrugated pipe should be 18-25 millimeters. Such a pipe will be needed to protect the wire from rodents or mechanical damage. Holes in tribal blocks should be selected with a diameter of 2.5-4 mm and they should consist of 1-2 strips, this directly depends on the number of shades and connections. The current strength in the pads should be from 5-10 amperes.
Lighting in the garden as an element of decor
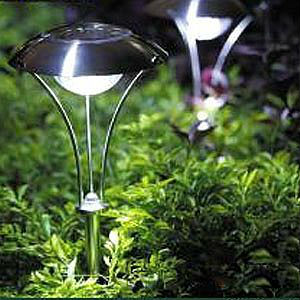
With garden lights you can make country cottage area more attractive and unusual. To do this, choose different forms of garden lights with your own hands. For example, along the paths you can install lamps in the form of mushrooms, with caps on top. In this embodiment, the light will be reflected down, creating an unusual effect. The lighting of the gazebo, for example, will become bright accent in the garden area. You can use the illumination of vases, benches, alpine slides. Use the latest in the lighting industry and your imagination and magical lighting at night in your garden will become a reality.
For garden decor the combination of plants is key, a lot of important role is also played by additional elements that contribute to the completion of the ideal image. But this condition is valid only for daytime, in the evening you will need additional lighting.
Having equipped your site with appliances, you will get the opportunity to enjoy a wonderful extravaganza that puts accents in the right places and turns the yard into a fairyland where you want to enjoy harmony and solitude to infinity. In this article, we have collected for you the most relevant ideas that will help you emphasize the delightfulness of the plant world.
The garden is like a jewel shimmering with bright lights
Even if you have low voltage lamps at your disposal, with them you can highlight flower beds and create a unique atmosphere. Notice how the spotlights are placed under the trees and bushes, making them visually more appealing. A backlit pool will create the effect of an exotic lagoon.

Garden and Yard Design by QAL Surroundings
There is a cozy seating area for you. In addition to the elegant and luxurious headset, attention is drawn to tall trees, which, with the help of lighting, turn into decorative wall providing a relaxing backdrop for a relaxed conversation.

Unique chic from Oak Leigh Manor
On a comfortable site you can place not only upholstered furniture but also a dining area. And believe me, dinner in such an enchanting environment will be unforgettable, especially if you have a romantic nature.

Multiple strategic flares for a lovely minimalist look
Wonderful expositions with a combination of light and plants can be found at exhibitions from eminent landscape designers. The combination of shades and textures largely depends not only on the intensity of lighting, but also on the angle from which these streams enter the riot of greenery.

Light Positive (formerly Nancy Goldstein Design): flower garden magic
Garden gazebo should be the star of the show. Outdoor lights will be a good opportunity to showcase a unique design under which you can place furniture. Also, do not ignore the selection of trees and other plants, so that the surroundings are no less spectacular.

A timeless classic wrapped in soft streams of light

Conciseness can become no less attractive,
if it is supplemented with climbing greenery and a lamp
The feeling of a holiday will be present in your yard every evening!

Solemn atmosphere, The Gardens at Great Oaks
A stunning option, designed in the best traditions of the official style.

Below is an option when the direction of lighting can dramatically distinguish palm trees that are identical at first glance.

You can also get some ideas from nature reserves that have lit their fires for visitors. Pay attention to the competent placement of accents, it is especially visible among the thickets of bamboo, where bright red flowers float among the stems. To your attention Clearwater Outdoor Lighting, which provide these nuances, emphasizing them in such a way that they are visible at a glance.

Exotic palm trees in the rays of monotonous lighting

decorative bamboo wall
VOLT makes architectural grade lighting to order and they have some fantastic ideas on how to transform garden landscape design into the fairy-tale world after dusk.

Impressive size Asian-style arch for a luxurious site

Highlighting a chic fountain and ornamental trees

Impeccable layout highlighted by intense lighting

Cozy place to relax
Just imagine a quiet and calm evening in the garden, sitting in a comfortable armchair... in front of the TV. Your Technology Advisor simply couldn't help but combine the harmony of nature and modern technology.

Amazing terrace with all amenities
The shining bright light falling on the trees gives them an original surreal look. S.A. Grows created a creative atmosphere in the garden not only with spotlights, but also with unusual additions, such as a restored wagon.


The light coming from behind flowered shrubs can produce amazing results. Outdoor Lighting Perspectives of Wilmington uses this technique to great effect, as well as other tricks.

Sometimes an open living room needs an accent with lighting. The peripheral area of light allows you to visually touch the garden.

Unique Gardens in the UK
Landscaping using colored lamps can provide additional drama. For outdoor lighting, using a blue tint, white and muted green will be a great idea to express individuality.


In New Zealand, a garden that surrounds a road has been filled with colorful lanterns that turn the street into a dreamlike action. Just a festive vision is complemented by multi-level spotlights that outline a stunning landscape. Just imagine with what benefit it will be possible to use this solution for your site.

Wellington Botanical Night Street Creative Decoration
But Piedmont Park in Atlanta is decorated with lanterns wrapped around the trees and shrubs themselves. Different colors form an interesting effect, illustrating the fairy tale itself, living in our imagination.

Additional colors like red and green can be effective way green dilution. Buffalo & Erie County Botanical Gardens turned exotic bushes into an unrivaled Garden Walk Garden Talk masterpiece in the evening.

White hues perfectly highlight the tall trees, and a gentle blue tone is used to initialize the pool. The perfect combination is the work of DIYFUSE presenting this enchanting garden.

Features of reservoirs
Probably, few people can not ignore the temptation to create a small reservoir. But we will talk not only about ponds, but also about artificial waterfalls. water bodies are a good solution for any garden. And you can radically transform decorative cascades into an enchanting show, which you will get to know later.
St. Louis Homes gives us a kind of lighting that colorfully highlights the trees, stone steps and water surface.

The next example is a really spectacular sight. A huge reservoir with installed lamps, well highlighting the borders and islands. It is especially breathtaking when fog hangs over the surface.

A fountain is a great addition to a well-lit garden. Shrubs and trees are almost literally shrouded in streams of light, and it is impossible not to notice how correctly and harmoniously the intensity of the backlight and the fair prioritization of their potential are chosen.

VOLT also has some bold ideas for ponds, the splendor and luxury of this garden is beyond description!


In addition to the front lights illuminating the edge of the infinity pool, we see three more levels of cascades. Two of them are backlit, which adds drama to the overall picture. Landscape Archives has gone to great lengths to transform this garden into a dreamlike oasis beyond imagination.

Dennis' 7 defies standard landscaping by allowing great lighting to have enough beautiful view. As you can see, in the light streams there is not only an artificial waterfall, but also large stones and grasses around them.


Expand your imagination and reveal all aspects of non-standard solutions in relation to design and garden lighting it is possible not only on a large plot, but also on a compact terrace.

how original way to express your individuality will be the option of creating a pond with carps. This pure pleasure will allow you in the evening, after a hard and eventful day, to plunge headlong into the endless world of tranquility and peace.

A fountain or waterfall in the yard will play a decorative role in decorating your personal space. They go great with the pool or dining area.


The Garden Environments example is a demo of an original show showing off the charms of monochromatic paintings with splashes of green.

Ashland Berry Farms has designed the ideal pond model with a beautiful shimmering effect on the surface provided by the backlight.

Our garden acts as a quiet and cozy haven where we prefer to spend time during the warm seasons. If you like to spend long evenings fresh air, then you just can not do without decorative garden lamps.
In this way, you will not only provide good lighting, but also add incredible beauty to luxurious landscaping. beautiful effect with properly installed spotlights and lanterns. creative possibilities are limitless for you, and you can draw inspiration directly from your garden.
Categories: