How to finish the walls with laminate? Non-standard use of known materials - we fix the laminate on the wall Attaching the flooring to the wall
Laminate performance and a wide choice color solutions, textures and patterns, the relative ease of installation make you think about its possible use for decorating walls. Of course, in the first place - this is a floor covering, popular and in demand, and as a wall is not used very often. However, the laminate can bring interesting and fresh "notes" to the design of the room precisely when it is not used for its intended purpose. Which laminate to choose for laying on the wall and what are the specifics of such installation?

Arguments for"
At first glance, the idea of decorating a wall or a niche with a laminate looks unexpected. However, if you look, there are weighty arguments in favor of such a decision:
- Beautiful appearance. Some models of this coating are difficult to distinguish from natural wood of valuable species.
- Wear resistance, strength and long service life. The top protective layer perfectly protects the laminate from external influences.
- Antistatic.
- Simple installation that literally anyone can do.
- Easy care of the laminate during operation.
- Affordable price for a material with such characteristics and appearance.
This coating has all the qualities to be part of the original and stylish design rooms, even if not in a very familiar "role". Laminate on the floor and on the wall, matched in one color scheme will help visually expand the room.

The choice of laminate for wall decoration
Important! For decorating walls, you should choose a low-class coating (21-23) - it will practically not experience loads. So you can save a decent amount. After all, it is important for you to choose a material that matches the color and pattern of your design ideas. However, it is quite difficult to buy a low-class laminate, stores try not to keep it in stock.
The choice of panel connection option (glue or lock) depends on the laminate class. The coating of 21-23 classes is not available with a Click-lock, the laminate of this class has only an adhesive connection. Adhesive-bonded laminate is mounted on a leveled surface, with the adhesive applied in a zigzag pattern to the back of the panel. Then glue is applied to the end of the panel and the next one is laid. Excess glue is immediately removed with a damp cloth, which is moistened in a weak solution of vinegar. A bar is placed under the bottom panel as a stop so that the structure does not start to slide down.
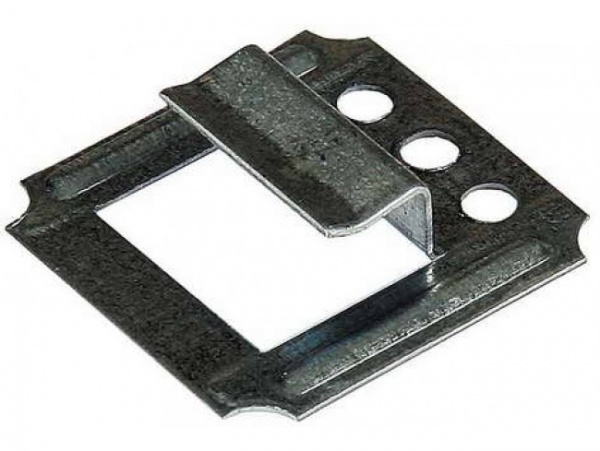
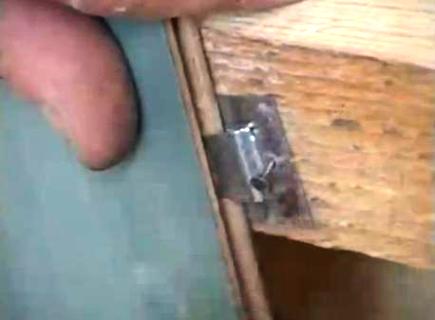
Laminate with Lock and Click locks is attached to the wall using liquid nails and clamps. Kleimers are galvanized brackets, they differ in size and shape. One type of kleimers has teeth that are driven into the end of the panel and fixed with screws or nails to the crate or wall, the other has a flat protrusion that enters the groove of the panel. Kleimers are specially designed for fastening lining, laminate and other similar coverings to walls, providing a very secure fastening.

Advice from experts. It is not necessary to glue the lock connection of panels with Lock and Click locks. But experts strongly advise to go through the gel for the laminate - the gel will allow you to maintain the elasticity of the connection.
Where and how will we use it?
Let's start with the rooms where you should not lay laminate on the walls. This is a kitchen, a bathroom, an uninsulated balcony, a basement in country house. Changes in humidity and temperature will adversely affect the material, and it will quickly lose its appearance.
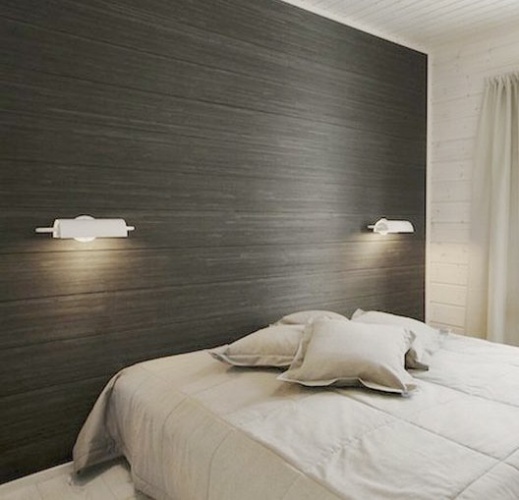
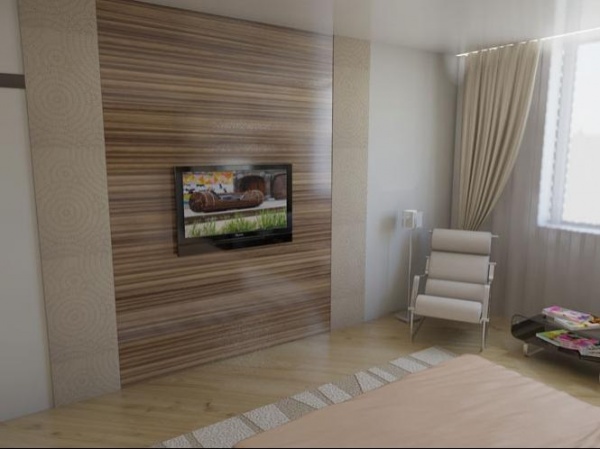
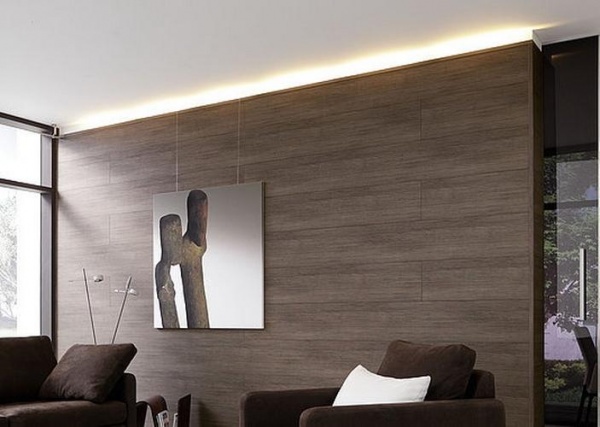
Traditionally, laminate is used to decorate the walls in the hallway to the height of the panel. They decorate with this coating part of the wall above the head of the bed in the bedroom, decorative panels are made of laminate behind the TV in the living room, and niches are trimmed. The difference in shades of the material in the same color scheme on the floor and on the wall creates an interesting effect.


Features of the installation process
The laminate is intended for laying on the floor, and the technology for mounting it on the walls, taking into account all the features of this material, has not yet been fully developed. Only recently, some manufacturers began to produce special frames for attaching this coating to the wall.
One group of experts cites a lot of practical experience and videos posted on the Internet demonstrate fastening with liquid nails, clamps and even self-tapping screws and nails. Some manufacturers (for example, Egger) show in video instructions that the first panel from the bottom is fastened with self-tapping screws at the bottom, and studs are hammered in the upper part (this is how the lining is attached).
Another group of specialists argues, and argues not unreasonably, that the coating cannot be fixed rigidly, which is why it is called a “floating floor”. And a twisted self-tapping screw or a hammered nail is not very compatible with the concept of a “floating floor”.
The truth, as usual, lies somewhere in the middle. It is not worth refusing to use laminate as a material for decorating walls on the basis of theoretically correct judgments of the second group of specialists. But these judgments cannot be completely ignored either.
Important! Try to avoid rigid fixation of the panels during installation. How to do it? For example, on a metal crate with the help of clamps, the upper panel is rigidly fixed in the structure. Further, the panels are fastened with clamps with a flat ledge, but the clamps themselves are not screwed to the vertical rail. Fixation is made only on panels of rows 6-7, which gives some mobility to this part of the structure.
With the adhesive method of fastening, the surface of the wall must be dry and very even. You can not attach the material to drywall, which is simply glued to the wall - under the weight of the entire structure will collapse. It should be remembered that the laminate is quite a heavy material.
For fastening to the crate, the step of the bars should not exceed 600 mm. For vertical mounting Laminate bars of the crate are arranged horizontally, and for horizontal - the bars are mounted vertically.

It is required to leave a distance of about 10 mm between the laminate structure on the wall and the walls in the room. The same distance should be between the structure and the floor. To maintain this distance, plastic wedges are used.
When laying a laminate on a wall horizontally, it is required to follow a checkerboard pattern or shift the next row by one third of the panel. Everything, as when laying on the floor. With one long vertical seam, the load on the fastener increases. Installation is more convenient to start from the left corner of the wall and move to the right. However, it is more convenient to work “right-handed” this way, it is more convenient for “left-handers” to start from the right corner.
Conclusion
Avoid using laminate for wall decoration in rooms with large changes in humidity and temperature.
Wall decoration with laminate can be done in several ways, both with a horizontal arrangement of panels and with a vertical one. Before proceeding to a description of the intricacies of technology, let's get acquainted with the varieties of laminate suitable for wall decoration.
Which laminate is suitable for walls: adhesive, tongue and groove or click?
- On adhesive laminate the edges are even, without a lock. The adhesive laminate is laid on a flat surface on liquid nails or building silicone: glue is applied to the inside of the panel in a zigzag pattern, the strip is laid, glue is applied to the end, the next one is laid, etc. The streaks of glue that have come out at the joints are immediately removed with a cloth slightly moistened with table vinegar. The adhesive laminate is not suitable for laying on the crate due to the small area of contact with the underlying surface. The floors are covered with adhesive laminate.
- sheet piling panels equipped with a tongue-and-groove lock. It can be laid with glue without gluing the tongue, so that the joints come out dry and always neat. When laying dry, the strips are fixed into the groove of the tongue like a lining: with small nails (only to a wooden crate) or staples-stamps (to a wooden and metal crate). Sheet piling is suitable for all surfaces of the room: floors, walls, ceilings.
- click laminate- Improvement of sheet piling. The comb in the section has a pear-shaped shape; the groove profile matches it. When laying it, the adjacent panel is tilted at about 20 degrees, the lock comb is inserted into the groove, and, turning to the base, they are pressed - the lock snaps into place. Cladding made of click laminate has increased strength and resistance to buckling. In addition to glue, click-laminate is fixed with nails into the grooves of the lock. Claymers cannot be used - the lock will not snap into place. Click laminate on the walls can be glued to a wooden crate.

Laminate is also called MDF panels of the same size as laminate panels. This is very good material, but expensive, so it is not considered in this article. But all the working techniques and subtleties for a laminate based on fiberboard and chipboard are also suitable for MDF. And more detailed description work with MDF can be found.
Work tool
For wall cladding with laminate, you will need some tools used when laying floors. It makes no sense to use them on the ceiling, because. everything is done by weight. Click-laminate strips can be precisely adjusted when laying with just a tool. It will not be possible to move them with your hands - the comb sits very tightly in the groove.
- Boss. With a hammer through the boss, the strips are knocked out as they are laid.
- Rule (emphasis on “and”), or hook. It is sometimes incorrectly called a clamp. As a rule, the last strips are pulled up, either by hand or by hammer blows on the “flag”.
- Spacer wedges maintain indentation around the perimeter. You need at least two sets of wedges to work. Wedges are mainly used in flooring.
Technological subtleties
Where Laminate Doesn't Work
The kitchen is not suitable for finishing with laminate. Fiberboard and chipboard - inexpensive materials; raw materials for them do not undergo complex processing. Therefore, the laminate from excessive moisture and temperature changes swells and warps. In the kitchen, fluctuations in temperature and humidity are not only great, but frequent and sharp.
For the same reason, basements, cellars, closets cannot be finished with laminate. But the hallway - you can. Here, the deviations of air parameters from sanitary norms do not last long and happen infrequently.
But for a balcony, even very carefully arranged, a laminate is even less suitable than for a kitchen. The balcony has large seasonal fluctuations in temperature and humidity. Therefore, the balcony needs to be sheathed plastic clapboard, eurolining or MDF.
gaps
Due to the tendency of the laminate to swell at high humidity, for any installation method, it must be laid with a gap (indent) from the corners of 15-20 mm around the entire perimeter. It is difficult to withstand it when mounting it on the wall with spacer wedges, especially from below, so it is better to do this: we lay a flat board or rail of the required thickness along the bottom. If the laying goes on glue, we wrap this board or rail with one layer of a thin plastic film. And from the sides it is already possible to use wedges - here they are not loaded with the weight of the skin and will not slip off. The gaps at the end of the sheathing are closed with a plinth on glue.
Glue or crate?
Most often it is recommended to lay the laminate on the crate. At the same time, the strength of the finish is guaranteed on any wall and additional sound and heat insulation can be made. But the artistic possibilities of finishing when laying on the crate are very limited. To get a cladding original design the laminate is laid on glue (liquid nails, silicone) on a flat, dry wall without plaster.
About the nuances of the formation of a wooden or metal crate.
Advice: Many flooring manufacturers, knowing about the desires of customers, are already producing special systems for attaching parquet and laminate to the wall. An example of such a solution in the video below:
How to check if the wall is even?
To do this, you need a flat rail the height of the wall without a plinth. Before checking, plaster, skirting boards, door and window trims are removed. The rail is led vertically along the wall; protrusions and depressions are marked with a pencil. The protrusions are scraped off or knocked down with a chisel to a shallow depression. Then all the cavities are filled with starting putty and overwritten.
And how to check the "evenness" of the rail itself? Right on the wall. Having attached the rail flat to the wall, we draw a line along it with a pencil. Then we turn the rail 180 degrees, and attach the ends to the ends of the line. If the line along the entire length already coincides with the edge of the rail, it is even. If a deflection / inflection is noticeable, another one is needed. This method of checking the ruler is described in the school geometry textbook.
Where to start?
Most often, it is recommended to start laying the laminate from the far left corner and work it clockwise. There is nothing to argue here, but you can add: if you are left-handed, then it will be more convenient to start from the far right corner, and go counterclockwise.
Horizontally or vertically?
Laying laminate on the wall is possible both in vertical stripes and horizontal. We will talk about the possibilities of vertical laying later, but for now we will describe the methods of laying horizontal.
Laying with solid strips at first glance is easier and cheaper, but it only seems so. The joints, which are thus obtained in one line, must be closed with skirting boards, and the skirting boards themselves must be attached to the wall with mounting nails (dowel-nails). Fixing holes for nails are drilled directly through the joints of the panels. Even if the cladding goes in solid strips along the length of the wall, all the same, skirting boards must be installed at least every 1.7 m.
Why such complexity and additional costs? The fact is that solid panels will only lock each other in one direction. Without additional reinforcement, such a lining will tend to fold like an accordion. Mechanical stresses on fasteners (glue, nails, adhesives) in some places will be concentrated, and in general the lining will turn out to be unreliable.
For good strength, the lining is laid with a “comb”: the number of strips equal to half the horizontal rows is cut exactly in half. If, for example, 10 rows are laid along the height of the wall, we cut 5 strips. We carry out laying, starting the rows alternately from a whole strip, then from a half. The joints spaced half the length of the strip will evenly distribute the load on the fasteners.

In some cases, it is interesting to lay the laminate diagonally. To do this, it is better to use a coating of two colors. Naturally, for such work you will need certain skills and experience.
Variations of vertical laying
Opportunities to show your creative abilities in wall cladding immeasurably increase if you put the laminate on the wall vertically, glued on a flat, dry surface. The dreary and dusty work of cleaning and leveling the walls is compensated by the cost of the crate.
For examples, we will use panels of only two types: long (or solid, if the height of the room exceeds 3 m) - the main ones, and pieces in the size of the rest of the wall height - complementary. Let's take the main and complementary panels of contrasting tones, say, dark and light. Let's see what can happen:
- We will lay out a strip along the bottom from complementary panels 60-80 cm long; to the ceiling we sew the main ones. Place a plinth on the horizontal joint. Vertical joints at certain intervals (for example, after 3-4 joints) can be additionally fixed with pieces of the same plinth, and it can also be put on the ceiling, also sheathed with laminate. What happened? Romantic, medieval (medieval) room with imitation of ribs and ceiling beams. Instead of torches, linear fluorescent or freon lamps can be installed on the ribs.
- We sew only the bottom with the main panels, and leave a clean bleached strip along the top. What for? And at least as a screen for LED strips. Who said that lighting design is possible only on the ceiling? There is no such law, and that's it.
- Let's put a strip of dark complementary panels in the middle of a light wall and decorate it with skirting boards. We will place paintings, photographs, decorative plates, souvenirs, straw appliqués, macrame, a collection of decorative weapons, etc., on it. Aesthetic and original.

As an option, sheathe the wall at the head of the bed with a laminate that matches the tone of the floor.
- We will cut the complementary strips along the length in a ratio of 1: 3 (cut off in thirds). On the top and bottom we lay them out with a comb, and between them there will be the main ones. It will turn out a light (or dark) surface between two combs - minimal in terms of labor intensity and economical in material, but quite a decent design solution.
- We will buy the main and complementary strips equally and cut them into squares. The idea is clear: walls in the form of a chessboard. It is not so trivial if flat symbols of chess pieces made of dense sheet plastic are pasted onto some squares. You can depict a collection of chess studies.
- We will cut both the main and complementary stripes in a ratio of 1: 2, and lay out a pattern from them, or simply scatter them in an artistic mess. It turned out - complete freedom of expression.
In the latter version, there is a stumbling block: if you lay it down as your soul wanders, then there will not be enough space for some fragment at the top, or a failure will remain. Therefore, the pattern (or artistic mess) must be laid out in advance on the floor just like that, without fixing, and transferred to the wall in pieces.
What if the room is narrow? In this case, you need to simulate the pattern on a computer in any computer design program, at least in the well-known CorelDraw, number the real fragments accordingly and stack them in horizontal order of numbers.
If you have only basic computer skills, then it may be easier to cut pieces of thick multi-colored paper on a scale, lay out an application from them on the table, and transfer the numbering from it to “live” pieces. Of course, you need to apply numbers on their back side.
Conclusion
As you can see, laminate wall cladding is not only possible for almost anyone. Laminate also provides ample opportunities for the manifestation of creative abilities to people who do not have artistic education and skills. Even the cheapest laminate of only two tones allows you to express the individuality of its owner in the design of the apartment.
Video: an example of a complex sheathing of a loggia with a laminate
Despite the fact that in the video the balcony is completely sheathed with laminate, we remind you once again that such a solution should be resorted to only with deep confidence in the good microclimate of the room, or use more serious MDF-based laminated panels.
As you know, laminate is a floor covering. But what kind of ideas do not come to the mind of designers to create unique interior premises. One of these original solutions was the use of laminate for wall decoration.
This innovation is gaining more and more popularity, which is why many home craftsmen began to think about how to fix the laminate on the wall.
This article will tell you how to install laminate flooring on the walls.
Why laminate walls
It's no secret that PVC and MDF panels are most often used for simple and quick wall decoration.
If we consider the laminate from this point of view, then it has some advantages over them:
- Its strength is much higher. PVC panels can break through on impact, and laminate flooring can withstand high forces and loads.
- Its hygroscopicity is much less than that of MDF panels and it is not difficult to wash the laminate.
- Ease of care.
Against the background of these advantages, there is only one drawback - the cost, which is almost 2 times higher than that of the panels.
Problems when laying laminate on the walls

Before you begin to mount the laminate on the wall, you should familiarize yourself with some of the nuances of this process.
In order to avoid problems that sometimes arise during installation, you need to know what they can be:
- Laminate is quite heavy. That is why the surface on which it will be attached, and the fasteners must be durable.
- Despite the fact that the hygroscopicity of the laminate is much lower compared to the panels, it has the ability to swell with changes in humidity in the premises.
- The lower part of the protruding groove is used to fasten the panels to each other, which ensures quick and easy connection. With laminate, the situation is somewhat more complicated. As a rule, laminated boards are equipped with click locks.
On the one hand, such fastening provides good rigidity of the connection, but on the other? the head of a nail or self-tapping screw that falls on such a lock will prevent tight closing, which will lead to gaps.
Based on the above, we draw the following conclusions:
- Laminate should only be installed on a flat and solid surface. Sheets of drywall, planted on plaster, can fall off along with the laminate boards attached to them, under their weight.
- Do not allow rigid fixation of laminate panels. In the case of adhesive seams, they must be elastic.
- When fastening the boards, you should pay attention to the fact that the fasteners do not fall on their locks.
Helpful advice! In rooms with high humidity, such as bathrooms and kitchens, it is not recommended to use laminate as a wall finish.
This finish is only suitable for rooms with a constant and moderate level of humidity (bedrooms, living rooms, hallways).
Laminate installation
You can fix laminate boards on the walls with your own hands different ways. The technology of this process depends on the characteristics of the surface on which they are installed.
Mounting on a flat, solid surface
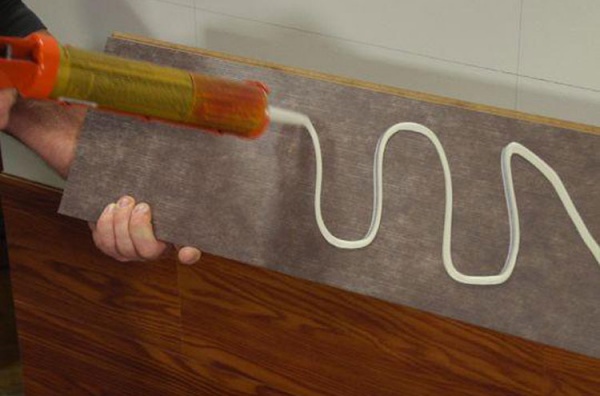
The easiest way- fixing the laminate on a plastered surface or sheathed with sheets of drywall. Such a surface is quite even, so the laminate is attached to it with liquid nails. This adhesive bond, even after hardening, has good elasticity and is also quite strong.
The following instructions will help you in your work:
- At the bottom, we set an emphasis for the first row of laminated boards to avoid them slipping under the weight of their own weight.
- We apply glue in a zigzag pattern on the first board, press it tightly against the wall surface and immediately check the horizontal level with a level.

- Apply glue to the next board. With this fastening, you should not knock the boards through the boss. It is recommended to insert them into the lock with a slight kink, then snap and press. At the same time, the bottom board should be held.
- We lay the boards so that in adjacent rows the transverse joints do not coincide.
Helpful advice! If you need to cover a small area with a laminate, then you can assemble a shield from it on the floor and stick it on the wall in this form.
Mounting on an uneven wall
To attach the laminate to the wall, which has irregularities, a crate is used.

- You can mount the frame of the crate from wooden slats section 40x40 mm or from metal profiles. The step of the guides should be no more than 60 mm.
- We lay the first board so that it rests on the rail (profile). This will ensure the stability of the entire structure, and during installation it will not move down.
- Subsequent installation is carried out in the same way as in the case of a flat surface. Do not forget to ligate the transverse joints. In work, a plinth for a laminate can also come in handy.
Mounting on clamps
Laminate can be mounted on walls not only with adhesives. There is a very simple and proven way - fastening with clamps.
These are galvanized brackets, specially designed for fastening lining and laminate to walls or ceilings.
For such fastening, two types of clamps are used:
- Serrated staples. They are driven into the board and fixed with screws on the crate or wall;
- Flat lug staples. They are used to press the protruding part of the click-lock.
Self-tapping screws are used to fasten the kleimers to the wall or board.
Conclusion
Laminate is a reliable and durable finishing material that gives any interior a beautiful and modern look. No wonder it began to be used for finishing many surfaces.
We have considered all the subtleties of laying laminate on walls, fully covering the specifics of such work. These recommendations will help you avoid the main problems encountered during installation and carry it out with your own hands without much difficulty.
Additional information and step by step process installation of laminate you can find in this video.
It has long ceased to be a purely floor covering, since its very presentable appearance and low weight make it possible to ennoble any surface: sheathe a ceiling, decorate a niche or revet the entire room. In particular, we will consider how the laminate is mounted on the wall: methods of fastening and laying out the board, consumables and other nuances.
To create a decorative wall covering, a laminate with the lowest physical and mechanical characteristics (class 21-22) is usually used, because it will not have to experience any loads on the wall.

Note! This does not mean that, for example, a class 32 board cannot be used for wall cladding. You can, it's just more expensive, and it's impractical. However, you will even be forced to use such a laminate if the finishing is done on the floor too.

Board sizes may vary. In the standard version, this is a bar 1288 mm long, 186 mm wide. But depending on the desired design you can also use narrow short boards that look like parquet. They look very interesting when laying herringbone or diagonally.

Before proceeding with the transformation of the interior, you must first solve the issue of acquiring the main and Supplies. And for this you need to accurately determine the technology, since you can mount the board on the wall both with glue and with a crate. Let's consider both methods.

Glue mounting
Adhesive finish always implies the presence of a perfect level ground. Therefore, in preparation for installation:
- a brick or block wall will have to be plastered along the lighthouses;
- concrete panel walls usually quite even, they only need to be puttied;
- in (and in any other) surface can be leveled with plywood, grooved chipboard or drywall.

After the primer has dried, applied to last step preparatory work, you can proceed with the installation of the cladding.
Important! A newly purchased laminate should acclimatize - that is, lie down in the room where it will be installed for at least 48 hours.

Facing in stages
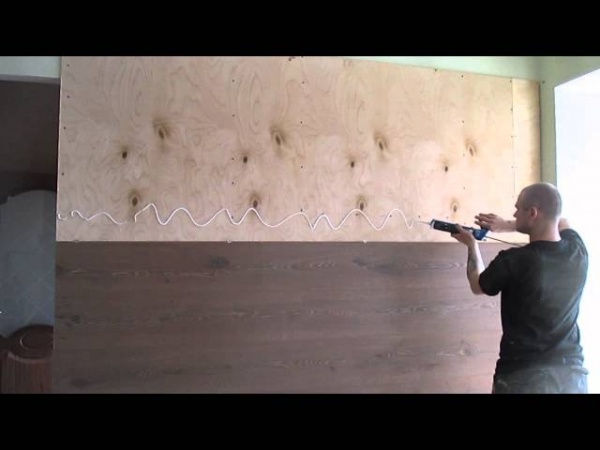
To work, you will need two tools: an electric jigsaw and a drill with a “crown” nozzle, through which holes are made for socket boxes and switches, as well as a metal square with a pencil and a clerical knife. Glue must be purchased polyurethane (it does not shrink), in a tube for a mounting gun.


Table. The main stages of cladding.
| Steps, photo | Description of actions |
|---|---|
| The first thing to do after printing laminate packages is to sort the boards according to the intensity of the shade or the severity of the pattern. Most likely, it will turn out that certain variants will prevail in number. Your task is to make sure that when laying in the coating, the boards alternate, and the unevenness of the pattern is not striking. |
| The laminate board has lock joints around the entire perimeter that protrude beyond the painted chamfer. From the first board, from the side where it joins the perpendicular wall, the lock is cut off with a jigsaw. This can also be done with a knife, but it is more likely to damage the bevel. |
| Glue is applied to the back of the board with a snake. |
| Glue the first cladding element in the upper right corner, after which you measure the remaining distance to the floor with a tape measure. Accuracy to the millimeter is not required here, since the gap will then be closed with a plinth anyway. |
| One board does not overlap the height of the wall, so it has to be increased in length, cutting off pieces of a certain length. Usually, in order to save material, a “floating” layout is made, when the rest of the board, the first part of which was laid at the end of the previous row, is set at the beginning of the next. On a note! The end cut can be performed in two ways: with an electric jigsaw equipped with a saw with a tooth in the opposite direction; grinder with a disc for ceramics. To avoid chipping the decorative coating, the laminate is cut along front side, having previously cut through the top layer with a knife along the square. |
| Cut not along the line itself, but next to it. In this case, the cut line is perfectly flat and without jagged edges. For a better effect, the edge can be slightly rounded with fine emery. |
| The second row must be glued with a single strip, for which all the parts are folded on the floor and fixed together with adhesive tape. |
| It turns out a long composite board: it is turned over, glue is applied and inserted into the lock of the first strip at once. If you lay each element of the strip one by one, then on each of them you will have to cut the end locks. |
| If necessary, make a hole for the socket, mark the board and drill it with a crown on the tree. |


AT last row boards usually have to be cut lengthwise if they do not fit in width. But even if they do, you just need to cut off the side lock, as they did at the very beginning.

Lathing installation
The option with a crate is good when the wall needs to be insulated or soundproofed, or there is simply no desire to level the base in a wet way. Under the bars, which in this case are used for battens, irregularities can be compensated for with linings or direct hangers.

Advice! The tree is highly susceptible to linear expansion from temperature and humidity changes, which can affect the quality of the coating (). Therefore, it is very important that the bars used for the frame are well dried. And even better if they are heat-treated. Such wood is easily recognizable by its specific “tan”, as in the photo.

- The size of the bars is selected depending on the presence or absence of internal filling.. In addition to insulation, after all, it is possible to provide for the installation of built-in lamps, the height of which will determine the amount of indentation of the decorative surface from the wall. But if you are not going to do any of this, the size of a bar in a section of 45x70 mm will be quite enough. In this case, the indentation of the cladding from the base base will be 45 mm.

- If the laminate board will be mounted horizontally, the frame elements are placed vertically on the wall. At the same time, all because of the same linear expansion, there must be a gap of at least 10 mm between their lower ends and the floor. The step between the frame belts is 600-650 mm.
- Before installation in each element of the frame, every 50 cm, it is necessary to pre-drill holes for fasteners. According to the preliminary marking, apply a beam to the wall, stick a pencil through these holes and put marks on which you will drill.

- Dowels are selected depending on the type of base. If it is, for example, cellular concrete or ceramic block, you need a special spacer fasteners. The fixing bar of the self-tapping screw should have a flat head that is recessed flush with the surface of the wood. If it sticks out, the laminate will not lie flat on the crate.

- Horizontal cladding is carried out from the bottom up. The first row of boards is laid so that the ridges "look" at the floor and wall, and the grooves - in the direction of laying the next elements. After the level shows the perfect line, the laminate can be fixed to the frame. To do this, use wood screws with a flat cone head, and they are screwed along the bottom line - right through the laminate. In the picture below, these fasteners are circled in red.

- Along the upper edge, the board is no longer fixed through the front cover, but through the edge of the tongue, carnations measuring 1.7x2.5 mm, hammered at an angle of 45 degrees. The end of the next board of the first row snaps into the lock of the previous one.


- To seal the connection, attach a plank to it and lightly tap it with a hammer. Then, again, fastening is made with self-tapping screws from the bottom through the front layer, and on top with nails through the lock.
- Let's move on to the second row.. You cut its first board in half - this is necessary in order to ensure that the lining of the seams is offset. Now the boards from below are fixed only with a comb into the groove, and from above - all the same with nails. Everything else is done in the same way until the wall is completely transformed.

To hide the ends of the laminate and give the cladding a finished look, you can use wooden or polyurethane moldings, aluminum corner profiles. The principle of using corners is shown above.
If there is on the wall outer corner, which also needs to be lined, then the boards forming a right angle must be cut at 45 degrees. The joint can also be closed with a special profile. Alternatively, it can be sanded and covered with a pencil or other compound intended for repairing wooden surfaces.

Conclusion
Sometimes you need to hang something on the laminate flooring. A light object - for example, a poster in a frame - can only be attached at the junction of the laminate to the crate, directly to the bar. If, for example, you need to hang a TV on the wall, then you need to make a window in the cladding and mount it to the base base as shown in the picture.

Prices for laminate "Tarkett"
tarkett laminate
Video - How to fix the laminate on the wall
On the wall, at first glance it will seem unusual to a person uninitiated in the trend modern renovation. However, there is nothing exotic here. In fact, this type of finish is not only unusual, interesting view but also very practical and durable. Laminate already enough long time used for laying on the floor in various rooms - everyone is used to this. But wall cladding with this material is, perhaps, extremely rare. There are a lot of photos by which you can judge the interesting nature of this method of finishing the room.
In this article, we will consider how to do-it-yourself laminate wall cladding, the technical and aesthetic components of this method. The use of laminate for laying on the wall is increasingly used in the interior of residential and office premises. The use of MDF panels and different kind siding is a thing of the past. In the article we will tell you how to fix the laminate on the wall with your own hands, we will demonstrate photo and video instructions.
Benefits of laminate wall cladding
- The main advantage of laminate flooring is its environmental friendliness. It does not contain toxic fumes, so it is great for wide application inside residential areas.
- Laminate was originally designed as a floor covering, therefore it has excellent strength characteristics, which means it will last a very long time on the wall.
- Since the cost of a laminate directly depends on the strength class, a low-class laminate is perfect for wall cladding, without sacrificing quality at all.
- Lots of different textures and colors. This opens up great horizons for imagination when decorating walls.
- Ease of installation of laminated panels. This means that even an inexperienced person in this matter can lay a laminate.
disadvantages

Unfortunately, this method also has disadvantages. Fortunately, there are few of them:
- The susceptibility of this finishing material to moisture. Therefore, with prolonged contact of the laminate with water, deformation or swelling of the panels may occur.
- A certain sensitivity to sudden changes in temperature. This disadvantage must be taken into account, for example, when facing the walls of the kitchen. With particularly unfavorable temperature regime, the quality of the appearance may be slightly reduced.
That's actually all. It is enough to observe some precautions, for example, it is not recommended to lay the laminate on the walls of the bathroom, balcony, or kitchen. As a finishing coating for the walls of these rooms, it is best to use traditional, proven methods.
How to choose a laminate for wall cladding

- Conventional shunt laminate. This type is familiar to everyone. It is he who is most often laid on the floor. The convenience of its use lies in the fact that the laminated panels themselves are connected by a special shunt lock;
- Adhesive laminate. This type of panels is connected to the surface and to each other using building glue, or ordinary liquid nails.
- Laminate with click lock. This type has a more perfect lock, which snaps into place, preventing the panels from separating. Such a laminate has a higher strength.
Laminate is divided not only by color and texture, but the main indicator is the strength class. It is this parameter that determines the price of the material. It must be remembered - the higher the class, the higher the quality of the laminate. The advantage of using a laminate board for wall decoration is also the possibility of using low-grade panels 21-31. After all, there will be no mechanical load on the laminate.
How to fix on the walls

So, to get beautiful finishes on the walls, you will need to carefully level the surface. The beauty and accuracy of the lining depends on this. Treat this preparatory action as the most important. Of considerable importance is how to fix the laminate. Laying laminate on the walls is done in two ways:
- Fastening to the crate. It is used in case of large curvature of the walls. The advantage of this method is that there is no need to level the walls. In addition, an additional layer of heat and sound insulation can be laid under the crate. In modern budget apartments with "cardboard" walls, this method may be preferable.
- First of all, you need to calculate the required amount of laminate. To this amount, you need to add another 10 percent for trimming and fitting.
- Prepare the wall for laying. The wall must be smooth and dry. If you decide to make a crate, then this will require a little more effort from you. The crate is made either from wooden bars, or from metal or aluminum profiles that are attached to the wall with self-tapping screws. The distance between the screws should be no more than 40 cm.
- Sticking directly to the wall. Here, the preparation of the surface for gluing is of particular importance. Various glue can be used: construction, liquid nails, titanium, etc. Glue is applied with a "snake".
Work procedure

- First of all, you need to calculate the required amount of laminate. To this amount, you need to add another 10% for trimming and fitting.
- Prepare the wall for laying. The wall must be smooth and dry. If you decide to make a crate, then this will require a little more effort from you. The crate is made either from wooden bars, or from metal or aluminum profiles, which are attached to the wall with self-tapping screws. The distance between the screws should be no more than 40 cm
- The panels can be fixed to the wall both vertically and horizontally. If you plan to clad the entire wall from ceiling to floor, it's best to start at the top.
- In the case of gluing the laminate, it is treated with an adhesive composition, pressed against the wall and fixed for a while until the glue sets. The panels are attached to the crate with brackets, which are used for mounting plastic panels.
- After finishing the walls, it is necessary to give them a finished look by installing ceiling and floor skirting boards.
A photo


Video
This video shows the process of fixing the laminate to the wall, with explanations of the master doing the work:
This video will help you understand how to close niches in the wall with laminate: