Balcony glazing scheme with aluminum profile. Aluminum windows to the balcony. How to make a cold balcony glazing with your own hands - a step by step diagram
Specialization: master of interior and exterior decoration (plaster, putty, tile, drywall, wall paneling, laminate, and so on). In addition, plumbing, heating, electrical, conventional cladding and balcony extensions. That is, repairs in an apartment or house were done on a turnkey basis with all necessary types works.
For some reason, many are afraid to make balcony glazing with an aluminum profile - here, most likely, the effect of pressure from the opinion of the majority and / or fear of a new one is triggered. But conservatism is inherent in the vast majority of people, although, having understood the situation, they will be happy to use new technologies.
I want to introduce you to an aluminum profile and methods for installing a remote window from such a material. I am sure that many will easily change their position to use PVC.
Aluminum profile for balcony glazing
All window and door structures made of aluminum profiles are regulated by the state, this is an instruction from GOST 21519-84, GOST 23747-88, GOST 215-19-83 and TU-5270-001-44991977-97.
Types of aluminum profile

Cold Profile
Frame or frame made of glazing profile can be cold or warm. If you do not plan forced heating of the balcony (removal of the radiator or installation of the system), then the first option is more suitable for you:

- on the installation of windows (I mean the technical process itself) this will not affect in any way;
- in cases where cold glazing is made, double-glazed windows are usually not used, since this makes no sense, and they get by with single glass, the thickness of which can be 4-12 mm. For a balcony, 4-6 mm is enough;
- The main purpose of cold glazing is to protect the internal space of the balcony from precipitation, dust and wind, and the price of such a profile is lower than that of a warm one.
Warm profile
If the profile for the window is insulated, it means that it consists of two chambers closed to each other, between which a thick polyamide gasket is inserted - this is the insulation:

- the metal part of the window takes up little space - most of it is glazing, so single, double and triple glazing are used here, where the maximum thickness can reach 46 mm:
- it can be noted that the installation of warm windows is not dependent on natural temperature changes - polyamide has the same expansion coefficient with aluminum;
- for sealing double-glazed windows and deaf inserts, EPDM rubber is usually used, which has a long service life.
Mounting
Stage 1 - base and window sill
I do not advise you to use online calculator. It is best to do this with a pen, paper and tape measure in hand. So the measurements will be accurate.

Now we will figure out how to glaze a balcony with a window removal with our own hands. We will not consider the technique or technology of the removal itself - these are welding works and they have little to do with our topic.
So, we will start from the fact that the metal frame is already ready and we will only have to cover this area with boards or thick (16-20 mm) OSB. Moreover, it can even be old boards, the main thing is that they are “live”.«.
Before glazing, you need to install the outer cladding, since after glazing, mounting any panels from the outside is extremely difficult, and sometimes even impossible.

Most likely, the platform for the window sill will be flat, but, nevertheless, this is not a reason to abandon the building level during installation. Moreover, you need to measure it only on a flat area - this will allow you to make even joints without gaps.
Window sills are usually made of PVC and are very easy to cut. To do this, it is best to use not a grinder, but an electric jigsaw - the cut will be much more accurate and even.

When you expose the window sill, consider the thickness of the frame, or rather the front protruding part of the profile, which will block the window sill from the outside - leave a strip of the platform for this. Fix the PVC with self-tapping screws so that they subsequently overlap with the frame, that is, so that the hats are not visible.

To protect the lumber with which the removal platform is covered from atmospheric precipitation, we blow out the gap under the windowsill mounting foam. There will be a gap there, as you will have to use different linings when leveling.
Stage 2 - assembly and installation of the frame


After leveling and installing the window sill, you can start assembling the frame: for this, there are special holes for screws on the edges and ends, and you just have to twist the folded structure with them. All profiles are usually numbered, so you won't confuse them - just be careful.

On the side profiles and below you need to drill holes for self-tapping screws with which the frame will be fixed to wooden base through the window sill and among themselves. Moreover, in the sidewalls of adjacent sections, the holes should be at different heights so that you can pull them together from two sides.
If such a window is mounted on an extended balcony, then it is usually inserted into a pre-welded subframe made of a metal profile, and then fastening with self-tapping screws occurs around the entire perimeter.

When you have made all the holes at a distance of 50-60 cm from each other and in the corners, you can screw in the screws in advance - it will be easier to fix the sections at the installation site. I recommend using stainless steel for this, or at least self-tapping screws, where there are anti-corrosion additives.

We are not installing a window on the top floor, there is a balcony slab above us, which we will use as part of the roof and the basis for fastening. Therefore, we need to screw pieces of a perforated metal strip onto the upper crossbar of the frame - with the other end they will cling to the top plate.


Now we need to expose all the frame sections, fastening them together, as shown in the top two photos, and screwing them to a wooden outrigger. We do not touch the top yet.
If you are afraid that the frame may fall under its own weight from a roll, then in vain - aluminum is a fairly light metal, so, I assure you, nothing will happen in a short period of time.

Now you need an assistant: one person with building level in the hands should set the frame strictly vertically, and the other should drill holes for the dowels in the top plate and fix the perforated tape. Level measurements should be done on each rack - this way you will achieve the most accurate position of the structure.

Next, you need to attach the visor to the top plate (this ebb is made of painted or galvanized sheet, less often PVC). If the visor is made of several parts, then they are fastened together aluminum rivets and seal the seam with silicone sealant.
On the frame, you can screw the visor on top, but for this you need to be tall and physically fit, so you can attach it with rivets to a metal tape. The front mount will not allow the wind to fray the tin and create a rumble.
When installing the visor between it and the top plate, blow out the mounting foam and immediately press it down and screw it on. So you will have a 100% guarantee of leakage protection.

The final touch in the installation of the frame will be the installation of the ebb on its lower part (it is made of tin, painted by spraying). If the front line is with turns, then the tide will be from several parts. Therefore, you first need to cut all the sections, and then screw them to the profile with self-tapping screws with a press washer.
Stage 3 - glazing and mosquito net

On the this stage to glaze the balcony with an aluminum profile, you need to insert the movable transoms into the frame, and this is quite simple to do. These sashes are already with glass - insert into the groove first upper part transoms, pressing it up, and then the bottom.

Glass and double-glazed windows, as well as capercaillie, which are installed after mounting the frame, are inserted into the grooves of the fixed sections and sealed with EPDM rubber and glazing beads. The result is a rigid and airtight window with a convenient sliding opening.

To protect against insects you will need mosquito net on a balcony with an aluminum profile, but it can be installed in different ways. I offer the simplest and most convenient option - the mosquito is made according to the size of the movable transom and inserted between the two wings, and then pressed against them. You can put this design on and take it off at any time.
Conclusion
I want to note that aluminum profile loggias are made almost identically, and I have already given instructions about this on our portal. If you want to share your ideas or ask questions, join the discussion in the comments! And watch the video in this article with visual information on the material discussed.
If the balcony is properly insulated and properly glazed, the open area will turn into an additional living area. Armed with the necessary knowledge, you can do it yourself, following the instructions for completing the main stages of the installation of the selected balcony design.

A glazed balcony will not only expand the space of the room, but also protect the additional area from the effects of bad weather from the outside, and reduce heat loss in the room. To determine the direction of work, you need to know what types of glazing of an additional room exist, what type your balcony belongs to.
Choice of glazing method
For cold type glazing, single glass is used, framed by lightweight window frames. Inexpensive option do-it-yourself glazing, suitable only for summer time, is made with an aluminum profile that does not load the support.
When choosing a warm glazing option, you will have to install double frames with special plastic inside the profile. This design reliably protects from the cold from the street, but has a high cost and more weight.

The French type of glazing is carried out by windows with transparent mirror glass. High-strength glass frames are installed along the perimeter of the balcony space along the entire height. A solid glass sheet creates a stunning viewing effect.

Important. For comfortable use of the balcony at any time of the year, the space should be protected from condensation. They realize the task by using high-quality insulation with a double seal, as well as the presence of an adjustable ventilation system.
Which double-glazed windows to choose
- The most convenient for installation on a balcony is considered to be plastic structures with single glass for low-budget reconstruction. The option of massive windows with the installation of double-glazed windows is more expensive.
- Lovers of antiquity prefer double-glazed windows framed with wooden frames. Massive structures made of natural wood look solid, but have a significant drawback - the need for careful maintenance.
- An aluminum profile can be considered an actual option for glazing a loggia in old houses. Installing a light frame on the balcony base plate and the parapet will not heavily load the weakened ceiling.

How to glaze a balcony with your own hands
Before the beginning installation work you need to decide on the option of installing balcony frames. Among the methods of independent glazing of an internal or hinged balcony, the following methods are most popular.

It is important to take care of the outer skin of the balcony in advance. From an already glazed room it will be difficult to deal with exterior finish, but for external work it is better to contact the masters who have special equipment for working at heights.
Construction Guide
Getting to the glazing of your own balcony with your own hands, you need to decide on the front preparatory work. Step-by-step instruction:
- having cleared the room of things and debris, assess the condition of the external and internal structures;
- if defects (irregularities, cracks, bevels) are found, they must be leveled so that there are no problems during operation;
- when installing frames on a metal parapet, insulate it before starting work on glazing;
- leaving the old fence, take care of the strict horizontalness of its surface and strength;
- if old frames are installed, dismantle them; in case of a balcony on the top floor, install a canopy.
Having finished the preparation, they begin to measure each surface, not forgetting about the space from the processed parapet to the installed visor. The dimensions of the side windows and the front section must be carried out with particular care. The control is performed by the difference of the diagonals - no more than 2.0-2.5 cm.
Measurements and design order
The inaccuracy of measurements threatens with problems after the installation of frames, measuring work it is better to trust a professional measurer. If you are not a professional, performing an independent measurement will help you estimate the size of the estimated cost of glazing a balcony space.

Measurement plan:
- the height of the balcony is measured as the distance from the plane of the parapet up to the bottom of the balcony slab located on top;
- for plastic construction 8-10 cm are subtracted from the resulting height, in the case of an aluminum frame - 3-4 cm;
- the width of the loggia is determined by taking measurements in a horizontal plane along the parapet between its edges;
- with a plastic version of glazing, 5-6 cm are subtracted from the resulting length, for an aluminum type - 2-3 cm.
Advice. Measurements are carried out with a construction tape, it is important to monitor the tightness of its web. If the balcony room is wide, height measurements are taken at a distance of a meter from each other. By choosing smallest value among the obtained values, you will determine the height of the balcony.
Before placing an order for production balcony windows and supporting structures of the frames, it is necessary to decide which of them will remain fixed and which will need to be provided with sashes. If deviations are found, they must be taken into account when ordering the manufacture of frames with double-glazed windows.
The accuracy of measurements can only be guaranteed by a professional who will take into account the features of the structure, tell you the volume of necessary components, and give advice on finishing and insulating the interior.
Additional preparation for glazing installation
When taking measurements of a hinged balcony, before measuring the front and side balcony handrails, you should make sure that the roof of the balcony overhangs its vertical railing with railings. This is checked with a plumb line. Also check the calculated value of the upper perimeter with the lower one, they must match.
In order to install windows on an open balcony or loggia with your own hands, you must prepare a set of tools in advance:
- reliable hammer with a hacksaw, nails, screwdrivers;
- puncher with a powerful drill (8 mm), dowels, a set of self-tapping screws;
- gun for construction works, putty knife;
- varnish and brushes, high-quality sealant, polyurethane foam.
Important nuances. Balcony glazing works, from a legal point of view, are classified as redevelopment of an apartment, you need to get permission for this. To ensure safety, you will have to stock up on a safety belt, find a partner to install heavy frames with glasses.
How to glaze a balcony with your own hands
If the parapet is not supposed to be dismantled, it will have to be additionally insulated to preserve heat in the built room. Cracks in the vertical fence of the loggia are sealed, surface irregularities are leveled, insulated and insulated.
Frame installation rules
The installation of the balcony is started after the installation of the visor. We take out double-glazed windows with non-opening sashes, hinged ones are removed from the hinges. Such actions will protect the glass from damage, lighten the weight of the window product. What to do next:
At the end of the above operations, a window sill (inside) and a drainage system (outside) are mounted. After that, the installation of a balcony with glazing is considered complete.
After sealing all the cracks with mounting foam, you can return the double-glazed windows to the frame, not forgetting the flaps. They need to be hung back, making sure that the opening mechanism works.
Installation of ebbs
For reliable protection of frames from moisture penetration, ebbs from a material with a long service life are chosen. What protective elements provide:
- upper - drainage protects the window structure from the weather outside;
- lower - to protect the junction of the window frame with the railing of the balcony box.

The canvas of the upper ebb along the balcony perimeter is fixed with galvanized screws to the surface of the upper floor slab. The lower tide is fixed under the lower part of the window frame with self-tapping screws designed specifically for the type of material from which the casting products are made. Do-it-yourself drainage is sealed.
Advice. For reliable protection against displacement of the "dew point" and the formation of condensate, balcony walls must be insulated not only from the inside, but also from the outside. If the old parapet is being disposed of, the weight of the material of the new design should be taken into account so that it does not load the base of the balcony.
Installation of wooden window structures

First you need to install a box made of wood. After fixing the lower beam (railing) and the upper part of the structure (ceiling), the side elements are fastened with brackets to the walls.
Step-by-step instructions for glazing a balcony with your own hands:
- installation and fastening of support posts made of wooden beam– angular, final, intermediate;
- insert the frames after preliminary removal of the glass, first install the front glazing, then the side glazing;
- if distortions or other defects are found, they are eliminated by leveling with wedges;
- after fixing the frames with self-tapping screws and anchors, seal the seams with mounting foam;
- return the double-glazed windows and the removed sashes to their place, making sure that the glazing beads fit tightly to the frames.
Advice. Before installing the wooden frame, treat the mounting surface of the main beams with sealant and antiseptic. This will help protect the structure, which can be pre-painted, from the accumulation of moisture penetrating from the outside, making the balcony room much warmer.
Glazing of a loggia using an aluminum profile

Lightweight aluminum construction is the most popular today due to the low cost of a fairly durable product. The high-strength design chosen for the cold method of glazing the balcony space will last at least 80 years if it is correctly installed:
- install prepared wooden frame, we perform sealing of all cracks;
- we dismantle all sliding elements, remove glazing that is not tightly fixed;
- on the top plate we fix the visor with special fastening fittings, and also install ebbs on the parapet;
- along the perimeter wall panels we attach mounting plates to the frame at pre-marked places;
- we return back the previously dismantled elements of the balcony system, filling all voids with mounting foam.
Video instruction:
Thanks to modern design and extensive color scheme aluminum profile easily adapts to any variant home interior. A significant disadvantage of aluminum structures is low noise insulation, a high probability of negative consequences associated with changes in ambient temperatures.
Installation of frameless window structures

The frameless method of glazing balconies has a spectacular view, but it will take a lot of effort to create a home panorama. It is also important to take into account that when installing a “full-length” glass sheet, neighbors and passers-by on the street will become witnesses of your private life in the apartment.
What else will have to do for lovers of viewing the surroundings:
- take care of the safety of the space when people are there;
- provide reliable insulation premises, which will increase the expense item;
- choose the option of glass shading - curtains, blinds, tinted windows.
Advice. When choosing frameless glazing, which you will do yourself, you will have to dismantle the balcony parapet. For this type of work, it is necessary to obtain permission, as well as a conclusion that the dismantling of the structure of the house will not result in negative consequences for its residents.
Features of glazing with removal

If on the glazed balcony you are going to do the device winter garden, it is wiser to choose the option of glazing with removal. But you will have to take into account some restrictions - a ban on the installation of removal for old houses and the maximum offset, it should not exceed 35 cm.
When there is no ban on taking out a balcony, you can implement the idea in one of the following ways.
- along the windowsill. An additional metal structure is mounted on which double-glazed windows are installed, but the floor area remains unchanged.
- It will take more time and effort to expand the balcony space along the floor line. As a result, the owners receive not only visual extension balcony space, but also real additional meters.
Remote work on glazing this type of balcony can be done independently with the appropriate knowledge and experience. But one cannot cope with an extensive front of construction work alone; two people will be needed to install the supporting structure.
Do-it-yourself glazing of an apartment balcony will significantly reduce costs and allow you to gain pride in your own work. But this is only if you have sufficient knowledge of the construction specialty, you can quickly assemble a small team of professional builders. Otherwise, problems are guaranteed at the very beginning of glazing work. It is much safer to spend money, but to order a quality product created by time-tested craftsmen of a well-known company.
Glazing with aluminum windows
So ... We continue to choose glazing for your balcony.
In this article, we will consider only aluminum glazing. I will tell you how it happens, in what cases it is used and what is the difference between some aluminum windows and others.
To date, all aluminum windows can be divided into two large groups:
- "Cold" aluminum windows, for example - the Spanish system Provedal.
- Warm "aluminum windows. Let's take the Newtek and Alumark systems as an example.
Compared to PVC, aluminum glazing balcony, there are a number of advantages:
- Strength. For all its lightness, aluminum alloy is quite durable. It well resists external physical impact, deformations and gusts of strong wind.
- Fire safety. The aluminum balcony is resistant to fire. In the event of a fire, the windows will not emit dangerous, toxic substances. (as opposed to PVC or wooden structure processing). This will facilitate evacuation and rescue operations.
- Anti-corrosion. Aluminum balcony is resistant to rust and rot. Thanks to powder coating, windows can withstand any mechanical impact, and the paint itself will be extremely difficult to scratch.
- Attractive appearance. Despite the fact that metal balcony attractive in itself, it can additionally be painted in any RAL color, as well as give it the look of wood or old bronze.
- Cheap. As a rule, glazing with a light aluminum profile costs 2 or even 3 times cheaper than glazing a balcony with PVC or “warm” aluminum windows. Firstly, the profile system itself is inexpensive. Secondly, there is no need to carry out additional work on major repairs. balcony slab and strengthening the parapet, and sometimes even replacing it completely (the cost of such work may exceed the cost of the balcony itself).
- Maximum area on the balcony.
First. In 60% of cases, for light glazing, there is simply no need to reinforce the existing parapet and thereby reduce the usable area of the balcony.
Second. Light glazing can be moved outside up to 30 cm and thereby increase the balcony area up to 1 m2. - Reliably. Glazing made of "cold" aluminum is less sensitive to vibrations and forced deformations, which always occur during operation, as well as under the influence of wind loads. This way, your balcony windows are guaranteed to keep opening and closing even after 10 years.
- Excellent thermal insulation. The heat-insulating properties of the material are ensured by a 36-40 mm double-glazed window. These windows are great for installation in cold climates. A plastic insert separates the outer and inner wall, so that the cold is not transmitted into the room. Having glazed the balcony with it, it can easily be turned into a continuation of the room (provided that there is an additional source of heating).
- Good soundproofing. The vacuum between the panes in an insulating glass unit provides not only thermal insulation, but also good sound insulation: You will not be disturbed by extraneous sounds if you live near a busy road or airport
- Unrivaled strength. Aluminum profile windows are much stronger than PVC profile windows. Thanks to this, it is possible to install floor-to-ceiling glazing without fear of frame deformation during operation and strong wind loads.
And now in more detail for each of the groups.
"Cold" glazing system "Provedal"
"Cold" aluminum glazing is the best solution in 80% of cases. I'll try to explain why.
When it comes to balconies - in 80% of cases we are faced with a concrete slab 3 to 6 meters long, protruding from the wall of the house by about 80-90 cm. At the same time, the slab simply hangs in the air, having no support either to the right or to the left . Along the perimeter there is a shaky parapet made of thin sheet metal up to 1 meter high. In addition, over 20-30 years of its existence, the slab and parapet wear out in order and are no longer able to withstand the weight of windows made of warm aluminum or plastic.

In such cases, the only the right option there will be glazing made of light "cold" Provedal aluminum. This is the best price-quality ratio in relation to balconies.

The benefits of a light "cold" glazing:
In the Provedal profile, hinged, sliding, as well as blind type sashes can be used.
Swing aluminum windows and "wood grouses" of the Provedal R-400 system
Provedal P-400 is an aluminum profile for a balcony with single glass (5mm). The profile width is 40 mm. It is used to make hinged sashes and "capercaillie" (not opening), which are usually used when glazing the side parts of the balcony. allow to establish hanging dryer to the ceiling. Distinctive features profile - its lightness, strength, durability and low cost.
The service life of windows and doors from the Spanish profile Provedal P-400, with correct installation and operation, can be decades, and the factory powder coating is durable.
Sliding aluminum windows (two- and three-sliding С640)
Provedal C640 sliding profile is made of 6063 aluminum. In a two-track version, the width of the aluminum profile is 60 mm, in a three-track version - 90 mm. Total number of leaves: 2, 3, 4, 6. In this case, it is possible to combine with blind and swing leaves on the sides of the balcony, but only through a connector.
To prevent blowing through, the sliding sashes have a locking connection, which is complemented by velvety brushes to minimize the gap. To prevent the sashes from moving apart from gusts of wind, the design has special stoppers that prevent arbitrary opening of the window. At the same time, the sashes can be easily removed and put back on (like a mosquito net), which is very useful when washing windows. Provedal C640 metal profile windows are ideal for glazing, especially if the balcony is old and the weight of the structure is critical.
More details about the Provedal sliding system can be found
"Warm" aluminum windows for a balcony
Only in the remaining 20% of cases is it still possible to install warm balcony glazing! It's about about new buildings with strong balcony slabs and reliable metal parapets. There are fewer and fewer of them in our region every year. Nevertheless, even if you have a strong slab and a good parapet, I advise you to think a few times! The cost of "warm" aluminum glazing from the Newtek or Alumark profile is at least 3 times more expensive than "cold". For example, the price of PVC profile glazing will be 2 times more expensive. In addition, with “warm” glazing, it is necessary to insulate not only the parapet, but also the ceiling and floor! All this costs a lot of money and colossally “eats up” the useful area of \u200b\u200bthe balcony. As a result, you get not a balcony, but Matchbox for the price of an aircraft! Those. the costs in this case are many times greater than the result obtained. Nevertheless, "warm" glazing has the right to live, so let's talk about it.
I had to work with different systems of "Warm" aluminum. Among all designs, the Italian Newtek profile (Newtek) received the least criticism. And more recently, the German-Russian development of Alumark (in terms of cost is more interesting. In terms of its thermal insulation characteristics, it is not inferior to PVC windows, and in terms of strength, durability, ability to withstand heavy weight and wind loads, it significantly exceeds plastic windows.
More details from technical specifications profile "Newtek" can be found.
Benefits of Newtek and Alumark profiles
As I already noted, the system has 2 significant drawbacks:
- The large weight of the frame with double-glazed windows: not every balcony slab can withstand such weight loads.
- The high price of glazing even compared to PVC systems.
What to do if you want to turn the balcony into a full-fledged warm room? Remains only overhaul balcony slab and strengthening, and often, a complete replacement of the cover.


Permissible load per slab is 150 kg / m2, that is, a 1m by 3m slab can be loaded with a maximum of 450 kg. The weight of a 1m2 window (in 3 glasses) is approximately 30-33 kg, and the total weight of the entire glazing will be about 200-250 kg. And I also want to do the decoration and put a locker on the balcony ...
Summarize. In order for the glazing of the balcony with a warm profile to be successful, you need a solid foundation and a reliable metal fence. The fence is sheathed outside and inside. A heater is placed between the skin, and “warm” windows are installed on top of the fence. If you live on the top floor of a residential building, you also need to make a roof on the balcony.
It should also be noted that warm glazing and parapet insulation alone will not make the balcony as warm as a living room. The maximum that should be expected is an increase in temperature by 5-10 degrees. In order for your balcony to become really warm, you will also have to take care of heating. All this is an additional load, which, like the weight of the stored items, must be taken into account when calculating the margin of safety of the remote plate!
Possibility of panoramic glazing
Do not forget! With the help of both "cold" and "warm" aluminum profiles, you can organize panoramic glazing- the so-called French balcony.

In this case, the fence is dismantled, and the windows occupy the entire height from floor to ceiling.
Advantages: beautiful appearance day and night; more light penetrating into the apartment, less cost for sheathing and insulation of the parapet, maximum preservation of the usable area of the balcony.
Disadvantages: your neighbors, as well as passers-by on the street, will see everything that happens and is stored on your balcony. Although there is a way out!
A combined version of floor-to-ceiling glazing is possible, when the lower glasses are opaque, or blinds hang on them (which open as needed).
I hope my article allowed you to understand the issue of glazing a balcony with aluminum windows, and now you can easily choose the right windows!
Thank you for your attention!
2275 0 0
Aluminum windows to the balcony: installation in 10 steps
The glazed balcony is convenient, practical and warm. In addition, the apartment has additional storage space for various items. It is possible to equip a study, a dressing room and a resting place on a glazed balcony. Having decided to do the glazing of the balcony with your own hands, the first step is to decide on the material of the window opening. I will describe the pros and cons, varieties and features of aluminum structures.

Advantages and disadvantages of aluminum
Aluminum balcony frames have pros and cons, which you need to familiarize yourself with before starting installation.

Advantages of aluminum frames:
- Availability. The price of aluminum structures is several times lower than other window materials.
- Light weight. Aluminum is the material that is lightweight, and the structures made of it are light and somewhat airy. Window frames exert low pressure on the parapet, so they can be equipped even in an emergency home. Plastic window frames cannot boast of such a feature.
- High-quality sound insulation. This effect is achieved by creating a sealed frame and fully closing the frames. Glazed balconies will drown out extraneous noise coming from the street.
- Attractiveness. Aluminum is easily painted in any color.
- Care. Aluminum frames are covered with a special film that repels moisture. The product is easy to wash using fabric material. The film does not allow dust to settle on the surface in large quantities.
- Durability and strength. Average service life - 30 years.

Cons of aluminum frames:
- Insufficient thermal insulation. Average air temperature in winter period on a glazed balcony it rarely rises above +7 degrees.
- bumps. If the prepared surfaces are even, then the sashes will be even. It is important to use a sufficient amount of cement mixture.
Varieties of aluminum structures
The most popular window frames:
- "Harmonic".
- Sliding window structures.
- Lifting-sliding frames.
The design itself is a flat rectangle, the movement of the valves along which is carried out using guides. Guide lines are installed at the top and bottom of the window structure.

The position of the sashes changes with the help of special rollers. The average width of the sash is 5 cm. All aluminum structures are protected by special clamps that prevent the glass from falling out of the frame even with very strong gusts of wind.
I note that some variants of aluminum frames in the kit contain special plugs. Plugs are necessary to protect the surface and the balcony area from the formation of condensate and moisture.
How to install aluminum windows
Instruments
Installation of balcony frames begins with preparation necessary tools. Here's a list of what's needed:
| A photo | Description |
 |
Scrap
This tool is used to dismantle old materials. |
 |
A hammer
It will be needed for driving dowels, as well as for fitting frames and removing old balcony doors. |
 |
Chisel
Tool for dismantling ebbs and window sills. |
 |
Roulette and level
It is necessary to clearly define the dimensions and angles of inclination. Sliding doors must be level, otherwise they will not open. |
 |
Screwdriver, concrete drill and screwdriver
These construction tools are essential for drilling holes. |
 |
Foam or sealant gun
It is necessary for filling the voids between the frames and the walls of the house. |
Installation in 10 steps
The process of glazing loggias with high-quality and functional aluminum frames takes just a few steps:
| A photo | Description |
 |
Step 1
Aluminum profile windows can only be installed on a flat wooden surface. First of all, the wall is leveled and a wooden board is attached to it. The width of the board should correspond to the planned distance of the inner window sill and the width of the profile. |
 |
Step 2
Before installing the frame, you need to make sure that all aluminum elements are even and free of defects. Assembly can only be done after all preparatory work. |
 |
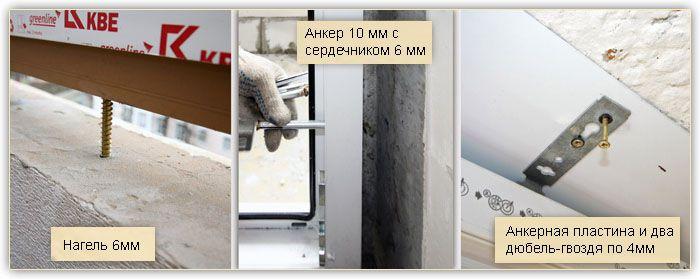
Step 3
Anchor plates must be installed on the top of the frame. It is not allowed to connect the profile to the ceiling part. The interval between the plates is no more than 40 cm. |
 |
Step 4
over wooden board you need to install a window sill. If your balcony is of impressive dimensions, then the installation should be done by two people. Working together will allow you to install correctly and reliably. First of all, the window sill is aligned along a horizontal line. Self-tapping screws are used for fastenings. Please note that the window sill can be solid, or it can have two components. |
 |
Step 5
Installing drains. They contribute to the runoff of natural precipitation. The first part is overlapped on the next element. According to this principle, all the details of the ebb are assembled. |
 |
Step 6
Sliding sashes are installed from one balcony edge. The first component is inserted into the opening and securely fixed. Fastening is important to carry out both from below and from above. The position of the frames must be controlled using the building level. |
 |
Step 7
Nearby, a second row of aluminum construction is being installed. Fastening takes place using self-tapping screws and dowels right size. Plates act as clamps. |
 |
Step 8
The ceiling part of the structure must be firmly fixed. This can be achieved by placing a window frame under the visor. Fastening is carried out using self-tapping screws installed through the anchor plates. |
 |
Step 9
All resulting joints must be treated with a silicone-based sealant. |
 |
Step 10
Casements of window frames must be strong, reliable and fixed. They must be mobile. Aluminum frame guides are fastened with special fasteners, which are included in the kit. Checking the quality of the installation of frames occurs by dynamically closing and opening the sashes. |
Installation of aluminum structures can be certified after the implementation of all points of my instructions. It remains only to remove the garbage and you can equip the balcony room.
Conclusion
Aluminum windows are reliable, durable and attractive. And if you correctly observe the assembly of the structure, then they will significantly increase the thermal insulation in the apartment.
In addition, I suggest watching the video in this article and leaving questions in the comments.
Looking at new buildings, homeowners, where the glazing of the loggias has not been done, are thinking: about the immediate installation of the profile, about the insulation of the balcony room, about finishing inside and outside. In order to perform the installation yourself, you must have the skills and know some of the nuances of glazing a balcony room, the technology must be observed. This will be discussed below.
Cold glazing of balcony rooms of any size is best done. These days, the market offers an abundance of high quality aluminum alloy profiles. The main advantage of such structures is that the product has a fairly low weight when compared with other profiles. The service life of aluminum structures is 50 years or more. This is very important and should be taken into account when making an estimate of financial investments when planning to glaze a balcony / loggia. The second advantage is that the construction costs much less than the PVC profile.

To the above one can add:
- Aesthetics;
- fire resistance;
- Strength;
- Environmental friendliness.
The negative aspects of aluminum glazing include the high thermal conductivity of the material. Equipping a loggia / balcony, this nuance matters. There is an opinion among professionals that aluminum structures are used when cold glazing is planned.
To compensate for the high thermal conductivity, profile manufacturers began to produce structures with an air gap from the inside.
In order to better save heat, this cavity is filled with a special material. Additionally, instead of ordinary glass, reliable double-glazed windows are installed. Thanks to a simple calculation, it became clear that this approach to creating a profile brings aluminum structures to a leading position in the market. The appearance on the market of an aluminum profile makes it possible to make balcony glazing with a removal.
The mounting technology makes it possible to arrange aluminum structures with an extension and not add a serious weight to the load, since their mass is minimal. If the balcony small size, it is better to arrange sliding system opening windows, it will save space. It is possible to complete and install such a system from aluminum guides.
Balcony glazing with an aluminum profile: installation sequence
Before glazing a loggia or a balcony room with aluminum, it is necessary to complete a competent set of building materials and fasteners. If the home master decides to do all the work on the construction of the structure on his own, then it is necessary to perform a preliminary calculation of the glazing area. This indicator affects the type of profile that will be selected.

According to their functionality, aluminum frames from can be divided into 3 main types:
- deaf;
- Swing;
- Sliding.
The swing profile will be an ideal solution for a wide, voluminous balcony room. If the balcony is medium in size or the loggia is narrow, then it is better to give preference to the sliding mechanism. In order to ensure highly efficient ventilation of the apartment, it is necessary to arrange 2 opening structures on 4 blind frames.
You may also be interested in the material on how to make a French balcony:.
Cold glazing of the balcony with an aluminum profile
If there are already standing on the loggia wooden frames, then they must be carefully removed using a special tool. At the same time, the area of \u200b\u200bthe balcony room should be freed from any things and objects. It is imperative to check the strength and reliability of the balcony slab.
In older houses, a concrete or brick foundation may lose its original reliability over the years.
The old vertical surface must be reinforced with a metal strap. The arranged metal frame should take on the entire load from the glazed frames. Perhaps go the other way. Make a cement-sand base by pouring. A small formwork is arranged at the top of the parapet. After pouring the solution, the surface must be made even strictly horizontally. It is imperative to wait until the solution is completely dry. Only then is it possible to continue the repair of glazing.
In some cases, the parapet may be leveled by reinforcing a wooden beam on top. This option is well suited for glazing loggias. The canopy is arranged from above immediately after cleaning. This must be done without fail before mounting the frames. The visor must be mounted regardless of what kind of glazing - cold or warm - is done on a particular balcony room. Thanks to this, rainwater will be removed from the double-glazed window. Before starting installation, it is necessary to remove the glazing from the frame. This is done so that the glass does not break during the fastening process.
Since the canopy has already been made, the next step is to strengthen the ebb from below. The void that has formed between the parapet and the ebb must be filled with sealant. The next step is to attach mounting plates to the aluminum profile. It is necessary to mount on construction screws. The distance between the mounting plates should be about 7 cm. After that, the frame must be arranged in the opening.

Design needed:
- Put;
- Fasten with wood wedges;
- Align.
Alignment is a very important step and must be done carefully and carefully. The frame must be leveled horizontally, vertically and in the plane of the balcony / loggia. This is done in order to mark the places in the vertical surfaces and the ceiling where the holes for the fasteners will be drilled. Having strengthened the frame, it is necessary to once again check its orientation in space. Vertical and horizontal deviations cannot be more than 3 mm.
When the rigid structure is in place, it is necessary to mount blind and movable frames.
Sliding sashes should simply be removed and put back. When moving, the sash should open easily. If these conditions are not met, then the metal structure is skewed. You need to inspect and redo everything.
The final stage of installing an aluminum profile for balconies and loggias
At the final stage, it is necessary to seal all the cracks and empty spaces with mounting foam. All foaming zones, both outside and inside, must be covered with plastic flashings. After the finish is completed, fittings must be installed on the frames.
This is also an important stage, everything must be done very carefully. All levers and handles need to be checked and adjusted. The sashes along the guides should move apart well. To do this, the elements must be well lubricated with machine oil.
Cold glazing of a balcony with an aluminum profile (video)
In conclusion, we note that if you intend to perform the glazing of a balcony room on your own, you need to decide what type of profile will be mounted. To this end, it is necessary to assess the strength of your balcony, its orientation to the side of the sun or shade, and the condition of the residential building as a whole.