Make a pitched roof 4. How to make a hipped roof and calculate the design. Varieties of hip roof truss systems
A four-pitched roof, also called a hip roof, is the most popular in the construction of individual housing in most European countries. Except, perhaps, Scandinavia, which has a similar climate and building traditions with central and northern Russia. The Varangians, like the Eastern Slavs, preferred to build from solid wood and arrange simple gable roofs. In our time of comprehensive globalization, all branches of human activity, including architecture and construction, are subject to. hip roof country house now fell in love with the inhabitants of the CIS countries and has become an integral part of the landscape of our villages and small towns.
We note the pros and cons of a hipped roof in comparison with the more common and structurally simple gable roof.
Benefits of a hip roof:
- A properly designed and assembled hip roof, due to the absence of vertical end walls (pediments or gables), has low airflow resistance. Accordingly, it resists hurricane winds in the best way and is less prone to destruction of the roof in places of cornice overhangs (it does not have gables).
- The four-pitched roof, due to the angular ribs converging to the ridge support beam, has a rigid structure and is not subject to any serious deformations.
- The hip roof allows you to build large overhangs on all four sides of the building, thereby protecting the facades from precipitation.
- A four-pitched roof makes a house with an attic visually lower. This is important when a building needs to be built into an existing one-story building without disturbing the balance and character of the building.
- The hip roof is beautiful. Although not everyone agrees with this.
Four-slope roof of a two-story country house. Large overhangs protect walls well from rain and snow
Hip roof disadvantages:


Another option for integrating full-fledged windows into the roof.
Varieties of a hipped roof
- The classic roof with four slopes assumes straight rafters without fractures, corner ribs start from the ridge, all overhangs are at the same height.

The main type of hipped roof. Two end sides have the shape of a triangle, the other two are trapezoids. Large overhangs protect the facade well from precipitation, and you can safely walk around the house in the rain.
- A hipped roof is a type of hipped roof in which all the ribs converge at one central point.

A hipped roof is more suitable for a square house plan.
- The Danish hip roof is a type of four-pitched roof with gables located in the upper part of the short slopes.

Diagram of the truss system of a Danish hipped roof. A small tong at the top of the short slope is used for ventilation or lighting.
- Full vertical windows can be built into the Danish roof.

vertical windows
- Another type of complex Danish hip roof with two slopes at the short end.

This type of roof is called Dutch.
- A half-hip roof (also called a gabled half-hip roof) is actually a type of gable roof, since all the rafter legs resting on the Mauerlat are installed on the long side and parallel to each other.

- A broken hipped roof is also called a mansard hip roof. It is more difficult to manufacture, but allows you to allocate a large area for living quarters.

The broken shape of the roof makes it possible to use the attic space more rationally, but it is more expensive
- Sloping hipped roof distinguishing feature traditional architecture of China, Japan and Korea. Only they make a break in the wrong direction to which we are accustomed.

- The hip roof can be not only hipped, various combinations are possible different types structures.

A combined type of roof, where a hip and gable structure is combined.

This roof is hipped, but there are many more slopes than four. But the principle by which rafter system- the same as that of a simple four-slope.
Design features of the truss system
Consider how to make a hipped roof on your own, while ensuring its reliability and strength. We choose a simple design with a central support.
Since only part of the rafters in the central sector of the long side are full length and converge in the ridge area, not the entire rafter system can be tightened with puffs - in the hip area they will not work as they do in a gable roof. In addition, often in the struggle for the height of the attic floor, the Mauerlat is located much higher than the plane of the floor and beams (puffs). Therefore, we will proceed from the fact that in our case, the truss system of a hipped roof will not use puffs as a structural element. The main load in the center of the roof will be carried by a beam located in the ridge zone: it will be supported by slanting and ordinary full-sized rafter legs.

Standard hipped roof construction with support in the ridge area
The ridge support beam must be supported by racks. In order to perceive a fairly solid load from them, in the ideal case, there should be an internal bearing wall. If there is none, the floor beams must be strong enough to support the weight of the central part of the roof. If the first floor is covered with precast concrete floor slabs, their load-bearing capacity is usually sufficient and the rack supports can be placed on the slabs through a horizontal wooden beam.
It is not necessary that the support should be located in the ridge area. Racks can be placed on the sides of the ridge, that is, there can be two or more support zones located along the ridge.

The photo shows that the skate does not rest on the racks.
The ridge is supported on both sides along the ridge on the racks. In this case, the racks directly support the rafters, the beam was not used. Each rafter beam has its own stand. Pretty solid solution.

A four-pitched roof over a small building can be mounted without racks
With small spans (up to 4 meters), you can do without racks. However, if possible, at least in the areas of intersection of the ridge with the braids, it is worth placing one puff and a rack each.

A small structure is covered without the use of racks or puffs
The truss system of a hipped roof is almost identical to the hip hip roof. Only instead of a ridge beam it is recommended to install a central support. Or arrange a closed support contour of beams and racks.

Variants of the hipped roof truss system. In the diagram on the left, the corner rafter (slope) rests on the truss, a similar solution can be used for all types of hip roofs.
The sequence of installation of a hipped roof
First of all, as in all types of roofs, a Mauerlat is mounted. For frame houses this is the top harness wall panel, for log cabins - the upper crown. As a Mauerlat, a wooden beam with a cross section of 10x10 cm or more is used, more often at least 10x15 or 15x15 cm. It is necessary to strive to ensure that it is solid along the entire length. The fastening of the beam must be given special attention. For a stone wall, the ideal solution would be a reinforced concrete monolithic belt in the support area of \u200b\u200bthe Mauerlat with embedded parts pre-mounted in it (threaded studs from M12 and above). If this is not possible, you will have to fix the studs with metal expansion dowels in the masonry.

Mauerlat fastening scheme in masonry
Mauerlat connections along the length should not be made end-to-end, but in an overlay, with multiple connection points. The corners must be securely connected with metal plates, corners, brackets.

The layout of the Mauerlat on the wall. Pay attention to the junction of elements and the connection of corners. On the right, the installation of a beam on a monolithic belt is shown.
The next step is the installation of racks and the installation of the supporting ridge or side beams parallel to it. For racks, as a rule, a beam of 10x10-10x15 cm is chosen, for a beam of a higher section: 8x16, 10x20 and more. The optimal ratio of width to height is 1 / 1.5-1 / 2, then the beam twists less when it dries. The same rule is true for the rafter beam.

The rack and support beam in this case are parallel to the ridge
In frame-panel houses, support beams are often not used, only racks with a rafter pitch are installed. In any case, a beam is placed on the skate, only of a smaller section. You can use an ordinary truss element. The skate is supported on temporary racks, which are then removed. The ridge serves as a guide element for mounting the entire structure.
Racks are installed in frame house. After installing the rafters, they are cut at the desired height.

Such a support contour is placed under a hipped roof, it replaces the central support
In the third place, they put corner (sloping) rafters. The loads on them are higher and the cross section should be higher. Although sometimes they prefer to first put the privates of full length, and only then mount the braids. This is unprincipled.

The truss system of the hip roof of a wooden frame. In this case, they did without racks at all, instead they pulled upper part rafters with double horizontal ties. It is better to mount the rafters on the wall of the log house on sliding supports.
First, racks and a ridge beam are mounted. The next step is the rafters, ordinary ones are placed. Corner (sloping) rafters are mounted from a bar of the same section as the rest. It is not right. The load on it is much higher and the cross section should be more powerful.

Sliding supports - the best solution for attaching rafters to the wall for a log house
Then the remaining rafter legs are mounted, including shortened ones. The rafters themselves must be solid, in extreme cases, it is necessary to install linings at least 1.5 meters long at the joint and fix them on both sides at several points. Connections of wooden elements can be made by overlapping, using overhead metal plates. In the areas where the rafters are supported on the Mauerlat and beams, support cuts should be made and strong metal elements should be used.

This is how the rafters are attached to the mauerlat and beams
In accordance with the table, it is possible to roughly determine the cross section of a wooden beam for rafter legs.

For the corner rafter, the value obtained must be increased by at least 1.5 times
The rafter system is ready. Now you need to choose the type of roof and start building a suitable base for it: solid flooring or battens, if necessary, counter-battens and wind protection.
A do-it-yourself four-slope roof is quite a feasible task, at least for a house that is not difficult in terms of plan. General principles for all types of hip roof: the mauerlat must be well fixed and connected at the corners, you need to start from the ridge, the racks need good grounds. It is necessary to ensure reliable support of the roof with a large span and to monitor the reliability of all connections.
The fixation of the elements will be better when using special modern metal fasteners for wood, and it will be easier to work. Of course, you must have at least basic carpentry skills. Having a power tool helps a lot: a drill, a circular saw or a chainsaw. You also need to stock up hand tool: saws, chisels, hammers. You will need measuring devices: carpentry level, plumb line, tape measure, cord.
Year after year, thanks to the attractive appearance, projects of houses with a hipped roof are popular. Such a roof as in the photo not only transforms the building, making it original, but also protects against negative impact precipitation and other natural phenomena. As the name implies, this roof consists of four planes located at a certain angle to the horizon.
The design of a four-pitched roof does not imply the installation of gables, and this circumstance greatly simplifies its creation and saves on building materials for the walls. At the same time, the absence of rigid gables that act as load-bearing elements leads to the need to provide additional reliability to the roofing system.
Types of hipped roofs
Four-pitched roofs are tent, hip, semi-hip.
Hip roof . Consists of four triangular planes, the vertices of which converge at one point. Its base can be square or rectangular, and the slopes, respectively, can be identical in parameters or paired.
hip roof . At its ends there are two triangular planes, and two facade slopes are made in the form of a trapezoid. Triangular slopes are called hips.
Half hip roof . It is distinguished by the presence of a broken configuration of triangular slopes, consisting of a triangle in the upper part, and a trapezoid in the lower part.
hipped hipped roof

Hip hip roof
If you look at the drawing of a four-pitched hip roof, you can see that its truss system consists of three types of rafters:
- diagonal (they are also called oblique);
- central (another name is ordinary);
- corner (external).
Roof semi-hinged hipped
The half-hip roof gives the building an unusual and original look, it is mounted on small houses in case of insufficient attic space. As a result of installing a roof of this type directly under the roof, a large room is obtained that can be equipped for economic or residential purposes.

Design features of a hipped roof
The construction of the building begins with the fact that a house project with a hipped roof is drawn up based on the calculations made. It is accompanied by drawings, specifications and other technical documentation.
When developing a project, all the loads exerted on the truss system are taken into account, including:
All loads affecting the state of the hipped roof are divided into permanent and temporary during calculations. The following are considered constant: the weight of the truss structure and the roofing "pie". Temporary (variables) include snow, wind, weight of people and equipment for roof inspection and repair.

Roofs with a slope of 5 to 18 degrees, which are considered flat, are usually made using roll coatings, and if the slope is 30-60 degrees, then profiled sheet, asbestos-cement slate, and tiles are used.
The calculation of the slope for a hipped roof has the following features:
- with a slope of slopes of not more than 60 degrees, the snow load is taken into account in accordance with SNiP;
- when the slope is more than 60 degrees, the snow load on the roof is not taken into account;
- for roofs with a slope of less than 30 degrees, the wind load is not taken into account.

For the rafter system, a beam with a rectangular section is used, or a cut board with dimensions that correspond to the loads, according to the calculations made. The design of a hipped roof, in addition to rafters, also includes other elements (for example, struts, puffs) that give rigidity and strength to the system.
Roof truss system, look at the video:
Drawings and diagrams of a hipped roof
The project for creating a roof of any kind - tent, hip and half-hip - contains drawings of the truss system, attachment points, a diagram of the lathing device (read also: ""). When a hipped roof is being designed, the diagram clearly shows the location of the layers of the roofing "pie" and other details of the roof structure.
The presence of a developed project helps to calculate the amount of building materials needed to carry out work on the construction of the truss system and the roof pie.
Not every private developer has the knowledge and skills that are enough to independently complete all the necessary drawings for a hipped roof, so for this service you need to contact professionals with the appropriate education and the necessary qualifications to perform load calculations and draw up project documentation (read more: "").
Installation of a pitched roof
When a hipped roof is being built, the drawing of the truss system is one of the main technical documents of the project. The roof frame of this type consists not only of rafters - a support beam is laid on the load-bearing walls (it is called a Mauerlat). This element should be mounted strictly horizontally, the only way to ensure compliance with the geometry of the structure. Ceiling beams are laid on the Mauerlat. When a wooden frame is erected, the rafters are fixed along the upper crown.
".If there is no need for an attic or attic room, a hipped roof is the most reliable and economical option for creating a roof in a private cottage.
Four-pitched roofs are becoming more in demand every year, due to the design conditions for sufficiently large structures. Such a roof looks more compact and neat compared to the classic versions of gable roofs. In addition, it is possible to perform not only the standard design of such a roof, but also to diversify the roof with various elements, most often represented by dormers and dormers.
Variants of pitched roofs
Four-pitched roofs are distinguished by sufficient species diversity, which allows the following types of structures to be performed:
- . It is characterized by two trapezoidal planes in combination with a pair of triangular slopes. The design is distinguished by the absence of gables, and for the installation of attic or dormer windows roof slopes are used.
- half hip roof. The main difference lies in the unusual design of the hips, which consist of two parts. The lower trapezoidal segment is combined with the upper triangular part.
- hipped roof. The name of this design is due to the joining of all four slopes of a triangular shape at one upper point with the formation of a quadrangular pyramid with a base of a square or rectangle. Characterized by the complete absence of gables. The design of four-pitched roofs is due to the presence of a rather complex truss system, which requires detailed drawings and careful planning.
Design features
To create a competent roof project, it is necessary to take into account any possible loads that the future truss system will experience.
Project documentation should contain:
- the main drawings of the rafter system and the main nodes, at the junction of the rafters with the Mauerlat and the ridge, as well as the location of the crate;
- technological features roofing cake and other roofing elements.

Drawing hip roof
The basis of a detailed project makes it easy to perform all calculations of the required amount of materials for the rafter system and the roofing pie.
Load calculation
The main units of account are:
- the mass of the necessary roofing material;
- the mass of all layers of the roofing cake being performed, including vapor and waterproofing, as well as the amount of insulation;
- wind load, calculated with the condition of regional features and roofing slope;
- indicators of the intensity and amount of precipitation in summer;
- snow load typical for the construction region;
- weight serving roofing, of people;
- dimensions and weight of additional equipment intended for installation on the roof surface.

Carrying out the calculation of the dimensions of the elements of the hipped roof
The obtained parameters and the indicator of the roofing slope form the basis for calculating the length and cross section of the truss system and contribute to the competent selection of roofing material.
The device of the truss system
The process of constructing hipped roofs is based on the use of sloping or diagonal rafters, which are located towards the corners of the structure. It should be borne in mind that such a design is subject to a greater load, which requires the construction of rafters from a double type of timber.
A sufficiently significant length involves the use of connections that, under high loads, can be subject to subsidence. It is for this reason that it is required to install strong support stands under the connecting elements.
The design requires the use of sprockets or short rafters, resting with the upper part on the rafters. For fixing, several different points are selected, contributing to the most even distribution of the load from the sprigs.
In the process of creating a hipped roof, in addition to standard elements, additional frame components are involved. All components of such a roof make up a single system that combines:

- beds, which are internal support bars laid on top of load-bearing walls or columns;
- side rafters forming trapezoidal roof slopes;
- diagonal or oblique type of rafters;
- vertical type of supports, represented by racks and trusses, which help to maintain the truss system;
- purlin or ridge beam, which is a horizontal support for the rafter system at the top of the roof structure. Stacked on top of the racks and fixed. For a hipped roof, there is no need to mount a ridge beam;
- horizontal puffs or crossbars for connecting side rafters, which, without installing such elements, can move apart in different directions;
- roofing sprigs mounted on top of diagonal rafters to form a pitched frame;
- wind types of beams and strut struts, which increase the strength of the roof and allow it to withstand most loads;
- filly to create the necessary roof overhang, which are fixed in the lower segment of the rafter legs.
Do-it-yourself step-by-step construction technology
Installation work is carried out immediately after the development of the project and the acquisition of all materials necessary in accordance with the calculations.
On the initial stage Mauerlat is installed, which is fixed on the walls of the building. When laying, it is necessary to maintain a distance from the edge outer wall five centimeters. Most often, an anchor option is used to fasten the Mauerlat.
The next stage involves the implementation of high-quality markings, followed by the installation of racks and the establishment of a ridge beam. In the course of the work performed, it is necessary to use a plumb line. To fix the racks, special jibs are required.
Next is the installation of the rafters, during the installation of which the size of the future overhang is taken into account. Under standard conditions, the length of the overhang is from fifty centimeters to a meter. Optimal size- sixty centimeters.
Proper installation of diagonal rafters must be carried out in accordance with the following rules:
- slanting rafters are attached to the Mauerlat with the fastening of shortened rafters or sprigs;
- the transfer of loads from the rafters is distributed by trussed trusses;
- as a support for truss trusses, additional puffs are used, mounted on beams of longitudinal or transverse types;
- in accordance with the design documentation, puffs, crossbars, racks and struts are installed, which are designed to increase the rigidity of the structure;
- the fastening of the diagonal rafters at the top is carried out on a ridge run, based on a longitudinal type of beam;
- it is imperative to use a special type of tie-ins and cuts, supplemented by metal fasteners, which will ensure the connection of the lower rafter ends and the Mauerlat;
- installation of ordinary rafters with a step corresponding to the calculated loads is carried out immediately after the installation of diagonal rafters;
- the rafters are connected by means of horizontal crossbars from boards with a section of 120 x 40 millimeters;
- rafters increase the resistance of hip slopes under significant wind loads;
- the presence of a bay window in the project requires the installation of rafter beams from finger-jointed edged boards or a bar.
The next stage of installation is the installation of sprockets and side rafters, which must be located in the same plane. As a result of these works, lateral roof slopes are formed. Care should be taken to ensure the parallelism of all installed rafters, sprigs and side elements.
After the installation of the structure of the entire truss system is completed, it is necessary to perform high-quality for which bars with a cross section of forty or fifty millimeters are used. This is followed by the standard execution of a suitable roofing cake, on top of which the selected roofing material is mounted.
Learn more about the construction of the roof from the video.
Summing up
four-pitched roof is the most reliable and economical option roofing device without the need for an attic space.
The absence of load-bearing elements in the form of rigid gables requires ensuring the reliability of the structure in accordance with the calculations and the project.
Four-pitched roofs are classified as popular and in demand roof structures due to ease of installation and minimization of costs for Construction Materials for building walls.
Pitched roof structures are very often used in private homes. Their four-slope variety is ideal for tall buildings, since the roof looks more compact and neat without a massive gable. The design of the hipped roof contains many constituent elements. It can be both relatively simple and more complex due to dormers and dormer windows. But in the latter case, it looks more interesting and diverse.
The hipped roof, in comparison with its gable counterpart, better resists wind loads, precipitation and protects the walls of the building well. Its design is more complex, but such a roof can be built independently on a small house or gazebo. In the photo on the network you can see how beautiful and harmonious the 4-pitched roof looks. She decorates like one-story houses and taller buildings.
Before you make a hipped roof with your own hands, you need to decide on its type. There are the following types of such systems:
- hip design has in its composition two slopes of a trapezoidal shape and two triangular slopes, called hips. The first two slopes are joined to each other in the ridge. During installation, the method of arranging layered rafters, as in a gable system, and sloping rafter legs from a 4-slope system, is used.
- Half hip design has the same structure, only the hip slopes are shortened. Under them is a pediment in which you can make big windows to illuminate the attic or attic floor without losing the strength of the roof.
- You can also build hipped roofs with your own hands if you make four slopes in the shape of an isosceles triangle. They converge at one point.
- Hardest to build yourself hipped roof complex configuration with many valleys, gables, junctions and attic windows. In this case, it is better to entrust the construction to specialists, since only they will be able to correctly calculate the structure, execute its plan, diagram and assemble it on the spot.
Attention! In addition to the supporting frame of the roof, it is necessary to decide on roofing, waterproofing and thermal insulation materials because different roof designs and slopes require different materials.
Constituent elements

Since the design of a hipped roof is practically the same as gable system, it consists of the same constituent elements, but with the addition of some additional details. 4-pitched roof includes the following details:
- Mauerlat. This is a wooden beam of square or rectangular section, which is laid on top of the external load-bearing walls on which the rafters will rest. It takes the entire load and distributes it evenly for transfer to the walls. Houses with a hipped roof are made with a Mauerlat section of 100x100 mm or 150x100 mm.
- Beds are internal supporting elements that are laid on load-bearing walls inside the house or support. The material and cross section of the bed is the same as that of the Mauerlat.
- Rafters are divided into sloping and side. The last of them form a trapezoidal slope, and the slanting ones are needed for hip slopes. In a hipped roof, side rafters are not used. The side rafters are assembled from a beam with a section of 5x15 cm, and the diagonal ones - 10x15 cm. The optimal step of the rafter system is 800-900 mm, but it can be less or more depending on the chosen roofing and roof design features.
- Racks are needed to support the frame of the four-slope structure.
- Skate run- a horizontal element that simultaneously connects the rafters and serves as a support for them. The pitched design of the hipped roof does not have a ridge. It is better to make it from a bar with a section of 150x100 (50) mm.
- Puffs - a horizontal element that connects paired side rafters, preventing them from moving apart. Material - board with a section of 5x15 cm.
- Sprockets are shortened rafters that are attached to a diagonal leg. They are made from a board measuring 150x50 mm.
- Struts are special struts that allow you to increase the strength and load-bearing capacity of the roof.
- The filly is the elements that form the overhang of the roof and are attached to the rafters from below. It is made from a bar with a section of 120x50 mm.
When arranging a more complex 4-pitched roof, the drawing and structural diagram may contain other additional elements e.g. cornices, protective strips, additional battens, etc. In order to accurately calculate the required amount of material, it is necessary to make a sketch or drawing to scale, and carry out all the necessary calculations on it.
Important: the material of all the constituent elements of the roof is wood conifers not lower than grade 2 with humidity not more than 15%.
Mounting sequence

We will study how a hipped roof is made with our own hands using the simplest example hip design. The step-by-step process of installing the constituent elements of the roof looks like this:
- To transfer and evenly distribute the load from the roof frame, snow and the roofing itself, Mauerlats are laid on the load-bearing walls. The beams are fixed to the enclosing structures by means of anchor studs, which are laid even at the stage of wall construction. If the house is built of wood, then the role of the Mauerlat is performed by the last crown of the log house. Mauerlat beam is necessarily protected from brick, concrete and stone walls by means of waterproofing. To do this, it is wrapped with two layers of roofing material.
- Beds are laid on carriers internal walls. They are necessary where racks are provided in the truss system. If there are no internal load-bearing walls in the house or they are in the wrong place, then reinforced beams must be provided under the racks, which act as floors. As a rule, beams have a section of 20x5 cm, so the bearing elements are increased to a section of 20x10 cm.
- After that, they begin to install racks on load-bearing beams or beds. Racks are leveled by level or plumb and temporarily fixed by means of supports made of boards. For reliable fixation of the rack, metal corners or steel plates are used. For simple hip system you will need one row of poles centered right under the ridge. The step of the racks is not more than 2 m. When arranging a hipped roof, the racks must be installed under diagonal legs at the same distance from the corner of the house.
- Next, runs are placed on the installed racks. In a conventional hip system, this run is a strong point. At the hipped roof, all the girders form a rectangle with a smaller perimeter than the house itself. All runs in this design are fastened with metal corners and self-tapping screws.
- Now you can start installing the rafter legs. At the same time, the installation of side rafters in a simple hip system is performed in the following sequence:
- A board (150x25 mm) along the width of the rafters is applied to the ridge at the installation site of the extreme rack and a template is made. The upper cut is marked on it (the place by which the rafter leg will rest on the ridge) and cut out.
- Next, the template is applied to the ridge and the lower cut is cut out (the one with which the rafter element will rest on the Mauerlat beam).
- After that ready template apply to the ridge at the installation site of the rafters and check the need for adjustment for each rafter element.
- The rafters are marked and a notch is cut out according to the template.
- Now the rafter legs can be installed and attached to the Mauerlat and the ridge beam. For fixing use metal corners and screws or staples.
You can learn more about the installation of a hipped roof truss system from the proposed video:
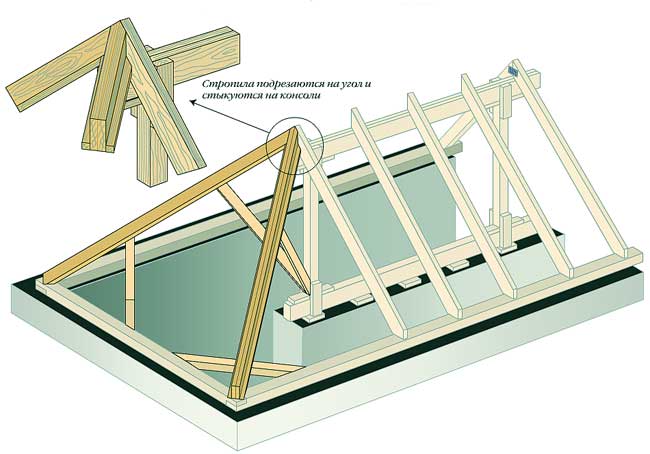
- For the manufacture of diagonal reinforced rafters, you can use two spliced boards of a conventional side rafter. A template for diagonal legs is done in the same way. The upper part of these elements rests on the rack, and the lower part rests on the corner part of the Mauerlat. That is why the cuts must be made at 45 degrees.
- Next, sprigs are installed between the two diagonal rafters. The installation step of these elements is equal to the installation step of the rafters. The upper part of the narozhnik rests on a diagonal leg, the lower part - on the Mauerlat. Washed down on the top of the sprigs in half of the elements is done in a mirror image. The lower washed down is usually performed in place. After mounting the element, an overhang is formed, which is aligned with the stretched cord and cut.
- The constructed truss system does not yet guarantee the reliability of the roof. Since the diagonal legs bear the maximum load, it is necessary to install additional racks under them - spregnels. They must rest on reinforced floor beams.
- Under the side rafter legs, struts are installed, which with their lower edge rest on a bed or floor beam, and their upper edge should rest against the rafter at an angle of about 45 °.
- Do-it-yourself hipped roof can be made with any roofing, for example, from ondulin, corrugated board, metal tiles, shingles. But it is worth remembering that under soft cover you need to make a solid crate of moisture resistant plywood or OSB. If you are planning to do attic floor, then it is necessary to lay a heater between the rafters, and hem everything from below with a vapor barrier. If the attic is cold, then only the floors are insulated. Waterproofing is necessarily laid under the roofing and a ventilation gap is made.
The hipped or hipped roof is one of the most popular roofing options in the construction of individual housing around the world.
Unlike gable roof the house, on the sides of which the gables are mounted, the four-pitched one has additional slopes in the shape of a triangle.
A four-pitched roof with your own hands is very difficult to perform, and if you are interested in how to make a four-pitched roof, you should definitely familiarize yourself with the theoretical part first.
Before starting work, you should carefully calculate everything, draw up drawings and a project in which you need to indicate the placement of various elements and other design features.
The calculation of the hipped roof and the project must take into account all the loads that will affect the building.
The design must be very strong, resist strong wind, snowfall and other weather conditions. The service life of the roof depends on how correctly the roof material is selected.
That is why, when creating a project and drawings, it is very important to calculate everything correctly. Project of a hipped roof in the photo:

Before creating a project and a drawing of a hipped roof of a house, you must first find out the angle of inclination of the slopes, which depends on many factors, such as the purpose of the attic, the choice of roof material, and the features of atmospheric influences.
Most often, the angle of inclination of the roof of individual houses is from 5 to 60 degrees.
If in your region precipitation and winds are not very strong, then the angle of inclination of the structure may be insignificant.
If in your area it often rains heavily, and in winter it snows, then the angle of inclination of the hipped roof of houses should be from 40-45 to 60 degrees.
The finishing material, as well as installation features, also depend on the option, what angle of inclination the structure will have:
- if the angle of inclination is less than 18 degrees, wavy and flat slate is used for the roof, as well as roll materials for roofing;
- when the angle of inclination is up to 30 degrees, varieties of tiles are usually used;
- for a roof whose slope angle is at least 30 degrees, piece material is usually used.
Calculation of the slope of the roof in the photo.

The design and calculation of the structure must take into account where all the elements of the roofing system will be located. When you have determined the slope of the hipped roof, you must also calculate the height of the ridge.
Roof truss system
The device of the roof of this type of private houses involves the calculation of the desired section of the rafters. The calculation is made based on the loads that your hipped roof will receive.
The calculations, as well as the design of the structure, should include the wind load, the maximum possible mass of snow in winter, the angle of the roof.
When calculating the distance between the rafters, it is necessary to evaluate their ability to withstand loads, as well as their margin of safety, which should be 1.4 or more.
The type of device of the truss system depends on the features of the building, and therefore may be different.
If the house has a load-bearing wall or supports from pillars, then layered rafters are usually used, but if the support device is not possible, then hanging rafters are made.
In some buildings, both types of rafters are used simultaneously.
When carrying out a drawing and a project for a future building, it is important not only to determine the type of truss system, but also to take into account additional fasteners that will give the structure strength and reduce the load on the beams.
Calculation of roof loads
When developing a drawing and a roof project for individual houses, it is important to correctly calculate the loads.
Loads are of the following types:
- constants - the weight of the insulating material, various materials finishes and insulation, weight of materials
- for roofing and lathing weight;
- temporary - the weight of snow in winter, Negative influence wind;
- additional - various structures that are attached to the roof.
When creating a project and a drawing of the roof of your house, you should adhere to the average snow load, which is 180 kg per square meter.
But if the angle of inclination is 60 degrees or more, then the snow load is not taken into account.
As for wind loads, their average value is usually 35 kg per square meter, but if the roof slope is less than 30 degrees, this amendment is not taken into account.
After making all the calculations, you can proceed to the choice of material for the roofing device.
The photo below shows a diagram of the structure of a hipped roof and the name of all structural elements.

The choice of materials for the construction of the roof
When the hipped roof area is covered with roofing material, a lot of waste remains.
Therefore, in order to cover the area of \u200b\u200ba hipped roof, roofing materials are usually chosen, the elements of which are small.
The most common materials for covering the roof area are flexible or ordinary tiles, slate sheets, ondulin, metal tiles.
To build a roof that will last for several decades, special attention must be paid to the selection of materials for the construction of the truss system.
Usually, softwood lumber is used to build a hipped roof.
Do not neglect the quality of wood, choose a material without defects, which can further reduce the quality and durability of the structure.
An important criterion for choosing lumber is its moisture content, which should be no more than 15 - 20%.
If this indicator is exceeded, the beam should be dried before use, so that during the service the hipped roof does not distort or deform.
The construction of rafters for the roof of a house is usually carried out using a rectangular beam, the cross section of which should be calculated for each individual case.
To build such a structure, boards with a rectangular section measuring 50 by 100, 50 by 200, 100 by 150 and others are usually used.
If necessary, then in the process of work, you can double the boards to obtain the desired diameter.
To build a four-pitched roof, special steel elements are often used that hold the rafters firmly in one position for many years.
In addition, supports for ridge runs are also often made of metal.
Construction of a pitched roof
All wooden details for the roof frame, they are treated with a special compound that will protect the tree from fire. In places where the beam will be adjacent to brick or stone, it must be wrapped in waterproofing.
The construction of a hipped roof begins with laying the Mauerlat building around the perimeter of the roof area.
Fasten it with wire loops or studs, which are embedded in the wall or in the floor slabs. Next, install the central beam, which is located on the central axis of the house.
It should rest on a floor slab or internal wall.
In order for the structure to be absolutely symmetrical, it is important to correctly calculate and mark the location of the diagonal rafters, as well as the ridge support.
The height of the ridge must also be marked with maximum accuracy.
A clear symmetrical marking of the structure will make the load distribution uniform and prevent the roof from distorting in the future.
After the Mauerlat has been installed along the perimeter of the roof area, the beams are placed under the ridge run. The height of the ridge must strictly comply with the design drawings.
Diagonal beams withstand high loads during service, so they must be installed very well.
If the length of the beam or board is not enough, diagonal supports are made of two parts. In order for the junction not to experience the maximum load, a support bar is installed under it.
The structure can be made the most rigid if the joint with the support is located at such a distance that is equal to a quarter of the length of the rafter beam from its upper edge, which is attached to the ridge.
It is best to implement diagonal rafters with the help of prefabricated rafter legs, which are convenient to mount. You can see the process of installing diagonal rafters in the video.
The device of this roof involves the installation of not only full-length rafters that are connected to the ridge, but also those that are attached to diagonal beams - sprigs.
The closer to the corner of the house, the shorter the jumpers.
The distance between the rafters is determined during the development of the roof project, but it should be borne in mind that each slope must have at least three central rafters.
To give the structure maximum rigidity, supports, braces and puffs are attached in the necessary places. The scheme for attaching the rafters can be seen in the photo.
The final stage of the roof device is the installation of the rafter sheathing. Usually, a beam measuring 50 by 50 mm is used for the crate. The step of the crate depends on what roofing material you have chosen.
If the attic area will be used as a living room, then ventilation should also be installed.
To date, all manufacturers of roofing materials also offer ridge parts of the same textures and colors.
The main ridge is installed on the hipped roof, and skates that cover the gaps between the main slopes and hips.
Complete the installation of a hipped roof by installing cornices and gutters. The whole process is shown in the video.