The location of the bath on the site according to the law. Economy bath in the country Easy bath for giving with your own hands
Often, land plots involve only the construction of only vital buildings. The small area of the site, the use of every piece of land for planting or thought out simply does not leave room for additional buildings. In this case, there is only one way out for lovers of bath procedures: the construction of a mini-bath. What is a mini-bath for a summer residence, how to build it and what is needed to build it - let's figure it out.
Read in the article
Mini-bath for a summer residence. Advantages and disadvantages
The main advantage of a mini-bath is the area of the site occupied during its construction. The second, no less important parameter is the cost of building a mini-bath in the country.

There are ready-made projects of frame mini-baths on the net, in addition, it is possible to create such a project by order in construction organizations. But sometimes, in a do-it-yourself mini-bath project, projects of frame and combined baths are simply combined.
We offer you to watch a video of building a frame mini-bath quickly and inexpensively:
Important! When purchasing lumber, pay attention to its quality. Lumber for construction must be well dried and free of geometry defects.
A summer bath from boards is a variant of a frame bath, for which it is used for sheathing. Like a frame one, a do-it-yourself bath from boards is built quickly and easily. The construction technology is similar to a conventional frame bath, with one exception: instead of OSB panels, a board is used for exterior cladding. The budget savings are quite significant, especially if you use an unedged board for sheathing. At the same time, such a structure is less durable than with the use of composites and has greater heat losses than assembled using panels.

When building a bath, attention should be paid to heat and vapor barrier. The more quality materials used in construction, the longer the steam room will last.
Laying the board on the wall must be overlapped. This laying order will make the wall more dense and reduce heat loss during use.
Before you build a bath from the boards with your own hands, you should take care of the selection of lumber. For lining the bath from the inside, it is better to use wood conifers wood (pine or larch), while for exterior cladding it is better to use aspen. It is quite low, which will allow the bath to keep warm longer. Particular attention should be paid to vapor barrier. Dampness is the worst enemy of wood.

Usually mini-ovens for small volumes are metal structures designed to generate steam. As an example, consider the stove for the bath Varvara "Mini".

Sauna stove Varvara Kamenka mini
This is a wood burning stove overall dimensions 48x66 cm and 88 cm high. steel structure The top of the firebox itself is covered with a casing, inside of which there are convection channels. The air, heated in the area of the firebox, exits through the holes in the casing into the heater, thereby quickly heating the stones. As a result, the stove heats up very quickly, warming up a small room in a very short time.
In addition, there are more simple designs stoves in which the heating of the heater is carried out directly, by the action of heat from the combustion of fuel. Using in the steam room, you need to provide a place for storing fuel, or a shed near the bath.
With small volumes of a steam room, in some cases it is advisable to use electric sauna stoves and electric heaters.

On a note! Installing a heat exchanger on the chimney will allow you to quickly warm the air in the steam room. But this option is possible with the appropriate dimensions of the bath.
Mini-pools for a bath
Additional installation in the bath will expand the functionality of the bath and add comfort. It is worth noting that it is better to initially foresee the laying of a pool in the bath project, since mini-pools for a bath require summing up water supply systems, draining water, and heating.

For this reason, embedding a pool in a finished bath is a rather troublesome and costly business. There are several types of pools designed for installation in a bath:
- Stationary. In this case, the pool is initially laid in the bath project, a foundation pit breaks out under it, the walls of the pool are concreted and covered with a decorative coating. This type of pool is mainly used for full-sized bath buildings.
- Font. metal or plastic construction designed for installation in a pre-prepared box. To put it into operation, you only need to connect the font to the water supply system.
- Portable pools. metal structures with plastic trim. As well as the font, they are installed in a prepared bed, after which they are connected to the water supply system.
Pools can be equipped with water heating systems, hydromassage equipment, but in this case, the help of qualified specialists is required to connect them.
Mini-sauna for a summer residence
From the bath is distinguished by the type of steam and temperature. In order to make a sauna out of a steam room, it is enough to install an electric steam generator, an electric heater or a wood-fired sauna inside the steam room. When using a steam room for a sauna, interior decoration from one type of wood is recommended: pine, linden or alder. A mini-sauna in the country should be as closed as possible, almost sealed. Particular attention should be paid to its thermal insulation. This is necessary to maintain a high temperature inside the sauna for a long time, while minimal cost energy carrier.

portable sauna
How to build a small bath for a summer residence with your own hands
Before construction, you should familiarize yourself with the projects of already built baths and choose the most best option. Projects of mini-baths for giving with their own hands (both frame and timber) are quite widespread, and it is not difficult to find them. Before you build a small bath with your own hands, you need to decide on the type of bath, the material for its construction and location.
 Do-it-yourself foundation on screw piles. This technology is used to speed up the construction of not too heavy buildings, other architectural structures. In the article you will find step by step instructions building construction and helpful tips specialists.
 The main requirement during construction is accuracy. Everything must be done calmly and without haste. This will allow you to build a bath in a short time without excesses in work.
Helpful advice! When purchasing materials for construction, focus on the medium and high price range. soft materials for roofing, heaters and a vapor barrier, purchase according to a pre-calculated estimate, + 10% for the stock of material.

An important point in the construction of a bath is not to forget about. For a steam room of a small volume, a channel in the wall is sufficient; for larger rooms, a fan will be required. This is necessary in order for our small bathhouse in the country to be a place of comfortable rest, and not a peddler of miasma.
Article
Since ancient times, this building, special for the Russian people, was placed in a place that inherently invites to rest: on the shore of a lake or river, on the edge of a birch grove. But if you are the owner of a summer house, the question of where to put a bath on the site is a foregone conclusion. And with six acres, and with large areas, the bathhouse should be located away from the residential building.
In Russia, there are SNiP 30-02-97 sanitary norms that regulate the distance between buildings on a land plot and in relation to buildings on neighboring plots. The layout of the bath on the site must take into account and comply with the rules for the location of such buildings so that the authorized departments do not force the building to be dismantled. Therefore, before thinking about how to arrange a bath on the site from an aesthetic point of view, you should apply for permission to build it.
How to position the bath suburban area, depends not only on the imagination of the developer, but also on the current regulations. So, from the house to the bath, be sure to maintain a distance of 8 meters. To avoid conflicts with neighbors, the distance to the fence should be at least 3–3.5 m. If a sewer or ditch is used for drainage, the agreed distance is reduced to 2.5 m.
To recreate a special microclimate, you do not need to turn to landscape designers. It is enough to place the building on the edge of the site, the most distant from the residential building. Thanks to the secluded location, no one will take you by surprise, in one towel on your hips. To feel even more free, the building can be placed in some recess relative to the surface of the site. A meter of depth is enough so that vacationers cannot be seen from the street. The question of where to build a bathhouse on the site decided by itself!
The bottom of the recess is covered with gravel, granite chips and large cobblestones from the fields. The earthen wall is trimmed with logs so that the soil does not crumble.
In front of the bath, as we mentioned, a bench is installed for rest. From prying eyes, a hedge of dogwood, barberry and juniper is additionally planted.
How to build a bath in the country? We will discard the option of acquiring a finished log house because of the high cost. But a do-it-yourself bath in the garden is a reason for pride. So, the foundation and floor slabs of self-building are poured out of concrete. Mandatory moisture is carried out, for which bitumen and polystyrene are purchased.
The walls of the bath are built from expanded clay concrete blocks and spruce beams (20 × 25 cm). Horizontal surfaces adjacent to the ground (building in a recess) are additionally protected from moisture by a profiled membrane.
The bath looks more aesthetically pleasing with wooden windows and doors. The interior design of the premises should also set you up for relaxation: wooden furniture, accessories made from natural materials, subdued light. The stove-heater is selected depending on the area of the washing room. Ventilation, sewerage and lighting are best left to specialists.
A do-it-yourself bath in the country is an affordable luxury. It is worth erecting a separate building, and not being content with a built-in sauna, so as not to change the microclimate of the living quarters and not provoke the development of the fungus. You can go outside from the bathhouse, standing aside, to cool off. This procedure is especially useful in winter! "Bathing" in the snow is another attraction. And how useful the steam room is for the soul, only a Russian knows!
From ancient times, the bath was sung and was an integral part of Russian folklore. It is often referred to as a place to purify the body and soul. It is especially nice to have your own steam room in a summer cottage or in a private house, which is quite easy to build with your own hands without the involvement of outside help.


Peculiarities
A bath is a place with a special comfort and aura, which requires careful observance of the conditions, rules and stages during construction. On the modern market there is a wide variety of materials, thanks to which the construction of a steam room can be done very quickly and quite cheaply.
To build it with your own hands, you need to consider a few points.
- The place of the future bath. Its location should not be chosen at random. There are a number of instructions and tips that will help determine the territory for future construction.
- From what the foundation will be laid, what form it will take.
- Building dimensions. Masters advise to calculate the area in such a way that each person has about 3-4 square meters. m. For this reason, it is necessary to think in advance what approximate number of people will visit the bath.


- Material, its quantity, purchase.
- Choose the type of heating (electric boiler or traditional wood burning). The traditional Russian bath implies the presence of a real stove. Modern steam rooms are increasingly equipped with an electric heater, which quickly heats the room to a predetermined temperature, and also does not require constant maintenance of the fire.
- Finishes and accessories. It's always nice to be in a beautiful and clean room. This also applies to baths. External decoration plays an important role. High-quality and skillful design will always contribute to complete physical relaxation and peace of mind. Do not forget about bath accessories (buckets, brooms, hats and others). Of course, without them, you can steam and wash well, but there are special cases in life when “bath romance” is simply necessary.
You can start work only when the owner has decided on all the stages. Otherwise, this process may drag on for a long time without exact dates for the end.
Experienced masters in the construction of baths are advised to carefully consider all the details and not to rush during construction. Especially when you do it yourself. It takes a lot of effort to make this place truly a real bath, and not just a room where you can wash.


Where to place?
The location of the bath is one of the most important issues. Convenience and comfort when using it depends on it. It is also important where it is planned. Many people think that it can be any plot in the country, the basement of a private house, the roof or basement in a high-rise building.
There is a large number of rules, which is primarily aimed at the safety of a person and his home (if it is next to the future bath).
- It is advisable to make the bathhouse a separate building, since with poorly made waterproofing, adjacent rooms can become damp. If the area of the site allows, then it is best to place it 8–10 m from the main house. If this is not possible, then you can make it in the form of an extension to the house. It is very convenient when it is in the backyard.
- Particular attention should be paid to drainage and water supply. The bath should be at least 25–30 m from a well or well. This is due to the fact that the steam room is a direct place of water pollution, which should not flow along the ground, but into a specially designated drain.
- It is good when there is a reservoir at 30–40 m. It is not worth putting it closer, since the onset of floods is possible, the structure will be flooded.


- It is not recommended to locate this building next to the road. This prescription is more about ethics than safety. It is not always pleasant when strangers can see you naked.
- The bath should not border on nearby areas, so as not to cause discomfort to the neighbors when the owners decide to have a good rest and take a steam bath.
- It is desirable that the doors face south, and the windows are located on the west side. These tips are related to weather conditions and the characteristics of human psychology. They say that the wind from the north is much colder, so there is a high chance of getting a bad cold. As for the windows, the rays of the setting sun will help you relax and get
The bath is a room with a high temperature inside, then, unfortunately, cases of its ignition are not rare. In this regard, the choice of location for its location should depend on the material from which the foundation is made and bearing walls. According to fire safety rules, if the building is made of non-combustible building materials, then it can be located 5–6 m from the dwelling (house). If this whole tree or part of the steam room has wooden base or finishing, then the distance increases to 8–12 m.


Do not forget that there are neighboring houses and buildings in the neighboring territory. Their location must also be taken into account, since non-compliance with the norms can lead to unpleasant proceedings, and, as a result, the demolition of the installed bath.
Projects
Not every person can boast of a large house and a huge plot of land. But having modest or large possessions, you always want to have your own bathhouse or at least a mini-steam room.
If there is enough land for building, you can create a reference bath, which should have a steam room, a dressing room, a relaxation room (sometimes they make a pool there) and a shower or washing room. There you can wash off the remnants of soap and shampoo, or prepare the body for the heat (people take a warm shower with warm water). Owners of a truly large area can equip a bath room for a jacuzzi, massage, billiards and others.


But in a small area for construction, you can easily combine several rooms (dressing room and rest room, dressing room and shower room). It is worth noting that this comfort and coziness in the bath does not disappear anywhere.
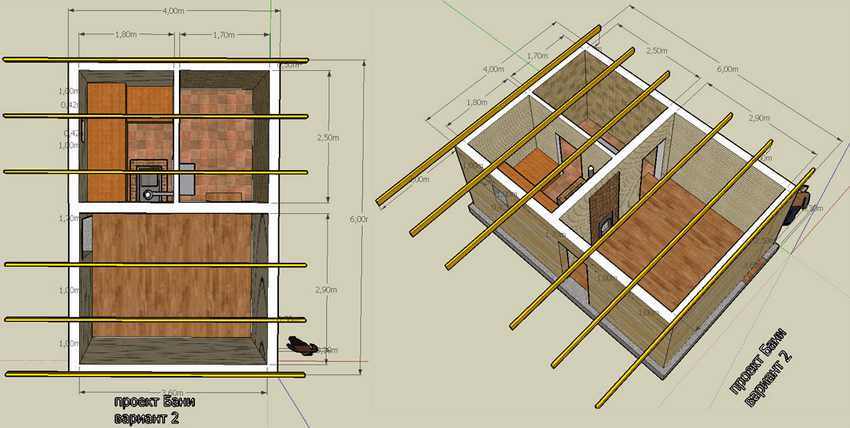
Depending on the quadrature, you can choose the ideal solution. For example, if it turns out to build a bath with a size of 3 square meters. m, then a small steam room (approximately 1.8 sq. M) and a pre-bath room (1.2 sq. m) can fit there. This space may well be enough for one or two people to visit without much discomfort.


In the building 6.5 sq. m will fit the same number of rooms, but they will be more spacious. Under the steam room, it is better to allocate 3.5 square meters. m, and the rest of the place under the dressing room. Some owners put a small shower in the corner.
If you have 9 or 10 sq. m, you can plan the territory more interestingly. Under the "hottest place" it is better to give 5 square meters. m, where 2-3 people can comfortably accommodate. The rest of the room is easily divided into a dressing area and a small shower.


Bath size 12-15 square meters. m is much easier to equip, since you do not need to cut out every meter. Here you can already give more space for a steam room to go there with a small company (3-4 people), or combine it with a washing room (1 sq. M) and make a large lounge with a table for drinking tea. It is also easy to divide the room into 3 separate rooms: a steam room, a shower room and a dressing room.
When there is room to turn around, it is much easier to divide the space. It all depends on the preferences of the owner of the bath. If he loves big companies, then of course it is better to focus on the size of the steam room, because you can relax in the house after all the procedures. But when solitude and bath romance are more valued, then it is worth considering a rest room. There, a person can sit in an armchair with hot tea, think about life, have a sincere conversation with a friend, read a book.


materials
The selection and purchase of material for building a bath is best done by yourself, as it will be possible to check its quality before installation. The market is crowded various options. Thanks to this, you can easily build a beautiful, high-quality and budget steam room with a dressing room. Most masters claim that the material from which the bath structure is made (its foundation) does not affect the bath procedures in any way. In this regard, more attention should be paid to the choice of the internal component, namely the material that will be inside the steam room.
In the minds of most people, a bathhouse is only made of wood or stone. But it is not so. Materials are improved in their qualities, and are also combined depending on the region of residence.
For the southern regions, it is not advised to use timber or wood for the frame, as there are many pests (bark beetle, grinder beetle, barbel, and others). From high temperature and humidity, fungus and mold appear. Therefore, the service life is very short - 2-4 years. For the southern part of Russia, the use of stone or brick is recommended. Most often, wood concrete blocks, polycarbonate (for a summer bath), aerated concrete, and sandwich panels are used there.


For the northern regions, wood is more preferable. Due to its natural features, it does not need to be treated with chemistry from pests. For this reason, the bath will be more environmentally friendly.
If it was decided to make frame bath from wood, then the walls will require a wooden beam directly (the quantity is purchased based on the project) or wooden sleepers (rather cheap building material), insulation and sheathing material. It can be OSB boards. They are pressed sawdust with resin, wax and boric acid.
For the inner lining, they take even pre-prepared boards, and for the outer - lining or eurolining. Sometimes (to save money) people use wooden pallets. Due to their shape, they can be used to build strong enough walls. Of course, they will need to be insulated. This option is the most successful for a summer steam room. To build a frame and walls in a brick or stone bath, you will need silicate brick, shell rock or rubble. Increasingly, cinder blocks began to be used. As for the exterior and interior decoration, the materials can be different.


Sometimes, when there is such an opportunity, skilled craftsmen make the base from a metal container. Construction is going very fast. But there are some nuances here (you need to cut holes for the door, make an additional partition for the steam room itself, and others). All walls are also carefully insulated and sheathed.
Interior decoration the ceiling in the dressing room can be made of wood such as alder, linden or pine. If we talk about the ceiling in the steam room, here experts recommend mounting a lining (it tolerates high temperatures better). It should be from a tree species that does not emit strong-smelling resins (spruce, pine, fir). The best option for this there will be linden, alder, cedar. Under no circumstances should chipboard or fiberboard be used. When heated, they release substances that harm the human body.
Wall insulation also requires special attention. They insulate the bath, as a rule, only inside, but they can also lay the outer layer of this material (into the frame of the building itself). If the building is made of a log house, then the insulation is placed on a lattice frame (crate). To do this, use mineral wool or other organic heaters. In the case of a stone or brick bath, the same mineral wool is taken, but it is laid in a thicker layer (5–6 cm).


In the steam room itself, after a layer of insulation, a vapor barrier is necessarily laid. For these purposes, thick foil or a special self-adhesive three-layer film can be used. It consists of a polyvinyl chloride mesh with two layers of film with small holes for steam removal. For the floor in the steam room, all the same wood that was used for wall and ceiling cladding is suitable, and tiles are usually laid in the dressing room. It is convenient to wash and disinfect from fungus and mold.


Important areas
A bath is not just a steam room, but also a place for rest and relaxation. In order to fully restore strength and spiritually cleanse, there must be such zones as a steam room, a change house (waiting room), and a shower. Of course, when the territory is small, there is not enough space for all sorts of extensions, but you can always find a way out. For example, combine functional areas in one room.
A bath without a dressing room is uncomfortable to use, especially if the house is 10–15 meters away. It is necessary so that a person can safely undress, prepare for the procedure. Also, this room plays an important role in the heat balance. The change house helps not to “lose” the heat from the steam room, and also blocks the way for cold air flows into winter time. On top of that, all bath accessories are stored here: buckets, ladles, various gels and shampoos, bathrobes, caps to protect hair from overheating, slippers and much more. Without this room, the use of the bath will be uncomfortable and inconvenient. With sufficient size, you can put a small table there to drink herbal tea, dry and cool down for going outside.


If we talk about a shower, then according to the recommendations of doctors, it must be. Before entering a hot room, you need to prepare your body - take warm shower. It will be easier for the body to endure sudden changes in temperature, and the pores will open much faster for active sweating and further cleansing. This area does not have to be large (in the form of a shower stall or an installed "standing bath"). One is enough square meter which can be hung with a curtain. In the case when it is possible to make a large and full-fledged bath, then it can be equipped with a separate room for a sauna or a jacuzzi. It all depends on the preferences of the owner.
The most important thing when building a bath with your own hands is to make it as comfortable as possible for your use.


Mounting technology
By itself, the process of building a bath is simple, if you have a clear plan of action. To get a high-quality and beautiful building, you need to follow a series of steps step by step.
- Prepare the area for future construction work. This includes clearing the ground of debris, digging up shrubs (if any), cleaning up stone boulders, and leveling the surface (it is necessary to remove earthen embankments or fill deep holes). They also make markings for pouring the future foundation.
- Foundation. It may be different in its configuration and type of installation. Masters recommend columnar or pile.
- Building walls and installing roofs. On the this stage walls are being built, insulation is being laid, holes are being made for doors and windows, a roof is being built (it is imperative to leave an opening for the chimney).


- Interior decoration of the premises. It is made based on the chosen style. Doors are installed, windows are inserted. The room is being prepared to accommodate the necessary elements for the steam room and the bath as a whole.
- Installation of the stove and tiered benches in the steam room.
- Arrangement of furniture and accessories.
Strictly adhering to the work plan, it will be possible to build a good bath. Experienced builders advise investing in advance for each stage so that the construction does not drag on for many months or years.


Foundation
In the case when a small bath is planned, it is more expedient and cheaper to make a regular one. strip foundation. The most important thing is to produce good thermal insulation, otherwise the floor will take heat from the room. As a result, condensation may form, and then a number of unpleasant consequences.
The creation of the foundation includes several stages.
- Before construction, it is necessary to clean and mark the area. As a rule, 10–15 cm of soil is removed. They mark the boundaries for building with wooden stakes (15–20 cm). A line or twine is stretched between the pegs. The evenness of the corners is checked (they must be exactly 90º).
- Next, the soil is dug along the marked trajectory to a depth of 60–70 cm (the earth can be thrown to the center, it will still come in handy). A layer of sand 10–15 cm thick is poured onto the bottom of the resulting trench and rammed. Sometimes for greater density it is slightly moistened with water. Following the sand, a layer of granite stone is poured or a brick is laid in one layer. This will be the supporting frame for the crate, which is made of a thick metal rod and also laid in one piece.


- Formwork is made from wooden boards. It will serve as a form for pouring cement mortar. In this regard, the boards should be 40-50 cm above ground level.
- The solution for pouring is prepared in certain proportions: 1 part of cement, 3 parts of sand and 3 parts of fine gravel. By consistency, it should resemble sour cream. It must be loaded immediately. It is advisable to initially calculate the required amount, otherwise you will get a foundation with poorly connected layers.
- For further work, you will need a construction vibrator, which can be rented. With its help, you need to “shake” the filled cement mortar so that all the air comes out and the voids go away.
- The next step is to level the top layer. After 5-6 days, you can remove the wooden sides. In this form, the foundation is left until completely dry and fastened. Masters recommend to withstand 20-25 days before continuing construction. During this time, the foundation must be watered, otherwise cracks may form due to uneven drying.
- Do not forget about the special holes for communications ( sewer pipes, wiring). At the pouring stage, the pipes should already be in the planned place.


If you plan to build a large bath, and the site has a complex bumpy and uneven shape, then it is better to install the foundation on piles. They come in several types: some are curled, while others are “screwed” into the ground. For a bath, both options are suitable.
Before its installation on the site, similar preparatory work, as with a strip foundation. Particular attention should be paid to the issue of freezing of the earth in winter. Usually these data are verified according to SNiP. Based on the information received, it is purchased metal pipe with a wall thickness of 3–5 mm.
Its length should be the sum of the following values:
- the length of the freezing layer of the earth;
- 40–50 cm for “drowning” of piles;
- 50 cm above ground level.


To make it easier to insert the pipe, it is sharpened. Each element is installed in the ground at a distance of 1 m from each other along the perimeter of the building area. It is very important that the piles are level. To do this, each pipe is leveled using a level (ruler with liquid and a scale).
A square “hat” (625 sq. cm) should be welded onto each pile. At its ends, holes are made for the installation of a reinforced concrete frame. All metal elements must be coated with a solution that prevents corrosion. After that, a layer of sand, gravel is laid and rammed and everything is poured with cement mortar using strip foundation technology. After installing the foundation, you can begin to install the walls.


Walls
According to their species diversity, the walls are:
- frame;
- brick;
- from foam block;
- from a tree log.
For installing frame wooden walls it is necessary to install the base on the grillage (there must be a waterproofing film under it). After that, racks are mounted at the corners of the future bath. They are fastened with metal corners, and for greater strength, jibs are screwed to them (beams standing at an angle of 45º).


wooden beam installed every half a meter along the entire perimeter with obligatory oblique struts. Do not forget about door and window openings that do not need to be blocked. Between themselves, the vertical beams are fastened horizontally along one line. After the frame of the walls is ready, they can be sheathed. But before that, all the wood is covered with impregnation from decay and mold (black mold is especially terrible).
Next, a heater, a hydro-barrier film and a facing material are laid. If brick was chosen for the construction of walls, then it is better to take red. He has the most suitable properties- does not "pull out" heat, as white brick does.
As a rule, the wall is made with two layers of bricks. The beginning of work is carried out from the corners, since the level will be set from them. The layer of bonding cement should not exceed 2 cm. For the convenience of masonry, the masters advise pulling the fishing line as a level. A reinforced concrete lintel is laid in place of the future window and door. Next, the walls are built up to the required height.


The construction of walls from the foam block is carried out in the same way as for bricks. The only difference is that every 4 rows you need to lay metal mesh. It will give greater rigidity and strength to the wall.
The most interesting, from the point of view of work, will be the installation of walls from a log house. It is very important that all trunks have the same diameter (a small error of 1-3 cm is allowed). Before installation, each of them is examined for defects (knots, bark remain), and is also treated with an antiseptic. Further, “holes” of 1 radius are made on each element. At the very first trunks, which are placed at the base, one side is made straight so that they do not “roll”. The next beam fits like a puzzle. In the corners they make a rope binding, starting from the floor itself, and all the joints between the bars are laid with a heater in the form of a tape.


Roof
Following the instructions for building a bath, the next step after installing the walls will be the installation of the roof. This process won't take much time and effort.
There are 3 large groups of roofs:
- flat;
- lean-to;
- gable.
The remaining species are varieties of type groups. Professionals advise to install shed roof for small baths. If the building is of impressive size, then the functional side of the roof is already selected here (for example, the 2nd floor for a recreation area, made from an attic).
If the walls are built of brick, the first layer (before laying the beams) will be a layer of roofing material as a waterproofing. Next, a wooden frame is mounted along the perimeter of the walls using anchors. It will serve as a support for all further structures that make up the "backbone" of the roof. A wooden crate of the selected shape is made on top. A heater is “inserted” into it and a vapor barrier sheet is necessarily placed. After these works are completed, you can proceed to the external and internal cladding. Inside, it is better to sheathe the ceiling with clapboard or prepared boards.


Floor
The floors in the bath should be given due attention, as a person has direct and frequent contact with them.
Like walls, floors come in 3 types:
- wooden;
- brick;
- concrete.


Concrete
Brick is undesirable as a floor because of its physical properties(small heat transfer). It gets very hot and can cause serious burns to the feet. The most commonly used, improvised and durable material is concrete. But it should be understood that such a floor is very cold and requires an additional layer of insulation on top.
Installing this option is very simple.
- First, sand is poured onto the finished foundation (at least 15 cm). Next, crushed stone or gravel is laid in a uniform layer of 10 cm. Do not forget about the drain, under which you need to leave space and remove the pipe, and it should go into the gutter or septic tank.
- After laying the “cushion”, the primary layer of concrete is poured 5–7 cm. When it dries, you should start laying insulation (mineral wool, perlite, polystyrene) and waterproofing. A reinforced mesh is placed on top of them.
- When the grid is fixed, you can fill the floor. Masters advise taking the finished mixture, since it is difficult to make it on your own. It is recommended to start work from the corners towards the door. As soon as the floor is dry, you need to start laying floor covering. It can be tiles, laminate and other materials.


Wood
The most practical and comfortable floors for a bath are wooden. They are of two types.
- Passing water through themselves into the drain hole (trellised or leaking). This is the simplest and cheap option floors. They do not require insulation material to install. They are made in the same way as a regular floor, only they leave a gap between the floor boards and the floor with a drain hole of 5–10 cm. For this, an additional frame is installed, on which it is mounted wood flooring. The most important thing is to qualitatively process the wood from decay and dampness. As a rule, such a floor is made in the steam room itself.
- Stationary floors (not leaking). Usually they are made in the dressing room or rest room, but they can also be done in the steam room. To begin with, a drainage system is made so that there is a full drain of water. Next, an identical preparation of the floor is done, as in the variant with concrete. Then a waterproofing insulation is laid, and a fine wooden floor is placed on top of it. It is very important to coat all cracks and joints with sealant.


Wiring
It should be noted right away that only the person who has knowledge and skills in the field of electrics can do the wiring on his own. It will be very difficult for a beginner in this matter, even if he follows the step-by-step instructions.
Installation of electrical wiring must be carried out in a strict and clear sequence.
- Grounding of all metal structures, housings electrical appliances or gaskets to protect yourself and people from electric shock.
- Connecting the power cable. In rooms where there is no contact with water, it is laid in special plastic boxes. Where there is water or steam, it is laid in PVC pipes.
- Cable routing in rooms with no access to water. From the junction box, a wire is laid along the same plastic gutters. Further, a through hole is made in the wall, where there will be a lamp in another room, and joins it. It also connects to a switch. A metal sleeve must be inserted into the passage for the wire in the wall and filled with a non-burning composition.


- Connecting electricity to the steam room. It is worth noting that it is strictly forbidden to find a junction box and switches inside it. In this room, it is recommended to use low-voltage lighting. Also there it is necessary to lower the voltage of the flow of electricity, for this they use step-down transformers. The cable that will be led into the steam room through a hole in the wall must be heat-resistant. A hole in the wall is processed in the same way as above. It is very important to mark all the cores in the junction box, otherwise it will be difficult to find the cause if the power supply breaks.
- Installing sockets. Their installation is carried out in a similar way. Most importantly, any outlet should be at least 60 cm from the sink and shower. Also, each of them should have a protective plastic cover that closes them from moisture.
When connecting electrical wiring to the bath, you should select a cable according to the equipment to be installed, it is necessary to take into account its power and electricity consumption. All work must be carried out in rubber shoes, dry room and rubber gloves.


Finishing work
Today it is very profitable to do the finishing work yourself. If you order this service in a company, you can get a fairly large amount. Finishing work is a complex of construction activities aimed at the external and internal improvement of the building. The material is selected in advance. His choice should be approached very seriously and responsibly, as under the influence of heat and water, he can emit odors or change shape.
Masters advise doing work in parallel, and not in parts (first the facade, then the steam room, and so on). But there must be a certain sequence. First, the ceiling is finished, then the walls, and then the floor. At the time of the finishing repair, windows and a door (at least a rough one) should already be inserted.


Internal (as well as external) finishing is carried out in a number of stages that must be observed.
- All purchased material must be acclimatized. For example, if a tree is chosen for work, then it needs to lie down for several days indoors.
- Installation of the frame on which the cladding will be applied.
- Heater pad.
- Waterproofing.
- Installation of panels (wood, lining and others).
Similar work is carried out from the outside.


External design
The external decor of the bath is just as important as the internal one. It is always nice when the house and the steam room built nearby are in harmony with each other, creating a single style of the site.
How and from what to make the outer skin of the bath depends on such factors:
- General style. The harmony and combination of buildings will always please the owner;
- Sheathing must perform certain functions: protection from weather conditions, insulation of internal heat, containment of cold air currents.
The walls of a classic Russian bath are usually made according to old traditions - solid logs. This is truly one of the coziest and most pleasant designs. Such walls do not need additional finishing, but sometimes a rope rope is laid along the seams, which is soaked in resin.


To date, there is a large selection of material that can beautifully and quickly decorate the facade of the bath. It can be lining, siding (metal, plastic), fiber cement panels and others.
The most common type of cladding is panel siding. It is recommended to choose vinyl or wood. They are most suitable for the theme of the bath. They must be mounted on a specially installed crate made of timber with laid layers of insulation. Sometimes it is attached with a metal profile. Then it is installed in a circle butt to joint.


The second most popular material for exterior design is lining. It is convenient in that it has slats of various widths (they can be selected for any building), which can be made of plastic, MDF or wood. The latter option is chosen most often. The most important thing is that all boards are well treated with a special solution that protects the material from dampness and decay. Lining made of plastic (vinyl) will also last a long time, but it fades quite quickly due to direct sunlight. But its plus is that it is not afraid of moisture and sudden changes in temperature. The lining is installed in the same way as the siding panels.
If the bath is built of brick, but you want it to look like a wooden one, then in this case you can make a cladding from a block house. This is a finishing lumber that resembles eurolining. It is made using a special technology - 4 boards are cut in a circle from a round tree trunk. The result is boards that are perfectly even and flat on one side, and convex-semicircular on the other. With their help, it is easy to create an imitation of a house built from a log house.


Interior Design
Since childhood, the image of a simple Russian bath has been embedded in the head of every person. As a rule, the interior of this room is entirely made of natural wood (alder, linden), there are wooden chairs with forged legs at the same table, home-made new brooms made of birch or oak hang on the walls, and most importantly, there is a smell of wood resin, steamed leaves, soap.
To preserve the atmosphere of a real traditional Russian bath, it is best to purchase wooden furniture.(table, chairs, benches). It is very beautiful when it has carved elements. Homemade knitted or woven bedding is sometimes placed on the seats. They are made with bright ornaments to complement the room with comfort and joy.


It is advisable not to lay a carpet on the floor in the dressing room. Fungus and mold will multiply in it due to high humidity. It is best to use ordinary tiles or wooden planks treated with a special solution. Shelves on the walls will not be superfluous. They are also made from wood. It will perfectly accommodate mugs for beer, a teapot or beautiful brownie figurines. It all depends on the imagination of the owner.
In the steam room, too, should be comfortable. Usually, lighting with a birch bark lampshade is placed in the corners, and forged hooks on the walls that hold ladles and buckets. Buckets can also be in ethnic style. They have carved handles or a metal rim in the middle. A decorative panel made of wood is often installed along the upper rim of the ceiling. Ethnic ornament, animals, bathing process and so on are carved on it.


A dressing room or a rest room is also filled with accessories. They are often made on their own, searched for at flea markets or folk fairs. It is easy to find wooden spoons, bast shoes, carved figures of brownies, paintings on birch bark and other accessories there. With the help of them it is easy to add comfort and warmth to this room.
An integral part of the interior of the Russian bath is the smell. Thanks to him, a person relaxes as much as possible and rests entirely (soul and body). Each room has its own scent. In the steam room, it is the aroma of steamed oak or birch brooms. It’s good to put an aroma lamp in a change house, and change it every time to suit your mood.


Style
In the XXI century there is a huge variety of baths. Their main difference lies in the temperature of exposure to the human body, as well as the quantity and quality of steam in the room itself (steam room).
- Russian sauna. Steam heating temperature - 40º–75º, humidity about 60%. Thanks to such conditions, the human body warms up qualitatively and deeply, and a high level of humidity helps to quickly open the pores and start sweating. The result is high-quality skin cleansing.
- Hamam (Turkish bath). Here the temperature is slightly lower - 35º-60º, and the humidity is about 85-100%. The conditions in this steam room are more gentle. Thanks to this, you can spend quite a long time here, do various cosmetic procedures (massage, peeling and other procedures). The body warms up gradually, and the skin is constantly moist. Thus, “opening” and steaming of the deep layers of the skin is performed.


- Finnish bath. The difference between such a steam room is that rather high temperatures are used here (120º-150º), and the humidity level is very low (10-15%). In this regard, going to such a bath has a number of contraindications and conditions for staying in it. It is not uncommon for a person's skin to be severely dried out, or burns were received. But at the same time, the body warms up and relaxes very well.
- Japanese water bath. This type of steam room is very specific. A person sits in a barrel of water that heats up to 60º. The skin warms up and steams well, but it does not breathe under water. Due to this, profuse sweating occurs, toxins and toxins are removed from the skin.


How to choose a boiler?
The heart of any bath or any steam room is a heating boiler or stove. Without it, in principle, the functioning of this room cannot be carried out. The most important thing is that the heating boiler can be heated to a sufficient temperature, and therefore have a good thermal power. In addition, it is necessary that a person can regulate the level of heating with tangible intervals in temperature. All these parameters depend on the material from which the boiler is made, as well as on the competent selection of power and size of the steam room.
Boilers for baths are made of metal. As a rule, this is ordinary or specially treated steel. In more expensive models, its thickness can be 1–1.5 cm. During the long-term operation of such furnaces, the so-called “metal fatigue” may appear. This phenomenon is manifested in a slight deformation of the form. Because of this, the door for filling the fuel may begin to jam, or the welding seams may “spread”. For this reason, masters recommend using cast iron boilers. They are much stronger and have a longer service life.


The main function of the boiler is to heat the room as quickly as possible to the required temperature. This ability in many ways elevates him above the usual brick stove. In turn, metal furnaces can be conventional or long burning. It is better to choose the second option, since such a boiler cools down much more slowly and keeps heat for a long time, and will also save on fuel.
When choosing a stove for a steam room, it is necessary to take into account its design features and human comfort. Each boiler has a door where firewood or coal is placed. In some models, it is located inside the steam room. On the one hand, this is convenient, since there is no need to leave the room to add temperature. But at the same time, the steam room is always humid, and wood or coal is damp from this. It turns out that first the fuel is dried in the oven, and only then it gives the desired temperature. Plus, from firewood and coal, chips and debris will accumulate, which can injure steamed tender feet.


The boiler must have a stove. Medium-sized stones are placed there (it can be pebbles brought from the sea). Since they lie on hot metal, they also warm up. During the bathing procedure, water is poured there, and steam is generated, which is so necessary in the steam room.
The heater can be on top of the boiler or located on the side. The side option is better, as the water only hits the rocks. Such steam is considered softer and more correct. Ideally, when this design (reminiscent of a forged lattice bucket) does not touch the walls of the boiler. This is due to the fact that the stone keeps the temperature for a long time, therefore it can deform the adjacent wall of the heater, thereby reducing the life of the boiler.


Most models have a special container where water is heated. It is scooped up with a ladle and poured on stones to add heat to the room. It can be located on either side of the boiler, but it is best if it is hung on a pipe (chimney). So the water will not boil, but it will always be warm. Plus, the risk of scalding a part of the body is reduced.
Particular attention should be paid to the weight and dimensions of the boiler. If the steam room is large, then it should correspond to the size of the room. If the floor is not prepared in advance, then it can simply collapse under its weight. Usually, the future place for the boiler is poured with concrete during the construction of the foundation. When the stove is small, it can be installed directly on the floor, but it is better to lay a layer of bricks, as the wood dries and deforms from high temperatures.


The above are the main reasons why part of the heat leaves the boiler. If you clearly know these data, then the calculations will be more accurate and correct. Then all this information is substituted into the formula. By itself, it is very large, and without knowledge in the field of physics and mathematics, it will be difficult to calculate the correct answer. It is best to come with known data to a specialist. Usually in any store specializing in boilers and heating system there is always such a person.
The most important thing when choosing a boiler is not to focus on the price, but on the quality and characteristics of the product. Expensive doesn't mean good. It is worth knowing that if almost any part in the boiler breaks down, you will have to change it entirely.


Even an experienced master in the field of construction and repair will not be easy to build a bath absolutely correctly. As in any other business, it has its own nuances and subtleties of the work, and they can only be learned from a person who is professionally engaged in this business.
The first thing that the masters advise is that the construction of a bath is best done in a dry and warm period of the year. This is due to the fact that all solutions, putties and impregnations must dry completely. Otherwise, there is a risk of installing poorly processed wood, which will last only half the prescribed period.
Before starting construction, it is imperative to create a detailed project of the future bath. It should indicate the exact dimensions, the layout of the pipes for the drain and water inlet. For electrical wiring, it is better to make a separate drawing. Based on the plan, it will be easier to calculate the amount required material, as well as a novice builder will immediately understand what work he cannot do without the additional help of professionals. He will be able to budget for the cost of support work from outside.


If you want to build a comfortable and roomy bath, and there is not much space on the site, then it can be made as an extension to the house. Thus, it will be possible to save on the “4th wall” and space.
In order for the bath to serve for a long time, the masters advise airing it as often as possible. As a result, wood and metal coatings will dry and not be exposed to the formation of mold and fungus.


Beautiful examples
- This example shows that even a small bath can be beautiful and comfortable. There is a small steam room, and plunge into cold water with the heat can be on the street. AT summer time a table and chairs are easily placed nearby, where it will be pleasant to sit, drink tea under the moon and stars.
- Shown here is a spacious steam room, where a friendly company can easily fit. Due to such dimensions, there is a place for a person to lie down to his full height and be steamed with a bath broom, while other vacationers can sit quietly and relax.
Almost every land owner, sooner or later, thinks about building a bath. After all, a bath is not just a room for washing, but also an important element of summer vacation. The construction of a turnkey bath can be ordered from professionals for a tidy sum, or you can try to build a bath with your own hands.
After reading this article, you will be able to choose a project, find out the sequence of the construction process, get acquainted with the models of boilers and find the best bath option for your dacha.
Before starting construction, it is necessary to develop a bath project. To do this, it is not necessary to contact an architect, you can develop a simple project yourself, especially since now there are many computer programs for designing.
Think about what size bath will be optimal for your family. What rooms will be located inside the bath. From what materials to make the foundation, walls and roof, do not forget also about the decoration of the bath. An important point in design, is the location of the boiler and the method of its combustion.
Below you can see the popular projects of baths:

- Bath project size - 4x4 meters.
- Bath project - 4x6 meters.

- Bath project - 5x6 meters.

- Bath project - 6x3 meters.

- Bath project - 3x3 meters.
After you have decided on the size and materials for the bath, you need to draw up a cost estimate.
Foundation
For the construction of a bath, several types of foundation are used. Depending on the weight of the walls and the characteristics of the soil, the following types of foundations are made:

- Slab foundation.
- Column foundation for light walls.
- Pile foundation.
- Concrete strip foundation.
As practice has shown, the most reliable foundation for almost all types of soil is a concrete strip foundation reinforced with reinforcement.
To make a strip reinforced foundation for a bath, you will need:
- Cement.
- Sand.
- Gravel.
- Fittings.
- Formwork.
- Ruberoid.
- Wire.
- Shovels.
- Concrete mixer.
- Harness.
- Stakes.
- Tools (pliers, hammer, tape measure and others).

In the place chosen for the construction of the bath, mark the trench for the future foundation. For marking, use a tourniquet stretched between the pegs. The width of the trenches is made based on the weight of the material for the walls. For one-story bath made of wood or brick, it is enough to make a trench 30-40 centimeters wide. After installing the markup, do the following:
- Based on the markings, dig a trench 50-80 centimeters deep.
- Tamp the bottom of the trench and fill it with water to shrink the soil.
- Cover the bottom of the trenches with roofing paper for waterproofing.
- Fill the trench with gravel to a third of its depth.
- Install the formwork along the edges of the trench.
- Make a frame reinforcing the foundation, from reinforcement rods interconnected by wire.
- Install the reinforcement cage into the formwork.
- Using a concrete mixer, make a cement mortar in the proportion of one part cement to one part sand and two parts gravel.
- Pour the cement into the formwork, being careful not to allow air pockets.
- After the concrete has dried, remove the formwork.

The foundation for the bath is ready!
Walls
For the construction of walls use the following materials:
- Wooden bar.
- Logs.
- Boards.
- Brick.
- Blocks from various building mixtures (cinder block, aerated concrete, wood concrete, and so on).
Since the construction of a bath from logs or bricks has already been quite widely described on the Internet, let's consider the option of building a frame bath from a bar of 15x15 and 5x10 centimeters and boards with a section of 2x15 centimeters:

- fabricate bottom harness, for this, take bars with a section of 15x15 cm and install them on the foundation, connecting them with special metal plates and corners. There is another way to connect the bars, by cutting spikes, grooves at their ends and then fastening them with screws or nails. When tying, do not forget to put waterproofing under the bars.
- Install vertical racks from a 5x10 cm beam. The distance between the racks is usually 50-60 centimeters. First of all, determine the position of the window and doorways and install the racks framing them.
- In the process of work, fix the already installed racks with temporary strips so that they do not warp.
- Make the top harness by attaching it to the ends of the uprights.
- When making the final fastening of the upper trim, carefully monitor the position of the vertical racks, checking their evenness with a level.
- Be sure to strengthen everything corner connections diagonal racks, this will help to avoid warping the frame.
- Make a ceiling sheathing.
- After making the frame, make the outer cladding of the walls of the bath with a board with a section of 2x15 centimeters. If you do not want gaps between the boards, then make the sheathing - "overlap", laying the bottom edge of the board on the nailed board. By appearance, this method resembles the decoration of walls with siding.

- Having sheathed the bath from the outside, proceed to the installation of insulation. Styrofoam sheets or mineral wool installed along the vertical racks of the frame.
- On top of the insulation, it is necessary to install a layer of vapor barrier, which is attached to vertical racks using thin rails.
- After installing the vapor barrier, make the inner lining of the bath with clapboard or slats.
- Insulate the ceiling by laying vapor barrier sheets on the inner lining, then insulation. Sheathe the ceiling from the outside with plywood sheets.
Please note that the manufacture and insulation of the ceiling can also be done after the installation of the roof.
Roof
The roof for the bath is of three types:
- Shed.
- Gable.
- Complex - consisting of four or more slopes.
Usually, the first two options are used for a bath. Let's look at the option gable roof covered with metal tiles: 
The manufacture of the roof begins with the installation - Mauerlat. In case of frame walls, the role of the Mauerlat is performed by the upper stroke.
- Install the uprights on the bench.
- Connect the racks with girders and puffs.
- Install the rafter legs by attaching them to the Mauerlat, run and connecting the upper ends to each other. The distance between the rafters should be 50-60 centimeters.
- Install sheets of metal.
- Sheathe the gables wooden slats or sheet metal.
For a more visual acquaintance with the roof fastening, the following figure is shown: 
All sizes of roof elements are listed: 
Keep in mind that the smaller you make the slope of the roof, the more snow load will fall on it in winter. Also, a small slope of the roof can lead to poor drainage and leaks.
floors
The design of the floor depends on the type of room. In the rest room, ordinary wooden floors are made. In the washing and steam rooms, the floors are made of two levels:
- The first level is made of concrete, has a slope towards the drain hole.
- The second level is a finished floor made of boards with gaps for draining water.
If you want to make a porcelain stoneware floor or tiles, then they simply fit on the first level at a slope to the drain hole. 
In order to make a concrete floor and drain in the bath you need:
- In the center of the steam room and washroom, install plastic pipes with a diameter of 5-10 centimeters with a bell at the end. Pipes must go through the foundation to the street and connect to the sewerage system.
- Lay down a layer of waterproofing material.
- Spread a layer of gravel 10-15 centimeters thick over the entire area of \u200b\u200bthe rooms.
- Make a cement mortar and pour the floor with a slope to the hole installed on the drain socket pipe.
- Install a grate on the drain hole to prevent debris from entering the sewer.

At the second stage, wooden floors are made:
- Install baths in all rooms wooden logs. Make the distance between the lags 30-40 centimeters. As a log, you can use bars with a section of 3x5 cm or 4x6 cm.
- Nail boards with a section of 2x15 cm or 5x20 cm onto the logs.
- In rooms where water is supposed to be drained, leave gaps of 0.5-1 cm between the boards.
Do not forget, before starting the installation of wooden floors, treat all parts with wood impregnation. When making floors, keep in mind that they should be above, or at the level of the top edge of the foundation.
Boiler
The model of the boiler for the bath will largely depend on your financial capabilities and the fuel that you will use for heating. If you know how to use welding, then you can make a simple boiler yourself, from thick sheet iron. If you prefer more advanced colas on gas or electricity, then they can be purchased from specialized companies.
The boiler in the steam room is installed in such a way that the combustion chamber is loaded with fuel either from the street or from the rest room (dressing room). The boiler itself, for fire safety purposes, is located 10-15 centimeters from the nearest walls. Walls to the height of the boiler, covered with sheets of iron. A good solution would be to overlay the boiler with bricks, thereby reducing its cooling time and protecting the walls from fire.
When arranging a chimney for a boiler, pay special attention to the place where the pipe is in contact with the ceiling. The hole for the chimney should be insulated with a refractory material. Also, pay attention to the place where the chimney pipe exits through the roof. Usually, this place is prone to leakage, so it should be carefully sealed. Below are the options for boilers for the bath:

- Homemade boiler from sheets of metal.

- A gas boiler.

- Electric boiler.

- Solid fuel boiler.
Bath arrangement
After the bath is built, it is necessary to equip it:

- Bring to the bath all the communications available on the site - electricity, sewerage, water supply.

- Place inside the sink, shower, light sources, furniture for relaxation.

- Decorate the walls of the steam room with curly slats and make stepped shelves.

- Buy wooden tubs, buckets, buckets and brooms.
After the arrangement, you can safely invite guests to take a steam bath in your personal bath!
You can also see the instructions for assembling a mini-bath for giving without a foundation in the video:
Variants of beautiful and unusual baths
In addition to traditional materials and design for a bath, there are many alternative solutions. Below we give photos of the most unusual baths:

- A mobile bath from a "lining", built on a car trailer.

- Sauna in a huge wine barrel.

- Bath from plastic bottles.

- Bath dugout, built right in the ground.

- Bath housed in an iron container.
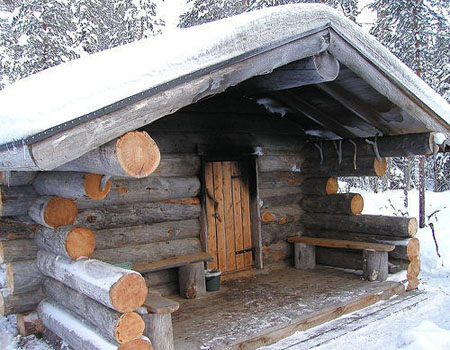
- Forest bath from raw logs.
![]()
- A beautiful bath from a gun carriage.

- Bath from unedged boards.
At the end of the article, I would like to remind you that heating the bath is associated with fire and high temperatures. Therefore, when building a bath from bricks, logs, cinder blocks or boards, pay great attention to fire safety. This warning also applies to the electrical wiring, since the rooms inside the bath have high humidity air and the risk of an electrical circuit due to condensation is very high. 
We hope that reading our article will encourage you to build a bath yourself!
Hello! I'll tell you how I built a bath in the country. Built one. Sometimes only (when installing heavy or long parts) he asked someone to help (when installing a log house and rafters).
Well, I'll start in order. To begin with, we determine on the site where the bath will be. We mark the place of the future foundation and start digging.
Digging under the foundation.
Since our site is located on quicksand, the foundation was made more powerful. At the collection point of black scrap metal, I bought pieces of rebar. He welded a frame out of them and laid them on bricks so that the metal did not touch the ground.
Next, we make the formwork so that the foundation protrudes above the surface. For formwork, I used chipboard from old cabinets. I set it up with smooth edges and set it to the level around the entire perimeter. This is necessary so that later the brick does not display the level. We lay a sewer pipe for draining water.
Next, pour concrete. You can bring ready-made concrete with a mixer (this is if there are ways to drive the mixer). In my case, there was no possibility of a mixer entrance. I ordered 1 Kamaz OPGS (Enriched Sand-Gravel Mix). They dumped it on the site (by the way, my plot is small, only 4 acres). And the hardest part began. From one end of the site to the bath on a construction wheelbarrow I carry 3 buckets of OPGS + 1 bucket of cement. I add water on the spot and mix it in the same wheelbarrow with a shovel, pour the finished mixture and level it. Since I did all this alone, it took me 2 days. At that time, I thought it was pointless to buy a concrete mixer, but then it turned out to be better if I bought it, because then I filled in the paths and other little things. In short, if there is such an idea, buy a stirrer, it costs 7-8 thousand. For one and for the stove we fill in the foundation.
We are waiting for the poured foundation to grab and get stronger and begin to lay out the red brick base. Between the foundation and the brick, I put a layer of waterproofing on it 2 rows of bricks. When laying bricks, he left 50 mm sewer pipes for ventilation and one polypropylene pipe for cold water supply.
We bring a log house and lay out all the logs in order so that later we don’t have to look for the right ones.
Already on the finished brick base, I put 2 layers of TechnoNIKOL waterproofing material and began to assemble the frame. I sanded each log with a grinder with a sanding nozzle. Jute was used to seal the joints. Waiting, he nailed it with a stapler and, when installing the log, threw it in order to crush the jute. The frame is assembled. I immediately treated the exterior with an impregnation against bugs and weathering.
The frame is assembled.
Rafters and lathing.
Gables.
Dressing room.
Entrance door.
Ceiling board 40mm. I glued it with foil and sheathed it with aspen clapboard, insulated it with ecowool on top.
Shelf frame.
The stove is fenced off.
The floors in the dressing room were varnished for yachts.
Well, here's what happened in the end.
www.drive2.ru/users/malaika11/