How to make a warm shower in the country. Heating a country summer shower - The simplest methods Do I need to insulate a summer shower
As Ostap Bender would say, a dacha shower is not a luxury, but a means of hygiene. Moreover, a remedy of paramount importance: according to medical statistics, people who put off bathing after a weekend at the dacha until they arrive home go to the doctors about skin and gastrointestinal diseases 12% more often than others; data of a similar nature are not available for other types of health disorders.
You can buy a simple country shower room, designed only for summer weather, for 10,000 rubles. Having spent an amount that is 2-3 times less, or even completely from improvised materials, you can build a warm shower with your own hands, suitable for bath procedures from the beginning to the end of the summer season. In this case, a full range of amateur products is found - from a slimy konurka, the dream of a greedy dermatologist (there will be many patients, they will give money) through completely functional, hygienic and even almost not spoiling the view of the building site to structures from, for example, construction waste, at the sight of which the experienced designer nods his head knowingly, see fig.

But, which is typical, there is no medical correlation with the type of shower - purchased, of different price categories, or home-made. A “super-duper firm” for 70-100 “sput”, with automation and touch-remote control, can turn out to be a hotbed of infection, and a shower concocted from a kondachka in the country will faithfully guard the cleanliness and health of the owners for many years and decades.
Do-it-yourselfers with manufacturers are not to blame here; and that, and others efforts, skills and considerations do not occupy. It's simple - no one really knows how to do it, a country shower. If there are any regulatory rules for its construction, then neither the builders, nor the plumbers, nor the orderlies know anything about them. It is clear that you need to do a country shower correctly in essence, i.e. so that it does not infect, but does not infect, and so that the contents of wastewater do not kill the earth and spoil the crop, but how? It's dark here, like in Khrushchev's bathroom, when the plugs were knocked out.
For example, the minimum volume of a cesspool is supposed to be 2 cubic meters. m, but this is with the standard volume of flow, and in the country it is many times less. The biochemistry of the cesspool is disgusting, but well balanced; the pit should neither overflow nor dry out. Modern (dry closets) allow you to reduce the volume of the cesspool and the frequency of calls to the toilet, but the processes in the cesspool do not fundamentally change. What volume and design do you need a cesspool for an outdoor shower? I have no idea, as Barack Obama would say. The same applies to other components and structural elements. In fact, those who want to make a country shower competently are pulled according to the norm from there, then from there, and there - maybe they will all come together. Or maybe they will disperse, and the byaka will come out.
Well, let's try to include what mother nature of the American president has yet to deprive a little, to say at the end: "Well, at least I've found a good ideal!". We will design a summer shower for ourselves, based on the principles:
- Hygiene - neither the shower itself nor the water for it should harm those washing, only benefit.
- Environmentally friendly - shower drain should not harm environment not in the near (in the form of a correspondence of the crop from the plot sanitary standards), nor in the distant (in the form of water quality from local water supply sources) perspective, in space and time.
- Practicality, it is also functionality - it should not only be possible, but it should be pleasant and useful not only to freshen up in the heat, but also to wash in any weather from the first to the last trip to the country.
- Aesthetics - a shower cabin for a summer residence should at least not spoil landscape design site, but, preferably, organically fit into it. An alternative is an invisible shower, collapsible or not conspicuous.
- Profitability - the construction of a shower should take a minimum of labor, materials and financial costs, without prejudice to any of the previous qualities.
We will use the existing norms and rules, but for verification, so as not to fantasize nonsense. And we also use a good bit of knowledge about physical and chemical processes in nature and the soul. The data in the regulatory documents is the tip of the iceberg and, since there is no single code for country showers, you will have to turn to the basics. To properly build a shower, let's go from one critical node to another; what is in the middle, then it will be easier. Realistically, in this order:
- Base.
- Stock and cesspool.
- Design choice.
- The possibility of combining functions (shower, combined with a toilet, etc.)
- Floor, pallet and platform.
- Cabin - frame, walls, etc.
- Diffuser (watering can), pipelines, shut-off valves.
- Additional equipment - water heater, cabin heating, pumping.
What does all-weather mean?
Item 3 of the list above is especially important for medical reasons. When it is violated, the case no longer smells of itchy ankles and shoulders, but of such things as pneumonia. A heated shower means more than just hot or warm water.
Let's say it's +13 outside, but you need to wash. The cabin has cooled down to the same temperature: there will be only sense from warming (may the readers forgive the involuntary pun) if there are heat sources inside the washing room. Without them, you will have to tremble and shiver for 2-5 minutes until the heat of the spray from the watering can heats up the cabin. In the meantime, hot water may also run out, the tank is not a vat.
So, you need to heat not only the water in the tank, but also the air in the shower. It is highly desirable to create a warm island in a light cabin with large gaps at the bottom and top. How to achieve this, we'll see when it comes to additional equipment; for now, as they say, we will tie a knot.
child question
Why is the shower separate? In the apartment he is together. Then, that summer cottages are not equipped with sewage. Here it is appropriate to recall the rule: the cesspool should be at least 15 m away from residential buildings. The point is not only in miasma, but also in the fact that the filtrate from the cesspool can wash away the foundation of the house with all that it implies. It is still possible to arrange a shower in a country house. Then, if the house is heated, then the shower will be all-weather.
Note: a bioseptic tank, which almost does not give harmful fumes, under certain conditions can be moved closer to the house by 4-5 m. But this topic already applies to the arrangement of country toilets.
Country shower device
Base
When zero is not needed
The need for a zero cycle of country-shower work is eliminated in the following cases, see fig. below:
- When a compact portable shower is used, on the left in fig.
- If the shower with adjacent outbuildings are ready-made modular, in the center in fig.
- If the cabin is on a frame made of plastic pipes(propylene or PVC) with soft skin, right ibid.

A compact shower in a suitcase (on sale - a large selection) is used in any random place, but is inconvenient in terms of water heating; it is difficult to adapt a water heater to it, and compactness with mobility is immediately lost. Capacity - rinse one or two. To this, a soul and a cesspool are not needed - there is not enough water in the tank, and no matter who and no matter how they wash, the local ecology will digest such a volley discharge.
Modular showers are designed to be installed directly on the ground. They are supplied with adjustable legs, which, when installed permanently, allows compensating for current soil movements. Modular common areas are more familiar to citizens from public dry closets, but besides them and modular showers, kitchens, shelters, etc. are also produced, so that a full-fledged utility block can be assembled from the modules. Pleasure is by no means cheap, more modules are used to organize the amenities of professional mobile teams. A cesspool is not required, you only need to change the filler of the built-in septic tank in a timely manner.
Frames of soft showers are put on stakes driven into the ground from reinforcing bars. If the frame is made of PP water pipes, then it is assembled using standard connectors, but one size larger, and not by soldering, but by self-tapping screws. The cabin turns out to be collapsible and quite reliable, because. the frame is lightly loaded and absolutely maintainable. Sheathing is most often made of colored tarpaulin: in the heat then the cabin is not so parky, in the cool it is warmer, and the tarpaulin, unlike the film, does not stick nasty to a wet body. Such a design will withstand a 12-point earthquake, if only the earth itself from under the shower has not gone anywhere. A cesspool is needed, so soft showers are not particularly popular: if you dig a hole, then it’s better to make a foundation, and put something more impressive and more attractive on it.
Under plastic
It is possible to build a shower cabin from light, resilient and chemically resistant materials with rigid sheathing (see below) without a foundation, even on very heaving soil. So that it does not overturn, in this case, 30-40 cm of a non-porous pillow is enough. Specifically - sand and gravel bedding in layers of equal thickness. The thickness of the pillow is approximate, in fact, the upper humus layer of the soil is removed to the underlying rock: loam, sandy loam. Summer cottages on meter-long black soil are not distinguished, so you won’t have to dig very deep, but still - 30 cm, of which 15 is sand and 15 gravel, this is the minimum. Suddenly, after the winter, it still warps, you can move the booth, align the pillow, and put it back as it was.
Note: a plastic shower is attached to the ground with the lower ends of the pipes put on fittings driven into the ground, like a soft shower. But there is a difference - since the structure is permanent, then the stakes are driven into the ground at least 0.35 m below the bottom of the pillow, and it is better, if local conditions allow, to the freezing depth, then seasonal distortions are excluded.
Under the tree
A shower made of wood, in principle, can also be placed simply on a pillow, but double impregnation of wood with a water-polymer emulsion, biocides and then treatment with hot bitumen will protect support frame and the floor from rotting for 3-10 years, depending on local conditions. Wood treated in this way can hold strength for 30-40 years, but mold fungi with bacteria will get to where they stand and rub against bodies much faster. Therefore, a shower cabin made of natural lumber should be raised above the ground by at least 20-25 cm, and for a hygienic cesspool (see below) - by 35-40 cm.

an example of the implementation of the foundation for a country shower room
The means to ensure these requirements has long been known - a columnar or pile foundation. For such a light and freely "acting out" wooden structure, for reasons of economy, the second is preferable. There is no need to buy expensive ones, it is better to get by with homemade hammers. Simply - with pipe segments with a diameter of 60-150 mm (if available) with ends flattened into a spear. Further - a sledgehammer or a home-made woman (it is much easier to work with her), and - to the estimated freezing depth for a given area.
Location of piles - 1 per corner and every full or incomplete 1.5 m of the contour. After cutting the protruding ends with a grinder at the hose level, anchor bolts (M12 - M16) are welded to the piles; they are dressed and attracted by nuts with washers 40-60 mm in diameter, the lower support frame - the grillage.
An alternative option, again, depending on the availability of materials, is drilled piles from asbestos-cement pipes. The wells go to the same freezing depth with a hand drill. It is very good if there is a camouflage nozzle for it, with which wells are drilled under a strip-pile foundation on heaving soils. Reinforcing piles and pouring them with concrete are also similar to the indicated case. Asbestos-cement piles are cut in height with a grinder with a stone circle before reinforcement and pouring. Anchor bolts are immured to a depth of 120 mm.
Under the metal
Under the shower on a metal frame, the foundation is made the same as under a wooden one: if the wood rots, then the metal rusts. In this case, piles are preferably driven metal, and a grillage from a channel of 50-80 mm is welded to them.
Under the brick
A brick shower in the country is a rarity, laborious and expensive. But it has a valuable advantage - it is easy to heat it. It is enough to pass the return from the tank to the water heater through an old thin-walled heating radiator (see below), and in a closet with half-brick walls, insulation with 30 mm packing foam, dimensions 1.2x1.2 m in plan and a ceiling height of 2.2 m with +8 outside in 4-5 hours it will be +22.
Brick buildings are not elastic, heavy, and therefore the foundation for a brick shower needs to be strong and stable. Since the structure in this case is small, the slab monolithic foundation turns out to be optimal in terms of labor intensity and costs. Its device is simple: a solid (necessarily!) Reinforced concrete slab 170-300 mm thick is placed on the non-porous pillow described above and with a 0.3-0.5 m extension beyond the building contour, this will be a blind area.
The brand of concrete does not matter much, M150 is enough. Reinforcement - a cage with a mesh (150-200) x (300-400) mm from a 12 mm bar. If it is planned to equip the compact cesspool described below, then it is better to pour the slab on the spot, encircling the recess under the barrel with formwork.
cesspool
As already mentioned, in order to maintain the biochemistry in the sewage pit necessary for the disposal of effluents to a naturally recyclable level of pollution, the moisture content in them must be kept within certain limits. For example, in the instructions for branded fillers for septic tanks, it is clearly indicated: do not fill it, it will turn sour and stink. Do not let it dry out, the microflora will die, and generally stop working.
 The fact that the drain from the shower is too liquid for a general cesspool in the country is obvious. But its chemical composition also matters: there is practically no household organic matter, a nutrient medium for beneficial bacteria in the pit. Unless someone will use the shower, like Polygraph Polygraphych Sharikov from "Heart of a Dog" uses the toilet. But in excess of alkalis (from soap) and detergents (surfactants, surfactants), from shampoos, gels, etc., which are harmful to them.
Therefore, to reduce drains from the shower and toilet in the country to a common pit - blunder in terms of biochemistry. The kitchen can still be combined with the toilet, but the shower must be taken separately to a special pit. In a city apartment, the matter is different: there, until the effluents reach the treatment facilities, everything will mix up and react so much that only the percentage composition of simple connections and elements. In any case, it is impossible to build a sewerage system separate for the bathroom and toilet in the city.
Note: what kind of abominations do researchers not sometimes have to delve into, eh? But it's something necessary and useful.
Here the question arises: so what, take out the extra 2 cubes of soil? Since the septic tank does not recycle the shower drain? And the weaving of land disappears: from the harvest from the vicinity of a simple pit, consumer supervision will screech with a screech when the analysis is done.
It is not at all necessary, given the time of heating the water, the maximum frequency of using a country shower resulting from it and the volume of water in the tank (there can be no more one-time flow). That is, we are faced with 2 tasks: the first is to bring the runoff into the soil little by little, so that organic acids from the soil have time to neutralize alkalis and decompose detergents. The second is to bring them into the soil below the fertile layer, so as not to kill the soil microanimal. And organic acids, a product of her vital activity, will seep from above.
Calculations, for a description of which, unfortunately, there is no space here, show that a drain of 100 l / h or 50 l in one gulp (for a country shower for normal users, this, as they say, is above the roof), must be discharged into the ground at a depth of at least in 2 thicknesses of the humus layer. Conclusion: an ordinary 200-liter barrel with a height of 850 mm will help us out. A fertile layer of 40 cm is not a dacha, it is Eldorado. A smaller plastic barrel will do, as long as its volume is not less than a one-time discharge (we take the tank capacity for it), and the height is at least 2 thicknesses of humus.
Note: if you feel sorry for the barrel, the shell of the pit can be made from old tires. Only then will it be necessary to periodically pour bleach into the pit, in the resulting side cavities, with frequent use, the wastewater will stagnate.
From theory to practice

It is not difficult to arrange a compact and cheap cesspool for a shower from a barrel. First, we dig a pit according to the diagram in Fig. to a depth equal to the height of the barrel. The distance from the siphon spout to the neck of the barrel is not critical, the plastic corrugated hose will reach. Then we cut off the bottom and the lid with the neck from the barrel. The bottom is no longer needed, and we cut off a segment from the cover to make an inspection hatch; it needs a tight lid.
We install the barrel in the pit, backfill the soil. Next is the filter. We pour fine crushed stone into the cesspool with a layer of 15-20 cm. In a bucket of water, we shake 1-1.5 kg of any clay to “milk”, and pour the filling evenly with a thin stream until the clay milk covers it. After a day or two, when the water leaves and the clay dries up, we stir up the filtering layer, often piercing it thickly with a pointed armature. It remains to weld the lid, and after the construction of the shower, insert it into the neck and seal the siphon spout with construction foam. You can insert a tee into the neck and feed the drain from the kitchen here, it is more similar in bio- and simple chemistry to a shower than to a toilet.
Note: if construction is underway nearby, and the concrete mixer is free, you can knead porous concrete, from which filters are made when building wells. Then backfill with clay impregnation is not needed - 2-3 buckets of porous batch are simply dumped into the cesspool and leveled.
The smell from such a cesspool is excluded constructively. It is convenient to inspect and, suddenly, need to clean it, and the cost of labor and money is nothing at all; useful area, except for the one under the shower, is not withdrawn from economic use. At the dacha of the author of the article, a shower cesspool from a barrel has been working properly for almost 20 years. I didn’t need to clean it even once (they go to the dacha on weekends and spend their holidays there). The inside of the barrel was overgrown with a dense layer of some chemical compounds, but it did not rust through. Fruits from plants in the immediate vicinity of the pit were repeatedly submitted for analysis to the sanitation station, which invariably showed their full suitability for food. For the test, they scored a well for water 5 m from the pit - the water turned out to be good.
More about shower with toilet
A shower with a cesspool of this type can be placed in a block with a toilet. For the latter, by the way, if the dacha is summer, it is not at all necessary to make a rather complicated and expensive septic tank, not to mention an antediluvian two-cube pit. You can do without a toilet cesspool at all by arranging a powder closet. More precisely, powder sorter, because. it's a french idea. Sortie in French way out; toilet, respectively - a latrine. Powder-closet can be used only in the warm season, but it was the study of the processes in it that led to the invention of dry closets. However, this is again about country toilets, which require a separate analysis.
What will the shower be like?
Now that we know how much work is needed to arrange a shower area, and in what cases we can do without them, it's time to decide - what kind of shower will we do? Or buy? In general, the choice is:
- Compact portable shower.
- Street extension to the house.
- Garden cabin.
- Capital shower.
- Household complex in the shower.
- Shower room in the house.
Compact is not compact

A portable shower does not have to be carried everywhere with you. No one bothers to use it constantly in one place. In the same way, no one bothers to fill the waterskin hot water, heated on a fire or in the stove, immediately before washing. The only thing that is required additionally is a fence.
Shower enclosures for mobile showers are sold, complete with the actual shower or as an option. But, frankly, the game is not worth the candle - a shower enclosure is easier to make yourself. The simplest, but very convenient option is a semicircular guide attached to the wall of the house, see Fig., And a curtain. It is not necessary to bend a stainless steel pipe, you can get by with propylene plumbing, put on all the same pins from reinforcing bars. Then the fence will be completely collapsible. It is better to sew a curtain from a colored tarpaulin (preferably also propylene); why - said above.
Cabin on the street
Users of "stationary" showers sooner or later come to the conclusion that the waterskin for water needs to be replaced with a tank: 6-12 liters is not enough for one person, but definitely not enough for a family. Now we have an outdoor shower, and there is a drain problem. Usually it is solved by lowering water down a slope or a gutter into a flower bed, on the basis that the flowers are not eaten. But from the point of view of respect for nature, this is, of course, wrong. And the earth, if the shower is often used, can turn sour, and then the whole flower bed will disappear. Still, it’s better to choose the time, on the lower edge of the sewage slope (usually the blind area of the house) to make a bell-catcher from cement, and bury 40 mm PVC in the ground sewer pipe to the sewer. For the one described above, one 3rd pipe is enough; its slope is needed 4-10 cm / m.

If you want to quickly and easily replace the curtain with something more impressive, then the same arched pipe on the wall will help out. How the simplest one with rigid sheathing is made from a booth with a curtain is schematically shown in fig. Within the simplified blind area of the building, only 60 cm wide, it turns out to be quite comfortable (passages 45 cm each, a semicircular washing room in terms of 60x120 cm) and a completely unpeepable booth. The material of the cladding and fences is any, sufficiently rigid and allowing some bending. Polycarbonate is best; it will be discussed further. In this case, the fence of the labyrinthine entrance can be bent, getting a completely elegant extension.

shower in the garden
However, there is no need to rush to dig and attach: there is another simple option - a garden shower. This is a cabin on a light frame with a soft opaque lining, see fig. Its highlight is that the cabin is put in a new place on each visit, or rearranged once a week. It is enough to carry it 2-3 m away from the previous one, and the local ecology will fully tolerate the increased flow.
Capital
A capital shower differs from a simple cabin not only in that it stands on a foundation; it, as we will see below, may not be. There must be a dressing room in the capital shower room, although exhibitionism in certain circles is now, if not the norm, then certainly fashion. However, when washing, it is not necessary to demonstrate models of swimsuits, coupled with graceful forms or a relief torso, as shown in advertising shots.

Washing completely without clothes is necessary primarily for sanitary and hygienic reasons. The reason is dust in the fabric and scars of clothing. Having become sour, and even in contact with a wet body, it can cause skin diseases just in those places where they are least wanted. According to the rules of field work in countries that make extensive use of seasonal migrant agricultural workers, i.e. unaccustomed to dig in the ground, after the shift, having washed, it is imperative to wear clean underwear. Outerwear can be left working, but underwear - only fresh. In any case, it is uncivilized to be like the ancient nomads, for whom dirt up to a centimeter thick is not yet dirt, and then it falls off on its own.
How a shower with a dressing room should be arranged is shown in fig; dimensions - in cm. Clothes from splashes are protected by a curtain, and shoes from getting wet - by a lattice, wooden or made of propylene pipes on self-tapping screws, see below. The curtain in this case is more suitable from the film - a tarpaulin that is not blown by the breeze will dry for a long time, and if it is not propylene, but cotton, then it may soak.
Note: for people of average height and build, so that, bending over the dropped soap, not to knock out the door and not break the walls with the fifth point, the size of the washing room in the plan can be reduced to 80x100 cm. Then the entrance, where the curtain hangs, will be a large side.
All in one
The change house in the country does not play the same role as at the construction site and field work. In any case, the cesspool should be carried away from housing as far as the conditions on the site allow. And to have a meal, since you have already fled from the bustle of the city, is more pleasant and useful in the free air. Therefore, a kitchen with a veranda is often included in the composition of a country change house, along with a shower and a toilet.
Limiting, so to speak, device schemes summer cottages shown in fig. The left one is the simplest, 1.8 x 1 m, on concrete blocks without a foundation. Toilet - powder closet or bio; the dressing room can be used as a shelter in case of bad weather. Appointment - temporary, for the period of construction of the house.

On the right is a permanent change house. The foundation is slab, see above. Walls - from aerated concrete 75 mm + 12 mm on each side for finishing. The roof is flat sloping slate. As a refuge, if there are a lot of people, a large shower room can also be used; the size of the kitchen allows you to build or put a wood-burning stove. It is built, with the average skill of the master and the presence of an assistant, over the weekend, except for the technological break for the curing of concrete and the time for finishing work.
Note joke: do not rush to build this, otherwise who knows when hands will reach a real house.
In home
A country shower in a house, since it is in a residential area, must meet all the requirements of sanitation and hygiene. This is a separate topic, some features in relation to the cottage will be discussed later in the course of the presentation.
Floor, tray, grate
Floor
The floor in the country shower is made of wood; capital, as in big house too laborious and expensive. In a cabin with dimensions up to 1.5x1.5 m, if a tongue-and-groove board is taken for flooring, logs are not needed. If the cabin is not square, the deck boards are cut to the size of the short side, so it will be stronger.
So that the tree does not rot from moisture, it, of course, needs to be processed. In our time, this can be done without complex and time-consuming operations such as scalding with bitumen, two-layer painting with oil zinc or titanium white, etc. The preparation of boards for the cabin floor is reduced, after sawing to size, to a double treatment with a water-polymer emulsion; the second treatment can be done one hour after the first.

Then - drying. At temperatures above 22 in the shade and drying in direct sunlight, the boards will be ready for further processing in the evening if processed in the morning; at 15 degrees and drying in the shade - by the morning of the next day.
After drying, the wood is impregnated with any wood biocide. It is only necessary to read on the package whether the preparation is intended for impregnation under pressure, this is not suitable. It is desirable to impregnate in the sun in warm weather, allowing the boards to warm up for an hour or two.
After 3-4 hours after impregnation, acrylic varnish can be applied in 2 layers. The first will dry up in the evening, then you can varnish again. The next morning the floor can be laid. So, if you pick a nice day, a floor that lasts at least 10 years can be done in a weekend, and there's still time left.
Pallet
Shower trays, if you don't already know it, are low and high. The first fit into a cutout or recess in the floor, and the second is actually a standing bath: they are installed on legs and are equipped with a screen. Those and others come in sizes from 800x800 to 1580x1580mm, straight and angular, rounded or faceted, as well as round, oval and complex shapes. Manufactured from acrylic or enameled sheet steel. The former are more expensive and more durable; the second is cheaper.
For a cottage with a separate shower on the territory, a straight low shower tray is needed, see the figure on the right. The most popular size and material is steel 1000x1000 mm. Its advantages:

- Ease of installation and sealing: a sausage of construction foam is applied along the contour of the cutout and immediately, until it has hardened, a pallet is laid; squeezed out excess foam is removed.
- Saving wood and work: by making the cabin support frame (see below) the width of the inside to the outer size of the pallet bath, we get rid of the flooring of most of the floor. It is enough to upholster the top of the frame with scraps of boards so that the pallet does not end up in a hole.
- Cheapness: with a relatively low intensity of use of a country shower, a steel pallet with careful use will last at least 15 years.
- Durability in suburban conditions: acrylic pallets in summer cottages do not withstand the estimated service life, because they are afraid of abrasive wear with sand, from which you can’t get anywhere outside the city.
Note: if the shower is with a dressing room, you can take a pallet 800x1000, see above. If in the country there are people with a corpulence above average, then the best would be a pallet 1200x1200
The country shower room in the house requires an already high pallet. The reason is that the cutout will weaken the floor, unless it is formed according to the full pattern. Yes, and then the mortising and concrete work will take a lot of time and effort, plus beat the channel for the sewer. Suddenly, the house has not yet been built, it is also not necessary to lay a low pallet in a project with a wooden floor: the lag installation step turns out to be too large for flooring of this size.
It is more profitable to purchase a high pallet complete with a cabin and a screen. Then it is better to take a corner shower: a shower corner of the same overall dimensions takes up much less usable space in a small room and is even more convenient than a straight shower.
As for the installation, it is desirable to do it yourself. Firstly, the departure of the master out of town will be too expensive, his day disappears, and in a day he can install up to 3 cabins, if not more. Secondly, the water supply and runoff in the country are almost always non-standard, which will be even more expensive. Therefore, how to install a shower cabin with a high tray yourself, see the video below.
Video: self-assembly and installation of a shower cabin
And the following is about the intricacies of precisely the corners:
In addition, before buying, you will need to familiarize yourself with the company instructions, because. installation methods for showers from different manufacturers are somewhat different.
Lattice
In the locker room, a grate under your feet is a must so that your shoes do not get wet. In a washing room with a low tray, a grate above it is also highly desirable, because. due to the lack of a threshold, the risk of slipping and crashing when entering the pallet is increased.
 Usually the lattice is made of wood from slats from 30x30 to 100x40 boards. The preparation of wood is the same as for the floor, but instead of varnishing, if funds allow, it is desirable to cover the grate with an acrylic compound for repairing bathtubs, then its resistance to wear by shoe soles will increase significantly. Yes, and for the floor, coating with a compound will not be superfluous; in this case, the pallet can not be sealed with foam, the thick mixture will tighten the gap.
The best, and if you take into account the price of varnish, then a cheaper grill is obtained from PP pipes assembled on self-tapping screws. Pipes are needed 1/2 "; installation step - 1.5 outer diameter. The pitch of the crossbars from the same pipe is 300-400 mm. There is a little trick here: after assembling the grate, a little mounting foam is launched into all the gaping ends so that the grate inside does not sour from dampness.
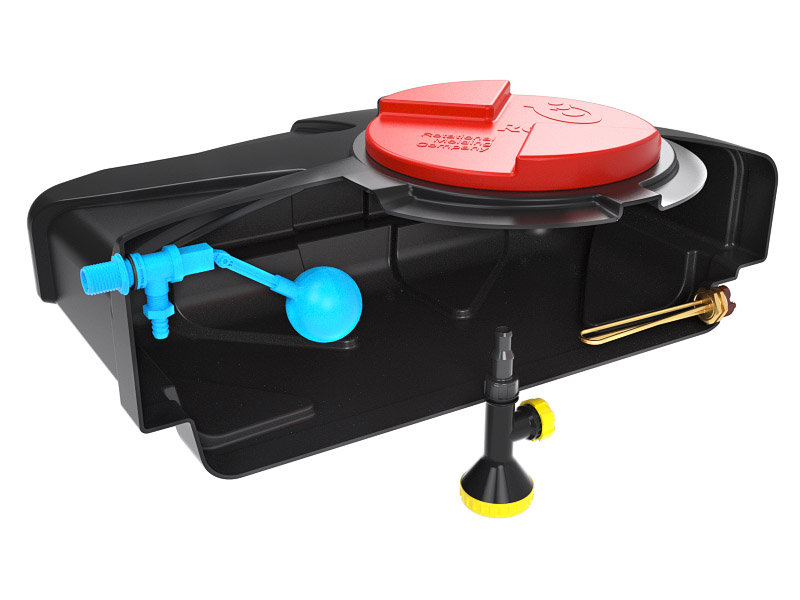
Tank
The shower tank in the country house must be equipped with a sanitary drain with a shut-off valve, indicated in brown in fig. It is placed at the lowest point of the vessel, and the source is made flush with the bottom. Before a long break in use (at least for a week), the tank is completely emptied through the drain. It is advisable to regularly, with the same frequency, drain the sludge and with constant use. Please note that in the country the probability of getting spores and eggs of unwanted microorganisms into the tank is many times higher - orders of magnitude higher than in a city apartment. The author knows the case when in the shower tank were found ... crucian piglets. They apparently fed on the larvae of mosquitoes, which swarmed there.

The second condition is that the selective pipe must be placed higher so that clean water splashes from the watering can, and not sediment. Finally, if there is water heating in the tank, its thermosiphon circulation must also occur, otherwise most of the heater power will go to waste. i.e., supply pipe hot water should be as high as possible.
If the tank is powered from the water supply, then it needs a float valve and an overflow with a cross-sectional area of \u200b\u200bat least 2 of those of the supply pipe. Sufficient clearance is needed above the float so that it does not rest against the tank lid, without locking the water supply to the end. For such a case, a tank diagram with recommended dimensions is shown on the left in fig.
For a tank filled manually, the layout of the pipes changes, because. the water level in it decreases during use. Its diagram is shown on the right in Fig. An indispensable condition is that the hot water supply should be located at least a little (5-7 mm at least) above the selection source, and the mouth of the supply pipe should be moved away from the outlet source; selective is located approximately in the middle between them. It is advisable to drain the sludge from such a tank immediately after each emptying so that the sediment does not clog the water heater.
What is he from?
Ready-made tanks for showers of different sizes, containers fully equipped with fittings, are commercially available in a wide range. But, since our task is to implement everything entirely with our own hands, then we will see how to make the tank ourselves.
The most common tanks of country showers are made from barrels laid on their side; then it is convenient to place a drainage system, and the flow of water into the sludge becomes minimal. In this case, a wide filling and inspection hatch is cut out in a 200-liter steel barrel and through it, after welding the pipes, the container is painted from the inside with yacht acrylic enamel or the same bath repair compound. An outdated long way - primed with a rust primer and painted with iron minium in oil.
Plastic barrels do not require preparation from the inside, but the problem of sealing the joints arises: almost nothing sticks to polyethylene and polypropylene, and it is impossible to connect by soldering, like water pipes. Fortunately, plastic barrels are produced with wide necks, through which it is possible to install M12-M16 threaded fittings with a flange and a rubber gasket, and on the outside - also with a gasket and a washer; everything is tightened with a nut. So that the pipe does not turn out with thermal deformations, the diameter of the flange and washer must be from 3 outer diameters of the fitting, but not less than 40 mm.
Note: an alternative method - sealing with silicone - does not justify itself, for season 2-3 the joints leak.
About the tank from the old washer
It's no secret that many country showers have tanks from unusable old ones. washing machines. Their capacity is small, for 2-3 washings hastily, but otherwise they are very good: they do not rust, drainage is automatically obtained from the previous drain pipe, and the input-output of the rest is easy to carry out through the opening for the activator, there is already a stamping for the gasket and holes for fasteners. By covering such a tank with glass on silicone (preferably acrylic), we get effective solar water heating (see below), because, repeatedly reflecting from the internal shiny walls, the solar radiation is almost completely absorbed by water.
Cabin
Grillage
The cabin support frame is most often made of wood; in the conditions of suburban operation, it loses strength more slowly than a thin-walled (1.5-2.5 mm) metal profile. The channel, of course, will last longer, but it will cost more. It is more suitable for welded structures, see above.

As for wood, a 100x100 or even 60x60 timber is suitable for a light cabin, and 150x150 for capital showers. Wood processing is generally the same as for the floor, only instead of varnishing it is impregnated twice or thrice with heated bituminous mastic. In combination with a water-polymer emulsion, this will provide a durability of at least 12 years; WPE, penetrating deeply into the pores of wood, makes them unsuitable for the germination of mold spores.
How high?
The rise of the grillage above the ground, and the corresponding protrusion of the foundation piles, is calculated as the sum of 200-250 mm for ventilation, plus the depth of the pallet tub, plus the technological height of the siphon and another 50-70 mm of stock. So, for a low pallet, this will be 320-450 mm, i.e. need 2-3 more steps at the entrance.
frame
A wooden shower is assembled, as well as - on load-bearing poles, only the problems of the roof disappear: it either does not exist at all, or it is simply sloping. The frames of the walls are reinforced with diagonal braces, one per side, from a 100x40 board or its own, spread in half lengthwise, i.e. 50x40, and installed flat. The latter option saves material, but takes up space inside the cab.
A professional pipe from 25x25x1.5 to 40x40x2 usually goes to the metal frame. The profile frame is assembled by welding, primed and painted. Thin-walled galvanized profiles are cheaper and easier to assemble - on self-tapping screws - but they do not last long, this material is not intended for outdoor use at all.
The best material for a shower frame is 1/2″ and 3/4″ polypropylene water pipes. The assembly scheme is the same as for wood: frame and diagonal. In this case, it is not required to solder the plastic, it is enough to select standard connectors so that the pipe enters them more tightly, and assemble them on self-tapping screws. In the shower, phosphated (black) ones hold better. Self-tapping screws diameter - 4.2 mm; length - 1-1.5 mm shorter than the outer diameter of the connector, so that the tip does not protrude and scratch.
sheathing
In general, any sheet metal is suitable for shower cladding. Decoration Materials outdoor use: corrugated board, plastic lining, siding, polycarbonate, top row in rice; they can be attached to any frame either with standard fasteners, or, if the frame is propylene, with brackets and clamps.

Of all the sheathing materials, polycarbonate stands out. Its main advantage is a self-heating shower made of polycarbonate. Features of the interaction of cellular polycarbonate with sunlight are such that an increased energy density of infrared (thermal, IR) radiation is created inside the cabin. Simply put, a kind of warm cocoon appears, even if the shower is without a roof and with a wide ventilation gap at the bottom. Cellular polycarbonate was originally developed to cover greenhouses and greenhouses.
The shower cabin is sheathed on all sides, cramped, i.e. the area of its glazing is large relative to the volume, and tomatoes are not grown in it in winter. Therefore, the cheapest sheet of the 2R structure with a thickness of 4 mm from the most alternative manufacturer is suitable for shower sheathing. You should not be afraid of peeping: especially for showers, milky, non-translucent, polycarbonate is produced.
The second important factor is that a honeycomb sheet, if it is oriented vertically with internal channels and bent, acquires the properties of a prestressed structure (PNC): high strength and rigidity. That is, a very strong and light round cabin can be made on a frame from only 2 hoops, upper and lower, bent from PP pipe. The hoops will also be prestressed and add a lot of overall strength.

Finally, by tightly winding the sheet to the curvilinear template and heating for 20-30 hours to 70-80 degrees, the bend of the sheet can be fixed. This technique is often used by designers; in particular also for original frameless showers, see fig. on right.
The good old wood, pre-treated, as well as for the floor, and even raw, at least in the form of wattle, is also widely used for showers, the bottom row in fig. higher. Its advantages are accessibility, ease of processing, and for capital showers under the roof - wood holds heat well. Heat loss through wooden sheathing from a forty board is less than through a half-brick brick.
Note: it is undesirable to use laminated and modified wood materials for sheathing showers - plywood, fiberboard, chipboard, MDF - they delaminate.

fittings
A garden garden shower is distinguished from an ordinary shower primarily by a shower head (spout, diffuser): its design includes a control valve, see fig. If there is hot water separately in the country house, then this one is not suitable - diffusers with a regular two-way valve are not on sale. However, it is easy to make a watering can with a valve yourself, it does not have any fundamental features. Other shut-off valves - any ordinary one, but pipelines are easier and cheaper to make flexible, from a reinforced garden hose.
Heating and heating
Now let's finally figure out what a warm shower is. In capital showers, as mentioned above, heating the washing room will ensure that the return flow from the tank to the water heater passes through the heating register, see fig. For constant heating of residential premises, this scheme is utter heresy, but in the soul it is quite efficient without loss of overall efficiency.

The cheapest and fastest water heating is provided by a flow-through gas boiler low power or, if bottled gas, an electric boiler. We will leave one and the other, because. it is impossible to make them in accordance with safety requirements outside of industrial conditions: a heating element with grounding is only a base, automatic temperature control is also needed, emergency from boiling up, emptying, overheating of the heating element due to scale buildup or sedimentation, and some other necessary little things.
Without heat exchanger
The easiest way, than from time immemorial and used by summer residents, is to heat water with the Sun. But the well-known bitumen-drenched tank is not the best solution; the fact is that bitumen or simple black (not selective) paint is black only in visible light, and IR reflects well.

2 ways of primitive solar water heating are shown in fig. on right. The first (left pos.) uses the fact that water itself actively absorbs IR and ultraviolet (UV). The latter carries a lot of energy, but you need a well-transmitting UV tank, i.e. expensive acrylic. In the other, on the right pos. the own heat capacity of the hose is used: when the water flows, it gives it the accumulated heat, so it is possible to get more warm water than it was originally in the volume of the pipe.
With register and pot
Direct heating of water is bad because it depends on the weather and the time of year: clouds have come running - the water is cold, and you can get hot only in the very heat, when a little warm is enough. For good water heating, not only in warm weather and not only in clear weather, a shower water heater must, firstly, somehow collect solar radiation, the energy density of which is relatively low, and transfer it to water, the heat capacity of which is relatively large. An indispensable condition in order to “sew” these requirements is thermosyphon or forced circulation of water in the system, i.e. a heat exchanger is needed, and how to heat it is a second matter.

A simple heat exchange register is a coil (on the left in the figure) or a U-shaped elbow made of copper or aluminum thin-walled tube. It can be laid flat with an inclination, in the middle there; then the hot side must be raised above the cold side by at least the value of the inner diameter of the tube, otherwise internal convection may develop, boiling up and bursting even with a relatively small influx of energy.
In some cases, it is more convenient to have a heat exchanger in the form of a sealed vessel, on the right in Fig. The principle of "theromosiphonism" is observed here by the fact that the outlet (hot) pipe is located as high as possible above the cold one. In this case, sealing is needed complete, without the slightest leak!
From the stove

The hot water register can be built into a country heating and cooking stove, but this is already a question of how the stoves are arranged, and by and large, where the hot water goes then, the stove doesn’t care. A solar oven looks much more interesting in terms of heating water for a shower. In our latitudes for cooking, it is not very suitable, but the shower will provide hot water and the simplest (see Fig.) In the spring and autumn in cloudy weather.
The pattern of such a stove is shown on the next. rice. Material - any foil, even cardboard. Please note that the reflector is certainly metal, it reflects the entire spectrum of radiation, and household mirrors only the visible part. For IR, clouds are much more transparent, while UV carries a lot of energy even in small quantities.

The scheme of a stationary solar oven is more complicated, but much more efficient, is shown in the following. rice. The reflector is assembled from pieces (you can cut off) galvanized on silicone. Fragments of the reflector are installed one by one, adjusting (adjusting) so that the light spot lies on the bottom of the heated vessel; already installed and adjusted mirrors are still covered with something. For this furnace and the heat exchanger described before it, a compact one is required; it is placed instead of cooking utensils.

Panels
Solar panels are not that complicated and do not require any alignment. These are, in fact, blackened from the inside and glazed flat boxes or other containers in which a strong greenhouse effect is created; a coil is installed inside such a mini-greenhouse, the diagram on the left in fig. Modern solar panels use truly space technologies, and some models in winter on a cloudy day at -20 outside give water to the system at a temperature of +70.

We do not need such super-efficiency, it is enough for us to heat 50-100 liters of water from +15 to +40 in 2-4 hours. The most unpretentious design, like those shown on the trail, will also cope with this task. poses of the same fig. And in fig. below (on the top position - with an installation diagram and a use case for heating a house) - drawings of home-made solar panels, comparable in efficiency to individual industrial designs. The first panel is completely homemade; heat exchanger soldered from copper tube. In the one below, a radiator from an old unusable refrigerator went to him; the dimensions of the box are adjusted to the cash.

And in the dark?
If the kitchen in the country is gasified, anyway, from a mains or a cylinder, then you can heat water for a shower for nothing at any time of the year, in any weather, day or night. How? Due to waste heat (in essence, own heat loss) of a gas stove. To do this, the burners are circled with a copper coil from a 6-10 mm tube, as shown in Fig; This method was invented back in Stalin's times, when the people heard that somewhere up there, at the top, a curiosity appeared - hot water in the tap.

To tilt the heat exchanger, pieces of soft wire are wound around its hot tube, and their whiskers are used either as legs or as hooks. Remember: the heating is intense, without tilting the coil boils and bursts instantly! It is also necessary to withstand other dimensions so as not to burn or dry out the flexible hoses connecting the coil to the tank. What else needs to be remembered is that the slope of the hot tube should be greater than the cold one, and the coil heats up well only if the burning burners are occupied by cooking utensils. That is, it makes no sense to burn gas idly, you need to heat water during cooking. As a rule, in an hour of cooking dinner, a 50-liter tank heats up to 40-45 degrees.
Finally

Finally, let's mention one curiosity - a supposedly hydromassage shower. On fig. the simplest model is shown on the right (the price, by the way, is not unpretentious - about 300 euros), but installations are produced with 6 and even 10 diffusers, loudly referred to as nozzles in advertising brochures.
Such scents are only a tribute to fashion, if not inventions of marketers of the consumer society; simply a split. For a real hydromassage, it is necessary to reduce muscle tone in conditions of hydroweightlessness, which cannot be without a bath with water.
It is difficult to imagine modern life in the country without the usual comfort. A heated country shower will help maintain the desired level of hygiene and comfort for those who love countryside holidays or work on weekends in the country. A simple shower already greatly increases the level of comfort for the backyard. In order to maximize the level of comfort, a summer shower with heated water will help, it can be used in any weather, thanks to insulation and a fenced-off changing room.
There are quite a few methods to equip country shower cabins with heated water on your site, properly equipping it, starting from a custom design and its turnkey installation at a specialized enterprise and ending with the purchase of individual units and the independent implementation of all work from a sketch and marking to installation towel holders and soap dishes.
If someone is quite satisfied with the average temperature of the water, so as not to get a cold when using a regular garden shower, then for some it is fundamentally important to have a warm shower with the ability to adjust the heating temperature. Based on this, it is necessary to consider all common summer and all-season models with their pros and cons in order to make it easier to choose the best option.
- Titanium. A country shower equipped with forced heating can be equipped with wood or coal titanium. This method allows you to get hot water, regardless of weather conditions. To increase efficiency, it is necessary to mount an expander that will help ensure the circulation of water - the cold one will go down to the heat exchanger, while the warm one will go up to the tank.
The category of especially dangerous equipment includes equipment whose work is directly related to open fire, and if you do not have the necessary experience, it is better not to try to make a do-it-yourself country shower with heating based on a boiler, titanium or stove. The best solution in this case would be to buy a ready-made design with the appropriate certificates and a quality guarantee. But even in this case, there are serious drawbacks that relate to security.
In order to avoid fire, it will be necessary to install asbestos or thermal insulation protection. In order to mount titanium inside the shower cabin, you will need to carefully choose the material that will be used to construct the walls, floor and ceiling. If a decision is made on external placement, then it is necessary to take care of the titanium or furnace fencing to prevent children from approaching them.

- Electric heating. One of the most convenient methods of heating is electricity, of course, if all the necessary safety measures are observed during the assembly of the structure. The disadvantages of such heating include a serious load on the network, which comes from heating elements or a conventional kilowatt boiler (this option can be used with a limited budget). When designing a country shower with a similar heating method, it is necessary to optimize the power grid in advance to obtain warm water.
Important: any electrical equipment (whether lighting or heating) is essential to install, in accordance with the requirements of safety rules: all cables, switches and sockets must be waterproof, and in addition, they must be equipped with reliable grounding for better protection.

- Solar panels. Arrangement of a country shower with heating using a vacuum solar collector enough expensive pleasure. Panels with vacuum pipes are accumulative water heaters. The principle of their work is the use of ultraviolet radiation from the sun, and not its heat to generate thermal energy. Equipment for such a shower can be bought, but also if you have special knowledge and skills, then you can make such a heated tank with your own hands.
Proper operation directly depends on the selection (it is necessary to take into account the load recommended by the manufacturer) and the quality of the equipment itself, capable of heating water. Based on these data, it is worth concluding that it is not worth saving on the purchase of equipment, as it may turn out that the money was spent in vain.

Preparing a place on the site for installing a shower
The choice of location plays a major role not only during the installation of a shower with solar water heating, but also for other types of showers. If you install a country shower in an open sunny place, this will allow the shower stall to dry faster, and if you also make an open riser (such as, for example, a drainage ditch), this will avoid the “eternal puddle” even during frequent use of the cabin.
Before starting work, you must also decide on the method of drainage - this detail can have a significant impact on the entire structure, for this it is necessary to foresee everything during the design, so as not to correct the finished structure later.
The most popular types of drainage in a country shower, perhaps, include the following:
- the simplest is a direct drain to the ground or into a ditch through a drainage hole or cracks in the floor;
- using a pipeline through a pallet or a drainage hole in the floor and transporting them to the sewer;
- use of a septic tank.
Based on these dirty water removal methods, based on the availability of materials, conditions and budget, a huge number of options can be created.

The project is the most important part of the construction of a shower house
Before you start building even the simplest cabin or shower for a polycarbonate cottage with a dressing room, you need to think over a project that will avoid serious mistakes. It is not difficult to do this, the main thing is to think over the end result and build on this topic.
The total height of the structure should not be more than 3 meters, since a person should be able to freely raise his hands up. You also need to remember about space. While in the shower, movement should not be restricted.
During the construction of the soul, you must follow the following characteristics:
- booth dimensions should not be less than 1 × 1 m;
- you need to remember that you will need to allocate space for clothing.
During the construction of a warm shower in the country with your own hands, you need to take into account a small area that can lead to the destruction of the entire structure. To strengthen the structure, you can erect a pile foundation, this will make it more reliable and durable.
Pile foundations are quite popular in construction due to their good reputation. The modern pile foundation is quite in demand, since its price is much less than that of its "brothers", and in terms of quality it is in no way inferior to them.
In order to build this foundation, it is necessary to use pipes whose diameter is 100 mm. For them, holes are drilled in the ground of such a depth that the pipes protrude 15-30 cm above the ground.

How to install a heated shower in the country?
The work on the erection of a country summer shower consists of the following stages:
- Making a foundation (if the foundation is piled, it will be necessary to drill holes for it in the ground, for a filler, dig a small pit).
- Installation of the frame (horizontal and vertical racks) and the upper ceiling for mounting the tank.
- Hanging on one of the vertical supports of the door.
- The frame must be sheathed with the selected material, which will play the role of walls.
- If there is such a need, it is possible to perform thermal insulation of the entire structure and install a roof over the tank space (only necessary if there is forced heating).
- Installation of the tank and heating equipment, reflectors, protective film (it all depends on which type of heating was chosen).
- Hanging hooks, shelves and hangers.
In cases with ready-made options, it is worth mentioning a plastic country shower with a water heater.
Recommendations for choosing a ready-made country shower with heating
Before purchasing a tank for a country shower with heating, it is necessary to study what requirements are imposed on it:
- profitability - low cost, but also the corresponding quality;
- environmental friendliness - the materials used to make a heated country shower should not harm human health;
- fire safety - is a mandatory requirement, if the shower is heated by electricity, all contacts and connections must be of high quality and reliable, taking into account fire safety standards;
- comfort - being in the shower should not cause inconvenience, and the dimensions should be comfortable for swimming;
- modernity - this requirement is imposed on the design of the purchased, as it must fit into the overall picture.
When choosing a purchased shower, it is necessary to be guided by the volume and shape of the tank, the choice of which is characterized by personal preferences. There are models both with booths and without them. It is possible to install various add-ons, such as automatic heating and draining of water, various hygienic devices and additional nozzles.
Additional options for a purchased country shower with heating include:
- indicator responsible for the level of filling the tank with water;
- shutdown timers and heating devices;
- devices for filling and draining water;
- thermostats.
The heaters can be located at the lower, central and middle levels.
There are pedal options and showers equipped with separate changing rooms, their difference lies in the price, the latter are more expensive, but also more comfortable.
Convenience during installation is another requirement for a heated shower, and since the shower is purchased, installation and connection should take a maximum of three hours.
The shower cabin should have a window or mesh elements through which light and air can penetrate, killing mold and fungus.

In the event that the country shower provides for the installation of electrical wiring, it is necessary to remember the elementary safety rules when carrying out electrical work. The shower is the place high humidity, therefore, it is necessary to take into account all the nuances:
- In order to make it more convenient to use the shower, it is recommended to replace the iron pallet with plastic ladders. Their advantage is that - the air circulates well and the water does not stagnate.
- Thermal insulation is one of the main requirements for the normal operation of a shower with thermal insulation. For such purposes, polystyrene foam is most often used. This material is great for places with high humidity and it is quite easy to install. To achieve tightness, the womb is covered with an additional dense film. A room with this type of thermal insulation will be quite warm and comfortable. For year-round operation of the shower, the entire structure must be insulated.
- The most common mistake when installing a heated shower is installing a leaky door and thick walls. As a result, due to poor ventilation, various fungi and mold begin to spread.
- To prevent electric shock, the operation of the shower while the heating element is on is strictly prohibited.
- Careful monitoring and maintenance of the correct water level will help prolong the life of the heater. Turning on the heater without water can cause it to simply explode. Repair of this type of product is not provided.
In order to create comfort while bathing in a country shower, water heating is essential. And warm water in the shower is truly a real treasure for avid lovers of countryside holidays and summer residents.
How nice it is to escape from the stuffy metropolis and find yourself in your dacha! Fragrant greenery, birds singing and friendly sun - it's wonderful. But, if there is no summer shower on your site, hot days will turn from relaxation into torture. But it’s not at all difficult to build a garden shower for a heated cottage with your own hands. It is only necessary to approach this process in detail.
Choosing a place for a shower in the country
Before proceeding with the construction of a summer shower, it is necessary to determine exactly where it will be located. Basic selection rules:
- Locate the shower stall in a sunny location. It is desirable to find an area where the sun penetrates throughout the day. Then you can rinse with refreshing water at any time.
- The shower stall should be on a hill for the best outflow of water. When you shower, you will spend a large number of water. Stagnation of water under the booth is fraught with erosion of the soil and, as a result, loss of stability of the structure. Also, stagnant water will lead to unpleasant odors.
- Lack of drafts and visibility. Despite the fact that the wind is warm in summer, the presence of airflow can bring you a lot of trouble.
It is worth considering that the location of the shower in the most prominent place is not desirable from an aesthetic point of view.
Organization of draining warm water
The best solution is to connect the drain to the gutter. If it is missing, dig a hole not far from the shower stall. Using a hose or pipe, connect the drain hole to the pit. The platform for the summer shower should be tilted towards the drain pit.
In this case, the used water will flow freely along the inclined pipe.
Equip the bottom of the shower cabin with a tray or make a container for draining water yourself. To do this, fill the area with concrete of the size you need. Place bricks around the perimeter that will serve as a side.
The shower drain cover must be provided with a waterproof cover. The following materials are suitable for this:
- ruberoid,
- hydrostekloizol,
- concrete with the addition of PVA,
- PVC film.
It is a mistake to use clay for drainage. Such flooring will wash out with water over time.
How much will it cost is detailed in this article.
How to build a country shower and toilet so that they do not interfere with each other is detailed in.
Shower cabin and dressing room
Designing a cabin for a country shower
The width and depth of the shower cabin must be at least 1 * 1 m, and the height of 2 m and above. Spaces within finished construction should be enough to turn around, raise your arms and bend down without obstacles.
It should also be noted that in the booth there should be a place for a dressing room where water will not penetrate. For the locker room, it will be enough to allocate 60 cm. Thus, the optimal size of the shower will be 1.6 m * 1 m. The material for the frame can be wooden beam. The standard diameter of the racks for such a structure is 100 * 100 mm.
Various methods can be used to give stability:
- Concrete every part of the frame;
- Attach the lower corners of the structure to pegs driven deep into the ground.
When designing a shower stall, consider the design of the buildings in your yard. The shower room should not stand out from the general style.
Installation or how to do it yourself
Cut the timber to the length you need. Connect the side parts of the frame in the form of frames. Reinforce each frame in the middle with jumpers from distortions. Jumpers are made from the same beam and should be installed at an angle of 45 degrees.
If you decide to make a shower cubicle with a size of 1.6 * 1 m, then the side parts will be 1 m, the back - 1.6 m, and the front 1 m, since in the front part it is necessary to leave a space for the door equal to 60 cm. For for a convenient passage to the shower room, it is not recommended to make a door less than 60 cm. Then you should connect the frames.

Before fastening the frames together, make sure that their diagonals match.
Having fastened the frames, reinforce them with jumpers at the top and bottom. Thus, you will get a solid frame, which can be closed with polycarbonate or any suitable material. It will be interesting to know that along with a shower, you can also build a toilet, as well as a utility block, but how to do it correctly will help you figure out the content.
Install the resulting structure over the prepared inclined platform for water drainage. Use building level for aligning the shower cabin frame horizontally and vertically. Stuff the slats on the bottom jumper. Leave a distance between them so that the water drains freely down onto an inclined platform.
For the shower door, make a frame in the same way: assemble a frame from 4 planks of timber and reinforce them with jumpers crosswise to protect the door from distortions. The size of the frame should be approximately 1 cm smaller than the opening for the doors to open freely.
- slate,
- lining,
- moisture resistant OSB,
- cellophane,
- plastic,
- glass.
Please note that any of the materials listed must be opaque.
After choosing the base, cut the walls to the desired size and install them on the frame frames. The top and bottom of the booth do not need to be closed completely for good ventilation. The door must be cut separately. Install the doors on the hinges and sheathe the door with cellophane so that water does not get on the timber. But, so that it would not be expensive and very simple, it is indicated in the article.
Capacity: tank, barrel or water tank
The minimum volume of the water tank should be 100 liters, the maximum - 500 liters. Installed on support posts above the shower.
Please note that the material from which the outdoor shower tank is made must not be subject to corrosion. The best option will be plastic or stainless steel. If you chose the plastic option, you need to not only install it on supports, but also tie it to them. Since in the event of strong gusts of wind, an empty container may fall.
It is best to purchase a flat tank with a fitting thread for screwing in a tap. If this is not found, make a hole for the faucet yourself.
It is good if your container is equipped with a lid, thanks to which the water will not clog. The cover can be made of metal, plastic, glass or cellophane.
Water supply to the tank can be carried out manually or using a pump. The latter option is preferable.
Sources of water heating in the summer shower
The water in the garden shower can be heated in various ways.
Firewood
To increase the temperature of the water in the summer shower with firewood, install a stove next to the cabin. On its surface, place an expansion tank that will push hot water into the main shower tank. The principle of the expansion tank is the constant circulation of water.
Hot water from the heating system will go up, cold water from the tank above the shower will go down. The connection between the expansion tank and the main tank will be a metal pipe.
With a wood-burning heating system, you need to use a metal container for water, not a plastic one.
Electricity
Install a boiler or heating element with a power of 2 kW or more in the water tank. If you use a heating element to heat water, it must be inserted into the bottom of the water tank. The boiler is lowered into the tank from above. But be sure to monitor the water level during the heating process. Otherwise, your appliances may burn out.
To prevent a short circuit, the wire stretched from the outlet to the shower must be one-piece. A thermometer should be installed on the water tank, which will indicate when the heating devices can be turned off. Or purchase a tank with automatic heating, where there is control not only of the temperature, but also of the water level.
A good option for a summer shower with electric heating would be to use 2 tanks at once: a large one for cold, a small one for hot water. In this case, each family member will be able to choose a comfortable temperature for themselves. For mixing hot and cold water get a mixer.
As in the case of heating with wood, it is not recommended to use a plastic tank along with heating appliances.
The sun
The most economical and hassle-free heating option is the sun's rays.
It is more convenient to rinse in the midday heat - which means that the shower stall should be in the place where the rays penetrate in the morning; If you prefer an evening shower, choose an area that receives the sun during the day so that the water has time to warm up. Find out how to make a country toilet without a cesspool.

The shower cubicle should be located in a place that the sun heats all day. If this was not found, decide at what time it will be more comfortable for you to use the shower.
How to enhance the effect of heating by sunlight?
- Paint the water tank black. The sun's rays warm up dark colors the most.
- Wrap the shady side of the tank with foil, as this material will keep the heat inside the tank.
- Using an additional frame, stretch a plastic film over the open tank, which will create a greenhouse effect.
Conclusion
After the final installation of the summer shower, you can create a certain style by adding a few details to it. Plant moisture-loving plants around the booth that will not only please the eye, but also contribute to accelerated drainage. Decorate the shower room with decorative elements so that an ordinary cubicle turns into a bright accent of your garden plot. Read about a country shower with heating and a locker room.
Of course, before you start building, you will have to make drawings of a warm shower in the country with your own hands in order to calculate all the materials, and besides, technical capabilities with which you are going to endow this structure.
Indeed, often heated water occurs in such buildings only in hot weather, that is, it is heated naturally, depending on weather conditions, but it can also be forced heating.
It is about this forced method of heating water, as well as about the insulation of the architectural structure itself, that we want to tell you, as well as bring to your attention the video in this article.
Warm shower box
How to supply hot water

- The main problem for a shower that is separate from the house is hot or at least warm water - if this can be organized in a building from a common system, then autonomy is needed here. In this case, the most convenient option is a flow-through electric heater, because almost any country house is connected to the mains, therefore, the installation of such a device is a minor technical problem, where the safety instructions from electric shock must be observed.
- Let's say right away that this is not some kind of super option - the device does not heat water to a very high temperature, especially if it is cold, but, given the very specifics of a country shower, warm water will be enough for you. In most cases, even if the price of the device is high, it will not heat water above 40 ⁰C, but you are unlikely to need more.
- Another option is a hot water supply from the house.- pipes are laid underground and insulated, but during transportation there are too large heat losses, and if this does not bother you, then this option is better than the first one.
How to heat a shower

Of course, in the summer you will not have a question about how to heat the shower stall - it will already be warm or even hot there, but in the spring or autumn, when you plant a garden or harvest, in your soul it will most likely seem too chilly. But you can make such a box with heating and here, they are the best fit and there are good reasons for this.
Firstly, the IR panel will heat up a small room very quickly, since there is a special principle of giving off heat calories - the panel will not heat the air, but nearby objects, which will just become a source of heat.
Secondly, such devices can be installed in any place convenient for you - on the floor, on the ceiling and on the wall, and, thirdly, they can be easily turned off and removed. This very “third”, perhaps, is the dominant factor in favor of IR systems - they will not be stolen, since you will have the opportunity to bring them into the house for the winter, or even take them to the city.
Note. Infrared heaters There are not only different capacities, but also different configurations.
That is, it can be a device in the form of a panel, but it can also be a film type - the latest models can be installed under wall and ceiling cladding.
How to keep warm in the country shower

So, we need an insulated shower in the country, that is, given that our construction will be quite simple, most likely from boards or OSB, this will not be enough to keep the cold from the street inside. Two materials are best suited as thermal insulation here - mineral wool(glass or stone (basalt), but not slag) and polystyrene (in extreme cases, extruded polystyrene foam, but it is much more expensive).
The process of laying such insulation is actually no different from installation in other rooms - all the same frame and fasteners that are most suitable for the material used.
But there is one very important nuance, which arises in connection with the specifics of the shower box - it is constantly humid there, therefore, the thermal insulation must be protected from water splashes. If you are doing installation from the side of the street, then this question disappears, as it were, by itself, but inside it is extremely important, otherwise you risk getting fungus and mold there.

Foil - excellent waterproofing
So, it is best to cover the insulation with an ordinary thick cellophane film, and then cover this entire structure with foil or any thin foil insulation, as shown in the photo above. Here you immediately, as it were, "kill two birds with one stone" - protect the insulation from moisture penetration and create an infrared reflector.
The fact is that the foil has an excellent property - it reflects infrared rays, therefore, the overexpenditure of heat calories in boxing will be minimal.
Note. It is very important that you insulate not only the walls, but also the ceiling, since according to the laws of physics, heated air rises and if there is poor thermal insulation, then warm air fade away very quickly.
The same applies to the waterproofing of the ceiling - the steam, rising up, will be reflected by the foil insulation.
Plumbing nuances

Since we are insulating the shower box on the street, it is quite natural that we will not make a drain (lattice) floor there, since from below it will cold air and all heating will be useless. In such cases, of course, it is best to fill the floor concrete screed with insulation, which is most often used as an expanded clay pillow laid on a layer of sand.
That is, the screed is poured here according to all the rules - the soil is planned, then a waterproofing film is laid with a twist on the walls, then a layer of sand 2-3 cm is poured and after that - an expanded clay cushion, the thickness of which depends on the coldness of the soil, but not less than 4-5 cm.
Do not think that we have made a reservation about - the film is needed here not so that water does not get into the soil, but so that the pillow is dry - thereby reducing the thermal conductivity of materials.

You will need to mount a drain on the floor and take it to the general sewer, to a septic tank, or dig a cesspool nearby, only use it exclusively for soapy water. But still, the best option there will be a septic tank - you will not only not pollute the soil, but also will not breed unpleasant odors, which exudes stagnant water.
Conclusion
You understand that building a wooden box is easy enough, but how to make it so that you can wash in it during the cold season is a completely different question. So such a seemingly insignificant building in this case will turn out to be a capital object, but if you bring water underground, you can wash there at any time of the year.