Do-it-yourself pvc pipe greenhouse drawings. How to build a greenhouse with your own hands from plastic pipes: design options and assembly technology. Preparing for construction
Plastics lungs, they are easy to work with. They are not afraid of mold and fumes, they are not damaged by caustic chemicals. Greenhouses made of polymer pipes serve for a very long time.
Since the price of greenhouse structures is high, gardeners can make a greenhouse on their own. You don't have to spend a lot of money.
If we talk about size, then having modern materials, you can easily make a greenhouse according to individual sizes.
How to make a greenhouse plastic pipes with your own hands?
PVC and HDPE pipes for greenhouses
For, the frame of which is made of pipes, a foundation is not needed, because the structure is light. Bases are required for the device boards and wooden blocks.
Choose quality, dry lumber. Treat all elements with an antiseptic, this will increase the life of the structure. Drying oil can be used instead of an antiseptic.
To work, you need a plastic pipe, PVC. The most commonly used pipes white color, but you can choose another.
How many plastic pipes do you need to build? Buy products with a diameter of 13 mm, for a greenhouse it is enough to purchase 19 six-meter pipes.
In addition to the items listed above, you need to buy steel reinforcement or bars. You will place them inside the pipes. You will need at least 10 rods 100 cm long.
If we talk about consumables, then clamps made of aluminum or plastic will be needed.
Types of greenhouses
Greenhouses can have a film covering, or polycarbonate. Most often, gardeners choose an arched design. She is can be of two types:
- with a plank box and arcs that were strung on steel rods;
- with frame made of plastic, arcs and tees made of the same material.
You can easily make a greenhouse with gable roof. He can be two kinds:
- film coated;
- with polycarbonate finish.
Some landowners who are serious gardeners will appreciate two-layer greenhouses made of PVC.
Such structures are distinguished by excellent thermal insulation, because the space inside the greenhouse is reliably protected from the external environment by two sheets of cellular polycarbonate. Such a greenhouse gives off heat three times less than a conventional greenhouse.
Attaching the film to the frame
 In stores you will find polymer pipes of the desired diameter. Sellers will help you find the right ones for them. fitting, you don't have to look for them yourself.
Manufacturers in the pipe kit include swivel joints. Thanks to them, the process of building a greenhouse will accelerate significantly. You will find cross and tee splitters in the store.
Of course, the use of connectors will increase the construction budget. That is why you need to evaluate for yourself whether you will use fittings or not.
You can choose which plastic pipe greenhouse to make on your site. It can be of two types: stationary and collapsible. Stationary is erected by welding or gluing parts of the structure. Collapsible involves the use of screws.
Advantages of products made of polycarbonate and plastic pipes
Polycarbonate greenhouses have low cost. The frame is easy to do with your own hands. You can move the structure to another place at any time, it is very easy to adapt it to your needs.
The plastic greenhouse will be absolutely safe for soil and plants. With proper assembly, a long service life is guaranteed. Polycarbonate is a material that protects plants from ultraviolet radiation. Light passing through the material is scattered. At the same time, the sheets have a high degree of light transmission. Even with prolonged use of the greenhouse, it does not deteriorate.
Polycarbonate is not afraid of being hit by stones and even large hail. The material is 200 times stronger than glass and 6 times lighter, so no foundation is needed to install the greenhouse. Installation is carried out without special equipment.
Sheets are not afraid of temperature changes, greenhouses endure severe frosts and the hottest rays of the sun. Polycarbonate burns only if it is directly exposed to flame. The sheets are flexible, you can easily assemble arched and vaulted greenhouses.
A photo
Do-it-yourself greenhouse made of plastic pipes: photo examples.


Preparatory work
Locate the greenhouse in a sunny location. Leave free space around, there should be a passage around the greenhouse. If you are going to put up a greenhouse for one year, then it is better to stay on a folding or portable structure.
Choose stationary if you plan to grow crops annually.
Remember that greenhouses of this type are suitable for operation in winter period. For such structures, it is necessary to put a high-quality foundation so that the greenhouse does not come into contact with frozen soil, so that cold does not come from outside.
Determine the place Where will the greenhouse be located?. Clear the soil from the fertile layer, it is enough to remove a couple of centimeters. This must be done, because during construction, carnations and construction debris will fall on the ground.
How to install a greenhouse
How to build a greenhouse from plastic pipes under the film with your own hands? No matter which project you choose, installation includes a number of steps:
- Foundation preparation. It will replace the foundation, since pouring a concrete strip does not make sense. The plastic is light enough, no foundation is required.
- Assemble the frame. Use pre-purchased polymer pipes in your work, they can be rigid or flexible. Fix polycarbonate or reinforced polyethylene film. Glass cannot be used.
- Proceed to end side mounting. Make windows in the greenhouse, install doors. Hang locks.
This is short description stages. In fact, the construction of a greenhouse has its own characteristics. It all depends on the type of greenhouse you decide to build in your backyard.
At first decide on a base. This is the frame that will hold the frame on the ground. It is needed in order for the greenhouse to retain its shape. The basis does not depend on which project you choose. The choice is limited by your financial capabilities and wishes.
Ramu can be made from a rigid plastic pipe, eight-millimeter boards, bars of small width. Most often for the device bottom strapping use a thick board. Buy either her or the bars. The material is connected by cutting half a tree. Metal parts are not used to connect the base.
The base is either immersed in the ground, but for this, a shallow trench is first dug. Along the perimeter, you need to lay roofing in it, it should cover the walls of the groove and its bottom. After that, a greenhouse frame is installed in the trench.
Do not assume that the frame is polymer pipe may be self strapping. It is only necessary if there is a brick or concrete foundation. It is also installed when building a foundation made of wood.
The base is fastened with brackets to the beam; anchor bolts can be used in the work. They are fixed in concrete at the moment when it begins to harden. Or the bolts are fixed in the brickwork.
All options you can use with any project. But when building such a foundation, you will have to forget about changing the location of the greenhouse.
If you plan to move the greenhouse from place to place, then it is better to bring down a simple plank frame. Prepare the site, remove the sod, freeing the territory.
Take from the need to make from dried wood. Treat the structure before assembly with hot bitumen. Additionally, impregnate the tree with an antiseptic.
Use a PVC pipe with 3 mm thick walls. Determine the number of six-meter segments yourself. Do not forget that one segment must be left on the screed.
For fastening arches buy plastic clamps. They will need as many as there will be PVC pipe segments. To securely fix the arches, attach them to wooden base, buy mounting brackets or aluminum drywall fasteners. For each piece of pipe you need two pieces.
Take a sledgehammer and drive in pieces of reinforcement on both sides of the base, leaving 40 cm above the surface. Put on pieces of PVC pipe. Fasten the arches by fixing them to the frame with metal brackets.
Arrange the ends by making a doorway. For this purpose, use wooden blocks. Such an opening will act as a box. To increase the rigidity of the structure, reinforce the ends with wooden parts. At the highest points of the arches, make the top screed. Attach it with polymer clamps.
cover the greenhouse polycarbonate or film, fix the material. Make a door and vents.
Do-it-yourself plastic pipe greenhouse: drawings for manufacturing on a frame of water pipes polyethylene pipes.


Useful video
To your attention, a video about how to make a greenhouse out of plastic pipes.
And here is a video about a greenhouse under a film with your own hands from plastic pipes.
This is the most simple design , which you can easily assemble on your own. Such a greenhouse will last a very long time, delighting you with its aesthetic appearance and large yields.
If you find an error, please highlight a piece of text and click Ctrl+Enter.
Almost on every suburban area the owners arrange a greenhouse or greenhouse, and most prefer to do it with their own hands. Previously, various natural materials were used - wood, metal, glass, and today plastic is increasingly being introduced into the yards of private owners. A greenhouse made of plastic pipes is modern, simple, convenient, durable and cheap. Moreover, she is going to, as from a Lego constructor: with her own hands and with virtually no tools.
A greenhouse made of plastic pipes is becoming more and more popular, because it has a number of undeniable advantages. It is easy to make, the assembly itself will take only a few hours, you don’t need to be a professional for this, just decide on the dimensions, make a drawing, buy and bring necessary materials. Since plastic pipes are light in weight, they do not need much physical strength to transport, load and unload, assemble a greenhouse or greenhouse. Therefore, you do not need to attract many people to work.
Any structures made of PVC pipes (polyvinyl chloride) or HDPE (polyethylene low pressure) are easy to assemble and dismantle, which is very convenient in the country. Often they make greenhouses for seasonal use, covered with plastic wrap: the owners do not use them all year round, after operation, the film is removed, the frame is disassembled, removed for the winter, and assembled again in the spring. Assembling the structure with his own hands, the summer resident wants not only to save money, but also to realize own desires, plastic elements are best suited for this.
Perhaps the most important advantage of plastic pipes compared to other materials used is the absence of their interaction with water, earth, air - PVC and HDPE do not rust, do not mold, do not rot, do not emit any harmful substances either into the air or into earth. This explains the durability of the material - an important quality in itself. And environmental friendliness in agriculture, of course, is welcomed.
What are greenhouses made of PVC pipes
Greenhouses most often do:
- arched;
- gable;
- lean-to.
For do-it-yourself arched greenhouses made of PVC pipes, they knock down a box of boards or wooden beams. Pipes are put on metal, less often wooden pins (pegs), which are securely fixed in the ground, 30-40 cm of the pin should remain on top, which freely enters the pipe . If such a greenhouse (greenhouse) is covered with plastic wrap, then the ends are usually covered with plywood, wood board or plastic, in which doors and vents are made for ventilation. If the arched structure is covered with polycarbonate, then the end sides are also made from it.
Single-pitched and double-pitched greenhouses are covered with both film and polycarbonate. Such a heavy, fragile and expensive material as glass is less and less used for greenhouses and greenhouses in our summer cottages, which is not surprising.
Pipe structures are usually installed on a foundation or rigid base to add rigidity and stability to them due to the lightness of the material.
Video "Installing a greenhouse from plastic pipes"
Do-it-yourself step-by-step process of assembling a greenhouse from plastic pipes at a summer cottage
How to build a flexible pipe greenhouse
Arched greenhouses and greenhouses are usually made by hand from flexible pipes with a diameter of at least 20 mm. In order to build such a greenhouse, you need to take:
- metal pins with a diameter of 10-12 mm and a length of 50-75 cm;
- plastic pipe with walls 3 mm thick;
- plastic clamps for connection;
- aluminum fasteners to attach the arches to wooden frame;
- polyethylene film for coating;
- planks to help secure the film.
The amount of materials must be accurately calculated according to the drawing, which will inevitably have to be done if we want to assemble the structure with our own hands. You will also have to purchase a wooden bar for door frames, vents, hinges for hanging opening doors, nails, locks, screws. At the most convenient place for the greenhouse, you need to mark its position, along the line of long walls, hammer metal rods into the ground with a sledgehammer, leaving 30-40 cm outside.
Now you need to put the pipe on the opposite pins and attach it to the wooden frame with metal brackets. This is how all arches are performed, and the more often they are located, the more stable the whole structure will be. If the frame is made under polycarbonate, then the step is commensurate with the size of the sheet, polycarbonate will make the greenhouse (greenhouse) heavier, more stable and simply tougher. And if the coating is supposed to be from a film, then the more often the step, the more stable the greenhouse, the less polyethylene will walk, and, therefore, it will be used longer.
Now you need to assemble the end walls, insert doorways, vents, additional fragments of wood for frame rigidity. After that, the upper screed of the arched structure is installed. It runs along the highest points of all arches, is attached to them with polymer clamps.
The finished frame is covered with a film, placing it in such a way that pieces of the same length remain from the ends. They fix it with planks, press the film with them and nail them to a wooden frame on one long side. Moreover, you need to start from the middle, and not from the corners. After the film is fixed on one side, it is evenly straightened and the same is done on the other long side: the planks are nailed, starting from the middle and moving towards the corners.
At the ends, the film is collected in folds and nailed. Doors and vents pre-covered with film are hung. If the ends are also film, then the film under the doors and vents is cut out so that there is enough left to fix it on the beam. This is simple circuit do-it-yourself construction of an inexpensive greenhouse (or greenhouse) using plastic pipes. Based on it, you can create something of your own, more aesthetic, artsy or suitable for a particular area.
Some do not use boards to fix polyethylene, instead they take a furniture stapler. Some people add ribs at the ends for rigidity, and many make the ends of an opaque but rigid material. That is the beauty of building something with your own hands - you can give free rein to your imagination and choose the most acceptable from the many options. Flexible plastic pipes in this case are the most suitable material.
Use of rigid pipes
Rigid plastic pipes are usually used for the construction of shed, wall and gable greenhouses. Using fittings, you can assemble the frame without gluing, which is convenient for greenhouses used temporarily. Rigid pipes are connected with polymer tees or couplings, covered with plastic wrap or polycarbonate - all options are good. The only thing that cannot be done when using plastic pipes is glazing. It is not advisable to use glass in a frame made of PVC or HDPE pipes.
Video "Description of the assembly of greenhouses and PVC pipes"
A self-respecting summer resident should have a greenhouse or greenhouse, at least, because to get good harvest, and even before a neighbor, every gardener dreams. Having decided to build your own greenhouse, it remains to decide on the material from which to light it all. Firstly, it must be accessible, and secondly, the greenhouse must be easy to install. After a short search, such material was found - this is a standard PVC pipe used for water supply. A do-it-yourself greenhouse made of plastic pipes is made in 2-3 days, and its cost is more than affordable.
Types and advantages of PVC greenhouses
Greenhouse from polypropylene pipes- this is far from uncommon, and you can find them everywhere. They grow seedlings for garden plants, use them to grow vegetables and herbs all year round. Sometimes greenhouses can take on bizarre shapes, but three design options are considered the most common:
- A shed greenhouse is an “economical” option, since most often such structures are adjacent to a house or other buildings. A significant drawback of this design is the need to constantly clean the roof of snow, besides, not enough light gets inside.
- Gable greenhouse - a design that is very popular. The triangular shape at the top creates additional possibilities by increasing the usable area inside the greenhouse.
- The arched greenhouse made of PVC pipes can be used all year round, it does not deform under the influence of snow in winter, but the main advantage is more sunlight entering it, which helps to increase the yield.
Today, greenhouses made of plastic pipes are the most affordable, and only wooden structures. You can make them yourself, or you can buy already in ready-made mounted on site.
It will be inexpensive, and among the advantages of greenhouses made of polyethylene pipes, one can note the wide possibilities regarding shapes and sizes, the possibility of year-round use, which is associated with good tightness of the structure. In addition, installing a greenhouse from PVC pipes with your own hands is a task that even beginners can handle.
Making a drawing and choosing a material
The construction of a PVC pipe greenhouse requires careful preparation, and the first thing we need to do is prepare a drawing. You can do this yourself, taking into account your wishes, or you can find a ready-made drawing of a PVC pipe greenhouse, since there are no problems with this today. Many, however, prefer to draw up a diagram of a future greenhouse on their own, given characteristics area and other factors. Given the great popularity, we decided to build an arched greenhouse.
Starting installation, we must select the material, on which the strength of the structure and tightness will depend. In our case, this will require:
- greenhouse pipes;
- accessories, including tees and oblique tees;
- board for making the base;
- reinforcement with a diameter of 12 mm or a steel bar;
- self-tapping screws and clamps for attaching the frame to a wooden base.
The diameter of PVC pipes in greenhouses may vary, but most often pipes with a diameter of 25 millimeters are used for this - the standard diameter of the pipe used when performing hot and cold water. Pipe length PVC greenhouses is also not a fundamental issue - it depends on its size, some even use waste, but in this case, the amount of fittings needed to connect individual fragments increases.
Choosing a place to build a greenhouse
When starting to install a greenhouse or greenhouse, it is important to choose the right place, because we are talking about the harvest, and here there are no trifles. Firstly, a plastic pipe greenhouse must be in the sun, which means that the distance to the nearest buildings must be at least 3 meters.
In addition, try to orient it relative to the cardinal points - the ends should look to the north and south, and the sides to the west and east, respectively. Do not forget also about neighboring trees, the distance to which should be significant.
Site preparation and foundation installation
Sand cushion under the greenhouse
Before answering the question of how to make a greenhouse out of plastic pipes, you must prepare the site for the future construction. The place of the future greenhouse must be carefully planned, removing excess land or filling it.

Marking by pegs
We carry out the markup, in accordance with the previously drawn up scheme. To do this, we drive in metal rods, fittings or wooden pegs in the corners. It is important here that the dimensions are ideal, and special attention should be paid to right angles, for which it is necessary to “break through” all the diagonals, which will avoid skew.
Master's advice. Checking diagonals is very easy using the Pythagorean theorem. Everything is done elementarily: from the corner we measure the same distance in both directions (the twine should already be stretched). We connect the obtained marks with each other, getting a right-angled triangle. We take measurements with a tape measure. If the square of the diagonal (hypotenuse) is equal to the sum of the squares of the legs (sides), then we are doing everything right!
Next, we proceed to the device of the base, and for this we need wooden plank, hammer and nails. Everything is simple here, but if you want the greenhouse to last as long as possible, impregnate the wood with a special compound that can prevent decay processes. After collecting the base, do not be too lazy to check the diagonals one more time in a known way.
Next, we make marks and drive in the reinforcement or steel bars necessary to install the frame to the desired distance. The distance between them should be 50-60 cm. Now it would not hurt to make the greenhouse itself from PVC pipes, which means that it is time to mount the frame.
Greenhouse frame device
The next step in the installation of a greenhouse from pipes with your own hands is the construction of a frame - a task, at first glance, difficult, but completely solvable and within the power of any owner. The frame of the greenhouse is made of PVC pipes, as we have already decided. The main feature of this pipe is the absence of the need to involve a welder, whose services are not cheap. It is enough to have a simple device for soldering plastic pipes, and you can even borrow it from a neighbor or rent it at the bazaar for a couple of days.
We will insert pipes into previously clogged reinforcement or into steel bars, but first we need to weld the pipe in the middle, where a cross will be installed, creating an additional stiffener.
Tees are used at the junctions of pipes. Paste bent pipes and do this several times, depending on the number of arcs. We connect the arcs to each other with crosses, thereby increasing the strength of the structure. We fix the structure from below by screwing it with self-tapping screws and clamps to a wooden base.
As you can see, there are no particular difficulties yet, but they can arise when arranging doors and windows. To do this, draw vertical lines from the base on both sides and make marks on the arc. For fastening we use oblique tees, although you can do this with wooden slats, but in this case it suffers appearance designs.
Covering the greenhouse (film or polycarbonate)
A do-it-yourself PVC greenhouse will be ready when we cover it, for which there are two common options. It is easier and cheaper to do this using plastic wrap, which is not difficult to buy. You need to fasten the film to the base on one side with nails and wooden planks, stretch it and fasten it in the same way on the opposite side. But there is 1 drawback: this design is not too neat, because "stretch" finishing material quite difficult.
Some difficulties will arise with polycarbonate - in this case, an additional timber is stuffed onto the base, which will allow the carbonate sheet to be drowned. It is attached using standard screws. Such a greenhouse looks much more beautiful, but it costs a lot more money and the scale of the problem can only be realized after comparing the price of polycarbonate and film.
This is where the work ends and, as you can see, making a greenhouse out of a plastic pipe is easier than a steamed turnip, right?
Let us give some advice on increasing the strength of the greenhouse structure. So that it lasts for a long time, and if you do not plan to move it from place to place, do not spare the effort and money required to build a concrete foundation that can extend the life of the greenhouse for many years. It will be enough 40 centimeters deep and 20 cm wide.
The use of transparent polycarbonate as a coating can extend the life of a greenhouse and greenhouse, but when choosing a material, you need to decide on the density. Thick material costs proportionally more, so you will have to choose between a reasonable cost of construction and its strength.
And now let's see a short video of making a greenhouse from plastic pipes in order to see this simple process with our own eyes:


A greenhouse made of plastic pipes can be easily made on your own, as this material allows you to build structures of any shape and size. It will be a light, but strong, collapsible or stationary structure with a sheathing made of ordinary polyethylene or polycarbonate. In this article, we will provide you with information on how to build such a greenhouse with your own hands at the lowest cost in one or more days.
Advantages and disadvantages of the material, types of structures
Plastic hot water pipes can be used not only for their intended purpose - the installation of plumbing or heating, but also for the manufacture of various lightweight and durable greenhouse structures.
The disadvantages include the fact that during thermal welding, the structure cannot be completely disassembled without damaging the integrity of the greenhouse frame. Under great physical stress, the pipe can bend and even break.
Types of greenhouses
There are several modifications of greenhouses made of plastic pipes:
- Arched type coated with polyethylene;
- With a gable roof with a polyethylene covering;
- Arched type with polycarbonate sheathing;
- With gable roof with polycarbonate sheathing.
Preparation for construction: drawings and dimensions
Before starting the construction of the greenhouse, it is necessary to resolve the issue of installing the foundation. If the greenhouse is needed only in certain months, then a capital foundation is not required. We will make a wooden base.
It will be necessary to choose a convenient and even place in the garden, make sure that the soil does not sag under the mass of the greenhouse. To cover the frame of plastic pipes, we will use a polyethylene film.
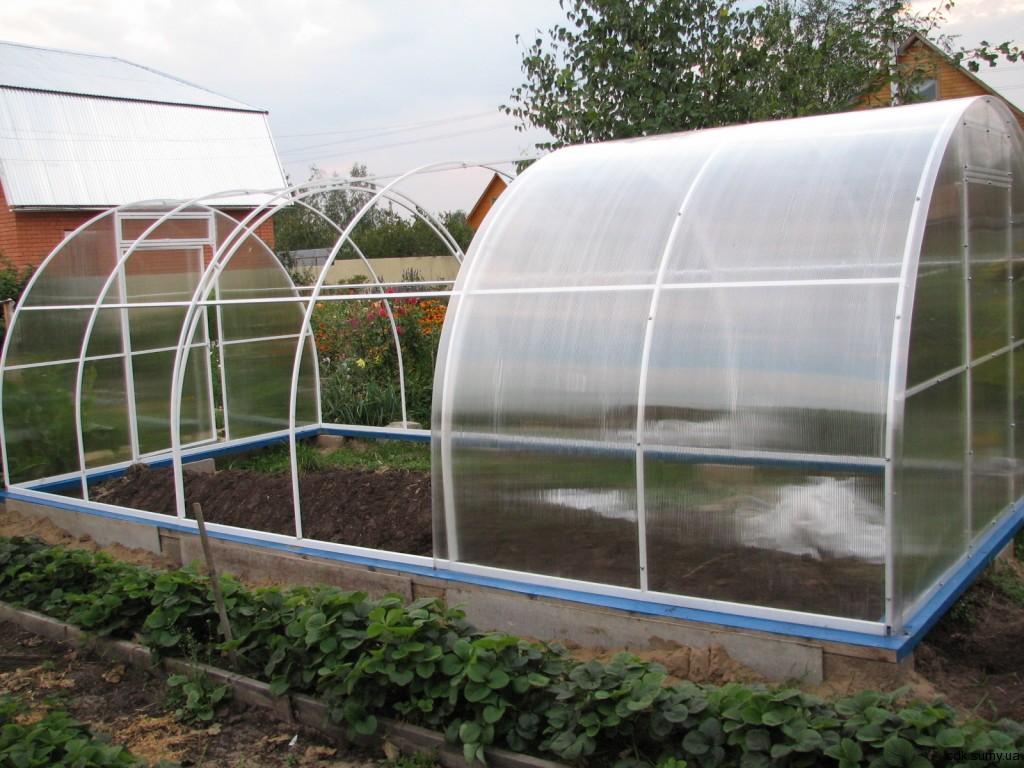
Arched greenhouse dimensions:
- By bending the pipe 6 meters, we get the correct arc;
- The width of the greenhouse is 3.7 meters, the height is 2.1 meters, the length is 9.8 meters;
- When buying plastic pipes, pay attention to the manufacturer. Quality pipes are offered by Czech and Turkish companies. If you want to save money, you can buy Chinese or domestic products.
- For strength, it is necessary to take pipes intended for supplying hot water with a wall thickness of 4.2 mm (diameter inside 16.6 mm and outside diameter 25 mm).
- Connecting fasteners made of thermoplastic - wall thickness 3 mm.
- We take fittings in accordance with the diameter of the pipes to ensure the strength and rigidity of the structure.
Calculation of the required amount of material and tools for work
- Four boards with a section of 2x6 cm - 5 meters;
- Two boards with a section of 2x6 cm - 3.7 meters;
- Fourteen boards with a section of 2x4 cm - 3.7 meters.
- Six-meter plastic pipe with a diameter of 13 mm - 19 pieces.
- Three-meter fittings with a diameter of 10 mm - 9 pieces.
- Polyethylene six-millimeter film - size 6x15.24 meters.
- Wooden pieces of rails 1.22 m long - 50 pieces.
- Screws or nails.
- Fasteners (possible for drywall).
- Butterfly hinges for doors - four pieces and two handles.
For the sides of the greenhouse:
From five bars 2x4 cm (length 3.7 m) it is necessary to make a frame of the sides of the structure:
- 11'8 3/4" = (2 beams) 3.6 m;
- 1'6" = (4 bars) 0.45m;
- 4'7" = (4 bars) 1.4m;
- 5'7" = (4 bars) 1.7m;
- 1'11 1/4" = (8 bars) 0.6m;
- 4'1/4" = (2 bars) 1.23m;
- 4 bars 1.5 meters long;
- 4 bars 1.2 meters long.
Tools for work:
- A hammer;
- Bulgarian and hacksaw;
- Screwdriver or a set of screwdrivers;
- Hand, electric or petrol saw;
- Building level and tape measure.
Do-it-yourself greenhouse from plastic pipes: assembly steps
- For the construction of the base, we cut each reinforcement rod into 4 pieces. You should get 36 pieces of 75 cm each. To fix the pipes, we need 34 pieces. We divide two segments into two equal parts and get 4 rods of 37.5 cm each.
- From the boards 2x6 cm lay out the base of the greenhouse rectangular shape 3.7x9.8 meters. We connect the frame with self-tapping screws or knock it down with nails. After making sure that all the corners are 90 °, we fix pieces of reinforcement 37.5 cm long in them.
- To make a frame from pipes, you need to take 34 pieces of rod (75 cm) and hammer them at the same distance (about 1 meter) along the two long sides of the base of the structure parallel to each other, 17 pieces each. At the top there should be rods 35 cm long.
- Next, we put 17 plastic pipes on the reinforcing stakes driven in from both sides, bending them into an arc. We get a preliminary frame of the greenhouse.
- We fasten plastic pipes to a wooden base with metal plates using self-tapping screws and a screwdriver.
- To mount the end, it is necessary to assemble the structure from the bars, as shown in the photo below. Install them in the frame of the greenhouse and connect them to the base with screws.
- From a 2x4 cm beam, we cut 4 pieces 70 cm long. From one end of each beam we make an angle of 45 °. These bars are designed to strengthen the ends. To do this, we fasten the end frame to the base, as in the photo below.
- After we have made the frame, we need to make a stiffener at the top of the structure. To do this, you need to connect two pipes of 6 meters each with a plastic connector, and cut off the excess to get a length of 9.8 meters. We fix the pipe with special ties to the central part of each of the 17 arcs.
- We cover the greenhouse with plastic wrap. The entire greenhouse should be completely covered with a film with a large overlap on the sides and in length. On the larger side of the greenhouse, the film must be fixed with prepared slats, nailed to the base with nails.
- Then pull it well and fasten it on the other side as well. We recommend starting to attach the film from the middle, gradually moving to the sides.
- Tip: if you fix the film at a positive temperature, then in the future it will stretch and sag less.
- On the sides, pull the film down, carefully fold the excess into convenient folds, moving from the center to the edges and nail it to the base with slats. Where the door is located, it is necessary to cut out a square for the opening, leaving allowances for fastening about 5–10 cm. We wrap the film behind the opening and fasten it inside the greenhouse with nails or self-tapping screws.
- Before final installation doors, you need to check the actual dimensions of the opening, as they may turn out a little different, and the door itself may not fit in size. To assemble the doors, it is necessary to cut bars with a section of 2x4 cm (4 bars 1.5 meters long and 4 bars 1.2 meters long). Make two frames out of them. Diagonally, it is necessary to nail a beam for rigidity. We fasten the hinges to the opening with self-tapping screws. Doors should be on both sides of the greenhouse.
- The rest of the film will go on the door. It must be pulled over the frames of two doors and fixed wooden slats. On all sides there should be a margin of film of 10 cm.
- We fasten the handles and put the doors on the hinges.
The second version of the ends
- You can make the ends of the greenhouse from a sheet of fiberboard, chipboard or OSB. wooden frame ends remains the same. Before covering the greenhouse with polyethylene, it is necessary to cut out elements from the selected sheets, as shown in the photo. We measure on the spot.
- At the bottom we fasten the sheets to the wooden base and on the sides to the frame using self-tapping nails. At the top, you need to take long 6-meter pieces of foam rubber or another soft material and fasten together with them the first pipe of the structure and wooden ends. We do this with self-tapping screws so that the ends do not fall off in the future.
- Then we stretch the film on the greenhouse in the same way as in the first case, but now we do not give a large allowance for the ends. We fix it with rails. We install doors.
Greenhouse made of plastic pipes coated with polycarbonate
Polycarbonate is one of the most the best options coverage that will last for many years. This material is resistant to temperature fluctuations, has good thermal insulation properties, does not burn, protects plants from UV rays.
The place for the greenhouse should be flat and fully lit by the sun. If you will use the greenhouse in the winter, then you need to install a heating system. Building a large greenhouse is not rational, as it will be difficult to maintain the required microclimate in it. The height of the structure should be no more than 2 meters. The width of the frame is selected depending on the number of seedlings.
materials
- Plastic pipes (for hot water).
- Boards 10x10 cm.
- Beam - 2x4 cm.
- Polycarbonate sheets.
- Armature - length 80 cm.
- Plastic tees.
- Staples metal, plastic collars.
- Construction cord.
- Self-tapping screws, screws, nails.
- Sand, waterproofing material (roofing material).
Details for doors and windows

Tools for the job
- High building level.
- Long tape measure 10 meters.
- Jigsaw.
- Knife for cutting plastic pipes.
- Electric or cordless screwdriver.
- Electric drill.
- Set of drills.
- A hammer.
Stages of assembling a greenhouse from plastic pipes and polycarbonate
- For the base, we take a bar 10x10 cm and treat it with antiseptic agents. We make blanks: two beams 3 and 6 meters long. We connect into a rectangle using metal brackets or self-tapping screws.
- We dig a trench under the base. We mark the perimeter with pegs and pull the cord around the entire perimeter. To control the correctness of the angles, we also stretch the cord diagonally. They must be the same length.
- The depth of the trench should be about 5 cm so that the beam is not completely buried in the ground. At the bottom of the trench we pour a small layer of sand. We cover the bars with roofing material and lower them into the trench, in order to avoid contact of the tree with wet soil. We lay the waterproofing with an overlap. We fill the remaining space with earth and tamp it well.
- We cut the reinforcement into 14 rods about 80 cm long. We drive them on both long sides of the frame to a depth of 40 cm in increments of 1 meter. The rods should be located strictly opposite each other.
- We put pipes on the reinforcement, creating an arch. We fix them on the base with brackets or clamps with self-tapping screws. We fasten the stiffener from the plastic pipe at the top with plastic tees, which must first be machined so that the pipe passes through them. Then the tees can be fixed with self-tapping screws and the greenhouse will turn out to be collapsible.
- At the ends we make a structure for installing doors and windows. From plastic pipes we make blanks of the desired size. We connect them with the help of corners and tees into a design, which is shown in the drawings.
- For the manufacture of hinges, we take yes a piece of pipe 10 centimeters long with a diameter of 1–1/4. We glue them together with glue for PVC pipes and fasten them to the frame with screws.
- We make latches from the same piece of pipe, cutting off its fourth part and cleaning the edges. We install doors and a window on the sides of the greenhouse and fix them with latches or fasten them with self-tapping screws.
- To cover the greenhouse with polycarbonate, you need to know a few nuances: the fasteners are placed in increments of 45 mm, the sheets are mounted end-to-end and connected with a special fastener - a bar (or overlapped by a few millimeters), holes are drilled 1 millimeter more than the diameter of the self-tapping screws. Sealed thermal washers are placed under the screws, the sheets are placed so that the cells are vertical, the protective film is removed after final installation, the corner lines are fastened with a special profile.
- Polycarbonate should be stored only in a dry room with a low level of humidity.
- Before laying polycarbonate on the structure, it is necessary to close the ends with perforated tape and a side profile that drains and circulates air in the sheets so that condensate flows freely from the channels. Polycarbonate sheets are laid with a protective film up. Otherwise, the material will quickly collapse.
Note to gardeners
- If the weather is too hot outside, then the greenhouse doors on both sides of the ends must be opened for ventilation.
- In the northern regions of the country, where there are heavy snowfalls, it is necessary to remove polyethylene for the winter, as it can stretch or tear. Also, snow perfectly protects the soil from freezing, helps to keep useful material and nourishes the earth.
- If you do not remove the film, then you need to put strong supports in several places of the frame.
- Instead of polyethylene, you can use a durable film such as lutrasil, agrotex, agrospan, reinforced or bubble. Reinforced film with a thickness of 11 mm is able to withstand the weight of wet snow, hail and strong gusty winds.
- Light stabilized and polypropylene with aluminum reinforcement resistant to thermal deformation and UV - radiation.
- If possible, the place under the greenhouse should be concreted in order to wooden base stood not on open ground if seedlings, and then large plants, you will keep in special boxes.
- The service life of plastic pipes indoors is about 50 years. On the street, they will last about 20 years.
- All wooden elements must be treated with antiseptic agents.
Video: we make a greenhouse from plastic pipes coated with polycarbonate
Video: how to make a greenhouse out of plastic pipes and polyethylene coating
Video: how to build a greenhouse from plastic pipes coated with polycarbonate
https://youtube.com/watch?v=FezdC-E2iu8A greenhouse in the country will allow you to always have fresh vegetables and greens. Salads of fresh tomatoes and cucumbers will be on your table all year round. You can build a strong and reliable greenhouse with your own hands with minimal cost, since you do not have to pay craftsmen for work or buy finished structure for a lot of money, but only for plastic pipes, a few wooden bars and plastic wrap.
Having your own greenhouse in the garden is always profitable and convenient. It's still cold outside, and you have organic vegetables in your fridge that can't be compared to the products bought in the supermarket. Today, you can build a greenhouse from any material, but if you need to build a structure quickly and easily, then you should use the PVC pipe option.
Which pipes are suitable
Before proceeding to the description Supplies, it is necessary to highlight some of the advantages of a greenhouse made of PVC pipes:
- ease of installation, dismantling or transfer to another location;
- low cost of materials for the construction of the structure;
- creation of conditions necessary for growing numerous crops;
- high strength, lightness and environmental safety.
With all the advantages, it should be noted that a PVC pipe greenhouse is being built temporarily. It will be possible to grow vegetables there only one season. After this time, at least the top coat will have to be replaced. When choosing PVC pipes, it is necessary to calculate the required number of them.
To build a small greenhouse, you need to buy PVC pipes of the following length:
- 190 cm (4 pieces);
- 68 cm (10 pieces);
- creation of hinges 10 cm (10 pcs.);
- 350 cm (2 pieces);
- 558 cm (4 pieces);
- 170 cm (2 pieces);
- 360 cm (2 pieces);
- 90 cm (4 pcs.).
On the video - a greenhouse made of pvc pipes with your own hands:
When choosing a material for sheathing the frame, you can pay attention to polyethylene, polycarbonate or reinforced film. The most durable of all remains polycarbonate. But not everyone can afford it because of the high cost.
But what it looks like can be seen in the photo in the article.
What is the best and most suitable material for a greenhouse is described in great detail in this
What a spunbond greenhouse looks like, and how to make it yourself, the information from the article will help you understand:
And here budget option remains polyethylene or reinforced film. If every 2 years you will change the top cover of the greenhouse, then it is worth using polyethylene. It is inexpensive and can withstand small wind loads.
Manufacturers and prices for pipes
Today there is wide range of PVC pipes used to install greenhouses. The most popular manufacturers are:

Installation of greenhouses
With wooden box base
An arched building made of PVC pipes can be mounted not only on the ground, but also on a pre-made wooden box. Thus, it is possible to create more favorable conditions for growing crops, accurately monitor their condition, soil composition and temperature.

From a wooden box
All installation work carried out according to the following plan:
- To complete the foundation, it is necessary to prepare a site for installation, markup.
- Drive metal rods along the edges of the future box. They will be the basis for PVC mounting crates.
- A distance of 70 cm must be observed between the pins. Drive in the pegs so that their length above ground level is at least 10 mm.
- Check all diagonals, all corners must be right. Otherwise, the greenhouse will not be stable.
- Using the prepared boards, you can start creating the box. Its height can reach 30 cm.
- Next, proceed to the assembly of the PVC pipe sheathing. To make ends, you can use wooden bars. Just do not forget to leave room for doors and vents. Cover the assembled frame with foil. Fill its edges under the box and fix with staples. The last step is to install doors and vents for air circulation. But what the new generation greenhouses look like can be seen in the photo
A box for such structures can only have soil at the base, which is poured to a certain level. But there is also the option of installing the box on a pillow of expanded clay and sand. This will improve the microclimate inside the greenhouse. Such a structure will be warmer, and it will be much easier to assess the condition of the soil.
Polycarbonate coated
You can get a more durable building from PVC pipes, provided that the frame is sheathed with polycarbonate. Such a structure is durable, reliable, and it is also much easier to maintain the conditions necessary for the full growth of plants. It is absolutely not required to build a powerful frame for polycarbonate sheets. So prepare metal pipes won't have to. PVC constructions perfectly resist all loads, if the assembly conditions were not violated.

Installation work is reduced to compliance with the following plan:
- The first step is to prepare the site for installing a greenhouse. There carefully level the soil.
- The assembly of the greenhouse takes place in the end parts. First, cut out 3 sheets with dimensions of 2x2.1 m. For these purposes, you must use a sharp knife. But the material should lie on a solid and even surface.
- Assemble PVC pipe frame on the ground. In this case, it is necessary to take into account the fact that there should be a window and doors that will open up. So the greenhouse looks like
- Remove the protective film from the polycarbonate sheets, lay it on the prepared horizontally installed frame with the outer side up.
- Polycarbonate align. The first sheet must be laid so that the doorway and the window are covered. When the sheet is installed evenly, it can be fixed to the PVC pipe crate using self-tapping screws. After fixing, cut off unnecessary parts of polycarbonate in an arc using a construction knife.
- Now you can start fixing the second sheet. He must or butt to first. Also make sure that there are no gaps between the materials. Perform the second end of the building in the same way.
- You can start creating doors and vents. Using a knife and a ruler in polycarbonate sheets, draw and cut through the center of the door frame so that an overlap forms when closing. Cut out the vents in the same way. In order for them to close well, it is necessary to make protrusions for the hinges. It is not surprising, but any doors and windows can be made from improvised materials, but, it is described in great detail in this article.
- Now you can proceed to the assembly of the frame. Along the perimeter, make a wooden box from the boards. Now mark all its longest sides and drive metal rods around them. They are necessary for the crate racks.
- Install PVC arcs on these guides, fasten them to the ends with a longitudinal tie.
- Using building level, check the position of the crate. Now you can fix the greenhouse. To do this, drive in special pegs at the corners of the crate to the base. Thus, the structure will not change its position during its use or strong wind.
- Completes the installation of fixing polycarbonate sheets. It is necessary to measure the arc and cut the material with a margin of 10 cm. The outer side should be directed upwards. It is worth leaving a margin of 5 cm above the ends. All unnecessary parts of the material must be removed after fastening.
- Fixation of polycarbonate sheets is carried out using press washers. It is possible to remove the protective film from the material only after the installation work is completed.
- All joints formed between sheets must be sealed.. Neutral is perfect for this purpose. silicone sealant. Install handles on doors and vents. You may also be interested in learning more about what are, and in what part of the garden it should be planted.
On the video - installation of a greenhouse made of pvc pipes: