Safe chimney for a bath with your own hands step by step. Building a bath: how to build a brick chimney. Step-by-step instructions for do-it-yourself installation How to make a chimney in a sauna stove
Ideally, the combustion products of any fuel are carbon dioxide and water. But in reality, even in the case of very high-quality fuel, soot and carbon monoxide, resulting from incomplete combustion, will inevitably be added to them. In addition, fuel - be it coal or wood - contains impurities that also pollute the air with the products of their combustion.
The ingress of combustion products into the room is not only dirt and bad smell, but also a threat to health: carbon monoxide extremely toxic, and poisoning them can lead to serious consequences. All these products of combustion must be completely removed from the premises of the bath - this not only ensures cleanliness, but also preserves health.
Therefore, an important element of any bath using a stove on any type of fuel - coal, wood, gas - is a chimney. It is arranged quite simply and in most cases it can be made by hand.
Choice of chimney type
Material
The main materials for the manufacture of chimneys for a bath are:
- brick;
- metal (steel) pipes;
- ceramic pipes.
Combined options are also possible - for example, a ceramic pipe is enclosed in a steel casing or a steel pipe runs inside the brickwork. Traditionally, chimneys were made of brick - simply for the lack of other materials. However, metal chimneys are now quite widespread.
A brick chimney has time-tested advantages that have made it popular:
- It is much stronger and more durable than metal.
- A brick chimney is safer in terms of fire.
- The brick itself has good thermal insulation properties, and also accumulates heat well.
- It only requires bricks, cement, sand, and water to make, making it more economical than other options.
- If the stove in the bath is brick, making a chimney from the same material is the best option.

However, brick chimneys also have disadvantages:
- The construction of brickwork is a rather time-consuming process that requires appropriate experience and skills. In the absence of experience, building a chimney with your own hands is very difficult, and in this case, you may have to invite a specialist.
- The inside of a brick chimney will inevitably be rough - which means it will trap soot, which makes it difficult for smoke to pass through. In addition, the soot accumulated in the chimney can catch fire. So brick chimney have to clean more often.
- Brick structures are heavy - therefore, they need a foundation.
Metal chimneys are made of stainless steel - other metals do not withstand prolonged changes in high and low temperatures, as well as the high humidity inherent in the bath. Their advantages:
- soot accumulates less in them, and they are also easier to clean;
- they are easy to install (assembly);
- many companies produce ready-made metal chimneys, which can only be assembled with your own hands in accordance with the instructions.
Main disadvantages steel structure stem from the high thermal conductivity of the metal - it is desirable for them to provide reliable thermal insulation, especially in those places where the chimney passes through the walls of the bath, the ceiling and the roof. In addition, it is necessary to carefully monitor the tightness at the joints that make up the chimney pipes.
A popular design of a metal chimney is a sandwich pipe, consisting of external and internal metal pipes, between which a layer of thermal insulation is laid.
In this case, the inner pipe must be steel, and the outer pipe can be made of any metal (although galvanized pipes for a bath are not recommended - they change their diameter when heated and cooled, as a result of which strength is lost and tightness may be broken). If it is not possible to purchase ready-made sandwich pipes, you can make a similar design with your own hands.
The foundation for steel and ceramic structures is needed only if their weight exceeds 750 kg - in most cases this weight is not reached, which facilitates the arrangement of the bath.
Chimneys made of ceramic pipes combine the advantages of brick and steel:

- they are fairly easy to install; like metal, ceramic structures can be quite easily assembled with your own hands, without resorting to specialists;
- Ceramics, like bricks, have low thermal conductivity, are fireproof, and accumulate heat well.
Internal or external?
According to their location relative to the building, chimneys can be divided into
- internal - passing completely indoors;
- external - in this case, the pipe immediately from the furnace goes outside the building, and the main part of the chimney is located outside.
The internal location allows you to use the heat of hot smoke for heating  bath rooms.
External - greatly simplifies installation (this is important when building a bath with your own hands), however, it requires additional thermal insulation to avoid the accumulation of condensate and soot in the pipe. This option also increases fuel consumption, since the chimney in this case "heats the atmosphere."
Additional elements of the chimney
The best chimney is straight, without bends, which goes straight up from the stove. As a rule, brick chimneys are arranged this way.
However, this is not always achievable for steel or ceramic chimneys: there may be obstacles in the path of the pipe - for example, load-bearing beams - it is impossible to pass the pipe through. And in any case, you have to make bends with the external location of the chimney. In such cases, it is necessary to lead the chimney straight, then horizontally or at an angle to bypass the obstacle, and then again straight up.  It should be remembered: the total length of horizontal and inclined sections should not exceed 1 meter - otherwise the movement of smoke will be difficult (as is known from the course of physics, hot gas tends to rise, and not go sideways). In addition, soot will accumulate on a horizontal section. The number of pipe bends should be kept to a minimum - as a rule, it can always be designed to have only one or two bends.
To connect pipes running vertically and horizontally (or at an angle), various options transition knees. When choosing and installing an elbow for connecting pipes, you also need to take care of how to clean it afterwards - the elbow is one of those places where soot accumulates the most. More convenient in this case is a tee - a variant of the elbow, which provides a removable glass (or similar design) for cleaning.
Pipe connections must be absolutely sealed so that smoke does not enter the room. To safely pass the pipe through wooden ceiling and roof, branch pipes are used. The pipe is brought to a hole cut in the ceiling, into which a pipe is inserted, and then brought out.
Since the metal pipe has a considerable weight, it is fixed with wall brackets every 2 meters. When the pipe is led out through the roof, a hermetic roof cutting must be arranged, which prevents the ingress of water from rain and snow into the bathhouse.
The outlet of the pipe must be protected by a "fungus" on the top of the pipe from atmospheric precipitation getting inside.
What to consider when designing and installing a chimney
When designing and installing a chimney with your own hands, you must:
- Select the correct pipe section. Too narrow a pipe will not cope with the removal of smoke and will smoke the premises of the bath. If the pipe is too wide, the smoke will pass through it too quickly, not having time to warm up the bath - as a result, it will take more fuel and time to fire. Depending on the power of the furnace, the cross section of the pipe can be from 140 to 270 mm.
- The best pipe shape is cylindrical. She provides best walkthrough less dirty and easier to clean.
- Choose the location of the chimney closer to inner wall baths - this will improve thermal insulation.
- The total height must comply with the instructions in the furnace passport. If the chimney is assembled by hand, and there are no such instructions in the manual, the height should be chosen at least 4.5 meters.
- The pipe must be installed above the roof ridge by at least 50 cm.
- The place where the pipe exits through the roof must be provided with reliable waterproofing.
- It is necessary to provide for the installation of a gate (valve) for draft control.
- Ensure its complete tightness to prevent smoke from seeping into the bath. We must not forget that the carbon monoxide contained in the smoke can cause severe poisoning.
- It is desirable to additionally protect the walls and ceiling near the chimney with basalt wool, copper sheet or other non-combustible materials.
- In the place where the pipe passes through the ceiling, it is advisable to increase the wall thickness to prevent fire. Usually the wall thickness increases by 5 cm. You can thicken the walls with your own hands by covering them with a layer non-combustible material and enclosed in a metal casing.
- The chimney can be whitewashed or painted in White color. This will not only improve appearance, but will also serve as an indicator of tightness: the paint will darken in places where smoke penetrates.
And for clarity - a small video on installing a chimney in a bath
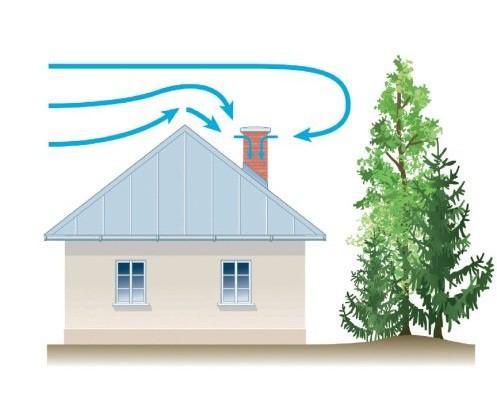
Before proceeding with the installation of the chimney, you should study its main parameters. From right choice parameters depends not only on the efficiency of the furnace, but also on the fire safety of the bath and the health of people. Each boiler manufacturer gives recommendations on the diameter and height of the chimney, depending on technical indicators, they must be observed as much as possible. Do not think that the stronger the draft, the better the chimney.
Consider the main problems of chimneys.
- Insufficient traction. With weak traction, a limited amount of oxygen enters the furnace, the combustion process slows down, and the calorific value of the furnace drops sharply. In addition, there are risks of gases entering the room; incorrect chimney dimensions often cause reverse draft.
- Too much traction. Hot gases do not have time to give off heat in the furnace, the fuel begins to "heat the atmosphere".
Chimneys must meet the requirements of SNiP 2.04.05–91 and DBN V.2.5–20–2001, by the way, they require the presence of supply ventilation. This means that fresh air must be supplied to small baths during the heating of the furnace. It should be noted that our compatriots very rarely comply with this requirement - they save heat.


There are two calculation options: complex and simplified, but they all take into account the amount of oxygen required to ensure the combustion of fuel.
More important point. To exclude the formation of condensate on the walls of the chimney, the temperature of the gases at the outlet of the chimney must exceed +120°C. Condensation on the inside of the pipe causes soot to linger, which quickly reduces traction and requires frequent cleaning.
Optimum chimney characteristics

- D - chimney diameter;
- Vr is the volume of air.

To calculate, you need to know the area of \u200b\u200bthe furnace (F) and the area of \u200b\u200bthe chimney f, divide the first value by the second and determine the percentage. For example, the ratio of the cross section of the chimney to the cross section of the firebox is 10%. This means that the minimum height of the chimney round section is 7 meters, square 9 meters, and rectangular 11 meters. The difference in height compensates for the eddy resistance created by each type of chimney.
You must understand that these values are only valid with a straight pipe, which is difficult to achieve in a bath. For the most part, the chimneys have different turns, this negatively affects the draft. To accurately calculate a specific chimney with various curvatures, you will have to invite "professors", and we advise you to slightly increase the resulting diameter. All calculations are made with a large margin, plus some increase - this is quite enough for a solid fuel stove.
Several Yet practical advice along the chimneys
| Advice | Illustration |
|---|---|
| If a residential building is heated with firewood, then the rules recommend checking the draft every year before the start of the heating season. |
|
| If necessary, the chimney is cleaned. In practice, cleaning is done no more than once every 10-15 years. Baths are heated mainly once a week. Accordingly, it is necessary to clean chimneys many times less often. Conclusion - do not make special complex designs for cleaning. |
|
| The main "enemy" of the chimney is wet firewood. During combustion, they evaporate a lot of water, the temperature of the gases drops significantly. Condensation is constantly inside the chimney, to which soot adheres. Under such conditions, the chimney may not last even one season. Conclusion - use only dry firewood. |
|
| To increase the temperature in the bath, the metal chimney pipe can be connected to several knees - the heat transfer area increases significantly, the bath warms up faster. |
|
| Try not to lead the chimney through the roof; it is much easier to place it at the end of the bath. Thus, it will be possible not only to reduce the time for installation, but also to eliminate the risk of leaks on the roof of the roof. |
|


Chimneys can be brick, ceramic or sandwich pipes (double). Consider the installation of each of these types.
Masonry brick chimneys

First, familiarize yourself with the device of a brick chimney. This is an existing standard, but for a bath, you can simplify the design a bit if you wish. Of course, it should be simplified wisely, changes should not cause the structure to self-destruct or lack the necessary traction.

 Brick chimney device
Laying from the furnace to the ceiling is best done on clay mortar, cement-sand mortar can be used above, on the roof only cement-sand mortar.
Brick prices
How to install a chimney?

Step 1. Make markings for the chimney on the ceiling and roof, the holes must be strictly vertical, use a plumb line or level. Saw holes to the calculated dimensions. Prepare goats and mortar.

Step 2 Start laying out the overhead part. It is laid already on the prepared place of the furnace, the conditional diameter of the passage should provide stable traction under various climatic conditions and furnace firing modes.

An important note - make the inner passage as smooth as possible, close the seams immediately. Any irregularities cause turbulence in the air flow, a large number of bumps can significantly impair traction. Even with normal nominal bore values, traction will be insufficient.
Check the position of each row, it is impossible to correct the mistakes made during laying, the bricks will have to be removed. In order to constantly control the verticality of the chimney, pull the thread between the corner of the first row of the overhead part and the corner of the hole in the ceiling. Such a simple device will allow you to lay bricks vertically. The thickness of the chimney is half a brick, this is enough for a bath.

Chimney - ordering
Step 3. Fluff masonry. This assembly not only protects the ceiling covering from spontaneous combustion, but also serves as an element for fixing the chimney. Fluffing - expansion of the outer walls of the structure, to increase their stability, you need to use pieces of building reinforcement. The fittings must not protrude into the chimney opening and be visible from the outside.

 Fluff sizes
Each new row should protrude slightly (a quarter) above the previous one, after three rows the width of the chimney should be one brick. The widest point should be at the level of the ceiling covering.
Step 4 A very important step. The chimney needs to be fixed. To do this, close to the fluff around the entire perimeter, nail edged boards. They will hold the chimney and prevent it from swaying during wind loads. Boards are nailed to the top ceiling. Perfect option- the fluff is placed close to the ceiling beams, but this situation is rare.
Step 5 It is necessary to transfer the fluff back to the riser. Gradually reduce the outer perimeter of the chimney. So lay the chimney up to the roof covering.
Step 6 Otter. This design serves to drain rainwater. The size of the riser is a quarter of a brick. You need to put it on the same technology as the fluff. In order to inner dimensions chimney has not been changed, use special thin inserts. The height of the otter depends on the angle of the roof. The main condition is that the otter should start from the bottom of the roofing and protrude two rows above the top point.


Step 8 Sealing the joint between the otter and the roofing. Very carefully do all the work on sealing, the choice of a specific method and additional elements depends on the type of roofing. There are a huge number of different methods, the decision is made on the spot, taking into account the maximum number of existing factors.


Brick chimneys are among the most complex and expensive types of chimneys, modern materials and technology make it possible to install simpler, but no less effective designs.
How to install a sandwich chimney


New designs, look great, quickly mounted, have a long service life. All performance characteristics are at the highest level. The only drawback is that the price of these structures is at the same high level.
Manufacturers package their products full set additional elements: elbows, tees, clamps, plugs, ceiling-through nodes, heads, protective screens. The specific choice of additional materials should be carried out taking into account the design features of the chimney.


One of the advantages of a sandwich chimney is the presence of a layer of insulation that protects the outer pipe from overheating. In addition, this layer allows the inner pipe to heat up quickly, which minimizes the amount of condensate, and this prevents soot from adhering to its walls.
Algorithm for installing a sandwich chimney
| Step, No. | Illustration | Description |
|---|---|---|
| Step 1 |
| Using a plumb line, mark the places where the pipe exits through the ceiling and roof, make holes. Do not forget to leave a distance between the sandwich pipe and the wooden ceiling structures of about ten centimeters along the perimeter of the hole. For thermal insulation, use mineral wool or glass wool, carefully close the pipe entry into the ceiling. Do not be afraid that the mineral wool will become damp, the high temperature of the pipe will quickly dry it out. |
| Step 2 |
| Remove all dimensions, determine the installation location of the unloading unit. It is made in the attic of the bath, it takes on the load of the pipe coming out of the ceiling. In addition, the unloading unit does not allow lateral vibrations to appear. If you have a large distance between the attic floor and the roof, then you need to install an unloading unit, if the distance does not exceed 1.5 meters, then additional stops are not needed. The unloading unit consists of metal corners and installation elements. Metal corners are fixed to the legs truss system, make the fastening as reliable as possible. |
| Step 3 |
| Install a starter sandwich on the stove outlet, it must fit snugly into the pipe, select dimensions at the time of purchase, or change the diameter of the smoke outlet from the stove. |
| Step 4 |
| Note: inner pipe must enter the socket at the outlet of the furnace, and not cover it. All individual pipe sections are inserted one into the other, the transitions and bends must be additionally fixed with clamping clamps. |
| Step 5 |
| In the place where the pipe passes through the ceiling, a ceiling groove should be installed to close the outlet in the ceiling and make the structure stable. A pipe of a slightly larger diameter (drift) is welded to the ceiling groove than the diameter of the outer pipe of the sandwich, due to this, the abutment area increases and deformation is eliminated during the occurrence of strong lateral loads. The pass allows the sandwich chimney to move up/down and does not allow lateral vibrations. In order to minimize heat loss through leaks, it is recommended to use mineral wool. Place it under the ceiling cutout and tightly pull it to the ceiling with self-tapping screws or nails. |
| Step 6 |
| Make holes in the crate and roofing. Next, proceed to sealing the exit point of the chimney, for this, use the roof penetration. All joints must be sealed with sealant. If you wish and if you have free time, you can put an additional sheet on the cover. The waves must match, secure it with self-tapping screws with sealing rubber washers. Treat all accessible and “suspicious” cracks with sealant. The chimney outlet must be 50 cm above the level of the roof covering. |
| Step 7 |
| Install a fungus on top of the chimney. |


As an experienced master can notice, the installation algorithm is significantly simplified. We did this specifically to speed up and reduce the cost of work. At the same time, the functionality and safety of the chimney has not deteriorated. You can, of course, install spark arresters and deflectors, thermofungi and weather vanes, and other details. If you have the desire and money - install.
Video - Sandwich pipe chimney
Video - Installation of a chimney


New systems, characterized by high performance and performance, very reliable and beautiful, relatively easy to install. They consist of three parts: an inner ceramic pipe, a layer of insulation and external facing ceramic bricks of a special profile. At the corners, ceramics have holes for installing metal fittings. At a price more expensive than a sandwich chimney, manufacturers produce a large number various kinds ceramic chimneys, differing in appearance and design features.


Do not require additional protection of wooden architectural elements. The disadvantage is that they can only be upright. We will consider the easiest way to install these types of chimneys in a bath.
Step 1. Prepare the installation site, it must be level. Chimneys can be installed on a separate foundation near the stove or on the top surface of the stove, it all depends on the characteristics of the bath. For masonry, you need to use a special glue, the solution does not provide sufficient strength.

Prepare metal reinforcement with a length of ≈ 1 meter, the diameter of the reinforcement is within. 5÷10 mm. With its help, we will additionally fix the structure, this will make it possible to completely eliminate violations of the integrity of the chimney. Make holes in the ceiling and roof, you don’t need to give a margin, a ceramic chimney will perfectly protect the wooden elements from high temperatures.


Step 2 Install the first two halves of ceramics, lubricate the lock with glue, check the position of the halves, align them if necessary. Insert metal fittings about one meter high into the side holes. The gaps between the reinforcement and ceramics must be filled with glue. It is not necessary to achieve complete filling of the hole, it is enough that in several places the glue connects the reinforcement and ceramics.


Step 3 Wind the thermal insulation around the ceramic pipe, pull it a little to the pipe with a metal wire or a special clamp. Do not tighten too much, do not allow the heat insulator to compress. As a rule, a layer of pressed mineral wool is used as a heat insulator.
Step 4 Insert the pipe into the ceramic hole, check its position. To speed up the process, you can immediately wrap all ceramic pipes with insulation, the number of pipes must correspond to the height of the chimney.
Step 5 Put the second ceramic on the glue, check the position again. Now you need to insert another pipe. It is placed in the socket first on the glue. It is difficult to get to the lower socket, you need to make an elementary adaptation. Take a small plastic bag from a dense film, cut off one corner. It should look like a package that women use while spreading cakes with cream. Through the cut corner, the glue will lie exactly in the socket of the pipe. Remove the remaining adhesive from the inner plane of the pipe immediately, do not allow the appearance of various streaks. They swirl the air currents and significantly worsen the draft of the chimney.


Step 6. Repeat the described operations, constantly monitor the position of the chimney. If the length of the protruding reinforcement has become shorter than the height of one block, insert new rods into the holes. Bring the chimney to the attic of the bath.

Step 7 Carefully close the gaps between the chimney and the ceiling tiles. For these purposes, you can use ordinary wooden skirting boards or a decorative baguette.

Step 8 Fix the chimney in the attic. Cut boards to fit the hole, lay them around the perimeter of the chimney, and nail them firmly to the attic floor. If the height of the attic does not exceed one and a half meters, then such a fixation is sufficient. If the height is greater, you will have to make another design to fix the vertical position of the chimney. Secondary fixation is made to the rafter legs as high as possible. You can make stops from wood or use metal corners. Choose a specific design, taking into account the exit point of the chimney and the features of the truss system of the bath.


Step 9 Seal the roof where the chimney exits. Select the sealing method and materials depending on the characteristics of the roofing. These works in themselves do not require great skill, they only require attention and strict implementation of all technological operations. For sealing, you can purchase factory-made additional elements or make them yourself. We recommend choosing the first option, the roof is not the place where you can experiment. All leaks inevitably become the cause of big problems.

Video - Installation of a ceramic chimney
Video - How to install a ceramic chimney
We strongly recommend that you - if you saw a brick and a trowel only on TV, do not immediately start laying a chimney. Lay out at least 10 rows of bricks on the ground, "fill your hand and eye", learn how to tie, expand and narrow the wall. And further. Do not read articles that begin with the words "making a brick chimney on your own is very simple." Such articles are written by those who have not done anything themselves and have not seen how others do it.

It is better to practice in advance in the laying of the chimney, without using the solution
After completing all the work, you need to check the "operability" of your design. For brick ovens with brick chimneys, this is not easy. At first, there will never be draft, the stove and chimney must “dry and heat up”. If it’s summer outside and you have time, open the windows in the bathhouse, the blower and furnace doors in the oven, and the valves in the chimney. In this position, the chimney should dry for approximately two weeks.

If you do not have time, then heat with firewood, they should only be completely dry. You need to heat it daily, but without too much enthusiasm, do not throw a lot of firewood. Take only a few dry logs for each fire. After the firewood burns out, do not close the firebox and the valve, let the masonry dry until the next day.
The chimney for a bath should not only remove smoke well, but also be designed in such a way that the likelihood of a fire is reduced to zero. In addition, a good chimney perfectly retains heat - in this case, the high temperature in the steam room will be maintained for a long time, and you can save on fuel.
The main types of chimneys for a bath
| Characteristic | Kinds | Peculiarities |
|---|---|---|
| By material | Metal, brick, ceramic, asbestos-cement, polymer | Metal pipes are easy to install and most prefer this option. A brick chimney is more difficult to make, but it is more durable than a metal chimney and retains heat better. Ceramic pipe is more expensive, but it is easy to install, has good thermal insulation, heat resistance and durability. Asbestos-cement chimneys are very cheap, but do not withstand temperatures above 300 ° C, like polymer ones. |
| By design | External and internal | The external chimney exits through the wall and goes up outside the room, the internal one is led out through the ceiling and roof |


To get a high-quality brick chimney, it is very important to correctly build the masonry. This is a rather laborious process that takes a lot of time.
However, at the same time, a brick pipe has important advantages:
- it is stronger and more durable than metal;
- brick accumulates heat well and has excellent thermal insulating qualities;
- a bath with a brick chimney will be better protected from fire.
Since a brick chimney has all these advantages, this option is still worth paying attention to. There is nothing really complicated in the construction of a brick pipe for a bath.

But it must be borne in mind that a serious drawback is also inherent in brick chimneys. Soot deposits settle on the inner surface of such a pipe, since it has roughness and corners. Due to the accumulation of this soot, traction begins to decrease over time, and the bath warms up worse. If the inner surface of the chimney is clogged too much, this can lead to smoke in the bath, and soot inside the pipe can flare up.
However, to solve this problem is quite simple - you just need to clean the pipe in a timely manner. The cleaning process does not take much time, while this procedure is often not necessary.

Brick chimney - strengths and weaknesses
Features of a metal chimney

The best option for the construction of a metal chimney would be to use sandwich pipes. They are a three-layer structure:
- inner pipe;
- a layer of thermal insulation located on top of it;
- outer pipe.

Sandwich pipe has two very important advantages:
- it does not heat up too much outside, therefore it cannot damage the wooden floors, in addition, its use will minimize the risk of fire;
- thanks to the three-layer design with the presence of a heat insulator inside the chimney, condensation will not form during the cold season;
- also, due to the presence of a heater, the high temperature in the room is kept much better, however, such pipes also significantly lose in this characteristic to brick chimneys.

Scheme of installation of a sandwich chimney
In general, the main advantages of a metal chimney for a bath include:
- ease of installation - assembling such a structure will take much less time and effort than laying a brick pipe;
- smooth inner surface - soot and soot will settle on it in minimal quantities, smoke will go out in a directed stream, and traction will be good;
- cheapness - especially if you do not use ready-made sandwich pipes, but make them yourself.
Condensation appears on the inner surface of a metal chimney in the event of a sharp temperature drop. The use of sandwich pipes minimizes this problem. To further reduce it, you need to use pipes with the thickest possible layer of thermal insulation.
Chimney prices

Note! It is best to make a metal chimney, consisting of two main parts. In this embodiment, an ordinary single-layer pipe should depart from the furnace, it will warm up the interior. Sandwich pipes are put on top of it, it is they who will go further out. An important advantage of this option is its cheapness: the fact is that the pipe located near the furnace heats up more, so it quickly becomes unusable. When this happens, it can be replaced without having to buy a new sandwich pipe.


Outdoor chimney
In this version, the chimney does not pass through the ceiling - it is brought out through the wall, and then goes up. This design has significant advantages, including:
- ease of installation;
- security;
- moisture protection.

During its construction in the attic and in the roof, it is not necessary to arrange isolated transitions. At the same time, the risk of water entering the premises will be minimized, since there will be no gaps between the pipe and the roofing.

However, moisture condenses quite quickly in such a chimney. To minimize the problem, the pipe must be very well insulated. Another disadvantage of an external chimney is that being outside the room, it does not warm up the interior of the bath. As a result, fuel consumption increases significantly.
Internal chimney
In this option, which we will consider in this article, the chimney rises from the furnace to the ceiling, and then goes outside. This design will be the best for capital construction, which is designed for long-term operation. Making it a little more difficult, but it's still worth doing if you want to get a really good result. In the event that the chimney is arranged according to all the rules, it will last for many years without problems.

The pipe keeps heat well and warms the interior of the bath and the attic, besides, the stove cools longer, so you can save on fuel - this is an important advantage of the internal chimney. The only significant drawbacks of the design can be attributed only to a higher, in comparison with outer pipe for smoke extraction, fire hazard. However, if everything is done correctly and all the recommendations are followed, the likelihood of an emergency will be reduced to almost zero, and you won’t have to worry about a fire.
Prices for sandwich chimneys
sandwich chimney

Security
When building a chimney in a bath, first of all, you need to consider safety issues. Indeed, in the event that something is done incorrectly, wooden structures can flare up very easily. The problem must be approached carefully, then the bath will last a really long time, and there will be no risk to people's lives.
All the necessary requirements that chimneys must meet are established by the relevant sanitary regulations and norms. They prescribe the distance that must be maintained between the pipe and the combustible parts of the roof slabs. This value depends on the parameters of the pipe. If you are going to make a chimney in a bath, you should familiarize yourself with SNiP 41-01-2003, which approves the rules for ventilation, heating and air conditioning. At the same time, pay special attention to paragraph 6.6.22, which contains all the necessary information.
To make the chimney completely safe, you need to use the appropriate materials for thermal insulation:
- mineral wool;
- basalt cardboard;
- minerite

Fire-resistant drywall and glass-magnesium sheet are also suitable for this purpose.

It is necessary to pay attention to some other points. So, it is important to choose the right materials from which the chimney itself will be made - they must be resistant to high temperatures. For example, if you decide to use a metal pipe to build a chimney, it must be made of non-galvanized material. The fact is that when heated to high temperatures, zinc begins to evaporate, and its evaporation is extremely harmful to health.
Brick chimney device
Unless you have much experience building brick chimneys, you'd better play it safe and opt for a simple, standard, time-tested design option.
Prices for a chimney kit
chimney kit

Such chimney consists of five main parts:
- overhead pipe with a valve - that part of the chimney that goes straight from the stove;
- fluff - expansion of the chimney by 30-40 cm, which begins 5-6 rows before the ceiling;
- riser - part of the chimney that goes into the attic;
- otter - an expanded part that prevents precipitation from entering the gaps between the roofing and the pipe itself;
- head neck - top part chimney.
A cap or deflector can be installed on top of the neck, which will protect the pipe from rain, snow and debris. Also, this design will improve traction.

For the construction of the pipe, refractory or ordinary solid bricks are suitable. You can put them on a composition made from a mixture of cement and sand or cement and lime. In the area where the temperature will be the highest, refractory clay should be used. To prepare such a composition, it is necessary to take fireclay powder and dilute it with water and sand in large capacity, a 10-15 liter tank is perfect for this. The consistency of the ready-to-use solution should be such that it does not drip from the trowel and does not stick to it, but slowly slides off, leaving no traces.
Brick pipe laying

Step 1. First of all, find or prepare a detailed masonry scheme yourself.

Step 2 Then make a brick or reinforced concrete foundation for the stove, build the heater itself. The height of the foundation should be at least 30-40 cm, and the width should be 15-20 cm greater than the width of the chimney.
Step 3 After that, build the chimney itself, sequentially making all its parts - the overhead pipe, the fluff, the riser, the otter and the neck with the head. In this case, a valve must be installed in the overhead pipe.


Step 4 In areas where the chimney passes through the ceiling and through the roof, cut and lay one of the heaters that were listed above.

Video - Masonry fluff


Step 5 If the chimney is located near the wall, it should be fixed to increase the reliability and durability of the structure. Fasteners can be installed every 30 cm.
Step 6 It is better to finish the inner surface of the pipe with plaster. Thanks to this, it will become smooth, as a result, much less soot will settle on its walls. Also, after the completion of the main work, you can whitewash the chimney from the outside.
Step 7 The last upper section of the chimney, which rises above the roof level, must be insulated, and then carried out finishing. To do this, you can use a facing brick.
To get a quality result, carefully monitor the thickness of the seams. They must be the same throughout the pipe. Optimal Thickness such a seam during the construction of a chimney in a bath - 15 mm. Experienced stove-makers can do the job quite quickly, but you don’t need to rush - carefully make sure that the laying takes place brick by brick according to the scheme you found or prepared in advance. The walls of a good chimney must be perfectly even, all corners must be perfectly straight. To get this result, you need to use a plumb line, level and other tools. If you approach the work seriously and do not rush, you will succeed, even if you have never done such work before.
Video - Laying the stove and chimney
The choice of a metal pipe for the construction of a chimney in a bath
To choose a suitable metal pipe for the construction of a chimney in a bath, you need to pay attention to two main points:
- diameter;
- wall thickness.
If the diameter is too small, the smoke will not be drawn out well, and some of it will begin to enter the room. If you choose too wide a pipe, smoke and warm air will go out too quickly, as a result, the bath will cool down. To buy a pipe right size, you need to take into account the required length of the chimney and the number of bends. If the pipe will have two turns or more, a diameter of 110 mm will do.
The wall thickness must be sufficient for the metal chimney to last for many years. If the pipe is thin, it will soon become unusable, because when heated, the metal quickly corrodes. This happens primarily in those areas where the chimney heats up more. Therefore, the pipe that will move away from the stove must have thicker walls than the sandwich pipes located above it.

Installation of a metal chimney for a bath
The assembly of the chimney from sandwich pipes takes place in 7 main stages.
Stage 1. First of all, you need to cut a hole in the ceiling, which should be 15-20 mm larger than the outer diameter of the chimney.
Stage 2. You also need to make a similar hole in the roof.
Stage 3. From sheet metal a square is cut out that will close the hole in the ceiling, in this square you also need to cut a hole for the chimney, and drill holes along the edges for mounting on self-tapping screws.

Prices for a coaxial chimney
coaxial chimney


An example of insulation with expanded clay and asbestos cardboard

Stage 4. The first single-layer pipe must be installed on the furnace and put on a square of sheet metal, which will be fixed to the ceiling.
Stage 5. Then you need to insert the first sandwich pipe into the nozzle of a single-layer pipe.
Stage 6. Thus, it is necessary to completely assemble the chimney, installing and fixing one sandwich pipe after another.
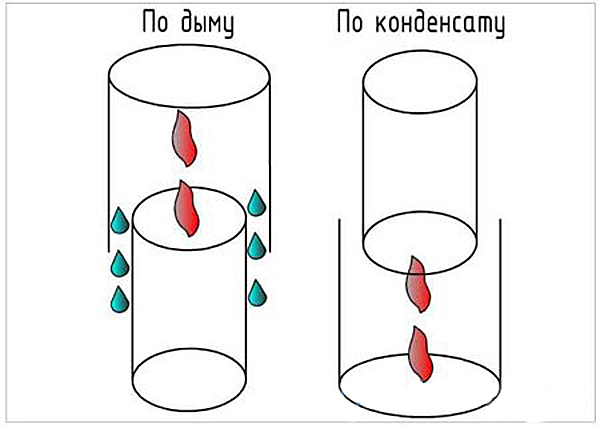
Assembly of chimney elements "by smoke" and "by condensate"

Stage 7. A cap must be welded to the end of the last pipe, which will protect the structure from precipitation.


Video - Installation of a chimney sandwich
Thermal protection gasket
To insulate the ceiling of the bath near the pipe, any heat-resistant material will do. It can be:
- expanded clay;
- cellular concrete;
- clay.
Mineral wool should not be used - it absorbs water well, therefore, for rooms with high humidity does not fit. If you leave the ceiling near the chimney without insulation, the room will quickly cool down, and the cost of heating it will increase significantly, so this step should not be skipped.
Making sandwich pipes with your own hands

If you do not want to spend money on buying ready-made sandwich pipes for building a chimney in a bath, you can make them yourself. Then they will most likely have a less presentable appearance, however, these pipes are no worse for removing smoke and protecting against fire. In addition, no one bothers you to make your own sandwich pipes that will look as good as the purchased ones - everything is in your hands.
To make them, you need:
- take two sheets of steel and roll them into pipes, while the diameters must be different - one will be internal and the other external;
- the inner pipe must be wrapped with thermal insulation;
- then from above it is necessary to put on a pipe of a larger diameter and connect the entire structure together by rolling;
- the next step is to cut out clamps from the same sheet metal - strips 20 cm wide, they should be longer than the outer circumference of the chimney;
- these clamps connect the pipe from above and below;
- thus, it is necessary to make the required number of sandwich pipes for the construction of the chimney;
- a square sheet of metal must be fixed to the ceiling with self-tapping screws, after which it is necessary to place thermal insulation on it;
- a strip must be welded around the circumference to the end of one of the pipes to form a pipe.

Another option is not to roll the sheet metal pipes yourself, but to use ready-made ones. Also in the store you can buy ready-made clamps.
An easy way to install a chimney
There is an easier way to install a metal chimney in a bath, which, moreover, will be much cheaper. It involves the use of exclusively ordinary single-layer pipes that go up from the furnace and go out through the roof.

The main features of this design:
- self-tapping screws can be used to fasten various elements;
- in the place where the pipe passes through the floors, it can be wrapped with any suitable insulation (for example, basalt wool) and asbestos cord.

However, such a chimney is neither durable nor fireproof, and if you want to get a quality result that will delight you for many years, you should still use one of the options above.
Brick and metal chimney maintenance
There are many various ways chimney cleaning. Perhaps the most popular of them is the cleaning of the pipe in winter with the help of snow, which must be thrown from above. However, the effectiveness of this method is low. It is better to use one of the methods that bring much more noticeable results.

Chimney cleaning - photo
| Way | Description |
|---|---|
| Brushing is an old and proven method that has been used since time immemorial. It allows you to achieve an excellent effect, but for this you will have to work hard. In addition, be prepared for the fact that a lot of soot will fall on you - this work is very dirty. |
| Cleaning the chimney with a weight on a cable is another mechanical cleaning method. Like cleaning the pipe with a pipe cleaner, it is effective, but it requires you to tinker with it, and along the way, get a good dirt on the soot. |
| You can also install a fan in the upper part of the pipe, which will work for suction. He will pull soot out of the chimney, but you need to prepare for the fact that the space around the bath after that will be contaminated with it. |
| There is an easier way - you need to throw aspen firewood into the oven. As a result, powerful traction will arise, and soot will be knocked out upward. In the dry and intense heat that aspen creates, the resinous substances that settle in the pipe quickly burn out if you heat the bathhouse with firewood from conifers tree. |
| Cleaning with chemicals. Here exist different variants, for example, you can throw special drugs into the sauna stove together with firewood that increase traction. A significant advantage of this method over cleaning with aspen firewood is that the compositions used contain special substances that further loosen the soot. As a result, it easily moves away from the inner surface of the chimney. |
Washing and heating the furnace | Another option is to pour several liters of water into the pipe, then you need to heat the stove for a long time. |


To prolong the life of the chimney, it is necessary to periodically inspect all joints and check the general condition of the structure in order to notice problems that may appear at an early stage. As noted above, in the event that you install a metal chimney in your bath, its lower pipe will need to be changed periodically, as it heats up much more, and therefore becomes unusable faster.
If you strictly follow the technology, a do-it-yourself brick or metal chimney will remove smoke well and retain heat perfectly. In this case, the risk of fire is reduced to almost zero. Both metal and brick structures are very durable, so you will not soon feel the need to build or install a new chimney in your bath.
Video - Typical mistakes when installing stoves and chimneys
No sauna stove can do without the right equipment of all its parts and departments. The device of the chimney in the bath is somewhat different from the chimney system heating furnace for home. Therefore, in order to achieve the greatest efficiency of the functions of the sauna stove, it is very important to take into account all the nuances of building not only the firebox and heater, but also the chimney.
The device of the chimney in the bath for wood stove
It should be noted right away that the arrangement of this main bath facility is better done by an experienced master, but if you want to try your hand, you need to carefully understand all the subtleties. Not only how quickly and well the bath room warms up, but also its fire safety depends on a properly arranged chimney.
Basically, in the construction of a sauna stove, two types of chimney are used - these are indigenous and mounted.
- The root chimneys are built separately, next to the stove, and connected to it with a special pipe, which removes smoke into the main channel. This kind can even be used for two or three ovens. Naturally, in this case it must have an appropriate inner diameter, and pipes from different heating appliances mounted at different heights.
- The chimney systems with a built-in pipe differ from the indigenous ones in that they are installed directly on the furnace pipe and are brought out into the street through a wall or roof. In bath buildings, the owners often prefer mounted chimneys.
Also, chimneys can be divided into external and internal.
- The first ones are brought out through the wall, and their main part passes along the street, where it is fixed to the wall surface with the help of brackets. But it must be said right away that the external view of the chimney is not suitable for a bath, as it cools faster, no matter how well it is insulated. Namely, for a bath, losing excess heat is an unforgivable luxury.
- Internal chimney systems are installed more often, so it’s worth learning more about them.
Chimney passing indoors through the ceiling
One of the main advantages of an outdoor morning chimney is its maximum verticality, which contributes to good draft. However, it certainly has its drawbacks:
- for its device in the finished building, you need to cut (punch) holes in the ceiling and roof, as well as make reliable waterproofing. In addition, you will have to work hard to isolate the passage in the ceiling with heat-resistant material;
- a chimney passing outside is much easier to repair than an internal one.
But despite the possible disadvantages, the heat given off to the room is much more important for the bath, so it’s better not to be lazy and spend it inside so as not to lose the bath heat and not burn excess fuel.
Materials and features of the manufacture of a chimney for a wood-burning stove
The choice of material for the chimney will depend on which stove is installed in the bath.
- A brick oven can be equipped with a chimney, also made of brick, metal or made of asbestos cement.
- The metal version of the stove with an equipped heater is usually supplemented with the same chimney (less often - from asbestos cement). But most often this — metal pipes with a layer of insulation, the so-called sandwich chimneys.
- Asbestos concrete the option of chimneys, especially for bath stoves, is undesirable for the most important reason - this is the porosity of the material. Due to the structural features of asbestos cement, the condensate remains on the channel walls for a long time or even soaks into them, which leads to the destruction of the material. Such a pipe can burst or, if burnt out, even explode. To reduce the formation of condensate, the asbestos-cement pipe is dressed in thermal insulation and lined with brickwork.
Whatever material the chimney pipe is made of, its parts must be hermetically connected to each other, and brickwork should not have gaps. These flaws make it possible for cold air to get inside, which not only reduces traction, but also contributes to the formation of condensate.
The diameter of the pipe must also be calculated correctly - if it is larger than necessary, the smoke rising through it will cool quickly, which also contributes to the formation of condensate.
It is worth paying special attention to the choice of the thickness of the chimney pipe of the bath. The inner version of the chimney must have walls of at least 12 cm, and the outer one - 38-40 cm thick. This will also protect against rapid cooling, which means moisture condensation.
The most important factor for this section of the oven is the perfect smoothness inner walls pipes. It will provide the necessary traction, which means that soot will not be deposited on the walls in large quantities. Porous surfaces are capable of accumulating a large amount of burning, from which the chimney will have to be cleaned quite often. If a brick chimney pipe is built, then in the attic it is rubbed with clay mortar and whitewashed. Thanks to such precautions, in the event of cracks in the masonry or other defects, they can be immediately detected, as black smoke will seep through the cracks in the grout, and it will be clearly visible on the whitewash. This is a visual signal of the need for urgent repairs.
Sometimes a combined chimney design is used for bath stoves. In this case, its lower part is built of brick, and the upper part, passing through the floors and roof, is made of a modern sandwich pipe.
This option allows you to arrange neat small passages, which will be easier to arrange with heat-resistant material.
Chimney Safety
It is imperative to ensure high fire safety of the chimney for the bath. To do this, as mentioned above, pay special attention to the tightness of the joints of individual parts of the pipe, as well as to the cutting when the chimney passes through the floors and roof.
In places where the pipe will pass through the ceiling, it is necessary to isolate it from the wooden elements with heat-resistant material - this can be asbestos, mineral wool, sand or expanded clay.
- To do this on the ceiling in place chimney passage a metal panel is fixed with a hole through which the pipe will be passed.
- From the side of the attic, a kind of box is arranged, which should be 10-15 centimeters higher than the attic floor. Insulating material is laid or poured into it, which will save wooden floor from high chimney temperatures. The pipe must be at least 25 centimeters from combustible floor materials.
- It is very important to arrange thermally insulating protection not only in the ceiling, but also on wooden wall baths. Basically, bath buildings are built from pine, and its wood is quite resinous and can easily overheat and even burn out from the high temperatures of the nearby chimney. Therefore, the wall must be secured with a non-combustible material - it can be special drywall, asbestos, masonry, foil mineral wool, or a combination.
- After passing through the attic, the chimney channel is led through the roof and rises above it by at least one and a half meters.
- Around the chimney, when passing through roofing, waterproofing is arranged, which will save the roof crate from moisture, and hence from the appearance of mold and destruction.
- A special protective fungus is put on top of the pipe head and a spark arrestor is arranged.
water tank
In the chimney system of the bath, erected from metal sandwich tube, sometimes a metal tank is built in for heating water, inside which passes bare part chimney. Tanks can have a different volume - this is primarily, will depend on the power of the selected furnace.
When choosing this chimney accessory, it is best to pay attention to a stainless steel product that will last a long time. Naturally, you need to focus on the diameter of the chimney pipe on which the tank will be fixed. It is better to purchase the whole set in a kit so that you do not have to disassemble an already assembled structure.
Branch pipes are provided on the water tank, on which sections of chimney pipes are put on. They must fit tightly with each other, otherwise the thrust will decrease, and carbon monoxide may enter the room.
A metal water tank is also built into the design of a brick chimney. In this case hot air from the furnace, passing next to it, heats the water poured into the tank. When building a container, you need to provide a place in the wall of the chimney where there will be a tap and a pipe with a tap to fill the tank.
Scheme of the device of the bath chimney
In this diagram, all the above sections of the chimney system of the sauna stove are clearly visible.
It is worth noting that the sauna stove with its firebox usually goes into another room - dressing room. This is provided so that there is no risk of getting burned during washing, and so that the attendant has the opportunity to put firewood in the firebox all the time.
Directly in the bath room, the stove itself is located with a metal crate, which encloses the red-hot walls and is 10-15 centimeters away from them. Pebble stones are laid in this distance, which, when heated, give off heat to the room, and if you want to get steam, they splash plain water or an infusion of fragrant herbs on them. The chimney and the tank arranged on it in this embodiment are also located in the bathhouse.
The figure also shows how the chimney should pass through the floors and roofs and how to ensure the complete safety of its operation.
Relying on this scheme, you can easily arrange a chimney yourself, if you strictly follow all the norms, rules, sizes and volumes of insulating materials.
Video: an interesting version of the chimney device in the bath
All work - both on the construction of the furnace and on the arrangement of its chimney system - must be carried out with all responsibility and accuracy. It must be remembered that not only the safety of the bath itself, but also the life of the people using it, will depend on the approach to this issue.
The most difficult thing in the construction of a bath is the installation of a chimney. People who do not have the relevant experience prefer to order ready-made chimneys for sauna stoves, since there are a lot of different variations of such products on the modern market.
Nevertheless, the bath pipe can be made and installed independently, there is nothing difficult in this, the main thing is to correctly determine the material and act in accordance with the instructions below.
Pipes for a bath have a lot of classifications. For example, depending on the location, they can be external and internal. The first are mounted outdoors, which allows you to free up a considerable amount of space and partially eliminate the possibility of burns.
Such pipes for a bath also have a significant drawback: you will literally heat the street.
Chimney pipes for a bath, located indoors, should be mounted very carefully, observing all the rules. Installation of a chimney in a bath, made with the slightest violations, can cause serious consequences: from fire to suffocation.
No less common is the classification based on the materials from which the chimneys for the bath are made. It includes the following types of chimney channels:
- brick;
- modular stainless steel with one or two circuits;
- corrugated;
- ceramic;
- polymeric, etc.
All types of bath chimneys are described below. In addition, there is a lot of useful information that will certainly facilitate the installation of structures.
Types of chimneys and requirements for them
The chimney for a sauna stove must meet a number of requirements. The slightest discrepancy can cause weak traction. Therefore, when installing a chimney in a bath, you should pay attention to the following factors:
- The front side of the pipe must not be damaged. This can result in excessive condensation.
- The inner surface must be smooth. Various irregularities will contribute to the rapid accumulation of soot and burning.
- The chimney in the bath with your own hands or with the involvement of specialists is equipped not only in the vertical, but also in the horizontal plane. Due to this, heat literally does not fly out into the pipe, while each horizontal component flue duct must not be longer than 1000 mm. Otherwise, the traction will be weak.
- Chimneys for sauna stoves, mounted through ceilings, must be equipped with fire protection structures. For example, steel and ceramic chimneys are placed in special boxes.
- When deciding how to install a pipe in a bath - through a ceiling or a wall, last but not least, you should think about the diameter of the pipe. It directly depends on the power of the furnace and, as a rule, varies from 100 to 350 mm.
- The part of the chimney channel located outside the building must be made of strong, durable materials that can resist aggressive influences. environment(rain, wind, snow, etc.). To a greater extent, this applies to pipes installed outdoors. In such a situation, the pipe in the bath through the ceiling and roof has more advantages, because only a small part of it is outside the room.
Do not forget about the size of the chimney channel. Before people who have bought a furnace manufactured at a factory, such a question is not so acute. After all, it already has an entrance for connecting the chimney channel. Thus, pipes of a smaller diameter cannot be used, and a larger one does not make sense, because these are additional costs for the gearbox.
If the oven is homemade, then an arbitrary pipe diameter can be used, varying within the values \u200b\u200bspecified above. High accuracy here is unimportant, as well as complex mathematical calculations. Leave them to the experts involved in the design of ducts for the removal of combustion products in huge buildings.
This also applies to the height of the pipe. The main rule for its installation is that its outer part must exceed the highest point of the roof by at least a meter. Thus, deciding to make a chimney yourself, you do not need to delve into the calculations.
After reviewing the basic requirements, you should think about how to remove the pipe in the bath. There are three ways to install a chimney:
- On the foundation of a building or ceiling. The first method is ideal for people building a bath from scratch, the second for those who decide to convert any room into a steam room.
- Above the oven. Such a chimney is suitable for owners of metal furnaces.
- On the facade of the building, that is, through the wall.
What is the best chimney for a bath? Everyone should give the answer to this question independently, having compared the purposes and means. The information provided in this article will surely help you make the right choice.
Steel pipe chimney
The output of the pipe through the roof of the bath is a rather laborious process, so the first thing to consider is the option of installing a chimney through the wall. Any person, even without relevant experience, can easily cope with such a task. To carry out the work you will need:
- three knees of different sizes, which directly depend on the location of the stove (if the stove is near a wall, then the knees of the following sizes are suitable: 200 × 1200 mm, 160 × 1200 mm and 160 × 100 mm);
- tee with plug;
- a fungus to be protected from water and debris entering the chimney.
Having stocked up with all the necessary materials, you should proceed with the installation of the chimney in the bath with your own hands, the step-by-step guide is as follows:
- First of all, it is necessary to carry out preparatory work. The passage of pipes through is not needed, so the preparation is reduced to drilling the wall. Taking into account the parameters of the pipes taken, the hole diameter should be 160 mm.
- Next, you need to connect all the knees. Usually self-tapping screws are used for these purposes.
- A fungus is installed at the top of the structure.
Such a chimney installation in a bath is usually resorted to if the design is temporary. Therefore, most people are interested in how to make a chimney in baths through the ceiling.
This is the right approach to solving the problem, because pipes laid along the street do not contribute to the speedy heating of the room. An alternative could be chimneys in the bath through the wall, containing materials in their design that help retain heat.
Stainless steel chimneys with heat retention systems
The most popular is the pipe for the sauna stove, which contributes to the preservation of heat, having in its design a cavity filled with heat-insulating materials. Such chimneys for a bath to a greater extent exclude the possibility of burns and fires, rather than saving heat.
Thus, the installation of pipes in the bath eliminates the need for additional fire-fighting materials when laying through wooden walls.
If the main task is to keep the heat, then you can use a chimney for a water-cooled bath. The use of such systems has many advantages:
- Firstly, chimneys for stoves in baths become completely safe in terms of the possibility of ignition in contact with combustible materials. In other words, there is no need to use fire protection materials at the point of contact between the pipe and the wall.
- Secondly, the possibility of getting a burn is excluded.
- Thirdly, the pipe for the stove in the bath serves as a heating element, which eliminates the need to install a boiler.
Sauna chimneys made of stainless steel are a cheaper option. Their installation does not require special experience and additional knowledge, so installation can be carried out by anyone who knows how to hold construction tools in their hands. The main thing is to follow all the precautions.
Chimneys made of ceramic materials
Speaking of ceramic chimneys, first of all, ceramic pipes should be mentioned. Their installation requires much less effort than the installation of brick structures, while cutting the roof is greatly simplified.
Ceramic pipes as a chimney have a lot of advantages:
- they are able to withstand high temperatures;
- ceramic pipes are not afraid of corrosion;
- a smooth inner surface significantly reduces the possibility of soot and burning accumulation, so cleaning is required infrequently;
- ceramic pipes are not highly thermally conductive. Thanks to this, the heat does not go outside, and the possibility of getting burned is completely excluded.
Do not forget that the installation of a ceramic pipe does not require the dismantling of the ceiling and roof in a large volume. You just need to drill a hole for the pipe.
Chimney from corrugated pipe
Corrugated pipe is often an integral part of chimneys for baths. In most cases, they replace the elbows connecting the horizontal and vertical pipes of the chimney. With this approach, you can save a lot of space.
Sauna stoves equipped with a chimney made entirely of corrugated steel are a rarity. Despite the ease of installation, such chimneys have many disadvantages:
- Lack of necessary thermal insulation characteristics. Leaning against a corrugated pipe, you can get burned. With prolonged exposure to temperatures above 900 degrees, the material begins to break down.
- Corrugated pipes are easily susceptible to corrosion, which, together with the high humidity of the steam room, leads to their rapid failure.
From corrugated pipe you can only make a temporary chimney. At the same time, it is necessary to properly protect the ceiling-passage assembly from ignition, otherwise the occurrence of a fire will only be a matter of time. This also applies to other places where the chimney comes into contact with combustible materials.
What material to choose for the installation of the chimney
The choice of material for mounting the chimney depends on many criteria. In this process, everything should be taken into account: from what kind of ceiling-through unit you want to make, and ending with the type of furnace. Ideally, a chimney for a bath should meet the following requirements:
- Contribute to the combustion of fuel in full.
- Ensure high-quality heating of the furnace walls. In other words, heat should not fly away into the pipe.
- There must be good traction. It is ensured by a competent selection of the diameter of the pipe and the absence of horizontal parts of the chimney more than a meter long.
In addition, the chimney should be easy to maintain. Any chimney requires cleaning over time, so during installation it is necessary to assemble a design that will not complicate this process.
Installation of a chimney for a metal and brick oven
Installing a pipe without connecting to a furnace is a fairly simple process that anyone can handle. It is much more difficult to make sure that the chimney is properly connected to the stove. Correct installation as follows:
- First you need to install supports that have gaps, because the chimney expands when heated. An excellent support for the chimney will be a construction with asbestos. This material is resistant to high temperatures.
- If the chimney opening of the furnace is located in close proximity to the wall or the duct will not exit through the wall, then the use of supporting structures is not required.
- The junction of the pipe with the furnace must be perfectly finished. This eliminates the possibility of cracks and, as a result, the ingress of smoke into the room.
Thinking about how to make a pipe, some bath owners do not know if they need it. If you decide to assemble and install a chimney in the bath with your own hands, then installing the valve will greatly complicate the process. If you buy a ready-made chimney, then you can choose a model with a valve.
As a rule, this element of the smoke exhaust system is designed to retain heat after the fuel burns out; there is no such need in the bath. If the valve plays an important aesthetic role for you, then you can make a passage in the pipe or use an additional elbow.
traditional chimney
A classic chimney is a system for removing combustion products,.
It means the passage of the pipe through the ceiling of the bath. It is called classic due to the fact that such chimneys were built in the past. If you are interested in a brick chimney diagram, then it can be easily found on the Internet, on numerous resources dedicated to construction. The scheme can also be found in the specialized literature.
The advantages of installing such a chimney are as follows: low cost, durability and increased performance. Bricks perfectly tolerate both high and low temperatures. The rules for installing a brick chimney are quite complicated:
- The first rule is fire protection. It is provided with a high level of fire safety. Having asked the question: “How to make a chimney out of bricks and take into account the fire safety rule?”, It should be remembered that the minimum distance between the chimney and the wall should be at least 380 mm. In areas where the chimney passes through the floors, special extensions are created.
- The draft directly depends not only on what diameter of the chimney pipe is selected. This indicator also depends on the height of the structure. It is possible to achieve maximum traction and, as a result, heat transfer if the height of the pipe is five meters.
- Fire safety directly depends on the thickness of the walls of the chimney. The thinner the wall, the more reliable and safer. The minimum thickness must be 100 mm. Thus, if the pipe diameter is large, then, coupled with a thick wall, you can get a rather voluminous structure.
Based on the foregoing, it becomes clear: before choosing a brick chimney, you should think carefully. Its installation may be overwhelming for you.
Think about it, maybe it makes sense to make a chimney through a wall or ceiling using the above methods.
Rules for laying a brick chimney
Laying should begin on top of the stove. A tube is preliminarily installed on the furnace. Bricklaying is carried out, as in the construction of walls, but there are a number of nuances:
- In order for the stove to properly provide heat, and the smoke to escape through the channels, you need to carefully monitor the level of construction. You need to use a measuring device after each lined row.
- When building a brick chimney, however, like a stove, it is necessary to use not a standard solution, which includes cement and sand, but add clay to the mixture. The proportions of the solution are as follows: 2: 5: 1.
- The thickness of the mortar layer should vary between 5 and 10 mm. An indicator equal to a centimeter is critical. If you exceed it, then the masonry will collapse rather quickly;
- Joints between bricks must be carefully sealed. If this procedure is neglected, sparks can enter the room.
- Installation must be carried out exclusively from whole bricks. The use of quarters and halves may lead to the need to increase the consumption of the solution, which is unacceptable.
From the foregoing, the following conclusion should be drawn: a brick chimney has a lot of undoubted advantages, but its installation is complicated by many factors. Therefore, installing it with your own hands, without having the appropriate experience, is unlikely to succeed.
Roof cutting of the chimney
If the idea of installing a chimney in a bathhouse through a wall does not suit you, then carefully study the types of roof cuts. This procedure is an integral part of the installation of a chimney made of steel pipe and other materials through the roof.
Cutting the chimney is a mandatory procedure. It guarantees safety, warmth and dryness in the room, so any method of cutting must be used during installation.
To choose the type of cutting, you should decide on a number of factors on which it directly depends. At the same time, you can decide how to insulate the pipe in the bath. Factors affecting the cut are as follows:
- the material from which the chimney is made;
- roof type;
- type of roof, etc.
Having made a pipe in the bath through the roof of sandwich panels, you need to use a metal cone for cutting, fixed on the apron at a slight angle. This type of cutting is suitable for a chimney in a wood-burning sauna. Other solid materials can also be used as fuel.
The arrangement of the chimney in the bath through the ceiling and slate roof involves the use of a lead apron. Due to its plasticity, it easily acquires the desired shape. Such work must be carried out immediately after installation. roofing material to your place. The pros and cons of using a lead apron are: secure fit, ease of installation, against low melting temperatures.
Round pipes and corrugated metal roofing are prerequisites for the use of polymer-based penetrations with a metal frame. The installation instructions for the cutting are quite simple:
- in a cap consisting of polymers, it is necessary to make a cut in size corresponding to the outer diameter of the pipe;
- then you need to put the product on the pipe;
- the base sheet easily bends in the shape of the roof.
Cutting of this type guarantees complete tightness of penetration through the roof.
Do you need drawings for installing a chimney
As a rule, the installation of a chimney in various buildings requires the advance production of drawings, indicating all the main components. Using the drawing, you can install it step by step.
When installing a chimney in a bath, such difficulties are useless. Everything is much easier. Required data and instructions are given above. Using them, you can easily make a chimney for a bath with your own hands.
The final stage of the chimney installation
When all the components of the optimal materials are installed, you need to check the performance of the chimney.
Testing is best done in the evening or at night. It is important that the ambient temperature is lower than the room temperature.
Otherwise, smoke during kindling will enter the room even with a working chimney. A desirable, but optional condition is the presence of wind - traction will be better.
The ignition of the stove should be carried out carefully. A competent stove-maker uses a minimum of fuel when carrying out such a procedure. This allows appropriate action to be taken if the operation of the chimney piping is unsatisfactory.
If the ignition was successful, there is no smell of smoke in the room, then you should add fuel, choosing raw wood that gives more smoke. Well-insulated chimneys prevent smoke from entering the room. The reverse situation is a direct indication to a thorough check of the channels for installation inaccuracies and damage.