Do-it-yourself bathhouse in the country: a project, materials and a guide on how to build a bathhouse. How to build a budget bath at the dacha Do-it-yourself bath at the dacha is small
Since ancient times, the bath has been a place where you can relax and unwind. These ancient buildings bypass even outdoor recreation in popularity.
How to build a bath yourself?
Building a bath with your own hands is a difficult task and its implementation will require a certain amount of knowledge, which you will soon learn about.

To build a bath with your own hands, you will need to familiarize yourself with the action plan:
- Design a bath
- Understand the stages of construction;
- Acquire building materials;
- Connect communications;
- Equip the bath from the inside.
After familiarizing yourself with the stages of construction, you need to decide on the place where the bath will be located, since a lot also depends on the location.

The best option would be if:
- the bath will be located on a hill, this will greatly simplify the installation of a water drain;
- next to the bath there will be a river or a reservoir;
- the window in the bath will be located opposite the house, which will allow you to observe its firebox.


For garden house the distance will be no more than 3 meters, and for buildings such as a bathhouse, this distance should not exceed 1 meter.


The design and drawings of the bath are best ordered from local designers, it will cost about 5,000 rubles. You can also search for ready-made sketches and photos of a bath on the Internet that best suit your preferences.

Bath made of brick, stone or blocks
Brick, stone or blocks can be used directly as materials for a brick bath.

To build a bath, it is necessary to dig a pit and fill it with 20 cm of sand, then it must be filled with water for compaction.

The second step will be laying rubble on top of sand 10 cm thick, which then needs to be covered with sand again.

The last step is to install a system for drainage and drainage of the building.

Bath from a bar
The first layer for the base of the bath will be laying sand at 20 cm, crushed stone is applied in the second layer, and concrete pouring is laid in the third layer. The key step will be the reinforcement of the building.

Metal rods must be inserted into the layers for a more durable structure, and as additional stability, metal plates must be laid in the middle, which are connected with wire.

Note!

The next stage of work is the blind area, which is needed so that the foundation of the bath is not washed with water.

It is best to make a blind area from clay, it is much stronger than concrete, and also does not form cold seams in the process. A layer of rubble must be poured over the blind area.

Next, you need to install a drain in the bath. First you need to dig a hole and bring its groove to the edge of the foundation of the building, cover the walls of the hole wooden planks with reinforced wire, and then pour everything with concrete.

Frame bath
The foundation for such a structure of the bath is made according to a simplified technology, which is the advantage of the frame bath. It is necessary to make a foundation of asbestos-cement pillars, which, after installation, are poured with a concrete mixture.

The next step is to mark the walls. Then you need to start connecting the boards using nails. From the boards, the upper and lower trim is assembled. The walls for such a bath are made in a lattice structure.
Note!


The materials that are needed for the walls are bars, insulation, and materials for the outside, for example OSB boards or a block house, and inside you can use the clapboard.

Materials for insulation and vapor barrier
It is worth warming the bath from the outside only with the condition of heating in the building.

For a wooden bath, it is necessary to make a grate that will be inserted into the insulation. The work will need mineral wool, the layer width of which will be 50 mm.
Floor in the bath
In case of frame bath d, when it remains to insulate the floors, as well as install the floor boards, in addition, it is necessary to install logs, a subfloor, and fix the structure for steam removal, then lay the insulation and check the waterproofing.

It is best to make the floor of concrete, as this will allow the bath to dry faster and it will last much longer. Shields made of wood are laid on the concrete floor; they can later be taken out to dry and calmly leave on their own business.

Note!

DIY bath photo


Having fruitfully spent the whole day at their summer cottage, it is appropriate to start your vacation with a visit to the bathhouse, where you can take a steam bath and in this way relieve accumulated fatigue. Needless to say about the benefits of such procedures for the human body, this has long been a proven fact. The point is small - to determine where the bath should be located in the country and build it with your own hands. How to do it right, you will learn from our article with step by step instructions for the construction of this popular structure among the people.
Construction stages
To make a bath yourself, you need to outline a clear procedure:
- Choose a suitable place to build.
- Design a bath building and determine its dimensions in accordance with the needs, wishes and possibilities.
- Select building materials and calculate their quantity according to the developed project.
- Prepare the site and make the foundation.
- Build walls, partitions and roofs.
- Perform internal arrangement - conduct communications, install a sauna stove and organize ventilation.
The best option for a bath is a separate building, an extension to the house is economical, but inconvenient. There are no strict requirements for the placement of the building, except for one - compliance with fire safety standards. Based on them and taking into account the common wishes of the owners of cottages, we will give the following recommendations for choosing a place:
- plan the construction site somewhere in the backyard, in a quiet place and at the maximum distance from the neighbors;
- optimal distance to country house- 8-10 m;
- excellent location - next to the home pool or on the shore of the reservoir;
- think over the question of how to inexpensively bring water supply, sewerage and electricity to the bath;
- outbuildings, from where they can hear unpleasant odors(garage, barn, stable) should be as far away from the designed building as possible.

Site plan with the location of the bath
Note. If you decide to start building a bathhouse near a pond, then you need to foresee the likelihood of flooding and take measures in advance, for example, raise the level of the clean floor higher.
Step one - choosing a project
Unlike similar structures being built next to private houses, 2 main requirements are put forward for a summer cottage:
- A bathhouse for a summer residence should be designed for daily washing after a hard day and quick heating. If the heating of the steam room lasts for half a day, then it is easier and more convenient to use a summer shower.
- The design is provided as simple and cheap as possible. We do not accept cases where country house represents two-storey cottage and the sauna should look like him.

Reference. For those who do not want to engage in construction in principle, there are options for ready-made mini-baths. For example, a mobile bath in the form of a trailer to a car or ready product in the shape of a barrel, shown in the photo.
In order for the steam room to be heated quickly, its size must be optimized for the number of people who constantly live in the country and take bath procedures. This will not create any special problems for guests who can take turns washing. The drawing below shows a plan for a mini-bath 3 x 3 m, designed for the simultaneous stay of two people:

As you can see, the small house is divided into only 2 rooms - a rest room and a steam room combined with a shower. Since this is a budget option for a sauna, the ceiling height is also small - up to 2.7 m. If you need to divide the rooms and increase the size, you can take as a basis the layout of the building 5 x 3 m, shown in the following drawing.

Note. The terrace is shown in the picture conditionally and is built according to your desire and size.
For comfortable bathing and relaxation for 4 people total area all rooms of the bathhouse should be 20 m², 5 m² for each. Then a 5 x 4 m building scheme with a large open terrace will suit you:

Stage two - selection of materials
In general, baths are usually made from various building materials - bricks, blocks and even sandwich panels. But the best way is a tree and here's why:
- wood is a natural eco-friendly material;
- it is easy to handle with a minimum of tools;
- lumber is affordable;
- wooden structures are lightweight and do not require a powerful foundation (an exception is log cabins).

Bath, built on frame technology
When building a bath, the ecological purity of the constituent elements plays a special role. It's all about the high temperature, due to which building materials that are harmless under normal conditions begin to release compounds that adversely affect the health of those who wash. Therefore, it is highly undesirable to use any artificial heaters in the bath house - mineral wool and polymers. What to use:
- dried timber with a section of 15 x 15 or 10 x 15 cm;
- edged boards 150 x 50 or 150 x 40 mm;
- finishing lining;
- materials for caulking - jute, moss, flax;
- natural heaters - expanded clay, sawdust, clay and so on.

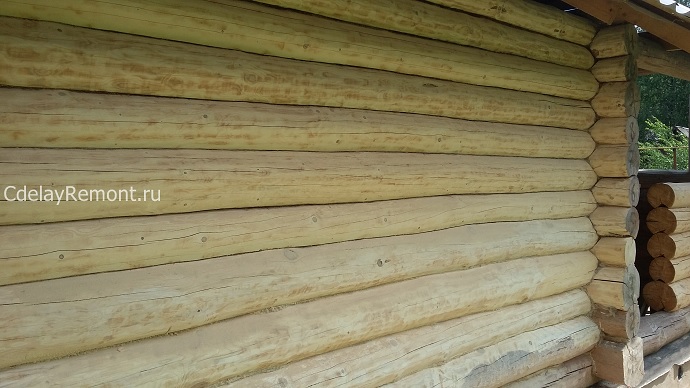
log bath
Note. For the device of vapor and waterproofing, it is allowed to use polyethylene films and special membranes that allow moisture to pass in one direction.
A few words about how best to build a bath from lumber, more precisely, about the construction of the walls. There are 3 ways to choose from:
- Installation on frame technology.
- Prefabricated timber structure.
- Walls made of logs (log house).
The preferred option is a do-it-yourself bathhouse made of timber, shown below in the photo. It meets all the requirements and will cost relatively inexpensively. Yes, a frame building is cheaper, but it uses basalt wool for insulation, which releases carcinogenic substances when heated. A chopped house is suitable for environmental friendliness, but it requires a strip foundation, and this is an increase in the cost of the project. In addition, the logs must be able to connect correctly so that the structure turns out to be beautiful and warm.

Advice. If you want your bath to look like a log house, nothing prevents you from building it from a bar, and then finishing it with a block house that imitates a log.
We build a turnkey cottage
Before the beginning construction works site needs to be prepared. Remove unnecessary objects, stones and vegetation from it in order to calmly proceed with marking. If the site has a slight slope, then it is desirable to level the site.
With the help of pegs, rope and measuring instruments, mark up, outlining the contours of the future building. Make sure that the indents from other buildings correspond to your calculations, and then mark the installation points for the foundation supports. Usually they are placed like this: 4 corner posts, and between them - intermediate supports with an interval of no more than 1.5 m. For the installation of internal partitions and a log in the middle, several more rows of posts are planned.

Base device
As a basis, we took the foundation of the columnar type as the simplest and cheapest in execution. It makes no sense to pour a concrete tape under a small country bath, except that it is built from a log and therefore has a decent weight. The work algorithm is as follows:
- In the places marked with pegs, dig holes 0.7-1.2 m deep, depending on the location of the stable layer of soil. Make the dimensions of the recesses 20 cm larger than the dimensions of the future columns so that they are convenient to lay out.
- Tamp the bases and sprinkle them with sand to a height of 10-15 cm, and on top make the so-called footing 40 mm thick from a cement-sand mortar.
- Lay brick or cinder block pillars to the desired height. Inside each, insert reinforcing bars with a diameter of 12-14 mm to fasten the beams.
- After the mortar has hardened, process the masonry bituminous mastic, providing waterproofing, and lay the usual roofing material on top (2 layers are needed).
- Fill the recesses around the supports with soil and compact it.

If the soil in the country is supersaturated with moisture and is prone to frost heaving, then columnar and strip foundation won't last long. In winter, the freezing soil will push it outward and the structure will warp. Since the depth of the unstable horizon sometimes reaches 3 m, the pile-screw foundation shown in the photograph will serve as a reliable foundation here. Laying so much concrete is simply unrealistic, and pointless.

The essence of the idea is to screw piles with blades into the ground to the required depth so that they reach dense soil that does not give subsidence. Wet soil will not be able to push them back - the blades will interfere. Details about the device of the pile-screw foundation are described in the video:
Construction guide
The crucial moment is the installation of the first crown. The bars are laid on supports, aligned horizontally and at the corners, and then fixed. If you need to connect 2 beams to increase the length, then docking is performed on one of the foundation pillars by cutting into half a tree.

Attention! Before erection wooden structures baths, all elements should be impregnated with an antiseptic.

Connect the bars at the corners in the simplest way - "in the paw". To speed up the process, make a template for sawing the ends shown in the diagram:

Before combining the sawn beams, lay the joint with a caulk - jute or flax fiber. Repeat the same action before laying subsequent crowns so that there are no gaps between the elements. Connect every 3 rows of bars with steel brackets - dowels, as the scheme prescribes:

To cut internal partitions into external walls, it is necessary to cut each beam to get a connection in half a tree, as shown in the figure. Other ways of cutting are also shown there, but it is more difficult for a novice carpenter to implement them.

Note. Using the presented connection diagram, you can assemble walls with cuts, as is done in log houses. But keep in mind that the consumption of timber will increase.
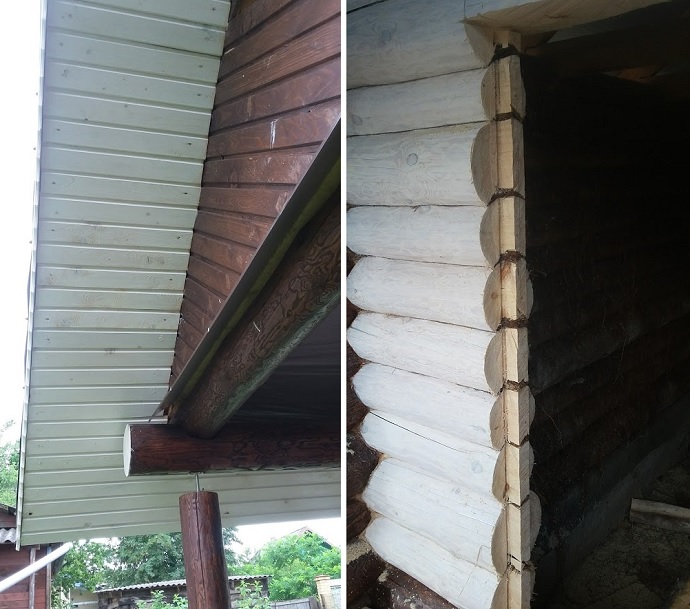
During installation, check the vertical and, if necessary, correct the position of the elements before placing the dowel. Having reached the design height, lay the boards around the perimeter (in technical language - Mauerlat) and proceed to assembly truss system gable roof, whose design is shown in the photo:

The installation order is as follows:
- Attach the cross beams to the Mauerlat in increments of 0.5-0.6 mm.
- Install a vertical post in the center of each crossbar. Rafters are attached to it, resting on the Mauerlat with the other end.
- To support the rafters, put 2 slanting jumpers on each beam. Nail the batten boards on top.
- Cover the crate with sheets of a diffusion membrane and nail it with planks. Mount roofing from slate, corrugated board or metal tiles.
- Knock the ceiling beams from the bottom with a clapboard. Sew the gables with the same material.

Thermal insulation of ceilings with sawdust
To prevent heat from escaping through the roof, be sure to insulate the ceiling. Use sawdust mixed with clay, vermiculite or expanded clay. Do not lay floors until you carry out communications in the building - water supply and sewerage. Very detailed and accessible about the construction of a bath from a bar is described in the video:
Interior arrangement
The organization of water supply and wastewater disposal begins at the stage of foundation construction. While the solution is solidifying brickwork pillars, you should dig trenches for communications, as is done in the example in the diagram:
![]()
To complete the equipment of the bath in the country, you need to do the following work:
- Lay water and sewer pipes along the trenches (the first should lie above the second) with a conclusion at the intended points. At the entrance to the building, insulate these communications.
- Pour at least 30 cm of expanded clay on the ground so that it forms a gutter under the steam room and washing room. Run a sewer pipe into the gutter and fill it with cement screed, as shown in the diagram below. After that, you can sew up the floors with boards.
- Install plumbing fixtures and connect them to the supply pipes. Install sinks and siphons.
- Make lighting by connecting it to the mains through the RCD. Use lamps and switches that are not afraid of moisture, and hide the wires inside special corrugated sleeves.
- Organize ventilation by building adjustable wooden dampers into the outer walls.
- put together wooden shelves and put them in a pair.

The device of the inclined subfloor in the steam room
A separate question - installation sauna stove. Brick building is not necessary, it is too long and expensive. It is better to put a metal one (you can make it yourself) with a firebox placed in the dressing room. For the installation of the chimney, the recommendation is this: take insulated sandwich pipes and try to immediately bring the channel out into the street so that you do not have to go through the attic and roof. The wooden walls of the steam room must be protected from the stove with steel sheets - this is a fire safety requirement.

Installation of a sauna stove and crossing wooden floors with a chimney
Conclusion
From the foregoing, the conclusion suggests itself: to build even a simple bathhouse in the country, you will need to make a lot of effort. But don’t let that bother you, imagine that you hired a team of builders to complete all the work, who will give you an impressive bill. Add to this the time spent supervising the construction and an unknown number of mistakes made by workers. Here it is worth remembering a proverb adapted to the occasion: if you want to make a bath well, build it yourself.

Structural engineer with over 8 years experience in construction.
Graduated from East Ukrainian National University. Vladimir Dal with a degree in Electronic Industry Equipment in 2011.
Related posts:

Hello, dear site visitors! We continue the series of articles from our readers In this article, the author shares personal experience for the construction of a log bath with their own hands. Construction is not finished yet, so we wish him success! If you have recommendations and questions for the author, you are welcome in the comments.
Part 1. Foundation
For the construction of the bath, I chose a relatively flat area with a slope of 20 cm on a six-meter segment. First of all, after preliminary marking, he made a cut of the fertile layer over the entire area of the future foundation. This is required to exclude the processes of decay of plant residues and other organic matter in the basement.

The site is dominated by sandy soil, so the best option would be a height of 50 cm from the base and a width of 40 cm. The outline of the foundation is marked with ropes that are attached to improvised corners of the inner and outer perimeter. To mark the perimeter, I took cuttings of boards about 70 cm long and drove them into the ground, screwed horizontal shelves with protruding screws for attaching the rope from above with self-tapping screws. It is better to choose a rope that is not prone to stretching, it will be easier to work with this.
In addition to the lengths of the sides of the future foundation, the diagonals between the corners must be verified, which must be equal to each other with a tolerance of plus / minus 3-4 cm. You can read more about how to mark the foundation in this article. We continue to remove the fertile layer and dig a trench to create a sand cushion.
As a result, we get a fully prepared "pit", where the bottom of the trenches is almost horizontal (we verify building level). The depth of the trenches is 20 cm, from the soil level at the highest point of the site 40 cm, at the lowest - 30 cm.
The dimensions of the foundation are determined by the center of the intersection of the logs of the log house. This will be the center line. If the diameter of the logs is about 20-22 cm, then we retreat on both sides of the center line, respectively, by 15-20 cm. This will be required to obtain "shelves" for attaching floor logs and rain tides. In addition, the error is practically eliminated when the logs, due to miscalculations of the foundation, fall outward or inward “hanging” in the air.
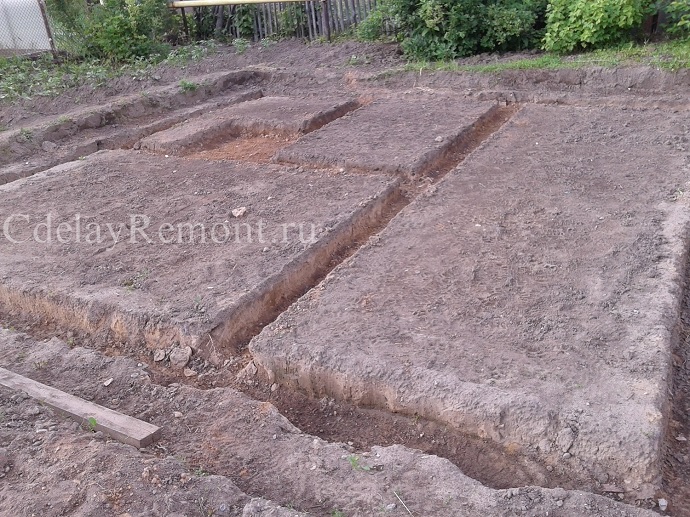
The bath is connected to the strip foundation in order to exclude multidirectional shifts of the bath and the furnace. The size of the furnace platform was chosen as 120 * 120 cm, as the average for installing metal furnaces under brick lining.

We start laying sand in the trenches. At the same time, we moisten and compact the sand. We pour water until puddles appear, after the moisture is absorbed, we begin to tamp. The process is repeated 3-4 times until your shoes leave no marks on the compacted surface of the sand.

A day later, after the completion of work, we once again pass the entire base under the foundation with a rammer. Of course, you can use a simpler option and connect a tamping machine to work, this will not speed up the process much. I have the simplest option: a beam of 100 mm, a sole of 20x20 mm and a handle. The appearance of the finished base and manual tamper is shown below.

On top of the prepared site under the foundation, we pour a sand cushion to level the horizon and raise the site above the level of the site in order to prevent water from entering under the foundation.
If you hire a concrete truck, then take care of additional strengthening of the formwork with diagonal stops outside and inside the proposed foundation. The pressure that is created when the mixture is supplied can demolish an insufficiently strong structure. The same applies to pouring the mixture from a concrete mixer. Only in this case, you need to strengthen the place where you will drain or simply move the concrete mixer around the perimeter.

It is better to pour the entire volume of concrete at one time, so as not to get the effect of a layered cake. We cover the top of the foundation with a film that keeps our foundation moist in order to avoid cracks in the concrete. The foundation is periodically watered with water, not allowing it to dry out.

After 7-10 days, we remove the formwork, unscrewing the self-tapping screws, which will also go into work at subsequent stages. The finished foundation looks like this. Layout: 2x6 meters - veranda; 4x4 meters - rest room; 2x2 meters - washing room; 2x2 meters - steam room. The location of the ventilation holes is approximately 20 cm from the ground level, if necessary, you can buy plugs to close the holes in winter period.

The approximate quantity and price of materials used in the construction of the foundation are shown in the table below.
Part 2. Installation of a log house and a roof
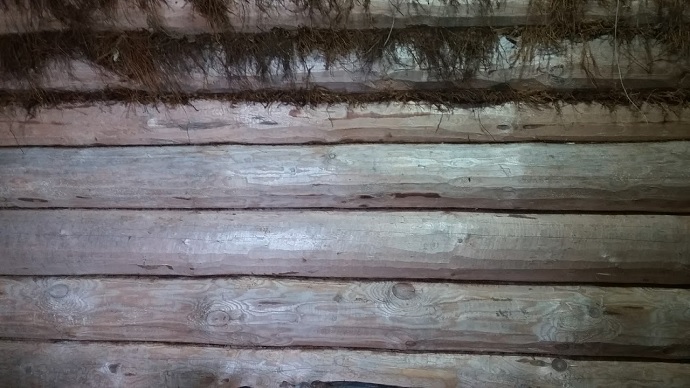
For dressing a log house 6x4 meters and a chopped veranda, you will need 25 bags of moss. When buying, make sure that the weight of a bag of compacted moss is approximately 20 kg. Moss must be elastic, that is, have optimal moisture content.

We use “cuckoo flax”, which we collect in late autumn, when all living creatures go to “wintering” in the soil and there is no risk of grabbing a snake with a bunch of moss. Allowed a small amount of sphagnum moss, which is shorter and crumbles when dry. If only sphagnum is fully used, then after a while it will simply fall out of the grooves.

The length of the strands of moss should be at least 30 cm, so that when caulking it is possible to twist the ends and ensure the sealing of the grooves. When drying, we sort the material, choosing twigs, foreign plants and cones from it. By the way, if the bump falls into the groove, then at a certain humidity it opens with such an effort that is enough to lift the log and arrange a “cold bridge”. This is how log house installers did in the old days, and even now this situation is not uncommon if the owner “offends” with money.


We install rolling logs. I have a small gap between the foundation and the log house, so I used half a log on one side and a 100 mm beam on the other.

We punch the place of contact of the log with the roofing material with moss.


Errors were revealed that caused the unwillingness of the cutters to do their work efficiently. The grooves were cut with a chainsaw, which made the gaps in the logs very large. Look, the edges of the grooves fit snugly against the body of the log, but in fact there is a void inside. Because of this, the amount of moss that will go to the caulk increases greatly. And this is if you do the caulking yourself, and the "shabashniks" only do the external processing, no one will break through the insides.

| Material | Volume/quantity | Price |
|---|---|---|
| Edged fence board "inch" on the crate, 300 mm | 1 m 3 | 4500 rubles |
| Wood screws 50 mm | 2 kg | 300 rubles |
| Moss | 25 bags | 6250 rubles |
| log cabin | 1 piece | 72000 rubles |
| Board 50 * 150 six meters | 14 pieces | 3600 rubles |
| Metal tile, thickness 0.5 mm, length 4.2 meters (additional ridge and wind protection) | 12 sheets | 31000 rubles |
| Steam-Wind-insulation | 1 roll | 800 rubles |
| Grooved board 20 mm | 1 m 3 | 8500 rubles |
| "Belinka" base | 2.5 liters | 400 rubles |
| "Belinka" glazing composition | 2.5 liters | 600 rubles |
| Total: | 127950 rubles | |
Part 3
The most simple, but tedious work on caulking a log house. We use a mallet, iron and wooden caulk. An iron one with a blade thickness of 3 mm and a width of 50 mm, a wooden one is made of hardwood (I have dry birch) and is a consumable.

The original view of the groove.

We fill the moss into the groove with a construction trowel. Previously used a spatula, but it quickly failed and was not as elastic. Feel free to hammer the groove completely. There is an opinion among the inhabitants that there is no need to make the seams dense and uniform, they say, the temperature in the bath is enough to compensate for the losses. But judge for yourself, drafts in the steam room and washing room will not add comfort and firewood consumption will be 2-3 times higher.
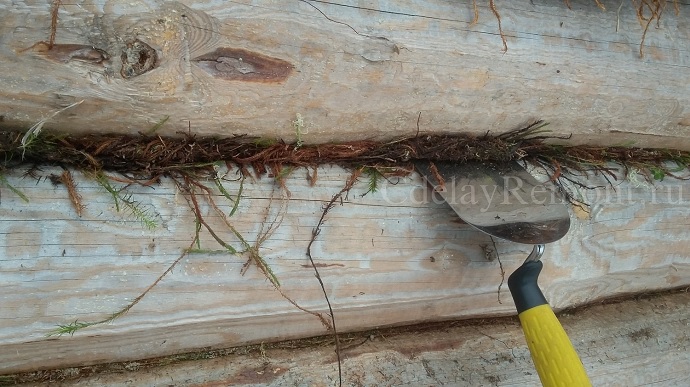
We hammer the resulting roller with a wooden caulk.

If necessary, if the groove is not tight enough, we make another roller of moss and punch it until we feel the hardness of the wood when struck with an iron caulk.

The final view of the caulked groove.

To prevent birds from dragging moss and for aesthetics, we close the groove with a 100 mm wide jute tape, which will subsequently be treated with impregnation and glazing composition to match the color of the log. Special "craftsmen" put logs on only one jute or linen, but this is unacceptable for a bath. If we have constant humidity in the house, then vaporization is welcome in the bath. Flax and jute absorb moisture, but do not dry out for a long time, the grooves rot and become moldy.

We get logs prepared for grinding.

We especially carefully caulk the corners to prevent cold air from entering the bathhouse. Work, if you do not hire specialists, will cost nothing. When attracting "shabashniki" - from 70 to 150 rubles per linear meter.
Part 4. Sanding logs
So, the caulking is completed, the moss is filled and compacted in the grooves, we proceed to prepare the log house for painting. At present, the logs look very unpresentable - traces of a planer, chips and pulled out wood chips. In addition, the logs are strongly "tanned" in the sun and under the influence of slanting rains, and some of the knots require sampling and sealing with mastic.

The ends of logs that were damaged during storage and transportation also require processing. Here the most loose wood, respectively, a high probability of decay and further destruction of the log.

Logging tools:
- Bulgarian;
- petal emery wheel;
- soft brush from a mop;
- putty knife.
Bulgarian used the cheapest - 1200 rubles, made in China. It is worth noting that it withstood all the tests with honor and remained operational even after passing 70 square meters of walls (we add to this the semicircular profile of the log). The only inconvenience is cleaning the stator, rotor and the inside of the grinder from wood dust. Of course, you can put a stocking on the instrument, but the incoming air is not enough for cooling. By the way, the work is very dusty and immediately stock up on glasses, closed on all sides, and respiratory protection equipment - a respirator is enough. Working with a grinder requires utmost attention. High speeds and a removed protection cover can play a trick on you. One has only to lose vigilance, intercept too quickly to the grinding wheel, and you are guaranteed an injury. I twice went through the same place on my arm - the glove to shreds and the skin torn to the meat.
The grinding wheel was used with grain 80. Through testing and selection, I settled on this value - grain 60 leaves too noticeable marks, and grain 100 clogs very quickly. The approximate consumption of petal circles is 1 piece per 3 square meters. You can use the circle further, but the pace of work slows down, and you just get tired.
Attention bonus! I accidentally found that if a circle clogged with dust and tar is passed over the concrete of the foundation, then the sandpaper is cleaned and the circle is ready for work again.
With no skill and when working with all caution, you can sand 6-10 squares of a wall in a day. The prices of "shabashnikov" fluctuate between 400-500 rubles per square, and plus they do not stand on ceremony with consumables. Pay attention to resin pockets. If you expose such an area, then treat it with a solvent, otherwise this resin will then come out even through a layer of paint.
I started working from the smallest wall, the logs are changing before our eyes. Faced with the problem that when processing grooves, the edge of the grinding wheel leaves cuts on the lower log. But with further processing, the cuts grind well, and no traces remain.
Especially a lot of fuss with the corners, the high speed of the grinder and tightness slow down the process. Where the circle does not reach, you will have to switch to a slower processing method - a chisel.
When the grinding wheel is almost "sat down", we pass the ends of the logs. It is irrational to use a new circle for the ends - you will have to throw it out after a dozen logs.

We seal the ends with mastic on wood. At first I used the color "pine", but then I realized that it was more economical to use White color, as it will be painted under it.

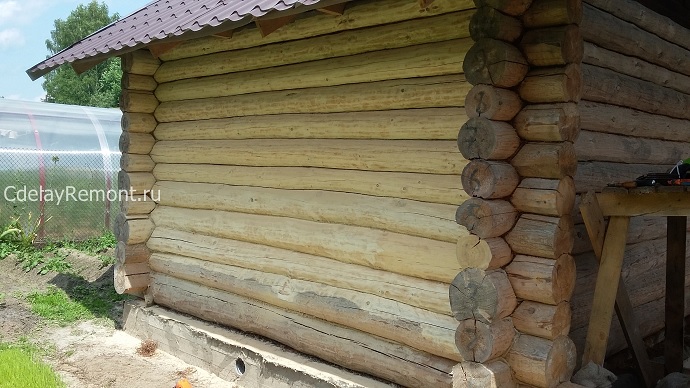
After grinding, an interesting structure of the tree appears, intricate patterns run throughout the log. The knots and irregularities of the log add a certain fundamentality to the log bath, and I was even glad when there were especially knotty specimens.


To get an idea of how the wall would look after painting, I stopped and prepared the logs. According to all the aggregate features (quality and price), I chose the composition under the Belinka brand. Pre-treated with Base, the drying time of which is 24 hours, and passed over the polished surface with the first layer of glazing composition No. 24 (rosewood). Agree, enchanting beauty! If you want to get a surface that is smooth to the touch, then after the first layer of the composition and its drying, go over the log manually with a “zero” sandpaper. This is true on the railings and on the front of the bath, where guests love to run their hands along the wall and appreciate the work of the master.

The drying time of the first layer is 12 hours, to be sure, I survived the day and covered with the second layer. A dark noble matte sheen appeared. Another trick - after using the glazing composition, a little pigment remains at the bottom of the jar. We dilute it with a solvent to a very pale appearance and pass through the second layer of the dried coating. You can do the procedure at any time after the coating. As a result, we get a surface that resembles a log additionally impregnated with wax. Very pretty.

Along the way, the ends were processed with a glazing composition No. 11 (white), which favorably sets off the work already done.

The result completely satisfied me, we continue the polishing that we started. Since you will do all the work yourself, the quality will be at the highest level. If the hired workers can ignore flaws, then the master himself will torment himself for even the smallest oversight. For example, I, knowing that somewhere at the bottom of the log I missed a cut, like a criminal returning to the scene of the crime, again and again examined his “jamb”. Until it was corrected.
The log cabin is getting more and more beautiful. Do not forget to clean the logs from dust with a brush after work.

In the next photo, the logs processed by the Base, and the ends sealed with white mastic.

Having appreciated the color and texture of the painted logs, I realized that inside the veranda it would look a little dark, and I experimented with coloring the log with composition No. 11 (white).


White paint retains the texture of the sanded log, and I decided to completely paint the veranda. Through the first layer, a slight yellowness of pine appears, and there is no shine. Very similar to just bleached wood. But the second layer works wonders. There is brilliance and a certain completeness. By the way, buy "Belinka Azure", as the white "Belinka Top Azure" is designed for window frames and costs much more.


Now the bath, with the exception of one wall, is covered in one layer and looks like a house with a Khokhloma painting negative. Pleased with the upper cross beam - it is a knotty Christmas tree, which gives the structure a look of conformity with the natural style.


We continue the construction of the bath and proceed to the stage of flooring on the veranda. There is a roof over the room, but the absence of a pediment (for the airiness of the building) does not prevent drops of slanting rains from entering. In winter, snow blowing and its subsequent melting during a thaw is not ruled out. Therefore, we will pay special attention to the conservation of boards and logs, as well as to making the surface of the floors water-repellent along with a good appearance.
Part 5. Floor of the veranda
Boards 50 * 150 set on edge will serve as lags. According to the universal formula, the thickness of the board is multiplied by a factor of 20, and we get the step between the lags in my case 1000 mm. But I decided to somewhat strengthen the structure and placed the logs in 600 mm increments. It turned out like this.

On the veranda (conditionally 2 meters by 6 meters) I bought 16 six-meter boards, taking into account the lag and a margin of one board. It cost me 4300 rubles and 500 rubles for shipping. Some boards showed blue and mold, which can be easily removed by sanding and bleaching. Worst of all, several boards are affected by the woodworm. Its larvae made several through holes, which I then sealed with mastic. On examination, I didn’t find more living creatures and calmed down on that - after drying, the wood attracts them little, and treatment with an antiseptic and biocide will discourage the beetle from any desire to approach my veranda. I laid a vapor-permeable film on the ground inside the foundation so that no plant would get a chance to germinate inside the veranda. The boards were marked and sawn in accordance with their location.

After that, I removed the boards, numbering them according to their location, and started processing the logs. I used a vigorous antiseptic of Yaroslavl production. I am a little familiar with the preparation of antiseptics and the composition of the purchased products inspired confidence in me. Preservation of wood is declared at 45 years old, subject to the impregnation technology. It is required to use 500 grams of solution per square meter, i.e. We apply the first layer, and after 1-2 hours the second. antiseptic yellow color so the coating is clearly visible. When dry it becomes dark brown.

Next came the turn of the boards. Previously, on the surface located below and on the sides of the boards, I passed with a petal emery wheel, fixed on a grinder to remove the pile. So we provide better absorption of the antiseptic. Then we grind the front surface with a circle with a grain of 100. I also used my long-suffering grinder of the lowest price category. If you are afraid to make potholes and holes, then try grinding part of the board with a clogged circle to gain a little experience. Don't forget to chamfer the edges of the board.

Attention bonus! To make the floor surface perfect to the touch and pleasant for the feet, walk along the sanded board with a mild soapy solution. Apply with a brush or roller. When dried, the risen residual pile will become hard and it is easy to knock it down with a sandpaper even in manual mode.
The boards are laid on logs with a gap of 4 mm. As a "standard" we take an ordinary nail, which we put vertically between the boards.

Since my boards are of natural humidity, they can be somewhat drier, that is, they are likely to warp during the drying process. That is why I decided to use not self-tapping screws for fastening, but screw nails. A self-tapping screw is a weaker fastener for transverse loads and can simply burst. The head of the nail, so that there is no rust and its spread to the boards, is covered with mastic on wood.

See the nail? And he is here!

In the process of laying the boards, I begin processing them. I had the choice of using oil as a coating for open terraces Alpina (Alpina) or Belinka glazing composition. I liked the second option better. Firstly, that the oil that the Belinka Base penetrates deep into the tree and protects it from moisture. Secondly, the oil tinting and Belinka No. 24 are almost similar. Thirdly, oil and glazing composition, which does not have high resistance to abrasion, should be renewed every two years. And fourthly, Belinka is cheaper. A large flow of visitors is not planned on the veranda and the maximum load is walking in slippers or barefoot.

After the first layer of the Base has dried (24 hours), apply the second layer and let it dry for another day. And the culminating moment comes - coating with Belinka No. 24 glazing compound. If you want more effect and shine of the floor, then get Top Azure.


–––––– Half a year has passed ––––––
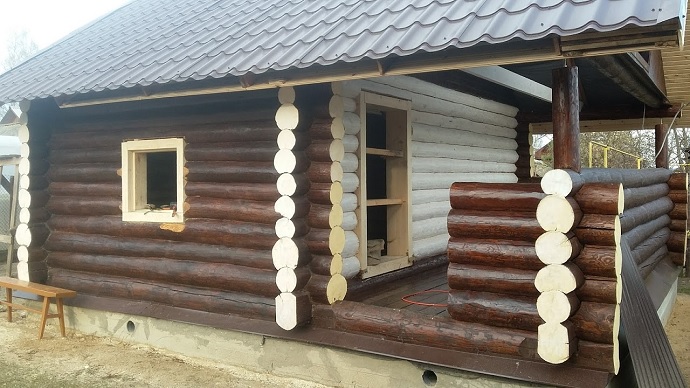
Since my last story of the past, quite a lot of time, and the construction of the bathhouse was gradually moving forward. Little by little, because you have to do everything yourself. I don't trust scammers. I contacted them twice (assembling the log house and installing the roof) and was very dissatisfied with the result.
I looked at the bathhouse from the side and decided that another pediment was needed to protect the veranda space from rain. He laid the lining in different directions, leaving something like a window. There will be a stained glass window - polycarbonate with a pattern applied with special stained glass paints.


The fit of the boards to the pediment turned out to be quite tight, so I will do without an additional plinth, I will leave it as it is.

The pediment is painted in the same color as the bath, a side board with a claim to carving is installed. The cost of the work was: lining - 2500 rubles; self-tapping screws - 200 rubles; paint - 200 rubles; wind carved board - 800 rubles. I think that it is quite inexpensive for such a result.

Last year, I didn’t have time to paint the roof lining, I just covered it with a base coat, the temperatures started to drop below zero. Just the other day, having chosen a period without rain, I walked with two layers of white Belinka. I liked the result, but I think to fix it with a third layer.
And so, the new bath construction season has opened. In autumn, I managed to capture a few fine days with a positive temperature, which finally made it possible to make a window and a door. The technology for preparing openings is standard. We mark and cut out with the formation of a spike on the log. For the window opening, I used a bar 100 * 200, and for the door frame, a bar 100 * 250. At the sawmill, they met me halfway and made two six-meter blanks on special order. They took quite ridiculous money - about 2500 rubles with delivery.
On the spot, the beam was sawn into the required segments. The window opening turned out to be clean 50 * 50 centimeters, the door clean 70 * 160. So we really implement the old commandment - bow to the bathhouse when you enter. The upper level of the threshold will be 15 centimeters from the floor to keep warm in winter. I sawed a groove on the beam according to the size of the spike on the log, plus a centimeter in width in each direction. I fixed a rolled insulation 20 centimeters wide on the spike, it seems linen, I don’t remember what I bought. The vertical beam went to the stretch, and horizontal segments were used as struts. The gap from the top pigtail to the log is about 3 cm, filled with moss. There is also moss under the threshold and window sill, which, after installing all the components, was compacted to the state of almost a log.

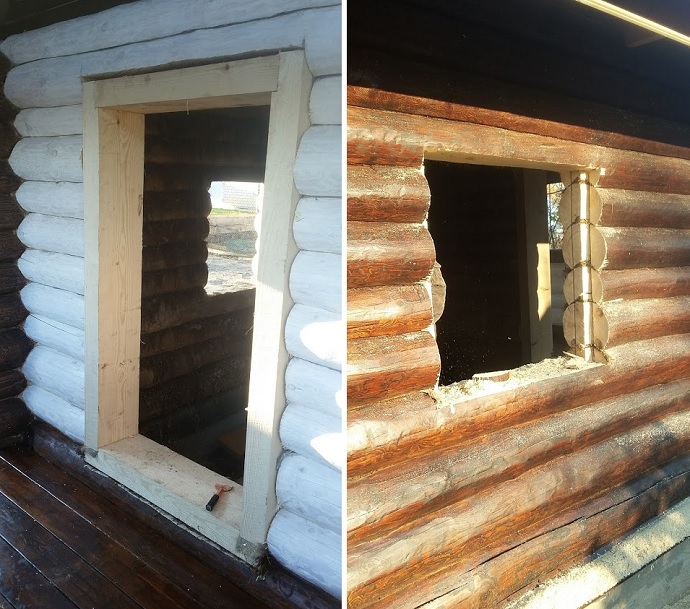
A quarter is selected on the window for the convenience of installing plastic. Spacers are placed in the door, since during the natural drying of the timber, deformation is possible.
What is planned. The window is plastic with imitation of division into smaller windows. The photo shows my hooliganism, so to speak - instead of a window, I inserted foam plastic and made markings for the future product with insulating tape.

The door is metal with a heater on a cloth and jambs. In the company where the doors are made, the director is my good friend, we discussed all the details and, I hope, a good product will turn out. By door leaf there will be a wooden overlay 1.5 centimeters thick. According to the overlay, I will perform aging of wood, I will make an imitation of forged hinges and wooden cross bars. But this is in the future, and now he is engaged in the improvement of the veranda.
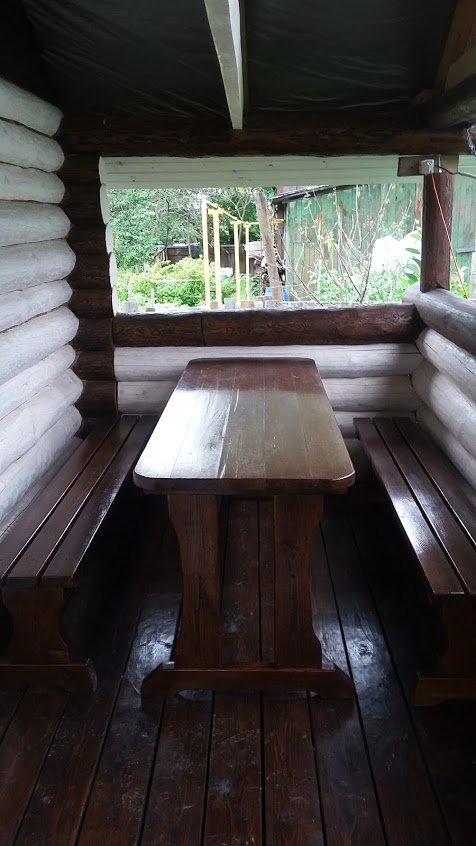
We have one craftsman who makes tables and benches of fairly good quality and quite inexpensively. This headset cost me only 7.5 thousand rubles. By tradition, I covered it with the Belinka base, Rosewood glazing compound and deck varnish from the same company.
Somewhere on the hundredth or two hundredth jump from the level of the veranda, I realized that I needed a porch. The plans were to make some kind of forged product with wooden steps, but for now I decided to limit myself to a temporary hut. Although the makeshift turned out to be quite nice and will still serve me until I get bored. On the sidewalls I used logs that remained from cutting out openings, on the steps a board 50 * 150. On the base he laid stones from a nearby quarry.

And now about the pressing. Firstly, I spend the caulk inside the log house. The logs have already settled down in place. What is possible - dried up, what is needed - led what it wanted - settled in its permanent place. Accordingly, gaps appeared inside that require careful sealing.
External examination confirmed good quality caulks. Nothing has fallen out, the birds haven't messed up, and the moss is lying as planned. When sawing openings, the moss was packed into one dense and hard strip, it was even difficult to make out, but it is good to fill cracks with such strips. I made another birch caulk. The shoulder blade turned out to be wider and larger, a two-kilogram sledgehammer perfectly suited it. Moss flies into the cracks with a whistle, and where the log lay too tightly I use birch wedges. The process is lengthy, but mandatory if you do not want to bathe in felt boots in winter. Secondly, I conducted an audit of the foundation. There are light chips on the outside, but these are sagging during pouring and do not affect the quality. However, if I have free time, I will plaster and cover with facade paint. Manufacturer and color not yet chosen. Last year I installed low tides, which performed well even with a serious snow load. And, thirdly, I will count the snow holders. When last year a crust formed on the roof after a freezing rain, and 50-60 centimeters of snow fell on it, it was a good surprise in the form of a huge dense snowdrift near the bathhouse after the first thaw.

Well, I’ll tell you what I do to keep my bath warm and dry. A month ago I bought a metal stove from Izistim for 58,000 rubles. I chose for a long time, tediously, I read all the reviews and realized that this is what I need. Its parameters can be found on the official website of the company, where given detailed description. While the furnace is standing on the street in front of the bath, 130 kg of metal still needs to be thought out how to carefully drag it, especially since I still have no floors and 600 pieces of bricks are stacked on the ground. It turned out that these stoves are made literally right next to me, so I had the honor to communicate directly with the manufacturers, who really helped with advice and recommendations. The pipe is planned to be adjacent to the stainless sleeve. The structure will be about 5 meters. I ordered a stainless pipe with a wall thickness of 1 mm in the same place, in the Izistim company. Just a week later I received the order. Laser welding, high quality and reasonable price. In terms of money, the pleasure amounted to 11,500 full-weight rubles for a set of pipes of 5 meters. CRAFT company.

The complete kit includes a tee, a plug for cleaning the pipe from soot and removing condensate, and a type of adapter with a platform that will allow you to firmly fix the chimney in a brick pipe. The design on the right in the photo is a horizontal pipe section from the stove to the chimney. Heat-resistant stainless steel 4 mm thick, made in EasySteam for 4300 rubles.

Naturally, I didn’t go shopping and bought convection doors without leaving the cash register. Comfortable constipation, normal appearance and additional sheets of metal for fixing products in brick.

I bought Kostroma clay brick of grade 150, which is enough for lining the furnace. The geometry of the brick is normal, if necessary, the edges can be rounded to give the products a more interesting shape. If you want a more beautiful brick, then buy Vitebsk brand 200. Each brick cost me 25 rubles apiece.
I didn’t bother with clay, which needs to be mined and prepared somewhere else, since I don’t have any special skills. I bought a ready-made mix "Makarov's Furnace House" produced by Kostroma, Gzhel color. They also have a white clay mix for aesthetes. Pechnikov could not be found - everyone is busy. The cost for the masters starts from 40 rubles for a brick for lining and 60 rubles for a brick on a pipe. You can calculate the cost yourself. I will do it myself, although the work will be delayed.
Part 6. Furnace
“And the battle begins again” - we continue the construction of the bathhouse and the improvement of the internal space. The heart of the bath is the oven. My wishes for the climate of the future steam room and other rooms are extremely simple and unpretentious. Firstly, the legs and ears should be warm even in winter, and not bathe with a hard plus in the head area and at the same time in felt boots so that the legs do not freeze. Secondly, the inertia of the sauna stove must be present in order to be able to stop the heating and take a steam bath without running around for firewood while constantly maintaining the desired temperature. It is desirable that the heat in the bath was two or three days to dry the premises. And thirdly, hot water should not boil in the steam room, but is located in the washing compartment in the remote tank.
As I already wrote, the Sochi stove from the Izistim company was chosen with a hinged heat exchanger for heating water.

The heat exchanger is equipped with inlet and outlet pipes with a diameter of one inch. The design is intended for lining with brick, which will simultaneously become a screen from hard infrared radiation emanating from metal and a heat accumulator. Before installation, it is required to heat the oven on the street in a gentle mode to burn the factory paint and eliminate the smell of burning when operating directly in the bath. A heat-resistant cord is laid on the door and blower, which is necessary for sealing. Previously, this was not the case, but the company's managers listen to the recommendations of consumers through communication on the forum and make the necessary changes.
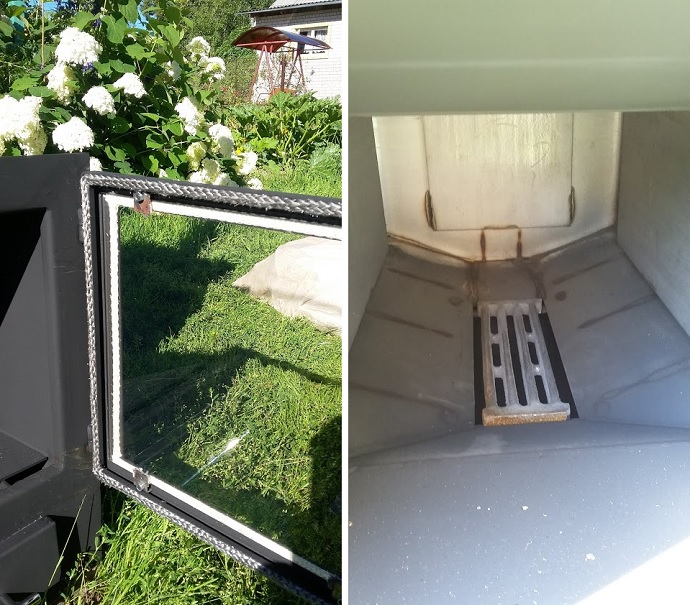
A cast-iron grate is installed inside the combustion chamber. Additional sheets of metal are welded on the sides and at the end of the chamber to reduce the effect of the flame on the walls of the furnace in order to avoid deformation.
For relative thrust, he installed a meter-long pipe and conducted the first tests of a metal sauna stove. The draft even with such a pipe stub is quite good, only a slight flow of smoke from the door is observed when it is opened and, accordingly, a small amount of soot on the glass.

The foundation for the furnace is connected with the foundation of the bathhouse, reinforcement was carried out during pouring. To start masonry leveled the surface cement mortar so as not to damage the waterproofing. I laid a roofing material on the pedestal in two layers, on which I will begin to lay out the brick.
To rise above the floor level, and from the foundation it will be about 18-19 centimeters, we lay out the base under the oven three bricks high. There is a little trick. To save mortar and bricks, we lay out a “well”, and inside we simply place the worst brick and fill the remaining space with sand.

The sand will need to be slightly moistened and compacted so that it does not settle, but this is not necessary, the filling will not go anywhere.
Brick made by Kostroma, worth 24 rubles apiece. The geometry is normal, there are chips at the corners and edges, so you have to choose front side ovens. It pricks badly, it is better to cut with a grinder. For the solution, the furnace mixture "Makarov's Furnace House" is used. The solution sets quickly, holds the brick perfectly, and is easy to use. Bags of 25 kg, the cost is about 400 rubles per piece. One bag is designed for laying 60 bricks. The solution must be mixed with a powerful drill with a nozzle, it is unlikely that it will be possible to make a homogeneous mass with your hands. The mixture is well dried and water has to be added quite a lot.
I “sealed” the upper row of bricks at the base of the furnace with mortar, I wanted to install the structure on metal nickels - the legs of the furnace, it seemed to me, would push through the brick. But it turned out that in this case the neck with the door rises and a gap appears. Therefore, then he cleaned the solution, refused the lining.

I immediately tried on convection doors that will draw air from the rest room to the steam room for exchange. But, as it turned out later, they cannot be installed in this place, the decorative screen around the firebox will interfere.

The most difficult thing was to drag the stove into the bathhouse and not demolish anything along the way. The design of 130 kg commanded respect, and I had to order two stronger loaders. If for the first time a loader from the category of “legs and a cap” helped me to drag the stove to the bathhouse, then the masters really arrived. They pushed me away and in 10 minutes they hoisted the “piece of iron” to the place of operation.
I put a T-shaped outlet on the furnace to determine the root pipe. The picture shows a rear view, where the “lambs” are located for removing the roof and then cleaning the pipe from soot, although the manufacturers assured me of its absence.

The root pipe will run to the left of the furnace and also stand on a foundation connected to a common belt. We continue laying with the formation of a pipe.
The pipe will be functional only after the entrance of the T-shaped segment, so we make its sides one and a half bricks, and we also fill the internal space with sand.
Inside the steam room in the furnace screen, we install two more convection doors, but of a large size. This is necessary to quickly warm up the room. We do not lay the top of the furnace with bricks, we leave space for stones. With the convection doors open, air is taken from the floor, passes near the furnace body and exits through the stones already heated. The air flow can be adjusted with a damper. Doors are hung from the side convenient for you.

I bought the doors from the Izistim company, they modernized the design by adding a stainless steel box along the width of the brick. Now it has become convenient to install the doors, without additional wire fastening. Small gaps are left along the perimeter (except for the bottom) of the doors, which compensate for the thermal expansion of the metal.
The root pipe, so that it passes between the rafters and does not take up much space, is located in line with the “face” of the stove screen. The T-shaped adapter goes a little to the side. In "Izistim" it was made for me with a margin. But, as it turned out, the size was the most suitable, as they say, do not subtract, do not add. A 4 mm stainless steel product cost 4,500 rubles.

It's time to hang the heat exchanger. I bought galvanized corners, spurs and couplings per inch, attached to general design, wrapping the thread with flax treated with a heat-resistant sealant (red in the picture).
Brickwork reached the top of the firebox. We install a support corner of 50 * 50 mm with an approach to a brick of 8-10 cm. Around the firebox there is a thermal gap of about 2 cm.
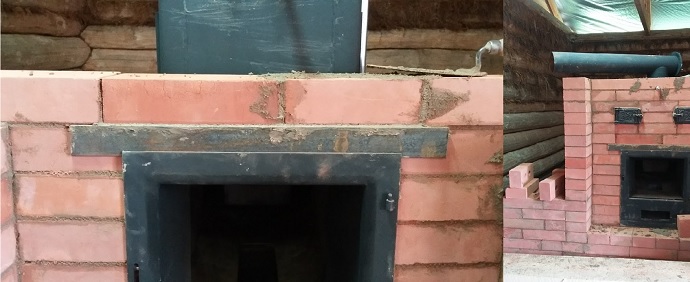
The front side is almost finished, the convection doors are set higher than planned, but for air exchange it is even more convenient, the air coming from the rest room to the steam room will not overheat. Contact with the heated oven is minimal.
We slowly close the heat exchanger with masonry and make outlets for the pipes for connection to the remote tank. The holes are not very neat and then I will close them with stainless steel discs or other decor that is not afraid of moisture. This is a wall in the washing room, it is planned to lay bricks up to the ceiling.

The facade of the stove is finished, the “mantelpiece” will go next in order to hot air from the firebox, when it was opened, did not go directly to the ceiling, but had some obstacle. Yes, and you can put interior decoration items on a shelf.
The wall in the washing room is finished, the pipe outlets are made. It remains to buy stainless pipes and make connections with a mounted tank.

It's time to blow the pipe. Tying masonry from the steam room. The T-piece is connected to the sleeve through a tee. At the bottom of the tee, a cover is installed that allows you to drain condensate and clean the pipe from soot.
From the side of the steam room, the stove looks like this: the T-shaped adapter is covered with a brick screen from above. A corner 40 * 40 is taken as supports.

I will close the cavity above the stove and the adapter with stones for decoration and evaporation of various incense, there is no other function for these stones. And perhaps I will close the pipe with a sheet of stainless steel iron to avoid hard thermal radiation from a very hot metal.
We continue to build a pipe. In the place where the ceiling passes, we form a fluff in order to maintain fire-prevention distances from the "smoke" to the wooden structures. As expected, the front and side walls of the furnace reached almost to the future ceiling.

According to the calculations, the root pipe should pass in the middle between the ceiling beams. And so it happened. The pipe has "grown" to the roof and it's time to make an opening.
And the "face" of the stove looks like this. Convection doors are located in one row with a pipe cleaning. It is still covered with clay, but it is already possible to understand what I want.

Next, we prepare the roof for the passage of the pipe. From the inside, the roof was drilled at the corners of the future passage with a margin of one centimeter. Bulgarian sawed out a metal tile on the roof. I got a passage almost strictly in the center of the ridge, which is convenient for the subsequent closing of the hole from the rain. And the snow will not put pressure on the brickwork.

First of all, we bring a sleeve from a stainless pipe into the opening, then we begin laying.

You should not be content with only the level, you will have to run down so that the pipe is visually even. "Otter", protection from the rain is made almost half a brick. And now the pipe, not yet cleared of clay, takes its prescribed forms.

The pipe was cleaned of clay and varnished for outdoor work on stone and brick in three layers. Each layer hardens about four parts at a temperature of +200°C. It turns out the effect of a wet stone and sealing the pores. The temperature at the top of the stove will roughly match the outside air, if only a little warmer, so the varnish is frost-resistant, withstanding sudden changes in temperature. We got the effect of a wet stone and sealing the pores on the brick and seams, which will protect the material from washing out.
Around the pipe he covered with material that remained from the manufacture of ebbs. Entry on the brick is about 1 centimeter under the "otter". The first rains showed the effectiveness of the design.
First of all, clean the furnace from clay. Don't use water. So you will only rub the mortar inside the brick and you will not be able to get rid of the stains. If you do not want to spoil the outer part of the brick, then be patient, rags and brushes. You can use fine sandpaper.
Secondly, cover the oven with heat-resistant varnish, it is enough to use the composition up to 1500 ° C, you will no longer heat up the screen with all your desire.
And thirdly, put an umbrella on the pipe in order to avoid rain getting inside.
Little trick: to prepare the solution, take rain water, thereby you can avoid salt stains on bricks when clay dries.
And, I will be happy to answer all your questions, since the report from the scene is far from complete and you may be interested in some of the nuances. We'll help you take pictures and show you.
To be continued! (No ratings yet)
A trip to the dacha is a joyful event, since there you can do a garden or landscaping, and then relax, having a steam bath, provided that it is there. We will tell you how to make a bath in the country with your own hands, demonstrate drawings, diagrams and photo instructions. You'll have to work hard, but it's worth it.
In your imagination, you probably already see how you approach the bathhouse, open the door and find yourself in a warm and cozy dressing room, and then into the steam room. Yes! This is exactly what will happen, but a little later. First you need:
- choose the right project;
- get acquainted with the stages of construction;
- buy construction material;
- build a bathhouse and bring all communications;
- finish the interior and only then bathe.
If, after reading the introduction, you have not lost the desire to make a bath in the country, then we will continue the topic, considering all stages of construction.
Choosing a place for the construction of a bath
Often summer cottages they do not differ large sizes, but in addition to personal preferences and convenience, there are norms that must be followed. Let's look at preferences first.
- It would be better to put the bath on a hill, which will greatly simplify the organization of draining the water.
- It is good when the bath is located next to a pond or river.
- The rays of the setting sun penetrating the steam room through the window will relieve stress, but at the same time it is necessary to make sure that the entrance to the bath is clearly visible from the window country house. So you can watch the bathhouse being heated and the children, especially when a swimming pool is built in front of the entrance.
- The bath can be made in the form of an extension to the house.
In order to avoid conflict situations with authorities or neighbors, the instructions of SNiP 30-02-97 must be observed. Paying attention to section 6, paragraphs 6, 7 and 8, you will find comprehensive information on the placement of the building on the site, but we will give only the numbers that you need in order to choose the best place for the bath.
Taking into account the fire safety measures for buildings located on opposite sides of the passage, the distances indicated in the table must be adhered to:
|
The material from which load-bearing and enclosing structures are made |
The distance, which directly depends on the material used in the construction of the building |
|||
|
The same buildings using wooden elements |
||||
|
Wooden and similar buildings |
||||
As for the requirements regarding distances to the neighboring site, they are also unambiguous.
It is also important to take into account the requirements for the location of buildings on your site - from garden house shower, bath and sauna must be at least 8 m away.
By the way, non-compliance with these norms can lead to litigation with a neighbor and the demolition or transfer of the bath to another place.
Bath project
When choosing a bath project, it is important to consider the material from which it will be built. There can be several types of structure:
- Frame bath.
- Wooden bath (from timber or rounded logs).
- Bath made of brick, stone or blocks.
- Arbolite building.
Having decided on the material, when choosing a project, make sure that it suits you according to all the criteria.


Material selection
So, having chosen a suitable project, in accordance with its requirements, you need to prepare building materials.
- Most often, summer residents prefer to build frame buildings, as they are the cheapest and successfully cope with their task. In addition, due to the low weight of such a design, the foundation also does not have to be spent much.
- The most favorite buildings are wooden. The cost of such a building will be slightly higher, and the foundation will need to be made stronger, in contrast to the frame structure. Built in the country is good wooden bath does not need warming.
- Stone and brick are rarely used to build a bath in the country. This is due to the fact that such a heavy structure needs a strong foundation, and the walls freeze during long absences and such a bath needs to be warmed up for a long time. The exceptions are buildings made of foam and gas blocks. The requirements for the strength of the foundation are not so high, the walls turn out to be warm, but it is important to consider that this building material is very hygroscopic, so it must be protected from moisture.
- Arbolit is also often used in the construction of baths. Walls can be monolithic or built from blocks. The structure is warm, durable and inexpensive.
Wall materials
Since our article deals with several possible options for using various building materials, we will consider them separately.
Frame structure

The walls of such a bath are made in a lattice structure. For the walls of the frame you will need:
- Timber of various sections, the dimensions and quantity of which are indicated in the project.
- Insulating material with high thermal insulation qualities for filling the frame. Again, you need to adhere to the requirements regarding the use of one or another insulating material, but here you need to take into account that the documentation often indicates one type of material, but not all possible ones. If the specified material is too expensive, then you can refer to the forums to clarify what is acceptable in your area.
- Material for sheathing the frame outside and inside. Most often, OSB boards are used for the exterior cladding of a building, edged board, siding or block house, while lining is used from the inside.
wooden bath

For the construction of walls can be used:
- Natural debarked tree.
- Cut beam.
- Profiled bar.
- Glued beam.
- Round log.
Bath made of brick, stone or blocks
The walls of such a bath can be made of the following materials:
- Brick (ceramic or silicate).
- Stone (quarrystone, limestone, shell rock).
- Block (foam, slag, gas blocks).
Arbolite building

If it is possible to purchase sawdust inexpensively (or maybe you have your own), then at home it is quite possible to make wood concrete blocks pretty high quality. Also, this building material in the form of finished blocks is on sale. Walls are built very quickly. Another advantage of using wood concrete is the possibility of manufacturing monolithic walls by pouring cement-shaving mortar into the formwork.
Materials for the ceiling in the bath
The dressing room and the rest room are warm rooms, so it is recommended to use materials with low thermal conductivity - aspen, linden or alder.
For sheathing the ceiling of the steam room, it is preferable to use wooden lining, as it is able to withstand high temperatures. Pine or spruce products should not be used in this room, when heated, resin begins to stand out from this wood. It is also impossible to hem the ceiling with sheets of fiberboard and chipboard, since moisture and high temperature contribute to the release of fumes that can harm human health.
Materials for insulation and vapor barrier
It is advisable to perform external insulation only if the bath is heated. It is unlikely that someone will make such a luxury in the country, so we are considering materials for internal insulation unheated bath.
The frame bath does not need to be insulated, since the thermal insulation is laid inside the structure. AT wooden bath you need to make a crate into which the insulation is inserted. Other types of baths need insulation made using more complex technology.
To perform the work, mineral wool is required, the thickness of which is selected depending on the material used in the construction of the bath and climatic conditions. Usually a layer of at least 50 mm is laid. Insulation can be in the form of mats or in rolls.
As for vapor barrier, it is important to know that this is not waterproofing. Each has its own purpose. Even an inexpensive vapor barrier will do its job, while waterproofing, used for other purposes, can nullify all the work.
What you especially need to pay attention to is not to get a fake.
Decoration Materials
Insofar as we are talking about the bath in the country, we will not talk about chic types of finishes. The best option there will be the use of wood: lining or similar facing materials.
Concerning exterior finish, then it can be any material that is used for sheathing houses. If the bath is made of rounded logs, then it would be unreasonable to close the beautiful facade something else.
Bath construction
Now we will consider how the construction of a bathhouse in the country with our own hands can be done. It is clear that the work will be easier to do with an assistant, which may be one of the family members. At the initial stage of the work, some instructions can be given to children. Of course, they will not do everything and not as quickly as we would like, but if they feel that they are needed, then they will then be more careful about the bathhouse built with their participation.
But let's be realistic, small children will help a little, and if you build it alone, it will be a long-term construction, especially since some work cannot be done alone. As you read this article, you'll see when and how many helpers may be needed - this will help you plan everything.
markup
So, the plan has been chosen, the location has been decided, now let's start marking on the ground. To do this, in accordance with the scale specified in the project, transfer the contour of the bath to the area. In the place where the corner of the building will be, a long peg (or reinforcement) is hammered, and the lengths of two walls located at an angle of 90 ° are measured from it. The next pegs are hammered there, and the distances of other walls are measured from them. Finally, the last - the fourth peg is hammered.
Now, when there is a designated perimeter of the future structure, you need to check how straight the corners turned out. To do this, it is necessary to perform a check along the axes - measure the distance from one peg to another. The received data must match. If this is not the case, then the plane must be shifted, "shortening" the longest axis. After that, it will be necessary to check not only the axes, but also other dimensions, and, if necessary, correct them again.
If the foundation is tape, then a slight discrepancy can be left, but for a pile or column foundation, the marking must be very accurately done.
So we marked the dimensions of the bath in accordance with the design data. Further marking is performed depending on what the foundation will be. More details about this can be found in the table.
|
Foundation type |
Where is it applied and how is markup performed |
|
|
This type of foundation, due to its high cost, is done only in cases where it cannot be dispensed with. Marking is carried out according to the size of the building or a little more when it is necessary that the foundation be wider and longer than the bath. |
|
Tape
|
A very common type of foundation. Relatively inexpensive and durable. The marking is carried out in such a way that the tape filled with concrete passes along the perimeter of the building and under the walls. |
|
Columnar
|
This type of foundation is also often found. It is mainly used for mounting wooden structures on it. Depending on the dimensions of the bath, the marking is carried out according to the number of manufactured supports. |
|
Screw
|
It is believed that this type of foundation is new, but this is an erroneous conclusion based on the fact that it has recently been used in civil engineering. The screw foundation has stood the test of time, as the military has long begun to use it. The advantage of the foundation on screw piles is the speed and simplicity of its installation. The second advantage is that there is no need to carry out earthworks, so the site will remain clean. In addition, it can be used to build a bath even on a site with a significant slope. The marking is done according to the number of piles and no deviation to the side is allowed. |


Weigh all the pros and cons, and then make the final decision regarding the choice of the type of foundation.
Foundation pouring
The manufacture of a shallow strip foundation is acceptable under the following conditions:
- The soil in the area is dry and loose.
- The groundwater level is quite low.
- In winter, frosts are not very strong.
- The buildings are not heavy.
Do not try to guess the type of foundation for a heavy structure. If you are not sure, then invite specialists who, after performing the appropriate checks, will give an accurate answer.
Let's start with a simpler and most commonly used shallow foundation for a bath.
- We have external markings, now we need to make internal ones, taking into account the fact that the width of the foundation must be at least 50 cm, and must protrude 5–10 cm from each side of the building. Therefore, if the bath is 3 × 4 m, then the largest size along the outer perimeter will be 3.2 × 4.2 m.
- It is important to take into account the installation location of the furnace and at the same time make the foundation for it.
- For convenience, in the corners you need to install wooden structures similar to benches. They need to be set in the same plane along the height of the future formwork and a measuring cord should be attached to them. How to do this is shown in the illustration.

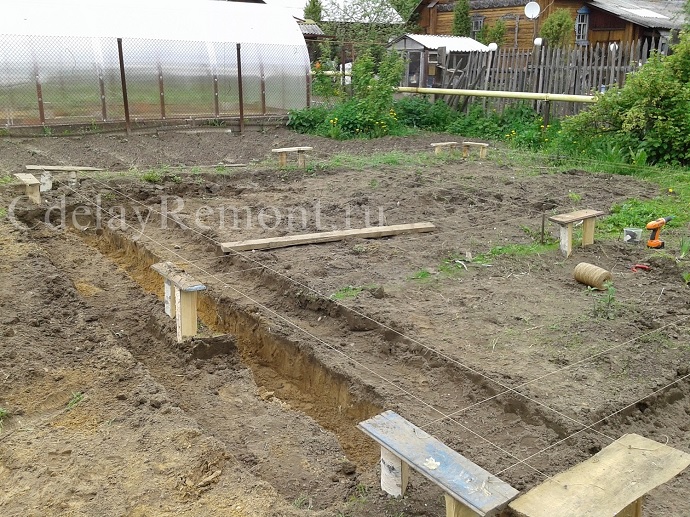
- It is necessary to remove the fertile topsoil and put it aside, then dig a trench, the clay from which can then be used as a backfill.
- As for the depth of the trench, in some cases it can be 35 cm. Much depends on the depth of freezing and the soil itself. It is necessary to dig to a solid clay layer and in no case stop on the ground. Therefore, most often the depth is in the range of 50–60 cm.
- The bottom of the trench must be leveled by checking its horizontal level.
- Now it's time for the sand bed. It is necessary to pour a layer of sand into the trench, at least 15 cm thick, moisten with water and compact well. To do this, it would be more convenient to use a vibrotamper, but it can also be done manually, using a heavy bar with handles nailed to it.
- The next layer is poured with crushed stone of the middle fraction and also carefully rammed.
- Now it's the turn of the formwork, the height of which should reach the stretched cord. It can be made from improvised materials or wood harvested for other purposes, since this temporary structure will be dismantled shortly after pouring the foundation. Finished shields must be installed along the trench and well fixed, otherwise the poured concrete may move them.

- In order not to stain the boards, and so that the concrete does not flow out through the cracks, the formwork is closed from the inside with plastic wrap, which must be fixed with a stapler or thin nails.
- Now you need to make a frame of metal or plastic fittings, fastened with knitting wire.
- The fabricated frame should not reach the edges of 5 cm. It must be carefully lowered into the trench so as not to tear the film protecting the formwork. To raise the frame above the bedding, you need to put pieces of granite under it, since, unlike brick, it will not crumble under the influence of moisture.
- If any communications pass through the foundation, then you need to leave holes for them, which will help the sleeves, as done in the photo above. The same applies to the manufacture of products.
- Plan your time in such a way as to pour the foundation with concrete in a day, since breaks are not allowed here - then the tape will not be monolithic. It is convenient to deliver the concrete with a mixer and pour it directly from it, otherwise it will have to be kneaded in a concrete mixer, on the basis that M400 cement will need 1 bucket, sand - 3, crushed stone (or gravel) - 5 buckets.
- The foundation poured with concrete should be compacted with a vibrator or bayoneted. After shrinkage, you need to add a little concrete and level the site. If a basis is made for wooden house, then in non-cured concrete it is necessary to fix the foundation bolts.
- Not earlier than a week later, you can remove the formwork.
It should be remembered that concrete has not yet gained full strength, so it must be handled with care or wait 28 days, and only then build a bath.
Video: building a foundation for a bath
Wall masonry
When building a bath from blocks, stone or brick, you need to level the foundation with a cement-sand mortar, and lay a roofing material folded in half on it. Masonry starts from the corners. Having installed the first blocks on the cement-sand mortar, you need to make sure that they are in the same plane, and only after that a twine is pulled along the upper outer edge, which serves as a guide for laying a number of building materials.
When laying the next row, the masonry mixture may differ: a wall of brick and shell rock is erected on a cement-sand mortar, while mixtures recommended by the manufacturer are used for laying lightweight blocks.
Having installed the jumpers above the doors and windows, you need to install the formwork on top and make an armored belt, fixing the foundation bolts in it for the subsequent fastening of the Mauerlat board. After the concrete has hardened, it will be possible to proceed with the manufacture of the roof.
The construction of the frame of the bath
The basis of such a bath is a wooden frame, which is insulated and sheathed with various types finishing materials. Need to choose quality materials and observe the sequence of their installation.
For the manufacture of the frame, boards from well-dried larch, aspen or linden will be needed, because this wood has low thermal conductivity. The manufactured shields will be resistant to deformation.
A frame is made on the foundation bottom strapping from a bar 100 × 100 mm. At the ends of the bars, you need to make cuts in half the thickness and fasten them together with self-tapping screws. If 50 × 100 mm bars are used, then the frame can be assembled end-to-end using metal corners. The dimensions of the bar used depend on the type of foundation, design and size of the bath.

- At the next stage, the end strapping board is installed, and the floor logs are attached to it right next to it. A beam of 50 × 100 mm is used.
- On the opposite side, the logs are cut in such a way that a second end strapping board can be installed.
- The logs need to be arranged so that the prepared insulation becomes close between them, then the end strapping boards are nailed.
- The wall frame is assembled from a 50 × 100 mm beam, and then installed in its place, all parts are fastened into a single structure.
To ensure the vapor barrier of the frame bath, you need to use a vapor barrier film, which will avoid the accumulation of moisture inside the frame. As thermal insulation material mineral wool or fiberglass is used. They are able to provide a high level of sealing without disturbing the natural air exchange.
It is preferable to carry out insulation and wall cladding after the installation of the roof. This approach will protect the wood and insulation from getting wet.
Floor

If in the frame bath it remains only to insulate the floor and lay the floorboard, then for other buildings you will have to work harder - you need to install logs, make a subfloor, fix the vapor barrier, lay insulation, perform waterproofing, lay the floorboard, which will have to be changed in a few years. Considering that the dacha in the dacha will not be thoroughly dried due to the lack of time for this, because after the weekend you will need to quickly leave for the city, then if there is such an opportunity, it would be preferable to make a concrete floor and tile it. Wooden shields are laid on it, which can be taken out to dry in a barn and calmly go home.

It is clear that for a frame and other structure installed on a columnar or pile foundation, only a wooden floor with insulation is acceptable. This process is described in more detail in the next two videos.
Video: how to install floor beams, make insulation and provide a drain in the bath
roof construction
Above any bath should be reliable roof, but the options for its creation may be different. In any case, you need to lay waterproofing, and then thermal insulation, think about the type of roof and the choice of a suitable roofing material. Without waterproofing, steam will freely penetrate into the attic, and, settling on beams and rafters, will contribute to their rapid destruction. In addition, formed on roofing material condensate will begin to drain onto the insulation, which will affect the properties and durability of the latter.
The type of terrain has a great influence on the choice of the type of roof, since the technical parameters of the structure must be taken into account.
- So, in a holiday village, especially when it is located among tall trees, you can safely make a high gable roof.
- If the cottage is located in the steppe zone, blown by all the winds, then the slope for the roof must be made minimal.
- With small sizes of baths and minor snow loads, the roof can be made single-pitched. The same roof is most often made in a bathhouse attached to the house.
Video: how to make a bath roof
Interior and exterior decoration
Although wood is most often used for interior decoration, not all wood is suitable for this purpose. It is necessary to choose the right material, especially for a steam room, in which a high temperature is created with high humidity. It should be said right away that pine lumber, as well as fiberboard, chipboard and linoleum, cannot be used to finish this room. Therefore, you need to purchase lining made of larch or linden.
As for other rooms, the conditions there are not so extreme, therefore there are no such high requirements for the material used - what cannot be used in a steam room is perfect for a rest room and dressing room. Pine lining in the dressing room will exude a pleasant aroma and create a feeling of comfort.
Finishing a wooden and brick bath with clapboard is almost the same. First, a crate is attached to the wall, and a lining is already attached to it. An exception is the steam room, in which there should be heat-reflecting foil under the crate.
Exterior decoration is carried out not only to make the bath beautiful, but also to protect it. To finish the bath from the outside, you can use the following materials:
- Imitation of a bar.
- Siding.
- Clapboard.
- Block house.
- Facade tiles.
- Dye.
You have to choose suitable material and decorate the façade.
Ventilation in the bath
Sometimes there is still such an opinion that good ventilation in the steam room is useless, since all the heat comes out through it, and it is made very weak, or it is completely absent. But there is another extreme, when the ventilation process is not controlled, and the heat escapes from the bath. In such a steam room at the top it is very hot, and the legs are cold.
In fact, while taking bath procedures, the air in the room should be updated 2-3 times per hour, but this is not enough, since ventilation must be done correctly. Usually the inlet is located at the bottom near the boiler, and the exhaust is under the ceiling on the opposite side. While the steam room is warming up, the exhaust window is closed. Then it opens and warm air begins to quickly leave the room. As a result, the steam room becomes cool and uncomfortable. You can make ventilation, as in the diagram.

Such a device allows you to keep warm air under the ceiling, and half-cooled air comes out through the hole located below (B), so it will be comfortable in the steam room. When you need to thoroughly ventilate the steam room, the upper air vent(BUT).
In addition to the steam room, ventilation is necessary in every room of the bath. In order not to waste precious heat in vain, it can be done so that it is possible to close the ventilation openings during those hours when there is no need for ventilation.
Furniture
Canopy and all furniture for country bath can be made by yourself. If there is no desire to make something else, then the network has many offers for the sale of everything you need to give.
With a strong desire to save on furniture, you can review old stocks. Maybe there is something that needs to be repaired, but does not get around to it? After a little restoration, such furniture can last a long time. The main requirement is not to use chipboard furniture, as this material will deteriorate very quickly from high humidity.
Scheme


Photo: original baths


If you want to have a good time in the country, then you definitely need a bath. A small do-it-yourself bath built on the site will save both money and square meters if you do not have much free space to build a bath. This article will discuss how to design and how to build a small-sized bath with your own hands.
Determining the size of a small bath

The size of the bath should be determined depending on the number of people who will regularly visit it at one time. If your family consists of 2-4 people, then you can get by budget option this building. In this case, the length of the bath will be 6 m, height - 2 m, and width 2.2 m. Inside there should be four separate rooms. Each of them will perform its function, and have a certain size. So, for example, each room will have a certain size. The width according to the size of the bath is 2.2 m, and the length:
- dressing room 1300 mm;
- rest room -2100 mm;
- shower room -1000 mm;
- steam room -1600 mm.
For the steam room and the shower room, it will be necessary to perform separate calculations for the area, because shelves should be placed in the steam room, and a tray in the shower room.
A small bath should be built in the usual sequence. The construction rules for its construction are no different from those according to which other buildings are being built.
Foundation construction

The construction of each building begins with the construction of the foundation. To determine which foundation to lay as the base of the bath, first determine the quality of the soil on which it will be laid. If the soil is hard enough and dry, then you can build a simplified foundation. To do this, lay out flat stones along the intended perimeter. Next, fill with similar stones inner part foundation. The cracks should be filled with clay and compacted. Lay a layer of wood beams pre-treated with hot bitumen on top. You can, in fact, not use clay. To do this, you can make a waterproofing layer that will cover the laid out stones.
As a rule, a columnar foundation is predominantly chosen for a bath. For these purposes, you can use stone, ready-made concrete pipes, bricks, or asbestos-concrete pipes, the interior of which is filled with concrete.
Another option is to install the bath on wooden, metal or concrete piles. However, in this scenario, you will need to take care of the thermal insulation of the floor.

The strip foundation is the most common and reliable. For its construction, it will be necessary to dig a trench and make a pillow of crushed stone and wet packed sand. After that, the reinforcement should be knitted and poured with concrete mortar. For a waterproofing layer, roofing material can be used.
If the soil is dominated by sand, ground water very high, then to equip the base of the bath should be used reinforced concrete structures block type. For a mini-sized bath, it will be enough to use ten such blocks, the dimensions of which are 20 × 20 × 40 cm.

After the foundation is ready, install the frame of the bath house and erect its walls, then the partitions separating the dressing room. The rest room and shower room should be insulated with a mixture of sawdust and expanded clay. The insulation should be covered with sheets of polystyrene, after which the walls should be sheathed with clapboard. To prevent the penetration of rodents into the bath, broken glass can be added to expanded clay. Before laying the lining, it is necessary to carry out heat and vapor barrier, as well as insulate the walls mineral wool. After that, sheathe them with clapboard.
Walls in the shower room are made of polystyrene or galvanized steel. These materials are more durable than wooden lining, they better tolerate changes in temperature and moisture.
Supply and discharge of water. How to do it right?

If you are equipping a bathhouse for a summer residence, but you do not have pressure water supply, you can organize a gravity water supply. To do this, it is necessary to build a structure that will consist of:
- two galvanized tanks (50 l);
- hose.
Buck with hot water in relation to the cold one, you need to set it half a meter lower. Attach one end of the hose to the bottom of the tank with cold water, and connect the second to the top of the hot water tank. Water circulation will be possible due to the temperature difference in the pipes. To organize the supply of water to the shower, the tanks must be connected with a separate pipe. A mixer is installed at the end of the pipe without fail.
To organize the drainage of water, installation of sewer pipes is carried out, which will drain effluent into a drain pit, previously dug and equipped. For quick gravity descent, the pipes must be laid with a sufficient slope.
Heating system installation

The water in the bath is heated by the stove, which is located in the steam room. In addition, a heater can be used for this, which can be bought at a specialized store.
If you decide to heat the water with a stove, then install a U-shaped pipe at the hottest point of the stove and go around the base of the chimney with it. The water supply must be on the body, and the outlet must be 5 cm above it.
If you decide to use a heating element to heat water, then install it under the cold water tank, connecting it to the system with stainless steel pipes and hoses.
Lighting and ventilation device

In a small bath, ventilation is simply arranged. For this, on the wall opposite front door, make a hole that will be easy to open and close with a damper.
To organize lighting in a small bath, it will be enough to install several halogen lamps with a heat-resistant housing. Use a small transformer to reduce the voltage from 220V to 12V. Now your little bath is ready!
Features of a single outdoor mini-bath

To assemble a bath for one person, you will need to purchase light insulated panels, which are a frame of beams sheathed with thin boards. The standard frame size is 185 × 60 cm. This will require a beam, the cross section of which is 1–1.5 cm and 3 × 6 cm. To insulate the bath and provide vapor barrier, fill the panels with mineral wool or foam. From the inside, the material is sheathed with a special foil made of aluminum and polyethylene film. As for the outside, it is covered with glassine or roofing felt. The panel can be sewn up with clapboard.
In one of the panels, a door should be made, measuring 160 × 60 cm. Install a small window in it, preferably with double glass. The bath must be airtight, door locks at the bottom and at the top ensure this. At the bottom of one of the panels, on the side where the heater will be installed, make a vent with a plug.
To build a single bath, you need to assemble the structure and, most importantly, ensure its thermal and waterproofing.
For the construction of a steam room with an area of 1.8 × 1.3 m, you will need 10 panels on the walls and 2 on the roof. Fill the seams with batting and close them with wooden planks on both sides. To protect the ceiling from atmospheric precipitation, cover it from the street with a triple layer of roofing material. If you use the bath in the warm season and only, then the floor should not be insulated. If you plan to use the bath all year round, fill in the strip foundation and insulate it. To heat the steam room up to 90°C, you can use a closed-type electric stove with a power of 3 kW. Place a metal bucket with stones on the stove and turn it on for several hours. Then proceed to the bath procedures.
Small indoor bath

You can also equip a small steam room in the house, for example, in the bathroom. It is possible to implement this in two ways. In the first case, you will need to install a removable shelf on two bars. From the floor, the height should be no more than one meter. The bars are fixed to the wall with reliable anchors. Above the bath, the height of the shelf should be between 400–600 mm.
To climb the shelf, it will be necessary to make several steps or a ladder, using rubber thrust pads. Tie the ladder to the shelf with twine. The width of the shelf must be 600 mm. Such a steam room is heated by an electric stove. It can be installed on a special stand, for example, above the washbasin. Use a metal basin or bucket as a heater, which should be filled with stones and placed on the stove.
In another option, make a sit-down steam room on the bath. It will be closed with removable wooden shields. The shelf will be used as a seat, and you can lean on strong shields with your feet. To make the room remind you of a bath, sheathe the walls and ceiling above the bathroom with clapboard or install removable shields. They can be installed and removed without much effort. Heating is carried out by an electric stove with a container with hot stones placed on it.
Choose your version of a small bath, plan your actions and get started!
Video
Sauna minimum dimensions built in full size Part 2 \ Sauna is small
A photo


