The path near the house is the most budget option. DIY garden paths (50 photos): laying technique, purpose, types of coatings and materials. paving stone prices
garden paths- part landscape design. They make the summer cottage well-groomed and attractive, facilitate movement around the territory.
In our article, we have collected detailed instructions, photos and videos, how to make tracks with your own hands.
Economy options for tracks in the country with their own hands
For the arrangement of garden paths are used different materials, but there is General requirements to which they correspond:
- Aesthetics
- Security
- Moisture resistance
- maintainability
- All season
- Strength
- Easy Care
Gardeners and summer residents make paths from concrete, wood, natural stone, paving slabs and other materials. See what they look like.
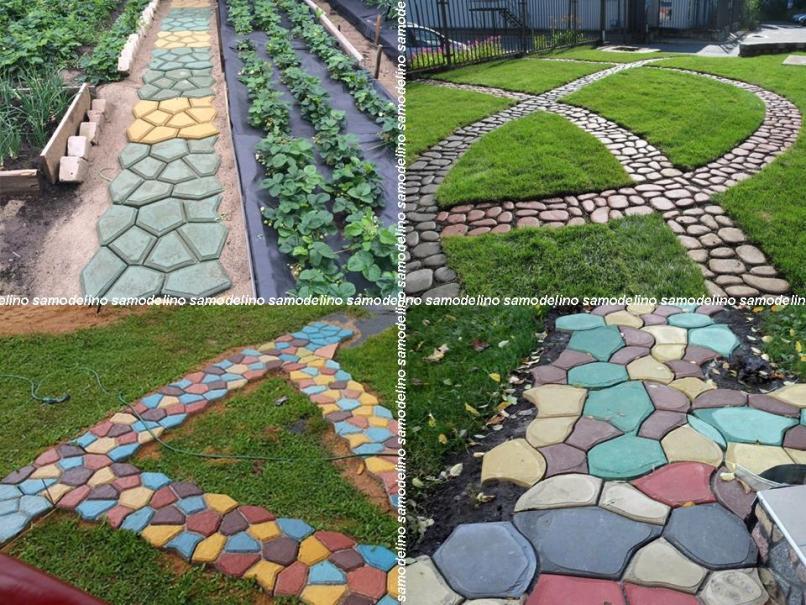
Concrete walkway using ready-made forms

Walkway paved natural stone

wooden garden path

Path of concrete and paving slabs

Walkway made of concrete imitating natural stone

gravel path

Combined stone and gravel garden path

Another option for combining crushed stone, stone and paving slabs

Walkway from paving slabs

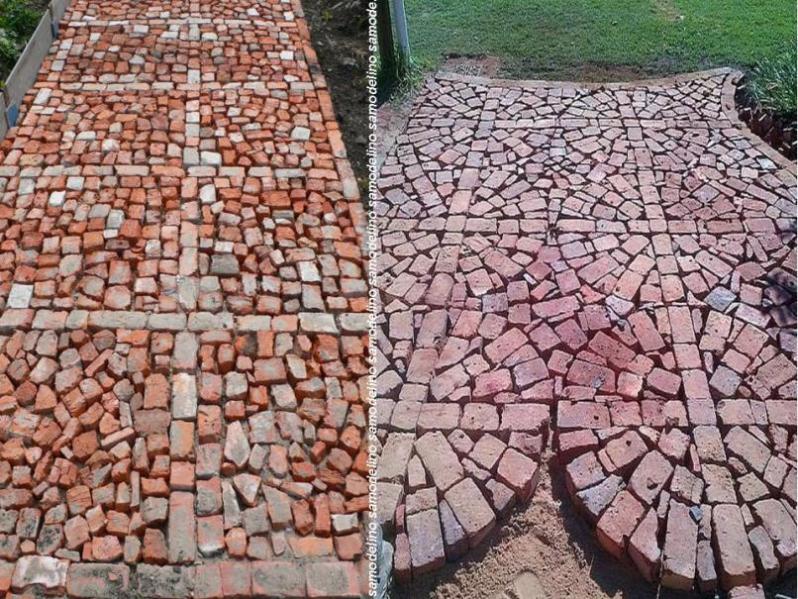
Clinker path

Walkway made of stone

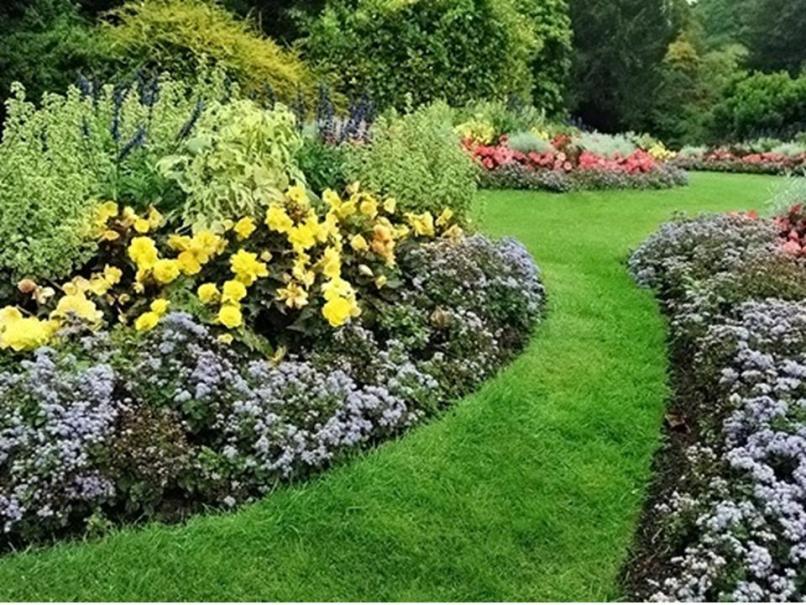
Ideally, garden paths are combined with exterior finish houses and complement the landscape. The material for the tracks is selected taking into account the expected load.
Decorative paths are rarely used for their intended purpose. Bulk materials are suitable for them: gravel, sand, crushed stone.
It is better to move along paths made of durable concrete, brick or paving slabs. Parking for cars is recommended to be paved with concrete, paving stones or stone.
Do-it-yourself concrete paths in the country
Concrete garden paths are practical, durable, and can withstand heavy loads. Rough surface concrete pavement does not slip.
Such paths are equipped in two ways: using formwork or special forms.
Filling with formwork
First, prepare the base: remove the top layer of earth and tamp it down. Then proceed according to the scheme.

Gray concrete looks boring, but there are ways to ennoble it.
In small areas, lay winding paths with smooth turns and bends. This will visually expand the space.

Add pigment to concrete mix to color the track in desired color. Introduce coloring pigments at the stage of preparing the mixture for pouring.

Show your imagination, and gray concrete will turn into an imitation wild stone like the photo below. This requires a sharp knife and a steady hand to cut stone-shaped grooves into the surface when the concrete has already set but not completely hardened.

Pouring into special molds
Plastic molds for pouring concrete are sold in hardware and garden stores.
Prepare the base for the path. To do this, go deep into the ground by 10 cm. Next, tamp the soil and lay a pillow of sand and gravel. If you add crushed stone to the concrete mix, make a sandy base.

Moisten the prepared base with water, and treat the molds for pouring with a special lubricant from the inside.
Then place the molds in a sand bed, press them in so that top part protruded above the ground by 0.5 - 1 cm.

Prepare the concrete mixture, add a plasticizer to it to give the track strength, add a color pigment (optional) and pour it into the molds so that the concrete is evenly distributed over the entire area. Level the top layer with a spatula or trowel.

After 30 - 40 minutes, when the concrete sets, carefully remove the forms, cover the path with a film for 1-2 days. You can walk on the path after 5 days.
The video of the thematic master class will help you
Do-it-yourself tile paths in the country house
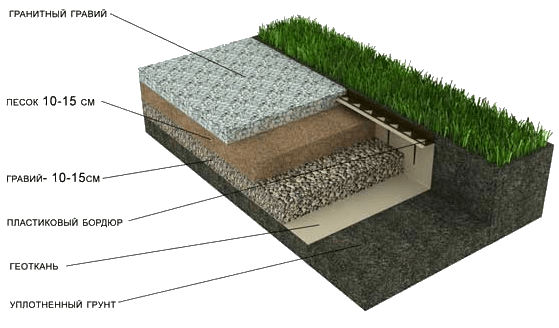
Paving slabs are used for garden paths different design, color and size. It is laid on a prepared base with a sandy substrate, as in the diagram below.

Tiles of 40x40 cm are often used for laying. The large size reduces the time for arranging garden paths. The tile is laid so that the distance between its centers is no more than a step.

The gaps at the docking points are filled with sand, and the edges of the track on both sides are limited by curbs.

The advantage of paving slabs is that it is combined with country houses and dachas of any style, fits into simple and complex landscapes.

Do-it-yourself wooden paths in the country house
Wooden paths in the country look natural, stylish and durable. Garden paths in the country are made from ordinary boards with a thickness of at least 5 cm.
The advantage of such wooden trails is quick installation and neat appearance. Manufacturing begins with the selection of materials and tools. Inexpensive and common lumber - boards from conifers tree. It is better to choose larch, but the cost in this case will be higher.

Wood is processed standard scheme: antiseptic, and then coated with varnish or paint - for further protection. Clear nail polish emphasizes the texture of wood, and colored paint sets accents. Boards are cut into segments of the same length. For paths of complex shape, the length of each plank is selected individually.

The base of the paths made of natural wood, as well as for a wooden path from saw cuts, is made from a sand and gravel cushion. Preparatory work is carried out in the following sequence: marking, pit, geotextile, crushed stone layer, sand layer, tamping.

Then the boards are laid on the base or placed on an elevation - a specially arranged frame. Boards laid in the ground look natural and at ease, but such a wooden path deteriorates faster. The structure on the frame will be stronger and more durable, in a word - capital. Such an idea requires more effort.
Watch the video on how to make wooden garden paths at minimal cost
The arrangement of a garden path made of wooden saw cuts resembles paving stones. Instead of stones, flat wooden dies of the same height are laid. To create a dense path, large saw cuts alternate with stumps of small diameter, free space filled with large branches.
From ordinary stumps or cuts of a tree, pretty winding paths are obtained. Choose the right material, understand the laying techniques, and you will be able to make a garden path from tree cuts with your own hands in the garden or in the country.

Pay attention to the preparation of the tree. Untreated wood will quickly become unusable, and the tree ring path will have to be redone. First, select the type of wood. Suitable:
- pine
- larch
- Birch
The difference between hardwood (larch, beech, oak) and other types is the service life. Larch will last 25 years, pine will be in operation for 5-7 years.

Use dry wood without traces of pests. Dissolve the logs into dice of the same height. Optimal size- 15 cm. For convenience, use a template. If you are doing the harvesting yourself, make sure that the cut is made strictly perpendicular to the log. Sort the sliced \u200b\u200bpancakes by size, remove cracked specimens. Clear the rings from the bark.
Next, process the wood cuts for the paths to protect them from rotting and decay. An elementary method is processing with drying oil. Bring the drying oil to a boil, then dip each stick into the hot oil. The boiling substance seals the pores of the wood and prevents moisture from getting inside - the first enemy. wooden products. Disadvantages of this method: long and dangerous. Hot oil can burn you.
Another option is special formulations. Arm yourself with a brush or spray gun and treat the tree with an antifungal agent. After preventive treatment, let the tree dry.
After preparing the material, proceed to the device of the path. Do not rush to lay the path from the saw cuts of the tree. First, carry out preparatory and excavation work:
- Mark the path in the garden
- Remove the top layer of soil
- Dig a trench
- Arrange waterproofing
- Prepare the base.
Now you can take on the shovels. Don't make the trench deep. Add 10 cm to the height of the dies - this depth will be optimal.
Lay a waterproofing layer in the trench. Some use a film, roofing material, but it is better to take geotextiles in such cases. This material does not allow stagnant water and the germination of weeds.
Pour a 10 cm layer of gravel on the waterproofing - this is a drainage for water drainage. Tamp and cover with 5-10 cm of sand.
Wet the sand to better compact and level the base for the stump garden path. When wet, the sand is rammed by hand.

Wood is laid in a pattern or in random order. The logs are placed on a sand cushion, then they are rammed and leveled. Sand or gravel is poured into the gaps. Mulch, sawdust, pebbles, moss are suitable for seams on top.

Garden paths winding elegantly through the trees add to the yard. refinement and perfection. And it is not necessary to buy for their arrangement paving slabs, hire a designer and builders. You can ennoble the paths in the garden on your own, putting your soul into their creation, and in return get a durable, well-groomed coating that can delight you for many years. We will tell you more about how to make a garden path from a variety of materials with your own hands.
We fill the stencil with the prepared solution , avoiding voids in its corners. Using a small rammer, which we work like a vibrating plate, we try to compact the concrete as much as possible, and then level its surface with a spatula. After the 30-50 minutes required to pre-set the concrete, the mold is carefully removed and set side by side, repeating the process until the finish line.
We begin to gradually fill in the form, do not forget that the concrete should not be very liquid. Pay special attention to the corners, you need to fill them with concrete mortar as much as possible. Since we used a plasticizer and made the solution thick, after 15-20 minutes you can remove the mold. Here is the first plate and ready! Leave to freeze for a day, after which we actively begin to use
To avoid animal prints , hand-made garden paths are covered with plastic wrap and wait at least 3-4 days before taking a new path and taking a photo as a keepsake. The full load on the concrete product can be given no earlier than after 20 days.

The last step in the construction of garden paths do-it-yourself at low cost is painting and backfilling tile joints with river sand.
There are several ways to paint a new path.
- The first is to add a dye at the final stage of concrete preparation. . After that, you can mix the concrete lightly, achieving an uneven color, or mix the components thoroughly to obtain a uniform color.
- The second method requires sprinkling a wet concrete surface with a dry dye each time after demoulding. , however, in this case, only the topmost layer will be painted, which will be erased over time. Garden paths with spots wiped off just after such a coloring can often be seen in the photo on the net.

DIY tracks video tutorial
Garden paths painted with their own hands look very interesting. dye dissolved in soil deep penetration , which allows you to achieve similarity with natural stone at low cost. Stone effect tiles painted in various colors will look especially impressive in your garden. And the last tip: after painting, do not forget to treat the surface of the path with a water repellent - it will not allow moisture to penetrate into the pores of concrete, destroying it from the inside.
We fill the concrete path with our own hands
Easy to manufacture, durable and outwardly attractive are monolithic concrete paths laid along summer cottage. Read on to learn how to make garden paths out of concrete.
Marking the future path , hammering pegs along its edges and pulling a cord between them at the required height. We take into account that optimum thickness fill is from 7 to 10 cm.

Preparing the sand bed . To do this, we dig a trench up to 20 cm deep, level its bottom, install beacons and lay geotextiles, also covering the slopes of the trench with this material. After that, we fill the hole with 2-3 layers of sand with intermediate pouring and tamping of each layer. It is possible to pour a layer of fine gravel between two adjacent layers of sand. This will enhance the drainage properties of the pillow.
Laying of agrofibre Sand cushion installation Sand cushion leveling
Preparing concrete . You can use the recipe from the instructions for filling forms. If you need a sidewalk path of increased strength, for example, for driving or parking a car in a country house, then take 1 part of cement (not lower than grade 400), 1.5 parts of sand and 2.5-3 parts of crushed stone or gravel. The ideal volume ratio is considered to be 1 part water to 3 parts cement, but a little more is added to increase the plasticity of the liquid. Do not forget that the less water there is in the solution, the stronger the concrete coating will be.

Formwork is used for garden paths from wooden planks not less than 20 mm thick. It is better if the width of the boards is equal to the thickness of the fill, otherwise you will have to dig them into the ground. Boards need to be nailed to the inside of the pegs.

Place dividers at regular intervals in order to create expansion joints. When making a track in the country, dividers can be used from improvised material. For these purposes, flat, narrow strips of drywall, glass, thin boards, trimmings of laminate, siding, etc. are suitable. In order to remove the separators after the concrete has set, they must be lubricated with any suitable lubricant.

We carry out reinforcement of the structure to increase its strength. As a reinforcing mesh, a chain-link mesh, cuttings of reinforcement, pipes, etc. are used. Of course, it is best to use a welded reinforcing belt made of rods with a diameter of up to 8 mm, with a cell of 100x100 mm. The reinforcement is set at half the height of the track, using fragments of bricks or clamps from the same rods.

Garden paths are poured up to the top edge of the formwork . Next, using a rammer, we compact the surface until cement milk appears on the surface of the path, and then level it using the rule. Next, we cover the path with plastic wrap and wait at least 5 days before removing the formwork. The full load on concrete can be given no earlier than after 3 weeks.
Decorate the path possible in several ways.
- Firstly, the surface can be painted or lined with marble or ceramic tiles.
- Secondly, you can apply a pattern to it with a figured spatula, screwdriver or coarse brush.
- Thirdly, you can paint the concrete itself at the stage of preparation.
- Fourthly, gravel or pebbles can be pressed into the wet layer, laying out intricate patterns.
In a word, a concrete garden path can be original and attractive, as on numerous videos of popular Internet resources.

DIY paving slab garden path
If you plan to equip garden paths with your own hands at low cost, then this method will not work for you. Paving slabs cannot be called cheap material. On the other hand, such tracks have a lot of advantages and are practically devoid of disadvantages. Watch the video in which such a garden path is laid with your own hands. Not so difficult, right? At first glance, this is what it is. In fact, in order for the pavement laid in the country to please the eye for a long time, careful preparation of the base and maximum accuracy and accuracy in work are necessary. So, how to make a path from paving slabs with your own hands:
- Choosing a tile . At the same time, we focus not only on design, but also on its operational features. For example, for a tile on which it is planned to drive a car, the ability to withstand increased loads is important.
- We stock up on tools . For work we need: a trowel, a rubber mallet, a rammer, a level, a cord, pegs, a pipe or an I-beam, sand and cement.

- Marking future tracks . To do this, we hammer in the pegs and pull the cord at the required height.

- We prepare the base . The successful operation of the track throughout the entire service life will depend on this work, so we approach this stage most responsibly. To do this, we level the base as accurately as possible, removing part of the soil on the hills and pouring it in the lowlands. In the process of work, we constantly compact the soil, wetting its surface with water.
We calculate the depth of the base from the calculation of the height of the tile plus the height of the sand layer. To the resulting value, add a couple of centimeters for shrinkage. As a rule, the depth is 20-30cm. Don't forget to create necessary slopes to drain water from the surface.
- After leveling the base, lay the geotextile . It will prevent weeds from growing into the tile joints.
- Pour a sand cushion , spill it with water and ram. After that, we level its surface with a profile, relying on pipes or beams installed at the required distance from each other.

- We prepare the mixture from 1 part of cement and 3 parts of sand, which we lay out on the base and perform a screed using an I-beam or channel.
- We start laying tiles from the curb in the direction "away from you" . We lay out the initial row clearly along the cord, installed along the chamfer. In this case, you can use 1-2mm crosses to form seams of the same thickness. To ensure the required height, sand is poured or removed with a trowel, ramming it in the process. At the same time, do not forget to constantly monitor the quality of laying with the help of a level and a mallet. If it is necessary to dock the tile to other buildings, then, if necessary, it can be cut with a grinder with an established circle for working on stone.
- After being laid the last row, we fill the seams with a sand-cement mixture and fill them with water.
Border installed around the edges pavement, will prevent the displacement of tiles and preserve the integrity of the structure. During operation, sand from the seams can be washed out with water, so it will be necessary to periodically add it.
wooden garden path
Many summer residents think about how to make garden paths out of wood, because this inexpensive and available material always at hand. In addition, you can use not only the classic version in the form of installed saw cuts, but also install beautiful and functional paths in the country, for example, from such improvised material as euro pallets.

The material for saw cuts can be both a purchased log house and fallen trees from a grove, which is located next to the site. A chainsaw will help to make wooden garden paths at low cost, which is not necessary to buy if you can ask a friend for help.
To arrange the track, follow the instructions below:
- We mark the place for the path and dig a trench 10-20 cm deep.
- We lay waterproofing, taking into account the overlap of not only the bottom, but also the slopes.
- As a drainage, we fill the bottom of the trench with rubble.
- We pour a 10 cm layer of sand as a pillow under the cuts.
- We install saw cuts, alternating thick logs with thin branches to maximize the filling of space.
- We fill the gaps between saw cuts with sand.
You can install saw cuts in such a way that their upper part will rise 3-5 cm above the surface. A path of this type will be much less polluted in slush and rain.
In the video, you can often see how great a garden path made of wooden planks looks. But such material as euro pallets is excellent for our purposes, and the cost of such material includes only its delivery to the site. At the same time, pallets are made from durable wood, which, when treated with antiseptics, can last a long time.
To prepare the boards, they are cut into segments of 50 cm, polished, processed protective agent and painted or varnished. The flooring itself is performed according to the following algorithm:
- Logs are arranged from wooden bars, which are fastened together with the same bars, using knitting “in half a tree”.
- Cover construction bituminous mastic, which will protect the frame from decay. The same mastic covers the bottom of the boards.
- Boards are laid, leaving a gap of 10-20 mm between them for water flow.
- Additionally, cover the track with varnish or paint.
When hammering nails, try to sink their hats into the wood as deeply as possible. This will allow you to walk barefoot along the path without fear of injury.
Prices for molds and materials
Everything you need for arranging garden paths can be found in the relevant sections of the Leroy Merlin store. "Garden paths" and other sections of the catalog have hundreds of positions necessary tools and materials. At the same time, it is impossible not to note the rather democratic prices.
So, the cost of a form for a garden path in Leroy is 507 rubles, which, you see, is quite inexpensive, given its reusable use. A concrete mixer, of course, will cost you more - a 120-liter unit has a price of 5690 rubles, but it will greatly facilitate concrete work.

Dyes for concrete
Dyes for concrete start at 603 rubles. for a 700 g jar, while plasticizers can be bought for a minimum price of 149 rubles. for a container weighing 600 g. Store consultants will be able to answer questions about how to make paths in the country with your own hands or tell you about the features of using certain materials. The form for the garden path, bought in Leroy Merlin, will allow you to save quite a significant amount when arranging paths in your garden.
If you have not yet decided how to make a path in the country, look at the gallery of photos located on our website. Interesting solutions using various ways arranging garden paths will help you choose the most best option, make the necessary changes to it and create your own unique design. And, maybe, soon the photo of your site will appear in the first lines of search results.

Having a personal plot, you immediately want to equip it, ennoble it. And then plant, and this ... Fantasy is in full swing, and there are so many ways to realize your plans! We just need to understand what exactly we want and HOW to do it? And you don’t need to immediately rush in search of a newfangled designer, calm down, you can arrange everything YOURSELF! And our site will help you make the right choice.
What can give each garden a special individuality, exclusivity? Of course, garden paths!
There is a great many different types garden paths that can be done at low cost. And there is nothing complicated in their manufacture, and the savings are obvious. Having done everything with your own hands, you will save on the services of a designer, and by correctly “seeing” and selecting materials from those already available on the site, you will also reduce these costs to zero.
Most Popular country paths from improvised materials that you can easily make with your own hands, we will now take a closer look at:

- Here's everything you need to get started:
- Gravel (pebbles, expanded clay), at the rate of 1 ton per 15 m ^ 2;
- Dense film or geotextile;
- Sand;
- Boards made of wood or concrete on both sides of the track.
- Mark your future path on personal plot, draw all its turns and bends (if any);
- On both sides of the future path, dig in the sides of wooden blocks, or concrete strips;
- Remove the top layer of turf along the entire path by 15-20 cm;
- Take a geotextile or a dense film and lay it along the entire path, while trying to put the edges under the sides of the path;
- Sprinkle the cleaned place with sand for 5 cm;
- Carefully level the sandy surface;
- All preparatory work is completed, now you can finally start filling the prepared space of the path with gravel;

- That's all the difficulty when doing a gravel path!
Related video: the secret to a quality gravel path
Tracks from natural stone are considered the strongest and most durable. However, to make them, you will need to purchase natural stone, if one is not available in your area.
- Prepare the following materials:
- Booth or chipped cobblestone;
- Sand;
- Sand compacting tool.
Stages of laying a stone path:
Work should begin with marking the future path, after which the turf should be removed from the place along which the path will be laid. Moreover, the largest of the stones you prepared will indicate the depth to you (dig 5-10 cm more than the largest stone);

Then you should fill the entire path with sand and evenly level it, the height of the sand embankment should be about 10 cm;
Lay the stones on the sand, pressing them well into the sand. For large stones, the distance between the stones can be up to 8 cm, subsequently it is covered with earth and, for beauty, can be sown with grass. For a small stone, a distance of 2-3 cm will be sufficient. Such seams are subsequently sealed with a cement mortar;
The stone path is ready! Do you have installation difficulties?
Do-it-yourself concrete garden paths
For concreting garden paths, modern manufacturers have come up with a special plastic frame. With this device, your concrete garden path with their own hands will appear in the garden very quickly and will not require any extra time or delivery of the stone. What materials are needed for garden paths - sand, fine gravel or small gravel, cement, water.
Related video: Concrete garden path, mold for making
- We prepare the path in almost the same way as the gravel one, only the trench under the path should be dug 20 cm wider than your finished path will be.

- We take out the excess soil and tamp everything down well;
- Fix the formwork with pegs along the entire path on both sides;

- Attach transverse rails to the formwork every 2.5-3 m. This will help protect the concrete from cracking during operation;
Apply the form to the prepared sections of the track and proceed to fill the form with cement mortar. At the same time, it is very important to ensure that the entire form is filled with cement evenly and that there are no voids anywhere. If you still haven’t noticed the void that has formed somewhere - don’t worry, apply the form again and fill it with cement - everything will be fixed;

Thoroughly compact the concrete with a heavy flat object, possibly a board;
Move from one section of the track to another. At the same time, cover the finished one with polyethylene - so as not to inspire debris on the freshly prepared and not yet completely cured concrete;

Fill in the space between cement tiles earth and sow them herbaceous plants- should be very nice!
The remaining spaces around the path (remember, we dug a trench bigger size than you need), you can overlay with bricks, cover with earth or small pebbles.
Related video: We concrete the garden path with our own hands
An excellent and very popular material for your garden path can be an ordinary tree. Thanks to the variety of colors and textures of wood, you can get a unique and very beautiful path!

Those who have their own dacha or garden know how important it is to equip them well so that rest or stay in the countryside after a dusty and bustling city is as pleasant as possible. Ennobling landscaping has become more important than simply growing vegetables in a vegetable garden.
Now every owner strives to give his garden or cottage a special personality and style. One of the main details of this style are garden paths, because the whole look of your site can depend on their design and appearance.
How to make paths in the country, but such that all the neighbors gasp with surprise and delight? Of course, you can invite a designer or hire specialists who will professionally decorate the site for you, but this will cost you quite a lot. There is another option - to design and make paths in the country with your own hands. Moreover, absolutely any materials can be suitable for this.
What to choose and how to turn the idea into reality?
First you need to figure out what country paths are in general and what they can be made of. You will have a very large choice, because there are a huge number of options for their manufacture and design, in addition, they are all very diverse and original and beautiful in their own way, so if you wish, you can find an idea to your taste and to your wallet.
Why do we need tracks at the dacha or garden plot? Many will answer that their main function is to provide the opportunity to move around this very site. Indeed, paths or paths should provide comfortable movement, connecting all the main objects or buildings of your dacha. However, in addition to this, ideally they need to perform other tasks:
- provide comfortable walking (especially if there is clay soil or a lowland around, where water accumulates all the time);
- divide the site into peculiar zones or sectors (flower beds, garden, vegetable garden, recreation areas, etc.);
- decorate and create a certain style, uniting everything around into a single harmonious ensemble.
So, we figured out the purpose of the garden alleys, now you need to understand what paths you can make in the country with your own hands. The main classification is based on the choice of material that you use to make the paths, and on the way they are constructed (there are also differences in size and location - straight, winding, etc.).
- The most spectacular and expensive paths, of course, will be made of natural stone. A big and undoubted advantage of this option is the durability of your product. However, even here you can save money by not buying a stone on purpose, but by using, for example, the remnants of building cladding. However, it is necessary to be able to handle such material. This also includes paving slabs or paving stones and bricks. If you chose the latter as the material, then find a special paving brick, since ordinary white and red bricks may not be resistant to moisture and temperature extremes. With a brick, you can lay out any designs and patterns in your alleys, folding it like a mosaic. Just designate in advance in the diagram the ornament that you want to get as a result.

- Wood is the second most popular material after stone. Wooden alleys look no less beautiful and stylish, especially since a do-it-yourself garden path made of wood can be obtained at much lower cost and effort. You can also use wooden blocks, and saw cuts, and boards, and chocks - in a word, any derivatives that are easy to get. The main thing is to show a little imagination and try to do something special. However, the tree will require some care, so for durability and beautiful view your wooden paths, learn how to properly care for them.
- You can pave the paths in the country with your own hands from gravel, pebbles, crushed stone or marble chips, pouring them into a specially prepared base and reinforcing them on the sides with a border tape made of bricks or tiles. Gravel can be multi-colored - then you will be able to make original patterns. The soil in a dug trench will need to be pre-treated before backfilling (usually herbicides are used), and then covered with agrofiber or polyethylene. So you protect the alley from the germination of weeds. At the end, you need to compact the gravel (you can use a portable roller or other device).
- The easiest way is to pour concrete paths. Moreover, on top you can lay at least a tile, even a stone, even a paving stone. And now on sale in hardware stores you can find plastic molds with which you can easily make various concrete elements and create unique and beautiful paths.
- In addition to the basic materials, you can use any improvised means for arranging tracks: pieces of old tiles, glass bottles, caps, corks, old tires, etc.

As you can see, you can easily and quickly equip garden paths with your own hands at low cost. Materials can be combined with each other, the main thing is that they fit the general style of the site and the house, fitting into their ensemble and complementing it.
Be sure to think in advance and draw up a plan-scheme of how the alleys will be located on the site, because their network must be built so that they unite all the main zones and buildings. Do not be afraid to combine different shapes and directions - let straight and curved paths side by side, wide and narrow, etc.
Getting Started: A Quick Look at the Basic Ways to Make Tracks
An important part of creating routes for movement around the site will be preparatory stage. First of all, you will need to properly markup. If a straight path is planned, then a rope stretched on pegs is also suitable. And to mark a winding alley, you can drive long nails along the edges of an ordinary rake and drag them where you want to see the path.

If the climate in your area is rainy, then you need to take care of drainage system, and also provide for drains along the edges of the tracks so that stagnation of water does not form. Keep in mind that large trees should not grow near the alleys themselves, because their roots will spoil the integrity and appearance of any roads.
- The device of all tracks begins with markings. Then comes the digging of a trench and the preparation of the soil for laying out the material. The depth and width of the trench depends on the type and parameters of the selected materials. The next step is to form a sand bed or pillow. Backfilling is especially important for areas with loose earth, as well as for paths on which you foresee a large operational load, for example, for a platform for a car.
- To line an alley with brick, stone, or tile, fill the trenches with gravel or pebbles, tamp them down, and then make another layer of sand. It is this top layer that will need to be well leveled. The depth of the trench for stone is about twenty centimeters (often it will be the same for paving stones or bricks). Crushed stone or gravel should be poured with a layer of ten centimeters, plus ten centimeters of sand. Then lay the material on this pillow, following the direction and shape of the desired track. Tap bricks or tiles with a rubber mallet to set them down to the correct level. Fill the void between the stones with sand, and then thoroughly water everything.
- You can make tiles of any shape yourself using a plastic frame. To do this, you only need to fill them with concrete, compact the mass in the form, and then remove it. From such tiles, when they dry, you can lay out an alley, and then fill the gaps between them with multi-colored filler or sow them with herbaceous plants.

- If you want to make a path from saw cuts, then you will need to cut a lot of stumps of various shapes (the large ones will go to laying the main part of the alley, and the small ones will fill the voids between them). A trench for wooden cuts does not need to be too deep. Fill its bottom with sand and tamp, and then lay out the stumps there. You can level the chocks with a sledgehammer and focusing on the level. You can also fill in gravel, soil or sand between them, and then sow flowers or grass if you want. If nothing should grow on your path, then lay polyethylene on the bottom of the trench, as is the case with a gravel path. Be sure to prepare the cuts - they must be well dried and treated with hot drying oil over the entire surface (you can process the sections with a ten percent solution of copper sulfate, and the side that will be in contact with the ground - with bitumen).
- Gravel and planks go very well together. Boards can be large and small, located next to each other or at some distance from each other, you can lay them in a crossbar or length, lay them out in a parquet way, paint - in a word, do whatever your heart desires. Please note that raising the planks a little above the ground will help you circulate air underneath them, which will extend their lifespan. Like saw cuts, boards also need to be treated with antiseptic and protective agents.
It is unnecessary to prove the need for arranging paths in the country: without them, in bad weather, you can neither pass nor drive. Of course, I want them to be both reliable and beautiful. It is clear that the paths in the country serve us for a limited time, and use them a small amount of of people.
In such a situation, it makes no sense to spend significant funds on garden paths.
Techniques for arranging inexpensive paths
The total length of the paths in the country can reach hundreds of meters. Simple calculations show that a lot of materials are required for their arrangement. Consider a few tricks that will help you decide what tracks can be made cheaply from:
- use as few materials as possible;
- apply the most budgetary components;
- use improvised means;
- do-it-yourself track elements;
- use local materials;
- use economical options and technologies.
We make budget trails on our own

If we talk about standard options, then the most inexpensive garden paths are obtained from local bulk materials: crushed stone, pebbles, sand and gravel. If the path in the garden of bulk material is properly arranged, it will turn out not only cheap, but also beautiful.

Cement-based paths will cost a little more than bulk ones. An economical option can be obtained by equipping a cover with a width of only 60cm. To reduce costs, broken bricks and local rubble stone can be used instead of crushed stone for concrete preparation.
The method of execution is very interesting. In this case, it is possible to make budgetary and at the same time beautiful coatings. Note that the construction of a track of this kind requires a lot of time.

Of course, graceful and durable paths in the garden can be made using natural stone. In this case, in order to make paving inexpensively, thin layers of material should be used.

A great option is to use bulk material in combination with natural stone, concrete, brick and wood. In this way, you can make a cheap and original coating. Of course, you will have to work hard with your own hands to implement a non-standard solution. In this case, you can use the technology of manufacturing bulk tracks.

Another way to reduce the cost of coating is not to make it solid, whether it be concrete, stone or tile. The option is quite acceptable for those places where they do not go very often - a lawn, a flower garden, paths between the beds.
We use improvised materials for paths in the garden
A cardinal way to reduce the cost of pedestrian pavement is to use the available material at hand. At the same time, it is quite easy to ensure the exclusivity of the path, and if you try, the durability and quality of the pedestrian pavement in the garden will not suffer either. You just need to carefully look at what material is available and get acquainted with possible solutions.
Budget paths made of wood, bark and grass

If you have an old withered tree at your disposal, you can make a beautiful path out of it. Unsuitable pallets can be dismantled and a covering made of planks can be built.
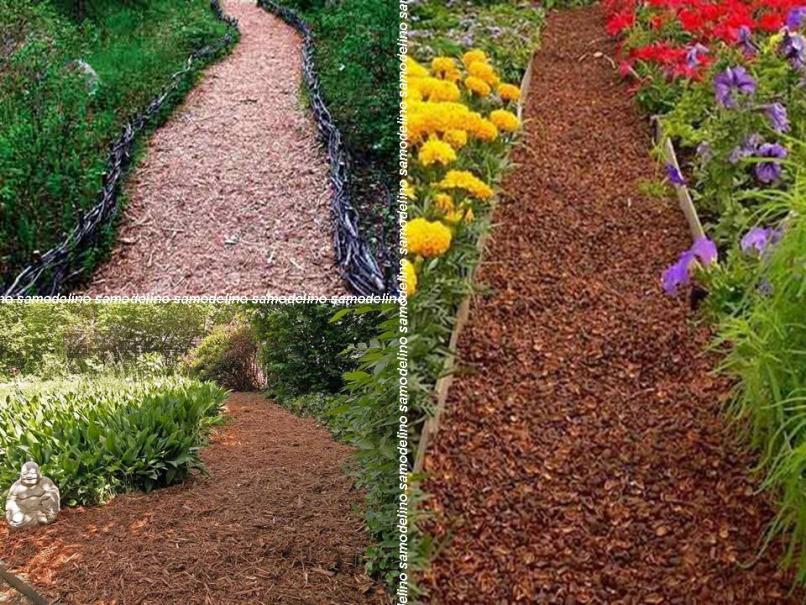
More than one season, a budget path made of bark, poured on flat and compacted ground, will last. The coating will be more stable if you first prepare a trench 10 cm deep for it and fill it with sand. Next to the trail, a miniature wattle fence made of branches will organically look.
The living path made of grass looks attractive, and it is quite inexpensive. It is pleasant to walk barefoot on the lawn, but if you do it too often, it will quickly lose its charming look. It is better to plant the green path with ryegasse or bluegrass. You can buy packaged seeds for sports turf. The grass should be cut, watered, fertilized.
Inexpensive and reliable tracks made of tires and asphalt waste

When repairing asphalt roads, the old coating is often cut off. The resulting crumb is inexpensive and will last a long time in the yard. The material is poured in an even layer on a flat and compacted ground. Then it is heated until softened with a blowtorch and rammed. The crumb is fastened, and a reliable coating is obtained. Of course, it is better to equip the curb near the path.

The most inexpensive garden paths can be made from car tires. The resistance of tires to moisture, sun and frost is beyond doubt. The coating does not become slippery during rain.
From the tire of a passenger car, a strip with a length of a strand of 2 meters is obtained. This means that to cover a width of about 60 cm and a length of 2 m, three old tires will be required. We stock up on the necessary number of tires and act according to the following plan:
- We level and ram the surface of the soil under the future path.
- Cut off the sidewalls of the tires with a jigsaw.
- We cut the tire tread across every 30-40 cm. It is better to use a grinder, since the jigsaw cuts the wire cord of the tire with difficulty.
- We prepare U-shaped staples measuring 50X25mm from wire. Best Option– galvanized wire with a diameter of 3 mm, PVC coated, which can be cut from a suitable mesh.
- We put adjacent fragments of the coating on the board and drill holes in the tread with a diameter of 4 mm for staples. They are placed 25mm from the edges of the rubber opposite each other.
- We insert the staples into the holes and bend from the back.
- We collect the track of the required length and put it in place. Elements of the canvas can be painted in different colors.
Economy version of paths from bottles, plastic corks and broken tiles

Plastic and glass bottles are free materials for arranging paths. This type of coverage has the following features:
- beverage containers are not afraid of frost, sun, moisture and serve for a long time;
- protrusions on the bottom of the bottles provide a massage for the feet;
- the track has an original look;
- when it rains, the surface becomes slippery.
A track made of plastic and glass bottles can be built as follows:
- At the site of the coating, they dig a trench a little deeper than the height of the bottles.
- The bottom of the groove is leveled and covered with a layer of sand 5-10 cm.
- Plastic bottles are filled with sand or gravel.
- The container is installed upside down at the bottom of the trench. A board is laid on top, which is tapped with a hammer to level the canvas from the bottles.
- A mixture of cement and dry sand is prepared in a ratio of 1:6. The composition is poured into the gaps between the bottles until completely filled.
- The path is moistened with a garden watering can.
As follows from the photo, glass bottles can also be used to equip a curb for the track. To mount such a fence, a groove is dug under it, sand is poured and rammed. Bottles are displayed on cement mortar prepared in a ratio of 1:3.
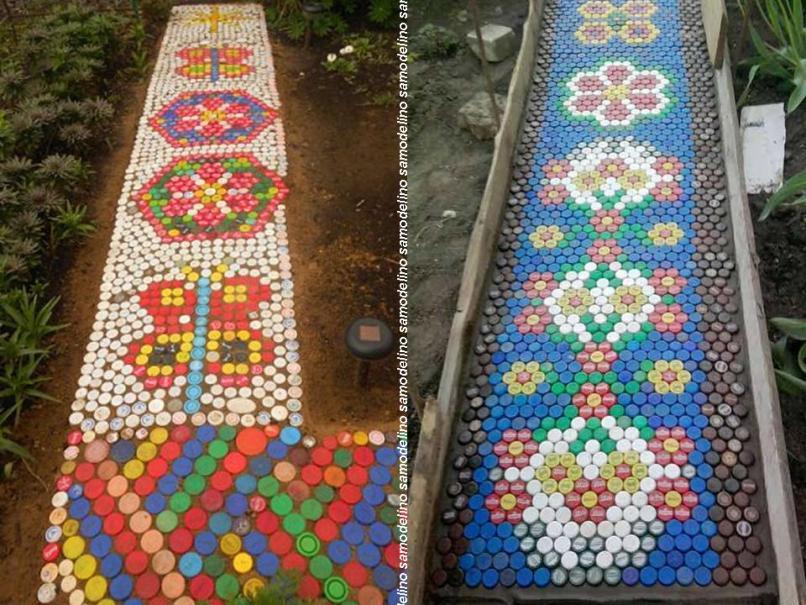
The colorful canvas of the track can be equipped with covers made of plastic bottles. Cork paths do not fade and are not afraid of the influence of the atmosphere. However, when it rains, the covers can become slippery.
The corks are placed in a hardening mortar of the cement track. Then the coating is leveled by tapping on the board laid on the coating. To simplify installation, fragments of the mosaic of corks can be pre-fastened with fishing line through the holes in the sidewalls of the covers.

Homemade cement-based country paths are easy to decorate with broken tile mosaics. Such material is enough after completion construction works. Fight tiles can also be purchased very cheaply from the respective store.
It is more convenient to use tiles of approximately the same thickness.
In the simplest case, to obtain a mosaic, pieces of broken tiles are pressed into a hardening solution and leveled by tapping on a board laid on top. To equip a beautiful and large canvas, do-it-yourself mosaic tiles are laid according to the following scheme:

We examined examples and methods for arranging inexpensive, convenient and beautiful paths on the site. In most cases, they need to provide