Installation of plastic windows in a private house. How to insert a plastic window to the video itself. How is the preparation of the opening
Plastic windows are increasingly being installed by owners country houses because they have many advantages over wooden products. Also, they are reasonably priced. But before you install, you need to carefully prepare for such work. To do everything yourself, you need to know the features of performing all operations.
All plastic products are equipped with parts for installation, so with proper preparation, you can install the window without outside help. It is necessary to perform all actions very carefully so as not to damage the structure. In order to fix the windows in the opening more accurately, it is worth working with an assistant. In some cases, before carrying out work, it is necessary to strengthen the opening.

Materials required for work
Before starting the installation, you need to prepare the following materials:
- wedges inserted for the correct location of windows;
- mounting foam;
- sealant;
- hydrovapor barrier material necessary to protect the joints from moisture;
- anchor bolts.
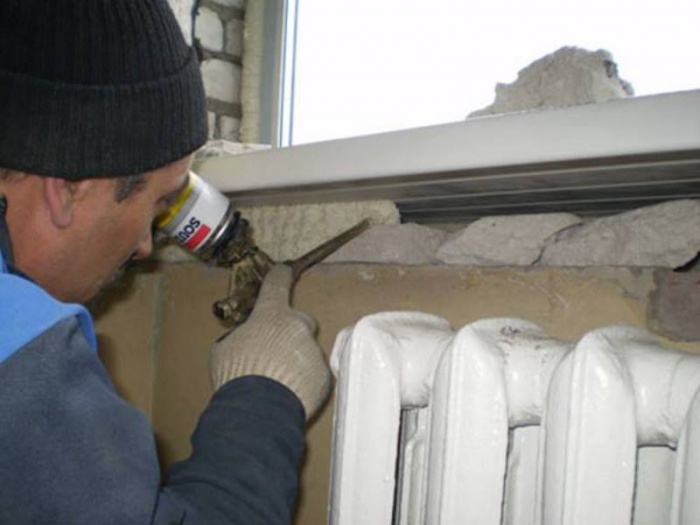
Wedges are used during the installation process for a more precise installation of the plastic profile. Without these materials, it is much more difficult to follow. Mounting foam is an insulating material that fills the space between the wall and the frame. When choosing a foam, it must be borne in mind that it must correspond to the temperature at which the work will be carried out. If you purchase material intended for use in summer time, its use in winter can lead to the creation of a poor-quality insulating layer.

Also during the work you will need a self-expanding sealing tape. This material is glued around the perimeter of the window from the outside, after which it expands. Sealant is used to fill the space between the slopes and the window sill.
How to determine the correct position of the plastic window
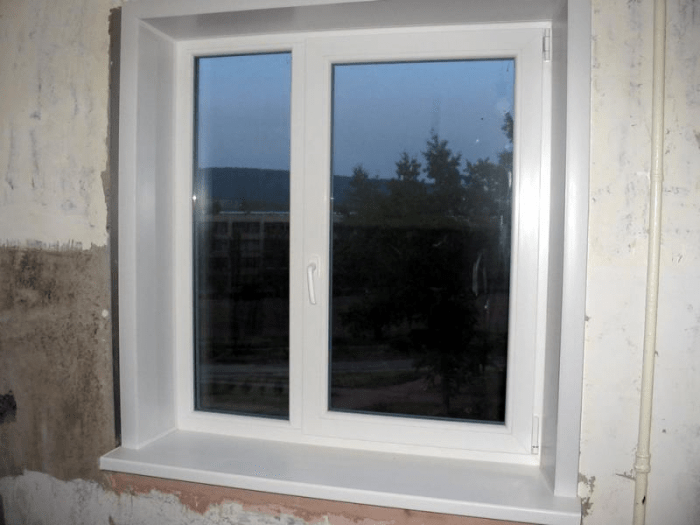
Before carrying out installation work, it is important to correctly determine the position of the frame in relation to the wall thickness. The plastic window should go inside about a third from the street side. This rule is not mandatory, but when shifting the window in any direction relative to the specified distance, it should be borne in mind that the length of the ebbs and window sills must correspond to the project.
It is important to consider the size of the radiator and its position. The window sill should not overlap it by more than ½ of the width. If the radiator is completely shut off, this may adversely affect the room temperature in winter time, as well as on the window state. If installed incorrectly, plastic windows usually begin to fog up.
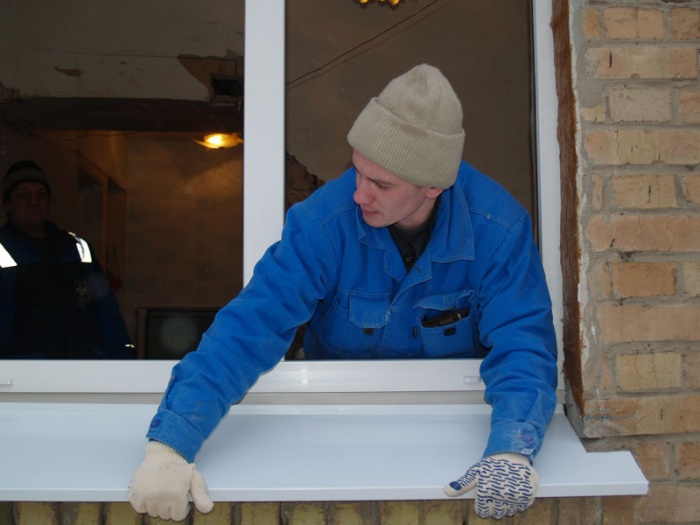
The length of the window sill should be approximately 15 cm longer than the window opening. Thanks to this, it is possible to process the edges of the window sill during the finishing of the slopes. Side plugs are included with the window sill, which should also be fixed after installing the window.
Methods for fixing plastic windows
The choice of a particular fixing method depends on parameters such as the size of the window opening and the material of the walls. This should also be taken into account when choosing fasteners for a plastic structure.
Fixing plastic windows can be done in several ways:
- With dowels or anchor bolts. They are fixed in pre-created holes in the wall.
- Serrated plates that are outside the window profile. They are mounted on a spacer and fixed with self-tapping screws.
The first described method is considered more reliable. That is why, with the help of dowels, plastic structures are fixed, which have big sizes. The fastener passing through the window block is more reliable and able to withstand impacts.
If you decide to install a plastic window that is small in size, they can be fixed using anchor plates. These fasteners can be hidden by slopes and finishing materials. But before carrying out the work, small recesses should be prepared for them. This will avoid plane alignment problems.
It is worth noting that when installing plastic windows, professionals combine these methods. In this case, anchor bolts are used to secure the base of the profile and its vertical parts. The upper part is fixed with plates.
Basic rules for installing plastic windows
To properly install windows, you should follow a few basic rules:
- Installation of plastic double-glazed windows should be carried out when using polyurethane foam. This material allows you to give the structure additional rigidity. It also acts as a fixative and heat insulator.
- To protect the space between the window and the wall, it is necessary to fix a waterproofing material on the outside, and a vapor barrier on the inside.
- Windows can be installed at any time of the year. Many professionals recommend that work be carried out in the winter, as this will allow you to immediately see if mistakes have been made.
- Before purchasing foam, you must carefully study the features of the composition. These materials differ in several ways. One of them is the solidification temperature. The instructions on the bottle indicate the most favorable conditions for using the foam. If they are ignored, the material may begin to break down during the operation of the building.
- During the foaming of the gaps between the plastic windows and the walls, it is necessary to fill in small portions. This allows you to use less foam.
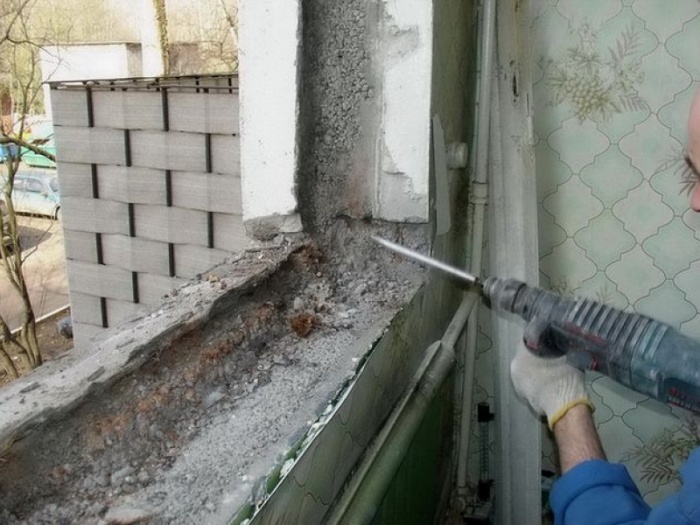
- If the opening crumbles, it is necessary to clean the surface of old materials and reinforce it.
By following the rules described, you can install windows with my own hands without making the mistakes that people who do not have experience in such work make. The technology of installing plastic windows in brick house quite simple, but it is important to carefully perform each action so as not to make a mistake.
How is the preparation of the opening
Before performing work on the installation of windows, it is necessary to thoroughly clean the opening from dirt and dust. It is important to remove all paint residue and building materials. Before installation, it is also important to compare the dimensions of the opening and the plastic frame. If the gap is more than 4 cm, it is necessary to use not only foam. This is due to the fact that when using it, it will not be possible to create an even and high-quality seam. In addition, a lot of foam will go away.
Before installation, it is necessary to remove the sashes from the frame. To do this, just pull the pin out of the loops. If it is necessary to remove the double-glazed window from the frame, the glazing beads holding the glass are removed. These steps must be performed very carefully so as not to scratch the glass.
After removing the sash and double-glazed windows, place them on a soft pad and lean against the wall so that they are in a stable position. Double-glazed windows are not laid flat, as this can lead to scratches on the glass surface.
After that, the protective film is removed and markings are applied to the places where the fasteners will be located. The distance between them should be about 40 cm. It is important to consider that the indents from the corners should be more than 15 cm.
Installation process
After carrying out the described actions, insert into the window opening into brick wall spacers to create the necessary clearance. The alignment of the frame should be done using the building level. It is also important to control the side clearances.
In the openings of brick houses, it is necessary to mark the installation sites of anchors. After that, holes are created in the walls. If fixing is done with anchor plates, it is necessary to bend them in such a way that they lie well on the wall.
The next step is to install the frame. It is important to check the horizontal and vertical structure of the structure before. How will it be finalized? After that, the bolts are finally tightened until the cap protrudes above the surface by no more than 1 mm.
After all the described work, the installation of sashes and double-glazed windows is carried out, as well as the functionality of the entire structure is checked. If you installed the products with your own hands for the first time, you should carefully inspect the opening and make sure that no mistakes were made during the work.
Slope installation
Before installing external slopes, it is necessary to measure the width and length of the opening. Cutting plastic slopes is done using a circular saw.
Important! It is necessary to fix the slopes only on clean and leveled surfaces.
At the first stage, the upper horizontal part is fixed. It needs to be drowned as deep as possible, and the space filled with mounting foam. Worth remembering. That it should not be released too much, since when hardened, the material can change the shape of plastic products.

After that, the installation of vertical slopes takes place. During these works, it is important to check the verticality of the elements. In the same way, the installation of the lower slope occurs. It is important to ensure that all elements are properly docked, and there are no gaps between them. corners between plastic slopes closed with a special detail.
Installation internal slopes should only be done after thorough surface preparation. If the opening crumbles, it is better to clean it up to the main wall and only after that carry out further work. After that, the opening is leveled and filled with insulation. If necessary, strengthen the window opening.
The newfangled Euro-window boom today has captured the majority of the inhabitants of our planet. You can argue for a long time about the pros and cons of plastic windows, but if you have purchased them, you will have to install them. Do it yourself or trust professionals - it's up to you. Before you make your choice, we suggest that you familiarize yourself with the material on how to insert plastic windows correctly so that they provide your family with reliable thermal protection for a long time.
Let's start with the steps preparatory work which you can easily do yourself:
- measure window openings;
- dismantle worn-out window structures;
If you are not too confident in your abilities, it is still better to entrust the installation of PVC windows to specialists.
measurements
The process of taking measurements should be treated responsibly. Be sure to keep in mind that there are 2 types of window openings: with a quarter and without.
In the first variant it is necessary to measure the width of the opening in its narrowest place between the quarters and add 30–40 mm to the resulting value - this will give you measurements of the width of the window structure. Next, make sure that the calculated width of the window unit exceeds the maximum distance between vertical quarters. To determine the height of the window, you need to measure the distance from the horizontal top quarter to the bottom quarter of the window opening. The dimensions of the window block you received should be larger than the outer opening of the window so that there are no gaps between the edges of the opening and the window frame.
For the second option in order to obtain the overall values of the window block, subtract 50 mm from the vertical size of the opening, and 30 mm from the horizontal one. In this case, you need to determine the size of the window sill and low tide, taking into account the following points:
- The width of the ebb is calculated taking into account the proposed method of insulating the opening or sheathing of the enclosing structures (usually the ebb protrudes 50-100 mm outward from the wall plane).
- The width of the window sill is determined based on its functional purpose (whether it will be decorated flower pots or not, etc.). Often, the protruding part of the window sill slightly covers the heating radiators.
- The length of the window sill should be approximately 100 mm greater than the width of the window opening (the edges of the window sill are recessed into the slope cavity by approximately 50 mm).
Ordering a window block

After the measurements, the next stage is the order of a new PVC window, while in addition to determining overall dimensions design, it is important to consider the following indicators:
- type of double-glazed window (one, two, three-chamber);
- type of window profile (three, five-chamber);
- the availability and quality of fasteners and other related fittings for window construction.
Window dismantling

Steps for dismantling a replacement window unit:
- All existing obstacles, be it furniture or household items, should be moved away from the place where the window is being dismantled.
- The window unit must be freed from opening vents and sashes.
- Further, in the window structure, the glass and the glazing beads holding them are removed.
- With the help of a hacksaw or a concrete grinder available on the farm (with a cutting wheel), cuts are made in the horizontal and vertical bars of the frame.
- Using the handy tool available at home (hammer, crowbar, mount), the old frame is removed from the window opening. In addition to the window frame, the window sill and tide should be dismantled.
- The window opening is cleaned and leveled.
- Then the room is cleaned from the resulting debris.
If desired, you can dismantle the window frame without destroying it, while maintaining integrity, but this requires the performer, in addition to knowledge, also experience and significant time costs. All operations to remove the old window unit should be done very carefully so as not to injure yourself, while eliminating the possibility of accidental falling out of the window.
Mounting process

This process consists of a number of steps:
- Acquired plastic windows should be freed from hinged sashes, and double-glazed windows should be dismantled in blind sashes.
- Next, pre-marking and drilling of holes for fasteners is carried out.
- Then, the window frame is installed in the opening and aligned along the perimeter (horizontally and vertically).
- Using anchor bolts, the frame should be securely fixed in the opening. Each side of the frame should be fastened in increments of 70 cm.
- Next, you need to install external ebbs. They are adjusted to the required dimensions, and then mounted in the place intended for them.
- After the new PVC window is installed and securely fixed, and the sills are mounted, sealing should be performed with a special mounting foam assembly seams. That is, the entire space formed between the walls of the opening and the window frame is filled with foam.
- Next is the installation of the window sill. With the help of a grinder, a saw with a fine tooth or an electric jigsaw, the dimensions of the window sill are adjusted to the required ones. After that, it is leveled on prepared wooden supports and foamed with mounting foam. But before the start of foaming, in order to exclude the possibility of deformation of the window sill (during the expansion of the foam), it is necessary to install some kind of load weighing about five kilograms at three points on its surface.
- After a day, the protruding remains of the foam are cut off. This can be done with a utility knife.
- The slopes of the internal opening can be sewn up with drywall, puttied, or you can decorate plastic panels. The joints between the panels are closed with special corners and then sealed with liquid plastic.
- At the final step, the installation of double-glazed windows and the installation of sashes into frames are carried out. Handles are attached to hinged sashes, fittings are adjusted, and window hinges are closed with special decorative caps.
Now you can remove the accumulated construction debris and organize a presentation to the family of your own installed plastic window.
Video
Below you can see the most detailed instructions for the installation of plastic windows:
A photo


To independently install a plastic window in your apartment or house, you do not need to have special skills and special tools. Correctly insert it into the opening and secure it with anchor bolts, even a self-taught installer can. It is enough to be able to deal with building level and perforator. Only the installation must be carried out clearly according to the rules prescribed in the GOSTs and the instructions of the manufacturers of PVC window products. Otherwise, this translucent structure will not last long.
Necessary tools and materials
Installation of a plastic window is carried out in five stages:
- Dismantling the old window frame.
- Opening preparation.
- Installation and leveling of a new frame with sashes.
- Drainage mount on the outside of the window.
- Foaming of mounting gaps and installation of a window sill with slopes.
In addition to a puncher and a level, you will also need a hammer, a screwdriver, a water sprayer, a spatula, metal shears and a mount to install a window from the tools. From Supplies it is necessary to purchase mounting foam, silicone, anchor bolts or metal plates with self-tapping dowels and plastic construction wedges in advance (or prepare small pieces of wood).

Necessary tools for installation
You will also need a vapor-permeable self-adhesive and waterproofing tape. Plus, PVC windows should include slopes, a support profile, a window sill and a metal tide. If all this is available, then you can proceed with the installation.

window design
Dismantling the old PVC window and preparing the opening
To get rid of an old wooden or plastic window, it is necessary to remove the sashes and make a cut on the side of its frame with a hacksaw. Then, with a mount, one of the resulting parts is pulled back and pulled out of the wall together with fasteners by force of hands. After the procedure is repeated with all the remaining fragments of the deleted window. Then the insulation is removed from the opening (if it is there) and everything that can fall off (for example, a solution).

Sectional design of plastic windows
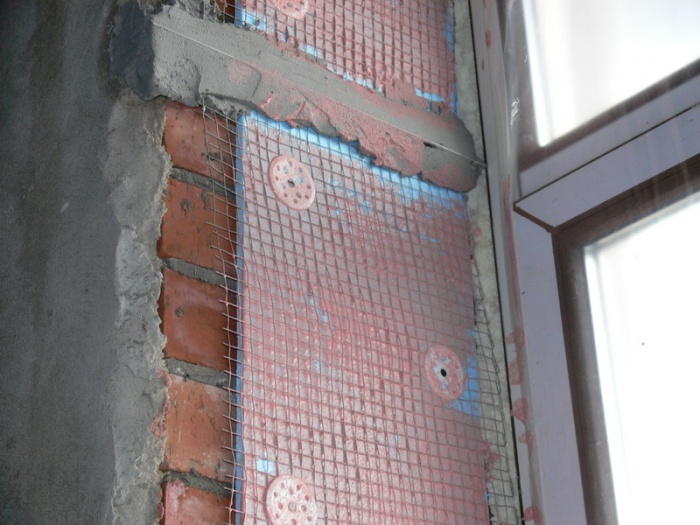
As a result, only bare and even ends of walls made of brick, concrete or wood should remain. If these surfaces have chips, cracks or potholes with a depth and size of more than 1 cm, then they must be repaired with concrete mortar. Nothing special is required here to align for a new plastic window, all the same, then small cracks and recesses will be filled with mounting foam. However, leaving deep noticeable defects without sealing is not worth it.

Possible measurement errors
Before working further and installing a plastic window with your own hands, dirt, dust and oil stains must be removed from the surfaces in the opening. If you have to insert a window structure in winter, then you also need to remove snow and frost, and then heat the ends of the wall with a building hair dryer to remove moisture.
Window installation
Installation of PVC windows with fixation in the opening can be done in two ways:
- Anchor bolts through the frame profile.
- Plates fixed on the side of the frame with self-tapping dowels.
The first option is more reliable. However, with this technology for installing plastic windows, the frame profile is drilled through. As a result, its thermal insulation efficiency decreases. If the window block needs to be installed in a building erected in a region with a cold climate, then it would be best to refuse this method.
The second option for fixing plastic windows is considered less reliable and is not recommended in the presence of strong wind loads. But in winter, the heat through the holes in the profile from the house in this case will definitely not go outside.

Installation of windows with different options slope
Holes for PVC window fasteners are drilled in the wall with an indent from the corners of the opening of 15–25 cm. Plus, one or two more holes on the sides, bottom and top are made in the middle with a step of no more than 70 cm between them.
Directly setting a new window in the opening is carried out on the stand profile and adjusting wedges. Plus, it will be necessary in advance to glue a vapor-permeable gasket (PSUL) around the outer side of the frame. And you should not tighten the bolts or self-tapping screws until they stop immediately after leveling the structure in the opening with the help of a level. First, you still need to fix the ebb to drain rainwater and waterproofing.

How to position the window frame
Drainage
The next step in installing a plastic window with your own hands is to mount the drainage system. It must be placed in any scenario. Without this outer element of the window block, all the rain water will fall on the foam and under the frame. The inevitable result will be the destruction of the mounting seam and the formation of gaps between the profile and the wall.
The ebb is fastened with self-tapping screws not to the window itself, but to the stand profile under the frame. In this case, the waterproofing tape is first laid. And then a drainage system is placed on top of it and fixed in place. Then foam is sprayed under this metal bar.

How to properly position a drain
Plastic window assembly
Before installing a plastic window in the opening, it is necessary to remove all opening sashes from it so that they do not interfere with installation work. Plus, the double-glazed window is also removed from the deaf part of the structure. To do this, pry off the plastic glazing beads with a spatula and knock them out of the groove.
Re-installation of sashes and double-glazed windows in plastic windows is done before foaming the gaps around the frame. If they are not installed back into place, then the mounting foam cannot be blown out. After spraying, polyurethane foam expands 1.5–2 times. Moreover, this happens with the creation of a sufficiently strong pressure on the frame profile. It can be easily bent so that then inserting the sash back simply does not work.
Window sill installation
Installing a window sill on a window largely repeats the technology of installing a drainage system. Only instead of a waterproofing tape indoors, a vapor barrier is used. If the waterproofing on the outside prevents moisture from entering the mounting seam, then the vapor barrier on the inside is designed to evaporate it into the house.

Installation of windows with and without waterproofing
The foam in the gap should not get wet and freeze in any way, this will instantly destroy it. the window sill is laid on wooden supports-guides located perpendicular to the window and along its entire length with steps of 30-40 cm. In this case, a slope of 2-3 degrees inside the room must be observed. This is necessary so that the resulting condensate drains from the window sill, and does not stagnate in the corners.

Joint waterproofing
After alignment and alignment of the window sill, it is inserted with pressure under the lower edge of the frame. Then the gap is foamed from below and a weight is placed on top of the plastic plate. After the foam hardens, it is securely fixed in place.
The technology for installing plastic windows in a brick house differs from the rules for installing PVC profile products in concrete or panel walls. Important before you start installation work understand these differences and avoid mistakes.
Installation of plastic windows requires a set of tools and consumables.
Plastic windows in a brick house can be installed on anchor plates or bolts. Their dimension depends on the depth of the quarters into which the product will be attached, as well as the quality of the brick from which the walls are laid. It can be gas silicate, foam concrete, etc.
//www.youtube.com/watch?v=PkRy0THGINA
If the installation is carried out in a secondary housing stock, before installing the window, you must first remove the old frame from the opening. This will require:
- removing sashes from hinges;
- removal of the old;
- dismantling of the window sill and low tide;
- removal of roofing felts and tow, once used to insulate the opening;
- beating old plaster, if necessary, alignment of the geometry of the opening.
Required for dismantling small size crowbar. If the frames are massive enough, then to facilitate the scrapping process, you can use a hand saw for wood or an electric jigsaw.
To drill holes for fasteners, you need a puncher, to fasten the frame to the anchor - a screwdriver. You will also need a construction knife with replaceable blades, a level, good quality construction guns for foam and sealant.
What materials are needed to install a plastic window?
Installation of plastic windows is a multi-stage process. At each stage, it is necessary to use various consumables:
- mounting wedges;
- professional foam;
- PSUL or acrylic sealant;
- waterproofing tapes;
- anchor plates or bolts.
- cyacrine;
- sealant.
Mounting wedges are needed to level the level, if necessary, they are placed under the stand profile.
Mounting foam- insulating material for filling the installation seam, i.e.
space between wall and window frame. Professional pistol foam must comply with temperature regime the season in which it is planned to install a plastic window.
PSUL (pre-compressed self-expanding sealing tape) is glued around the perimeter of the window frame and expands from the street side of the seam - from the edge of the frame to a quarter. It looks like gray foam. If there are no quarters, a special acrylic sealant will be required.
A waterproofing tape made of membrane material is placed under the ebb for ventilation and protection of the bottom seam from moisture.
Sealant is needed to fill the seams where the window sill adjoins the slopes and the window frame.
How to fix a window in an opening?
The rules for installing plastic windows are explained in detail by GOST R 52749-2007 “Mounting window seams with vapor-permeable self-expanding tapes. Specifications". This state standard prescribes that before you start installing a window in an opening, stick a PSUL around its perimeter.
This self-expanding material is an independent mounting layer that cannot be covered with plaster, putty, or painted over. Otherwise, the insulating material will not perform its functions.
When inserting the frame into the window opening, you should adhere to the tolerances. The deviation of the window frame in the horizontal and vertical plane should be no more than 1.5 mm per 1 m of length, but not more than 3 mm for the entire height of the window.
//www.youtube.com/watch?v=J4zdj8hP5As
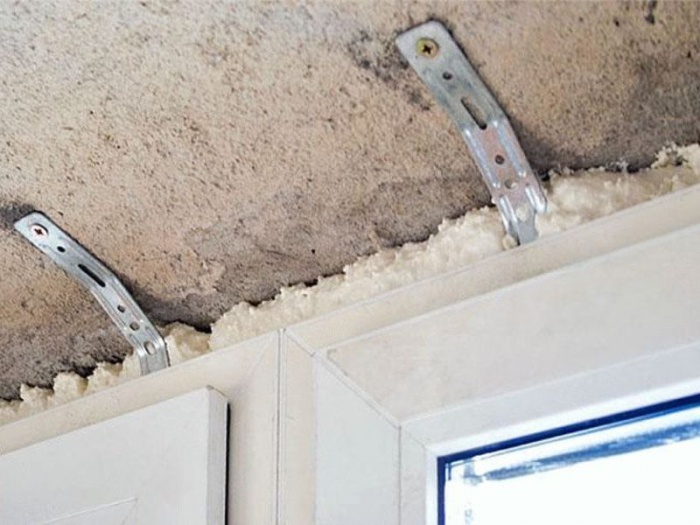
The frame is attached to a brick wall according to the following rules:
- from the inner corner of the frame to the first fastener, the vertical distance should not exceed 150-180 mm;
- from the impost to the fastener horizontally, this distance is recommended at 120-180 mm;
- vertical anchors - with a gap of 700 mm for white plastic windows and 600 mm for laminated profiles.
The inserted block must be checked for deviation from the level and foamed around the perimeter.
Assembly seam device
PSUL along the perimeter and foam insulation are only 2 parts of the three-layer filling of the assembly seam described by GOST.
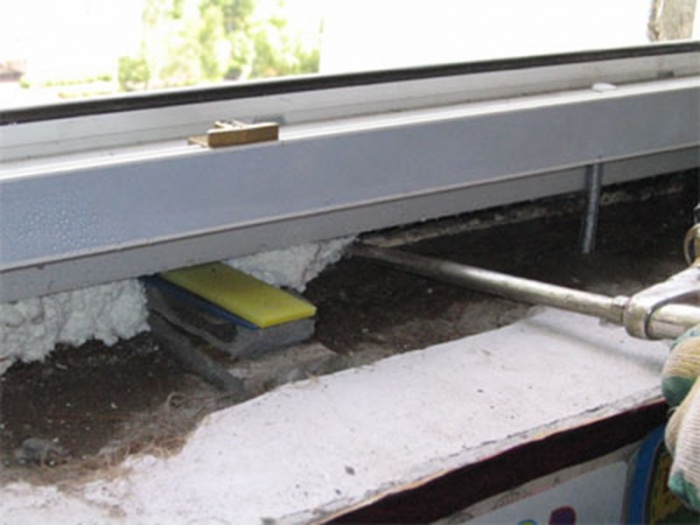
After foaming the frame, it is necessary to remove the mounting wedges from under the support profile and fill the voids with foam. For better adhesion, the inner surface of the window opening can be moistened with a spray before foaming.
Before installing the tide on the outside, a waterproof vapor-permeable tape should be glued. The ebb is screwed to the stand profile with self-tapping screws. The edges of the tide must be bent to the outer slopes to avoid moisture getting under it.
On the inside of the window along the perimeter (except for the lower horizontal part of the frame) a vapor barrier is glued, which provides an additional sealing layer to the mounting seam and isolates it from moisture. Such a tape is produced in various widths and can be glued both for wet finishing of slopes (plaster) and for dry (slopes made of expanded polystyrene or plastic). They also produce universal tapes for slopes.
A vapor barrier is also installed under the window sill: a full-butyl tape with a foil layer.
We collect the installed window
 The frame installed in the opening and foamed around the perimeter must be assembled.
Double-glazed windows are inserted into the deaf, non-opening parts. To fix (fix) the installed double-glazed window, you will need a medium-sized Plexiglas hammer. The glazing beads are cut at an angle of 45° and inserted into the frame along the perimeter of the double-glazed window with some effort. In order for the glazing bead to finally snap into place, it must be lightly knocked out with a hammer.
If the installed window unit has opening sashes, it is necessary to hang them on the hinges. It is not difficult to cope with this task, since modern window fittings are very easy to operate.
But putting the sash in place is not enough. You should check its performance and, if necessary, adjust it in the hinge part using a special adjusting key.
To check how accurately the level of the plastic window is, you need to open the sash. If by inertia it does not slam shut or open wider, then the block is installed correctly.
Installing window sills and slopes
The installation of wooden windows, like plastic ones, cannot be considered complete if a window sill is not installed. The window sill board snaps into place and is attached to the support profile.
If voids under the window are found during dismantling, you can fill them with insulation, for example, rolled or tiled, and then install a window sill.
For the final finishing of the opening, you need to understand how to properly install the slopes. They can be plastered or assembled from expanded polystyrene sandwich panels.
With the latter option, the panels are cut to size in place, taking into account the geometry of each slope. A U-shaped plastic profile is screwed to the frame close to the slopes, otherwise called the starting one. A panel is inserted into it. The voids are foaming.
Foam is a sealant made of polyurethane foam, which, due to its properties, takes a certain time to fully expand and harden. Typically 1 to 24 hours.
In places where they adjoin the wall, sandwich panels are closed with a decorative profile, most often of an F-shape.
The junctions of the slopes and the frame to the window sill are sealed with sealant.

Who is responsible for window installation?
Mount PVC profile window and install wooden window— is not the same thing. Installing windows in a brick house is associated with certain nuances. Required to have all essential tool, including adjusting keys for window fittings, as well as a supply of fasteners and special mounting tapes.
It is equally important to choose the right mounting foam and sealant. As an alternative to the latter, so-called liquid plastic can be used. This is a special adhesive-sealant that hardens very quickly, but also creates a particularly strong sealed seam.
If you are not sure that you can handle the installation yourself, it is better to enlist the help of specialists.
//www.youtube.com/watch?v=qMBqdgWXysU
The advantages of installing plastic windows are not only operational characteristics, but also ease of installation. A simple process, facilitated by the presence of fasteners and additional parts in the factory, the home master will be able to master and implement it himself. There are a number of nuances in it that dictate scrupulous implementation of building regulations to an independent installer. To call on assistants will need patience, accuracy and at least one person. Then the installation of plastic windows with your own hands will be performed flawlessly and practically free of charge.
Video tutorial for independent builders
Preliminary measurements and calculations
Before buying a window, it is traditional to measure the opening, taking into account whether it is with or without a quarter. Openings with a quarter are a characteristic detail of a foam concrete structure, which significantly reduces heat loss. In an opening without a quarter, you need to order a window, the length of which will be 5 cm less than the equivalent opening parameter. From the width value, you need to subtract 3 cm. Gaps along the contour of 1.5 cm are needed for foaming, an additional 3.5 cm from the bottom are needed for the window sill. GOSTs recommend leaving 2.0 cm around the perimeter.
To arrange an opening with a quarter, measurements are taken at the narrowest point. Windows are ordered by adding 3 cm to the width, the length value is not changed.

Windows are usually located not in the middle of the opening, but retreating from the outer plane 1/3 deep. But those who want to install a plastic window with their own hands may have options with an offset to either side. This circumstance must be taken into account when ordering window sills and external ebbs. To the width indicators of both elements calculated according to the location of the window, 5 cm must be added.
The location of the battery also affects the calculation of the width of the sill. It should only half cover the radiator. Plus 2 cm for the establishment under the base of the window. The minimum margin for length is 8 cm, but it is better not to skimp and add 15 cm to cut this part beautifully.
Note. Plastic side plugs are attached to the window sills and ebbs. Don't give up on them.
Frame fastening methods
The installation technology does not depend on the number of internal chambers in the metal-plastic profile, nor on the number of chambers in double-glazed windows. It depends on the material from which the walls of the building are built, and on the dimensions of the window. Based on the above prerequisites, the method and attachment devices are selected.
You can fix the plastic window structure:
- mounting anchors or dowels inserted into the walls through through holes drilled in the profile;
- with special toothed plates that are pressed into the profile, they do not penetrate into the wall, but are installed by surprise and fastened with screws.

The first method is recognized as the most reliable. It is used mainly for the installation of large and heavy window systems. With a through fastening, the window will firmly resist numerous shock loads that occur, for example, when operating windows with sashes that open in two different positions. In addition, the anchors passing through the frame will allow you to more accurately adjust the verticals and horizontals of the mounted structure.
However, those who want to know how to properly install plastic windows of small dimensions with blank double-glazed windows should be interested in the method of fixing with anchor plates. Appearance they will not spoil the windows, since then they will be hidden under the slopes.
Advice. For the installation of anchor plates in a concrete or brick opening, it is advisable to make small recesses so that you do not have to apply an extra leveling layer before installing the internal slopes.
Often builders combine both methods. The anchors are buried in the walls through the side elements of the frame and through the bottom profile (window base), and the top is fixed only with plates. If the installation of plastic windows with your own hands is done in wooden bath, anchor plates are rarely used, they can become loose. Instead of anchors, galvanized self-tapping screws are sometimes used.
Specifics of installation in a wooden structure
To a large extent, the installation process is influenced by the type of building material. If for walls made of foam concrete, hollow or solid bricks, the differences are only in the size of the depth of the anchors, then for openings in log cabins and in timber walls special approach. You need to take into account not only how, but also when it is better to install plastic windows in wooden openings, and even how to do it.
- It is possible to equip a wooden structure with plastic windows only after a year, preferably two years after the completion of construction. This significant break is necessary due to post-construction shrinkage. The smallest period of shrinkage and its size are for buildings made of glued laminated timber.
- Installation is not carried out directly in the opening. You can insert a window only in wooden box protecting the window structure from deformation. There should be no damage, defects and rot on the window unit. Before starting work, it must be treated with an antiseptic.
- Shrinkage, however, is no longer so intense, and will occur after the installation of windows and finishes. Taking into account what, a gap of 3-7 cm is left between the upper plane of the opening and the box. The size of the gap depends on the humidity and the category of materials used in construction. The gap after the installation of the window is filled with jute insulation and closed with platbands on both sides.

In building codes there are no exact recommendations about the material for ebbs and window sills in wooden houses. The ebbs usually use standard ones attached to the window structure. The window sill can be both polymeric and wooden. It is not forbidden for the bottom profile to rest directly on wooden window sill. That is, before installation, it may already be.
There is a nuance that is not specified in the regulations, but recommended by experienced builders to those who figure out how to insert plastic windows correctly. Wood that is permeable to vapor will help reduce technical qualities mounting foam. In order for the foam “blown out” along the perimeter not to be moistened, it is advisable to equip the window block along the line of its application with a foiled polyethylene foam tape.
Plastic window installation standards
A distinctive feature of the technology is the use of mounting foam, which stiffens the frame-opening connection. The layer obtained as a result of polymerization of the foam simultaneously performs the function of insulation and additional fastening. In order for the specified element to retain the necessary specifications the foamed layer is surrounded by insulating layers.

When it is better to insert a plastic window, the owner decides. Winter installation is often recommended due to the immediate manifestation of all flaws. When choosing a mounting foam, it is imperative to take into account at what values of atmospheric temperature the composition will harden better. It is advised to prefer professional foam, and to work with negative thermometer readings, you need to buy a specialized nozzle.
How to perform foaming is described in detail by the manufacturer in the instruction attached to the product. Foaming usually begins from the bottom, moving upward in a circular motion. To eliminate the overspending of expensive material, the foam is blown in several steps in segments of 25-30 cm.
Advice. In order to shift the dew point, foaming is performed with unequal density. The outward facing foam layer is recommended to be made less dense than the inner one. Along the perimeter, the foam must be blown evenly, without voids and gaps.

Window opening preparation
There should be no dust, no debris, no paint residues in the opening - this is a prerequisite. Home craftsmen who want to know how to insert a plastic window into a wooden structure need to cut off the top “unreliable” layer if the installation is to be done in an already used box. The foam will adhere firmly to the top layer. If there is a suspicion that it will exfoliate over time, it is better to eliminate it.
Advice. The gaps between the frame and the opening are filled only with foam, if the distance does not exceed the limit of 4 cm. If the gaps are larger, it is better to partially fill them with cheaper material: drywall, pieces of timber, foam plastic, brick, etc.
Preparing a plastic window
- First, release the frame from the sash, for which pull out the pin inserted into the upper hinge. You need to pick it up carefully from below with pliers and a screwdriver. Then, slightly lifting, remove the sash from the bottom hinge. Double-glazed windows are removed from blind windows, having previously removed the longitudinal and then transverse glazing beads. To remove glazing beads, a knife with a thickened side or a spatula is carefully inserted into the gap and slowly shifted, trying not to damage the glass.
Note. It is possible to insert a plastic window of small dimensions using mounting plates without removing the sashes or double-glazed windows. If possible, do not violate the integrity of the factory design.
- Lean a double-glazed window or sash at an angle against the wall, placing it on a flat surface covered with cardboard or some soft material.
Attention. You can't lay flat! Put with a warp too. The smallest pebble under the base will cause a crack to appear.
- Remove the protective film from the outer surface of the frame. If you do not remove it now, then it will be much more difficult to do it and you will have to use a building hair dryer.
- Regardless of the type of mount chosen, mark the places for its installation. The step strongly recommended by the builders is 40 cm (maybe a little less), allowed by GOSTs is a maximum of 70 cm. The standards for indentation from the corners and from the impost are 15 cm. If mounting plates are used, they are pre-attached to the frame with self-tapping screws. Holes are made for anchor bolts or long self-tapping screws by placing a metal drill on the outside of the frame.

Most of the video instructions teaching how to install a plastic window yourself dictate fixing the PSUL protective tape before installation. However, craftsmen, faced with its sticky "inconvenience", convince that it is more reasonable to attach it after installation.
Direct installation process
- Insert the frame into the opening, placing special plastic corners or small sticks to provide a technological gap. Slightly moving these spacer wedges, set the frame clearly horizontally and vertically with uniform side clearances.
Advice. It is desirable to place spacers near the point of attachment with a self-tapping screw or anchor. They will protect the frame from deformation.

- Since the installation pvc windows do-it-yourself can be carried out using different fasteners, on this stage differences appear.
- in the opening wooden house through the holes in the frame, immediately screw in the self-tapping screw. You don't need to screw it all the way in.
- On the walls of foam concrete or brick, mark the points through the holes in the frame, then remove the frame, drill holes with a drill appropriate for the material. Then return the frame to its place, “bait” the fasteners.
- There will be no need for double manipulation of the frame when mounting on anchor plates. They should simply be bent so that they adjoin the place intended for their fastening.

- The final fastening is made after the control of the horizontals and verticals with a spirit level and a plumb line. It is impossible to persist with tightening, so that the frame does not begin to bend barrel-shaped. Finish screwing as soon as the hat is level with the frame. Installers advise leaving 1 mm above the surface.
- Return the dismantled parts to their place in the reverse order and check the operability of the structure.
- Fill gaps with foam. Close the foamed seams from the outside and from the inside with protective tapes. Outside, the insulating tape must be "drowned" in
- Fill the gap under the drain with foam. Install it with a slope from the window, attach it with screws to the bottom profile.
- After the polymerization of the foam, it is necessary to install a window sill. Plastic variant 2 cm starts under the sweet clover. To create a slight slope from the window, the space under the window sill can also be foamed.
- It is desirable to make slopes on the day of installation. Maximum break 3 days after installation.

After performing all operations for 16 hours, it is not recommended to use windows so as not to violate the integrity of the assembly joints. Knowing how to install a plastic window is necessary not only for skilled owners. If the owner of country estate decides to order the services of a little-known team of installers, he also needs to study the specifics of installation in advance.