How to install PVC windows in a wooden house yourself: step by step instructions. Installing plastic windows in a wooden house How to install a plastic window in a wooden house
Repair work in wooden house significantly different from similar buildings in a different form. Most companies do not provide a guarantee for installations carried out here, especially windows. Isn't this a reason to think about DIY installation? armed step by step video, you can achieve a high-quality result, significantly saving the family budget.
Features of installing a window system in a wooden house
There are many prejudices about wooden houses. The service life of the windows installed here depends entirely on the quality of the building itself and compliance with the technology of the installation process.
You can not start working with a window opening in a new wooden house right away. In order to avoid deformation in the future, it is recommended to wait some time for the structure to stand, the wood to dry out, excess moisture to evaporate from it, and the walls to become static. Thus, the chance of mowing the opening is minimized.
As a place for a window, do not choose the outer part of a wooden house. The opening can be in the center or closer to one of the corners, but not in contact with it.

Window cutting pattern
The installation process itself is not too laborious: it can be carried out with one pair of hands in a few hours. The subtleties of conducting preparatory work depend on whether the windows have already been installed before or whether the casing needs to be created from scratch. Similar technology can be used for PVC mounting in any wooden building: a bathhouse, a gazebo, etc.
Preparing the Workspace
For self-assembly plastic windows you need a solid foundation - a frame. If the previous windows were installed over the past few years, did not have time to acquire physical damage and were not touched by rot, then you can use the box from them as a frame for new system. With this option, measurements are made according to the new size of the opening, focusing on the preserved box.
If PVC is installed in a new building, then you will have to take care of the pigtail. This is the name of the design that prevents the window system from deformation. There are several types of it:
- With a mortgage bar;
- In the groove of a log wall;
- On a spike in the wall;
- With a quarter.

Mowing a window opening is one of the necessary steps for installing a plastic window in a wooden house
Using a rag, you can remove dirt, dust and start measuring. The reliability and expediency of carrying out all further work depends on their accuracy: inattention to this stage may jeopardize the entire installation.
Advice. If the opening is distorted, then to create a plan with measurements, they are guided by the supposedly correct geometric shape and right angles, and the deformations are removed with a sealant or ordinary putty.
Window sill installation and window preparation
It is the basis of the entire window system, so its installation must be carried out with a level: the horizontal surface must be ideal from both the longitudinal and transverse positions.
To do the work with your own hands, the following algorithm of actions is used:
- Small recesses (at least 5 mm) are made in the window box for additional fixation of the window sill.
- Using plates made of fiberboard, plastic or wood treated with an antiseptic, level the level of the window sill.
- With the help of self-tapping screws, the installation of the window sill is carried out. A gasket or washer must be placed under the caps to prevent cracks. For self-tapping screws, you need to choose a place where they will be hidden by a future window. Usually, it is located at a distance of 2-4 cm from the end.
- After installing the window sill, its horizontalness is checked using the building level.
In general, installing a pvc window in a wooden house does not cause any particular difficulties if you familiarize yourself with all the nuances of the work in advance
As for the window itself, it is necessary to attach the handle in the downward position (closed state) before installation.
Attention! There is no need to remove the protective film completely: just open it slightly at the place where the handle is attached.
Window installation
Installing a window in a prepared area of a wooden house is no different from installing it in another structure. The process is performed in the following sequence:
- Marking the window frame and drilling mounting holes. The procedure is performed using a 6 mm drill for the corresponding self-tapping screw 1 mm smaller in diameter.
- Installation of the system in the opening. At the same time, they are guided by the window sill, the even level of which, thanks to additional control, is beyond doubt. The center is determined using a centimeter tape.
- Level relative to the wall. To make the window parallel to the wall surface, use a plumb line. If it is trimmed with siding, which allows you to place a level between the trim and the wall, then you can use it.
- Fixing a bar that would completely fill the space between the window and its frame. It will become the focus for further installation. Installation without it may lead to overlapping of the window opening-closing mechanism.
- The window is fastened with self-tapping screws from the bottom and top of the side posts, so that they do not interfere with the free opening of the window in the box.
- Foaming of cracks and removal of its excess.
Installing a PVC window with your own hands can save up to 60% of the family budget. following detailed instructions their installation will make the structure resistant to seasonal deformations of the tree, extending the life of the system for a long time.
Video: Installing plastic windows in a wooden house
Photo: Installing plastic windows in a wooden house


Unlike foam or reinforced concrete buildings, wooden houses are highly unstable. This term refers to the minimum, but constant shrinkage of the structure. The tree “shrinks” not for 2-3 years, as some experts believe, but for at least 5 years. Of course, shrinkage visible to the naked eye occurs during the first 12 months, but then the dwelling continues to decrease in volume. If you do not take into account this property and, for example, install a plastic window in a wooden house, by analogy with reinforced concrete structures, you can seriously pay for the miscalculation.
Shrinkage of timber and logs is from 1 to 2 cm per meter of masonry. That is, a two-story wooden house can reduce the height by 10-12 cm in 5 years. If the owners decide to insert plastic windows using conventional technologies, they will be disappointed in a year. With all its mass, the structure will put pressure on PVC products; first, the sashes will stop opening, and then the frame will crack altogether, ceasing to perform heat-insulating functions. But you do not need to take extraordinary measures to properly install plastic windows - just install them in window opening pigtail.
Design features
The purpose of the pigtail (otherwise called casing) is to give the windows complete independence from bearing walls Houses. The design has several undeniable advantages:
- it eliminates even the minimum vertical load on the window, since it does not allow the logs to move;
- does not interfere with the natural shrinkage of the house;
- serves to strengthen the house in the area of \u200b\u200bthe window opening.
There are two types of framing. In the first case, grooves are made in which wooden bars the same dimensions as a window opening. In the second, a comb is cut out in the latter, on which a gun carriage (a log hewn from opposite sides, better known as a gable beam) with a groove is fixed.
It is advisable to install plastic windows in log house(or timber) with an assistant, since the installation of a pigtail requires high precision, and with the mass of double-glazed windows it is sometimes difficult to cope with one person.

Required Tools
to install PVC windows, you will need a basic set of building supplies, including:
- drill;
- screwdriver;
- chisel;
- building level;
- roulette;
- mallet (wooden mallet);
- self-tapping screws no more than 10 cm long (elongated options violate the integrity of logs or timber);
- mounting foam;
- expansion wedges made of wood;
- spray bottle with water;
- gloves.
In addition, you will need a special adjusting hexagon for window structures. On the topic of installing windows in wooden structures Hundreds of videos have been filmed and are easy to find. However, the basic and most valuable tips are given below.

Surface preparation stage
The first step is to remove the old window. If its condition is not bad, it can be useful in another matter (for example, during the construction of a country greenhouse). The dismantling of windows is carried out carefully so as not to spoil the wooden walls. After that, the opening is cleaned of dust and dirt.
Measurement of the parameters of the window opening should be as accurate as possible. It is advisable to record the obtained values on paper. Installing a new window is simple, but due to one millimeter miscalculation, it can be very skewed.
If the contour of the opening is not quite smooth, it will have to be leveled with putty or sealant. A properly prepared surface for a new PVC product is characterized by ideal geometry (right angles).
It is also necessary to withstand the margin for shrinkage at home. This is about 6 cm in height, 2 cm in height and sides for foaming, 4 cm under the windowsill.
Depending on the time of the year and the current stage of construction, the order of double-glazed windows either precedes dismantling or becomes the final stage. Few people want to put a window in a wooden house and change it in a year or two, so you need to take into account some points. The buyer should decide on the number of doors, the direction of their opening, shape, size, color of future products. And, of course, you should place an order with reliable manufacturers.

Installation instructions for PVC windows
The ideal distance from the floor to the windowsill will be 80-90 cm. This is a little higher desk. The user must freely lean on the window sill, minimally bending the body. The further sequence of actions is given below.
- Precise marking is carried out for the side and lower spikes (5 × 5 cm), after which they are cut out.
- In previously prepared and well-dried boards (preferably one inch), holes are cut out to fill the spikes.
- The window opening and the blank of the pigtails are treated with antifungal impregnation.
- Insulation (jute tape, tow, etc.) is attached to the spike using a construction stapler.
- The casing structure is installed in the opening, starting from the window sill. Its elements are connected with self-tapping screws, and the joints are coated with sealant.
In general, the window frame is ready, it remains only to insulate the upper landing gap. The same jute will do; the lumen is caulked as tightly as possible. Now you can mount a plastic window inside the opening. To do this, do the following:
- Insert the double-glazed window into the opening, perfectly aligning it with the front edge. Applying a level, make sure that the geometry of the sides is correct. First, for the convenience of work, remove the sashes from the double-glazed windows.
- Fix the frame inside the opening with self-tapping screws, having previously drilled holes in it.
- Fill the gaps between the double-glazed window and casing mounting foam.
- While the foam has not hardened, install the window sill, screw it on.
- After the foam has dried, waterproof it from the outside with acrylic sealant, sealing tape or a vapor-permeable membrane, and from the inside with a vapor barrier tape.
Due to mounting additional design(casing) it may seem that it is difficult to insert windows in a timber or log house, but this is not so. To be calm about the durability of the structure and the reliable performance of PVC products, it is better to allocate a couple of hours for additional work. The casing will avoid unnecessary expenses as the dwelling shrinks, and will also save the plastic novelty from deformation.
https://www.youtube.com/watch?v=6s3VKuxmy4o Video can "t be loaded: Installing a plastic window in a casing in a wooden house or log house (https://www.youtube.com/watch?v=6s3VKuxmy4o)
Greetings dear readers!
I decided to replace the old windows in a wooden house on my own. This is not at all easy, so before that I reviewed a bunch of sites and forums, talked with friends who performed the installation. And he singled out for himself the basic rules in the installation.
First you need to take measurements of windows in order to know the exact dimensions and order the window correctly.
Next, you need to dismantle the old windows. Then he prepares the installation site of the window, for this you need to remove the dust and debris accumulated during dismantling. Next, we install the window sill and prepare the plastic window for installation. Then install the window itself.
At first it seems very simple, but there are little nuances, given that you can easily do it. I want to tell you more about the installation later in this article.
Do-it-yourself installation of plastic windows in a wooden house. Installation technology. Instruction, photo
Do-it-yourself installation of plastic windows into the prepared pigtail of a wooden house, like other construction and installation works, is carried out using a building level and a plumb line.
It is very important that the plastic windows in the house are strictly level, otherwise an open, for example, window sash will close itself or, on the contrary, open under its own weight. Thus, the technology of installing plastic windows in the pigtail of a wooden house includes setting it in terms of level and plumb before fixing the window.
Here is our, developed by our own experience, instructions for installing plastic windows in a log house.
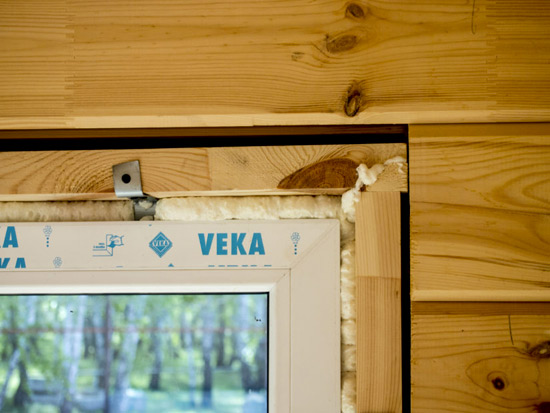
 First, I would like to note one point that you will need to remember when buying plastic windows: When you buy windows, it would be good to immediately buy mounting brackets for them, ideally 6 pieces per window.
These are iron plates (see photo) which, with the help of little effort, are fixed in special technical slides on the sides of the window frame. Thus, the frame is attached to the pigtail using self-tapping screws through these mounting fasteners.
During installation, many plastic window installers fix the window by drilling through the frame, but this is a violation of technology, and the tightness of special air chambers in the plastic window profile is thus violated, so this is not our method.
Plastic windows in a wooden house are generally a very capricious thing, but if observed right technology installation, then such windows in your house will last a long time without upsetting their owners with all sorts of distortions and other problems.
 In order to prevent the installation of windows with your own hands from becoming a torment, we advise you to remove the window sashes from the window frame. To remove them, you need to pull the pins out of the loops. Without window sashes, the frame weighs a little, and it will be much more convenient to tilt it, which will greatly facilitate the installation of windows.
The instructions for installing plastic windows in a prepared pigtail of a wooden house are as follows:
Align the window. We put the window on the lower part of the opening on chips about 2 cm thick and adjust it horizontally in level. For setting a horizontal level, the best tool, in our opinion, is a water level.
 You can't deceive water, it always levels off with the horizon.
Thus, setting the window exactly at the horizon level, placing chips of the required thickness under the frame for this, it will leave about a two-centimeter gap below for foaming with mounting foam, we proceed to setting the vertical level so that the window sashes do not live their lives.
How the vertical level is set when installing a plastic, and indeed any other window, I think it’s not worth explaining in detail, everything is clearly visible in the photo.
 After we put the window on the level, we fasten it to the pigtail with self-tapping screws through the above-mentioned mounting fasteners.
There is one technological point here - do not hit the crest of the log on which the pigtail sits with a self-tapping screw.
It is better to screw in the self-tapping screw a little obliquely than to deprive the design of the pigtail of independence from the log house in terms of the free movement of the gun carriages along the ridges of the logs.
The next step in our instructions for installing plastic windows in a wooden house is to fix the window sashes. It is necessary to hang the sashes on the window before foaming, but if you foam the frame without sashes, the mounting foam can slightly bend the frame, and the sashes will close / open poorly.
 Thus, if the technology is correctly followed and the installation of the pigtail and the plastic window is evenly done, your window should stand in such a way that distances of about 2 cm for mounting foam remain on all sides from the frame to the pigtail.
And above the upper part of the pigtail there will be a gap of 5-10 cm to the log for shrinkage of the log house, so that when it dries completely, the upper logs do not press on the windows.
Window foaming. Control check - On the already fixed, but not yet foamed window, with the shutters inserted, open the window and look.
 If the half-open sash of a plastic window does not try to open further or, on the contrary, close, then our window is installed correctly and you can foam the frame with mounting foam.
Here we have such a technology for installing plastic windows with our own hands. We hope you find it useful in the construction of your wooden house! Happy building!
http://dachaclub.rf/
How to install plastic windows in a wooden house with your own hands
In our wooden house, we decided to replace the old wooden windows with modern plastic ones. This article discusses in detail the installation of double-glazed windows with your own hands in a wooden house. The article is based on personal experience. Why is it profitable to install windows yourself:
When installing double-glazed windows in a wooden house by a supplier or manufacturer, the cost of a window along with installation will cost 40-50% more than its original cost.
As a rule, about 95% of companies that install windows do not guarantee the quality of installation in a wooden house. Therefore, when you install plastic windows in a wooden house yourself, you do not lose warranty period operation, but only save yourself for the good.
The installation of windows is shown on the example of self-installation of double-glazed windows, without the help of strangers, which takes an average of two and a half hours (for one window). Further, the process of inserting a plastic window into the window opening of a wooden house is described step by step.
Removing old windows
Self-installation of double-glazed windows in a wooden house is carried out on a solid foundation (frame). Since in our example the window boxes were installed quite recently (about 5 years ago) and were without damage (cracks, chips, putrefactive formations and wormholes), we decided to use them instead of the frame for installing new windows.
Old window frames that are in good condition and have sufficient strength can be reused, for example, to install a greenhouse.
Therefore, in order not to damage the frame tree, their dismantling must be carried out carefully, and before that it does not hurt to remove the glass from them. In our case, we did not pull out the glass from the frame, since the strong frames did not warp when they were removed and were dismantled quite easily.
Preparation of a place for the installation of double-glazed windows
With a dry and clean cloth (or soft brush), you need to wipe the window frame, remove the waste and debris accumulated after dismantling.
 The PVC window sill is mounted first, as it is the base of the double-glazed window when it is installed. In this regard, the window sill should be installed as evenly as possible (ideally horizontally). We check the exact horizontal position of the window sill with a level both in the longitudinal and transverse positions.
To make the window sill stand firmly, we make cuts up to a depth of 8 mm on the sides of the window frame. To adjust the evenness of the window sill, we use special plates made of plastic or fiberboard, or thin wooden planks treated in advance with an antiseptic. After final installation window sill we measure the evenness of the window sill with a building level.
We fasten the window sill on self-tapping screws to the bottom of the window frame, while indenting from the outer end of the window sill by 2 cm. PVC window sill has cavities). After the window is fully installed, the window sill attachment points will not be visible, as they will be hidden from view.
Preparing a plastic window for installation
At the very beginning, even before you start installing the window, you need to install the handle. It is not yet necessary to remove the entire protective film from the window surface, as it protects the window from possible mechanical damage.
Note!
The protective film can only be removed where the handles need to be installed. Handles of the handle at their installation should be in horizontal position.
This position means that the window opens on its side, while if the handle is turned down, the window will be locked in the closed state, if the handle is turned up, the window will open in the cranking mode.
We fix the handle to the window with two bolts, move the handle handle down. On the side pillars of the window (at the ends) we make markings for making holes on which the window will be fixed to the block.
Next, we drill with an electric drill according to this marking, two through holes (lower and upper) in the right rack of the double-glazed window and in the bottom rack (in total - 4 holes). Distance between bottom and upper parts the glass unit to the hole should be from 25 to 35 cm. The diameter of the drill for this work should be 6 mm, while the diameter of the self-tapping screw is 5 mm.
In order for the screw head to firmly rest against the window frame, we drill holes on the side posts from the inside for fastening with a drill with a large diameter - 10 mm, up to the metal frame itself. The hole should be such that the head of the self-tapping screw freely passes into the cavity of the window pillar.
window installation
We install the assembled window in the window opening. The center is controlled by measurements taken with a tape measure starting from the edge of the window and ending with the surface of the window frame on both sides, the distance should be the same (about 1 cm each).
We install the window on the surface of the previously installed window sill. Since we have already checked the window sill for evenness using the building level, there is no need to control the window itself for horizontality.
To install a window parallel to the wall of the house, we install a building level between the wall and the siding to stop. If the house was sheathed by another finishing material for example, a clapboard that fits snugly against the wall and does not allow you to place a level, then you need to use a plumb line for control.
We install a spacer bar 1 cm wide between the window frame and the window. It is necessary that this bar enters between the window frame and the window tightly enough. This bar is needed as a stop at the moment when the window is fixed in the window opening using self-tapping screws.
If this is not done, then the window, when it is fixed, may go to the side (it will simply be taken away) and the mechanism for opening and closing the window will not function well, or the window sash will not open at all.
When the installation of the stop bars is completed, and the window is leveled or aligned parallel to the wall of the house, then we fix the double-glazed window on the self-tapping screws. We fix the window to the window frame from below and above its side posts, so that the self-tapping screw is in the free space between the frame and the window.
Such fastening is not only reliable, but also provides a floating effect. If there will be seasonal shifts in the structure of the house, distorting window openings, then windows that do not have a rigid binding to the frame are almost not subject to distortion, due to the fact that the self-tapping screw can arbitrarily move towards the window frame skew.
Installation of double-glazed windows in a wooden house
First, we install adjusting plates between the drain holes. This is necessary so that the double-glazed windows do not close the holes through which condensate is drained from the window.
Carefully install a double-glazed window in the window opening. We make sure that it does not fit tightly between the racks of the window, since if seasonal changes occur and, accordingly, distortions of the window frame, the glass may burst.
Note!
If your double-glazed window entry is tight, and there is no gap between the window pillars and the double-glazed window (at least 5 mm), then you should contact the company that made windows for you for your order for an explanation, so that the company's employees eliminate this shortcoming. It is necessary to check the gaps between the frame and the double-glazed window even before removing the old window.
We install the double-glazed window evenly and fix it with plastic glazing beads, which have profile spikes that are inserted into the grooves of the window frame by lightly tapping on the glazing beads, during which the spike goes into the groove and a click is heard. A click indicates that the bead is securely fastened.
After the window is installed, we fill the void between the window frame and the window with mounting foam, both from the inside and outside of the house. Excess hardened mounting foam is cut off with a sharp knife.
After that, you can start finishing with platbands, fittings and drainage.
source: http://stroykaportal.ru/
How to install plastic windows in a wooden house
The relevance of the question: "How to install plastic windows in a wooden house" (and not only plastic ones), lies in the fact that wooden houses are very unstable. Moreover, unlike a stone or reinforced concrete house, this instability manifests itself throughout the entire service life of a wooden house.
If these factors are not taken into account when installing plastic windows or doors in a wooden house, very unpleasant (to put it mildly) problems can arise!
 What is the peculiarity of a wooden house? And the fact that the tree tends to "shrink", especially in the first years after construction. Those who claim that the log house shrinks a year after its installation are mistaken.
Yes, the most noticeable shrinkage occurs in the first year, but the process continues for at least 5 years, and in some climatic zones - for a lifetime! As the logs or beams dry out, the height of the wall can decrease to 1.5 cm per meter of masonry. This means that the height of the wall can “shrink” up to 6 cm.
And now imagine what will happen to a plastic window if, as always, you left a gap of 2 - 2.5 cm for foam ?! So, installing plastic windows in a wooden house is generally unrealistic? Quite the opposite!
But only if a special structure, called a pigtail or casing, is installed in the opening.
The purpose of this design is to give windows (and not only plastic ones) complete independence from the load-bearing walls of the house, to exclude even the slightest load on the window during shrinkage or curvature of the walls:
- The casing prevents the logs from moving from the vertical in the window opening.
- Does not interfere with vertical shrinkage.
- Takes all the load.
- Strengthens the wall of the house in the opening area.
Let's take a look at this system in detail. The simplest casing option is when a vertical groove of 50x50 mm is cut at the ends of the opening logs and a bar of the same size is inserted into it.
But this method of braiding is ONLY suitable for wooden windows. Therefore, we will not dwell on it. A more reliable option for casing is when a comb is made at the ends of the logs, and a window carriage with a groove is put on it.
 Now the logs during shrinkage (due to the ridge) will slide inside the groove without deviating from the vertical and without pressing down the window.
It happens that the groove is made in logs, and the spike on the gun carriage, the main meaning, I think is clear.
Window carriages are vertical bars 150x100 mm, at the ends of which 50x50 cutouts are made for inserting horizontal lintels - boards 150x50 mm with spikes at the ends.
The assembled casing is made smaller than the window opening by 7-8 cm in height. This gap is left in the calculation for the shrinkage of the wall. When assembling the pigtails in the opening, we cover the ridges with rolled tow and fill the gun carriages on it. This will save us from squeaks during shrinkage and insulate the opening.
Note!
Further, the procedure is as follows - we lay the lower jumper, stuff the gun carriages on the comb with tow, we wind up into the upper gap and lower the upper jumper into the grooves. We fasten the entire structure with self-tapping screws, trying not to capture the ridge, otherwise the whole point of installing the casing will be lost. In the gap between the pigtail and the logs, we also hammer in the tow.
And now you can insert plastic windows into a wooden house without fear for the consequences. We make installation in compliance with all technology: steam - noise - moisture protection. The gap between the casing and the frame is filled with thin boards wrapped in tow.
As the house shrinks, they have to be knocked out and replaced with others. To do this, the upper casing (attached only to the casing) is carefully removed and, after replacing the filling, is put in place.
At seminars, I was often asked the question, why does a window fitter need to know the technology of building a wooden house. And then, so that you can determine whether it is possible to install a window in this opening.
And, if necessary, equip it with a classic casing. Of course for a fee. There have been cases like this in my experience.
Now like this important point. You insert a plastic window into a wooden house where there are wooden windows. They removed the platbands for accurate measurement, but there is no casing. That is, the box of the old window plays the role of a pigtail.
This is where the choice has to be made (by the owner, but with your help): to remake the window opening for casing or to significantly reduce the size of the future window. After all, on each side you need to add the thickness of the casing + window frame + gap for foam. And what will be left there?
And in conclusion, I want to warn:
Helpful advice!
In no case do not agree to the installation of windows without casing in the opening. Even if the owner proves that the house is 300 years old and "all the shrinkage has already settled down." The tree "breathes" all its life with all the consequences, as they say.
Well, in the most extreme case, you can give in to the client, under his responsibility. But do not forget to put a dash in the contract in the column "Guarantee" !!!
All the same, the installation of plastic windows in a wooden house requires very serious attention.
There are always holes in a human dwelling, with the help of which natural lighting and, possibly, ventilation are organized. In most architectural projects, window openings are located in the walls. Of course, there are buildings in which sunlight enters through skylights, skylights, skylights and other devices.
Up to 50% of all heat leaving the room falls on the windows. But, despite the huge heat losses, humanity is not ready to “go blind” with its home (in Russian, the words “eye” and “window” have the same root), abandoning traditional windows.
About windows
Over its long history, window structures have undergone not very big changes. The window is still a frame filled with translucent material. Only technologies and materials in the manufacture of the frame itself have changed, and first glass, and then translucent materials made of polymers and composites have replaced the bullish bubble or mica plates.
And the question: “How to install plastic windows in a wooden house” is not entirely correct. First, because the concept itself is commonplace. It is usually understood as windows modern design in which not single glasses are used as glazing, but double-glazed windows (translucent structures made of two or more glasses hermetically connected to each other by spacers and sealants).
Windows with double-glazed windows can be wooden frames. And also aluminum, steel or fiberglass, which, by the way, are much better suited to the Russian climate than the widespread PVC. Simply plastic (PVC) for making frames is the most cheap material, so it became the most common.

And secondly, the process of installing a window does not depend on the material from which it is made. The basic requirements for installation are set out in GOST 30971-2012 “Mounting seams for adjoining window blocks to wall openings. General Specifications" and apply to any design - both modern and traditional.
Yes, and there is not much difference where to install the window: in a brick, wooden or some other house. It is important that the opening in the wall is properly prepared. Since the most common window structures today are PVC profile windows, called plastic ones, the conversation will be about their installation.
How plastic windows are installed
A modern window is a construction that is completely ready for installation, and, as mentioned above, the installation of a plastic window in a wooden house does not differ from the technology of its installation in any other building. Provided that you previously correctly designed the opening. For example, they made a good pigtail. You can read about what it is, why it is needed and how to do it correctly in the publication.
A well-designed opening is also mounting gaps fixed size along the perimeter. In the above-mentioned GOST, the compilers distinguish between 2 types of mounting gaps:
- end (or side) - the space between the end surface of the window box and the opening;
- frontal - the distance between the front surface of the window block and a quarter of the wall.

Mounting clearances: a - end, b - front. Drawing from GOST 30971-2012. Photo from docs.cntd.ru
The dimensions of the mounting gaps depend on the size of the window and the material from which it is made. Refer to the following table for recommended clearances. 
Do-it-yourself window installation
Today, buying or ordering a custom-sized window in a PVC profile frame is not difficult even in a small town, and even in a large city, there are countless companies involved in the manufacture and installation of plastic windows. But many refuse professional installation relying on their strength.
And this makes sense: the cost of corporate installation will be from a third to a half total cost. In most cases, anyone who has basic building skills, a simple tool and has a partner can install a window on their own in most cases if the window is large.
Installation methods: frame dowels and mounting plates
There are two ways to install a window with a metal-plastic frame: using frame dowels (through the frame) and on special mounting plates fixed on the end side of the frame profile.
It makes no sense to choose which method is better, because each has its own positive aspects. Professionals usually use both, and even during the installation of one structure - depending on the circumstances.
For self installation a small window, it may be preferable to use mounting anchor plates. They are attached from the outside and there is no need to “unpack” the window - remove the glazing beads so that you can remove the double-glazed window and get to the attachment point on the inside of the frame.

Professional installers, firstly, have a special tool - plastic blades of various shapes, and secondly, dexterity. Improvised means can damage both the frame and the double-glazed window itself.
Mounting on frame expansion dowels, in turn, is more reliable for installing a large window or for glazing that experiences significant wind loads, for example, in an apartment on a high floor. If you do not plan to remove the double-glazed windows, then the opening sashes must still be removed before installing the window.

Window frame options. Drawing from GOST 30971-2012. Photo from docs.cntd.ru
Whichever method you choose, you need to choose reliable fasteners of the required length and in accordance with the wall material. So, for a solid brick, you can use a self-tapping anchor, for a hollow one - Molly bolts, for concrete wall self-tapping screws with a plastic dowel will do.
For attaching the frame to wooden wall you need to pay attention to the following points:
- When installing, you need to take into account the size of the fasteners: self-tapping screws are taken of such a length so as not to pierce the pigtail bar through. Window fasteners should be fixed only to the casing beam, and not to the wall. Otherwise, the installation of casing becomes a waste of money.
- If the details of the pigtail, in addition to the mounting, also perform a decorative function (they serve as slopes), then the installation of a metal-plastic frame using special anchor plates is impossible, since the fasteners will be visible.
Marking of attachment points
After you are convinced that the prepared opening meets the requirements and dimensions of the finished window block, and you have purchased all the necessary set of hardware, you need to mark the attachment points - the location of the anchor mounting plates or the arrangement of holes for dowels.
The layout of fasteners and support pads. Drawing from GOST 30971-2012. Photo from docs.cntd.ru
The number of attachment points and their location depends on the design of the window and its dimensions. You must adhere to the following parameters:
- from mullion connection points - 150-180 mm;
- between fasteners along the length or height of the window - 600-700 mm.

Holes are made in marked places or plates are installed. Then the prepared frame is placed in the opening, leveled in the horizontal and vertical planes with the help of a level and fixed with spacers. Professional installers have special plastic wedges for this purpose. You can replace them with wooden ones - just bars or wedges. GOST recommends pre-impregnating wooden wedges with antiseptics. Holes are made in the wall in accordance with the existing holes in the frame or mounting plates.
Assembly seam device
In many cases (including professional installers, if the contract does not state “installation according to GOST”) at this stage, they fix the window block, hang the sashes and install double-glazed windows, and the mounting gap is filled with mounting foam.Installation according to GOST is somewhat more complicated. I will quote GOST 30971-2012 clause 5.1.3: “The construction of the assembly seam includes 3 or 4 layers with different functional purposes:
- the main central layer - providing heat and sound insulation;
- the outer layer of sealing - ensuring the diffusion of moisture from the assembly seam and protection from atmospheric influences (rain moisture, ultraviolet radiation, wind);
- inner sealing layer - providing vapor barrier and protection of the insulating layer from diffuse vaporous moisture from inside the room.

I - outer waterproofing vapor permeable layer;
II - the main central heat-insulating layer;
III - inner layer of vapor barrier;
IV - additional vapor barrier.
To create the first waterproofing layer, PSUL tape (pre-compressed sealing tape) is used.

Also, waterproofing and vapor barrier tapes are used, which are glued to the frame from the outer and inner sides, respectively, and along the perimeter of the opening to the wall (see the installation seam diagram above). For convenience, the tapes have 2 rows of adhesive layer: one is glued to the frame, the second - to the opening.

Hydro- and vapor barrier tapes for mounting windows with an adhesive layer. Photo from chistoe-okno.ru
After equipping the opening and frame with all layers of vapor and waterproofing, the frame is finally exposed in the opening, securely fixed, sashes and double-glazed windows are installed. And finally, the mounting gap "foams".

The use of vapor and waterproofing materials when installing a plastic window will prevent the destruction of the mounting foam under the action of ultraviolet radiation and the effect of diffuse moisture on the insulation layer. Which, in turn, will not only increase the service life of the insulation layer, but also protect the window slopes from damp spots and mold.
Installation of fittings and accessories
After the mounting foam dries, you need to cut off the excess and glue the second side of the vapor barrier tape. On the outside of the window, an ebb is mounted, installed decorative overlays holes for condensate drain, mosquito net. Additionally mounting seam can be closed from the side of the street with plastic or metal flashings.
When installing a window in a wooden house, the slits where the pigtails adjoin the walls are covered with decorative platbands. Do not forget that all finishing details (slopes, ebbs, trim parts) are also attached only to the casing beam, and not to the wall, so that the window with all the elements is installed independently and does not deform when the frame shrinks. From the side of the premises, final finishing work is also carried out - installation of fittings, slopes, window sills.

Correctly installed window will delight you for more than one year, especially if you did it yourself.
Reading time ≈ 12 minutes
Polyvinyl chloride (PVC) is currently very popular - it is affordable, holds heat well and does not lose geometric parameters. Against the backdrop of a rise in energy prices, such materials are almost a panacea, so many people are interested in installing a plastic window in a wooden house with their own hands. In the article, in addition to installation instructions, you will find photo and video materials that will help you cope with the task.
Log house with an attic in the process of glazing with PVC windows
Choice of plastic windows
In order to choose a good plastic window that is right for your case, you will have to pay attention to several parameters. Do not neglect these indicators so that during operation you will not have any complaints about the manufacturer or even force majeure.
Features of double-glazed windows

Single-chamber (left) and triple-chamber (right) double-glazed window
The production of double-glazed windows means not only different technologies manufacturing, but also different glass - this directly affects their performance. Below you will see what they are:
- The usual option with float glass. Such glass has high light transparency and is devoid of any shortcomings.
- Multifunctional double-glazed windows. It has protection against ultraviolet radiation (exposure to sunlight), has a low heat transfer capacity. These features directly affect the maintenance of the microclimate in the room - they do not let in the cold in winter, and the heat in summer.
- Self-cleaning designs. Such double-glazed windows help to significantly save time on cleaning, since the windows do not have to be washed from the outside. The special composition with which the glass is coated, when exposed to ultraviolet (sunlight), destroys the dirt that the first rain will wash away. Leaks and stains do not remain.
- Soundproof options. In this case, thickened glasses and a scientific approach to the distance between them are used. Thanks to the high-quality profile, seal and glazing bead, vibration, as such, is completely eliminated. Such windows do not absorb, but reflect airborne noise, which affects densely populated and industrial areas, as well as houses located near railways and airfields.
- Reflective glazing. They are also called specular because they are shiny and reflective with a reflectance of about 4%. Such options are ideal for hot climatic conditions - they do not allow heat to pass through, they do not heat up themselves, but at the same time they freely transmit photons (light).
- Colored glass panes. Such glasses soften bright light and poorly transmit heat, although transparency does not suffer from this. Properties (retention of light and heat) change with the hues.
- Tinted windows. They have the same characteristics as colored ones, but at the same time, no coloring pigments are used in the composition. The shade changes due to the gluing of a special film.
- Energy saving options with k-glass. This is an ordinary float glass, on which a k-coating (a thin metal film) is applied by the pyrolysis method during its manufacture (in the hot state). This significantly reduces thermal conductivity and increases mechanical strength (glass is placed on the outside).
- Energy saving options with i-glass. It has a reduced thermal conductivity inherent in k-glass. But the i-coating is a thin layer of silver and the glass can easily be deformed, so it is installed inside a double-glazed window.
- Constructions from smart glasses. These are, as it were, “living” windows that change their parameters (transparency and thermal conductivity) when they change from the outside. This category includes energy-saving and self-cleaning windows.
- Triplex glass. It is a multilayer sheet, where a transparent polymer is in the interlayer. This factor does not reduce translucency, but fire resistance and mechanical strength increase (this does not affect thermal conductivity and sound insulation). If such glass is broken, it will not shatter into small fragments, but will be held on the polymer.
Note. Double-glazed windows are also distinguished by the number of chambers. For regions with a temperate climate, one- and two-chamber packages are popular, in cold zones - three-chamber packages.
Video: Insulating glass formula determines the choice
Plastic profile

Five-chamber profile made of metal-plastic
The functionality of the PVC profile for windows can be determined by six parameters, including:
- number of cameras. According to the building standard, 3, 4 and 5-chamber PVC profiles are produced. In this case, the thickness of the first two options is 60 mm, and the third - 70 mm.
- The width of the outer wall can be of three classes:
- A - 3 mm ± 0.2 mm;
- B - 2.7 mm ± 0.2 mm;
- C - 2.5 mm ± 0.2 mm.
- Reinforcing or guiding profile. It determines the rigidity of the frame and its service life. When installing a plastic window in a wooden house, pay attention to its cross section - it should be a galvanized square with a wall of at least 1.2 mm. L-shaped perforated or ferrous metal, especially of smaller thickness, indicates poor quality.
- Rubber seals. High-quality seals are made of rubber and have a guarantee from the manufacturer for at least 10 years. But if at least once a year the inserts are lubricated with special silicone, then the service life will double.
- A high-quality PVC profile does not fade in the sun, does not turn yellow and does not emit a smell, but this depends on its composition:
- TiO2 is titanium dioxide. An effective white dye, which is practically absent in budget profiles.
- Chalk - its allowable rate in cheap profiles is limited to 6%, but unscrupulous manufacturers exceed this parameter by 2-3 times. From this, the plastic burns out, turns yellow, and there is no perfectly smooth surface.
- The manufacturer largely determines the quality. So, Chinese windows are much cheaper, but they will not last long. In the countries of the European Union and in Russia, a law has been introduced on laser marker marks, which are applied every 30-50 cm from the end side. It displays the date of manufacture and the country of origin. If such a marking is present, then there is no doubt about the quality of PVC, reinforcement and seals - they will comply with GOST and SNiP.
PVC window installation process
Below you will find step-by-step instructions for installing plastic windows in a wooden house. This is not difficult, but it will require the presence of certain carpentry tools - I will not write them out separately and you will learn about them in the process of reading.
Removing old windows

Removing old windows
I offer special instructions for dismantling old windows from the opening so as not to damage those elements that will remain in operation. But this applies only to old houses, where there are already window openings with a pigtail and they meet your needs - this item is irrelevant in a new building.
First of all, all glass should be removed - for this, the glazing bead and all the carnations that did not come out during the elimination of this profile are removed. Sometimes the studs are invisible, so to make sure they are present or not, run a knife or screwdriver at the installation site of the glazing beads, slightly resting on the glass. If the fixing material remains there, then the blade will definitely stumble on it, and then, as they say, it’s a matter of technology.
In some cases, in order to clog windows to the maximum and get rid of drafts, the glass is glued to the frame with silicone or silicone sealant. In such situations, all attempts to pick up the glass with a knife to tear it off the frame are doomed to failure. There is only one way out - to break the glass, but it can shatter and injure you. To avoid this, a wet newspaper is glued to the glass and broken - all the fragments will fall nearby and not scatter.
The frame is held on by nails, which are also very difficult to pull out - it is much easier to cut vertical frame profiles with a hacksaw, as shown in the top photo. After that, pick up a part of the cut vertical with a nail puller and tear it off. Perform a similar operation on the opposite side, and then tear off the diameters with a nail puller. The opening is ready and you can insert a plastic window.
Window casing in a wooden house

So they make a groove for the casing spike in the mortgage bar
First of all, window openings should be cut out and there are two options here. If the plastic windows are already ready, then, of course, you will have to focus on their sizes, but this is more an exception than a rule. Usually, first of all, window (door) openings are cut out and only after that they measure the windows or invite a representative of the company where the windows will be made (this is a free service).

Casing in a mortgage bar (left) and in a deck (right)
To begin with, let's look at the features of the installation of casing (pigtails). Casing into a deck clearly implies cutting a stud along the verticals of the opening, and in the box making a groove for this stud, as shown in the image at the top right. But we will focus on a pigtail with a mortgage bar - it is more popular.
With a mortgage bar, more options. The groove is cut out in the opening according to the size of the bar (usually it is 50 × 50 mm) and the bar is driven into it without nailing it, and a distance of 3 cm is left at the top to shrink the house. But sometimes they make the so-called stud-monolith, this is when the stud is one piece with the vertical of the casing. In both cases, when the wall shrinks, logs or beams will simply slide along the spike without deforming the window frame.
On both sides of the inserted bar, a jute or felt tape is nailed with a stapler - this is necessary for sealing and. Now you can screw a rough box to the bar, which is most often assembled from a 50 × 100 mm pine board. In this case, it is best to use wood screws with a length of 75 mm - they are guaranteed not to pass through the bar and will not reach the edge of the opening. If this happens, then a log or beam may hang on the screw, which will lead to the formation of a gap between the logs.
Now the upper and lower crossbars are inserted, but if it is placed below between the vertical boards, then it is placed on top of them. The gap left should be 3 cm, which means that the distance from the end of the vertical to the top of the opening is 8 cm, that is, the jumper, having a 5-centimeter thickness, will leave 3 cm after installation free space. The boards of the draft box are best fastened together with metal corners. Now we are talking about installing a plastic window in a wooden house with our own hands, so below you can watch a video on how a pigtail is made.
Important! The use of mounting foam in this case is unacceptable! The foam will glue the box to the opening, which will prevent the logs from sliding freely along the bar during shrinkage.
Video: Okosyachka or casing of the opening - protection against shrinkage of the building
Installation of PVC window sill

PVC window sill
After installing the draft frame (casing), you can proceed with the installation of the window sill - this is the first step to assemble the window within the opening. The fact is that the window sill is not adjacent to transverse profile on the side, but the frame is placed on top - there is a special recess there. But for strength on the sides of the box, you should make a cut of 5-8 mm and insert the window sill there - this way it will hold much better. To level the horizontal level, use plastic plates as supports (mention them when ordering a window if you insert it yourself).

Self-tapping screws with a press washer
The window sill element must be attached to the bottom of the window opening with self-tapping screws, stepping back from the edge plastic panel 20-25 mm, and subsequently the heads will be covered with a frame profile. To prevent the screw head from pushing through the plastic, you need a version with a press washer without a rubber gasket, as in the top photo.

Installing a plastic window in a wooden house
PVC frames are always pasted over with a protective film, but according to the installation technology, it is removed only when the window is finally inserted - this protects the plastic from scratches and dirt. To prevent the sashes from opening (this interferes with installation), screw the window handles and put them in the “closed” position (vertically down).
On vertical and horizontal window profiles, holes are drilled on the installation line of the double-glazed window with a diameter of 1 mm larger than the diameter of the fixing screw. Most often, the screw is 5 mm, and the hole is made 6 mm. The hats must be recessed into the plastic, so with a 10 mm drill they make a hole deep to the metal profile. Three holes are needed on the sides, and two at the top and bottom, indented from the corner by 50-60 mm.
At the bottom, the frame is placed directly on the windowsill, but at the top and sides there should be a gap of about 10 mm or a little less. Therefore, to screw the frame evenly, use wooden spacers (they are easy to make yourself). When everything is screwed on, check the vertical and horizontal levels, as well as the opening-closing function of the valves, so that there is no skew.
If the sash closes normally (there is no friction anywhere, and there is a tight fit), then close the window and insert double-glazed windows. It is unlikely that it will be possible to press the glazing bead with your hands, therefore, in order for this profile to fit tightly into the mounting groove, it is finished off with a rubber hammer. Now it remains to blow out the gap between the frame and the draft box with mounting foam, and it will be possible to open the sash the very next day (a precautionary measure against distorting the profile). It remains to make slopes inside and out, as well as install trim, but this is after the final shrinkage of the house.
Conclusion
In fact, the installation of a plastic window in a wooden house, except for the device and installation of the casing, is done in the same way as in a brick, block or monolithic building. But care is needed in any case, so try to remember all your actions and, if necessary, read the article again. You can also print the installation process on a printer and keep it in your pocket while you work, so you can use it when you need it.