Do-it-yourself wooden gazebo in the country: detailed construction instructions and drawings. How to build a beautiful gazebo with your own hands Arbor from nothing with your own hands
The gazebo on the estate is an integral part of modern landscape design. The beauty is that a gazebo with your own hands can be made in absolutely any style. Many people ask the main question after they decide to build a gazebo with their own hands - where to start? We will give a clear answer to this question in today's material, and we will also analyze at least important points regarding the construction of a wooden gazebo with his own hands.
Before starting work, you need to realize that the gazebo is a fairly simple structure that does not require special skills and knowledge in the field of construction. If you understand the simple technology and sequence, which will be discussed below, then the gazebo can be erected in a couple of days, with a minimum of effort, because in the end, you don’t Vacation home set out to build.
Moreover, having studied the detailed manual for building a gazebo with your own hands made of wood, you will save not only time and effort, but also money. If you don’t like the gazebo design below, you can choose a slightly different shape, because you will now be familiar with the main stages and principles of construction. Who knows, maybe you will be able to make yourself such a masterpiece, shown in the photo below. The main thing is to believe in yourself.
Gazebo with their own hands. What to do?
We will immediately decide on the material for the future design. Most experienced builders assure that the best gazebos are made of wood. This choice brings many advantages:
natural look;
Ease of construction
· simple processing wood;
Can be made in any style.
In addition, during the construction process, you will need the most common tool that lies in the garage of each owner. Materials for the design will take just as little, which will save significant funds. Do not forget that if you wish, you can build such a gazebo from wood, at the sight of which guests will not want to leave your site. This is sarcasm, of course, but there is some truth in it.
What about the foundation?
A wooden gazebo is quite plastic, elastic and weighs little. Thanks to these qualities, you can start its construction without a pre-prepared foundation. It is enough to treat the wood with special chemicals to protect it from contact with the ground. This will protect it from the effect of decay. Moreover, there are such types of gazebos, for example, wicker ones, which would be simply stupid to put on the foundation.
Initial stage of work
The first thing to do is to work out in detail the plan for future construction. If you can't find your bearings regarding design, then today there are a lot of magazines and websites dedicated to construction topics. There you can see examples of the most unusual, and at the same time, the simplest arbors for the estate. Making a plan includes:
The purpose of the building
shape of the gazebo
The shape of the structure can be square, round, rectangular, octagonal, hexagonal, and so on. The owners of the site with creative thinking and wild imagination can experiment by building a gazebo in the form of Baba Yaga's house, a fairy-tale palace or a spaceship. Below is a very creative and unusual example of a gazebo.

Or you can prefer more classic style which will look simple and tasteful.

Arbors also differ in their purpose. You need to decide from the very beginning whether you want to just relax in the shade on fresh air or a large company will have fun in the gazebo.
If the first option, in this case, you can start building an ordinary gazebo with your own hands with several benches.

If you plan to build for a fun pastime of the company, give preference to a large platform and a canopy.

For those people who cannot imagine a vacation without a barbecue in nature and a field kitchen, a gazebo with a Russian stove or will be an ideal option.

Advice! Before choosing the shape of the future structure, it is worth paying attention to the existing buildings on the site, as well as to landscape design generally. The chosen style of gazebo should be in harmony with the surroundings.
Deciding on a place
Once you've made your final design decision, it's time to choose the right location. Regarding the proximity of the location of the gazebo from the house, this question remains at the discretion of the owner. Proceed from the following - whether you want to take a break from the hustle and bustle of your home or want to spend time sitting outside with your family.
Do not place the building in a lowland, this cannot be done for obvious reasons - it is in the lowland that water will accumulate over time, which will lead to rotting of the wood.
Advice! Position the gazebo near trees, flower beds, or other vegetation. So you will achieve the maximum aesthetic effect, because it's nice when you have a view of the wonderful plants from the gazebo.
Gazebo with their own hands. Photos, drawings
After the above preparatory activities, we proceed to the design. The drawing will take into account:
· height;
· the size;
· components;
fastening methods, etc.
The drawing should also take into account the number of necessary building materials which must be pre-purchased.

For example, we settled on the standard square shape roofed structures. It is about such a design that will be discussed in today's practical guide. We remind you, taking into account the information and examples below, you can choose any other gazebo design you like.
Necessary tools and materials
To start building, you need the following materials:
concrete for the process of mounting racks;
timber 15x15 cm for making the base and racks;
timber 10x10 cm for roofing elements and upper lathing;
bars for log 5x15 cm;
board for flooring;
plywood or boards for roofing;
Roofing materials, depending on your choice, it can be metal tiles, slate or corrugated board;
boards for railings and others decorative designs;
lining for side cladding;
frames with glasses (if these elements are provided for in the plan);
· paint, varnish;
Self-tapping screws, screws, nails.
It is worth recalling that changing the project will also affect the list of materials, it can either decrease or increase, keep this in mind.
Also take care of the availability of the tools that you will need during the construction process:
hatchet;
shovel
hacksaw for wood;
Electric or chainsaw
a hammer with a nail puller;
planer
· chisel;
roulette;
· stairs.
Armed with the above tools, you can build almost any wooden gazebo on your site.
How to build a gazebo with your own hands
After all the above recommendations are fulfilled, it's time to start the main thing - building a gazebo with your own hands. To begin with, it is necessary to treat the wood used with moisture-proof and antiseptic agents. This must be done to keep the tree from rotting.
The next step is to install the supports. Mark the location of the future building with pegs and ropes.

Advice! In order to get a perfectly even rectangle or square, it is necessary to observe the symmetry of the diagonals.
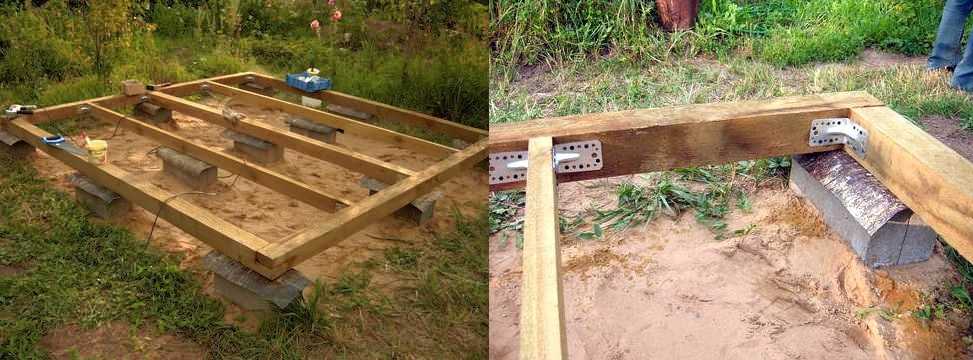
We will focus on the option when the foundation is not poured, but. This option is much easier to implement. Dig holes for the posts about a meter deep.
Pack the bottom of the pits with gravel, approximately 5 cm, after which, pour a 10 cm layer of concrete. Wait for the moment when the concrete hardens a little, and place the anchors in it. It is on them that the racks will subsequently be attached.
You can do it a little easier. Place a post upright in the hole and fill with concrete. It is important to ensure that the rack is installed exactly, strictly vertically. Racks should be dug into the ground in such a way that their strapping is a perfect square.

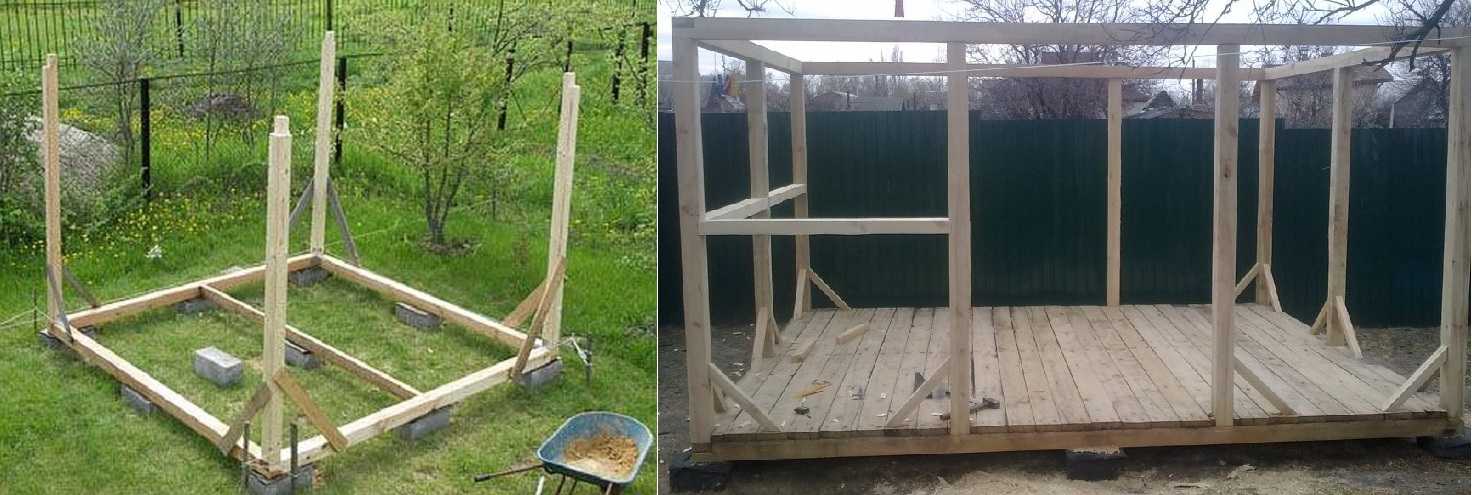
After installing the racks, it's time to start building the frame. This action must be started with bottom strapping. For the floor, you can use a regular beam, which must be laid every 50 cm. This design is guaranteed to withstand the weight of the flooring.
Next, install the remaining frame structures - racks. They are responsible for supporting the roof and the top trim. The location of the racks should be strictly symmetrical, the number of which depends on the dimensions of the gazebo.

After the construction of the frame, we are engaged in flooring. The floorboard is fastened with ordinary screws or nails.
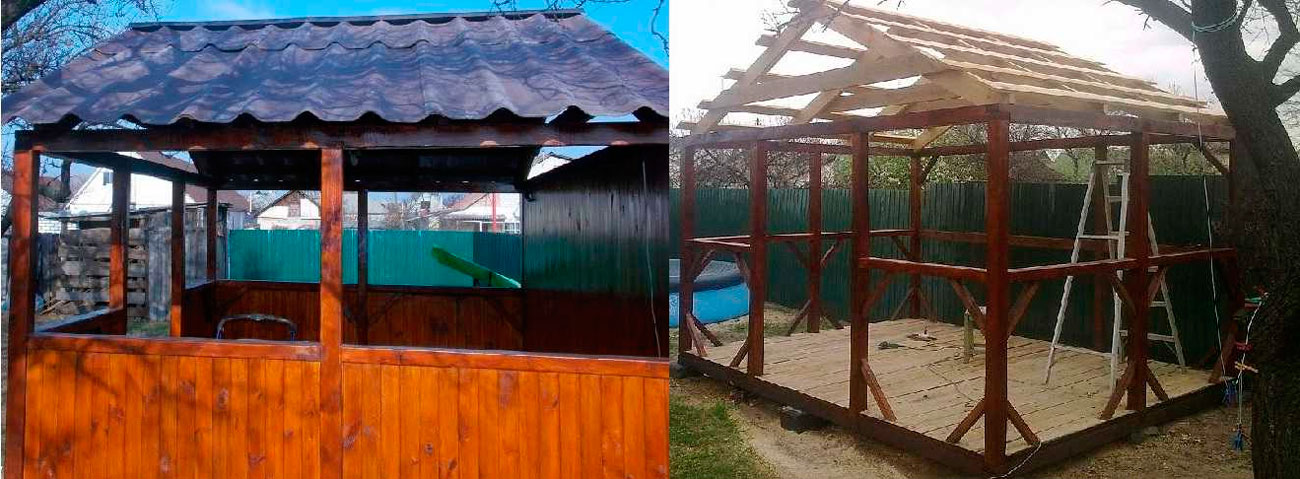
Roof installation is a critical stage of construction. First of all, the upper strapping of the entire structure is carried out from the bars, which must be attached to the supports with nails. Subsequent construction depends on what form of roof you have chosen for your future gazebo. More often, four or gable roof, due to its practicality, reliability and ease of execution.
The hipped roof looks very original, we will focus on it as an example. To make the structure stronger, it is necessary to install additional rafters fixed to the upper and main harnesses. You should follow the symmetry of the rafters, this is very important.
Important! It is necessary to fasten the material to each other every 20 cm along the entire length of the rafters.

It is worth paying your attention to the fact that you should follow the safety rules for working at heights. Make sure that the stepladder does not wobble and that there are sharp and dangerous tools under you.
The final stage is decoration. It's time to show your imagination and decorate the walls, roof and railings of the gazebo. Usually they use a standard beam for the railing, then sheathing the structure with clapboard.
If you get a little confused, you can apply carvings to the wooden surface of the railings and walls. It adds color and originality. finished construction. However, for wood carving to look really spectacular, there must be certain skills in this matter.
After, you can open the wooden surfaces with varnish or paint them.

The next steps depend on your preferences. You can fill the gazebo with comfortable and spacious sofas, install a deck chair in it, or give preference to ordinary benches and a table.
By the way, you can also arrange tables, benches and chairs for a gazebo with your own hands. This will complement general design. Provide light, install mosquito nets, take care of the path from the gazebo to the house and enjoy outdoor recreation with close friends and family.
Weaving from rods - we simplify the process
If you like simple but tasteful, then you will definitely love our next idea. Moreover, it will greatly simplify the construction process. Arbor made of rods is very popular today. It not only looks spectacular, but is also quite practical.

The process of building a gazebo from rods with your own hands is quite simple. It is necessary to drive rods into the ground to a depth of 35 cm. The main thing is that the rods form a symmetrical square or rectangle, although it is possible to make a design in the form of a hexagon or octagon.
You can also sheathe installed wooden racks ordinary arbor weaving. This also looks spectacular. If your gazebo is located near the sea or river, you can use ordinary ropes for weaving, it will look quite appropriate.

It is worth emphasizing that weaving is a very painstaking process, although not expensive. According to the principle of the above weaving patterns, you can choose the most acceptable pattern for your gazebo.
Do-it-yourself gazebo made of wood step by step video
Surely, you have seen from your own experience that it is not difficult to build a gazebo with your own hands from wood on your site. We figured out how to build a gazebo with our own hands. Choose your favorite gazebo design and decide on the place of construction. The main thing is to follow the above recommendations and use our methodology. Don't worry, you will definitely succeed. We recommend that you watch the following video of the gazebo construction process on your own, for a better understanding of the construction process.
The gazebo is an ideal addition to any summer cottage, because it is nice to retire here with a cup of tea, and talk with friends, and celebrate a family celebration. Do you want to become the owner of such a functional and cozy building? There is nothing easier - you can make it yourself, using the most common materials at hand. In order to cope with the task 100%, we propose to understand the construction technology in stages: to your attention are detailed instructions on how to build a gazebo beautifully, but quickly and cheaply, as well as photos and videos that will serve as a useful visual guide in your work.
Stage 1: Decide on the parameters of the gazebo
In order for the construction of the gazebo not to result in large time, power and financial costs, it is important to think over every detail of the future design to the smallest detail. In particular:
- dimensions;
- form;
- type of roof
- foundation type;
- frame materials.
The dimensions of the gazebo are best calculated using the formula: 1 person \u003d 1 sq.m. space. The shape of the structure determines the level of complexity of construction, so if you are taking on such work for the first time, give preference to a traditional rectangular arbor.
The roof of the gazebo can be single-pitched, gable, rounded or pyramidal. Naturally, it is cheaper and easier to mount a pitched roof.
As for materials, it is best to build a gazebo from wooden beams and metal racks - it is much easier to work with them than with brick, stone, logs or wrought iron bars. In addition, these materials are very budget-friendly.
Stage 2: Preparing for construction
As we see, perfect option for a novice builder - a rectangular gazebo with shed roof on a slab foundation. To build such an extension, you will need the following consumables:
- bars of two types - with a section of 50 x 50 and 100 x 100 mm;
- wooden boards 30 x 150 mm and 50 x 150 mm;
- sheets of corrugated board;
- reinforcement bars;
- large gravel;
- concrete mortar;
- sand;
- self-tapping screws and screws;
- primer;
- dye.
Do not forget about working tools:
- Bulgarian;
- jigsaw;
- hacksaw;
- screwdriver;
- anchor bolts:
- steel corners
- a hammer;
- level;
- rule.
After all the materials and tools have been prepared, it is necessary to select the place for mounting the gazebo and make markings on it. To do this, you first need to determine the four corners of the future design, taking into account the pre-designed dimensions, and mark them with beacons. Then between the beacons you need to pull the twine. As a result, you should get a rectangle - this area will be your gazebo.
Stage 3: We equip the foundation
The pouring of the foundation begins with the preparation of the foundation pit. Its depth should be 20-30 cm. You can dig it with a simple shovel: remove the soil, level and tamp the bottom. Make sure that the walls of the pit are vertical, without slopes. A 10 cm layer of sand should be poured into the finished recess. It should be moistened and compacted tightly. When you make sure that the layer is perfectly even, place the formwork from the boards around the perimeter of the pit. Its height should be no more than 10 cm. Next, you need to fix the formwork with bars.
The next step is to fill the pit with large gravel. Then, in the corners of the future gazebo, it is necessary to install reinforcement bars in the rubble. For the stability of the extension, the rods should rise 10-15 cm above the level of the foundation. Then fill the pit with concrete mortar.
Advice. After pouring, be sure to level the concrete with a rule so that the base is perfectly even. Proceed to further construction work only after the foundation has completely hardened!
Stage 4: Assemble the frame
Installing the gazebo frame is one of the most difficult and responsible works of the entire construction process, so it is very important to carry it out in a clear sequence:
- Prepare 4 bars with a section of 100 x 100 mm and cut them to the height of the structure. Treat the finished elements with a primer.
Important! The front bars should be at least 15 cm longer than the rear ones so that it is possible to form a roof slope.
- Drill each support bar in the bottom end. The diameter of the hole must be equal to the diameter of the reinforcement bars installed at the corners of the foundation.
- Put the support bars on the rods and align them vertically with a level. Fix them with anchor bolts.
- Connect the corner bars with boards 50 x 150 mm and install special braces for the rafters.
- At a distance of 10 cm from the top of the structure and 50 cm from the floor, connect the racks with jumpers from bars with a section of 50 x 50 m, fixing them with bolts. Between these jumpers, every 50 cm, fix the vertical bars with steel corners and self-tapping screws. Only the entrance area should remain free.
Stage 5: We mount the roof and decorate the gazebo
Installing a roof does not require much time and effort, as shed structures are very easy to install. So, first install the logs on the boards that connect the corner bars. The average step is 30-40 cm. Then sheathe them with a 30 x 150 mm board, leaving 10 cm gaps between them. Next, cover the boards with glassine and stuff thin slats on top. Place sheets of corrugated board on these rails and fix them with self-tapping screws or nails. Actually, the roof is ready.
After the main construction works completed, proceed to the design of the gazebo. To begin with, it must be treated with an anti-corrosion agent. Then the structure can be painted, varnished or even sheathed with clapboard. After that, conduct electricity and install the necessary furniture. And in the end, you can hang the walls of the gazebo with light tulle to give the space even more comfort.
As you can see, there is nothing complicated in the construction of a summerhouse. If you follow our simple instructions, you will be able to get a beautiful corner for a comfortable outdoor recreation without extra time and money.
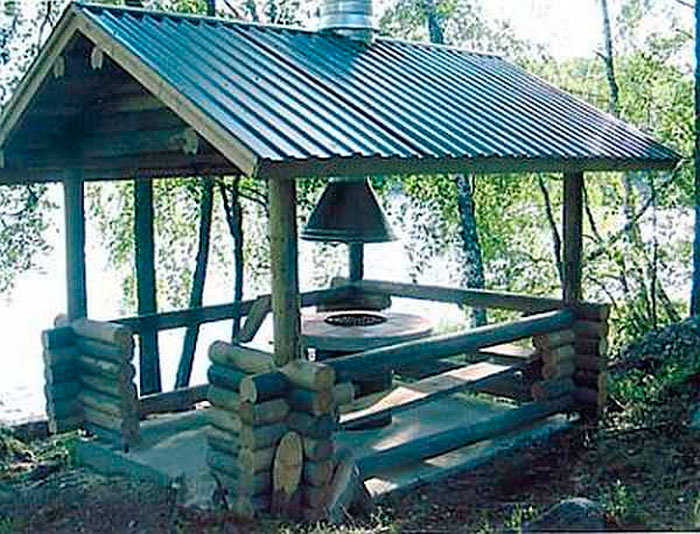
Almost all owners of cottages or private houses equip a wooden gazebo in the yard where you can sit in summer time and relax. If you make a capital gazebo of medium size, then inside it is really possible to install a barbecue. Then here you can not only relax, but organize any celebration with your family or friends. If it is also closed from all sides, then you can spend time here in winter, especially since the brazier will serve as an additional source of heat.
The decision on which gazebo is better to build is made by the owner of a summer house or a private house based on his financial capabilities. In this regard, most often you can see fairly simple do-it-yourself designs.
The article is aimed at helping the owners of cottages and private households to build some kind of gazebo, depending on the available opportunities.

There are summer arbors, open-type and closed-type arbors, all-weather. In addition, there are combined options when the gazebo opens for the summer, and with the advent of cold weather it is insulated. But these are intermediate options that deserve attention. As a rule, such options are somewhat cheaper than completely closed ones, but they take away some of the precious time for manipulation.
Gazebos with and without floors
There are gazebos with a floor, as well as gazebos mounted on an open area or a platform where concrete screed or posted paving slabs. If you build a gazebo just on the ground, especially a wooden one, then you need to take measures to protect wooden structures, especially in places that are in contact with the ground. If the gazebo is made of metal, then you will have to protect it from rust.
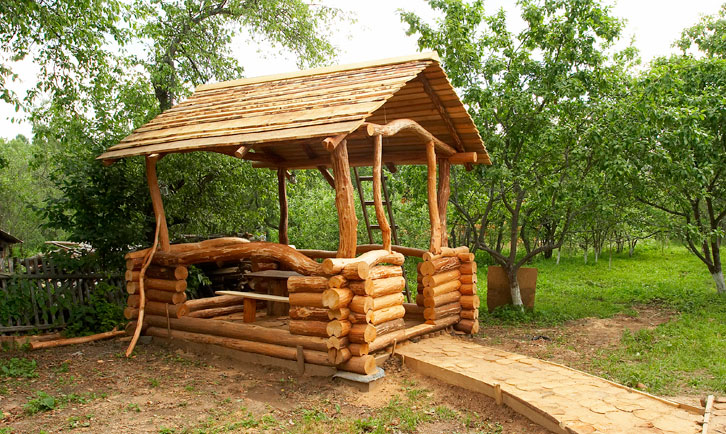
 Wooden gazebo without a floor, built of wood. She has one feature: the roof is quadrangular, and the gazebo itself has beveled corners.
 The construction of a gazebo with a floor involves the installation of a foundation. Basically, they are limited to a columnar foundation, which is made of brick or rubble, poured with concrete, or mounted on foundation blocks. Alternatively, you can use large stones (boulders) and support the entire building on them, if any are available. Such a foundation is suitable for light, frame buildings made of wood or metal. If the building is capital, made of brick, then it is unlikely that it will be possible to confine itself to a columnar foundation: you will have to pour a concrete strip foundation, albeit in a simplified version. It is enough to deepen the foundation by 20-30 cm.
 Arbor made of wood, but with a wooden floor, mounted on supports.
 To lay the tiles in the gazebo, you will have to fill the floor with concrete, but after insulating the floor with foam, for example, and also laying a layer of waterproofing. After that, you can lay the tiles, and the floor is frost-resistant. At the same time, it should be done so that the floor extends 50 centimeters beyond the gazebo, and these 50 cm should be laid out at a slope so that moisture is not retained on the tile. If the gazebo is not closed, then the entire tile should have a slope. If moisture does not linger on the tile, then the tile will stand for a long time.
Materials used
For frame buildings of this type, the following materials are suitable:
- Wooden beam or round timber of small diameter.
- Steel profile pipes.
- PVC pipes.
Of these three materials, only the last does not require additional protection. Polymeric materials do not rot and are not afraid of both high and low temperatures. Therefore, such structures quite easily endure winter. The only thing that is accompanied by a certain complexity is the selection of PVC pipes for the manufacture of the frame, since they do not have such high strength as wooden beams or metal pipes. In this case, you will have to decide on the design of the gazebo so that the installed furniture does not load pvc construction, and the brazier will have to be installed away from PVC pipes.
 PVC pipes can serve not only as a frame, but also act as a decorative finish.
 In order to wooden gazebo for a long time pleased others with her appearance, she will have to treat the tree with a protective compound and more than once.
Alternatively, you can use impregnations such as "SENEZH" or "ESTATE". Reviews about these protective compounds are not bad. In addition, this manufacturer also supplies tinting compositions to the market.
In the case of making the frame of the gazebo from metal, it should also be protected from atmospheric influences. To begin with, the pipes are primed, and then treated with a primer at the welding site. Although this option is not optimal: it is not at all difficult to coat an already welded structure with a primer. If rust is found on metal elements, then it is better to clean it off with sandpaper. This approach will allow you to maintain an acceptable appearance of the gazebo frame for a long time, which means that it will last a long time.
 Arbor made of plastic. Nothing to do with the environment, but no additional treatment is needed from fungi or rust.
 You can sheathe a gazebo with any material, but wood is considered the most popular: after all, a natural material. As a material for sheathing, a processed board, blockhouse, lining (wooden), thin round timber, as well as pallets that are disassembled, the board is processed (grinded) and the lower part of the gazebo is sewn up. Enough time, but very economical. In addition, such wood is quite dry and, after additional protection, can last a long time.
Arbors of any design, it is possible to sheathe such materials:
- Polycarbonate, but it will be quite expensive.
- Profiled, somewhat cheaper, but not very comfortable.
- Tempered glass is, well, very expensive.
- Ordinary fabric, which is very economical, but not very modern.
- Transparent PVC film.
- Bamboo, expensive, but stylish.
 Arbor made of metal combined with sheathing from translucent polycarbonate.
Frameless gazebo options
Frameless gazebos are capital buildings on a strip foundation, lined with brick or foam block, lined with decorative tiles or artificial stone. Moreover, building options can have both all walls up to the ceiling, and several main walls (for example, two), and the rest of the gap (s) remains open. Such structures are characterized by large capital investments. To build them, it is better to hire craftsmen or seek help from a construction company. If you do it yourself, then the construction of the gazebo can be delayed indefinitely.
 Capital gazebo, trimmed with wild stone, in combination with glazing. Both brick and other modern materials can be used as the main building material.
 If you plan to build a gazebo made of bricks, then it is better to hire good masons to lay out the frame of the gazebo with high quality. Then, you may not have to spend extra money on finishing the building from the outside. Building a gazebo from a foam block will require exterior finish. Lots of finishing options. In this case, you will first have to level the walls and only then proceed with the decoration. Since capital buildings are intended for their operation in winter time then they must be warm. Alternatively, you can build outside wooden frame, insulate with ursa and sheathe with siding.
Roof structure
The design of the roof depends entirely on how complex the shape of the gazebo is. If the gazebo is rectangular, then the roof structure will turn out to be quite simple: single-sided, double-sided or four-sided. Such forms of gazebos are also considered one of the simplest, requiring a minimum of time and money. The process of building a single-slope, dual-slope or hipped roof, almost identical, in technical terms.
 Rectangular gazebo made of round wood, equipped with a gable roof.
 With more complex forms of arbors, the process of building a roof becomes more complicated. If the gazebo is pentagonal, hexagonal or octagonal, then the most suitable option roofs - this is a roof in the form of a tent (tent). In technical terms, these are the most complex structures, since you have to think about how to connect all the rafters at one, central point.
 A roof in the form of a dome is technically difficult to implement. In the absence of experience with wood, it is better to refuse this option.
 The presence of modern building materials, including roofing, allows you to make the roof generally round, without the presence of edges. In this case, you need to be able to work with metal pipes and welding. The pipes are bent according to a certain pattern and a crate is attached to them. It is desirable that the crate be continuous. On top of the crate is mounted flexible roofing material.
 The simplest version of a garden gazebo: two curved pipes to which polycarbonate is attached.
 Simple designs of gazebos, especially in recent times, are very popular. Some summer residents equip gazebos under the same roof as the house. They are called verandas. In fact, it is just as simple and affordable option, with a minimum of costs.
There are a lot of designs of arbors, so it’s simply unrealistic to tell about all of them. Moreover, each of them is the result of hard work and wide imagination.
How to make a gazebo with your own hands
It just so happened that most often they build gazebos with their own hands from wood. This is due to the fact that working with wood does not require special tools. The second place is occupied by gazebos made of metal, but their construction requires skills in working with metal. Arbors from other materials are rarely seen mono. This is due to some difficulties, as well as increased costs, which the family budget cannot withstand.
In the case of building a gazebo made of wood, first of all it will have to be treated with preparations that protect the wood from bacteria and fire. Work can begin after the impregnation is completely dry. Firstly, it is necessary for quality, and secondly, it is problematic (inconvenient) to work with wood that has not yet dried.
Availability of a drawing
The presence of a drawing with dimensions greatly simplifies the process of building any structure and a garden gazebo is no exception, despite its small size. Without a drawing, it is very easy to get confused in the manufactured parts, although there are not many of them at all.
The figure below shows two options for gazebos: one of gable roof, and the other with a 4-pitched, although both gazebos are 4-coal.

Step by step instructions with the presented photo
All work begins with the preparation of the site for the gazebo. As a rule, a certain ball of soil is removed along with the fertile layer. This is necessary so that in the future this organic matter does not rot under the floor of the gazebo. If the soil is sandy or sandy loam, then construction debris, crushed stone, broken brick, etc. are poured into the dug pit, after which everything is carefully rammed. After that, a layer of sand is poured on top. If the soil is clayey and there are problems with water drainage, then it is better to fill the pit with a layer of clay and compact it. If you fill the hole with something else, then moisture will accumulate in it. Under the influence of heat, the water will begin to emit bad smell, which is not necessary at all.
Arrangement of the foundation and lower trim
The easiest way is to install on a prepared pillow concrete blocks so as not to delay the construction of the gazebo. If you lay out brick columns, then it will take a lot of time (not only work is taken into account here, but also the time to strengthen them). The distance between the blocks is selected from 1.5 to 2 meters. If the gazebo is built from wooden beam 100x100 mm, then the distance is chosen at 1.5 meters, and if from profile pipe 60x60 mm, then 2 meters is enough.
Supports must be set in the same plane. To control this, you will have to use a level and a long straight rail. After that, waterproofing is laid on top of the posts (2 layers of roofing material or bituminous mastic). And only after that the bars of the lower trim are mounted. The bars are interconnected with nails, 150 mm long. To strengthen the frame, each connection is duplicated with powerful metal corners. Despite the fact that this is a summer gazebo, extra strength will never hurt, as the structure will quickly loosen under the influence of the wind.
 Lower harness assembled.
 Mounting racks
The next step is to mount the racks. Racks are provided at the corners of the gazebo, in the center, on both sides of the entrance, and also where the supports (foundation) are installed. Racks on top have the same strapping as on the bottom.
Installation of racks is carried out strictly vertically, with the control of this process building level. Many argue that building levels have a large error. Maybe this is so, but for the construction of a garden gazebo, the error does not play much importance. In addition, when buying a level, it is advisable to check it. Alternatively, you can use the usual plumb line, but it is very difficult to use it alone. One person should use the plumb bob and the other person should fix the posts. Using the building level, you can do without outside help.
Fix the position of the racks with jibs. In the future, having fixed and secured everything thoroughly, the jibs can be removed if they interfere. If the lower part of the gazebo is not transparent, then the jibs can be left. They can simply be finally and securely fixed with the help of metal corners. At the same time, each time it is desirable to check the racks for verticality.
 Two options for mounting racks with slopes. On the left are temporary braces that are planned to be removed, and on the right are capital ones that will be used in the future.
 Installation of the top trim and floor boards
After the final fixing of the racks, they are also fixed from above, mounting the upper harness. Technically, it looks the same as when installing the lower harness. For reliability, metal corners should be used. This is especially important if there are no permanent jibs in the design.
After the frame is almost assembled, proceed to laying the floor boards. They are like everyone else wooden structures treated with antibacterial impregnation. For such purposes, impregnation "Senezh" or "Senezh-Ultra" is suitable. They differ from each other in that "Ultra" does not stain the wood, but gives it a greenish tint. If the entire structure is covered with a dark stain, then the greenish tint will disappear and remain invisible.
 Means for impregnating wood that may come into contact with the ground.
 After the boards are fixed with nails, it is better to paint the wooden floor, otherwise the wood will get dirty before the construction is completed. It is better to paint a tree on the street with varnish or oil-based tinting paints. And it's not classic. oil paints, and special compositions to protect the tree from precipitation. The basis of these compositions is oil, to which protective elements and color pigments are added. As a result, the wood acquires a completely different shade, while maintaining the texture.
Structural binding in the middle of the frame
The middle strapping of the frame, in most cases, is simply necessary, since the frame is divided into an upper and lower part, which is always (almost always) sewn up. It is better to fix the bars to be installed using metal corners or make recesses for them in the racks, up to 25 mm in size, if the thickness of the bar is 100x100 mm.
 Option for fastening the middle strapping.
 After that, you can proceed to the final coloring of the frame of the garden gazebo.
Roof arrangement
The next step is assembly truss system as shown in the photo below. rafters by appearance similar to triangles.
 Rafters (triangles) for arranging the roof.
 These elements are attached to the frame of the gazebo. Since there is no overhang of the roof, they are attached directly to the beam of the upper trim. Triangles are installed vertically and fastened with nails. To fix them in this position, you can use the slopes.
If an overhang is provided in the design of the gazebo, then it is necessary to cut out the seats in the rafter beam. The attachment points are in the form of triangles.
 Options for the correct fastening of rafters.
 Of these two options, the first is more suitable, since the roof does not have large sizes. In order not to customize each leg of the rafter individually, it is better to use a template. To do this, you need to take a piece of an ordinary board and cut an opening of the required size. This will not only simplify the task, but also provide the necessary accuracy. So that the work is not a burden, you can use a power tool, for example, a jigsaw.
Before the final fastening of the rafters, it is imperative to check the correctness of their installation, both vertically and horizontally.
After the final and reliable fastening of the triangles, the crate is stuffed. The nature of the crate depends on the nature of the roofing material. Soft types of roofing materials require a continuous crate. If it is slate or corrugated board, then the usual crate will go.
decorative trim
After arranging the roof, when the whole structure is closed from rain, they begin to finish the lower part.
 The gazebo with your own hands is ready.
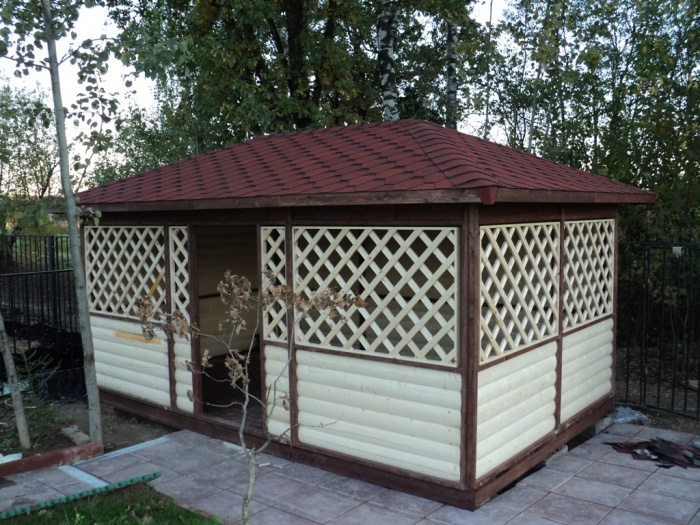
 This design belongs to the category "simple, fast and cheap." Taking her as an example, you can experiment by doing something with your own trim elements. In the following example, you can see how the gazebo, made according to the same project, has changed: the lower part is sheathed with a blockhouse painted in light tone. And the rest of the frame has a dark tone.
 This is a different version of the same project.
 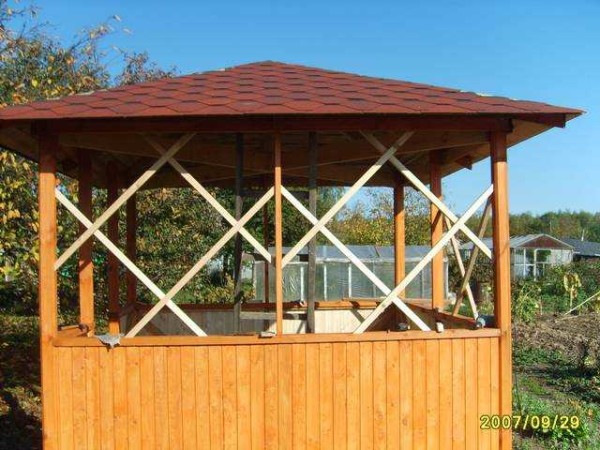 In the next photo, another option. Based on this project, you can get many options.
 Below in the article are drawings with all sizes. More below are interesting photos but no drawings. There is hope that someone will use them.
Sketches of gazebos with drawings and dimensions
All dimensions indicated on the drawings can be increased or decreased in order to obtain a design of the required dimensions. With a significant increase in size, the dimensions of the wooden elements (section) should also be increased for the required strength. If everything is done correctly and in the right sequence, then you can count on a positive result.
Classic wooden gazebo
The project is almost the same, but some dimensions have been changed: the top point of the roof has been raised, which makes it seem lighter. Arbor quadrangular with hipped roof.
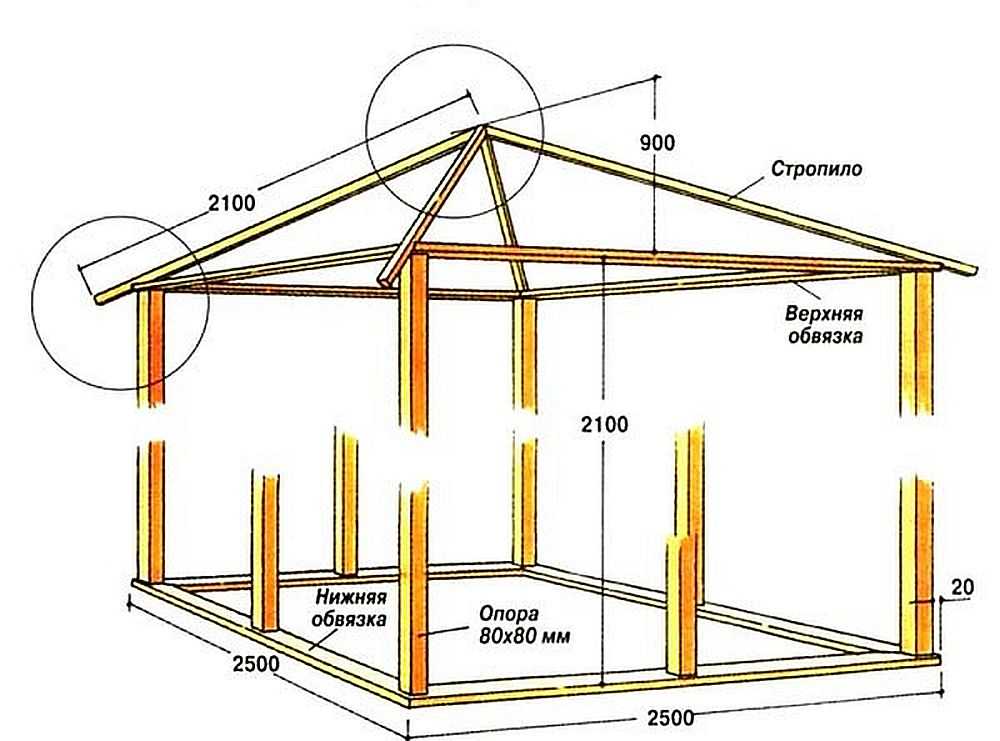 An ordinary square gazebo for a garden or a summer house made of wood.
 Mounting the roof has problematic attachment points, indicated in the figure by circles. The figure below shows how to do it correctly.
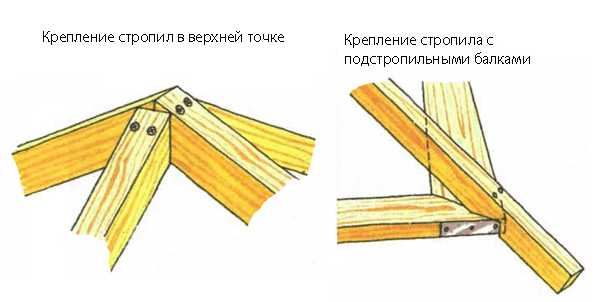 Options for fixing problem nodes in the arrangement of a hipped roof.
  Variant of distribution of space in height and option of fastening the crate on the roof.
 Chinese style gazebo
The drawing shows all dimensions, and the project includes marking for the foundation, installation of the truss system, etc. The project is arranged in the form of a photo gallery.
A cozy gazebo in the garden is the dream of many homeowners. Wooden and metal, polycarbonate or wrought iron, square, round and hexagonal, these structures are found in almost every garden. To make garden gazebos with your own hands, it is not at all necessary to hire specialists or be an experienced builder, it is enough to have minimal skills in working with a tool.
How to choose a gazebo design
The construction of a garden gazebo will be cheaper if you immediately carefully think through everything to the smallest detail. The main parameters are the dimensions of the gazebo, its shape, the type of foundation and roof, materials for building walls. The size of the building depends on the number of residents of the house and the planned guests. It makes no sense to build a structure of a large area for 2-3 people, in this case it is better to choose a 2x2 m structure.
The level of complexity of its installation depends on the shape of the gazebo. - rectangular, but round or hexagonal ones require more skill and time to build. If there is no experience at all, it is not worth taking on the construction of such a structure right away.

The foundation for the gazebo can be columnar, tape or slab. Most cheap option- besides, it is the easiest to install. Strip foundation it is widely used for both small and large buildings, but is practically not used for round arbors. Base from monolithic slab ideal for any gazebos, but the larger the area, the more expensive the slab foundation.

Roofs on garden arbors are single-pitched, gable, pyramidal, in the form of a tent. The most budgetary and easy to install is a pitched roof. It is suitable for rectangular buildings, as well as gable. Cone-shaped and pyramidal roofs are installed on hexagonal and round arbors.

A variety of materials are used for construction: brick, stone, timber, logs, polycarbonate sheets, metal pipes, forged lattices, and some craftsmen collect gazebos even from bottles. The easiest way to build from timber and metal racks; the assembly of the frame is carried out in a matter of hours, the sheathing also does not take much time. Working with logs is a little more difficult, because you need to cut and connect them correctly. To lay out walls of stone and brick, it is advisable to have the appropriate skills, otherwise the masonry will turn out to be sloppy and unattractive.

Prices for garden tents
garden tents
To avoid serious mistakes and minimize construction costs, you need to start with the simplest. For example, a rectangular gazebo with a pitched roof and on a slab foundation is taken.

Necessary materials:
- large stone or rubble;
- sand;
- formwork boards;
- timber 100x100 mm and 50x50 mm;
- boards with a section of 30x150 mm;
- primer for wood;
- dye;
- slate or corrugated roof;
- self-tapping screws and bolts;
- reinforcing bars.
You will also need tools:

Marking the base of the gazebo


Choose a flat open area of the garden and make markings. To do this, determine the location of one of the corners of the gazebo and mark it with a peg. They measure the distance to the other corners, put beacons, pull a twine between them. Diagonals are measured in the resulting rectangle: if they are the same length, the markup is correct.
Pit preparation

The soil is selected with a shovel to a depth of about 25-30 cm, the bottom is leveled, and it is carefully rammed. The walls of the pit must be strictly vertical. Next, coarse-grained sand is poured in a layer of 10 cm, it is well leveled and moistened abundantly for compaction. Along the perimeter, formwork is laid out from boards up to 10 cm high, reinforced with timber.
Foundation pouring
More about the foundation of the gazebo
The pit is laid out with large flat stones or covered almost to the top with large rubble. At the corners of the perimeter between the stones, segments of reinforcing bars are driven in; the rods should rise at least 10 cm above the finished foundation. A concrete solution is prepared and the foundation pit is poured. The surface is leveled with a rule or smoothed with a trowel.

Frame installation
For the frame, take 4 beams of 100x100 mm and cut the gazebo to the height. The front bars are left 15-20 cm longer than the rear ones to make the roof slope. After that, the supports are well treated with a primer and dried. In the lower end of each support, a small hole is drilled along the diameter of the reinforcing bars that protrude from the concrete at the corners of the base. They put the bars on the rods, set them vertically with the help of a level and additionally strengthen them with metal plates and anchor bolts.

After installation, the side supports are interconnected with 50x150 mm boards, and then the braces for the rafters are mounted. At a height of 10 cm and 0.5 m from the floor, the racks are connected with horizontal jumpers from a 50x50 mm beam. Vertical bars are fixed between the lintels in increments of 40 cm. The doorway is left free. All fastenings are carried out with the help of bolts and steel corners, which are screwed to the tree with self-tapping screws.


Prices for various types of timber


On the boards connecting the support bars, logs are stuffed in increments of 30 cm. From above, the logs are sheathed edged board 30x150 mm. Between the boards leave gaps from 5 to 15 cm wide. Of course, all roof elements must be treated with a primer and dried well. On top of the board, you can cover with glassine and fix it with stapler staples. Thin slats are stuffed over the film so that a ventilation gap remains between the roofing and the film. Slate is laid on the rails and fixed with 120 mm nails with galvanized caps.
Arbor arrangement

After installing the frame and roof, all wooden surfaces must be painted. When the paint dries, a wooden table and benches are placed inside the gazebo along the walls. From the house to the gazebo they conduct electricity, hang a light bulb or a lamp. To give the room coziness, you can hang the walls with a dense light fabric. The interior decoration is completely dependent on the taste and capabilities of the owners of the house.
This version of the gazebo is basic. If desired, you can improve the design: install wooden gratings between the supporting beams, sheathe the walls with clapboard or waterproof plywood, lay logs on a concrete base and make a wooden floor. Instead of beams for the frame, you can take metal pipes, and replace the slate with polycarbonate or soft tiles.

A hexagonal garden gazebo always looks very elegant and is an adornment of any site. During its construction, the accuracy of calculations is very important, because errors at any stage will significantly affect the final result. You need to start with a drawing of the future building, which will allow you to correctly mark the site and calculate the amount of materials.

For construction you will need:

Step 1. Markup
To mark the site you will need two wooden slats and a rope about 2 meters long. The selected area is leveled, freed from vegetation and stones, a rail is driven into the ground in the middle and tied with a rope. The second end of the rope is tied to another rail and, using such a home-made compass, a circle with a radius of 1.75 m is drawn. The resulting circle is divided into 6 equal parts and beacons are placed on the marking line. Here will be located the support posts for the gazebo.
Step 2. Making a column foundation
In place of the beacons, pits are dug 0.5 m deep and rectangular in shape. River sand is poured at the bottom with a layer of 10-15 cm, then a layer of coarse gravel of the same thickness. In the middle of the pit, a steel bar 70 cm long is driven in, after which everything is poured cement mortar. A brick is laid on top in 3-4 rows with obligatory dressing. The reinforcing bar should be in the center of the masonry. In the same way, lay out the remaining 5 supports and allow the solution to dry well.
Step 3. Mounting the base of the gazebo

Measure the distance between adjacent posts and cut the beams according to the measurements. You should get 6 beams of the same length and thickness. For reliable connection of the supports to each other, cuts are made at the ends in half the thickness of the tree. After that, the lumber is primed and dried, and then laid on poles in the form of a hexagon. Pieces must be laid between the beams and pillars of the foundation.

When the beams of the lower trim are fixed, logs are attached inside the hexagon. The central lag is placed exactly in the center of the structure, aligned horizontally and fixed to the beams using metal plates and bolts. Next, 2 logs are mounted perpendicular to the central one, and all the rest are inserted at an angle, for which small cuts are made at the ends of the boards on both sides. In conclusion, the logs are strengthened with lintels made of timber and sheathed with boards.
Step 4. Building walls

The frame of the gazebo is made of 6 bars 100x100 mm of the same length. Each beam is installed on one of the corners of the base and fixed with anchor bolts. Be sure to check the verticality of the support posts so that the structure is not skewed. A strapping of thick boards is mounted along the upper edge, and at a height of 70-90 cm from the floor, the racks are connected with horizontal lintels made of timber, leaving the entrance free.
Walls can be made in several versions, depending on the materials available. You can close the gazebo up to half with sheets of waterproof plywood, sheathe it with boards, fix wooden figured lattices on the lintels between the racks. You can make two or three walls blank, and decorate the rest with forged elements.
Step 5 Mounting the roof


When the walls are ready, proceed to install the rafters for the roof. Boards 50x100 mm are taken as rafters; for convenience, assembly is carried out on the ground. Since there is no central pillar in the gazebo, it is rather difficult to neatly connect the rafters. To simplify this process, a hexagon cut from a bar will help, each side of which will correspond to the thickness of the rafters. The ends of the boards are cut at an angle and fastened with nails to the hexagon; and on the inside of the strapping, grooves are cut out for installing rafters. After that, the structure is sheathed with boards in a circle, leaving small gaps, lifted up and fixed with bolts. Now it remains only to lay.

Prices for various types of fasteners for rafters
Fasteners for rafters
Video - DIY garden gazebos
Video - How to build a gazebo
In the country, it is not customary to sit in a house when it is sunny and warm outside. Only during bad weather can a summer resident hide under a roof. However, you can resort to another option. You can stock up on excellent impressions in the open air if you build your own gazebo.
Such a building will become an ornament garden plot as well as a place for pleasant communication with family and friends. There are many ready-made schemes of light arbors. If you assemble the structure yourself, its cost will be 50% lower than that of the finished building. The simplest do-it-yourself gazebo is assembled quickly enough. With unhurried work, it can be built in 2-3 days.
Materials and designs
A cheap and practical option is a wooden gazebo. Such material looks beautiful and is easily processed. If wooden elements are impregnated with special solutions, they can serve for a long time. In addition, the construction of a country gazebo will not take more than 3 days, even if the work is done slowly.

Another material that is used for the construction of such structures is metal. When the frame is made of a profile pipe and steel corners, the gazebo can serve for many decades. It can be built with your own hands. The work is done quickly enough, and the materials are quite cheap.
DIY gazebo
How to build a simple gazebo with a minimum of cost and effort? For the construction of such a structure, it will be necessary to create a frame and a floor. If it is wooden, the bases are made of bars. Flooring built from boards. As a base, it is better to pour a concrete screed. This version of the foundation will be simple affordable. Before work, it is necessary to choose the right place for installing the gazebo. The area for concreting should also be leveled.

Important! For a simple gazebo, you should not combine wooden and metal frame elements.
Practice has shown that even when protecting wooden supports with roofing material or bitumen, when placed in concrete, the elements begin to rot. Subsequently, this can lead to their destruction. For this reason, it is better to immediately exclude the contact of wood and concrete.

For this purpose, you should:
- Concrete round metal pipes.
- Then fasten wooden posts to them. Metal rods should come out of concrete base by 30 cm.
- Holes are made in them for fastenings.
On such supports, the gazebo can stand for more than a dozen years. Any roof can be mounted on the obtained supports. Building a wooden structure with your own hands is quite simple.
For an ordinary light gazebo, it is not necessary to erect brick fences. You can limit yourself to a simple fence from eurolining. Its height usually does not exceed 90 cm. Such a fence is attached to longitudinal bars. The gazebo will help you hide from the scorching sun, and also avoid blowing your back. strong wind. The fence for the walls of the structure is fixed to wooden supports using self-tapping screws.
Eurolining can be replaced with cellular polycarbonate. This material looks great and does not obscure the gazebo space too much. It is also easy to install. The material is not afraid of sudden changes in temperature and high humidity.
Roof
For the roof frame, it is better to find a beam of 50x50 mm. It is necessary to create a frame from it, on which the crate will be installed, and then the roofing material. The frame is installed on the top harness. The roof is covered with such materials:
- ondulin;
- metal tile;
- slate.

When choosing the optimal width of the roof, it is worth calculating it in such a way that you do not have to cut the sheets when installing the roofing. To do this, you must first measure the dimensions of the panels used, and then subtract the sheets overlapping each other, which will be performed during installation. The result will be taken into account when calculating the length and width of the roof. It is also worth considering the side overhangs and end overlap. You can make a gazebo with your own hands quite quickly. The main thing is to choose the right materials, including for roofing.

For example, for a slate with 8 waves in each panel, the length of the gazebo is chosen as a multiple of 1 meter. In this case, the length of the slopes can be equal to 1.75 m. If several panels are laid along the slope, the estimated length of each of them is reduced by 15 cm - this is necessary to create an overlap.
Choosing best option for roofing, special attention should be paid to polycarbonate.
Distinctive features of the material:
- It is an excellent option for the construction of lightweight structures.
- It also makes a fence.
- Polycarbonate is transparent plastic with little weight.
- In combination with it, a metal profile is often used.

Such gazebos are especially attractive and practical if they are located in the shade of trees. In the presence of a translucent roof and the shadow created by dense foliage, the atmosphere in the gazebo will be as comfortable as possible for relaxation.
Garden gazebos made of polycarbonate are simple and affordable. To create them, you need to have several tens of meters of steel angle, as well as polycarbonate panels and a steel strip. Also, before erecting such a structure, it is worth preparing planed boards, which will be needed for the manufacture of benches and a table. original photo gazebos can be seen below.

Manufacturing steps
To understand how to make a gazebo with your own hands, you should get acquainted with the main stages of work. It is better to choose an easier option. First you need to equip the foundation. In it, the support posts of the gazebo are concreted. After that, they should be scalded with a corner of 25x25 mm. After that, 2 belts of corners are welded to the racks. One of them is placed in the middle of the supports. The second should be put on top - the roof will rest on it.
Polycarbonate sheets have the ability to bend perfectly. For this reason, they can be used as an arched roof. For this purpose, steel strips must be welded to the racks, which have a width of 50 mm. They are mounted on support stands. And then holes are made in them to fix the polycarbonate. You can assemble a simple gazebo for a summer house with your own hands (as in the photo) quickly enough.

Also roofing often made of tiles. For the basis for it, OSB sheets should be prepared. The material does an excellent job of holding shingles on the roof. The thickness of such sheets can be 10-12 mm. It has a fairly high strength and rigidity. That is why it does not have to assemble a spatial frame from wooden elements. It is only necessary to firmly attach it to the harness.
Features of simple gazebos
A simple gazebo for a summer residence does not have to be done with a frame frame. The foundation for it is a concrete screed, which was reinforced with steel bars. On such a surface, you can put a barbecue. The safety of such a design is quite high, because concrete floor not afraid of hot coals. In the case of the winter version, it is better to equip the floor with planed boards, and sheathe the area around the barbecue with steel sheets. This winter design looks simple and beautiful.

Inexpensive in construction and easy to install is a columnar foundation. In order not to overpay when building a gazebo for a summer residence with your own hands, you can prepare a red brick. To install the foundation, it is necessary to dig holes for the supporting pillars, and then lay them in brickwork, place reinforcement and pour concrete. Anchor bolts of 20 cm are laid in the masonry. There should be a thread at their free end.
Supports are placed on the pillars. The frame is best made from a bar 50x100 mm. If you put antiseptic boards on it, you can get an excellent warm floor. Subsequently, the gazebo can be equipped with an open hearth. With such a finish in the room, it will be possible to rest comfortably even during severe frosts.
To figure out how to build a gazebo, you should get acquainted with the main features of simple structures, as well as learn more about popular materials. You should also understand the sequence of erecting simple arbors.

Conclusion
As you can see, build simple design you can do it yourself, without resorting to the help of professional builders. First, an exact drawing is made, and then, in accordance with it, all necessary work. It is important to consider the capacity of the gazebo, its location and materials. In order to avoid mistakes in the process of work, it is worth performing the correct calculations.