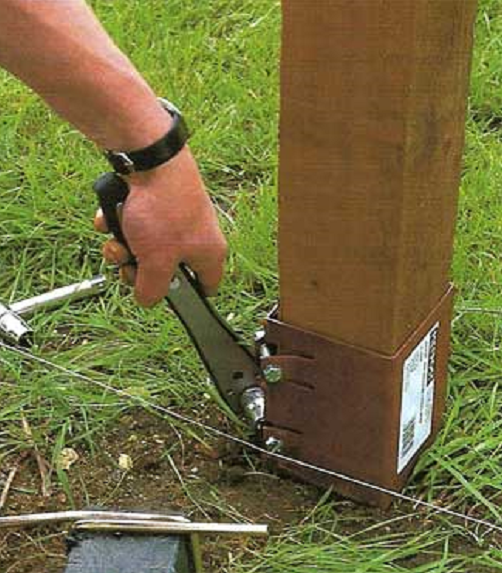
Anchoring posts to a concrete pad. Installation of wooden racks and poles - anchors for them. Fastening for floor log, methods, brackets, linings and posts
wooden beam- practical building material. The low price, low heat loss, light weight and ease of installation of a house made of timber make this material very popular. However, it is not so easy to fix the beam on the foundation, because the tree cannot be glued to concrete and not welded to metal. In this article, we will talk about how the timber is attached to various foundations, what they pay attention to and what mistakes they make.
Types of foundations for a house made of timber
Waterproofing
The lower beam, as well as the wooden grillage, must be adequately protected from water and dampness, however, it is not always possible to use creosote or other equally effective (and most often unpleasantly smelling) substances. If it is not possible to treat the grillage or lower beam with heavy fractions of oils, then less effective substances must be used, and at least 2 layers of roofing material must be laid between the foundation or the iron / concrete grillage and the beam. This is a material that falls out during temperature changes. After all, in the morning the air temperature rises, and the temperature of the foundation or grillage remains unchanged. If you use a wooden grillage, then the waterproofing must be laid both under it and above it. This will protect the wall from moisture and prevent mold and rot.
Which mounting method is best
When choosing a mounting method, consider the following factors:
- timber moisture;
- climatic conditions;
- seismic activity;
- strength of the most frequent winds.
To fasten a wet (over 16%) beam to a wooden grillage, only shrinkage compensators must be used. All other attachment methods are ineffective.
After all, a bar of high and especially natural humidity gives a very strong shrinkage, so ordinary anchor bolts will not be able to provide high-quality fixation. To fasten a beam of high or natural moisture to a wooden grillage, it is necessary to use an analogue of a shrinkage compensator, only made not from a screw, but from an anchor bolt. The same method can be used when installing a beam on threaded studs. Instead of a nut and washer, you must use a nut, two washers and a spring. The same method of fastening should be used in those regions where heavy and long rains fall in spring and autumn.

In regions with high seismic activity, it is necessary to use a lower beam with a moisture content of no higher than 12%, treat it with the most effective hydroprotection and install it on the most rigid mount (ordinary and anchor bolts). This will ensure sufficient strength of the entire structure. The same approach should be applied in regions where wind speeds often exceed 20 meters per second. Neglecting a rigid mount in seismically active or windy regions will cause the mount to loosen under the influence of external factors and the house will begin to sway. Neglect of shrinkage compensators when working with natural and high humidity, as well as in regions with frequent and heavy seasonal rains, will lead to the appearance of gaps between the flashing crown and the foundation or grillage.
There is no more traditional material for building a fence than a wooden beam. And even today, in the times of new building materials and construction methods, every third fence is built on wooden poles and slats. There are many reasons for such popularity, first of all, a very attractive appearance and relatively easy to process and install material. Wooden fence posts allow you to reduce the time of erecting a fence and at the same time make it much cheaper, which is important for owners of summer cottages and suburban areas.
Advantages and disadvantages of a fence on wooden poles
In a row building materials the tree stands apart, is in a privileged position:
- The use of special mastics and protective impregnations allows you to show a beautiful texture of wood;
- Wooden racks for right choice the sections of the supports and the installation performed are able to provide high strength of the fence at a relatively low cost;
- Wooden poles are easily combined with metal, corrugated board, wooden lath and any other material for facing the fence.
Wooden poles, unlike concrete or steel poles, are quite capable of being installed by hand, while the light weight and good machinability of the tree make it possible to manufacture and process the poles almost at home.
Important! Racks made of wood are extremely sensitive to excess moisture and putrefactive microflora, therefore, how long the pillars will stand in the ground depends on the quality of the processing of the material.
There are a lot of ways to process the material, but not all recipes give a stable and lasting effect, so the method of applying a protective coating must be selected in accordance with the composition of the soil and the type of wood.
How to protect wooden fence posts from rotting
The durability of a wooden support depends primarily on the type of wood. The wood of larch, oak, walnut is considered the most resistant to rotting. Pine, spruce, and fir withstand the putrefactive environment worse. Poplar, birch, aspen are considered unsuitable for use as poles. Experts recommend, before installing the pillars, to provide protection against the development of putrefactive microflora by the following means:
- Impregnation in two or three doses with antiseptics based on organic solvents;
- Treatment with salts of iron, copper, chromium, nickel, lead, creosote;
- Coating with protective waterproof compounds, for example, epoxy or pentaphthalic varnishes.
Advice! Processing is carried out, as a rule, in several stages, with drying of each layer. To install wooden poles in the most aggressive peaty soils, the bottom of the pole can be wrapped in sealed plastic bags.
All kinds of drying oils, organic oils, impregnation with used engine oil, kerosene, diesel fuel are considered ineffective for protection.
Installation of wooden fence posts
Any construction wooden fences begins with the installation of supporting elements. For fencing up to 2 meters high, use a square or round section with a maximum transverse dimension of 90-100 mm. Higher fences of 2.5-3.0 m must be installed with concreting of the base, the cross section of supporting elements for blind fences should be proportionally increased by 25-30%.
For fencing a cottage or country house most often use the following schemes for installing pillars:
- Concreting in a well drilled with an auger drill to the installation depth;
- Fixing wooden poles by backfilling the well with crushed stone, rubble, broken bricks, gravel screenings;
- Hammering a wooden support into the ground. Such schemes are often used as temporary, with subsequent replacement with metal or concrete supports;
- By installing a wooden beam inside a steel cup or pipe section hammered into the ground.
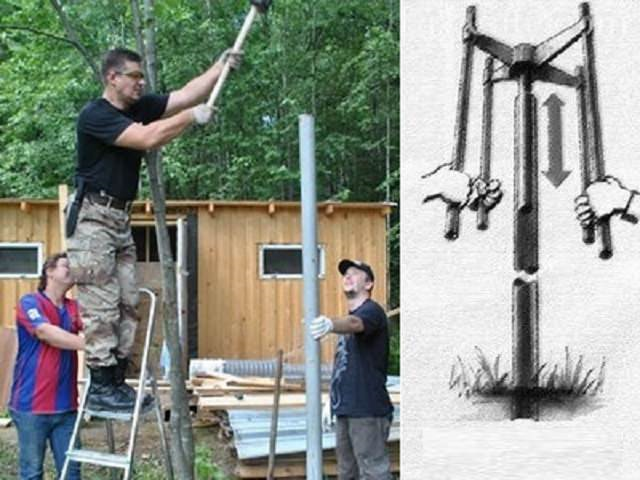
Note! The small specific gravity of wood makes it relatively easy to install wooden poles even alone, it is much more difficult to solve the question of how to align the supports in one plane without resorting to the help of neighbors.

We install wooden poles for the fence in concrete with our own hands
If you have to install wooden supports with your own hands, without assistants, then the most in a simple way there will be concreting or filling with rubble stone. This method makes it easy to align the posts with a marking cord and a pair of building levels.
According to the marked contour of the fence, it will be necessary to drill the required number of wells, with a diameter of 10-15 cm more than the maximum size in the cross section of the support. The easiest way is to use a garden auger drill with a diameter of 15-20 cm. Before drilling, a steel or paper non-stretching rope or twine is pulled, pegs 20-25 cm high are hammered. After drilling, the bottom of the well is covered with fine gravel screenings, the layer thickness is 5-7 cm. The screenings must be well compacted and leveled to get a flat bottom. Next, install the corner or extreme fence posts.
Before concreting the well, the extreme supports must be carefully aligned, since all the other pillars of the wooden fence will have to be placed along them. To align the position of the support, three main parameters are used:
- The distance from the marking cord to the head of the pole, so that there are no errors in height, the stretched thread must be leveled horizontally using the building level;
- Indications of two building levels in mutually perpendicular planes.
If possible, it is better to use the device shown in the photo. In its absence, you can take two building levels and fix them on the planes of a square bar with an elastic band. After leveling the pillars, the position is fixed with wooden spacers or pieces of building material. Concrete is poured into the well in small portions so that the mass does not hit the wooden beam of the support.

In the same way, leveling is performed when using a layer of gravel or rubble material instead of concrete. The fixing mass is poured and rammed in small portions, 5-6 kg each.
How to hammer and level a wooden post
For low wooden fences, it is easier to hammer supports into the ground than to fool with drilling and concreting. When using oak beams, you only need to sharpen the lower end with a symmetrical bevel, and you can hammer. In order not to break or split the top of the support, it is necessary to strengthen a board made of soft wood, linden or poplar on the head.
As the timber is hammered and settled, the position of the support must be periodically monitored using the building level. As long as the fence post is not buried in the ground by more than a third, the slope can be corrected by simply knocking out the side surface, at the end the soil around the post is rammed with sledgehammer blows.
Larch wooden poles cannot be hammered directly like oak poles due to the wood's high tendency to chip. In this case, the soil is pre-hammered steel pipe or scrap, and thus a thin guide hole is obtained, after which it is possible to install and hammer a larch fence post.
Conclusion
For heavy and dense loamy soils, before drilling or driving wooden supports, the soil has to be artificially “soaked”. In this case, a hole is punched to a depth of 30-40 cm and periodically filled with water. After about a day, you can drill a well with your hands or hammer wooden bars in the order described above.
All photos from the article
During the execution of various construction works sometimes it becomes necessary to attach a wooden pole to concrete. As a rule, this operation raises many questions among beginners. In this article we will figure out how to fasten wooden poles to concrete base in several ways.

General information
The need to install wooden poles on concrete can arise in a variety of situations, for example, when installing fences, building gazebos and other wooden structures on strip foundation.
At first glance, it may seem that installing a wooden pole on concrete is very difficult, however, in reality, professionals have some tricks to cope with this operation without any difficulties. Below you can see for yourself.
Installing a wooden pole on concrete
First of all, it should be said that under the installation of pillars on concrete, different operations are often understood:
Below we will take a closer look at each of them.
In this article we will consider the question of how to glue wood to concrete. Sooner or later, many people who start repairs in an apartment or in a house face the problem of connecting these materials.
The need for gluing such materials occurs when bare concrete screed a wooden floor covering is laid or skirting boards are installed with their own hands, wooden fillets are mounted, etc. However, sometimes fasteners are needed for more solid and weighty items, and this turns into additional difficulties.
Fixing Methods

In the photo - installation wooden slats for installation wall panels
Over the long history of construction work, it has been tested a large number of ways of fastening wood to concrete. Among the current and widely used methods, we note the use of specialized mounting adhesives and the use of fasteners.
Consider the features of the implementation of these methods and find out what materials are optimal for such work.
Application of specialized adhesives

If reinforced concrete was cut with diamond wheels, and now it is necessary to mount wooden parts that are small in size and weight, you can use special mounting adhesives.
Properly selected adhesive composition allows you to securely fix not only baguettes or baseboards, but also linings on stairs. However, you need to understand that the range of adhesives is wide, and therefore rely on optimal result should only be correct selection facilities.
If you need glue for concrete and wood, pay attention to the following compositions:
- Construction adhesive "Liquid nails" It is relatively inexpensive and at the same time effective solution to work with materials of interest to us. "Liquid nails" and are presented on the market in several modifications, namely, "Universal", "Express", "Super strong", "Especially strong", "For panels", etc.

If the question is how to attach a wooden block to concrete wall, the best choice will become a particularly vicious and universal modification.
The universal type of glue "Liquid Nails" is great choice for interior use. For example, with this tool, you can successfully glue lumber wall panels to pre-fabricated.
But if you are interested in how to glue wood to concrete at sub-zero temperatures, you will need "Liquid Nails" that are especially strong with a setting force of up to 70 kg per 1 m². This adhesive will hold wood even on uneven concrete at temperatures down to -17°C.
- Glue "Moment"- This is a wide range of different compositions with different technical and operational properties.

In the photo - the two-component composition "Epoxilin Duo"
Of particular interest is the Epoxylin modification, which is a two-component composition that works with a wide range of materials including concrete and wood.
After drying, the composition not only reliably holds the glued surfaces, but can also be sanded or subjected to other machining without compromising the adhesion strength.
Another modification of the Moment glue, through which concrete can be connected to wood, is Moment Joiner. This tool has found wide application in the process of laying floor coverings made using lumber.
Mounting foam is a good option for simple and effective gluing

In the photo - the use of mounting foam
If necessary, as an adhesive, you can apply mounting foam increased strength. It is a good solution for flooring flooring. wood flooring, installation of window sills, wall panels, etc.
This method of connecting two surfaces is characterized by a number of advantages, including:
- affordable price, in comparison with other adhesives;
- high bond strength after complete drying of the composition;
- low degree of thermal conductivity, which is important when finishing floors and walls;
- excellent soundproof qualities;
- hydrophobicity;
- biological stability;
- simple instructions for use.
However, there is also a significant drawback, namely the long drying of the foam. And therefore, within 5 minutes, the part to be glued will have to be held in the desired position so that it does not move away from the surface.
Important: In order to ensure optimal contact between the surfaces to be bonded and the foam, they must be lightly moistened with water.
Surface preparation is the key to success
Whichever of the above compositions you choose, before attaching wood to concrete, both surfaces must be properly prepared. In order to result installation work there was a strong and durable connection, both surfaces should be as smooth as possible, dust-free and grease-free.
The main problem is the porous structure of the material, especially if diamond drilling has been carried out in concrete. This property is the cause of excessive absorption of adhesives, and therefore the connection does not have time to gain proper strength.
It is not difficult to make a coating prone to gluing from concrete, for this you need to reduce the number of pores. For this, deep penetration primers are used, which seep into the porous structure of the material and solidify there. As a result, the micropores are closed, and the density of the concrete allows the application of adhesive.
Important: Glue wooden parts to pre-prepared concrete bases in strict accordance with the instructions of the manufacturer of adhesives.
Fasteners using dowels
If you need high-quality and durable fastening of a wooden pole to concrete, ordinary glue or foam is indispensable. In this case, you can use fasteners metal products designed for high mechanical loads.
Heavy wooden parts can be attached using dowel-nails and anchor bolts. The principle of operation of these fasteners is similar, since after they enter the concrete, their working part begins to burst. As a result, the fastening of wooden poles to a concrete base is very strong.
Conclusion
There are many ways to securely connect. concrete surfaces with wooden details, but maximum strength will be guaranteed if pre-treatment is carried out. There is no need for a connection using dowels.
You will find more informative and useful information by watching the video in this article.