Dimensions of arches from a profile pipe. How to cook a greenhouse. Determination of a place to install a greenhouse
High price finished products can become a serious obstacle to the installation of a greenhouse. In such a situation, you can make a greenhouse from a profile pipe with your own hands. Photos of structures and drawings can be easily found on the Internet. However, it will not be easy to assemble a greenhouse without the appropriate knowledge. We suggest that you get acquainted with the features of developing drawings, the order of execution installation work and choosing a place to install a greenhouse.
Read in the article
Advantages and disadvantages of building a greenhouse from a profile with your own hands
Surely each of you thought about whether or not you should take on such a task. For better motivation, here are a few reasons that will be a good incentive to create such a building:
- Uniqueness. With the independent manufacture of a greenhouse from a profile pipe, a design drawing is worked out specifically for a particular area. You can always change not only the size, but also the shape of the greenhouse.
- Availability. Often the cost is halved.
- Strength. At the stage of developing a greenhouse project from a profile pipe, it is easier to make the necessary changes than to refine ready-made solutions.

Among the shortcomings, it should be noted that the construction time is longer, since you have to spend time not only on assembling individual elements, but also on their manufacture.

How to choose a place for a greenhouse
When choosing the location of the greenhouse, the following rules should be considered:
- a winter greenhouse should be installed closer to the house in order to simplify the connection to the heating system and reduce the cost of purchased equipment and consumables;
Attention! The wall location is the least expensive.

- it is worth abandoning low-lying, open areas or places with a significant slope;
- if there are zones with different soils on the site, it is worth giving preference to sandy soil that does not contribute to stagnant water. Clay soil requires special preparation before installing a greenhouse;
- must avoid places where ground water located above 1.5 m from the surface.

Comment
Ask a Question" Observe your site and choose a well-lit place where it does not stagnate to install a greenhouse. rainwater and there is protection from strong gusts of wind.
"Having decided on the installation site, it is worthwhile to correctly position the greenhouse relative to the cardinal points. The choice will depend on design features mounted structure:
- a shed greenhouse has a roof slope to the south;
- the longitudinal axis of the gable or arched structure is directed from north to south. The deviation should not exceed 15−20°.

The choice of the type of construction of the greenhouse from the profile pipe
Starting to manufacture a greenhouse from a profile pipe with your own hands, drawings are developed for a tent or arched structure. An arched greenhouse implies the presence of a special production, since it is difficult to give the required shape on your own. The advantages of such designs include ease of assembly in the presence of curved parts. The disadvantages are limited functionality due to the impossibility of planting tall plants near the walls.

Tent greenhouses are distinguished by a simple design. There are no curved elements in their composition, which greatly simplifies the manufacturing process. Despite the availability of ready-made products for sale, many tend to make their own tent greenhouses from a profile pipe. In the design of this type, plants of various heights can be planted.
Attention! Tent greenhouses are more expensive than arched greenhouses, since their construction requires more basic and covering material.

What material to sheathe a greenhouse from a profile pipe with your own hands: photos and features of possible options
To make it easier to choose the right covering material, we suggest that you get acquainted with possible options. Preference may be given to:


- polycarbonate. Best Option for a greenhouse from a profile of 20 × 40 mm. Differs in an optimum ratio of strength characteristics and weight. Providing sufficient passage of sunlight and retaining heat well inside the greenhouse, polycarbonate is 200 times more durable than glass. With a knife or scissors available, anyone can cut polycarbonate to size with their own hands.
Advice! When choosing a suitable covering material, you should take into account your financial capabilities and the desired performance characteristics of the greenhouse.

Related article:
What are polycarbonate greenhouses, selection criteria for polycarbonate greenhouses, leading manufacturers of finished polycarbonate greenhouses, popular types of polycarbonate greenhouses with an opening roof - read the publication.
Preparation of drawings with dimensions for a greenhouse from a profile pipe and the creation of estimates
Most often, a sketch of a future greenhouse is developed taking into account standard dimensions. However, with a detailed study of the drawing of a greenhouse from a profile pipe with dimensions, certain adjustments can be made taking into account its location. We offer you to get acquainted with the features of creating drawings for structures of various shapes.
 Detail drawing make it easier to make your own
 Creation of a frame drawing from a profile pipe for a tent greenhouse
When developing a drawing of a greenhouse frame from a profile pipe with a hipped roof, you should determine the angle of the roof. The choice is made taking into account the wind and snow load characteristic of a particular area, and is usually 30-45º. The height of the side walls is chosen from the range of 1.7–2 m.
When calculating the dimensions of the roof, the angle of inclination of the roof and the width of the future building are set. The length of the slope will be numerically equal to the hypotenuse of a right triangle, one of the legs of which is equal to half the width of the greenhouse. In this case, the length of the slope will be half the width of the greenhouse divided by the cosine of the angle of the slope, and the height will be the product of half the width of the greenhouse and the tangent of the roof slope. For example, for a greenhouse 3 m wide with a roof slope of 45º, the calculations are made as follows:
- ramp length = 1.5 m / cos45º = 2.12 m. Additionally, an overlap with a length of 0.1–0.3 m is provided. The final length of the slope with an overlap of 0.3 m will be equal to 2.42 m;
- roof height = 1.5 m × tg45º = 1.5 m. If the height of the side walls is 2 m, the total height of the building will be 3.5 m.
Width doorway it is worth choosing 0.7–0.8 m. The dimensions of the ventilation vents should be 0.3 × 0.5 or 0.5 × 0.5 m. For a winter greenhouse, it is worth providing a vestibule. Vertical racks should be located every 0.6–1 m. By choosing the largest distance, you can reduce the cost of manufacturing the frame. Less will increase the life of the covering material.

Creating a drawing for making a greenhouse with an arched structure from a profile pipe with your own hands
Getting to the calculation, you should decide on the height of the future greenhouse. Usually it is 1.9–2.4 m. The arch itself, in fact, is half the correct circle. When developing a drawing of a greenhouse from a metal profile with your own hands, it should be noted that the length of the correct circle is
L = 2 × π × r, where
- π – 3,14;
- r is the radius of the circle. In this case, this is the height of the future greenhouse.
Comment
Landscape designer at VENUS DESIGN studio
Ask a Question" The standard length of polycarbonate and profiled pipes is 6 m. Based on this, the height of the future structure should be calculated. The width will be equal to two heights.
"
Creating a drawing for making a foundation for a greenhouse from a metal profile with your own hands
The need to equip the foundation for the greenhouse is due to the low weight of the profile structure. As a result, with a strong enough gust of wind, the greenhouse can fly away. A drawing of the base should be developed after the dimensions of the greenhouse frame from the profile pipe are determined. With their own hands, they usually equip the foundation, the height of which is 0.3–0.8 m. The remaining parameters should be chosen 0.2–0.3 m larger than the size of the greenhouse.

How to calculate the required amount of building material when creating a greenhouse from a metal profile with your own hands
To calculate the required amount of material, a detailed diagram of a greenhouse from a profile pipe will be required. You can make with your own hands different design. The calculation is carried out taking into account the design features and geometric parameters of the structure. We add the length of all frame elements, then divide the resulting value by the standard length of the profile pipe.
Comment
Landscape designer at VENUS DESIGN studio
Ask a Question"When planning the construction of a greenhouse from a metal profile with polycarbonate with your own hands, you should take into account the standard dimensions of the sheets: 2.1 × 6 m and the need to lay them with an overlap of 0.6–0.7 m.
"
How to build a greenhouse from a profile pipe with your own hands
For a high-quality assembly of a greenhouse from a profile with your own hands, you should adhere to a certain technology for performing work. We suggest getting acquainted with the main stages so that you can build a structure that can last for a long time.

What tools are needed for the job
The list of tools that will be required in the process of manufacturing a particular greenhouse may vary. To assemble the frame, in addition to the metal profile, it is worth preparing:
- a welding machine with a power of more than 3 kW, if the elements are planned to be connected by welding;
- grinder;
- pliers;
- a hammer;
- screwdriver;
- measuring tool. It is mandatory to have a square to control the angle at which the individual elements are connected, and a building level to determine their spatial position.

Assembling the greenhouse frame from a profile pipe
Not only the appearance of the mounted structure, but also its service life depends on the quality of the work performed. The assembly of the greenhouse frame from a profile pipe can be done in different ways: using threaded connections and by welding. We suggest that you familiarize yourself with the nuances of manufacturing the elements of an arched greenhouse and the procedure for welding the frame.

How to make a profile pipe for a greenhouse frame look like an arc
You can form arcs for a greenhouse from a profile pipe by contacting a specialized company. Here, the necessary manipulations will be performed on special equipment. For those who plan to do everything with their own hands, we suggest that you learn how to properly bend a profile pipe for a greenhouse without deformation. To begin with, it is worth preparing a radius template, and then use one of the following methods:
- First way. After sifting and drying river sand, ignite it on a metal sheet, achieving complete evaporation of moisture. Having installed a wooden chop on one side of the profile pipe, pour the prepared sand inside. After that, you can give the pipe the desired shape without the risk of deformation. You can use the method at any time of the year.
- Second way relevant for winter. Instead of sand, water is used, which is poured into the pipe and waiting for it to freeze. After that, the workpiece is bent according to the template.
- Third way. With the help of a grinder, cuts are made on the profile pipe by 2/3 of the width at equal distances. The latter are selected taking into account the magnitude of the bend of the roof. After that, the professional pipe is bent, and the cuts are welded.

How to weld a greenhouse frame from a profile pipe with your own hands
If you decide to weld a greenhouse from a profile pipe with your own hands, the work can be done in the following sequence.
| Illustration | Action Description |
 | It is necessary to prepare and cut to size the required amount of a profile pipe of the desired section. |
 | We set the elements of the side wall according to the level in accordance with the drawing. |
 | We control the spatial position of each element. |
 | We weld the elements together. The process mode is selected depending on the wall thickness and the material from which the profile pipes are made. |
 | We make a second wall with the same dimensions. |
How to sheathe the frame of a greenhouse from a profile pipe with your own hands
If polycarbonate is chosen as the covering material, the work can be performed in the following sequence.
The question of how to weld a greenhouse is of interest to many summer residents and other land owners. The principle of welding domestic and industrial greenhouses is the same. The difference may be in the material and the degree of reinforcement of the structure, depending on the size.
The main advantage of joining profiles by welding is reliability. The bolted connection weakens over time, and the greenhouse loses its shape. Other benefits include:
- a welded greenhouse from a profile has a large margin of safety, regardless of the size and weight of the structure. The cross section of a square of 20 mm is able to withstand heavy loads in wind and snow;
- profile pipes have a larger welding area, so it’s enough just to weld the seam reliably, and not to weld the stiffener to further strengthen the joint.
- when welding, taking into account deformations, heating and observing diagonals, the greenhouse is obtained without distortions, and it can be installed on the foundation or without it.
The advantage of profiles and the connection of parts by welding make it possible to manufacture greenhouses of any size and configuration. It is only necessary to choose the right section and the type of square, and calculate the design, taking into account the dimensions of the greenhouse.
Important Points
Welding must be carried out in protective clothing and gloves. Eyes and face are protected by a welding mask or shield.
 All main parts are cooked in the lower position. For better rigidity, the joints after welding can be fixed by welding a steel scarf on the inside. This method allows you to securely fasten parts even with poor-quality welding of the main joints.
It is imperative to monitor the alignment of the standing parts, install the first ones in terms of level and securely fix them with spacers.
All elements of the greenhouse are welded with high-quality electrodes for structural steels. It is better to use ANO-24 or MP-3 with a diameter of 3 mm. Having completed the entire cycle of work with high quality and reliability, you get the opportunity to grow your favorite vegetables or flowers even in slight frosts.
Criteria for choosing a profile pipe
The choice of profile for welding depends on financial capabilities and the need for a more reliable greenhouse, but the basic rules are the same for everyone.
Painted, galvanized and untreated profile pipes are produced. The galvanized profile has a long service life and is not subject to corrosion. This is true, but not in the case of a connection by welding.
When welding, zinc burns out, and the metal at the junction is weakened. This place will rust in the same way as an ordinary raw pipe. It is the same with painted pipes, but the price of such products is much higher.
In the case of greenhouse welding, it is better to use raw material, and in addition, buy a can of soil and paint the metal structure after assembling the frame.
When building a small greenhouse, it is better to purchase shelves in a smaller size. For a greenhouse 6 m long, 2 m wide and 2 m high, a 25 mm wide pipe is enough. Profile wall thickness - 2 mm. This is best option for small homemade structures.
Important. Before performing all work, including welding, it is necessary to calculate the number of profiles and Supplies by completing a sketch of the greenhouse and deciding on its dimensions.
Choice of design form
The most common and affordable form of a greenhouse is a house with gable roof th. It is easy to perform and does not require additional equipment and welding costs.
All installation and welding work is carried out using hand power tools and welding equipment. But such a greenhouse has a smaller useful area of \u200b\u200bthe inner part.
 Therefore, the most suitable form is arched. But this is a more complex design, requiring the use of rollers or a bending machine. You can work and manually, but for this you need to find a segment of a cylinder of large diameter.
The profile is covered with sand, which avoids deformation of the pipe. Then it is fixed in the middle of the base and the ends are bent. The work is very time consuming and does not ensure compliance with the dimensions of the arcs.
It is easier to contact specialists who will make the same arches on rollers in a minute. But this will require additional costs. Therefore, when they make a greenhouse with their own hands, they most often choose the shape of a house.
Dimensions and amount of material
Be sure to determine the length of the greenhouse, and calculate the number of main components of the frame. Arcs must be installed with an interval of no more than a meter.
With a length of 6 m, it will be necessary to make 7 arcs and sheathe them with jumpers for structural rigidity. The front wall must be equipped with a door and a window, and the rear wall requires the installation of only a window.
 This is the simplest and most reliable design of a small greenhouse. The profile pipe is mainly supplied in lengths of 6010 mm. It is quite expensive, so the task is to reduce profile waste to a minimum.
The best solution would be the height of the pillars 1070 mm, the size of one roof slope 1120 mm, with a slope angle of 30 °. This method will avoid the cost of purchasing the main pipe.
It will be enough to put the 20th profile on the jumpers. Consider their number. On the roof, they fix the structure at the top of the arcs and in the middle of each slope. On the side - 2 on each side.
On the back we provide 2 jumpers. The front should be equipped with a hatch and a door. Based on this, we calculate the number of lashes of the auxiliary profile.
Now you need to decide on the foundation. If it is made concrete, segments of the main profile for embedded parts will be required. In the case of the manufacture of a mobile greenhouse, you will need to purchase a profile to secure the bottom of the greenhouse.
After purchasing a sufficient number of profiles and electrodes for welding, they proceed to perform the main work.
Preparatory work
 The work is carried out in several stages. The most durable and reliable way will be the manufacture of a concrete foundation. To make it, you need to dig a trench along the perimeter to a depth of a shovel bayonet.
Then make a small sand cushion, mark out and hammer the mortgages under the racks into the ground. You will need to prepare a concrete solution and lay it in a trench.
It makes no sense to reinforce the foundation, the main thing is to make it even, without large drops and distortions. When pouring, pay attention to the vertical position of the embedded parts.
Manufacture and installation of standing parts
 Greenhouse racks can be made from individual pieces of pipe, cut to size and with notched corners. But it is better to perform simple operations and simply bend them from a long whip. To do this, mark the middle of the whip, make an angle cut with a grinder and bend the pipe to the desired angle of 60 °.
Then 1700 mm are measured from the edges of the profile and cuts are made. Bend the profile inward to an angle of 30 °. Now it remains to boil the cutouts.
For large gaps, mortgages made of wire or electrodes are used. When welding, attention must be paid to observance of the diagonals and the correct horizontal arrangement of all planes.
To do this, it is better to weld on a flat surface. If the part turned out with a small "propeller" - it does not matter, it is easy to align it.
Next, assemble all 7 main parts. The front and back part is immediately done with lintels, vents and a door. These parts are installed first, fixing each in its place and welding to the mortgages.
The first standing parts should be set strictly according to the level, this will avoid distortions of the entire greenhouse structure. By putting up building level or plumb, they are fixed with temporary struts.
Assembly
 When the main pillars of the greenhouse are fixed, from front side they begin to install intermediate racks and tie them with stiffeners. For this, the standing parts are welded to the mortgages in the foundation. The parts cut to size are unfastened with the previous main rack.
Now it remains to make the doors and vents of the future greenhouse. In this case, it is imperative to leave gaps of at least 5 mm on all sides. This will provide protection against rubbing when the loops sag.
The door and vents are installed in the hatches. To maintain the correct installation and clearances, it is necessary to unfasten these parts with wedges, and then set and. Then weld the door and vents.
This is the main work on installing a greenhouse made of metal profile pipes can be considered completed. It remains to paint all the pipes with a primer and sew up the greenhouse with polycarbonate or plastic wrap.
The geometric shape of the section of the hollow profile of a quadrangular shape provides high rigidity of the structure and relative ease of manufacture.
The do-it-yourself greenhouse scheme from a profile pipe, shown in the figure below, allows you to evaluate the material consumption and potential labor costs for the construction of the structure. The views and sections shown in the figure are a drawing of fasteners for connecting parts used in the assembly of a greenhouse building.
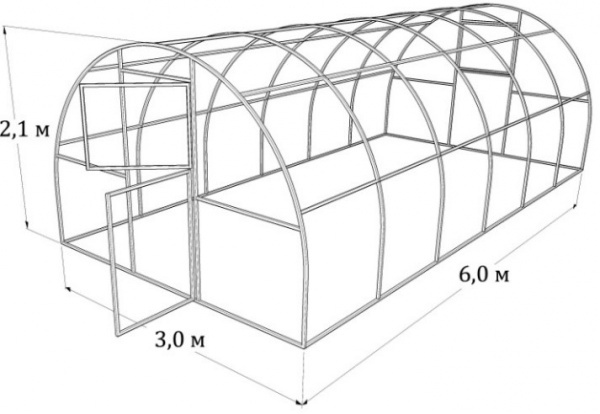
The designs of greenhouses from a profile pipe of two types are common - with a gable and arched roof shape. The standard size of a greenhouse from a profile pipe is a design with a width of 3 meters and a length of 6 meters.
Making a greenhouse from a profile pipe with your own hands is easier to do with a pitched structure, shown in the diagram above, due to the absence of the need to change the geometry of rolled metal to give it an arcuate profile.
A greenhouse made of a profile pipe with an arc-shaped frame with the same length of structural elements as a pitched building allows you to get a building with large sizes in height and width. The drawing of a greenhouse from a 20x20 profile pipe with an arc profile, presented below, clearly demonstrates this.
Arched greenhouses from a profile pipe have a more ergonomic appearance and greatly simplify the laying of covering material, whether it be polycarbonate or polyethylene. At the same time, for the possibility of glazing and a longer service life, a greenhouse with a house made of a profile pipe is more suitable.
Important ! The metal profile must be protected from corrosion, otherwise the service life is limited.
How to paint a greenhouse made of metal profile pipes is determined by the state of the surface. With stainless metal - painting is not required, with a surface without traces of rust - a three-layer application of nitro-paint will be sufficient, if the surface is rusty - acid treatment and a multi-layer coating of primer will be required.
double slope design
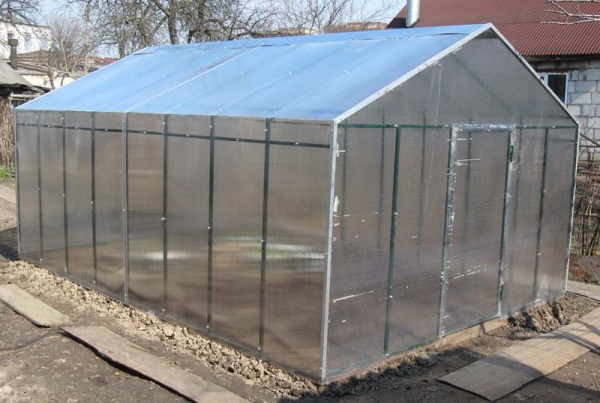
A do-it-yourself gable greenhouse from a profile pipe is the most common option for manufacturing a structure with a rigid body, designed for long-term operation and suitable for glazing or the use of polymer covering material.
The main component of any greenhouse building is a profiled metal skeleton, which is a supporting structure for fixing a coating that protects crops from atmospheric influences. The frame of a greenhouse building with a gable roof can be made in two ways:
- Making cuts at three points along the length of the profile, bending at the desired angle and fixing by welding.
- Assembly of segments by connecting individual racks with tees and their mutual fastening with bolted connections.

The drawing of a greenhouse building with dimensions, given below, clearly demonstrates the structural elements that make up its composition and give the necessary rigidity to the finished structure.
The presented greenhouse made of shaped square pipes has a size of 6x4 meters and a gable roof shape, the entrance is offset from the center, which implies beds of different widths. The roof slope is equipped with a window for ventilation and maintaining the required microclimate.
The frame of a greenhouse building is the main load-bearing element and requires careful fastening of structural parts to each other using detachable bolted joints or by welding. For the rational use of material and minimization of waste (cuttings), the design of a greenhouse building should provide for the use of a solid lash of rolled metal, subject to the width and height of the structure.
The calculation of a greenhouse from a profile pipe in this case is reduced to determining the height of the roof gable [ h], which is an isosceles triangle with a base equal to the width of the building [ S]. The length of the thigh of the triangle in this calculation is determined as half the difference in the length of rolled metal [ L] and twice the height of the side wall of the structure [ H], taking into account the height of the foundation [ h 1 ]. Raising the foundation above ground level reduces the calculated height of the side surface by an amount equal to its double value.
The calculator for calculating the greenhouse structure in this case can be represented by the formula:
![]()
The calculation of the frame of the designed structure consists in determining the total length of rolled metal, obtained by summing the length of all parts.

Important ! A 10% length margin is adopted with eight braces, four for each end. With a larger number of stiffeners, an increase in the safety factor will be required.
Frame welding
Welding the frame of a greenhouse structure is necessary to connect the parts to each other and to stiffen the structure.
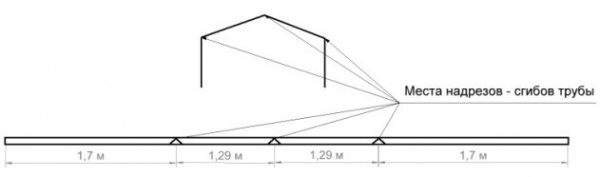
The scheme of cuts along the length of the lash of rolled metal and its bend, presented below, clearly demonstrate the content of the operations for assembling the main part that makes up the frame of the greenhouse building. Welding is carried out at the bends, allowing you to get a rigid frame element.

arched structure
The manufacture of a greenhouse structure with an arched vault includes the following activities:
- Longitudinal bases with guides for vertical arcs are prepared and attached to the foundation.
- Arcs of the arched vault are being prepared, which will require a galvanized profile pipe for greenhouses with a section of 20x20. The rolled metal is bent 90° around a concrete ring with a diameter of 3 m - this method is a practical solution for obtaining an arc profile, without special devices.
- The vertical arcs are fastened, for which it is inserted and fastened in the guide of the longitudinal base.
- The connection of vertical arcs to each other is carried out using longitudinal strips with guides, the size of which is determined by how long it will be homemade greenhouse from a profile pipe.

Below is a diagram of an arched greenhouse building with the designation of structural elements in the manufacture of semi-arcs, and not a single assembly unit in the form of an arch. Such a manufacturing scheme requires a larger number of longitudinal strips, which increases the metal consumption and weight of the structure.
With large dimensions of the arched structure, it will be necessary to connect the parts together by welding. A video of the installation process of a similar design is presented below:
How to bend a profile pipe for a greenhouse yourself
Below is a video demonstrating how to bend a profile pipe for a greenhouse using a homemade pipe bender and answering the question - How to bend a profile pipe for a greenhouse? It is the use of machine tools that makes it possible to achieve a gradual change in the shape of a solid metal-roll and obtain a full-fledged arched vault without the use of additional joints between the elements.
In the absence of a pipe bending machine or fixture, the algorithm for obtaining a bent form of rolled metal can be formulated as follows:
- Bending should be done around the object cylindrical shape with a transverse dimension corresponding to the diameter of the arched vault, for example, around a reinforced concrete ring.
- To avoid a sharp bend, fill the inner cavity with sand and seal it at both ends with a wooden plug.
- To avoid displacement, rolled metal should be fixed in a concrete ring in the middle, and to obtain a uniform profile, bend simultaneously in both directions.
- For better bending, the surface of the material can be heated with a blowtorch.
A video demonstrating the operation of a pipe bending machine to obtain a bent form of rolled metal in a garage can be seen below:
Equipment for the manufacture of greenhouses from a profile pipe, in addition to the pipe bending machines discussed above, may include manual devices for obtaining bending of a small length. Also, for processing metal during the manufacturing process, you will need the following power tools: a grinder or an impeller, welding, a drill with adjustable speed and a screwdriver, if this is not possible.
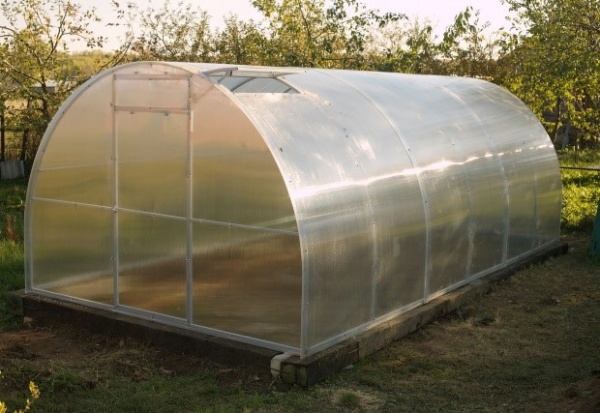
Ready-made greenhouse from a profile pipe
The greenhouses from the profile pipe shown in the photo below clearly demonstrate what can be achieved if you want to build a greenhouse building on a personal plot with your own hands.
We will send the material to you by e-mail
It is not necessary to install an expensive greenhouse to grow seedlings and forcing. An excellent option would be the construction of a greenhouse, which will take up a minimum of space on the site, will not require the connection of a heating system and will be undemanding in maintenance. Its design is simple and therefore, even without building experience, it will not be difficult to design and install a greenhouse from a profile pipe with your own hands. Photo and video instructions will help you competently complete all stages of work in the shortest possible time without the involvement of specialists.
Structures made of profile pipes are the most durable and reliable
Why is it profitable to build greenhouses from profile pipes, and not from wooden bars?
The frame is the main bearing part of the greenhouse, so it must retain its shape and withstand the loads of precipitation. Therefore, the material must be both easy to process in the manufacture of parts, rigid, strong and durable. There are two main frame materials:
- Wooden bar. It can be processed with any suitable cutting tool, allows you to build structures at minimal financial cost and is able to create a unique microclimate inside the greenhouse. However, it is subject to rotting or drying out with loss of strength properties, pests and insects. This significantly reduces its service life to an average of 5-7 years. To create an arched structure, significant woodworking experience is required.
- Metal profile pipes. Easy to process with specialized tools, allow you to create designs of complex shapes, can contact any type of material without damaging them due to the smooth surface. The service life is on average 10-15 years. At the same time, unlike wood, they do not need additional care or protection from pests. The pipe section of 20 * 20 mm is considered optimal, which provides sufficient strength and rigidity of the structure.
There are the following types of structures:
- Shed. Represents the simplest design, which is being built adjacent to in order to save building materials or compact placement on the site.


- Arched. Provides uniform illumination of the entire internal volume, regardless of the position of the sun. However, to achieve this effect, it is necessary to correctly place the object being built so that the arch is in the direction of the sun. During installation, it may be difficult to bend and center steel pipes, as well as attaching the skin to the frame. As a result, the maximum efficiency of heating and lighting will be obtained, in comparison with other types of structures.

Choose a suitable greenhouse from a profile pipe and make it easier with your own hands if you see ready-made examples on the picture. They will allow you to roughly understand the complexity of the construction, as well as indirectly assess the benefits.
Related article:
Create a drawing
Creating a drawing is an important design stage, which allows you to correctly calculate the amount of material, assess the complexity of the work, and also correctly assemble. Planning should begin with determining the dimensions of the greenhouse.
Unlike other objects erected on a personal plot, in this case it is impossible to make a reserve for the area. This is due to the increase in energy efficiency and provision optimal conditions plant growth. Therefore, it is necessary to clearly define which crops and in what quantity it is supposed to grow.

The greenhouse can be mobile or stationary. The first option is suitable in case of an acute shortage of usable area of the site or the need to move it to a heated room with a significant decrease in air temperature outside. It is a structure similar to a stationary one, but smaller, made of lightweight materials and located on a special mobile platform.

A stationary object is designed with any required area. It can be made in above-ground and low-depth design. Above-ground greenhouses are attractive in that they completely exclude the formation of shading, but at the same time it is advisable to install them in the middle and southern latitudes due to the possible freezing of the soil. Shallow ones can draw heat from the ground and warm up the internal volume, regardless of the level of soil freezing. The disadvantage is the appearance of shading near the walls, which will affect the slowdown in plant development.

Just like a do-it-yourself polycarbonate greenhouse being designed, the greenhouse drawing must take into account and contain removable elements(shutters or doors) that will provide access to plants and ventilation. To do this, in its upper part, one or two doors are provided on both sides, which are fixed to the upper crossbar of the frame.
Helpful information! To increase the strength of the frame, it is necessary to provide intermediate structural elements, which should be evenly distributed along the walls with an interval of 0.5-0.8 m. The interval is chosen so that the sheathing sheets with joints fall into the middle of the steel pipe.
Do-it-yourself drawing and photo of a greenhouse from a 20 * 20 profile pipe are shown in the images below.


Do you need to design a foundation?
During the construction of household objects, the foundation plays the role of a reliable foundation for the entire structure, allowing you to distribute the load along the entire perimeter of the walls. Since a greenhouse made of shaped pipes and polycarbonate has a minimum weight, in most cases it is not necessary to create a foundation for it, since the steel frame will take on the main loads without deformation. Therefore, it is not required to lay a foundation under it, especially considering that it will significantly increase the cost of the project.
Create a cost estimate
Based on the drawing, we draw up a cost estimate and detailing, which will guarantee the absence of problems during the purchase necessary materials and will allow you to calculate the budget of expenses. The detailing will show which parts require the use of a specialized tool and at what stage assembly difficulties may arise.
When calculating the amount of building materials, it is necessary to make a margin of 10%, taking into account their possible damage during delivery, as well as the assumption of installation errors. Even if you manage to save material, in the future the surplus can be used to repair or improve the facility.
How to competently make a greenhouse with your own hands?
The construction of a greenhouse can be qualitatively divided into three stages: the search for a tool and the creation of structural details, site preparation and the construction process itself.
Selection of the necessary tool and creation of structural details
To build a polycarbonate greenhouse with your own hands, you will need the following tools:
- shovel for leveling the ground;
- drill for installing frame racks;
- grinder for cutting profile pipes;
- screwdriver for screwing screws;
- hacksaw with a fine tooth for sawing polycarbonate.
Helpful information! It is forbidden to cut polycarbonate with a grinder, as it will melt and lose its decorative properties. Must use manual cutting tool for metal with a fine tooth or a power tool with speed control.
The frame assembly sequence is as follows:


- Finished parts are assembled into a single design according to the drawing. For fastenings we use standard steel brackets suitable sizes and bolts, or we perform a welded joint.


- We measure the length of the side walls and cut polycarbonate sheets to size.
Helpful information! You can measure the length of the arc with a curvimeter. If it is not there, then you can use the rope, attaching it tightly to the steel pipe, and then make marks on the polycarbonate sheets along its length and cut it.

After assembling the frame, it must be protected from the negative effects of the external environment - it is recommended to paint water-based paint. The finished frame of a greenhouse made of a profile pipe with your own hands is shown in photo 20.

Article
Advantages and disadvantages
Profile pipes are called pipes, in which the section is not round, but of a different shape, there are oval, square and rectangular. They are very convenient to use in construction. The most popular are pipes with a square and rectangular section, it is from them that the frames of greenhouses and greenhouses are often made. They are made of steel: more often carbon or alloyed, less often stainless.
The profile pipe is similar in shape to a wooden block, but in building structures it is much more profitable - light, durable, protected from corrosion. Greenhouses from a profile pipe, and even made by hand, turn out to be much cheaper than factory ones bought in a store. In addition to economy, they have a number of other advantages.
The rectangular (or square) geometry of the section causes an interesting effect: with a small weight, the professional pipes provide the desired frame strength for greenhouses and greenhouses. Sufficient rigidity of the structure is achieved due to the four ribs of the pipe. The large contact area of the connecting nodes further adds to the strength of the entire structure. The details of the greenhouse frame can be connected using welding, self-tapping screws, screws, clamps, the possibility of combining these methods when building a greenhouse with your own hands is also an advantage. Professional pipes are sold with an anti-corrosion coating, which is very convenient: you no longer need to think for yourself how to protect the frame (only the cut points will have to be processed).
The frame of profile pipes has undeniable advantages:
- it is easy to mount and dismantle;
- the design has great strength with low weight;
- parts are universal, easy to load and transport;
- he is not afraid of great physical and mechanical stress.
Light weight from an advantage can easily turn into a disadvantage, if on the ground with strong winds do not install the greenhouse on a solid foundation.

Choosing a material
It is easy to make a frame for a greenhouse or a greenhouse with your own hands, if you choose the right material for it. Usually choose between wood, PVC and steel. It is pleasant and quite easy to work with wood with your own hands, it is easy to mount it, it is an environmentally friendly material, but no processing will extend its life. If the greenhouse is made of polycarbonate, then the coating will clearly outlive the wooden frame.
The steel frame is also subject to corrosion, although it is able to withstand heavy loads. Polyvinyl chloride pipes are unlikely to be chosen by a summer resident for making a greenhouse with their own hands because of the high cost, although this material is quite satisfied with its strength, safety and durability.
In search of material, summer residents most often stop at profile pipes, and this is understandable - they make the most reliable greenhouses. They do not rust, withstand heavy loads, do not bend under the snow, and do not require special equipment or experience for installation. On the steel pipe rectangular section, it is easy to mount polycarbonate, thanks to the shape of the section, it is easy to make joints of elements.

The process of assembling and installing the frame of the greenhouse and the profile pipe. Fastening frame elements.
Drawings and diagram
If the owner of the future greenhouse has decided on the material, then it's time to choose the shape. The choice is not very large.
- An arched greenhouse is usually used for growing low plants. It is convenient because the roof does not need to be cleaned, snow and debris do not linger on it.
- Tall (or climbing high) plants are grown in a tunnel greenhouse. Standard dimensions: width - 10 m, height - 5 m.
- Seedlings are grown in a pyramidal greenhouse, it takes up very little space on the ground, narrow, tending upward.
- The gable shape seems to be the most convenient for those who want to grow plants of a different plan. It makes it possible to rationally manage the space inside the greenhouse, tall plants will be perfectly located in it, and undersized vegetables and berries can be located very compactly in tiers or vertical planting.
- A wall greenhouse is simply half of a gable greenhouse attached to the wall of an existing building.
From a profile pipe it is most convenient to make a gable greenhouse a house - all the elements of the side lie in the same plane. It provides enough light and space for a variety of plants, in addition, it allows the installation additional elements- doors, vents. It is advisable to start the work with the creation of a structure diagram, it will allow you to visualize the owner's ideas about the greenhouse or greenhouse that he is going to build. Moreover, it is the scheme that will help determine the optimal dimensions of the greenhouse so as to make the correct calculation of pipe cutting. And then you need to make a drawing indicating all the dimensions of the greenhouse "house".

The standard length of a profile pipe is 6.05 m. To make one frame out of it, it is necessary to calculate its dimensions according to the diagram. If we assume a height of 1.7 m, then 3.4 m will be needed on two sides, and with a roof angle of 30 degrees, the width will be 2.24 m. The author of the drawing suggests reducing it by 24 cm so that one sheet of polycarbonate is enough for the roof and 10 cm left on the sides for water flow. Since there is a calculation of materials for construction for your money and with your own hands, you should listen to this opinion.
Frame erection
A light greenhouse made of shaped pipes and polycarbonate should be built on a solid foundation. It can be different: wooden, brick, concrete. Most often, a monolithic concrete foundation is made for such a greenhouse, special anchors are laid in it for subsequent fastening of a profile pipe to them. After the concrete has hardened, a profile pipe with a cross section of 40 mm by 20 mm is attached to these anchors, and all frames will be attached to it. Next, you need to assemble the frame, mounting the frames on the base.
most responsible and important point should be the assembly of end frames, on which doors (70 cm wide) and a window vent (80 cm wide) are planned. It is better to make a door from a pipe with a cross section of 40 mm by 20 mm, and for a window, a pipe with a cross section of 20 mm by 20 mm will suffice. Hinges on frames can be installed directly on the assembly site.

Frame frames can be placed at a distance of 1 m from each other - the rigidity and strength of the pipes will allow you to do this without losing the strength of the greenhouse. Moreover, they will be connected by pieces of a square pipe with a cross section of 20 mm by 20 mm, they must be welded flush with the main profile. If the calculation was correct, the polycarbonate will lie flat on the frame. Installation of finished frames begins with an end frame with a door. It must be fixed by welding to the base with two braces from the corner. After 10 cm from the bend, horizontal connections from the pipe are placed, they are needed to fix the polycarbonate.
Do-it-yourself greenhouse frame from a profile pipe
Many summer residents prefer greenhouses from a profile pipe, especially since they can be made by hand. How to do it, read the article
Do-it-yourself greenhouse from a profile pipe - what is important to know

When making greenhouses for your site, each person always has the first and main question - what to make a greenhouse from, what material to use for this?
Today we will talk about how to make a greenhouse from a profile pipe.
Profile pipe - features of working with it
Manufacturing is the main task
From this material, quite strong frames for greenhouses, and with proper processing of the material with a protective coating, these greenhouses are also durable.
The frame of a greenhouse made of a profile pipe consists of many elements, and if the assembly of such a frame is not a difficult task, then the manufacture of individual elements can confuse even an experienced handyman.
The whole point is not in skill and knowledge, but in the features of this material. Let's deviate a little from the main topic and consider this issue in more detail.
Not all advice is correct
As many have probably noticed, there are many tips for building a greenhouse from a profile pipe. By typing in a search engine cherished words what do we get as a result?
And in most cases we get a method for manufacturing a greenhouse frame from a pipe. Yes, it is from a pipe, but not at all a profile one.
Our reference is a profile pipe, this is a pipe in which the internal section differs from the usual round pipe and has a square or rectangular shape.
Profile pipe - distinctive features

- The profile pipe is used in various construction as a structural material.
Speaking figuratively and comparing this material with a tree, then the profile pipe plays the role of a beam. Agree, is there a difference between timber and log or round timber?
- A special difference between a profile pipe and a regular one is the presence of four stiffeners.
Our reference - with a much smaller mass, a profile pipe is much stronger than a conventional pipe.
Experts know that when bending a beam, the main load falls on areas that are located at the edges. On the central part or core, the load has practically no effect, there are no factors leading to deformation.
- Having a stronger material and at the same time light in weight, you can adapt it to carry out various projects and manufacture different structures, which is what design engineers use with success.
The main problem is the fold
But this circumstance dictates the use of special approaches and the use of special tools when working with this material.
- For example, you are building a greenhouse from an ordinary pipe (see Greenhouse from plastic pipes with your own hands);
- You will not have problems and questions in its manufacture, unless of course you know how to work with metal and you have sufficient experience in this;
- When a greenhouse is built from a professional pipe with your own hands, a lot of questions arise;
- You will already have them when you just start making your own drawing of a greenhouse from a profile pipe.
After all, it is no secret that it is possible to bend an ordinary pipe without the use of special devices, and this may be necessary in the manufacture of a frame for a greenhouse.

But when do you think about how to bend a profile pipe for a greenhouse? This is a completely different question.
It can lead to the fact that you generally refuse to use this material in the design or you need the help of specialized companies or metalworking shops.
No equipment anywhere
The fact is that bending a profile pipe without deforming the latter, and even more so at the right angle and the desired configuration, is a difficult task.

Frame of industrial production from a profile pipe.
No, of course, it is easy to do it with a pipe bender at hand, and the well-established production of greenhouses from a profile pipe uses this particular device, bending the pipe in this case is quite simple.

Pipe bender for a profile pipe.
But you must admit, not everyone in the household has this device.
- To purchase this product for the manufacture of one greenhouse is a completely hopeless business, unless, of course, you plan to continue professionally engaged in a flexible profile pipe;

A bent element on a pipe bender.
- Therefore, before you start manufacturing a greenhouse from a profile pipe correctly assess your capabilities;
- Maybe you'd be better off using a different material for your greenhouse (see Do-it-yourself PVC arc greenhouse: how to do it?).
Drawing up drawings begins with an assessment of the possibilities
And you can do it differently by drawing a greenhouse from a profile pipe, try to make it so that you do not have to bend individual elements.
In this case, you do not have to seek help from specialized companies and spend additional money just to bend the pipe.
When we talked about the need for you to properly assess your capabilities, we also had in mind the issue of welding. If you don't have welding machine or you doubt your abilities as a welder, and there is nowhere to turn, do the following: complete the drawings of the greenhouse from the profile pipe, just create a frame that does not require welding at all. In other words, it will be completely made with the help of fasteners. The advantage of this material is that the frame of the greenhouse from the profile pipe allows you to do this.
As you can see, the material is quite versatile, allowing you to use it in various ways.
We bend a profile pipe
For those who want to build a greenhouse frame from a profile pipe with their own hands and at the same time they need to bend the pipe without outside help, we will give two tips on how to do it yourself and at home.
Method one - cutting, welding
The first tip lies in your ability to use welding. You will need:
- Welding machine;
- Cutting machine;
- Fix the profile pipe in a vise;
- After that, accurately determine the place of the bend and the angle at which you need to bend the pipe;
- On the side to which the fold will be made, it is necessary to apply transverse marks with a marker at exactly the same distance. The distance of the marks from each other directly depends on the bend radius. The steeper the arc required, the closer the marks are to each other and vice versa;
- With a cutting machine, it is necessary to make cuts according to the marks;
- Next, bend the pipe to the required radius;
- After that, all cuts must be welded by welding.
Accuracy first and foremost
With some effort and skill, you can get a pretty good fold.

Arcs from a profile pipe.
Method two - sand comes to the rescue
As for the second method, then we do not need welding at all. We need sand, not just earth or clay, but pure river sand.
Sand preparation
Sand must be cleaned of impurities and sieved.
For a better result, it can be washed with water. Then all extraneous smallest impurities will be washed out of it.
- After the sand has dried, it must be calcined on fire. This is done in order to remove the last traces of moisture;
- This can be done on a metal sheet located above the fire;
- The sand is laid in a thin layer and held until steam stops emitting from it.
Good preparation - great results
The frame of the greenhouse is made from a profile of various sections. Suppose we need a greenhouse from a profile pipe 20 * 20.
- We take the workpiece that we need to bend, we make two plugs from wood on both ends of this workpiece;
- In this case, the plugs must be of such a size that they would have to be inserted into the ends of our pipe with a hammer;
- We hammer the first plug into one end;
- We put the workpiece vertically, while the open edge is on top;
- Pour sand inside the pipe;
- It is necessary to pour to the very edge. At the same time, it is possible to tap the workpiece with the clogged end on the ground, thereby tamping the sand inside the pipe;
- When the sand is poured, it is necessary to hammer a wooden plug into the open edge;
- Now, by clamping the profile pipe in any place, it can be bent in the same way as a simple pipe.
The sand inside creates the necessary pressure, which prevents the deformation of individual parts of the pipe.
The fold is even and of good quality. After the element is ready, it is necessary to remove the plugs and pour out the sand. There may be problems with this, the plugs sit tight. In this case, they can be drilled or simply burned on fire.
If you need a greenhouse from a 40 * 20 profile pipe, then you can do the same with this pipe.
Winter - rot with water
In winter, water can be used instead of sand.
- Having hammered the plug on one side, water is poured into the pipe to such a level that there is only room for the second plug, after which the second plug is hammered and the pipe is exposed to frost;
- After the water turns into ice, you can successfully bend the profile pipe.
Our advice - using the latter method, carefully monitor the condition of the pipe when it is in the cold. Overexposure threatens to deform the pipe section or rupture it.
Profile protection - the foundation of the basics
If the profile pipe you used for the manufacture of the greenhouse frame does not have external protection from aggressive influence environment, take care of it.
Having considered this issue, it became clear that greenhouses from a profile pipe, the manufacture of a frame, individual elements or just drawings are important and responsible work, where there are no trifles. One wrong calculation and all the work is in vain, or vice versa, the right decision will lead to an excellent result.
How to make a greenhouse from a profile pipe with your own hands - a detailed guide
Inveterate summer residents often strive to install a reliable greenhouse or greenhouse on their site so that they can grow seedlings or get a crop much earlier. In this article, we will talk about how to make a greenhouse from a professional pipe with your own hands, so that it turns out to be reliable and durable.

Note that the choice in favor of steel profiled pipes is dictated primarily by their resistance to deformation and destruction, as well as the ability to withstand significant loads. Although the installation itself of such products requires some effort.
The initial stage of creating a greenhouse from profile pipes - drawing and selection of material
You can determine the exact amount of materials needed as accurately as possible if you first estimate the dimensions of the greenhouse from the profile pipe in the drawings, and also take into account the parameters of the manufactured products themselves.
Profiles with a section of 40 × 20 mm or 40 × 40 mm are optimal for creating a supporting structure. They are strong enough and have a wall thickness of 2 mm or more. At the same time, products with thinner walls, about 1-1.5 mm, can be used for horizontal screed - this will be enough.

The project of a greenhouse from a profile pipe can include several types of configurations:
- a greenhouse attached to the main house, the roof of which has an asymmetric oval or shed shape;
- a separate building with a gable roof;
- arched greenhouse.
When calculating the number of purchased pipes, it is worth taking into account the measured length of pipe products available for sale - it is 6.05 meters.
Given this value, it is possible to make drawings of greenhouses from a profile pipe with dimensions of 3, 4, 6 or 12 meters in length, as well as 2, 3, 4 or 6 meters in width. The optimal dimensions of the greenhouse, in which two parallel beds are located, will be values within 3 × 3-6 meters, and if there are three beds, then - 4-6 × 3-12 meters. However, most often a drawing of a greenhouse from a profile pipe is drawn up based on the dimensions of 3 × 6 meters - this is the most convenient ratio.

But as for the height of the building, then it is necessary to take into account the individual parameters of the owner. As a rule, the ceiling should be located 30-40 cm higher than a person's height. That is, the height of the greenhouse can vary between 1.9-2.5 meters.
Another important factor in calculating the height of the greenhouse is finishing material for sheathing. In the case of ordinary film, this does not matter, but if you purchase polycarbonate, it is better if its size is enough to cover the height without trimming or extensions.
The standard length of a cellular polycarbonate sheet is 6 m, and if you use the circumference formula (L = π × D), you can calculate whether it is enough to cover an arched greenhouse.

So, for example, let's take the planned building height of 2 meters and substitute it into the formula:
Then half the length will be 12.56 / 2 \u003d 6.28 meters - this is not enough to completely cover the surface of the greenhouse, but an additional segment of 28 cm is required. Therefore, it is better to provide for a greenhouse height within 1, 9 meters.
Preliminary preparation for work
Before you start making a greenhouse from a profile pipe with your own hands, you should pay attention to some additional conditions for your site. In particular, the type of soil can be important. It is preferable to install a greenhouse on dry soil, where excess moisture does not accumulate, which can affect the supporting structures. It is optimal to install a greenhouse on sandy soils, in contrast to clayey soils prone to waterlogging.

The location of the greenhouse relative to the cardinal points also matters. So, it is best that the long side is facing south so that as much sunlight as possible penetrates into the greenhouse, which will not be reflected from the polycarbonate sheets.
In order for the heat not to leave the greenhouse too quickly, and it was convenient to move in it, the front door is usually located in the end part. According to standards, the width of the door should be no narrower than 70-80 cm, but its height directly depends on the size of the greenhouse itself.

If you are planning to build a more or less capital greenhouse from a professional pipe, then you can additionally build a small corridor or vestibule in it. It will be possible to store tools and other trifles in it. In addition, such a space will allow you to keep warm when opening the door to the greenhouse itself.
The frame for the construction of a greenhouse from a profile pipe with your own hands must be placed on a strip or column foundation, the type of which will depend on the type of soil. In any case, debris must be removed from the foundation area and the top layer of soil removed.
The sequence of work in the construction of a greenhouse from a profile
In general, the entire process of building a greenhouse from profile pipes includes four main stages:
- Markup.
- Foundation pouring.
- Frame assembly.
- Sheathed in polycarbonate.
First, a place is planned for the future greenhouse from a profile pipe and wooden pegs are driven in along its perimeter, onto which a rope is pulled.

Next, start building the foundation. The frame structure made of a profile pipe, which will be transferred to the supports, is quite strong and not prone to deformation. Therefore, it is often enough for a greenhouse to have a columnar foundation made of asbestos-cement pipes.
The columnar foundation is poured like this:
- holes are drilled in the ground at a certain distance from each other, the diameter exceeding the dimensions of the pipes;
- actually, asbestos pipes are immersed in the resulting pits;
- the gaps between the pipes and the soil are covered with filler and carefully rammed;
- cement mortar is poured inside the pipe, making sure that there are no voids in it;
- in the upper part of the poured pipe, a metal plate or a piece of reinforcement is immersed in concrete, which will serve as a hitch for the foundation with a frame structure.
Assembling the body from profile pipes begins with the end sections of the structure. The pipe sections are connected to each other by welding, using tees, angles, and also with the help of couplings. Welding seams are much stronger, and the structure is more stable. However, if you want to make the frame collapsible, then it is better to use couplings.

At the last stage, they begin to sheath the body with polycarbonate sheets. It is fixed with self-tapping screws with thermal washers so that moisture does not penetrate into the material cells.
Please note that when attaching polycarbonate, its cells must be located at an angle or vertically. The horizontal position will not allow moisture to drain and degrade the quality of the material.
If you are planning to build a greenhouse from a profile pipe with a house, with a full gable roof, then in it, in addition to front door, you need to cut through the windows. Well, small arched greenhouses can only get by with a door.
How to bend a profile pipe for a greenhouse in a "cold" way
Arched greenhouses made of profile pipes for summer cottages are the most stable and, at the same time, practical structures. Due to their streamlined shape, arched greenhouses are able to withstand strong gusts of wind, they do not accumulate precipitation in winter period. However, in order to create such a design, you must first bend the pipes (read: “How to bend a profile pipe - bending options and methods”). In this case, there can be two options - contact specialists for professional help or do the work yourself using a pipe bender. Another alternative is to do the bending with your own hands using improvised means. To cope with the task as efficiently as possible, you need a radius template.

There can be two ways of cold bending of profile pipes - with or without a filler. If it is planned to assemble the body from profiles with a thickness of up to 10 mm, then pipe bending can be performed without filler. But for bending professional pipes with thicker walls, it is better to pour rosin or sand into them.
Alternatively, there is a bending method using a thick spring, the cross section of which will allow it to be pushed into the pipe cavity. The spring properties of such a device will make it possible to bend the pipes quite well, without changing the section of the profile at the bend.
Thus, there are two ways to bend profile pipes in a “cold” way:
- use improvised means and mechanisms - bending plates and similar tools;
- use a portable or manual factory pipe bender.

Rather primitive, but, nevertheless, an effective device for cold bending of profiles are bending plates with holes. Rods are placed in these recesses, which will serve as a stop when bending. The pipe is placed between two rods, which are installed in the slab at a distance of the deformation radius. Then they begin to bend the profile, moving from the center of the workpiece to its edges.
It is worth noting that such manual method cold deformation of the pipe is quite laborious, and the result will depend on the effort expended on bending.
Method of bending profile pipes with preheating
A similar pipe bending technique is used in cases where the prepared profile products have a sufficiently large wall thickness. The profile must first be filled with sifted sand, so that as a result of the work a high-quality uniform bend is obtained. In addition, funds must be prepared personal protection- thick gloves and a safe source of fire.

The hot bending technique looks like this:
- At the first stage, wooden plugs for the pipe are made in the form of pyramids. The length of such a workpiece should be 10 times greater than the width of its base, and the area of the wide part should be at least twice the pipe clearance.
- When the workpiece fits the size of the pipe, small grooves are made in it on four sides, through which the gases generated when the pipe is heated will escape. The second stub does not need to be processed.
- Next, the treated section of the pipe is pre-fired.
- Any fine filler must be sifted through a fine sieve before filling into the pipe. So you get rid of large particles that can be imprinted on the surface of the pipe when heated. After that, very fine sand particles are removed using a 0.7 mm sieve so that they do not sinter when heated inside the pipe.
- The prepared sand is calcined at 150℃.
- On one side of the pipe, a blind plug without grooves is installed. On the other hand, a funnel is placed in the professional pipe, along which calcined sand is poured inside in small portions.
- With periodic tapping of the walls, you can make sure that the sand is well compacted - the sound will be deaf. As soon as the pipe is completely filled with sand, a second plug with grooves is inserted.
- The place of the future bend of the pipe is marked with chalk. After that, the pipe section must be securely fixed in a vice by placing it on the template. Please note that products with welded seams must be bent so that the junction is located on the side. But bending along the weld is not worth it.
- By marking, they begin to warm the metal to red. When the material becomes soft enough, it is given the desired shape in one smooth and clear movement.
- When the workpiece has cooled, the bend is compared with the template. With perfect work, you can pull out the plugs and pour sand out of the profile.
It is desirable that all hot bending work be carried out in one step. Each subsequent heating will lead to a loss of metal strength.

In conclusion, we note that, by and large, even novice builders can cope with the construction of a greenhouse for a summer residence from profile pipes. Regardless of its design, all major work will be carried out according to the general principle. The only differences may be the features of the landscape and the preferences of the owners, which will need to be taken into account during construction.
Greenhouse from a profile pipe: drawings with dimensions, a greenhouse with a do-it-yourself house, a project from a professional pipe of an arched greenhouse
Greenhouse from a profile pipe: drawings with dimensions, a greenhouse with a do-it-yourself house, a project from a professional pipe of an arched greenhouse
Do-it-yourself frame from a profile pipe for a polycarbonate greenhouse: step-by-step instructions, drawings and nuances

To take advantage of all the advantages of a greenhouse on garden plot, even at the stage of its design, it makes sense to pay special attention to the choice of materials for the frame and walls.
The durability of the greenhouse will depend on the strength of the frame, and the health of the plants will depend on the properties of the covering material. The best combination of these requirements demonstrates pair "profile pipe / cellular polycarbonate".
Features of a greenhouse on a frame made of profile pipes
Cellular polycarbonate according to its characteristics almost perfect for use as a material for greenhouses.
It transmits almost the entire spectrum of solar radiation, due to the presence of an air gap, it perfectly retains heat and is absolutely insensitive to the level of humidity.
At the same time, the rigidity of polycarbonate does not mean the possibility of building frameless greenhouses. Under their own weight, plastic sheets will quickly begin to sag, their edges will begin to crumble, and cracks will run along the surface of the panels. Therefore, the presence of a frame is vital.
Metal profile pipe has a number of advantages before other frame materials:
- high mechanical strength allows not only to easily withstand the entire plastic walls greenhouses, but also withstand snow loads up to 300 kg/sq.m.;

Design options
Exist several types of tube frame greenhouses:
- Rectangular with gabled roof. Such greenhouses look like ordinary Vacation home and are the most widespread. Their convenience consists in a significant internal volume, which allows growing tall plants not only in the central part of the greenhouse, but also along the walls.
The material is usually used pipes with a cross section of either 20 × 20 mm or 20 × 40 mm. The latter have such a margin of safety that they can be used for any structural elements. But they do not have the smallest mass and the cost is not always justified for the greenhouse economy.

Preparation for construction
How to start building a greenhouse made of polycarbonate and a profile pipe with your own hands?
Has a durable metal frame makes it possible to place the greenhouse in any convenient place in the garden. It will cope with any wind loads without additional protection in the form of trees or walls of capital buildings.
However, it remains necessary to take into account soil properties. Excess moisture in the greenhouse will not lead to anything good, so the soil under it should be as dry as possible. Usually the driest soils are those with a high content of sand. An abundance of clay can signal a high risk of waterlogging.
Greenhouses are oriented to the cardinal points so that one long side they look south. Thus, it will be possible to capture sunlight at a large angle, excluding its reflection from the mirror-smooth polycarbonate.
Having decided on the place, you can start to determining the dimensions of the greenhouse and making a drawing. It is not recommended to refuse the latter, since it is impossible to fulfill the plan without errors without a paper diagram indicating all sizes.
Greenhouse dimensions and the dimensions of its individual elements are chosen not only taking into account own desires, but also based on the actual length available material. The less scraps left, the cheaper the greenhouse will be.
Do-it-yourself greenhouse made of polycarbonate (drawing) from a profile pipe.

Construction technology
How to build a polycarbonate greenhouse with your own hands from a profile pipe? All work is divided into several stages:
- markup. Marking is carried out using pegs and string stretched between them along the perimeter of the future greenhouse. In the future, this design will help not to make a mistake when building the foundation.
These features make the best choice in favor of a columnar foundation of asbestos-cement pipes. It is set up as follows:
- according to the marking in the ground, pits are drilled;
- cuts of asbestos-cement pipes are lowered into the resulting holes;
- the free space between the pipe and the walls of the pit is filled with sand or soil (with a rammer);
- the pipe is filled with concrete mortar;
- in the upper cut, a piece of a metal plate or reinforcement is immersed in concrete. These elements will be needed to connect the greenhouse frame with the foundation.


Do-it-yourself greenhouse made of polycarbonate (drawing), from a profile pipe: preparation for construction and construction features
A profile pipe as a supporting frame for a greenhouse will help you take full advantage of all the advantages of cellular polycarbonate. How to build a greenhouse with your own hands from polycarbonate and from a profile pipe. Instructions, drawings, photos and videos.