All kinds of hand tools. Do-it-yourself garage accessories: all the most useful. Other Helpful Ideas
Homemade products for the household will help to make the house cozier and more comfortable. Handmade fixtures, decorating old household items will allow you to give a second life to things, which will significantly save the budget. It will also decorate the environment, make the interior more creative. Some homemade products for the household will visually increase the space, create comfort.
Folding armchair
It is not always financially possible to purchase some furniture in a store. You can successfully get out of this situation if you make crafts with your own hands. For example, it is enough just to make from and
The folding part (legs of the chair) is attached with hinges or mounted on a metal pin, which is fixed from the edges with nuts. The tarpaulin is cut into two rectangles, in which grooves for bars are sewn on the sides. The side parts of the top of the chair (back frame with armrests) are made in the form of the letter "L". They are connected with bolts or screws. It should be remembered that the folding lower part must be fixed in the working position. Therefore, not far from the connecting pin on the legs of the chair, you need to attach a metal hook - it will securely close this structure.
Who cooks porridge in a little house, gathers guests
Craftsmen familiar with a saw and a drill can even make a children's room in a small apartment. To do this, you need to build something like a screen with doors and windows from plywood or other fairly light material. Corner connections plates will imitate the corners of the house. Having painted a homemade screen in an appropriate way, the master will turn it into a miniature children's house.

You just need to make sure that this screen can be firmly attached to the walls. After all, the safety of children is paramount! And inside, a children's table, a crib, and a box with toys will fit quite well.

And you can even sew. For such walls, any bright fabric that can simply be hung on a rope, wire or a solid cornice is quite suitable.
Knitted furniture
Today it has become extremely fashionable to make benches. They use such homemade products for the household, storing various items inside: toys, bed dress, pots, cereals. They can be placed in the kitchen, in the nursery or in the living room. They are also very convenient for relaxing both in a city apartment and in the country.
To make furniture with storage boxes, you must first make a frame for it. The bench consists of a rectangular box fixed on legs. The soft part is knitted in the form of a rectangular parallelogram without one base and put on the lid. An elastic band can be inserted into the lower part so that the elegant “upholstery” is pulled together at the bottom of the bench.
The pouf can be given both square and cylindrical shape. To do this, around the circumference of the lower wooden base vertical racks are stuffed, which are then connected on top with thick wire. Plywood shields are stuffed between the racks so that things do not fall out of the “storage”.
Separately cut out the upper round base. The soft part is knitted in the form of a cylinder, fixed on the upper part of the pouffe. It is put on top of the pouf like a hatbox lid.

Using used clothes in homemade products
who has a collection useful tips for a household, must necessarily make the following entry in it: “Do not throw away a thing before you are convinced of its complete dilapidation. Try to give every item a second life!”
From old clothes, for example, you can knit or weave creative upholstery. Unnecessary tights are widely used, which are cut into a spiral, slightly stretched to twist the strip into a tube. You can use other material, also cutting it into strips and sewing them together. “Yarn” is wound into a ball, from which they are then knitted with fingers or woven into a fabric.
Knitting without knitting needles repeats the algorithm of ordinary knitting. Only the loops are held directly on the fingers. Yes, and pulling the thread is also done by them.
For weaving, you can use a frame, along the edges of which nails are stuffed. The thread is first laid crosswise, clasping symmetrically located nails. They should all cross at one point in the middle of the frame. Then, the end of the thread from the material is tied to the center and the canvas begins to be shaped in a round way by weaving.

And the old refrigerator - in business
As a homemade product for the household, you can use a used large household appliances. And then instead of dreary pulling out washing machine or a refrigerator in the trash in the house, a creative necessary thing may appear. It will be both beautiful and useful.
There has long been a technique for converting refrigerators into incubators. However, such a thing is required only for those who are engaged in poultry farming and live in rural areas. But such original homemade products for home and summer cottages from refrigerators, like chests tied with fabric threads, will decorate the home and allow you to hide many useful gizmos in them.
For the manufacture of this piece of furniture, you need to remove the motor of the device. If you now put the refrigerator with the door up, then the frame of the chest is almost ready. It remains only to tie the cape and sew a foam pad on its upper part, cutting a hole in it where the handle will hide.
The cape must be made in the form of a rectangular parallelogram without a lower base. To make it easier to use the chest, you can sew a “lightning” lock into the side.

It's about painting - everything will be like in a fairy tale
Non-working refrigerators are also easily converted into lockers. One has only to conjure over their decor. You can make a creative piece of furniture in a cartoon style for a nursery or a fantasy one for a hallway, in an antique one for a living room or in a musical one for an office. It all depends on the imagination of the master.
Although a working refrigerator will become more creative if you paint it or stick an original film sticker on the casing. This will also protect the surface of the unit from scratches and corrosion.
Kitchen appliances decor
You can simply decorate not-so-new household items with stickers, applique, or draw pictures on the sheathing with paints for metal surfaces. The thing will again please the eye and sparkle with fresh colors. In just a few hours, you can completely change the look of the kitchen, without even making homemade products for the household from scratch.

Microwave ovens, washing machines, cabinets and pencil cases are decorated with both pictures-drawings and voluminous decorations are pasted on them.
Each person, using his skillful hands, can create unique and even luxurious items for his home. It just takes a little thought and effort.
Crafts made from old items and things that can be given a second life can make your home much more comfortable. Some do-it-yourself homemade crafts for the household can significantly save the home budget, make work easier, or make the surrounding interior more interesting. And even if difficulties arise in the process, overcoming them will be worth it.
DIY for the home workshop
In almost any home there is always some set of tools necessary for the household. But sometimes situations arise when working in your own workshop or garage requires some kind of device that is either impossible to purchase in a store or is very expensive. In this case, the way out can be found by making it yourself.
Blacksmith's forge from a cylinder
 This device for heating metal will become an indispensable assistant in the home workshop. The forge can be safely used to make original items using artistic forging. These will be truly unique forged items.
For the bugle, it is best to use an empty gas cylinder with a capacity of 25 liters. Its ends are cut off by a grinder, and the hearth door and its back will be made from the cut parts. Inner part the cylinder is covered with refractory ceramic wool, which is able to withstand temperatures of more than 1200 0 C. From above it is coated with fireclay (lined), which can withstand temperatures up to 1500 0 C. Fireclay slabs or refractory bricks are laid on the bottom of the hearth after lining.
A hole is drilled from above and a small drive is inserted, which allows inserting the nozzle of a gas-powered burner, which can create a temperature of more than 1000 0 C in the furnace - quite sufficient to heat the metal to a certain temperature suitable for forging.
Collapsible garage crane beam
In the manufacture of such a lift, the cash costs will be much less than buying a factory model. For its manufacture, you will have to spend money only on materials, half of which, perhaps, can be found in the garage.
Materials needed to assemble the lift:
- Two racks - a profile pipe 100x100x2350.
- Cross bar - steel pipe arbitrary length with a diameter of 100 mm.
- Four supports for the rod - profile pipe 100x100x600.
- The basis and braces - a corner with regiments on 100 mm.
- Two metal rollers for the cable.
- Four wheels for movement.
For the lifting mechanism, it is best to use manual winch with a worm gear with a maximum load of up to 500 kg, which is attached to one of the racks of the crane beam.
The design does not take up much space in the workshop, moves easily on hard surfaces and is quite convenient for removing the engine from the car.
Mobile tool rack
 The main highlight of this rack is its small size
, but at the same time it is possible to place a large number of tools, and if necessary - quickly move it to any place or adjacent room. It is very convenient to use such a rack in your workshop or when conducting construction and repair work in large rooms, especially when you need to frequently move tools.
The main highlight of this rack is its small size
, but at the same time it is possible to place a large number of tools, and if necessary - quickly move it to any place or adjacent room. It is very convenient to use such a rack in your workshop or when conducting construction and repair work in large rooms, especially when you need to frequently move tools.
The rack can be assembled on the basis of a collapsible plastic rack mounted on a self-made platform with wheels (trolley). The platform is made exactly to the dimensions of the rack from a metal corner with shelves 45x45 mm or a sheet of plywood with a thickness of at least 10 mm. For movement, furniture metal wheels are used.
It is additionally possible to manufacture and fix fasteners for the rack building levels, extension cords and other tools that can be stored hanging.
Help for the hostess
There is not always a financial opportunity to buy, for example, something from new furniture in a furniture store or place an order for its manufacture. But you can always get out of this situation by making the right thing with your own hands, while making it attractive and unique, using improvised means for this.
Cork kitchen apron
 A kitchen apron is a wall surface located between the countertop and wall cabinets. Usually this part of the wall is lined with tiles. But many other materials can be used to cover it, for example, wine corks can be glued to the wall.
Such an exclusive decor looks quite great.
Before sticking, each cork is cut lengthwise into two halves with a sharp clerical knife. It is desirable to paint the wall black, which will emphasize the seams between the plugs.
Corks are glued to the wall using liquid nails in a checkerboard pattern or with a certain pattern, since it is unlikely that they will be laid out perfectly evenly, and curved rows will visually look disgusting.
The corks themselves are not afraid of moisture, but they quickly get dirty and are poorly washed, so it is best to close them with a tempered glass screen. True, you will have to spend a little money on it and order glass in a special workshop, where they will cut it to a given size and make holes for sockets and fasteners.
Glass is fixed to the wall with anchor dowels, which can be purchased at almost any hardware store.
Although an apron decorated with wine corks may be expensive pleasure but the result will be worth it.
The surface of the countertop, as well as the wall, can be decorated with corks and covered with tempered glass.
Hinged folding table
fixed on the wall folding table IR allows you to save some space in the apartment. In the folded state, it can protrude from the wall at a distance of no more than 10 cm and does not interfere with anyone at all, but when unfolded, it can replace a full-fledged table.
There are many options where you can use a folding table fixed to the wall. Here are just a few of the most basic ones:

Shower for giving
There is probably nothing better than refreshing yourself under running water on a hot summer day, especially if he was working in the garden. Naturally, only a shower will solve this problem and relieve the fatigue that has accumulated during the day.
The shower can be installed independently without the involvement of outside help, the main thing is to choose a place for it and decide on the type of shower cabin.
Three types of cabins stand out among summer showers, which you can freely build on your own:

Installation of a simple shower is done in this way:
- A shower cabin frame is being made, which can be assembled from metal, wooden beam or other improvised materials.
- On the roof of the assembled frame, a metal or plastic container for water, which can be from 50 to 200 liters.
- It is advisable to paint a metal container black for better heating of the water. Additionally, several electric heating elements can be installed in the container, then you can take a shower even in cloudy weather.
The booth can be sheathed with boards, plywood, slate, or simply covered with a tarpaulin or cellophane film with folding canopies.
To build on your own
The topic of construction or repair, probably, worries everyone. And, of course, everyone who deals with it wants to finish it as soon as possible with minimal financial costs. Therefore, if you want to save money, you can make some materials for construction on your own. For example, it can be wall SIP panels or such useful tool, like a vibrating plate, the need for which often arises among many owners of a personal plot.
Homemade SIP panels
 For their manufacture, you need to prepare a flat, hard platform. After laying a sheet of OSB 10-12 mm thick on it with a rubber spatula with teeth, apply glue to it.
Then lay sheets of foam grade 25-30 on the glue. After that, an adhesive mass is applied on top of the laid foam, as well as on the bottom OSB plate, and the second sheet of OSB is laid on top.
If several stacked boards are being made at the same time, work should be done quickly until the adhesive has set. Usually in this way you can prepare no more than 4-5 panels at a time.
After harvesting, the formed slabs need to be pressurized with a press. Since at home, of course, hydraulic press no, it can be replaced with a thick plywood sheet laid on prepared SIP boards over the entire plane and loaded for 2-3 hours, for example, with several bags of cement, sand or other cargo. You can even use car, having driven onto a plywood sheet along a pre-made flyover.
After the glue has completely dried, the home-made panels are ready, they can be folded into a separate pile and proceed with the preparation of new panels. The manufactured panels should lie unloaded for another day, after which they can be used for their intended purpose.
Vibrating plate manufacturing
To make a homemade vibrating plate, you will need to prepare:
- An electric motor with an eccentric brand IV-98E, which is the main part of the vibrating plate.
- Steel sheet, at least 8 mm thick, 450x800 mm in size. It can be ordered at any metal base.
- Two pieces of channel no more than 400 mm long.
- inch pipe for the handle and two rubber bushings for its fastening.
- Of the tools you will need a welding machine, a grinder and a set of wrenches.
 From the narrow sides of the plate, stepping back from the edges by 80-100 mm, make an incision with a grinder to a depth of about 5 mm. After that, bend the edges towards the notch at an angle of approximately 25 0 and weld them by welding. Bends are needed so that the vibrating plate does not sink into the material compacted by it and moves freely along its surface.
Then, across the plate at a certain distance, calculated for mounting the electric motor, two channels are welded with the shelves down. Through advance drilled holes in the channel, with the help of M10 bolts, an electric vibrator is attached to them.
The tube handle is attached to the vibrator via soft rubber grommets, which can be purchased at an auto parts store or hardware store in the hardware department.
Thus, you can make a lot of useful things in the household with your own hands, spending on this only a part of the money that you would have to pay when buying. finished product. You just need to make some effort and have certain skills.
Each master seeks to equip his sphere as much as possible, to saturate the working space with machine tools and fixtures. Home-made machines and fixtures for the home workshop are of great benefit to private farming.
Among the home-made household crafts and equipment are:
- joinery;
- Workbench;
- stool;
- shelves;
- shelving.
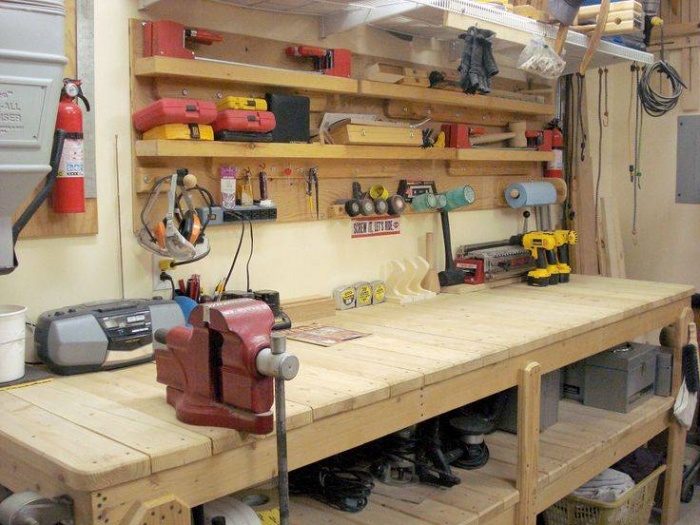
Workbench
Workbench dimensions
The height of the worktop surface should be such that the worker can operate tools and equipment while standing. The owner of the workshop determines the height of the workbench himself - according to his height. The height of the desktop ranges from 75 cm to 80 cm.
The size of the countertop is determined by the area of the utility room. The table should not interfere with the free passage around it.
workbench material
Wood
Often used wooden table. The workbench is made of timber and boards. The legs of the table are fastened with diagonal crossbars for reliability.
The tabletop is made in the form of a shield from knocked down boards with pieces of timber. The shield is supported on the legs of the table and fastened with nails or screws. Connection details are made of steel corner.
The options for assembling a wooden workbench are different, but in one they are the same - the design of the table must be stable and withstand static and dynamic loads.
If the surface of the workbench is exposed to accidental exposure to cutting and sharp tools, then the countertop is upholstered with tin or a metal sheet is placed on top.
Metal
The most reliable desktop design is a workbench welded from a metal profile. The manufacture of a welded product implies the presence of a welding machine and experience with it.
The support frame and table legs are welded from a steel angle and strip. For auxiliary parts, pieces of reinforcement are used.
The tabletop is made of a metal sheet, 8 - 12 mm thick. A thick sheet will significantly increase the weight of the workbench, which makes it difficult to move it.
Stool

Making a stool with your own hands is quite simple:
- From a bar 40 x 40 mm make 4 supports, 50 cm long.
- The legs in the middle of the length are fastened with crossbars.
- Grooves are made in the supports with a chisel.
- At the ends of the transverse planks with a chisel, protrusions are cut to fit the grooves.
- The protrusions are lubricated with carpentry glue and inserted into the grooves.
- While the glue dries, the supports are pulled together with a belt.
- The seat is cut with a circular saw from a wide board 30 mm thick.
- A seat measuring 300 x 300 mm is nailed or screwed to the legs of the stool.
Shelves
Shelves are made of board, chipboard or MDF. They are open or with side walls. For fasteners, hinged furniture hinges are used.
Holes are drilled in the wall into which dowels are driven. The screws are not completely screwed into the dowels so that they can be put on the hinges of the shelf.
The hinges are screwed to the back of the shelf. The shelves are hung on the wall, putting the hinges on the heads of the screws.

Shelving
Racks are a whole complex of shelves of different sizes. They are good to make from chipboard. The lattice structure is supported on a pedestal or simply placed on the floor. For the stability of the rack, corners are screwed to the sides of the furniture. Free shelves of corners with holes are nailed to the wall with dowels.
Vertical tool holders
Every craftsman seeks to organize his own workplace so that the tools are at arm's length. This is facilitated by vertical holders.

Wrench holder
- A wooden plank is attached to the wall above the workbench. The rail is screwed with screws into the dowels installed in advance.
- Small nails are driven into the bar at intervals equal to the width of the wrench handles.
- The keys are hung on the rail.
- Nail heads hold the keys in a horizontal and vertical plane.
Screwdriver holder
- In a piece of timber 40 x 40 mm, holes are drilled corresponding to the diameters of the screwdrivers, at a distance of 30 - 40 mm from each other.
- A piece of timber is nailed to the wall with dowels so that the holes are vertical.
- Screwdrivers are inserted into the resulting nests. Now you can quickly get right tool without leaving the workplace.
Belt for chisels
- The plank is fastened with dowels to the wall.
- The belt or belt is nailed to the bar with studs so that peculiar through pockets are obtained.
- Chisels are lowered into the pockets, through which only steel blades pass. The handles are held with a belt.
You can hold hammers, pliers, pliers and other tools in the fixture.
Homemade soldering iron stand
When working with a soldering iron, a situation arises when you need to put the tool down. Putting a soldering iron with a red-hot tip on a countertop or on any object is always risky. A homemade stand will solve this problem.
An example of making a stand for a soldering iron
- The holder is made of wire in the form of a spiral. To do this, unbend a wire hanger for clothes.
- The wire is wound on a cylindrical object with a diameter of 1.5 - 2 cm. The handle of a chisel or other tool is suitable.
- On one side, the springs leave the free end of the wire.
- The end is bent with round-nose pliers into a loop.
- For the base of the stand, take a board 200 x 100 x 20 mm.
- A through hole ø 4 mm is drilled in the base.
- On the back side of the board, a hole is drilled with a large drill - under the screw head.
- The screw is threaded from the bottom up.
- A spring loop is put on the screw and the nut is tightened.
- In the board, circles are cut out with a crown to fit the size of a cup for candles or similar products.
- With a chisel, wood is sampled in 3 recesses.
- Cups are inserted into the openings, which are filled with solder, tin and a napkin to clean the sting.
- The soldering iron is inserted into the spring.
- A small hole is made in the board for attaching a flexible steel cord from the lamp.
- A clamp is fixed at the end of the cord, which fixes various parts for soldering.
The design may have a different look - it all depends on the imagination and ingenuity of the author.
The simplest mousetrap in the world

This name can be assigned to many homemade mousetraps invented by craftsmen. They are united by one thing - this is the humane treatment of animals that have fallen into a trap. The device does not kill the animal, but isolates it. A few examples of how to make a simple mousetrap:
plastic funnel
Cut a plastic 3 liter bottle in half. The cut off neck is turned over and inserted into the bottom of the bottle. Bait is poured at the bottom (seeds, grain, etc.).
The trap is placed close to an object on which the mouse could climb. The rodent, having fallen into the funnel, can no longer get out of the bottle.
Console
The design is a tilting platform. It is made from a piece of cardboard or plastic. The bar is placed on a plane so that its half hangs in the air.
The bait is placed on the edge of the console so that the bar is on the verge of balance. The animal, having reached the bait, overturns the bar and falls with it into the substituted bucket.
Suspension
An empty one is placed on the edge of the table. plastic bottle with bait at the bottom. A cord is attached to the neck by piercing the plastic with a crochet hook from a paper clip. The other end of the cord is tied to a support.
The mouse, attracted by the smell of food, enters the container. The bottle capsizes under the weight of the rodent and hangs on a cord.
Mini metal loop vise

When performing small operations, it is often necessary to clamp small parts. To do this, use a mini vise made from a one-piece door hinge.
In both wings, the hinges drill matching holes.
They are threaded with a bolt of suitable diameter. On the other hand, a wing nut is screwed onto the thread of the bolt. The parts are inserted into the opening between the wings and clamped by tightening the nut. The device can be used as a clamp.
Portable beer box
A box for drinks in a glass container is a convenient device for carrying several bottles at once in a country house or a picnic. To make such a box with your own hands, you will need the following tools and materials:
Instruments
- jigsaw;
- saw on wood;
- grinder;
- drill driver;
- drill;
- a hammer;
- chisel;
- pen drill.
materials
- edged board - 1050 x 170 x 15 mm;
- planks from the fruit box - 5 pcs.;
- handle ø 36 mm and length 350 mm;
- stain;
- screws;
- nails.
Drawer assembly step by step instructions
- The edged board is sawn into three identical parts (bottom and two sidewalls), 350 mm long.
- Two boards are cut with an electric jigsaw so that from their middle the sidewalls narrow and end with an oval top.
- Holes ø 36 mm are drilled at the tops of the sidewalls with a pen drill.
- All wooden details cleaned with a grinder with an emery wheel. The stalk is sanded by hand with sandpaper.
- With a thin drill, 4 holes are drilled along the edges of the bottom. From below, the nests of the holes are countersinked.
- Sidewalls are installed on the sides of the bottom. Screws are screwed in from below. The heads of the screws "hide" in the sockets of the holes.
- Two planks are nailed to the sidewalls with carnations on each side of the box. They will become a vertical fence for bottles.
- Cuts are made in three planks so that when they are folded, a crate with square openings for glass containers is obtained.
- The crate is laid on the bottom between the sidewalls.
- Carnations are nailed in those places where the ends of the crate abut against the sidewalls and enclosing strips.
- A handle ø 36 mm is threaded into the holes of the tops of the sidewalls.
- Driving nails at an angle, fasten the sidewalls with the handle.
- The entire surface of the box is treated with stain.
The box is ready for use. The portable container freely fits 6 bottles of beer or other drink. The crate and railings of the box will not allow the bottles to break or fall out while being carried.
Hammer upgrade
A frequent occurrence is wooden handle from the hammer socket. One of the ways to create a reliable fastening of the handle is to make a cut in the upper end of the handle. The holder is inserted into the hammer socket. The cut is filled with Moment glue. A wooden wedge is driven into the groove.
In order not to look for nails during work, and even more so not to hold them with your teeth, a round magnet is glued into the hammer handle from below. Nails on a magnet will always be at hand of the worker.
It is dangerous to accidentally drop a hammer from a hand at a height. To prevent this from happening, a hole is drilled in the handle through which the cord is threaded. The worker's belt is threaded into the loop.

Homemade tools and machines
pipe bender
Bending device metal pipes is a metal rod welded to the frame. I make a rod from a piece of reinforcement. The pipe is put on a pin, and on the other hand, a long piece of reinforcement is inserted into the pipe. By pressing the lever, the pipe is bent at the desired angle. The device is suitable for small pieces of round pipes.

Device for bending profiled pipes
Greenhouse owners know how important it is to have a device for bending long lengths from a profile pipe. The curved profile is used as an arch structure for the formation of polyethylene coatings for greenhouses.
The pipe bender allows you to save a lot of money on the construction of a greenhouse. The design consists of 3 rollers - two are guides, and the third roller performs a leading function.
The profile pipe is inserted into the opening between the two wheels and the roller. The skating rink has an emphasis and a rotary device in the form of a lever or an electric motor drive.
Making a pipe bender with your own hands
- Two axles are welded to the metal frame from segments of smooth reinforcement, on which old automobile hubs are put on.
- Protruding chamfers are removed from the hubs so that the side surfaces of the rollers are smooth.
- In the opening between the hubs, a channel is placed with the shelves up.
- The same profile is inserted into the channel, of a smaller width with the shelves down.
- An axle is welded to the inner profile from above, on which the third hub is put on.
- A vertical shelf made of steel sheet is welded to the frame.
- AT vertical bar cut a hole and press the bearing into it.
- A nut is fixed on the middle channel by welding.
- One end of the screw shaft is screwed into the nut.
- The shank of the screw is threaded through the bearing in the vertical bar.
- From the back side of the bar, a rotary handle is welded to the shank.
- A swing arm is welded to the axis of the drive hub.
The machine is ready to work. Between rollers start profile pipe and fasten it with a screw. The rotary lever sets in motion the rollers that pull the pipe, bending it. The bending radius is set with the rotary knob of the screw.
A pipe bender from automobile hubs is one of the device options. There are many designs of bending devices. In some models, the drive roller is coaxially connected to the motor shaft.
Starter impact screwdriver
There are situations when it is impossible to unscrew a rusted bolt or screw with a conventional tool. An impact wrench works great for this. The tool is made by hand from the parts of a car starter:
- Remove the shaft and bushing from the starter housing.
- Part of the shaft is cut off, leaving the splined rod.
- A piece of pipe of a suitable size is put on the sleeve.
- A bolt of equal diameter is welded to the end of the pipe.
- The end of the shaft is turned in the shape of a tetrahedron, on which heads of the desired size are put on. For screws, a bit is inserted into the head.
When hit with a hammer on the head of the bolt, the shaft slides with beveled splines inside the sleeve, making a rotational movement. How hit harder, the more force the shaft turns.

Homemade circular saw machine
A do-it-yourself cutting machine made from a grinder is not inferior to some factory-made samples. Bulgarian is a fairly powerful manual circular saw.
The grinder-based machine performs precise cuts of lumber and metal profiles. For its manufacture, you will need the power tool itself, welding machine and metal profile.
Step-by-step instructions for assembling the machine
- Two metal strips are welded to the pipe section, in which mounting holes are drilled.
- Accordingly, two holes are also made in the casing of the grinder.
- The slats are bolted to the casing.
- The machine frame is made of a metal sheet with support corners welded on the bottom.
- By welding, a vertical segment of the corner is attached to the frame, in which a hole is drilled.
- A piece of a corner is welded to the lower end of the lever and drilled through with the pipe.
- The bolt is threaded through the holes and the swivel of the vertical rack with the lever is tightened with a nut. Additionally, install a locknut.
- In the vertical position, the angle grinder takes a stable position.
- At the point of contact of the saw blade with the frame, a cut is made so that the disc can completely cut the workpiece.
- The handle of the power tool is moved to the end of the lever.
- As additional devices, a transverse and angular stop is installed on the bed.

If necessary, the power tool is removed from the machine and a circular saw is used in manual mode.
Homemade bow saw
A bow saw is a handy tool for sawing tree trunks and lumber. The design of the saw is simple, making a hand tool with your own hands is easy. To do this, prepare tools and materials:
Instruments
- drill;
- hacksaw;
- chisel;
- a hammer;
materials
- cord;
- wooden lath 20 x 40 mm;
- cotter pins - 2 pcs.;
- handle ø 10 mm;
- saw blade;
- stain;
- wood varnish.
Step-by-step instructions for making a bow saw
- The rail is sawn into three parts (two vertical side strips and a middle horizontal strip).
- Grooves are made in the side handles with a chisel.
- At the ends of the mullion with a chisel, protrusions are cut out under the grooves.
- The centerpiece is connected to the side handles.
- Through holes are drilled at the joints. Wooden cotter pins are hammered into them.
- Cotter pins form swivel joints. This is necessary for the mobility of the lower ends of the side rails when the web is tensioned.
- Cuts are made at the lower ends of the sidewalls - parallel to the middle.
- Short bolts are inserted into the holes of the saw blade and tightened with nuts.
- The canvas is inserted into the cuts so that the bolts are outside the structure.
- Circular grooves are cut at the upper ends of the handles.
- Loops are made at the ends of the double cord, which are put on the grooves.
- Between the bowstrings of the cord, a handle is inserted, the long end of which rests on the mullion.
- The bowstring of the saw is twisted with the help of a handle, achieving the desired degree of tension of the saw blade.
- The wood is covered with stain and two layers of varnish.
- After the varnish has dried, the saw is ready to work.
Conclusion
Homemade fixtures, tools and machines not only bring significant benefits to the backyard, garage and household, but also significantly save the family budget. In the manufacture and use of homemade products, one must not forget about safety rules.
To maintain a home comfortable and convenient, sophisticated equipment is required. It greatly facilitates household work, but certain skills and knowledge are required to maintain it. Not everyone knows all the possibilities of modern tools and does not use them to the fullest. If you change them a little, you can get comfortable homemade devices for the workshop.
If you gradually acquire models of popular brands, they will turn out to be durable and reliable assistants. In addition, devices are needed to position and secure the workpieces during their processing. At the cottage it will be
As the inventory of the home master accumulates, it should be sorted into groups:
- metalwork and carpentry tools;
- appliances;
- electrical equipment.
All accommodation allow fixtures drawers and cabinets. Keeping inventory clean and tidy makes it possible to create a comfortable working environment and ensure the long-term preservation of tools.
Homemade tools for woodworking
Wood processing is most common in household. Useful homemade tools for the workshop primarily include a workbench. It should be comfortable in height. Its cover is located at the level of bent palms. If you need to raise it, bars of the desired thickness are installed on the dowels from below.
Making a modern workbench
The classic workbench consists of a lid with a front and back vise. This design is more suitable for manual work. It is poorly adapted to work with power tools due to the fact that workpieces can be difficult to fix. You can buy a modern compact workbench MASTER cut 1000 worth 12 thousand rubles, which is folded. You can install hand tools on it: a circular saw, a jigsaw and a router. But then it will have to be redone. The Festool MFT 3 workbench has good characteristics. However, the price of 30 thousand rubles makes you think. The master will be able to make home-made fixtures for the home workshop that work just as well.

To make a workbench, you need flat plywood without knots. The thickness must be at least 20 mm. By installing an electric jigsaw on it from below, it will be possible to cut boards and small bars along, across, at an angle, as well as complex curved profiles. The tool performs additional functions of circular and band saws.
First, the tabletop is made. An arcuate groove is cut in it to install a guide for blanks, which can be mounted at any angle. A guide with a slot is also made under the jigsaw. Its width is selected according to the size of the sole of the tool.
The sides should be cut out of plywood and glued to the countertop to give it rigidity. The legs of the workbench are made from a bar. You can make a metal frame, and then attach the countertop to it with screws. Then the design will be light and durable. The guides from below are attached to the countertop with furniture nuts.
The jigsaw is installed from the bottom of the workbench cover - “upside down”. From above, only the file remains visible. For the convenience of using a jigsaw, an additional switch is installed. The guide should also be easy to remove so that you can easily change the saw blade of the tool. For easy access to the underside, the tabletop can be made folding, on hinges.
The workbench takes up little space and can be installed even at home. To do this, it is made foldable so that it can be easily disassembled and put away in a closet or pantry.
How to make a workbench for a summer residence
For work in the country or in country house you need a powerful workbench. The tabletop is knocked together from a thick edged board up to 2 m long. It will not be superfluous if it is additionally fixed with self-tapping screws. From below, along the perimeter, the tabletop is sheathed with timber. Table legs are made of square section 120x120 mm. They can be buried in the ground or attached to a reinforced concrete base. The whole structure is treated with an antiseptic and covered with drying oil.
When the workbench is installed, do-it-yourself devices are mounted on it: guides, devices for fastening workpieces and power tools.
How to make a pipe bender with your own hands
In the subsidiary farm, it is necessary to have a device for bending metal pipes and profiles. The simplest home-made tool for bending pipes up to 20 mm in diameter is a steel plate with welded pins. By inserting a workpiece between them, it can be bent to the desired curvature. Such simple devices the pipe is crushed at the bend. To avoid this, it is necessary to tightly fill the pipe with sand. It will also help to heat it with a blowtorch, which any master has.

To improve the quality of bending, instead of pins, 2 profiled rollers and a locking element are used. You can also make a special profile from a steel angle and plate and fix it on a workbench that has a solid base. In the picture, the structure is attached directly to the boards. You can make it portable by mounting it on a steel sheet and fixing it to the bottom of the tabletop. Then the pipe bender, which is rarely used, will not interfere with carpentry work. The portable device, like other homemade workshop tools, can be used in the garage. It is convenient to fix it there, and it may be needed not only for pipes.
Homemade circular saw
Branded machines have high prices, and a home-made tool for a home workshop is quite suitable for a private user. It can be made on the basis of manual, cheaper models.

The workbench for the circular must be stable. A frame with a slot for the disk is attached to the tabletop. The best material is a sheet of metal or durable wood that can withstand heavy loads. It has a slight thickness, which makes it possible to use most of the disk and cut products of sufficient thickness. In addition, the tool itself and the fixture for machine tools are attached to the frame. The guide bar is made sliding on a steel or aluminum sled, or fastened with clamps.
Mounted on the bottom of the worktop on the bed. You can also use a grinder or drill, but they are not as effective and do not allow you to use the entire working area of \u200b\u200bthe disk. The mount can be anything, as long as it is reliable.
When working with a circular saw, you should remember that it has high speed and safety rules must be observed.

Homemade bow saw
Homemade woodworking tools can be very simple but effective. These include the bow saw. A thin blade makes it possible to quickly saw a large log. It is easy to replace with a new one when the saw becomes dull. A bow saw can be made independently from 3 blocks of durable wood. Two handles with cuts at the ends are connected in the middle by a crossbar using a “thorn-nest” connection. The canvas is inserted into the slots and fixed with two nails. On the other hand, it is stretched with a rope loop thrown over the handles and twisted with a collar.
How to sharpen a knife
Manual sharpening for knives is more effective because a strong cutting edge is obtained. To facilitate the process, it is widely used homemade device. It consists of a bar with a clamp for a bar, a base for fixing a knife and a rack for adjusting the installation angle.

With the reciprocating movement of the bar with the bar fixed on it, the blade is sharpened. The abrasive surface is pressed against the blade only when moving from the heel to the tip. By slightly changing the design of the knife sharpening base, you can also straighten the blades of carpentry tools.
Homemade garage fixtures
The garage is not only a place where to hide the car, but also a workshop where you can store tools and carry out repairs.
Shelves and racks
Provide hand tools. For this, a rack is made, which is usually placed on top. Then it will not interfere with movement inside. A small workbench is installed below for work, in which tools are also stored. It is most convenient to have everything near the back wall of the garage. Then the side passages will be free.
The inspection pit is laid out with bricks or cast concrete, and then covered with a lid so that it does not interfere with the passage.

Making a puller
Normal work with the car is carried out using a standard set of tools. Craftsmen make special equipment. A puller is often required to tighten bearings. The most convenient is the three-valve design. A standard device may not be enough. If you make a puller with your own hands, it will last for many years.
Small devices are made of steel sheet 10 mm thick. A pattern is made on it and paws are cut out with a gas cutter. They are processed on an emery machine, adjusting the dimensions. The core is machined from round timber, the foot holders are welded, the thread for the collar is cut and the necessary holes are drilled. The paws are held on bolts with a diameter of 8-10 mm.
The work of making a puller requires skills in working with many tools. Helpers may be needed here. A convenient solution is to manufacture removable legs of the desired configurations, which can be changed on a product purchased in a store.
Conclusion
Homemade tools for the workshop allow you to solve many problems in the household and subsidiary farms with minimal effort and cost.
The order in the house depends not only on whether each thing is in its place. Every home needs periodic maintenance. If every mechanism in the house works like a clock, then we can say that the owner is fully fulfilling his duties. To maintain order, you can not do without a workshop and tools. Some of them can be made independently. The article will talk about the process of assembling tools that will equip the workshop.
What can you collect with your own hands
With proper skill, you can assemble almost any machine that you need for processing wood or metal. They will differ from the factory assembly method, as well as dimensions. Most often for home use no large aggregates required. No problem to build your own milling machine, with which you can beautifully design various slats. Another necessary machine that can be assembled at home is a drilling machine. It is indispensable if it becomes necessary to drill precise holes in small workpieces. In some cases, the assembly of the machine involves the manufacture of a holder for hand tool, in others it can be assembled from scratch using engines from other devices.
Before assembling any products for the home workshop, it is necessary to clearly define what tasks are set for the workshop and what scope of work will be performed. On the one hand, this will allow you to decide which machines will be required, and on the other hand, it will give you the opportunity to find out whether the available space is enough or whether the workshop needs to be located in another room. It is good if it is a separate room, because the noise from working machines can annoy residents. The easiest way to build a workshop in a private house, where you can use the basement or garage. At good master everything is organized and in its place, so it is important to take care of practical shelving.
Storage elements

Almost any surface in your home workshop can be used to store tools. According to the location of the organizers, the following types can be distinguished:
- wall shelves;
- racks;
- shields;
- floor organizers;
- ceiling shelves.
They can all be located in one workshop, which will make it possible to significantly expand total area premises.
Wall shelves

This design for the home workshop is the most common and commonly used. It is not difficult to build wall shelves. The first step is to determine the wall where their placement will be the most practical. For example, it may be a wall near which it will be impossible to place a rack. You should not place wall shelves in the workshop where you plan to build a shield for hanging hand tools. In some cases, a wall shelf can be placed just under the ceiling. Since the shelves in the home workshop are designed to store heavy objects, and not soft toys, the structural strength must be higher than those used at home. For assembly you will need:
- corner 40 × 20 mm;
- board or chipboard;
- Bulgarian;
- welding machine;
- roulette;
- marking tool.

First of all, a sketch drawing is drawn up indicating the exact dimensions of the structure for the workshop, which are determined based on free space on the wall. The sketch also indicates the number of tiers that one shelf will have. The next step is to prepare the segments of the corner for assembling the frame. A shelf for a home workshop will look neater, in which the ends of the racks will be cut at 45 degrees. This can be achieved using a square or a special holder for a grinder. The first step is to assemble the side edges of the workshop shelf, which can be represented by rectangles or squares. It all depends on the chosen form of the shelf.

The elements must be absolutely identical so that the design of the shelf for the home workshop is obtained without distortion. After that, the sidewalls are interconnected by four horizontal crossbars. In this case, it is necessary to place the corner in such a way that the part with a length of 20 mm is at the bottom. It will serve as a support for the board. There is no need to rush when welding the frame for the shelf to the workshop. It’s worth starting with tacks so that the structure does not lead, and then boil with a solid seam. Corner clamps will serve as an excellent assistant in assembling the frame, which will allow you to keep the angle straight.

When the frame is ready, it is necessary to determine how it will be attached to the wall in the home workshop. This can be done by drilling holes in the corner or by welding special ears. The first option is more reliable. Next, the seams of the structure are cleaned to the workshop and the metal base is painted to prevent corrosion damage. The last step is to cut out wooden coasters that fit inside. The shelf locks into place in the workshop and is ready to use.
Shelving

Workshop shelving can be assembled in several ways. It all depends on the material used, and this can be:
- metal;
- wood.

Each of these materials is practical in its own way. With the right approach, wood is able to withstand significant pressure and weight, but the dimensions of such a shelving in the workshop will be larger than that of a similar one made of metal. The assembly of the entire structure into a home workshop begins with a drawing. In this case, it is necessary to correctly determine the depth of the rack. It is considered convenient to have such a depth at which it is possible to reach the edge of the shelf in the workshop, simply by stretching out your hand. Usually this size does not exceed 50 cm. necessary tools from the top shelves.
Note! On sale you can find ready-made shelving for the workshop, which have a modular design.
This means that the number of shelves can be varied depending on the needs. Often their purchase is cheaper, considering not only the cost of materials for self-assembly, but also the time that will be spent for this.

The number and height of the shelves of the shelving in the home workshop is determined by what will be stored on them. Each shelf can have its own purpose. For example, on the lower ones you can place devices or workpieces with a lot of weight. If it will be a power tool, then it makes sense to make the height higher than the highest item that will be stored on the shelf. The assembly principle is similar to that used for wall shelves to the workshop. In this case, it is better to use a corner with large sizes for greater strength. At the same time, it is important to correctly calculate the width of the rack for the home workshop, so that when using a corner with smaller dimensions for the shelves, they do not bend.
Shields

Shields are one of the most handy items you can use in your home workshop. The advantage over other storage methods is that each element has its own place and is in plain sight. The disadvantage of such a system is only inefficient use of space. Compared to shelves, it requires more, and the tool fits less. That is why shields are best suited for storing the tool that is used most often. The advantage of shields for the workshop can be considered their certain versatility. On the shield, you can place not only hooks for hanging, but also various small storage boxes.

There are ready-made shields for the workshop on sale, according to the model of which you can assemble your own version. For this you can use:
- sheet metal;
- plywood.

The assembly principle in each of these cases is similar, only the way of working with the material differs. If plywood was chosen as the basis, then there are several ways to do it. The first step is to mark the sheets that will be used in the home workshop. After that, they are laid out on the surface and a tool is laid out that will hang on the shield. A mount in the form of a self-tapping screw is screwed under each tool or it is circled along the contour, so that later it will be easier to navigate. Next, the sheet is fixed to the wall with self-tapping screws. For fastening, it is better to use hex bolts and clamp the sheets through washers.

There is another version of the shield for the home workshop, which uses hooks instead of self-tapping screws. Such a design can be considered more universal, since its configuration can be changed depending on the needs. The best solution is to pre-purchase metal hooks that are used for shields in workshops. Depending on how far the fixing antennae are at the hooks, the sheet is marked. Holes are drilled at the marked points. The shield is fixed on the wall in the home workshop at a small distance from the wall so that you can freely remove and put the hooks in their place.

The metal shield is assembled according to the model of the second version of the wooden one. In this case, the work also comes down to drilling holes at the indicated points. In this case, it is better to use metal with a wall thickness of 0.8 mm. Under the weight of the tool, the metal can bend. There are several ways to solve the problem. One of them is the installation of additional spacers in the form of corners on the back of the rack. You can also assemble several smaller individual shields and install them side by side.
Ceiling shelves

Certain areas in home workshops are hardly used, or the ceiling height exceeds 2.5 meters, which will allow you to freely place storage items on the ceiling. The easiest and most convenient way to secure containers in which small things can be folded. To do this is quite simple. To implement the entire project in the workshop, you will need to make wooden boxes of any size. It will be easiest to purchase plastic containers that are perfect for these purposes. In addition to plastic containers, you will need metal I-beams. If these are not available, then a U-shaped profile can be used for the workshop. In extreme cases, you can remove one wall from square pipe to achieve the desired result.
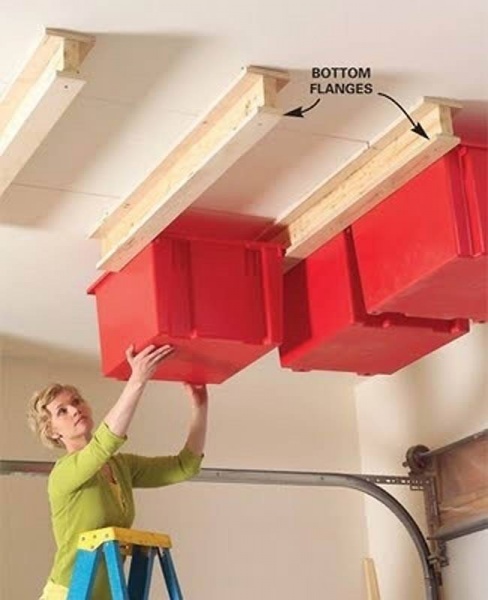
Plastic containers for the home workshop have special sides at the edges, for which fixation can be carried out. Therefore, it is enough to simply attach the prepared profile to the ceiling in the workshop at such a distance that the containers fit between them. This design is not suitable for storing heavy items, but a lot of material or tools that are rarely used can be placed there, freeing up space on shelves and racks.
Note! Floor organizers for the workshop can be represented by ordinary boxes, in which there will be inserts divided into a certain number of cells. It is convenient to store fasteners in such inserts. But with a sufficient number of shelves and racks in the workshop, floor organizers will not be needed.
Workbench

This design is essential for any home workshop. It is on the workbench that all the magic for the repair and construction of any products takes place. It is better to make a workbench for a workshop universal, since it will require processing not only wood, but also metal, but if the area of \u200b\u200bthe workshop allows, then you can make two separate workbenches, which will be more convenient, because wood requires the most careful handling, and metal is often required to apply force. The process of making a wooden workbench for a home workshop will be described in detail in several videos, which are given below. It should be noted right away that to assemble such a design for a home workshop, you will need a certain skill in working with power tools. A ready-made workbench for the workshop will support work with various systems mounts.
A simpler, but no less functional design for a home workshop can be assembled from metal. At the same time, it is easier to build additional holders for shelves and drawers on it. Above is a drawing that can be taken as a basis. Dimensions are adjusted depending on how much space is available in the workshop. The height of the workbench for the home workshop is selected individually, but most often 80 cm is enough, which allows you to work with objects at waist level. It is better if the workbench is securely fixed to the floor. It is also worth setting it by level. If it is planned to process wood on a metal workbench in the workshop, then special carpentry vise is additionally mounted where it will be convenient. You can use a portable version of the vice, which is fixed with clamping clamps.

Advice! An excellent option would be to make wooden tabletop to the home workshop, but metal can damage it.
To protect the wooden surface of the workbench, a metal sheet can be laid on top through a gasket made of OSB boards. The thickness of the metal to be used as an overlay should not be less than 1 mm.
Workshop machines
Below will be described general principle assembling machines for the workshop, which can be taken as a basis, and the assembly can be made from available materials.
Turning for wood and metal

It should be said right away that only small metal blanks can be processed on such a lathe in a home workshop. An important part of the machine for the workshop, which will ensure the stability of processing, is the bed. You can make it yourself or use the factory. For self-manufacturing you can use a profiled pipe or a durable corner. Two elements are placed at a suitable distance and securely fixed between them by the transverse elements. Examples of machine designs for the home workshop are visible in the photos above and below.

As an engine that will rotate the part, you can use the unit from an old washing machine, pump or some kind of machine. A powerful drill chuck can be used as a tailstock. In this case, it will be possible to insert a cone or drill into it, if necessary during processing. The headstock can be purchased from the factory or made according to the model in the photo.

In this case, a metal axle is required, it is better if it is made of hardened steel. You need two holders with bearings under the axle. On one side, a pulley is fixed, and on the other, a cartridge into which the workpiece will be clamped. The engine on such a machine for the workshop is installed next to the headstock, and the force is transmitted through a belt. The speed can be varied by the frequency module or by throwing the belt over the pulley. You will also need a support element, which is made according to the schematic drawing below.

Video about self assembly lathe on the tree is below.
Milling machine
The milling machine for the home workshop is also quite simple to assemble. One option is to use a ready-made hand router, which is indispensable for the owner who loves to make something from wood in his workshop.

For a manual machine, you can make a special workbench in your home workshop. The photo shows an example of such a table. At its core, this is a small table in which there is a hole for the cutter and a mount for the router itself. If you wish, you can do this in the workshop on a finished workbench. It is important to choose the most convenient place for fixing the router. During fastening, it is necessary to correctly calculate the maximum overhang of the cutter. When working in this way, you will need to fully raise the factory support on the hand router. Switching on and off can be realized via an extension cord with a switch. The disadvantage of this method is the need to manually adjust the speed directly on the router itself. A video about a homemade milling machine is below.
Advice! If you have an engine of the required power and a frequency converter, you can build a stationary milling machine in the workshop.
To do this, the engine is fixed to the bottom of the table. A cutter chuck is mounted on the motor shaft. The connection is made through a chastotnik, which will vary the speed.
Drilling machine

A drill can be used as a drilling machine in the workshop. But for this it must be properly fixed. This can be done by means of a holder, which can be stationary for the workshop or portable. There are many various options assembling such a drill holder for the workshop. One of them is shown in the video below. For assembly, you will need materials that are within walking distance in every hardware store.
A circular saw

A stationary circular saw for a workshop can be made in a similar way as a holder for a hand router. It is enough to make a slot in the countertop for the plate web and mount it when necessary. The only drawback of this solution is the reduction in the depth of cut. You can fix this by installing on a metal countertop, which is smaller in thickness. A video of the assembly of such a design is below.