How to make a swan from a bottle. Swans from plastic bottles. The stage of creating a composition
Any summer resident dreams that his site was the most spectacular among the rest. As soon as they do not decorate adjoining territory, but the most common way is to create shapes from plastic bottles due to ease of installation and availability of material. Birds and animals are most often performed. Today we will talk about the creation of a noble swan bird with graceful outlines from plastic bottles. Such a craft will become the highlight of the whole garden and will definitely not go unnoticed.
Varieties of swans from bottles
At the moment, from plastic bottles, you can create any configuration and design of a swan. Moreover, it can be not only decoration, but also a functional addition to the site, for example, a planter. The final result depends only on the imagination of the master and the materials and techniques used in the process of work. Among the variety of options for creating from plastic bottles, you can easily choose the one that is most suitable for the time spent, materials and just the algorithm of actions for a particular master.

Planter in the shape of a swan
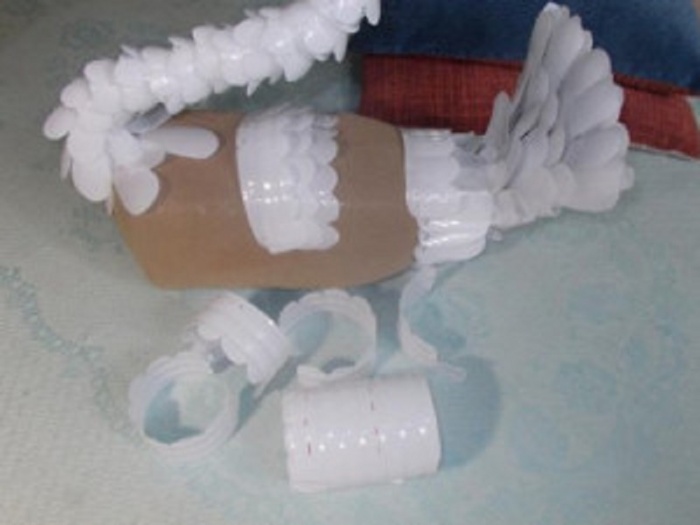
To complete such a craft, you will need one bottle of 5 liters and a sufficient number of small plastic bottles. It is best to take those in which milk was bought, since they are white, which will be relevant for a swan, and subsequently it will not be necessary to color the material. In addition, you will need a metal rod to create a long swan neck, a metal mesh to decorate the base of the wings, adhesive tape, thin wire and fishing line that serve as connecting materials.

We carry out blanks
The preparatory step before creating a swan is to clean plastic bottles from dirt, labels and glue. Next, markings are made on each small bottle.
So, for starters, a line is drawn 2 cm below the neck of the bottle. The lower dotted line should be 1 cm above the relief part of the bottle. They are connected by a strictly perpendicular line. It is necessary to mark and cut the details as evenly as possible.
After cutting off the neck from white bottles, you do not need to throw away these parts, they will serve as a decoration for the swan's neck. The lower part under the neck is cut into 6 rounded parts. You can hold them over a burning candle for a bit to get a more realistic look. At the base of the finished petals, 3 paired holes are made.

The head of the swan is a 0.5 liter bottle. It is performed according to the following algorithm:
- Removing the neck plug.
- Making an incision along the seam in a cone-shaped section.
- Cutting lines with a gap of 0.5 cm.
- Gluing a clothespin to play the role of a beak.
- Cutting a fringe on a bottle from the side of the bottom.
The basis of the body of the swan is a bottle of 5 liters. Holes are made on it from below and from above to attach the neck.
Construction assembly
After all the components of the future swan are completed, you can begin to assemble it. First you need to fix the eyes on the head of the swan. It is best to do this not with glue, since with constant influence environment they will quickly fall off, and fasten the buttons with wire.
The blank of the swan's beak must be wrapped with tape so that the halves of the clothespin do not fall apart. From above, the design is decorated with a red cloth or foil.
Next, you need to fix the neck rod in the head of the future swan with wire, and fill the bottle itself with padding polyester. After that, you can string the bottle necks created earlier on the rod. The fringe on the head is fixed with fishing line to cover the beginning of the swan's neck.

The rod from the swan's neck goes through a large plastic bottle and out. The whole body of the bird is shaped with nylon threads or a nylon stocking is pulled over it. Strong synthetic threads, starting from the tail, mount parts of the plumage, stacking them on top of each other to hide the fixation points.
As a result, a chic swan will turn out from the bottles, which, in addition to external beauty, will also serve as a spectacular container for planting flowers. You can put such a craft anywhere on the site, but the swan will most organically fit into the territory near an artificial reservoir, if one is present on the site. And if it is not there, then from the same plastic bottles it will not take long to simulate a pond.

Swan from bottles and tires
If there is one or more tires available in the summer cottage or in the garage, it is quite possible to build a swan from them. The combination of plastic bottles and rubber allows you to get not only beautiful, but also resistant to external influences and turning over crafts for the garden.

Execution Technology
To create the body of a swan, a tire with a diameter of approximately 50 - 55 cm is taken. So, the formation of the body of the future swan follows the following technology:

The head of the future swan is made from a piece of foam plastic with dimensions of 20 * 12 * 10 cm in this way:
For plumage, birds will be needed
- plastic bottles preferably white;
- pliers and a sharp knife;
- construction mesh;
- cutters and wire.
When calculating the number of bottles, one should take into account the fact that one container will become the basis for 5 - 6 feathers. Petal-like elements of the same size are cut out of it, on which 4 holes are created for fixing on the grid. For more believability, the edges of each petal can be slightly melted or just cut a fringe on them.
Important! The mesh is pre-coated with an anti-corrosion compound to extend the life of the finished swan.

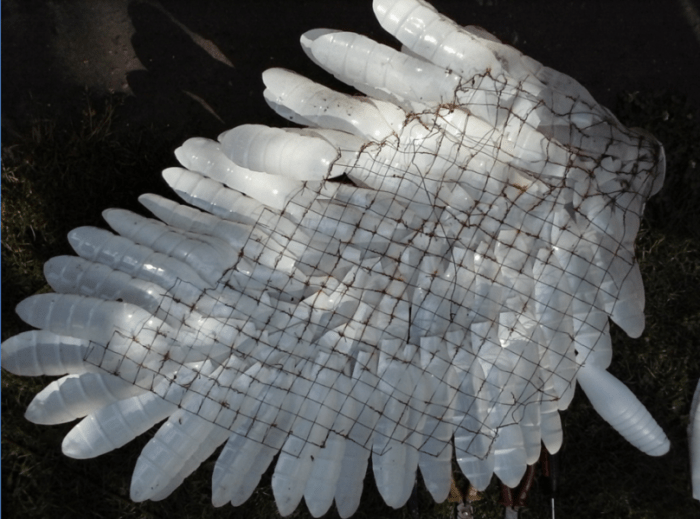
All swan feathers must be mounted on a piece of mesh, shaped like a wing, with overlapping wire so as to cover the joints. Even on the inside of the wing, it is necessary to create several rows of feathers in order to finished construction grid was not visible. The tail of the swan is done in the same way.
After the preparatory work, they proceed to the direct assembly of the structure. The connection of the neck with the body of the swan is made by screwing in the bolts. It is important to bend the end of the metal rod from the neck so as to fix it in the ground. The wings must be fastened together with wire and fixed with a rod. After that, the tail of the swan is installed.

Putty and bottle figure
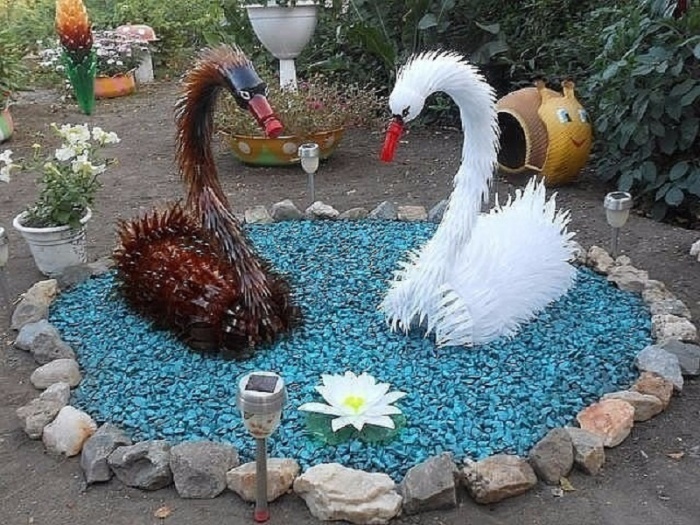
An interesting version of crafts for a summer cottage is a swan from a five-liter bottle, designed in the form of a sculpture. This is a unique creation that allows the fantasy to run wild. Such a swan will decorate the veranda, terrace and even look good just in the clearing. Among other things, it is very practical, since inside it is possible to create a small flower garden. If you decorate it with white flowers, you can achieve the effect of bird plumage.

The main stages of making a swan:

After completing the figure of a swan, it is necessary to wait for it to dry completely, carefully process it with sandpaper, and then paint it in the likeness of a living bird. The swan is a symbol of fidelity, so it is best to pair it up right away. Such figures will enliven and diversify the landscape of the suburban area. Marigolds can be planted in the recess from a plastic bottle, which will complete the composition.

Spectacular film swan
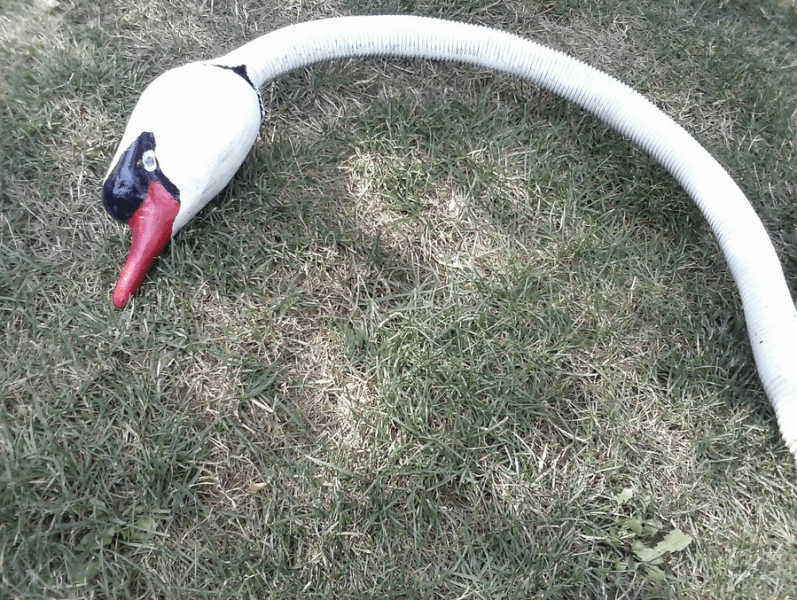
From a plastic film and an ordinary five-liter bottle, it is easy to assemble a real proud swan, which no guest will pass by without surprise. Consider the manufacturing technology step by step:
- We make 2 holes in the bottle and stretch a thick wire into them that can keep its shape. It will become the frame of the neck and tail of the future bird.
- To give a neat and smooth outline, the bottle is slightly crushed in front and on top. The resulting form is fixed with adhesive tape.
- Ribbons about 7 cm wide are cut from isolon. The entire swan blank is wrapped around them and fixed with adhesive tape.
Important! The head is also formed from isolon, but with more layers.
- A plastic film is being prepared to create the plumage of a swan. To do this, strips of ribbon are folded into several layers and cut so that a fringe is obtained. 17
- The whole bird is wrapped with such blanks, fixing the film with narrow tape. Each subsequent revolution is shifted by 2 cm relative to the previous one.
- The head is supplied with button eyes. They are easy to just sew on.
- The beak can be made from a red clothespin or marker. In the second case, it is necessary to make several cuts on it so that the wide part of the beak can be formed. After that, the marker is mounted on the wire.

Such an unusual swan will bring originality to the landscape of any site, and with any breath of wind, its plumage will sway easily, which is also very unusual.

Conclusion
The swan on the site is a wonderful decoration that will bring variety to the landscape of an ordinary summer cottage. Thanks to the creation of figurines of this bird from plastic bottles, you can not only take time, develop your imagination, get a spectacular decoration, but also get rid of unnecessary containers. Thanks to the presented master classes, everyone will be able to choose the equipment for themselves and update their site.
In this article, we will talk about how to make a swan with your own hands from improvised materials, five-liter plastic bottles will serve as the basis for the design. Probably, every person will agree that the swans in the garden, in principle, look quite romantic, and if functional qualities are added to the romance, there will be an indispensable composition in general. Below is a method for making swans, which will serve as excellent flowerpots.
To make the creation easy and not burdensome, we need:
- Large plastic bottles with a face value of 5 liters;
- putty;
- Metal mesh, for the manufacture of wings and tail;
- Twisted two to four times thick wire or metal rod;
- Polyethylene film;
- Putty knife;
- Brush;
- Bandage.
Figurine base
We cut the bottle lengthwise so that one side has enough space for planting flowers. This detail will be the body of a swan, so to give it roundness, fill it with wet sand.
Screw the bottle with a lid, check the fit and then insert a wire or metal rod, slightly bending it, like a swan's neck.
Take part of the putty, put it on a pre-prepared film in an even layer 5 centimeters thick. From above, on the putty, put and press the bottle tightly. Any excess that rises, gently smooth up the bottle. It is most convenient to do this operation with a spatula. Remember, in order for the putty to stick to the work surface, the spatula must be periodically dipped in water. 
The bottom of the flowerpot is ready and it's time to start making the swan neck.
Neck making
You need to wet your hands, take not a large number of putty and roll a roller out of it. Next, gently press the resulting roller into the base - a wire or a metal rod. In order to fix the putty roller, immediately after pressing it, wrap it with a small piece of wet bandage. This is how the whole neck is molded. Do not forget that a thickening of the transition from the torso to the neck is an obligatory element; without it, the craft will look unnatural. Upon completion of these works, a head with a flattened beak is molded.
Gradually coat the entire body of the resulting swan with putty, smoothing uneven areas with a wetted brush. Remember to constantly wet your hands.
Next, the wings and tail are made.
Press into the putty on the sides metal mesh and hold on for a while. It is necessary to wait until our future wings stick. Next, very painstakingly, with wet hands, we form wings from putty. The technology is simple: with one hand, from above, putty is applied to the mesh, with the other hand, it is supported from the back side. Using the same technology, a swan's tail is made from mesh and putty.
The figurine is ready. Now you need to wait a couple of hours until it hardens and move it for a few days to a place where it will not be exposed to direct sunlight and rain. When the swan is completely dry, it must be processed with mesh plaster sandpaper and then with ordinary fine sandpaper.
Priming and painting
After smoothing the surface, we treat the entire surface with a primer. It is she who will allow us to very carefully paint our crafts with paint. For painting, it is best to choose enamel paint, although, of course, ordinary facade paint is also quite suitable. Don't forget to draw the eyes and color the beak. For additional protection, you can varnish the swan.
That's it, the work is finally done. You can fill the container with fertile soil and plant beautiful flowers.
The graceful bird has always fascinated with its grace. It became possible to place a symbol of fidelity in your garden, having everyone at hand available material. Information on how to make a swan from plastic bottles, offered in three options, will allow everyone to choose the most appropriate way.
Swan planters from bottles
Crafts based on plastic bottles differ in different categories of complexity. A step-by-step guide will help even a novice master to cope with the task of decorating a swan. The main thing is to be patient. One bottle of 5 liters and a lot of white plastic containers with a volume of 1 liter are the main material of a spectacular craft. You will also need:
- metal rod for the swan's neck;
- fishing line, adhesive tape and thin wire for connecting individual parts;
- metal mesh serving as the base of the wings.
Preparation of individual parts
The making of a swan precedes preparatory stage. Work begins with the cleaning of plastic bottles from the remnants of labels and glue. On a clean container, markings are made according to the photo. The upper line is drawn 2 cm below the neck, the lower line is 1 cm higher than the corrugated part of the plastic bottle. There is a perpendicular line between them. The cut is made as straight as possible.

For the neck, parts from plastic bottles with a neck are cut into 6 parts, cylindrical elements are divided into 8 fragments.
Attention! All corners on the blanks are rounded, 3 paired holes are formed at the base of the petals.
A neat swan head is obtained from a 0.5 liter plastic bottle as follows:
- the neck with the cork is removed;
- on a cone-shaped section, an incision is made along the seam;
- all other incision lines go with a gap of 0.5 cm;
- the ends of the clothespin, which will play the role of a swan's beak, are melted over the fire;
- holes are pierced on them with an awl, holes are formed at a similar distance in a plastic bottle.

The basis of the swan's body is a 5-liter container, on the bottom and lid of which holes are made to fix the neck. The opening on the side should allow the hand to easily get inside the container.
Assembly process
When the individual elements of the swan are decorated, you can proceed to the assembly of parts:

The result of a painstaking process is spectacular swan from plastic bottles, similar to the photo below:


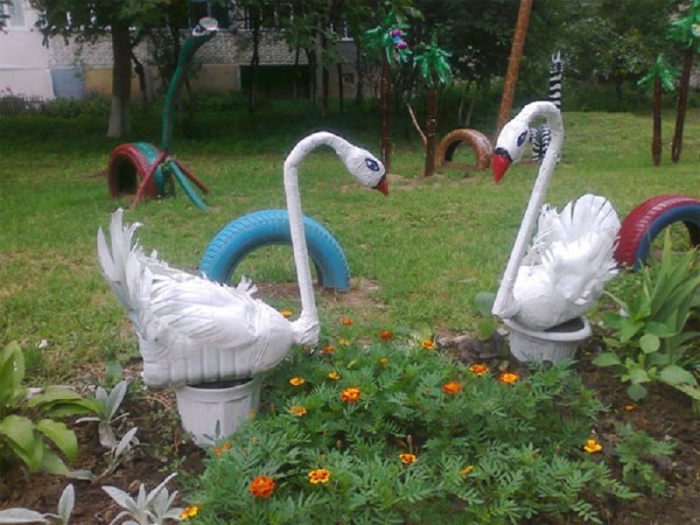
Combination with tire
There is another interesting and affordable option for making a bird with a majestic neck bend.
Frame
According to the proposed master class, a swan made of plastic bottles will turn out to be no less bewitching. The main difference is that the function of the trunk is performed by a tire with a diameter of 50-55 cm.
Hull shaping:
- The cover is cut in half. Work carefully so as not to injure yourself with the cord.
- One part is shortened by 10 cm.
- Both parts are connected in the shape of an egg about 45 cm wide and securely fixed.
The result will be the workpiece shown in the photo:

Head
Making a swan head:
- The basis of the part is polystyrene 20x12x10 cm.
- The head with the beak, after cutting out, is carefully polished with sandpaper.
- A 5 cm deepening is prepared at the back of the head to fix the neck.
- The swan's head is evenly treated with putty.
- After the solution has dried, the surface is polished with paper of a finer grain size.
- The workpiece is coated with white, black and blue paint. An example is the following photo:

Neck
The process of creating a bird neck based on plastic bottles:
- A rod about 2 m long is given the desired shape.
Advice! It is better to refuse a steel part, it is too difficult to bend and can burst.
- Corrugations will need about 80 cm. When using old material, it is thoroughly cleaned of contaminants.
- One edge of the corrugation is made with cuts for mounting the swan's head.
- The swan's neck is fixed to the body and head with self-tapping screws.

Plumage
For the plumage of a swan you will need:
- plastic white bottles - about 40 pieces;
- construction mesh;
- pliers and knife;
- wire, cutters.
Painting the mesh with white paint for outdoor use will help to avoid corrosive processes. One plastic bottle serves as the basis for 5-6 swan feathers. On each blank from a plastic bottle, 4 holes for the wire are prepared. Optimal use copper material which bends easily. Feathers are connected with overlapping wire to hide the connection areas. The process of formation of the wings and tail of the swan is identical, the difference lies only in the outlines of the grid.

Mounting and installation
When all the parts from the tire and plastic bottles are ready, they begin to assemble the swan. The site where it is planned to locate decorative figure, is made out with bricks, a board or a car tire. This will be a kind of podium.
The connection of the neck with the body is carried out with self-tapping screws. The end of the rod is bent in such a way that it is possible to fix it in the ground. The wings are fastened together with wire, clamped at the back with a rod. Next, the tail of the swan is fixed. The head, made from a plastic bottle, is screwed to the corrugation with screws. An elegant bird made of plastic bottles with your own hands will become a worthy decoration of the site.

Grace in the garden
Another craft option based on a large plastic bottle also has practicality, thanks to the possibility of placing flowers inside.

For example, flowers from plastic bottles are a great opportunity to demonstrate your taste and skills. In fact, making them is not difficult - you will need imagination and a little time. Believe me, hours fly by for such creativity, and the end result always brings pleasure.
To create such a beautiful decorative necklace, we need the following materials:
- green plastic bottle
- clear plastic bottles of various sizes
- paints
- yellow bottle caps
- colorful buttons
- scissors
- threads
- wire
- To begin with, we take transparent bottles and cut off their lower part, we get the basis of each flower - its petals. Next, cut out the middle in several blanks, and leave some of the blanks intact.
- Coloring our petals different colors and let dry.
- Next, we insert yellow covers, pre-lubricated with glue, into the flowers with cut out centers - these are the cores of the flowers.
- In integral petals in the middle we make two holes with an awl, attach buttons and tie them with threads.
- Cut out petals from a green plastic bottle. If you do not have such a container, then you can use an ordinary transparent bottle, and simply paint the finished petals green.
- Next, we connect the flowers from plastic bottles with the petals using a wire. To do this, we pierce small holes, form a circle of wire and string alternately either a flower or a petal.
Swans from plastic containers, a master class with a photo
A fairly simple and affordable way to decorate a summer cottage are swans from plastic bottles. They can be decorated in different ways - as an interior figurine or as a flower bed.
Making a swan from plastic bottles is a creative process that needs preliminary preparation. To create a composition, you need to stock up on all the necessary materials.
For work we need:
- white plastic bottles
- one clear bottle
- wire

Manufacturing process
- First of all, it is necessary to form the silhouette of a bird. To do this, cut off the neck of a transparent bottle, insert a wire into the bottle and bend it so that the figure resembles the bend of a swan's neck.
- Let's start cutting white bottles. From plastic, we cut feathers of different sizes, at the end of each we make a fringe with scissors to make the plumage look realistic.
- Now let's take care of the blanks for the neck of the swan: we need the narrowest parts of the bottles, which are located near the neck. We cut them on both sides and also form a fringe on the wider edge.
- On the wire, which will eventually become the graceful neck of a bird, we string all these details. And we glue the body in the form of a plastic bottle with ready-made feathers of different sizes: the closer to the tail, the longer the feathers should be. You can add a swan with a cardboard red beak and a golden crown, and instead of eyes, sew on buttons.

When planning to make a swan flower bed yourself, think in advance what the neck and head of the bird will be made of. It can be wood, polystyrene, or just a fabric dyed in the desired color. The most interesting and durable material is, of course, wood. It will not be afraid of rain and snow, and will be able to serve as a flower bed for many years.
Take one board, draw a silhouette of a swan with a pencil, cut it out, paint it in White color, draw black eyes, a red beak and, for example, a yellow crown. Dig in the resulting wooden base birds to the ground. Next, cut the plastic bottles in the middle, and form a flower bed out of them in a circle from the swan's neck. Plastic bottles can be left transparent, but if you have time, it is better to cover them with white paint - then the swan will seem alive.
Here is another visual example - a swan made of plastic bottles (video):
Such a craft will ennoble your garden or cottage - take note of our recommendations for making this beautiful bird from plastic bottles.
Palm tree from plastic bottles, master class with photo
Decorate your country cottage area you can use such an unusual tree as a plastic palm tree. In our latitudes, it will surely attract the enthusiastic glances of passers-by. But the creation of such beauty will take not too much of your time and all the plastic bottles in the house.

You need to collect in advance a large number of bottles of two colors - green for the leaves and brown for the trunk, and also determine what size our finished creation will be.
Let's start creating a tree.
- First, let's deal with the trunk of a palm tree. To do this, we take brown bottles, get rid of all the labels, and in case of contamination, wipe the container with a damp cloth.
- Next, cut the bottom of the bottle so that there is still 20-25 cm from its total height. Along the edges we cut out the cloves, which are slightly bent to the outside. At the bottom of the bottle, using a drill, we make one hole exactly in the center. We prepare as many bottles as needed for the height of the trunk of your future palm tree.

- Next, we connect all the brown blanks by inserting one into the other. For maximum fixation, the contact line can be lubricated with glue.

- And the last final stage in creating a tree trunk: we take metal fittings or a thin wooden trunk of the required length, and string all brown bottles on it. You can glue them together and string them all together, or string them one at a time, lubricating the areas of contact with glue.
- The last stage is palm leaves. First, get rid of the bottom of the green bottles by cutting it with scissors.

- Then we form palm leaves by cutting the bottle as shown in the photo.

- After all the bottles are cut, we prepare a thick wire and string all our leaves on it. The length of the wire should be what you want to see one palm branch. It is desirable that the length of all tree branches differ by 5-20 cm - this way your palm tree will look more realistic.
- With the trunk and branches ready, we need to connect them together. To do this, you can use welding to securely fix each wire with reinforcement or simply hook them together with pliers.

Think carefully about where you want to place the finished tree - dig a shallow hole, pour cement mortar into it, install a palm tree, fill the hole with stones and let it harden well. If you use this method of installing a palm tree, you can achieve a strong fixation and not be afraid that the tree will fall over time. But you can use another method of fastening - just dig a hole, bury the reinforcement well in the ground and sprinkle it with stones and sand. Such a fixation will be less strong, but it is also considered quite reliable.
As you can see, such ornamental plants can decorate not only a summer cottage, but also any adjacent territory.
Peacock from plastic bottles, a master class with a photo
How to do beautiful swans, you already know. Now we propose to start creating another bright and colorful bird - a peacock from plastic bottles can become your main creation at their summer cottage.

Manufacturing consists of three stages: visualization of the finished bird, preparation of the entire required material and the creative process itself. Each of these stages is important in its own way, but today we would like to focus on the third.
Our master class will help you easily create a peacock from plastic bottles.
To create a peacock we need:
- a lot of green bottles of 1.5-2 liters
- one bottle 5 l
- blue or light blue 2 l bottles
- scissors
- metal grid
- scotch
- colored paper for applications
- foil
- stapler
- We cut green and blue plastic bottles so that we get peacock feathers. You need a lot of bottles and different sizes, so we stock up on patience and try to complete this monotonous work as quickly as possible.
How to make different crafts from plastic bottles for summer cottages and at home?
For most people, a plastic bottle is just trash that clutters up the house. But in skillful hands, this, at first glance, worthless thing can turn into a very beautiful, and most importantly, unique decoration for a personal plot.
The big advantage of such man-made decorative objects is their cheapness, which is why the family with the smallest income can afford to decorate their living space with such decor. If you are interested in such an idea, then let's figure out together what can be made from empty plastic bottles.
What can be done from plastic bottles with your own hands?
Simple swans from plastic bottles Flower from plastic bottles
 Lake made of plastic bottles
 plastic bottle decoration
  Chandelier from plastic bottles
  Flowers from plastic bottles
 plastic bottle toy
 plastic bottle toy
 Fence from plastic bottles
 Until recently, with the help of plastic bottles, they gave the outline to flower beds, beds and garden paths. But over time, craftsmen realized that plastic is a very malleable material from which many beautiful things can be made. Therefore, people began to experiment and beautiful voluminous flowers, garden lamps and chandeliers, various kinds of coasters, vases, candy bowls and even full-fledged fences began to be obtained from unnecessary garbage.
To create all these masterpieces, the craftsmen used bottles of different sizes and shapes, cutting blanks out of them, carefully connecting all the details together, and then painting them with paints in the desired color. Yes, and remember that plastic can not only be cut, if you take a blank and hold it a little over heat (an electric stove or a lit candle), then you can make very beautiful three-dimensional compositions with perfectly rounded details.
 Swan from plastic bottles
 plumage manufacturing
 On the Internet, you can find many different ways manufacturing plastic swans to decorate the garden. But, unfortunately, all of them are quite complex and therefore people who have never done needlework in most cases are not entirely clear. That is why we decided to introduce you to the method of making a swan, which absolutely everyone can handle.
Materials for making a swan:
- One five liter bottle
- Up to fifteen bottles of milk or kefir (needed to make plumage)
- Wire and scissors
- piece of hose
- Finished product paint
Making a swan:
- So, for starters, we take a black marker and draw lines on the bottle, along which an opening will subsequently be cut out (flower pots can be inserted into it). You can see how to do this correctly in the figure above.
- Next, take a piece of hose of the desired length, insert a thick wire into it, and then use your hands to shape the workpiece into a shape that will visually resemble the neck of a swan. Insert the finished workpiece into the neck of a five-liter bottle.
- At the next stage, proceed to the manufacture of the feathers of our swan. To do this, cut blanks imitating a feather from milk bottles. And to make it look as natural as possible, cut it along the edge with sharp scissors, and then heat the resulting fringe over a lit candle (this will help fluff the feathers).
- After that, we cut off the neck and ass of several milk bottles and put them on the hose (we make an imitation of a swan's neck). In the outermost bottle, we cut off only the ass, and leave the neck in place, and form the head of our decorative bird from it.
- At the final stage, we take the previously prepared feathers and carefully glue them to the resulting body. We do this in such a way that there are not even the slightest gaps between them.
 Pigeons from plastic bottles
 I want to say right away that if you want to reduce the time for making pigeons, then use white milk or kefir bottles to create such decorative objects. In this case, you will not need to paint over absolutely the entire blank, it will be enough to decorate its head.
So:
- Prepare a standard milk bottle and cut the neck as shown in the master class
- After the body of the dove is formed, we proceed to the manufacture of its head.
- To do this, we take a piece of thick foam plastic and, with the sharpest knife, cut out a blank that visually resembles a bird's head.
- At the next stage, we proceed to the manufacture of dove plumage
- You can also do this as shown in the master class or by the method that was used to make the plumage of a swan.
- After the feathers are ready, make a small hole in their lower part and fix the wire in it
- On the last step connect all the blanks together and correctly paint the dove's head with paints
Peacock from plastic bottles

 Torso of a peacock
 Making plumage for a peacock
 plumage mount
 tail making
 head making
 Making Peacock Legs
 final assembly birds
 If you want to make a beautiful peacock, then you will have to be patient. Unlike a swan and a dove, this one requires plumage characteristic of it. And this means that in this case it will not be enough to cut the correct feathers. They will still need to be correctly connected to each other and only after that attach to the body of the future peacock.
Making a peacock:
- So, for starters, make the body of a bird. To do this, you will need to use one five-liter bottle, two half-liter and two plastic sticks.
- Next, move on to cutting out the feathers and shaping the large pieces of plumage.
- When the plumage is ready, start making the tail. Be sure to consider the size of the body and make sure that it is not too big
- When the tail is ready, start crafting a foam head (immediately paint it with paints)
- Connect all the details of the peacock together and, if desired, install it on a heavy stand
plastic butterflies
 Butterflies from plastic bottles
  Cutting template No. 1
 Cutting template No. 2
 Cutting template No. 3
 Plastic bottles are an ideal material for making beautiful and colorful butterflies. Depending on the size of the bottle you will use for this, you can get both very cute little butterflies, and very large ones that can be an independent object for decorating a garden or courtyard of a private house.
The best part is that making these insects does not require any special skills from people. All you need to do is stock up on bottles of the right size, scissors, paints and, of course, imagination.
- To begin with, cut off the neck and bottom of the bottle (you should have the most pliable middle part in your hands)
- Draw a butterfly on a leaf or find a suitable template on the Internet
- Using a black marker, transfer the outline of the butterfly to the bottle
- Cut out the drawing with sharp scissors and color it as you see it.
- Ready-made butterflies can be attached to a wire, and then placed on flower beds or just on the lawn
Yes, and if you have stained glass paints, then you can paint the transferred contour on the bottle with them, and after they have completely dried, cut out a completely finished butterfly. Since in this case rather convex lines will turn out, you will have the opportunity to fill them with small rhinestones or sequins.

 Ladybugs from plastic bottles
 Ladybugs from the bottom of a bottle
 If you want to make a ladybug as quickly as possible, then stock up on bottles of red (1 pc.) And black (2 pcs.), As well as an ordinary stapler. One bottle will imitate the body of an insect, and from the other you will make characteristic points.
So:
- Cut out a blank imitating wings from a red bottle
- Next, take a black bottle and cut mugs out of it.
- On one of them draw beautiful eyes and attach to the bottle cap
- Use a stapler to fix the remaining black circles on the wings of a ladybug
- At the last stage, attach the wings to the bottle and the craft will be ready.
If you wish, you can make a similar insect from plastic covers. To do this, you just need to take the paints and paint them correctly. So small ladybugs will become wonderful decoration plants that grow in pots.
Owls from plastic bottles

 Owls from plastic bottles
 An owl from a plastic bottle, made by the method with which we will now introduce you, can be both complete flower pot, and the original planter, which can either be placed on the floor or hung on the summer veranda.
- To start, cut upper part bottles
- Using paints, give the workpiece the desired color
- Next, take a simple pencil and draw a drawing on it that will imitate the face and plumage of an owl.
- Using a plastic cutting knife, give the craft the desired shape.
- Add volume to the owl with contrasting lines
Yes, and if in the future you want to use such a craft exclusively as a flower pot, then do not cut holes that imitate plumage. You can achieve a similar visual effect with paints, just by drawing the feathers correctly. Such a pot can be used for growing indoor flowers or for growing spices.
 Pig from plastic bottles
 As you already understood, crafts from plastic bottles can have several purposes at once. The plastic pig is also no exception, so it can be a flower pot, a flower bed or a full-fledged decorative object.
If you want to make a pig solely for decoration, then proceed as shown in the master class. If in the future you plan to plant plants in it, then prudently cut an opening of the desired size in the upper part of the workpiece and further reinforce it with a plastic rim.
So:
- Cut off four liter bottles neck (these will be the legs of our pig)
- We fasten them to the wire, and then we fix them on a five-liter bottle
- Next, cut out rounded blanks from the middle part of the plastic bottle (these will be the ears of the pig)
- We attach the ears to the top of the bottle closer to the neck.
- At the next stage, we cut out two small circles and fix them on the muzzle of the pig
- At the very end, we paint the entire workpiece in a delicate pink color and, using white and black paint, draw the eyes of our pig

 Daisies from plastic bottles
 If you want to decorate your home or garden with flowers that will delight you all year round, then try to make them from plastic bottles. Now we will teach you how to make very beautiful and, most importantly, the most realistic daisies that will become the most beautiful decorative object in your home. It is best to make them from white milk bottles. Since they are more malleable, it will be much easier for you to form thin chamomile petals from them.
Simple Tips:
- First of all, cut out circles of the same diameter from the middle part of the plastic bottles.
- Next, start to form the flower itself from them.
- To do this, first divide the circle into four parts.
- Further, each of the four segments is again divided into four parts
- If you do everything right, you will have 16 perfect petals.
- In the next step, take nail scissors and carefully round off the edges of the petals.
- After that, cut a small circle out of plastic and cut it along the edge.
- Hold this blank over the candle until the edges begin to fluff
- Paint the resulting workpiece yellow
- From a green bottle, cut out a star of the correct shape (it will imitate the sepal of a flower)
- Cut out characteristic leaves from the same green plastic
- Take the wire and wrap it with satin ribbon or corrugated paper
- Connect all the details together and the chamomile will be ready
Roses from plastic bottles
 Roses from plastic bottles
 Roses can also be made in the same way. Petals and stem can be made in the same way as for chamomile, but the bud itself will need to be crafted a little differently. In this case, you will need to cut a rectangular blank out of plastic and divide it exclusively into four parts. Another nuance in the manufacture of a bud is the twisting of the ends of the petals. In this case, you will need to heat the workpieces more than usual, and then use a round wooden stick to give them the desired shape.
If you refuse to carry out this stage, then in the end you will not get a rose, but a poor flower that can hardly be used to decorate a house or garden. Oh, and remember, if you need to paint the plastic, then you need to do this even before you start connecting the petals into a bud. Since the finished blank will turn out to be quite voluminous, you simply cannot paint over it as well as possible and, as a result, your rose will have ugly gaps.

 Palm tree from plastic bottles
 Top making
 If you want on your personal plot flaunted, then you do not have to buy expensive seedlings and wait for years until they grow to the desired size. If you wish, you can make such a tree from plastic bottles in brown and green:
So:
- At the initial stage, make a barrel from bottles
- To do this, cut off their bottom and neck, and then start inserting the bottle into the bottle
- When the hollow blank is ready, reinforce it with a wooden stick or an iron rod.
- Next, we begin to make the top of the palm tree
- To do this, cut off the bottom of the bottles, and then cut them into thin strips.
- Inside these blanks, you will also need to insert flexible rods or a plastic hose
- At the very end, you just have to fix the top on the trunk and securely fix the palm tree on the flower bed
Plastic vases for natural or artificial flowers

 Decoupage plastic vase
 Vase with pattern
  Vase with weaving
 The easiest way to make a vase from a plastic bottle is to simply cut off the neck and then paint the entire surface of the resulting workpiece in the desired color. And to make such a craft look more impressive, you can additionally paint it with a floral ornament or paste over it with rhinestones and sequins.
Decoupage plastic vase:
- Take a two liter bottle and cut off the top of it.
- Thoroughly coat the outer part of the workpiece with PVA glue, and then attach the selected napkin to this layer
- Gently level everything with a soft brush dipped in glue, and wait for the top layer to dry completely.
- Next, take a decorative ribbon that matches the color and style and use glue to attach it along the edge of the neck of the vase
- If desired, you can additionally decorate the vase with beads and ribbons.
Pouffe from plastic bottles

 Pouffe from plastic bottles
 A little higher, we have already told you how you can make various decorative decorations for your home and garden from empty plastic bottles. And now we will teach you how to make a soft pouffe out of plastic, which will decorate any interior.
But remember, if you want to end up with the perfect product, then use bottles of the same size to make it. If you make a pouf at the same time from one and two-liter bottles, then you definitely won’t be able to create something of really high quality.
So:
- To start, prepare 16-20 bottles of the same size
- Using adhesive tape, fasten the bottles in pairs
- When you cope with this task, form a circle from the blanks and also fix everything with tape
- Measure the diameter of the workpiece and, based on these data, cut out two circles from thick cardboard
- Place the bottles between them and wrap everything with tape again
- At the next stage, cover the workpiece with foam rubber and carefully sew everything with small stitches
- From suitable material sew removable cover and put it on an ottoman
Broom from plastic bottles

 Broom from plastic bottles
 For the manufacture of a broom, it is best to take two-liter bottles. Their dimensions allow you to create a fairly voluminous fringe, which effectively fights with garden debris.
- First, find a smooth stick that will mimic the top of a broom.
- It will be better if its diameter allows you to put a plastic blank on it
- Next, take a bottle and cut off the bottom of it.
- Then, with sharp scissors, cut the workpiece into strips, without reaching the neck.
- Make several blanks in this way and insert them one by one into each other
- Secure everything with wire and put on a smooth wooden stick
 Mosquito trap from a plastic bottle
 As you probably already understood, a plastic bottle in skillful hands can turn into a rather beautiful and original thing. But apart from decorative elements this material can be made for mosquitoes, which can be placed both inside the house and on summer terraces. You can see how to make this wonderful device in the figure located a little higher.
Remember, if you want the trap to do its job as well as possible, the liquid in it must be changed every day. It is advisable to do this in the late afternoon, after draining the old one from it and rinsing the container with clean water. If all these nuances are observed, you can forget what mosquitoes are and enjoy calm nights even in the wettest period of summer.
Video: What can be done from plastic bottles for a garden and a country house?