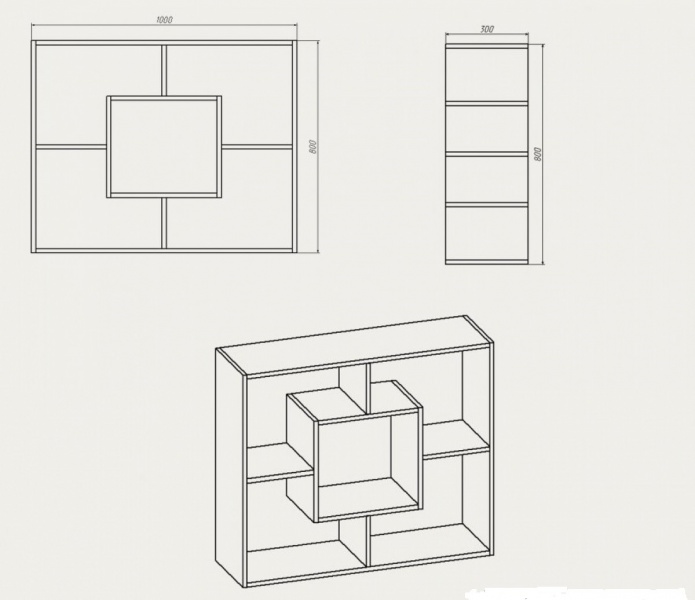
Do-it-yourself wall shelves from improvised materials. Plywood shelves. Bookshelves - a place where knowledge is stored
Wooden shelves are The best way occupy an area in a house, apartment and decorate their decoration. They differ in convenience, functionality, original forms. Wooden shelves, racks help to make the room cozy. In addition to wood, unusual shelves can be made independently from plywood, tin, glass, fiberboard. But wooden shelves, made by hand, are the most popular, because wood is convenient, it is easy to process.
Choice of wood and necessary tools
A good craftsman knows how to make wooden shelves of various bizarre and simple shapes: closed, open, horizontal, vertical, corner. A reference version is taken as a sample of any such product, which is complemented by other parts and takes on a fantastic look. Every craftsman wants his product to last as long as possible. The choice of wood in this case plays a significant role. For work, even dry boards are selected that do not have cracks, mold, voids. For wood processing you will need the following devices:
- The first assistant is a hacksaw.
- You can't do without a drill.
- For accuracy, you need a building level.
- Boards 16 mm thick are considered ideal for work.
- The smoothness of the wood will give a grinder.
- You can fasten the boards with screws, dowels, brackets.
- An electric jigsaw will help to give originality to the shelf.
- The final touch will help to apply stain, wood varnish.
Types of wooden shelves
The most popular are wall shelves. Mounted products are not inferior to them in operation, especially those made in the Art Nouveau style. For children's rooms or for shoes, floor shelves are used. It is very convenient for kids to place their toys on them. In small rooms, wooden shelves under the ceiling are sometimes used. They often contain books. For indoor flowers are very convenient suspended models. by the most in a simple way the manufacture of the shelf will be invisible. Quite a lot of things can accommodate whatnots, racks. A hidden shelf is a great space saver.

What are the shelves attached to?
Shelf holders for wooden shelves can be different. Wall products are often fastened with pins, ropes, perforated guides. Secret cabinets or doors are fixed on hinges or hinged spiers. An inverted bookshelf can be mounted on brackets. Wooden shelves on the wall for books or flowers can be fastened to belts, strong threads, clips.
For floor shelves, a very original method of fastening using ordinary glass bottles is just right. In libraries, sometimes wooden shelves are placed on posts made of decorative bricks. Very often, metal parts, such as pipes, are inserted into the design of wooden shelves.
An example of a simple rectangular shelf
A novice craftsman should first learn how to make an ordinary rectangular product. How to make a wooden shelf that looks like a box? First you need to make a drawing. To do this, take into account the height of the side walls, the thickness of the boards. After accurate markings, you should start sawing the boards. The jigsaw does it jewelry and evenly. For such a creation, you will need 4 blanks: 2 short and 2 long.
Before assembling the craft, each part is sanded, then covered with stain and varnish. If the master decided to paint his masterpiece, then the workpiece must first be coated with an antiseptic primer. Such a product will last longer and the paint will lie evenly.
Assembling a simple shelf
You need to start assembling from the bottom board. To begin with, it is laid on a flat surface. At the ends of this blank, a few centimeters recede on each side and draw a parallel line. Then, on these two strips, 2 points are marked for self-tapping screws for attaching side blanks. Do the same with the top board. Holes for self-tapping screws are drilled at the marked places.
When the holes are made, the side parts are placed on the lower workpiece and fastened with self-tapping screws. Then the top board is fixed to the side walls. Brackets are attached to the walls from the end. If there is a desire, then the back shelf can be closed with plywood, and glass can be inserted in front.
It remains only to hang this craft. To do this, holes are drilled under the dowels in the wall. Self-tapping screws from dowels should protrude 5 mm. Everything is ready, it remains only to attach the brackets.
Extraordinary solution
Such a shelf can be given a more original look if one of the sides is replaced with a stump of a branch (you can birch along with the bark). The log should be 8-10 cm in diameter. You just need to measure the chock of the desired length, cut it off, prime it, dry it and varnish it. When the workpiece dries, it is inserted between two boards and screwed with self-tapping screws.

Original shelves for books of non-standard shapes
Do-it-yourself wooden shelves can be of non-standard shapes. Such models are in great demand. An example is a bookshelf in the form of a labyrinth. To make such a shelf, you need to prepare the following material: edged board, miter box, hacksaw, grinder, level. Also, when assembling such a product, you will need carpentry glue, self-tapping screws, screws for furniture, special shelf holders.
First you need to make markings on the board of the right size for the cuts. The blanks for the butt must be cut at an angle of 45 or 90 degrees. In this case, it is better to use a chair. After the ends are cut at an angle, it is necessary to smear them with glue, squeeze and fix them with furniture screws (1-2 pieces). Using a level on the wall, mark the points where the shelf will be attached. After the brackets are screwed to it, it can be safely hung on the wall. Excellent shelf holders are the "pelican" designs.
Such a non-standard, but easy-to-use shelf can serve not only for storing books. On it you can beautifully arrange photos in frames, caskets, disks and other decor items.

Wooden shelves for shoes
AT furniture store shoes are not cheap. In order to save your budget, wooden shoe racks can be made at home. Special carpentry skills are not required for this. It's never too late to take on your hallway and build an original shoe rack. For such work, the master uses the following devices: a chisel, an electric drill, a hacksaw for wood, a grinder, a screwdriver. To make a drawing or marks on wood, you will need a ruler and a pencil.
Before starting work, you need to take into account the design of the future craft, its dimensions and functionality. Corner and round designs are the most popular. Most often, ready-made elements purchased in the store are used, the "raw" tree is used less and less. In addition to the above tools, you will also need wood glue, metal corners, sandpaper, varnish or paint, self-tapping screws.
First, the side walls of the desired height are cut out of the boards, for verticals. Then prepare bars for supports and transverse blanks. Immediately cut out four shoe shelves (elements). With the help of sandpaper, all workpieces are processed. Bars are attached to the side walls with self-tapping screws. Metal corners are attached to the end of the product. In turn, each shelf is applied to these bars. When the product is assembled, it is coated with varnish or paint of the desired color.
A wooden shoe rack can also serve as a comfortable ottoman. To do this, the upper part of the shelf is covered with a layer of foam rubber, which is fixed with a dense fabric or leatherette.

Racks for every taste
Wooden rack suitable for garage, shop, home. You can put books, flowers, unnecessary things, decor items on it. For the interior of any room, a rack with light, clean lines and modern design. Such a useful cabinet is the creed of many prominent architects, as it has a beautiful shape and excellent functionality.
To properly secure the shelves of such a product, you need strong racks. Special decorations for the racks are not required, but, if desired, you can close the back. The design of shelving racks is quite simple, so do not be afraid to start such work.
For strength, the racks are tied inside with long threaded rods. The convenience of making such a product is that you do not need to cut any corners or grooves. Each detail is best processed before assembly. For the manufacture of racks, both solid wood and laminated plywood are suitable.
For work you will need: planer, jointer, drill, drilling machine. Each master himself sets the dimensions of the rack. All work begins with measurements and a drawing. This design can be done on the entire wall. Some manage to make a rack even around the window to put the entire library there. Shelves of any size are suitable for such a cabinet. It can be small, medium and very large. There are a lot of drawings according to which you can assemble a structure of any size.
We store spices beautifully
Shelf for spices (wooden) will greatly decorate the interior of the kitchen. So that various jars, cups, cones do not spoil the beauty and neatness of the kitchen, their storage must be given an orderly look. The most convenient and functional option is a special shelf. To securely fix it on the wall, there are special limiters.
A wooden shelf for spices will radiate a special energy in the kitchen and create coziness and tranquility. In addition to wood, you can use chipboard or drywall. A wonderful neat shelf for jars can be made from narrow boards. For rear wall use a piece of plywood. To give this product an aesthetic appearance, it can be painted in desired color and neat labels to designate this or that seasoning on jars.
Making wooden shelves on the wall (for spices) is very easy. First you need to decide on the location of the future product. Then the master makes a drawing. For an open shelf, you need to take into account the presence of a small border so that the containers do not fall out. After measurements, the elements of the craft are cut out with a jigsaw and their ends are polished. It is advisable to use a furniture edge for gluing the cuts. For fasteners on the wall, the necessary markings are made. It remains only to fix the structure.

Corner products
To save space, corner shelves are sometimes used in the room. They can be fixed both on the inside and on the outer corner. Corner shelf (wall, wooden) is as follows. After measuring and cutting the boards of the desired length, the ends of the upper workpiece are smeared with glue and clamped with clamps. Do the same with the bottom board.
After the glue dries, the halves must be primed and covered with stain. Attachment points are marked on the bottom and top board and holes are drilled. Next, the sidewalls are inserted, which are fixed with self-tapping screws. Now the brackets are screwed to the adjacent walls, on which the shelf is fixed.
Hinged design on belts
Shelf holders for wooden shelves can be different. Small items can be placed on a decorative shelf. It fastens with straps. The easiest option is a regular board suspended on straps. To make this design, you will need 2 small boards, 4 belts of the desired length, 4 dowels and self-tapping screws, a drill.
First, the belts are prepared: they are folded in half and, stepping back from the edge of 2-3 cm, a hole is drilled in them, on which the shelf will be attached. The straps, folded in half, are fixed to the wall with screws. So four large loops should hang on the wall: two on top, two below them below. Sanded boards are pushed into these loops and leveled horizontally.
On such a shelf you can put a vase with flowers, indoor plant, jewelry box or folded discs for the computer. Simple and fast!

Each housewife tries to transform her room with the help of bright violets, geraniums or begonias. This gives an aesthetic and fresh look. It is best to place pots on spectacular shelves. Shelves can be made of wood in several tiers. They can be both floor and wall. wooden details for shelves can be painted, varnished or pasted over with a special film. You can turn on your imagination and make the products multi-colored or round the corners.
Unusual plywood shelf design. No glue, nails or other fixing materials are needed to assemble it. The assembly of the shelf into working condition is carried out only due to the grooves made in the design of the shelf itself. Therefore, it is perfect for those who like to move often, or simply as a seasonal shelf that can be quickly obtained, assembled and used, and then just as easy to disassemble and store in the pantry.
Materials and tools:
- plywood sheet 6 mm thick
-laser machine
-file
-lacquer and paint
- a few bolts and nuts.
- metal fasteners
Description of the manufacture of easily collapsible plywood shelves:
Step one. Design choice.
The author needed shelves for use in the place of his temporary residence. Therefore, the shelves had to be fairly cheap and easy to assemble and disassemble. Therefore, 6 mm plywood was chosen as the main material.
After defining the material, a small sketch was made in the CorelDraw program.
(downloads: 175)

Step two. Cutting details.
After creating a circuit for a laser machine. Plywood was laid in it and parts were cut. In principle, the design of the shelf is quite simple and can be cut no worse with the help of conventional saw or a jigsaw, so the presence of a laser cutting machine is not at all necessary when assembling a shelf of a similar design.


Step three. External processing of the product.
After the necessary details were received, the author began to process them. To give a more pleasant look to the product, its parts were varnished. After that, the grooves for joining the shelves were additionally processed with a file, as there were problems with the assembly.


Step four. Shelf assembly.
After the file solved the problems of joining the grooves, the author proceeded to assemble the shelf. It did not require any glue or nails. The whole structure is assembled and held by its own weight through the grooves made, while being quite reliable and stable.


The only fasteners that the author needed were a few metal corners and bolts with nuts in order to secure the shelf to the wall.
As a result, we got such shelves. Simplicity of construction, lack of fasteners, resulting in easy assembly and disassembly, and all this for a minimum price equal to several sheets of plywood.
All photos from the article
In any residential country house or another building, you can’t do without shelves, because this type of product is simple and functional, so the popularity of such structures never decreases. The biggest advantage is the fact that you can cope with their manufacture yourself, for this you need to make do-it-yourself plywood shelf drawings or find them in ready-made, after which you can calculate the required amount of materials and purchase everything.

What you need to work
As we noted above, first of all, you need to make at least an approximate sketch of the future product, this will help you calculate the required amount of materials and determine their exact list. Below we describe the main components:
| Plywood | This is the main raw material that will be used. As for the requirements for the material, they are as follows:
|
| Bar | If you are making shelving with plywood shelves or structures that require a stiffening frame, then you will need a beam. It is better to choose a planed version with a section of 50x50 mm, it will provide a high load-bearing capacity of the shelves and allow you to place even heavy objects on them |
| fasteners | It is best to use self-tapping screws, as they provide high strength connections. Their length depends on the thickness of the elements used and is selected individually in each case. You may also need corners, with their help you can very quickly and securely fix individual elements |
| Tool | A jigsaw is best for cutting plywood, but if the elements have rectangular shape, then you can get by with . Also, do not forget about such devices as a square and a tape measure, they will be used to mark the material. |
Important!
Experts advise using plywood, which consists of at least five layers of veneer, as this ensures high reliability of the structure, three-layer options resist loads much worse.

Overview of some design options
Now let's figure out how to make a plywood shelf with your own hands. For example, we will talk about two options - simple systems, as well as rack structures.
The simplest products
They are made without the use of a frame and are most often designed to store not very heavy items.
We will talk about some of the options that you can implement on your own:
- Rope can be used, in this case, several shelves of the desired width and length are cut out, after which it is necessary to fold the racks from wooden waste of different sizes so that the height of the structure is as needed. After that, holes are drilled in the elements, the size of which should be slightly larger than the diameter of the rope. After that, the structure is folded, knots are tied from below, and top part hung on hooks - the product is ready;

- A do-it-yourself shoe rack made of plywood is also very simple., and for this you need to make an approximate sketch. First of all, the upper and lower parts are cut out, between which shelves are placed, which can have a very different configuration. All elements are connected using metal corners and self-tapping screws, it is recommended to put a wall on the back side, it will not only close the space, but also provide additional rigidity to the product.
Four legs are placed below;

- Do original shelves for do-it-yourself plywood flowers as follows: first, boxes of different sizes are twisted from sheets, their dimensions must be sufficient to accommodate flower pots. After that, the elements are painted or stacked on top of each other in a chaotic manner and fastened with corners and self-tapping screws. It turns out a very unusual design that can be placed on a stand or hung on the wall.

Shelving
Instructions for the construction of such systems are also not difficult:
- First, on the basis of a project or sketch, a beam is cut for the construction of a frame. Then vertical racks are placed, between which crossbars of the desired length are attached. The easiest way to use special corners for this type of work is very simple and does not take much time. It is important that the elements fit exactly to each other, and the frame is not distorted, as it must stand securely on the surface;

- Next, you need to cut out the elements from plywood, they must fit the fabricated frame very accurately, this will give finished product very neat and attractive appearance. Fastening is carried out using self-tapping screws, their length must be at least twice the thickness of the sheets;
Important!
To prevent cracking of the elements, it is best to pre-drill holes for self-tapping screws, their diameter should be half the size of the fasteners.
- The finished structure is painted in any color or coated with a protective compound.
Conclusion
Do-it-yourself plywood shelf is a great solution that allows you to make a design that fits under free space in your premises. The video in this article will help you understand some of the features of the process even better, and if you still have questions, then ask them in the comments.
No matter how refined and thoughtful the interior, without small memorabilia: family photographs, souvenirs, flowers and other accessories, it is almost impossible to create coziness. Therefore, shelves in our time have become the most sought-after piece of furniture. There is a huge range of materials for their manufacture on the market. However, plywood shelves in the popularity rating still occupy the top positions. And it is not surprising, because you can make any exclusive from plywood with your own hands - there would be a desire.
Wall "balconies"
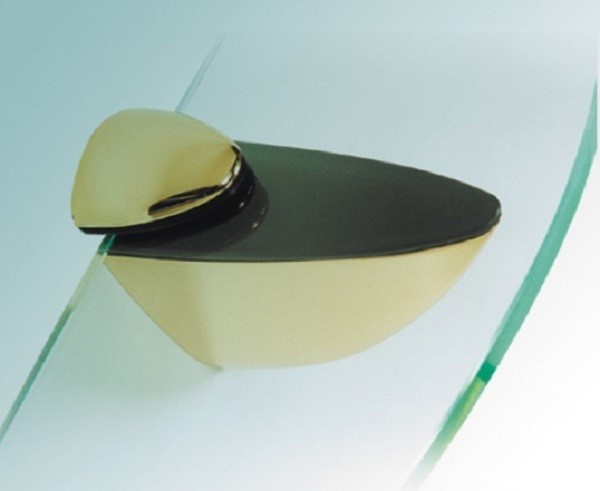
Even if you have never been engaged in the manufacture of furniture, then making hanging shelves for you will not be difficult. There are many accessories that can help you with this: pelican shelf supports, decorative brackets or hidden anchor bolts. Choose to your taste.
Attach to the wall the mount of your choice according to the level. If this is a “pelican”, it is enough just to cut out a shelf of the right size (rectangular or embossed), treat it with varnish, paint or self-adhesive and insert it into the clip. The shelf is ready. Despite the fact that this type of holder is intended mainly for glass shelves, it is also possible to fasten plywood of small thickness (6-15 mm) with it. It should be borne in mind that the carrying capacity of such a shelf will be very limited.

Brackets and blind anchors are more suitable for attaching plywood. The latter are remarkable in that they are not visible. They are also very easy to attach. Holes are drilled in the wall, fasteners are inserted. Then holes are also drilled in the shelf, the diameter and length of which correspond to the dimensions of the anchor. The shelf is mounted on a bolt. The plywood should be much thicker than the anchor bolts. If you take, for example, a pin with a diameter of 10 mm, then the plywood must be at least 30 mm thick.
There is another way to secretly mount wall shelves. But first, the shelf needs to be assembled.
To do this, you will need the following tools:
- screwdriver;
- electric jigsaw with wood saws;
- miter box;
- furniture stapler;
- perforator;
- level;
- roulette;
- pencil;
- brushes;
- non-metallic spatula.

Tools necessary for work: screwdriver, jigsaw, puncher, tape measure, level, pencil.
To begin with, you will need 2 long and 2 short beams 40x40 thick. From 2 short and one long timber, a U-shaped frame is constructed, fastened with self-tapping screws. The frame is smeared with glue and 2 sheets of plywood 4-6 mm thick are attached to it on both sides. Sheets are nailed with a furniture stapler, self-tapping screws or small staple nails. Ugly ends are covered with a platband sawn on a miter box at an angle of 45 °. It can also be attached with staples or hidden nails.
The shelf is puttied, after drying it is sanded with fine sandpaper, primed and painted.
The fourth, not yet involved beam, is attached in level to the wall. A shelf is put on it. The top plywood is fixed with self-tapping screws.
Back to index
Modular whatnot

This kind of shelf will be a worthy decoration of your apartment. If you have imagination, you can assemble a wide variety of designs from modules. It can be a small wall shelf with several sections or a large floor-to-ceiling column. If desired, you can construct a partition from it to zone the room.
To assemble such a shelf you will need:
- jigsaw;
- drill with drills for wood;
- perforator;
- a hammer.
- rectangular plywood elements;
- pins;
- glue.
The rectangles must all be the same. For example, 20 x 30 cm. If you are planning a shelf to the ceiling, calculate the dimensions of the parts in advance, based on the height of your room. Divide the height to the ceiling by the number of modules. Get the dimensions of the parts. Do not forget to take into account the thickness of the plywood when calculating.

All parts must be sanded - and you can start assembling. Lay the first piece on the floor along the wall. Attach 2 pieces vertically to it. The left part is located perpendicular to the wall, forming the sidewall of the shelf. The right part is parallel to the wall.
The next module is formed in the same way, but now the left part is parallel, and the right part is perpendicular to the wall. The module is installed on top of the previous one.
The parts are fastened with wooden pins, under which holes of the desired diameter are pre-drilled. The pin should go into the hole with great difficulty.
Holes in horizontal parts are made on the plane, and in vertical parts they are drilled at the ends. Thus, the vertical elements are "sandwiched" between the horizontal ones. Holes should not be through. Confirmates can be used as fasteners, closing the holes in prominent places with special plugs. By continuing to stack the modules on top of each other, you can get the original cabinet from the shelves.
If you collect several of these shelves, each of which is one module lower than the previous one, you get a nice partition. These shelves must be pulled together. Structures of several sections can be attached to the wall with hidden anchors. Large shelves are attached to the floor and ceiling.
Wall shelves are able to harmoniously complement the design of the room. The range of their purpose is very wide. Depending on the location and application options, they choose the material for their manufacture and think over the design. What features should be taken into account before you start creating a wall shelf with your own hands, and what are the main stages of the process, let's get acquainted in detail.
Variety of wall structures
The main purpose of the wall shelf is to place a lot of small items, while organically combining the functions of storage and interior decoration. Depending on this, the option of installing a furniture structure is determined. There may be several of them:
- The most common way of placement is to make a wall form, when the product is attached to the wall, at the bottom of which other pieces of furniture (sofa, bed or table) are often located.
- A kind of highlight among wall structures can be a do-it-yourself hinged shelf. The key difference lies in the method of fastening: instead of traditional brackets and loops, ropes, chains and straps are used.
- Depending on the organization of the living space, from time to time there is a need to make a corner shelf. Moreover, in addition to the common way of using the internal areas, sometimes they harmoniously use the outer corner of the room.


A little imagination, and you can make a wall shelf design with your own hands in various variations. The following models are widely used:
- The ease of manufacture with your own hands is distinguished by the console - a shelf fixed perpendicular to the wall.
- If desired, the design is supplemented with side walls and the back is closed.
- To create a kind of rack with your own hands, it is enough to combine several single consoles together.
- Recently, combined specimens with an extraordinary arrangement of horizontal and vertical walls have gained wide popularity.
- Numerous decorative models of wall shelves are original. Their main function is to create an exclusive design element in accordance with the chosen style.

Occasionally, the facade of a do-it-yourself structure is supplemented with glass. This is practical when storing items that do not have a decorative function. A small part of the designs of wall shelves that you can decorate with your own hands is shown in the drawings below:


The nuances of the choice of material in the design
No construction work is complete without a preliminary plan.
Remark ! Before you start designing a shelf with your own hands, you need to decide on the material for the base.
When choosing it, take into account the place where the furniture structure and its main functions will be installed. The scope of wall shelves is as follows:
- Book lovers and students will definitely need bookshelves based on wood and its derivatives.
- To store jars of spices or decorative items in the kitchen (in the role of which original plates or exclusive mugs act), narrow shelves equipped with low sides are used. In this case, it is most appropriate to use wood for manufacturing, although, depending on the chosen design, glass specimens can also look harmonious.
- The arrangement of the bathroom is not complete without the installation of glass shelves, complemented by chrome elements. This is due to the basic requirement for the material - it must have a high level of moisture resistance.
- Universal shelves allow you to show your imagination with the choice of material during self-production. They are intended for setting flowers or various souvenirs, and the base is selected taking into account the overall design of the room. It can be classic wood, durable metal, complemented by forged elements or glass, which creates the effect of lightness.

Mounting options
The type of fastening plays an important role in the design of the shelf wall structure. Having studied the options for fixing, it will be easier for you to determine the most suitable method.
Classic loops
The traditional fastening of wall shelves is the use of hinges. They are optimally suited for products made of wood and its derivatives. An important condition is that the material must have sufficient thickness. The whole process takes place in several stages:
- The hinges are fixed on the side of the furniture structure with self-tapping screws.
- After measuring the distance between the holes, the required segment is marked on the wall.
Attention ! Compliance with the horizontal line is important point when fixing the wall shelf.
- At the indicated point, holes of the required diameter are drilled, designed to insert the dowel.
- A self-tapping screw with a neat hat is screwed into the clogged dowel, on which a shelf is hung.

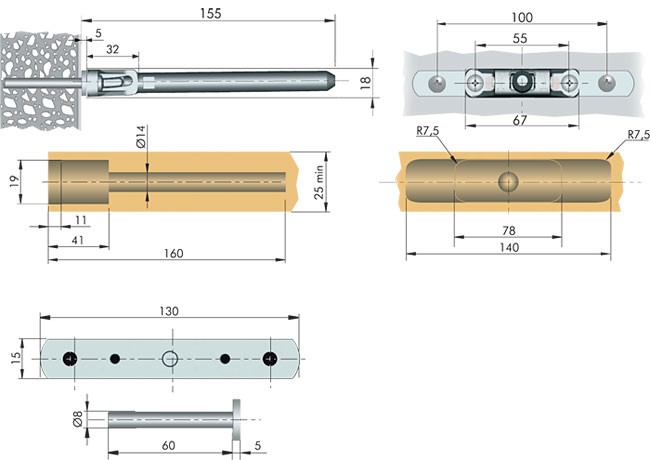
Fixing glass shelves
The use of loops is not suitable for all materials. Installation of wall-mounted glass shelves is carried out using special fasteners for fragile products. Fasteners are made of two parts and are often supplemented with elastic gaskets, a glass shelf is inserted between them. The lower part of the device for reliable fixation of the wall structure is equipped with a clamping screw.
A common mounting model for glass shelf is an instance called a pelican, capable of holding a wall structure with a thickness of 8 to 34 mm. In addition to glass, it can be used to fasten other materials with similar dimensions.
Concealed mounting and decorative brackets
The hidden installation of the wall shelf is distinguished by simplicity and originality. In this case, the fastener is completely masked. The essence of this method is as follows:
- at the end wooden structure a recess is prepared for the pin and the body of the fastener;
- the mensol holder is fixed to the wall, after which a shelf is put on it.


Create individual design rooms allow wall shelves with decorative brackets. They can be fulfilled in a production way or treat exclusive copies. Photos of wall shelves decorated with hand-made brackets are presented below:


Manufacturing process
Depending on the chosen design and material, the process self-manufacturing wall shelf has its own characteristics.
Wood
If you want to make an original wooden wall shelf with your own hands, you will need:
- Base material. In addition to natural wood, you can take MDF, chipboard or GVL, this will greatly facilitate the surface treatment process.
- An electric jigsaw that can replace a hacksaw.
- Drill and grinder.
- Line with a pencil.
- Building level.
- Wood glue or liquid nails.
- Lacquer or stain.
- Brackets, dowels and screws.
The whole process of DIY wall shelf production is simple. After drawing up a plan or taking a finished project as a basis, the dimensions of the structure are transferred to the material. Sawing wooden base better with a jigsaw, which provides a perfectly even cut.

All elements wooden shelf are carefully polished, in the presence of significant defects I use putty for wood. On the initial stage you will need sandpaper No. 40, sanding paper No. 80 and 120 will allow you to get a perfectly smooth surface.

Connect the parts of the wall structure with liquid nails or wood glue.

Mounting marks are made on the shelf and wall. The brackets are connected to the shelf, and a recess is made in the wall with a drill, after which the dowels are inserted.

At the final stage, self-tapping screws are screwed in and the wall shelf is suspended.


Glass
Rooms with a small area are best equipped with glass wall shelves that create an atmosphere of lightness and visually increase the space. If experience with glass is not enough, it is better to turn to specialists who, at the same time as cutting fragile material, will perform high-quality processing of sections. The following steps for mounting a wall shelf are within the power of anyone who can hold a tool in their hands and are similar to the procedure for attaching a wooden structure:
- Using the level, mark the attachment points on the wall.
- The Pelican design needs two dowels.
- After removal decorative overlay, you will find holes where you need to screw the fasteners.
- The decorative overlay is put in place and the glass is inserted.
- At the final stage, the screw is tightened.
This completes the installation of the glass wall structure.


Conclusion
A competent combination of a wall shelf with other details of the situation will create a harmonious design of the room, which is distinguished by individuality.