Do-it-yourself roof for a trailer. Country change houses: step-by-step manufacturing instructions. Material for the manufacture of country houses
Currently, the acquisition of suburban areas is becoming more and more popular.
Many people build houses and cottages in the country for year-round use. After a land plot is acquired, several questions arise before its owners: where to store?
Where to hide from the sudden rain or relax on a hot day, hiding in the shade? After all, the construction of the house is still ahead, and the utility room on the territory is needed now.
An excellent solution to this problem will be a small change house, which you can buy or build with your own hands.
Why do you need a utility room in the country?
Country change house is a small room or house, which is used for household needs in a suburban area.
Very often, a good change house is used as a temporary home or an economy version of a country house.
In the future, after the construction of the main house or cottage, this room is suitable for storing work and garden equipment, unnecessary toys, folding beds, work clothes, and various items that are temporarily not used for household needs.
This room is perfect for storing fishing rods, and equipment: lawn mowers, electric or gasoline trimmers.
And if you bring water supply to the change house and make a sewer, then it will be quite suitable as a sanitary unit or even a bath.
Economic owners of summer cottages can use the building as a mini-garage, a winter shed for rabbits, birds or beehives. In general, depending on the activities of the owner of the cottage, this room can be used for various purposes.
Change house is a multifunctional room, which in any case will become indispensable for suburban area.

Change house in the country - a multifunctional room
Change house as an element of the overall design of the site
Due to the fact that the change house is a room that performs various functions, it is necessary, before starting construction, to decide how the owner plans to operate it and the location on the territory of the dacha.
You should also consider some nuances:
- First of all, it is necessary to determine the period of use of the premises and the possibility of moving it to another place. For example, if a change house is built on one summer cottage for temporary operation for one or two years, and subsequently it is planned to be moved to another place (another plot or village) or simply sold, it is recommended to locate the building as close as possible to the entrance. Otherwise, the evacuation of the assembled change house will be extremely difficult, and it is not advisable to disassemble the building, since some of the materials may become unsuitable for further use.
- Secondly, the location of the room depends on its purpose. If the building will be used purely for household purposes, storage of tools, inventory or garden furniture, then it is desirable to locate the building approximately in the middle of the long side of the site. This will provide free access to the change house from any corner of the cottage. If in the future it is planned to operate the building as a bathroom, shower or bath, then it is necessary to build it in the farthest corner, which will fully comply with the rules and regulations of fire safety.
- drawings, step-by-step instructions with photo and video materials, and tips for building a building in our article.
Medicinal and colorful sage: planting and care different types plants. that the plant pleased the soul and body?
The main types of structure
Several options for the construction of a building on a summer cottage are used. The choice of construction technology also depends on the expected period and purpose of the operation of the premises.
Building a switch house with your own hands is the easiest and cheapest. This is the most economical building option.
For the manufacture of the base of the building (frame), bars are used, the outer skin is made with clapboard, and inside - with sheets of chipboard or MDF.
Styrofoam or glass wool are the most common insulators for panel houses. For overlapping floor surface can not be used edged board, which is covered with inexpensive tiles.
The roof can be made both single-pitched and double-pitched. Roofing material can be used quite thin, profiled sheets are quite suitable.
The main and perhaps the only advantage of this type of change houses is their cheapness and quick assembly. They also have quite attractive appearance.

The negative side is a short service life - the room is suitable for use only one season and summer period, since there are no stiffeners in the building, the walls are susceptible to deformation under the influence of wind force, and the insulation settles, and as a result the building freezes heavily.
Most often, change houses of this type are used as temporary structures in which you can cook food in the summer, change clothes and store some tools during the construction of the main house.
frame building
This construction option is more expensive, but also much stronger and longer in operation.
As a basis, a timber with a size of at least 10X10 cm is taken, which ensures stability and prevents deformation of the structure. Inside, the room is sheathed with clapboard, since plywood or fiberboard is not recommended because of their strong hygroscopicity.
Mineral wool is used to insulate the room, and vapor barrier is also provided by using special materials, such as glassine.

In addition, the ceiling and floor are made in two layers. Thanks to these techniques, the inside of the house is warm and dry. And the appearance will be given by the lining under the timber. Frame houses can be operated for several seasons, which distinguishes them favorably in comparison with panel cabins and is an undoubted advantage.
The only one the disadvantage is that interior small enough, but this does not prevent the full use of the change house as a summer kitchen, storage of work clothes and tools.
In the video, a do-it-yourself frame change house - making a base:
Fabrication and installation of frame walls:
Change houses from a bar and logs
This type of building is distinguished by its high cost, because bars and logs with a cross section of more than 100x150 cm are used for its construction.
The construction of logs has many advantages - long service life, beautiful view warm inside. The disadvantage is the high cost.

Container as a basis
Often in summer cottages during the construction of a cottage or house, temporary change houses-containers are installed.
Such buildings can be made from a metal channel welded in the form of a frame, the gaps of which are filled with sandwich panels.
The huge advantage of such change houses, including durability, reliability, strength, warmth, still does not contribute to their wide demand and long-term operation in summer cottages.
Due to the fact that the structure is metal, and most often all the buildings on the site are wooden, it is very difficult to fit it into the overall design. Therefore, as a rule, containers are purchased for the period of construction and sold after its completion.

Change house-container
Independent construction of a building: plan and stages of work
When the decision to build a change house with your own hands is made, the place and purpose are determined, it is necessary to make a small drawing of the future structure. It can be the simplest room, or a more complex building:

Drawing for the construction of a change house
More drawings, according to which you can build a change house with your own hands in a photo selection:
Only after that you can start work.
Territory preparation
First of all, it is necessary to prepare the site on the site.
To do this, the top fertile soil layer is removed, the earth is tightly compacted and covered with waterproofing material.
Foundation laying and frame assembly
After that, the area on which the change house will be placed is covered with sand, and again compacted. Now you need to arrange the cinder blocks symmetrically at a distance of no more than one and a half meters from each other.

Laying blocks for the foundation
They will serve as the foundation. In order to prevent the destruction of blocks, they must be wrapped with rubiroid.

After the lower part of the change house is assembled, you can begin to mount the support posts at the corners of the structure. For fastening, metal corners are used, which are fixed with self-tapping screws.
It is very important that the base of the change house is strong, and the bars are securely connected to each other. After all, it is on this that the durability of the building primarily depends.

Fixing racks with corners
Vertical racks on the front and back sides of the building must be made of different heights, since in the case of using a pitched roof, there must be a sufficient slope for atmospheric precipitation to drain.
Roof installation
The installation of the roof begins with the attachment of the rafters, on which the crate is then made. Roofing material can be used different.
It can be a profiled sheet, slate or ondulin, it is imperative to lay vapor barrier and insulating materials under the roof.

Roof of change house
Double layer floor and sheathed walls are the best choice
It is desirable to make the floor from two layers: rough and finish, between which it is laid as a heater mineral wool.
The walls of the change house are mounted in a similar way, which can be lined with various materials from the outside: siding, clapboard, block house. It remains only to carry out internal finishing work and build a beautiful porch.

Ready change house
Watch a video on how to make a change house with your own hands for 54,000 rubles:
A change house is a multifunctional utility room, without which it is quite difficult to manage in the country.
Depending on the use of the summer cottage itself, it is possible to make a change house as a place to store inventory, as well as a small house. And build it with my own hands under the power of every person who knows how to hold a hammer in his hands.
A metal change house today is practically a necessity in most summer cottages. In addition, such a structure serves as an indispensable place for the location of various premises on the construction site. In addition, it is easy to make a change house on your own, since it consists of blocks, which, in turn, are made of a frame, and metal plates. Of course, such a building will be difficult to use for a long stay in it, but it is an indispensable option for giving.
The project of a modern metal change house with windows and air conditioning
Such a trailer can often be found at construction sites. Considering that the majority construction works can last much longer than one year, a small building for workers can temporarily replace housing.
In such cases, a metal change house can have the necessary minimum of amenities, which will allow you to relax a little after a hard day's work or even provide an opportunity to take a hot shower. Therefore, it is difficult to overestimate the need for such a structure on a site where there is clearly not enough space for certain needs. That is why there are many projects for which you can independently assemble and install such a design.
Self-manufacturing metal change houses is a fairly simple matter, but at the same time it must be taken with due seriousness.
 Layout of a homemade change house made of metal
 To do this, follow the basic rules for the construction of such premises and use the material and tools that are listed below.
If you follow all the conditions, you can be sure that the building constructed from metal blocks will serve you for many decades. And its high functionality and usefulness will pay off all costs in a few months of operation. In order to make a high-quality change house from containers and blocks with your own hands, you will need the following tools:

Before starting work, make sure that there is all necessary material, as this will significantly speed up the manufacturing and assembly process, and will also help to avoid unexpected difficulties during construction.
Materials needed for the manufacture of a metal change house

Carrying out the construction of a metal change house with your own hands
To carry out all the preparatory and construction work, you will need a little time, from several days to two weeks. Terms usually depend on the number of workers and their experience in the construction business. With a completely independent carrying out of all the work, you need to be prepared for a longer period. Therefore, it is worthwhile to carry out the correct all stages of construction, which will help to significantly save both time and finances.
If you want to build a quality building from blocks, you will need to make some financial investments. But it is worth noting that such costs usually fully compensate for themselves in a few months.
 Options for planning a change house from a metal container
 One of the most quality materials for the construction of such a structure, a building container is considered. The metal change house is distinguished by high rates of strength and durability of the structure, which is easy to assemble with your own hands.
Before starting work, it is worthwhile to carry out the planning, which was mentioned above. This type of work is a necessity when building a metal change house with your own hands. Compliance with this condition will help to build not only a room such as a change house, but also come in handy when or.
 Installation of a metal change house on a columnar foundation
 In addition, with experience in construction planning, you will be able to easily carry out repair work practically any metal structures, containers, etc. Therefore, before installation, try to put all your thoughts, requirements and the intended purpose of the change house on paper. In this way, you can accurately calculate total area a metal change house for a summer residence or a construction site, which will allow you to find out the exact amount of material. Such calculations will help save money when building with your own hands, especially when compared with buying a metal change house.
A change house is a utility room in the form of a house that you can do with your own hands. It can be used to store garden tools and other little things that get in the way in the house. It can be clothes or shoes for the garden, deck chairs, a cot, children's toys, a fishing rod or a lawn mower.
On the garden plot a farm building is an indispensable thing. As mentioned above, you can store country accessories in it. Someone uses this building as a mini-garage, and someone in winter period breeds quails or rabbits in it, leave hives to winter. The drawing can be made for any need.
Some use the change house as a temporary home during construction. And someone arranges a shower or a bath in the outbuilding. Each owner has his own ideas for the operation of the change house, therefore, the project will be different.
Advantages and disadvantages of a frame change house
Like any thing, a change house has its advantages and disadvantages.
Advantages:
- Price - frame construction will cost several times cheaper than from other materials;
- Weight - the structure of the frame is very light;
- Versatility - when assembling a change house, you can arrange everything as the owner needs;
- Easy to assemble - one person can assemble the structure without assistance, having the necessary tools;
- Ease of disassembly - dismantling the change house is much faster and easier than installation;
- Ease of transportation - the dismantled structure is easy to transport, the main thing is accuracy. But the assembled change house is more difficult to transport, since the design is very fragile.
Disadvantages:
This structure has one drawback, but a very significant one - it is fragility.
Especially if the structure is often transported from place to place. The materials from which the outbuilding is made lose their properties.
What are frame cabins
Frame change house can be of three main types. Owners choose the one that suits their needs.
- Timber frame construction This option is best suited for owners who are going to build a house with their own hands. After the construction is completed, the change house can be disassembled and transported or left in its original place and used as a farm building. Also, a wooden change house can be equipped both inside and outside, for example, with decorative trim and strengthen it with a foundation. wooden frame is often transported assembled, then it will lose its properties very quickly. Such a building has many advantages: eco-friendly materials, good thermal insulation, minimum cost.
- Metal frame building If the owner cannot afford to build a house in a short time, then the best option will first build a change house with a metal frame. This is the same building with a wooden frame, only it is built into a welded frame made of steel channels and metal racks. A frame made of steel is able to protect the tree from deformation. The design is stronger and more durable. It can also be transported assembled without worrying about its destruction during the trip. This option is rarely used by those who are going to build on their own, since the design has a high cost and heavy weight.
- Portable cabinsFor a construction team that moves from one construction site to another with their tools, a portable building is suitable, without which it is almost impossible to do. The frame of such a change house can be either wooden or metal. Steel structure with correct assembly and proper care can last more than 15 years, which cannot be said about a wooden structure. Portable konstruktsich has a high price and very heavy weight. You also need to constantly tint the portable structure with your own hands and monitor the condition of the skin.
How to choose a place to build a change house
Before you start building a change house, you should take into account several important points.
- If a 6x3 change house will be used for a short time in one area, and then it is planned to be transported to another place, then it is better to build it closer to the exit.
- You should consider how the building will be operated. If the structure is intended to store tools, then it must be placed so that it can be easily approached from any angle.
- If, after the house is built, the change house from the 6x3 timber will be used as a bath, then it is better to place it where it will stand in the future.
Drawing change house 6x3
Most often, the owners of summer cottages prefer to build 6x3 change houses with their own hands, since this size is more versatile. Different owners use the premises in different ways, so everyone needs their own drawing, which is quite realistic. You can take as a basis typical scheme house frame. And then add the necessary openings and partitions.
Internal partitions are needed only if the structure will serve as temporary housing. Partitions should separate the toilet room, kitchen and warehouse space. In other cases, partitions are not required.

Change house scheme
The basis of a change house of a framework consists of a bar. Take two rectangles 100 * 100 mm or more. The rectangles are connected by vertical posts. The size of the change house is 6 m in length and 3 m in width. From below, it is better to use a beam of 100 * 150 mm or more. The height of the front racks should be 0.5 m more than the rear ones.
Racks must be placed based on the location of doors and windows.
Do-it-yourself change house
First you need to purchase all the necessary materials for construction and prepare tools. If the owner of the site has decided on the place and the estimate has been prepared, you can begin to make a drawing of the future change house. The premises can be both simple and more complex, it all depends on the needs of the owner. If all the materials are prepared, the drawing is in hand, you can start building a change house.
- The first thing to do is prepare the site for construction. The top layer of soil is removed with a shovel and compacted. Then you should lay a waterproofing material - no project can do without it.
- Foundation laying. The place where the frame structure will be located should be covered with sand and compacted again. So that the structure can be transported, it is better to use cinder blocks instead of the foundation. You need to lay them at a distance of 1.5-2 meters from each other. And in order to prevent the destruction of the blocks, they should be wrapped with roofing material. If the structure is not transported anywhere, then you can dig a trench and fill it with concrete mortar.
- How to assemble the frame? Beams are attached to the laid cinder blocks with anchor bolts. To the bottom of the do-it-yourself change house, support posts are mounted at the corners of the structure. The whole structure is fixed with metal corners and self-tapping screws. It is important that the bars are firmly fixed to each other, and the base is strong and not rotten. Only in this case the project will be useful, and the structure will stand for a long time. The vertical racks located on the front and rear sides should be of different heights if the roof is shed. This is necessary in order for precipitation to flow from the roof.

- Roof installation It is not difficult to build a roof, the main thing is to use a drawing. First you need to attach the rafters with the crate to the frame. After that, you can mount the roof with your own hands. You can use any material you like for the roof: slate, ondulin or profiled sheet. Insulation and vapor barrier material should be laid under the roof.
- Windows and doors Country change houses can be without windows, but there must be a door there. Therefore, you need to mark where the door will be and put additional racks that will strengthen the doorway. If the project still includes a window, then additional racks should also be placed under them.
- How to sheathe the floor and walls The frame structure can be sheathed in one or two layers. If there are two layers, then insulation should be laid between them. Outside, the frame can be sheathed with your own hands with any facing material.
At will, it is possible to carry out finishing work, carry out water supply or build a porch.
If the frame change house will be used as a sparrowhawk or rabbitry, it can be heated for the winter.
As can be seen from the article, summer cottages can be very diverse. But if the owner of the cottage has the ability, the necessary material and tools, the design is easy to do on his own.
The owners of dachas want to have a facility for storing inventory on their site. Many decide to make a suitable building - is it a shed or a change house - with their own hands, step-by-step instruction below. The purpose of the premises can be different (depending on the needs of the owner of the site), some believe that it will serve as a bathroom, a shower room, and a household unit. But most summer residents need a change house only for storing tools and equipment, in some cases - for storing beehives or cages for rabbits. This suggests that the building must be practical from all sides. Based on the needs, the types of frame change houses are also chosen:
- from wood;
- metal;
- portable.
A wooden frame is great for building a structure designed to last for many years. At the end of the work, it can be brought to the dacha, assembled on site and left as a utility room, or equipped with other functions, a foundation, etc. The frame is built from wooden beam size 100x100 mm. With frequent transportation, the structure quickly loses its original qualities, but such buildings are distinguished by environmentally friendly material, good thermal insulation and a relatively low price.
Change house with a metal frame
This is one of good options erection of a single building on a summer cottage. Such a change house consists of a wooden frame built into a metal frame, welded from channels and corners. The metal frame reliably protects the wooden part of the structure from deformation, so the change house can be safely moved over long distances.

This version of the built change house is rarely considered as an object for independent construction, but sometimes you can’t think of a replacement for it.
Transportable cabins
There are 2 options for transportable buildings for household needs. The first is made of metal, and the second is made of wood. The wooden structure differs from the previous options in that it is completely missing decorative trim. The building has a simplified interior design. Wooden beams 150x100 mm or more are used as load-bearing beams. In order to install a change house, no additional preparation and rigid binding of the structure to the soil is needed.

Metal cabins very reminiscent of trailers placed on construction sites. A well-assembled change house made of metal can last up to 15 years with constant movements from place to place. The frame of such structures is usually made of profiled pipes. The walls are sheathed with heat and waterproofing, and the interior of the room is covered with chipboard. For more convenient use, do-it-yourself light, water, and heating are carried into the trailer. The disadvantages of this design include the high cost of the material, high weight and the need to constantly monitor the condition of the outer skin, so it is quite difficult to make a block container with your own hands.
Projects of cabins
Among all the existing change houses, 6x3 m in size are considered the most practical. For each case, it is easy to draw up an individual change house project, starting from standard design. If the building is planned for temporary residence in the scheme of the main structure, partitions and openings must be added. An ordinary change house 6x3 has separate rooms:
- main - 3x4.5 m with heating and other amenities;
- intermediate - 1.5x1.5 m, used as a corridor;
- corner - for arranging a toilet, shower, etc.
The roof of structures for domestic needs is made only of corrugated board.
Change house frame diagram
The main frame of the change house is made of 2 rectangular wooden blocks measuring 100x100 mm. Between themselves, they are connected by vertical posts 6 m long and 3 m wide. The lower rectangle must be strengthened with a central longitudinal beam. From above, transverse logs are stuffed for the floor from a 50x100 mm beam with a step width of 0.6 m. To get a pitched roof, the height between the front and rear racks should differ by 0.5 m. be 2.8 m, and the rear ones - 2.3 m. In addition, 2 additional vertical racks from a bar 50x100 mm are needed on all end sides of the structure. The location of the racks should correspond to the places for doors and windows.

To the top of each of the corners, it is necessary to install diagonal braces from a 100x40 mm beam. Auxiliary corner posts that do not have window and doorways, should be provided with additional braces. The rafters are made of timber 50x100 mm, which are evenly distributed over the entire frame in increments of 0.6 m, while part of the rafters should extend beyond the level of the frame on both sides by 30 cm. The end rafters should be fixed to the upper end beams with transverse boards.
Making a change house is not complex process therefore does not require specific knowledge or expensive tools. But this does not mean at all that having mastered the theory of how to make a change house, you will not encounter certain difficulties. The amount of installation work assumes that it may take at least a month to independently build a room for domestic needs.
How to build a change house: building instructions
To independently build a change house, you need to adhere to a certain scheme that will avoid confusion in the process of performing work. For these purposes, it is necessary step by step instructions, which will allow you to perform all the actions in the right order:
1. Location selection. Before starting installation work, you must select a suitable site. It is desirable that it be located on level ground. This will avoid additional land works.
2. Preparing the site for the foundation. Initially, you need to remove a layer of earth 30 cm deep around the entire perimeter of the change house. When preparing a place for the foundation, it should be borne in mind that it should extend beyond the building to a distance of 0.5 m. Sand should be poured into the place of the removed soil layer and carefully compacted.
3. Installation. The foundation on which the change house will be built can be made of concrete blocks, bricks, stone, metal supports. At this stage of construction, it all depends on how long the building should stand. If you are installing concrete or iron poles, the depth under the supports should be at least 30 cm. To install a 6x3 change house, you will need 12 poles laid in 4 rows.
4. Fastening the frame to the poles. Before laying the crown, the pillars must be equipped with waterproofing. The base should consist of 5 bars measuring 150x100 mm: three longitudinal and two transverse, which must be aligned and securely anchored to the posts.

5. Mounting bottom strapping . A beam with a section of 100x100 mm is laid out along the perimeter of the structure. The strapping does not apply to the middle beam. After completing the installation work, a step of 50 mm in size should appear along the entire inner edge of the base.
6.Installation lag. To mount the floor log, a beam of 50x100 mm is required, which is installed edge-down on 3 longitudinal beams of the crown. To do this, you need to install them in the prepared slots in the bottom strapping.
7. Installation of vertical corner posts. Before fixing the racks from a bar measuring 100x100 mm, it is necessary to align them with building level and secure with a temporary double-sided brace.
8. Installation of the top trim. The mounting of the rear and end posts must be carried out at the same level. The front beam should be placed a little higher than the rest.
After completing these works, you can install horizontal bars measuring 50x50 mm, which will limit window and door openings. Temporary rack braces must be replaced with permanent ones made of 100x40 mm boards. Next, you need to install the rafter system, the crate and fix the roofing material. We proceed to the installation of the subfloor, for which a tongue-and-groove board measuring 150x30 mm is perfect. It is necessary to lay waterproofing and insulation on the subfloor. Next, you can do the installation of the flooring across the log, for which a 150x40 mm edged board is used. As the outer skin of the change house, you can use lining, edged boards, thick plywood and other materials.
Inner part the premises are usually sheathed with chipboard, fiberboard, plywood sheets or clapboard. Installation of partitions is carried out from a beam of 50x50 mm by attaching to the ceiling and floor, followed by sheathing. After everything installation work completed, you can proceed to the final arrangement of the change house, which consists of decorative works.
The construction of a private house usually begins with a "construction trailer". On the market you can find many offers for the purchase of new or used wooden cabins. There was even such a thing as a "block container" in everyday life. It is made of metal and has a large number of configuration options and can already be used as an element of modular housing construction.
But it is the do-it-yourself change house on wooden frame- the most economical and optimal solution for a zealous owner. After construction is completed, it can be used as a guest house, a shed for inventory and equipment, converted into a bathhouse or transported to a summer cottage.
Do-it-yourself change house: change house project
From the further use of the change house depends on its size, device and finishing materials.
As a small barn, internal partitions are not needed. There is also no need to insulate walls, floors and roofs.
If you plan to use a change house as a seasonal residence (for example, summer garden house), then it is possible to foresee the presence interior layout. Warming is best done at the construction stage - when using heaters, a do-it-yourself change house will be better to keep warm in spring and autumn, and in summer it will not get very hot in the sun.
For a construction trailer, the interior lining may be limited to inexpensive and simple materials. Conversion to garden or country house will require only refinement in terms of decorative finishes.
It is best if the interior space is divided into at least two rooms. For example, the house in the first photo can be represented in this form.
A small vestibule-entrance hall and a large room with one small window - a typical do-it-yourself construction trailer.
And this is an improved version with three windows, which can be conditionally called a house with a living room and a bedroom.

In this diagram, the change house consists of three rooms - a vestibule and two equivalent rooms.

And of course, before starting construction, you need simple drawing with basic dimensions.

Do-it-yourself change house: foundation
How to build a change house - a step-by-step instruction for building a change house begins with the foundation.
The peculiarity of a small wooden structure is its low weight. But even this does not mean that it can be placed directly on the ground. To protect against the effects of soil moisture (including from precipitation in the form of rain and snow), an elevated base is necessary.
The simplest kind is columnar foundation . Its strength is enough to withstand the weight of the change house. For temporary placement (and setting a horizontal level), bricks or cinder blocks are often used, laid simply on the ground. But in any case, it is better to use full-bodied blocks. Such an option as in this photo, even for a temporary base, is not the best the best choice, especially since the block was initially laid sideways and the pressure falls not on the walls, but on the voids.

Cinder block, although it refers to concrete, but hollow blocks are used to build walls.
Even the columnar foundation must be done according to the rules. A small depression is dug under each base, the bottom is tamped, a sand cushion (at least 20 cm) is poured, which is watered and compacted, and blocks are laid on top. Sand prevents capillary rise of moisture and acts as a drainage.

There is alternatives column foundation.
A geomembrane is laid on the ground cleared from the top layer, a layer of sand is poured on top, and then the base is laid out of the blocks.

Instead of sand, crushed stone of small or medium fraction can be used.

Even paving slabs large format can serve as the basis for a columnar foundation of blocks.
For permanent deployment, it is possible to use asbestos-cement pipes dug to the depth of soil freezing and filled with concrete as pillars. This is if not a construction building, but a summer cottage with their own hands is being built.

The distance between the posts is usually chosen based on the size of 1.5-2.5 meters. Therefore, in addition to the corner supports, there will be 1-2 additional ones along the perimeter plus internal ones (under the partitions and for the beam, which ensures the rigidity of the subfloor).
In addition to the columnar, the arrangement of the slab foundation is applicable. Of course, a reinforced concrete monolith for such a structure is redundant, but large-format paving slabs on a loose sand base are quite suitable.

Do-it-yourself change house: supporting frame
How to build a change house with your own hands, for this you need only dry wood. But this is not enough - all the wooden elements of the frame and sheathing must be treated with antiseptics. Moreover, mining is only suitable for “underground” elements, but the change house does not have them, and drying oil is only a temporary protection against moisture and mold, so it is necessary to use antiseptics and fire retardants.

A 150 × 100 mm beam is best suited as a lower trim. This size is even used for the grillage of a columnar or pile foundation of wooden and frame small residential buildings. The easiest gusset- in the floor of the tree.

Then follows the second crown of timber 100 × 100 mm. Moreover, the installation takes place with an internal "step" between the crowns. This is the best device for underfloor heating. Logs for a finished floor with a section of 100 × 50 mm are mounted on a 50 mm shelf.

Corner and load-bearing posts (for partitions and doors) are made of 100 × 100 mm timber, intermediate posts (including for fixing windows) are made of 100 × 50 mm timber. They are attached to the harness with metal corners,

previously leveled and fixed with temporary jibs.

Alternatively, dowels can be used, which will additionally fix the corner connection of the harness.

A frame wooden change house can be erected not element by element, but by sections mounted on the ground. This also applies to walls.

and to the upper harness assembly with the truss system.

But such a technology will require the involvement of assistants, therefore, when building a change house with their own hands, more “light” (by weight) techniques are often used.
The upper harness follows the same rules as the lower one. The supporting beam along the perimeter has the same cross section as the corner posts of the frame. The elements are connected to the floor of the tree, having previously selected the grooves at the intersections. First, mount the long side, fixing it to the racks with a temporary fastener.

Then install the cross bar. After checking the levels and angles, the upper harness is finally attached to the racks with a metal corner.

For shed roof, and this is the simplest option, the upper trim can be performed in two levels, when the front (or rear) racks are made at the required slope angle.

But there is a more complex option using wall racks.

Additional racks
Intermediate racks (100 × 50 mm) are also fixed to the lower and upper trim using corners.

The distance between the uprights is chosen based on the width of the insulation and the dimensions of the sheet sheathing material. If for interior decoration use lining, and for external -block house or siding, then only the width of the insulation is of decisive importance. The usual recommendation is 600 mm between the axes of the uprights. This size is tied to drywall.
But when sheathing OSB (OSB)(the most common for frame technology material), each of its sheets will require trimming by 50 mm. Therefore, if the inner lining is made with clapboard, then it is better to choose an axial distance between the uprights of 625 mm. The gap between the posts will be 575 mm, which is acceptable for laying mineral wool with a width of 600 mm and a deformation strip of 50 mm.
For racks between which windows and doors are mounted, their own criteria. You can, of course, make the frame of a paneled door and window frames out of timber yourself, but more often they buy finished goods. Therefore, they will require the installation of additional racks and struts.

And if the doors are standard in width and height, then the windows can be large

or vice versa a little more than a window leaf.

Change house: roof
Do-it-yourself change house, there are many ways to attach the rafters to the Mauerlat (in this case, to the top trim bar). The simplest one uses metal staples. For more reliable fixation, you can either cut a groove in the rafter, or use a support bar.

Rolled waterproofing is attached to the rafters, and a crate on top. The pitch of the crate depends on the type roofing material and slope angle.
The most inexpensive is ondulin (a modern analogue of slate). For an angle less than 10 °, a continuous crate is made, up to 15 ° - a step of 450 mm, more than 15 ° - 600 mm.

Change house: floor
Change house do-it-yourself floor device. First, boards (or OSB-3) of the subfloor are fixed between the lag. The protruding edge of the lower trim bar (150 × 100 mm) is used as a support.

Then the surface of the subfloor is covered with a waterproofing film. For this, dense polyethylene is often used, but they are considered more reliable. roll materials with bitumen or polymer-bitumen impregnation Hydroisol . The film is laid overlapping between strips of at least 20 cm, with sizing the seams with construction tape. The edges of the strips should go to the walls (the same 20 cm).
A heater is placed between the lag. It is better to choose mineral wool, for example URSA (URSA). Unlike polystyrene, it is not combustible and rodents do not start in it. Its only drawback is hygroscopicity and the property of losing insulating properties when saturated with moisture (the same condensate). Therefore, a gap is needed between the finishing flooring and vapor permeable membrane or use Izospan impervious to water - this will protect the mineral wool from direct contact with water and allow water vapor to escape from it.

As a finishing floor, a tongue-and-groove board is best. The principle of connecting the "thorn-groove" coating allows you to further protect the insulation from water ingress into it.

But you can lay the same OSB (OSB), and linoleum on top.
Change house: ceiling
In order for the change house to be warm, it is necessary to insulate the ceiling. Certainly, cold air from top to bottom it will not fall, but the warm one will “disappear”. In addition, getting on a cold ceiling, it will cause condensation. That is why even for a shed roof it is necessary to equip a small "attic" distance and insulate it with mineral wool. The principle is the same as for the floor: overlap (board or OSB), Izospan waterproof film, insulation (mineral wool).

Decorative lining from the inside is performed similarly to walls.
Change house: walls
The classic sandwich frame structure has several layers: inner lining, vapor barrier film Izospan , insulation between the racks of the frame (mineral wool), vapor-permeable membrane, spacer bar (for ventilation gap), OSB and decorative cladding.

In practice, the outer skin for a change house can be “simplified” to one outer layer - either OSB (OSB) or decorative trim. Given the low "aesthetic" properties of OSB, the second option is more often chosen, although the plates can be painted in any color like a regular wooden surface.
Most often for exterior finish choose a block house.

It is stronger and “warmer” than lining and is more suitable for outdoor decoration. You can use imitation timber.
As an alternative wood paneling some prefer vinyl siding. It does not require maintenance or refinishing.

Interior decoration can also have an economy option from OSB (OSB) or fiberboard ,

which can be painted or covered with vinyl wallpaper.
But more common cladding with wooden clapboard.

The internal partition must be foreseen while developing the project of the change house, but it is not too late to equip it later. The main thing is that it is attached to one of the floor logs from below and the beam of the ceiling beam from above.
From the outside and from the inside, window and door trims are attached. Corner joints are trimmed from the outside with planks or wooden profiles, and from the inside with skirting boards and fillets.
Finished with sanding wood flooring, primer and paintwork.
Video
How to build a change house out of wood, on a metal frame
Having bought a plot, land, you think about the fact that you need to live somewhere while building a house. Such a temporary home in a summer cottage or garden plot is a change house. A small insulated structure, usually 3x6 or so in size. There are a lot of offers on the market: both wood and metal. But their quality is more than doubtful, the cheapest materials are used in construction. This is easy to verify by calculating the costs that you will incur if you decide to make a change house with your own hands. With the same dimensions, it’s cheaper for you, most likely, it won’t work, and if there is savings, then it’s small. You will consider normal materials, not the cheapest ones. But in terms of quality and durability, home-made change houses are many times superior to purchased ones.

What and how are they built
Almost all change houses are built using frame technology. As building materials for the frame, a wooden beam at least 100 * 150 mm or profiled is used metal pipe 60*60*2mm.
For sheathing, the choice of materials is much wider. Use:
- edged board;
- sheet material - plywood, OSB, chipboard;
- profiled sheet;
- siding.
In any case, sheathing is done on both sides - outside and inside. The outer one can also be metal, but inside they often make either lining or stuff plywood or OSB.

Thermal insulation is laid between the two skins. Although the building is temporary, spring and autumn, and sometimes summer nights, can be very cold. Therefore without warming - in any way. Any heater is possible. Better - mineral wool, cheaper - polystyrene. Extruded polystyrene foam has the best characteristics, but also the highest price. Just when choosing a heater, keep in mind that the foam almost does not muffle the sounds, so that the especially nervous will not be able to sleep. Therefore, the optimal choice is mineral wool. What layer? If wisely, then in Central Russia, preferably 100 mm, but at least 50 mm.
Please note that the floor also needs to be insulated. Especially the floor. The bottom is very tight. Therefore, it should be double: first, a rough one, on top, across the board, they put logs, a heater between them, and then a finishing floor.
Layout and drawings
Despite the fact that the building is considered temporary, it often turns into a bathhouse or a guest house. Therefore, even in a change house there is such a thing as planning. Even temporary housing should be relatively comfortable.
Change house trailer
There are two main types of change houses: trailer and vest. In a trailer-type building, the entrance is on the side, there is no separation inside, in extreme cases they put a partition - 1.5-2 meters from the entrance. This room is used as a vestibule-dressing room and a warehouse for storing tools. This is the simplest possible option.

The drawings will contain graphic and numerical designations, their decoding is in the photo below.

vest
The most popular layout is the vest. This is when the entrance is in the middle. moreover, the middle is fenced off and used as a vestibule, pantry, etc. The purpose of the other two rooms may be different. Someone uses both as bedrooms, someone uses one as a kitchen.


Change house with toilet and shower
Not everyone agrees to lead a Spartan lifestyle even at a construction site or dacha, even temporarily. At least basic amenities are required. Although it's probably better to build them separately.
How to build a toilet on the street read here, but how to do it Summer shower- in this article.


with toilet
Having chosen a drawing, do not forget, when developing a frame for a change house, that racks must be placed at the junction of the walls. If doors are attached to the racks, they must be reinforced - double.
Foundation for a house
Since the structure is temporary and light, the foundations are usually posts or blocks. Mostly blocks. Preferably - concrete, standard. No - you can use any construction, but high density and not hollow.

They are placed on a prepared base. If the soils are normal, you can simply remove the sod and level the sites. For greater reliability, they dig a small pit under each block with a depth of about 20-25 cm. Crushed stone of the middle fraction is poured into it and rammed well. Blocks are placed on such a substrate.
Note! The top edge must be level (be in the same horizontal plane). It is also necessary to check the geometry of the foundation: the angles are strictly at 90 °, the diagonals are equal.
With a change house width of not more than 2.5 m and using a wooden beam for the frame, blocks are placed in each corner, as well as under those places where the partitions depart. If the building is without partitions, the spacing step - every 1.5-2 m - depends on the cross-section of the timber and the planned sheathing, as well as the weight of the roofing material. With a width of 3 m or more, an intermediate beam is required, and a base for it. In this case, three rows of blocks are obtained.

To prevent dampness from entering the premises, waterproofing is laid on the blocks. It is possible - two layers of roofing material, it is possible - another waterproofing material, even a film. Another option is to coat with bituminous mastic. On this, the foundation can be considered ready.
Step-by-step instructions: photo reports with explanations
It is difficult to understand some things from the description. No matter how much you read, but until you do it, or at least look at how others do it, you won’t understand. That's why photos of the construction of change houses are useful: you can see how the nodes were made and find a solution for yourself. This is a kind of guide for those who decide to build on their own.
Construction of a wooden cabin
A change house was built from wood in the country. Dimensions 3 * 6 m, insulated - for temporary residence during the construction of the house. Used the following materials:

Since the prices of materials are very dependent on the region, it makes no sense to talk about the cost of construction. But according to this list, you yourself can determine with fairly high accuracy how much a change house built by yourself will result.
Please note that this list does not include roofing material (ondulin was planned) and there is no glass. Also, lining for interior decoration was not purchased.
Before the start of construction, all wood, with the exception of the lining, was treated with Senezh Ultra antibacterial impregnation. Coated in two layers. So the quality of processing should be normal.

The site for the building has been marked out. We decided to put the blocks on the sand bed. They dug holes with a depth of 25-30 centimeters, poured sand, tamped. Set up blocks. First, they put out the two extreme ones, put a flat board on them, and a level on it. So put the extreme blocks. Then intermediate boards were adjusted to the height of the board. So on all sides.


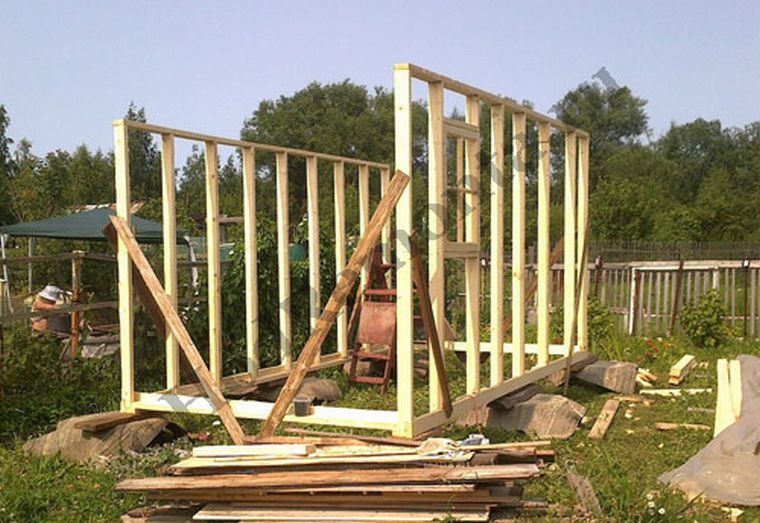
The next step was laying the floor joists. They were put in 50 cm, we will put racks through one. Made from a board 50 * 100 mm, placed on a narrow part.

We decided to immediately assemble racks with rafters on the ground, strengthen the joints with corners, and then in ready-made install. Collected from the same board 50 * 100 mm.


They nailed the racks with long nails. Then, for reliability, all attachment points were reinforced with corners and plates. They were already planted on self-tapping screws.
Bars 50 * 50 mm were nailed on the sides of the log. It turned out "nests" for laying foam. He was placed on mounting foam: and hermetic and reliable. A floor board was nailed on top.


Now the sheathing has gone directly. A lining of packs of 3 meters went to the short side, six meters were nailed to the long ones.

Having made the skin up to half, they laid the crate under roofing. They nailed a board 25 * 150 mm in increments of 30 cm, along the edges a pitch of 20 cm (so that the overhang could withstand). Then we continued with the trim.
In the places where the windows will stand, they put mortgages - a board that lies across the rack. The window frame will rest on it. They fastened with nails, through and through, but additionally the connections were reinforced with corners.

When the back and blind side walls were sewn up almost to the top, roofing material was rolled onto the roof. He will lie until we buy ondulin.


The outer casing is almost ready. Doors bought without finishing - only a frame upholstered with fiberboard

While we were finishing nailing the lining on the outside, work was also in full swing inside - they put foam. The width of the sheet is 100 cm, the distance between the posts turned out to be 95 cm. Thin strips have to be cut off.

So that it does not “fall”, we grab it from above with thin corners, which we attach, of course, only to the bar of the rack.


We started lining the inside, but the lining ended. While switched to painting the outside. It turned out well, it seems.

We bought the lining, finished the interior decoration.

Inside, they were also upholstered with clapboard. The beginning of the lining of the ceiling with clapboard. This is how the wall looks in the final version
Lining inside is covered with water-based varnish. It gives only a light tint in a little more dark color. Films on wood seem to be non-existent. If you look directly, it generally seems that the tree is not covered with anything. Only if you look from the side at a certain angle, you can see the shine.
On the floor, the varnish is already with a film: so that the wood does not wear out. Coated in two layers.
After we started finishing the overhangs. They were all sewn up with the same clapboard. In general, work with lining took the most time.


Metal frame for shed
Metal was chosen as the basis as more reliable and durable. The idea that the change house may have to be moved also played its role. If the frame is made of metal, nothing threatens her.

The dimensions were determined based on the length of the corner whips: 11.7 m. The following dimensions emerged: 2.8 * 5.8 m, height - 2.5 m. The frame was welded from a corner with a shelf of 75 mm, 6 mm thick.
The foundation is made on self-cast columns: construction began in autumn, and there is still nothing more to be done. So it was decided to pour reinforced posts: six pieces. First, the site was marked out, after which the places for the foundation columns were determined.

Holes 50*50 cm were dug, the total depth was about 30 cm. Crushed stone was poured into the bottom with a layer of about 10-15 cm and compacted tightly. From above, the same amount of sand, also with a rammer. As a result, the backfill came out on the same level with the ground.
Roofing material is laid at the bottom so that moisture does not leave the concrete, and it “matured” normally, and did not dry out. Next, the formwork was assembled and the reinforcement was laid in it.

The site is dry, the water drains normally, so there shouldn't be any problems. I just mastered welding, so the fittings are either welded or twisted - it is not clear.

Everything is filled with concrete, covered with a film: the end of October, and in order for the concrete to be of a normal fortress, it needs to be wrapped.

The frame frame was cooked for a long time - all winter: frosts, workload, did not allow to act with the desired frequency. The base was cooked from a corner of 75 mm, 6 mm thick, 40 * 2 mm were used for reinforcement.

The beginning of the frame of a change house from a metal corner - the lower harness
The side parts were cooked as a whole, then with the help of 4 people they were placed in a vertical position and so fixed. On the racks to which the window frames and doors will be attached, profiled pipes 40 * 40 * 2 mm went.

The most inconvenient moment is to measure the diagonals alone. You have to constantly control them, and doing it alone is inconvenient. But everything must be set, otherwise it will be skewed.
To give greater rigidity, I welded strips of metal in the corners. I received them by opening a corner (40 mm). It was possible to buy a strip, but I used corner trimmings.

Stripes for rigidity in the corners of the frame We weld the plates in the corners: at the top and bottom

We weld a few beams at the top. Now the frame for the change house is "iron"

Now the skin remains. It can be anything: even the same lining, block house, even an economy option - plywood and OSB. To attach the bleaching to the corner, it is more convenient to screw the timber, and to it already attach the crate and everything else. The same situation for truss system: around the perimeter, a bar is screwed onto self-tapping screws with preliminary drilling, rafters are attached to it.
Related videos