How to properly assemble the roof of a house with an attic. We make a mansard roof with our own hands. Mansard roof construction: video tutorial
The mansard roof is one of best ways increase total area your home, with minimal financial outlay. By erecting a similar design, you get an additional fairly spacious room, which can become a good nursery or yours. personal account. You can also just invite guests there, in general, there are a lot of options for you to choose from. Equipping it, you need to be prepared that everything is important to do correctly and step by step. The mansard roof itself is a converted attic, its creation requires a structural approach to the overall redevelopment, roofing and thermal insulation. Mansard roof construction country house, almost does not differ from the construction of a conventional roof. Below we will carefully study how to properly build a mansard roof with our own hands.
First of all, you need to consider the advantages and disadvantages of such a roof, in order to finally decide whether to proceed with its construction.
Advantages and disadvantages of a mansard roof
The advantages of mansard roofs include:
- additional room. As we have already discussed above, the main advantage of the attic is an additional spacious room that you can equip as you like according to your taste;
- moderate financial costs. The second factor of such a floor is the relatively low cost of its construction. Indeed, the construction of an attic will cost you much less than adding additional rooms to the house due to the general expansion of the area of \u200b\u200bthe house;
- view from the window. Beautiful view from the attic window will not leave anyone indifferent, since a view of the world from a height is always beautiful.
To disadvantages attic floor it is possible, perhaps, to add the need for additional heating. On the video you can clearly see the construction process:
Types of mansard roofs
If you decide to start building an attic roof, then first of all you need to start by designing how your work will look like in the end result, and also how exactly to implement your plan. The main decisions regarding the type of roofs must be made taking into account design features Houses.
The main types of roofs include:
On the video you can see how the mansard roof is being built:
Below we consider the device of this roof, which you can build yourself
Attic device
Mansard roofs are very similar to simple ones. pitched roofs. Each type of such roofs has its own design features, but in general they all have common elements, consider them:
- Roof. The surface of the roof, which is outside, serves to protect against rain, snow and other bad weather;
- Crate. Basically, these are wooden boards, a roof is attached to them;
- Skate ride. The outer part of the entire roof structure;
- Rafter. These are layered or hanging stiffeners of the entire structure. For the attic, it is the layered rafters that are used;
- Internal supports. Vertical beams serve to ensure the strength and stability of the roof;
- insulating layer. Between the walls of the premises and the roof is placed insulation cake from several layers, which allows you to observe temperature regime throughout the attic. Insulation includes soundproofing, vapor barrier, as well as a thick layer of thermal insulation. Of course, the safety of the roof itself directly depends on the correct insulation of the roof.
Video to help you get started:
Attic construction. Technology
Quite often, architects, when designing a roof, lose sight of significant errors in ventilation and insulation. These mistakes are fraught with the fact that mold, fungus appears on the roof and, in general, it begins to leak in just two years. This happens because the attic construction technology is violated. Due to the fact that it is strongly pressed against the wall inside the room, it is very difficult to achieve good heat transfer. The entire structure of the attic should include good ventilation, thermal insulation, as well as a truss structure, which will be made of wood treated with fire retardants.

The thickness of the thermal insulation should be at least 20 cm, since the climate in our area is quite cold in winter, and in summer period hot enough. The main disadvantages of the attic design are that a lot of heat is lost in winter, and it is very hot in the attic in summer. Proper thermal insulation able to fully solve this problem, it will keep the heat inside in winter period, and will not allow a large number of warmth in the intense heat of summer.
It is also necessary to properly equip the ventilation of the roof. In summer, at a sufficiently high temperature, the roof tends to get very hot, this process significantly increases the temperature inside the attic. Properly installed ventilation guarantees comfortable accommodation indoors, as well as protect the roof from damage in the winter. Soundproofing is necessary in order to reduce the noise level inside the attic when there is hail, rain or strong gusts of wind outside.
Important! Laying any type of insulation is preferably paired with a person with experience in this matter.
Step-by-step construction of the attic
Well, it's time to consider how you can build this roof step by step with your own hands. To build an attic, you will need some experience in such work. To build an attic is much harder than a regular roof, since the angles of the slopes must be observed. To learn how to build such a floor with your own hands correctly, you need to carefully study the work plan:
Of course, you should start with the development of the floor itself. A specialist can help you with this or, if your computer knowledge is at a sufficient level, you can do everything yourself in a special program. Next, you absolutely need to correctly calculate the slopes of the roof angles, loads, etc. To do everything correctly, you need to carefully study a book such as "Loads and Effects".
Advice! To understand everything correctly, the book "Loads and Impacts on Buildings and Structures" will help you, ed. Perelmutera A.V. 2007 or ed. Gordeeva V.N. et al., 2008 or 2009, which can be downloaded from http://dwg.ru/dnl/4183
How to make the rafters correctly will help the video:
How to build a truss frame
At this stage, you will have to work hard and for the quality completion of the task, you need at least 3-4 employees. We begin the construction of the roof by laying and fixing the Mauerlats over the entire area of \u200b\u200bthe house. In this case, a bar with a section of 100x100 mm is used.
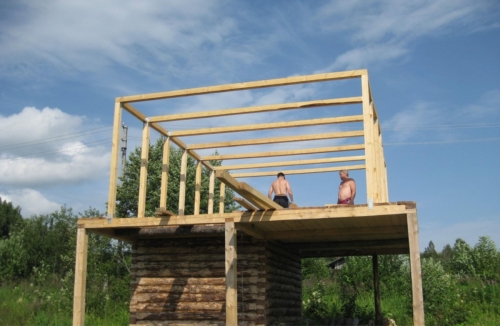
This should be followed by installing the frame of the room, its racks will be used as supports for the entire truss structure. The sections of the beam must correspond to the sections of the longitudinal beams, because the racks will rest on them. To begin with, vertical racks must be installed on both sides of the building. They need to be fixed to the longitudinal beams, using self-tapping screws and metal corners.
Advice! A screwdriver will greatly facilitate the process of working on fasteners.
So, we got two arches, a cord should be stretched between them, if its direction is strictly horizontal, then this will mean that everything is done correctly, if not, then one of the arches will have to be shortened a little. Next, with the desired step for the rafters, we put the following arches strictly along the cord. With the help of jumpers we fix the arches, and to fix the jumpers themselves we use special stamped corners.

This is followed by the installation of the upper rafters, and this is quite a difficult job. They must be installed at certain angles and centering, and this is the whole difficulty. Make a template out of two boards, they should match exactly with the connected rafters we are planning to make. When using this template, you should cut the rafters that are on the ground, and then put them in the right place. Installation of rafters takes place in the same way as in the construction of the interior.

The installation of the truss structure ends with the need to nail the crate. The material from which it can be made is plywood, chipboard or simple boards.
How to equip a room under the roof, you can see about it in the video:
How to insulate a mansard roof with your own hands
After the installation of the battens and rafters is completed, we can proceed to the insulating layer. The vapor barrier is laid on the inside of the roof, for this we attach it with brackets to the rafters. This is followed by the installation of thermal insulation. It is necessary to carefully monitor that the thermal insulation layer is tightly laid on the surface of the rafters. There should be no gaps, otherwise it will lead to very negative consequences in the future. The crate is attached to the thermal insulation with a step of 50 cm.

Waterproofing is laid outside the rafters, its direct function: protection against moisture ingress inside. A roof is laid on the surface of the waterproofing.
Attention! When administering construction works safety precautions must be strictly observed.
How to build an attic with your own hands can be seen in the video:
I think you have noticed that the construction of the attic is quite a serious event. The durability of your creation depends on how responsibly you approach the matter.
There are many examples of what a mansard roof might look like. Among its varieties, everyone can choose something of their own. If you need sufficient daylight, a large window can be installed. Attic shapes can be rounded or with strictly right angles and lines. Whatever choice you make, the approach to this matter must be serious and well thought out.
Many male people, finding a family, sooner or later think about purchasing their own home. Someone takes an apartment on a mortgage, and someone saves money for. But save up for big house not many succeed and the alternative would be to build a house with.
What is a mansard roof
The attic can be built from or from a suitable material for you.
It will not be difficult to build an attic, but patience, diligence, suitable materials and availability of tools.
The shape and design of the roof must be included in the design of the house in order to avoid incidents during further operation.
 You can take to build a house with standard project or order it from professionals. In such documentation, you will be able to understand where to start and choose the right materials for construction.
Now you can buy everything you need, but first equip a place to store building materials and tools. The storage area must be dry and free from rain or snow to damage the building material.
Also, under a canopy, it will be possible to equip a small workshop for the manufacture of some parts of the house or roof. For a house from or who does not have the opportunity to build a full-fledged second floor, the choice mansard roof will the best option. House of will budget option. Next, we will consider the attic device.
Structural elements of the attic in design are practically no different from gable roofs.
Materials required for the construction of a mansard roof
The roof is the outer covering of the roof, it protects the inside of the attic and can be made of various materials.
For roofing, as a rule, such materials are used:

Stages of building a mansard roof with your own hands
After getting acquainted with the names of the roof device, we can continue to further disassemble the construction in stages.
First stage
The construction of the attic always begins with Mauerlat mounting.
 When building on a stone box, you need to think about fixing with studs or anchors at a distance of no more than two meters.
At the locations of the anchors, the timber is marked, a hole is made in it and put on the anchor, then the Mauerlat is fixed with nuts to the wall.
To simplify the marking, it is necessary to put the beam on the anchor and lightly walk with a hammer on top, after these manipulations there should be traces, they will be places for drilling holes.
 Second phase
The second stage in the construction of the attic will be the installation of floor beams.
Actions must be consistent.
First of all, the extreme beams from the ends are installed, then the intermediate ones. Between the intermediate and extreme beams, it is necessary to pull a nylon cord or scaffolding, or you can still use a level. These devices are needed to indicate the plane.
Third stage
 We install, align in a vertical position and fix the support posts.
We strengthen with jibs and make horizontal runs.
It should be borne in mind that the racks are placed in equal numbers with the floor beams on two parallel sides of the attic.
The rigidity of the supporting structure is provided by horizontal runs.
 Fourth stage (truss system)
The details of the truss structure prepared according to the template are installed according to and fixed to the vertical supports.
Elements can be fixed using boards or metal plates with holes.
Fifth stage (pediments and crate)
W  we sew the gables, leaving room for, we attach the sheathing boards all over the roof. This is the most simple work during the construction of the attic.
Sixth stage
So we have almost come to the end of construction and this is the insulation of the mansard roof with our own hands.
AT modern construction use a variety of materials for insulation and, you can buy them at any hardware store.
final stage
 After the roof is covered with a roof, we lay the drainage system, it is she who will give the finished look. Of course, this is not quite the finale, because you will have interior finishing work, but this is not the subject of this article.
The cost of building a roof is 25-35% of the cost of building the entire house, and the cost of work is 50-80% of the price of materials, so if you build a mansard roof with your own hands, then the savings can be 15% of the total estimate.
Mansard refers to any roof under which there are rooms suitable for habitation in height (attic, or attic floor).
The device of a mansard roof is a complex and painstaking work.
In industrial construction, the installation of the roof is carried out when the drawings display each node, the fastenings of the parts and the parts themselves with the dimensions taken out.
Builders do not think about the roof device, about whether the load is calculated correctly, their task is to build a frame by sawing out templates of parts and fastening them together, while the system for fixing the roof elements is also indicated.
To figure out how to make a mansard roof, you will have to study the video, photo and master the theoretical part.
Comfortable ceiling height for living quarters from 2.5 m and above. The walls of the attic floor are most often roof slopes, so it is necessary to ensure their thermal insulation.
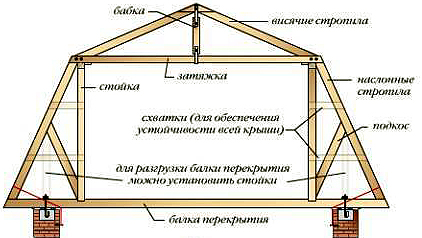
The top of the mansard roof is a ridge, a beam that lies parallel to the plane of the floor of the house, and is the highest point of the roof. The ribs of the roof are called rafters.
Ridge (upper) rafters descend from the ridge. Attic floor beams connect the bases of the left and right ridge rafters of the same roof section.

Racks (bars with a section of 100x100) are fixed on the interfloor ceiling at a right angle at a distance of 0.8-1.5 meters from the outer wall.
The higher the racks and the closer they are placed to the walls of the house, the larger the attic living space will be.
The side (lower) rafters go from the attachment point of the attic beam to the Mauerlat. Each section of the mansard roof consists of two ridge rafters and two side rafters on each side.
The system of the rafters of the same name forms a slope - ridge or side.
The most used version of the mansard roof is a broken gable roof. In this case, the ridge and side rafters form an obtuse angle at the connection points.
If they lie on the same straight line, then outwardly it looks like a classic gable roof.
When calculating the slope of the slope, the materials of the future roof and climatic conditions are taken into account, it can range from 15 to 45 degrees. The greater the slope, the less snow will linger.
In regions with little snow, the sloping roof of a house can be quite flat.
The standard slope of the slopes is 30-35 degrees.
Preparatory work
A mansard-type roof is planned even before laying the floor between the first and attic floors.
If you use wooden beams as a floor, then you need to provide for the cross section of the beam and the distance between the beams so that they can withstand the permissible load for a residential second floor.
Usually these are beams with a cross section of 150 cm and above with a length of 6 m. Such beams are located at a distance of 80-90 cm from each other.
The system is such that the longer the beam, the more load it will experience in the middle. The pressure will be created by the floor of the attic floor itself, the furniture and, in fact, the residents.
Even if the attic is planned for unfurnished lounges, floor beams with a cross section of less than 120 cm, laid at a distance of 100 cm from each other, are undesirable.
A reliable device will provide the right materials for the mansard roof.
The heavier the roofing materials will be, and the longer the frame of the sloping roof, the larger the cross section is needed for the timber from which the frame can be built.
Usually, sections 60x120, 60x100 cm are used.
In many photos, there is no reinforcing belt device along the external load-bearing walls when a sloping roof is planned.
The weight distribution system is such that the entire weight of the roof rests on the floor beams, and they, in turn, transfer this and their weight to the walls.
The gable roof of a one-story building is much lighter than a broken mansard, so a Mauerlat is enough ( wood paneling along the perimeter of the walls below the floor beams).
If the walls are made of timber or brick, then the Mauerlat will make sure that the mansard roof device is reliable. It is important at the stage of building walls to provide a device for fixing the Mauerlat.

The system must be reliable. In the case when a hollow cinder block or porous foam concrete is used as a material for the walls, it is difficult to secure the Mauerlat to the wall.
A good solution would be a reinforcing concrete belt, in which, at the level of pouring, rods are placed to install the Mauerlat.
It is placed on a substrate of roofing material or other insulating material and aligned with the inner edge of the wall.
Before fixing, make sure that the bars forming the Mauerlat lie strictly parallel. Even a deviation of 2-3 cm will cause the slope to sag.
If the house is up to 6 meters wide (the maximum allowable size of an unsupported interfloor beam), then the floor beam rests on the Mauerlat with both edges.
If the width of the house is more than 6 meters and the house has load-bearing walls perpendicular to the floor beams, then the floors are installed according to the following system: one edge of the beam is attached to the Mauerlat, and the second to the internal load-bearing wall, on which the Mauerlat is already installed.
In continuation of this line, the next beam from inner wall to the opposite outer Mauerlat. The gap between the beams should be at least 3-4 cm.
If the preliminary work is done correctly, then you have received a completely finished floor between the first and attic floors. Now it's time to draw the future frame.
Start studying the theory with a photo of a sloping roof and with a video that shows the installation of a mansard roof.
Draw the house from the front side, the racks on the left and right, bring out the rafters and calculate the angles of inclination. Increase or decrease the height of the posts to change the slope of the slope.
Calculate the length of the rafters (the cosine of the angle of inclination multiplied by the distance from the rack to the projection of the ridge - for the ridge slope, and the cosine of the angle of inclination of the side slope, multiplied by the distance from the Mauerlat to the rack - for the side rafters).

Watch the video various options fastening the bars to each other. High-quality fastening will provide a reliable frame.
If climatic conditions overload the high sloping roof with winds, and the width of the house does not allow much space for unused space behind the racks, then you can reduce the height of the racks and, after construction is completed, install built-in wardrobes around the entire perimeter of the side walls of the attic.
Frame assembly procedure
Make the roof frame only from high-quality wood. The main sign of a "stale" tree is a dark color.
If you can not buy dried in drying chamber wood, then get raw, but still at the stage of building walls.
Fresh wood cannot be used for the frame - under the influence of loads, it will lose its shape and bend.
Raw timber can be dried naturally in one and a half to two months.
To do this, we lay it out clearly in level with a distance between the bars of up to 5 cm. No two bars should touch. Every 75-100 cm, the beam should rest on a flat surface.
As support points, you can use a cinder block laid out on a flat area, but in no case should you use another beam intended for the frame.
In sunny and warm weather, the bars dry naturally, and in rainy weather they need to be covered. The manufacture of the frame is allowed only from completely dried wood.
Start the installation by making sure that the racks and rafters are straight wooden bars and there are no cracks or knots.
Pattern-sawn wooden blanks of the same type must be processed fire fighting agent and a mixture that prevents the formation of fungus.
Processing should be done twice with an interval of 1-2 days. Installation can begin when the tree has dried after the treatments.
The procedure for assembling the frame step by step:
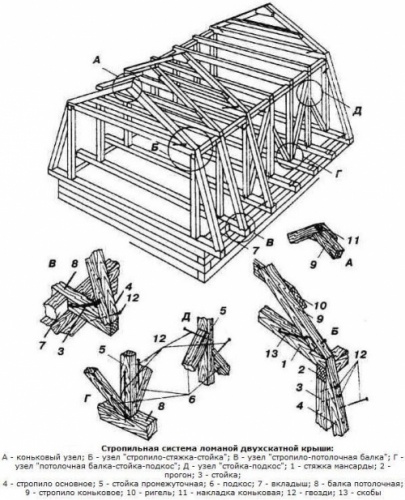
- Rack installation. On top of the floor beams, we put 5-6 boards, 5 cm thick, without fixing. They form a floor on which you can safely move. Beams of the same size are installed on the floors according to the level. First put extreme. Be sure to make sure that the opposite distances between the racks are equal. Then a cord is stretched between the extreme bars. It performs the function of the level at which all others are set. A harness is placed on top of the racks and fixed. Now we have a rectangle in which all other supports are mounted. To reduce the precariousness of the design of the rack, it is necessary to unfasten it with jibs to the floor beams. It is the racks that are the weakest point in the frame system, so we will pay special attention to fixing them. The rack with the floor beam must be fixed with a construction bracket of size 12-14. When all the racks are installed, wedge them with an overlap using a beam with a section of 50-60 cm. It is worth additionally fastening them on the outside with each other using an unedged board;
- Installation of upper slopes ( gable roof). At the top, the rafters are fastened together with brackets. The ridge rafter rests on the strapping of the racks and is fixed to the beam of the attic floor. Installation of the upper triangle of the attic must be carried out only on the ground and lifted completely finished structure. The triangle is laid on the racks and attached to them with brackets. As soon as the installation of the second triangle is completed, it is necessary to connect them in several places to each other. When all the structures are exposed, you can fix them with a crate;
- At the top of each side rafter, a groove 3-4 cm deep is cut out, and the racks are tied into it. The angle of the groove is equal to the angle of inclination of the slope. A groove is also made at the bottom of the side rafter for installing it on the Mauerlat. Due to these two grooves, the unloaded rafter can stand without fixation. Before applying the load that the crate will carry, you need to fix the side rafter with a bracket to the strapping and to the Mauerlat. Additional fixation should be carried out with self-tapping screws, twisted at the attachment points of the rafters, at an angle;
- Lathing - edged or unedged board or OSB plate- fixed to the rafters with self-tapping screws. The edges of the slopes should be even. The distance between the components of the crate depends on the roof. For slate, a distance of 3-4 cm is allowed, and for shingles a solid crate is required;
- It remains to build the gables and insulate the slopes and the broken mansard roof is ready.
Take photos and videos as you go through each step. This will help to understand the errors in case the result obtained does not satisfy you.
To work you will need tools:
- hammers of different sizes;
- screwdriver;
- a circular saw;
- pliers and small carpentry tools.
You will also need consumables:
- staples size 12 or 14;
- wood screws 45-50 cm long for battens and 150 cm long for additional fixation of rafters;
- hydrobarrier;
- construction stapler;
- as insurance - the installer's belt.
It is better to call 2-3 assistants for help (it is really possible to cut the cut yourself on the ground, but the installation of structures at a height cannot be done alone).
The device of the attic in an individual house is a fairly common phenomenon. This construction method reduces the cost square meter and create pretty interesting room in the roof space. In order to properly perform the device of the attic floor, it is necessary to study the basic requirements for it and choose the right type of roof and its slope.
What is an attic
According to regulatory documents, the attic floor is the volume under the roof, which is used to accommodate residential and utility rooms. At the same time, the height of the outer walls should be no more than 1.5 m in the general case, otherwise the space will be considered a full-fledged residential floor.
A do-it-yourself attic is beneficial both during construction and during the operation of a private house. In the first case, costs are reduced due to the fact that the height of the vertical enclosing structures is reduced. The roof takes on this function without ceasing to fulfill its original purpose.
An attic is an under-roof space that can be equipped as a separate room for living.
In operation, cost savings can be as follows:
- Decreased space to be heated, consequently, there is a reduction in heating costs, which are an impressive item in the cost of utilities.
- After the construction is completed, the house must be measured by specialists from the BTI, after which a passport of the object is issued. It is on the basis of the area values \u200b\u200bgiven in it that taxes are calculated and payment is made utilities(subject to connection to centralized systems and the absence of metering devices, which is now practically not found). The area of the attic floor is included in the area of the whole house with coefficients of 0.7 or 0.8 depending on the height outer wall and the angle of inclination of the roof, which allows significant savings throughout the entire life of the facility.
Preparatory stage
It is worth starting construction with the development of a project or diagrams on which the future structure will be drawn. Most often, the roof that is used for the attic floor is gable, but it is also possible to use a hip four-pitched roof. The gable design makes it possible to provide full-fledged windows in the gables.

In the case of using a hip to illuminate the premises, it is possible to install only attic window openings. This option can become more time consuming in terms of installing roof elements and designing interiors. Cost reduction with a hip roof is achieved due to the absence of gables (especially savings will be noticeable in brick house, where the cost of materials and the installation of wall fencing is quite high).
Do-it-yourself attic construction begins with determining the geometric dimensions and shapes of the roof. Earlier it was already said about the choice of the type of truss system at home (gable, hip), after which it will be necessary to decide whether the slope will be straight or broken. The broken structure has such disadvantages as increased cost and labor intensity. Its use is justified by the need to increase the height of the room by changing the angle of the roof.
At the design stage, the optimal slope of the roof is determined. Its choice depends on ergonomic considerations and the roofing material used, which imposes limitations.
Before making an attic, it is also necessary to calculate all its load-bearing elements for strength and bending, select the composition of the roof pie, perform thermal engineering calculations and decide on the materials. More on this later.
Main bearing elements
The design includes the following components:
- rafter legs, which transfer the load from the weight of the roofing and the wall to the walls of the house. The section is selected depending on the angle of inclination, span, step and design load. A professional can correctly perform a detailed calculation. For private construction, approximate values \u200b\u200bcan be used, while it is best to provide a small margin.
- Narozhniki- these are rafter legs, which, on one or both sides, are supported by slanted ones. The cross section is calculated in the same way as for rafters.
- Slanted legs- a design that is used in a hip roof. This element serves as a support for the sprigs. The cross section is taken depending on the load and the span, in any case it should be larger than that of the rafter legs.
- Mauerlat- an element that serves as a support for the stops and transfers the load from the roof to the walls, evenly distributing it. It will be correct to choose a section with dimensions of 100 by 100 or 150 by 150, depending on the complexity of the object. Mauerlat is not installed during the construction of frame and wooden houses, since in this case we play the upper crown of the walls or the strapping in its role.
- Rigel- a beam, which is also a support for the rafters, but already in the upper part. The crossbar is installed in the ridge of the roof or at the break of the slope, in case of a broken structure. The cross section should be taken depending on the conditions, as a recommended value, dimensions of 200 by 200 mm can be given.
- Struts, racks, fights – additional elements to unfasten elements. They are used to reduce the cross section of load-bearing structures. Their cross section is most often chosen constructively. At the same time, it is important to take into account the convenience of making connections.
A do-it-yourself mansard roof should be built starting from the selection of sections of all elements of the roof frame. The material for manufacturing is selected taking into account the following conditions:
- wood should be conifers(pine, spruce, larch);
- material grade - first or second;
- humidity not more than 15%.
Be sure to treat all boards and bars with antiseptic compounds before starting construction.
Thermal engineering calculations

To keep the heat in the house, you will need to choose the thickness of the insulation. Most often, mineral wool is used for attic rooms (more often in slabs than in mats). It is also possible to use polyurethane foam, polystyrene foam, extruded polystyrene foam and ecowool. Having determined what to make the heat-insulating layer from, select its thickness. It is important to consider the height of the rafters. It must always be equal to or greater than the thickness of the thermal insulation. For mineral wool it will also be necessary to provide a ventilation gap of 50 mm between the upper surface of the heat insulator and the roofing. If the cross section of the rafters is small, then in order to fulfill this requirement, a counter-lattice is installed.
Before you build a mansard roof with your own hands, you can calculate it according to heat engineering manually, guided by the Joint Venture "Thermal Protection of Buildings". But it is better to turn to special programs for help. In order to correctly calculate the thickness in the Teremok program (freely available on the network), you need to know the thermal conductivity of the insulation and the area of \u200b\u200bconstruction of the house, the program will find the rest itself.

A do-it-yourself mansard roof differs from a conventional pitched roof only in the presence of thermal insulation. More layers are also added to the cake to protect the insulation. Below step-by-step instruction will allow you to correctly install the elements of the mansard roof.
The procedure is as follows:
- fastening the Mauerlat to the wall;
- installation of rafters and systems of struts and racks;
- installation of waterproofing and wind protection;
- crate;
- roofing;
- warming;
- bottom trim.
Assembling the roof frame
Installation begins with a Mauerlat. It is laid on the inner grant of the outer wall. Fastening depends on the material of the load-bearing walls, but in general it can be done in several ways:
- on staples;
- on studs;
- on the anchor.


For fragile materials of the walls of the house, such as aerated concrete and foam concrete, a monolithic belt is made along the edge, which will prevent the destruction of the walls. For wooden and frame houses Mauerlat is not provided.
Next, you need to install the crossbars, if any. After the supporting structures are laid, the rafter legs are laid out. The fastening of the rafters to the Mauerlat can be rigid and articulated. It is better to do it with the use of cutting and fixing with metal corners on both sides.

This is a fairly old album, so nails are used as fasteners in all the drawings in it. It is better to replace them with studs. The design of the roof of the house in this regulatory document is shown in great detail, so it is recommended that you familiarize yourself with it before starting work.
Before starting the installation of insulation in the house, it is necessary to ensure its protection from negative influences. environment. To do this, a moisture-windproof membrane is spread over the surface and the crate is fixed. After that, the roofing is mounted, taking into account the recommendations for the selected material. For example, bituminous shingles require a continuous crate, which is most often made of moisture resistant plywood.

Installation of thermal insulation
To perform the insulation of the house, you need to install a heater without gaps and cracks. For mineral wool, it will be easier to install if the distance between the rafters is 580 or 1180 mm clean. This will allow you to lay the material with a slight expansion, which will prevent cracks.
When using expanded polystyrene, the distance between the plates and rafters is filled with sealant or mounting foam.
After laying the insulation, you need to fix the vapor barrier to it from below. After that, the lower crate and ceiling lining are mounted. For the attic, sheathing with two layers of drywall 12.5 mm thick along the frame is best suited, followed by finishing.
During the operation of a private house, country cottage or country house, often the question arises of increasing living space. It is usually solved by means of an extension or add-on.
Building a house is a tricky business. In addition, the residential extension has one significant drawback - it “steals” the usable area of the site.
Therefore, a popular way to expand the living space of an individual house is to build a second floor or attic, i.e. attic roof. The design of the mansard roof allows you to use the resulting space as a living space.
What is better attic or second floor
The following facts speak in favor of the attic: the cost of construction is lower, the best insulation living space, less load on the foundation. In general, the attic is the highlight of the house, giving it a certain flavor.
If in essence, then a full-fledged 2nd floor is more practical and easier in terms of implementation than an attic one. It all depends on the situation, if the house is being designed, then it is better to immediately provide for the second floor, because. arranging an attic is a more troublesome task. And if the house is residential and has a mansard-type roof, then it would be reasonable to equip a living room in it instead of an attic "for the right things."
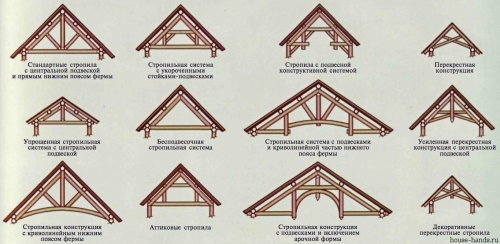
Types of mansard roof
 The optimum angle of inclination is 40°. The slope should be located on the leeward side. Allows you to equip a small attic above the attic. Due to only one acute angle, the usable area of \u200b\u200bthe room increases.
Double pitched mansard roof
 A simple gable (pitch or gable) consists of two slopes connected at a certain angle. The advantage of a gable roof is the ease of manufacturing the rafter part and finishing. The disadvantage is the appearance of a "deaf" area (at the junction of the roof to the wall), which is usually not used. Often attic with gable roof erected along with the walls. A 45° pitched roof is ideal for houses up to 6m wide.
 Asymmetrical gable roof. Private house with such a roof will be original and functional at the same time.
The complexity of building a roof with asymmetrical slopes is to carry out calculations.
 Broken mansard roof. Its difference is that each slope has two components. The sloping roof device allows you to get a higher attic room. And also reduce the unused area. Such roofs are the most common, due to the possibility of attaching a garage or a summer kitchen under one roof.
Four-pitched mansard roof
 Hip mansard roof. In this design, the roof slopes play the role of walls.
 One of the varieties of hip mansard roof is Danish hip roof. Its construction is distinguished by the presence of gables, which allow you to mount ordinary windows (dormer windows) rather than roof windows.
 Semi-hip mansard roof (two-slope, four-slope). A complex design, low slopes protect the gables of the house from precipitation.
 Pitched roofs can be single or multi-level.
 Non-standard solutions are also quite possible for a mansard roof. Their device requires careful calculation of loads, stability, etc. Without special education, installation is difficult, so the cost of work is higher compared to classical designs.
Some examples of the original mansard roof are in the photo.
We have decided on the types, the question remains how to make a mansard roof with your own hands.
Brief instructions contain the main stages of work and draw your attention to some of the nuances of their implementation.
Stage 1 - Design and calculation
Choice appearance mansard roof, and the calculation of its parameters is made taking into account such factors as:
A reliable assistant in the calculations will be SNiP 2.01.07-85 "Loads and Impacts".
Nuance. The larger the angle of inclination, the lower the height will be. attic space(minimum ceiling height of a room on the attic floor is 2.2 m). Accordingly, the smaller the angle of inclination of the mansard roof, the larger the area of \u200b\u200bthe room will be. If the slope is insufficient, then precipitation can collect on the roof, which will lead to additional loads on it.
Closer attention is paid to the calculations if a non-standard mansard roof is being built. For example, an asymmetrical gable mansard roof has a displaced center of gravity. This affects the uniformity of load transfer to load-bearing walls and foundations.
At this stage, such an issue as a way to access the attic floor is also solved. The choice of the location of the stairs to the attic is an important decision. The internal location allows you to use it at any time of the year. External allows you to save the usable area of the lower floor.
Advice. Ceiling folding ladder for the attic floor is the most economical option, but the least practical.
Mansard roof truss system
The choice of truss system is influenced by:
- attic dimensions;
- span parameters;
- roof shape;
- construction of the first floor;
- location of load-bearing walls and additional supports;
- roofing weight.
Mansard roof truss system design
There are two types of roof rafter system with an attic:
- hanging rafters. The walls of the house serve as the basis for the rafter legs. During the construction of hanging trusses, a mauerlat is not always installed (depending on the wall material);
- layered rafters. In this case, it is necessary to build an additional support. Which is used as a ridge run or an attic wall reinforced with reinforced concrete. The device of a layered truss system is allowed with a distance between the bearing walls of up to 7 meters.
The structural difference between the device of the roof with hanging and layered rafters is shown in the diagram.

When building a mansard roof, a combined type is more often used - hanging rafters on top of the system, and layered on the sides.

At the same time, drawings are necessarily made indicating the location of individual elements and the distance between them. An example is shown in the figure.

The material was prepared for the site www.site
Calculation of the rafter leg for the mansard roof
The choice of wood species and the rationale for its optimal thickness.
The amount of material required for the truss system depends on its type and all the factors listed above.
Nuance. The gap between the rafter legs depends on the lumber used.
The step of the rafter legs under the mansard roof will be 60-90 cm.
As a material, glued timber (80x80, 100x100 mm), a board (for slate and metal tiles section 50x150, for ondulin 50-200) can be used.
Nuance. The length of the spans increases the diameter (section) of the rafters or reduces the gap between them.
As for the breed, it is recommended to use pine. Its wood is characterized by high strength, flexibility, ease of processing, and the absence of knots. Commercial wood must be at least grade 2. Solid beams can be replaced with glued timber, it has higher quality characteristics.
The thickness of the board for the manufacture of rafters (section of the rafter leg) must be at least 50 mm. The width of the board for the rafter leg is from 150 mm (if the length of the rafters is up to 6 meters, if more, then 180-200 mm). On the one hand, this requirement is due to the fact that it has a load, on the other hand, a heater is placed between the rafter legs.
Council - any construction or restructuring must be legalized in the relevant authorities.
Stage 2 - Installing the Mauerlat
Mauerlat - additional wooden trim along the upper perimeter of the building.
The purpose of the Mauerlat is to create conditions for secure fastening of the lower part of the rafters. As well as the redistribution of the load, which is created from the pressure of the roof on the load-bearing walls and the foundation of the building.
Installation of a simple gable mansard roof requires the installation of a Mauerlat only on those walls on which the rafter legs will rest. A four-pitched roof requires its installation around the entire perimeter of the building.
Advice. In a wooden frame, the role of the Mauerlat is played by the upper crown. This can be done, but subject to the installation of rafter legs on sliding fasteners. Because due to the load on the rafter system (wind, snow), horizontal pressure is created and the upper logs can move outward. In addition, if the material for the truss system is not properly dried, then over time, with rigid fastening, the roof is deformed.
Nuance. A stone cottage and house requires the arrangement of a Mauerlat around the entire perimeter of the outer walls. In brick, you can install its links only under the rafters.
Mauerlat parameters for logs - diameter 150 mm, for timber - 100x100 mm.
The breed is pine, but larch is better.
The Mauerlat mount must be reliable, because this is the basis for the entire truss system.
There are several ways to fasten the Mauerlat: with anchor bolts, studs or reinforcement (fixed in the base bearing wall);
Advice. If the building is erected from foam concrete or other porous material, only long bolts or reinforcement can be used, the length of which is 3 times the width of the Mauerlat beam. This is due to the fact that any other fasteners are pulled out very easily from a porous material.
- annealed wire (embedded in brickwork);
- wooden dowel (used when installing a Mauerlat in a log house).
Nuance. To prevent the destruction of the Mauerlat, it is necessary to provide proper waterproofing, for example, put roofing material, and treat the beam itself with antiseptic solutions.
If the width of the attic matches the width of the house, the rafter legs rest on the base of the load-bearing wall. But, it’s better to install a Mauerlat anyway.
Stage 3 - Mansard roof construction
Mansard roof frame device
Cover beams. Installed on the Mauerlat. In the future, they will serve as the basis for the device floor in the attic.
Mansard roof truss system
For a simple roof, the manufacture of rafter legs consists in the formation of simple triangles. They can be assembled on the ground and installed in the form of ready-made triangles.
For a gable sloping roof, a U-shaped frame is first attached, and the rafter part is already fixed on it in a hanging (for the top) and inclined (for the sides) way. The diagrams below show this more clearly.
The lower ends of the rafter leg must be sawn down and attached to the Mauerlat with nails or metal staples (movable fastening).
Nuance. Wash down the legs must be very accurate to ensure a snug fit to the Mauerlat.
Rafter legs are installed at the same distance from each other. Otherwise, the load on the system will be unevenly distributed.
Installation starts from the extreme legs. Then between them you need to pull the rope. So the horizontal will be maintained when installing the intermediate legs.
After all the rafters are installed, they are interconnected. The step of the lathing depends on the chosen roofing material.
Advice. Places intended for the installation of roof windows are reinforced with a transverse beam. Thus, the window will be securely fixed.
With a significant width of the mansard roof, you need to install a ridge beam. It will serve as an additional support. And part of the load (from the weight of the roof and snow) is redistributed to it.
With a considerable length, the ridge beam is supplemented by a support.
Mansard roof waterproofing
A hydrobarrier film is attached to the crate. The peculiarity of its fastening is to make an overlap of 100 mm. Most manufacturers mark the overlap with a bright stripe.
The waterproofing film is fastened with a construction stapler. And in case of rain, it will reliably protect the structure even in the absence of roofing material.
Mansard roof insulation
The insulation is placed under the waterproofing. Professionals recommend using flexible heaters for these purposes - mineral and basalt wool. Their advantage is flexibility, the ability to fill any voids.
Laying the vapor barrier
The vapor barrier film protects the roof insulation from steam penetrating into it from the attic living quarters.
Advice. It is important to provide the necessary clearances between roofing material and a heater. Their presence and parameters are determined by the type of insulation, the class of films used and the roofing material.
Mansard roof construction - video
Stage 4 - Installation of skylights
The area of windows, for sufficient daylight penetration, should be at least 12.5%.
Due to the design features of the mansard-type roof, special roof windows are used for glazing. The installation technology provides for the installation of windows before finishing work. In this case, the windows must be opened to provide access fresh air. In bad weather, they, of course, should be closed.

Stage 5 - Mansard roof roof