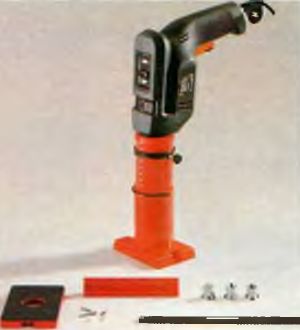
Jigsaw for furniture drilling. Furniture jig for drilling holes: types, do-it-yourself manufacturing. Design for confirmations and dowels
Description and features of the device
The conductor is a bar with several holes and sleeves. Such a device is fixed to the necessary part, and then a drill is carefully inserted into the sleeve and a hole is made. To fix the two parts, you need one jig, so that the fixation is reliable.
- drilling accuracy;
- ease and speed of creating holes.
It is worth noting that conductors are sometimes used in mechanical engineering, and not only in construction. Moreover, with the help of this device it is possible to make holes in cylindrical billets and pipes. Also, the jig allows you to make perpendicular holes.
Main types of equipment
All conductors used in various industries, divided into several groups .
Methods and scope of the conductor
There are many ways to use such equipment. Naturally, the main area is considered building sector .
furniture industry
When assembling furniture, it may turn out that some holes are missing. It is for this reason that you will have to drill various parts with your own hands. To perform the work did not cause difficulties, it is necessary to use a conductor. This will make furniture assembly accurate and fast. The use of such equipment is really relevant if you do not have a drilling machine.
Although today there is large selection of accessories and fasteners, dowels are still often used in the furniture assembly process. They must be installed very precisely, otherwise the parts will be displaced. To avoid such an unpleasant consequence, you should use the conductor.
Pipe drilling
If it is necessary to prepare holes in pipes and various cylindrical workpieces, the use of a drill will not be best idea, since it often slips off, which means that the holes will not have the desired shape. To facilitate the work, you should use a universal conductor.
It should be noted that there is special equipment that allows you to perform perpendicular holes. and this is very important when processing rounded elements and edges of workpieces.
Purchased or homemade conductor?
 As mentioned earlier, such a product is indispensable in the process of assembling furniture. Some people make these devices with their own hands, while others prefer to buy.
Conductors are sold in almost any hardware store, however finished products may not be suitable for specific purposes. It is also important to remember that the cost of the device depends on the purpose, size and manufacturer. Most simple options are inexpensive. which cannot be said about professional equipment with a large number of additional functions.
Many consumers prefer to make a jig with their own hands. For this purpose, you will need a metal sheet or a wooden board. Holes are prepared here, which will act as guides. In general, everyone will cope with such work.
Creating a conductor with your own hands
As already mentioned, you can make a similar product for drilling yourself. For this you need to prepare welding machine, grinder, drill and several locksmith tools. You will also need fittings. dimensions 10x10 mm .
- The workpiece is cleaned with sandpaper and markup is performed. According to accepted standards, the distance between centers should be about 32 mm.
- Next, the template holes are drilled.
- The next step is to create an emphasis. It can be a metal plate 1 mm thick. It is carefully bent and a place for carving is prepared.
- Then both parts are carefully connected.
So that the process of drilling holes does not cause any difficulties, it is worth using a jig. Such equipment is indeed indispensable in the process of assembling furniture. You can buy it, but it's better to do it yourself, because homemade device exactly tailored to your specific needs.
Device for drilling holes at right angles.
When you make any kind of furniture for the home, there is always the task of drilling a hole in the piece at a right angle. And no matter how hard you try, the result is not very good. If a drilled hole too “gone”, then when connecting the two parts, some skew is possible.


It is very difficult to catch a right angle without using any special devices. Available for sale various devices to help the home master. But with the help of some devices, holes can only be drilled with a drill that has a seat for an additional handle, i.e. for cordless drills this fitting will not work. Another type of right angle drill found on the market was more versatile and could have been purchased, but. Price. The price of such devices is exorbitant. For those people who more or less constantly make something out of furniture, the purchase of such a nozzle may be advisable. But for the average person who makes household items infrequently, the price is high. The device that the author of the article encountered in 2011 cost more than 800 rubles.
Therefore, when once again the opportunity arose to make another product from chipboard, it was decided to try to make an assistant from improvised materials. We took old chipboard trimmings.

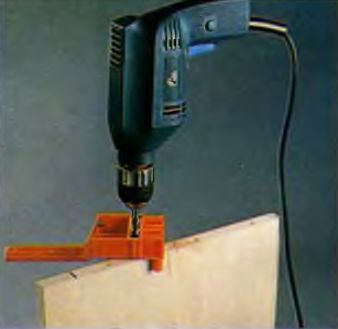
And first they made a device for drilling holes in the end of the chipboard panel. Figured it should look like this

This thing will have holes with which it will be possible to more accurately position the drill, and it will be put on the end of the panel.

Before assembling the device, we made markings on it for three holes for Euro screws of different diameters.


We took three euroscrews with a diameter of 5mm, 6.3mm and 7mm. And under them holes were drilled 3.5mm, 4mm and 4.5mm, respectively.


Collected the final piece. Drilled holes for one holder and attached it.

And then drilled holes for the second holder. When drilling, a piece of chipboard was placed between the holders in order to more accurately drill holes for the second holder. Since a home-made device should “sit” on the end of the panel very tightly and not play.


Assembled device.

This fixture is only for drilling holes at a right angle in the end of the panel. And in order to position the drill and more or less clearly drill a hole on the plane of the panel from a small piece of chipboard, they made another device. Just in a piece of chipboard, they also drilled 3 holes 3.5mm, 4mm and 4.5mm.


And now about how it is thought to drill holes at right angles with the help of newly made "helpers".
We make the markup on the panel. We pass the drill through the device and outline the hole.

After marking, we lower the device completely onto the panel, with its help we position the drill at a right angle and start drilling.

By the same principle, holes are drilled in the end. We passed the drill through the end assistant, marked the hole, pressed the device tightly against the end, and began to drill.

Other materials of the section:
Drilling at a right angle
According to statistics, the electric drill is the most common power tool in the world. household. However, carefully drilling a hole is not so easy. It is even more difficult to make holes at a right angle or at an angle. It is no coincidence that people invented drilling machines. But buying such a bulky device for the vast majority of home craftsmen does not make sense. In addition, it is not convenient to drill holes in every detail on a drilling machine. For example, fitting a long board or a furniture panel under a drilling machine is not always convenient. And I want to drill for sure, so as not to spoil appearance future product. Many people, I think, have come across a situation where you mark holes on one side of the board, drill it, everything seems to be even, but as soon as you turn the board over, you are horrified, all the holes are awry.
In order to drill at the right angle, various devices are used that allow you to accurately guide the drill. Not all such devices are equally convenient, but with their help it is possible to achieve an incomparably better result than without them. I believe that if there is a drill at home, then at least one of these devices should also be available. Everything without him beneficial features and the capabilities of the drill cannot be fully utilized. Unfortunately, these are for sale. necessary accessories are rare.
The most painful places of such devices are that they have backlashes and with their help it is not always possible to smoothly guide the tool. Accuracy also suffers from this. In addition, when holding a drill in one hand, the sole of the device must be pressed against the working surface of the part with the other hand. If the combination of a drill and a device is perceived in the hands as a whole, then it is pleasant to work. When there is no such feeling of solidity, then discomfort arises, and more effort has to be made in the course of work.
Taking into account practical experience, I want to offer, in my opinion, a fairly successful and simple design of such a mobile drilling device. Instead of a handle, the device itself is attached to the drill. Its base plate has a rubber outsole for better traction. The rotary die, parallel to which the drill moves, can change the angle of inclination from 90 to 45 degrees. Fixing the selected angle is very rigid. It is secured with two screws. If you want to drill at a smaller angle, then you need to unscrew and remove the handle so that it does not interfere. With the handle removed, the device folds up so that it takes up little space and is convenient for storage. Moving the drill along the die is provided by moving a wide and fairly long plate in the grooves. The length and width of the plate significantly reduce the likelihood of jamming and ensure smooth movement. The grooves can even be slightly lubricated with silicone grease to improve glide. The top spring is much stronger than the bottom one. This provides a smoother "click" of the drill. The lower spring performs the function of stretching, so that the structure dangles less. In a word, everything can be seen from the above diagrams.
This holder is designed for drilling holes in edge boards, see.
Furniture jig for drilling holes: types, DIY
Accurately and efficiently make holes in products made of natural wood, chipboard, MDF, metal and other materials, such a convenient device as a jig allows. Such a device, in particular, is actively used by specialists involved in the production of furniture. At the same time, the conductor can be either purchased in serial execution or made by hand.

Universal slide-type jig for drilling holes for euro screws and dowels
Design features and types
The jig, in fact, is a template for drilling holes, allowing them to be made as accurately as possible. It is also used to create holes, the axis of which is perpendicular to the surface of the part, and for drilling at an angle.
Due to their versatility and simplicity, drilling jigs are actively used in various fields. In particular, in the engineering industry, they have long been successfully used for drilling holes in workpieces of various configurations and made of different materials. It is impossible to work without a conductor and in furniture production, where such a device is actively used when assembling furniture, installing accessories on it and performing a number of other technological operations. Construction is another area where conductors find wide application. With their help, in particular, drilling holes in building structures. Jigs are also needed for drilling pipes and other tasks.

Even a simple fixture in the form of a bar with an emphasis greatly facilitates and speeds up the process of making holes of the same type.
As a furniture conductor, overhead models are most often used, made of lightweight materials, so that it is more convenient to manipulate them. You can purchase such devices in the factory version or make a furniture conductor with your own hands. Qualified furniture makers may not use a jig to drill a hole in furniture construction elements with high quality and accuracy, but for this they must have extensive experience in their field.
The most significant advantage of the jig is that with its help, even a person who is not highly qualified can perform high-quality and accurate drilling of both a perpendicular to the surface of the part and an inclined hole. The use of conductors eliminates the need for complex preliminary calculations and marking the locations of future holes, which reduces the complexity of assembling a furniture structure and allows you to perform such work in a shorter period of time. Even a novice specialist can understand the use of a jig for drilling under dowels and for solving other technological problems.

Attachment jig with turret is suitable for drilling standard holes for dowels of any size
Before purchasing or making your own homemade jig, determine for which tasks it is necessary to use it, and based on this data, select its type and design.
Among the conductors for drilling holes by type of design and functionality, a number of categories can be distinguished. Overhead
These conductors are called so because they are applied to the workpiece and fixed on it, or simply fixed by hand. By means of conductors of this type, in particular, holes are drilled in chipboard, MDF boards and other flat parts.
Such templates can be used to make holes on cylindrical parts. Conductors of this type are equipped with vertical and horizontal axes of rotation, which makes it possible to perform holes with their help at various angles.
These are fixtures that are especially relevant for small batch production, where the ability to quickly change over the equipment used is important. The conductor of this type is just endowed with such functions.

This universal jig is designed for drilling holes for minifix, confirmat, rafix and door hinge
These devices for drilling holes are required in cases where such a technological operation has to be performed in several planes.
Sliding and fixed
The sliding jig, in full accordance with its name, does not require fixing: it is simply applied to that part of the surface of the part where the hole needs to be drilled. Fixed jig devices, although they are more convenient, somewhat limit the freedom of action of a specialist, which is especially critical when performing drilling work on machines equipped with only one spindle.
Areas of use
Furniture conductors and templates are devices that are practically indispensable when assembling furniture structures. The use of jigs avoids the main problem that occurs when drilling holes - the drill enters the workpiece at the wrong angle. Correcting this error takes a lot of time and effort, and it is not always possible to fix it at all. The jig used for drilling holes not only allows the drill to be correctly oriented at the machining site, but also prevents the tool from going astray.
Devices such as furniture jigs and templates are used both in the manufacture and assembly of furniture, when it is necessary to make holes in the elements to be joined to accommodate fasteners. In such cases, a jig for dowels or a jig for drilling for confirmation is often used, without which it is not possible to make high-quality holes for fasteners. Such a device is indispensable in cases where it is required to make holes, including at an angle, in thin slabs (in particular, when making holes in chipboard or MDF).

The conductor for oblique holes is indispensable for the installation of hidden joints of panels and boards
When using a jig for drilling holes, the process of assembling furniture is simple and fast. Using such a device, holes can be drilled at any distance from the edge of the part, regardless of its width.
AT modern furniture dowels are actively used, which at the same time are quite an outdated fastener. That is why the jig for dowels (doweling jig) is used in the production of furniture structures. The main difficulty when using such fasteners is that the axes of the holes made in the parts to be joined have a right angle between them. Accordingly, such holes should be located strictly perpendicular to each other. Without the use of such a device as a jig for dowels, it is difficult to perform them.

A jig for making holes in the tubes will be a very useful tool for a home workshop.
Furniture production is not the only area in which conductors are used for drilling holes. Templates are no less often used in order to drill a hole in a pipe and other parts that have cylindrical shape. Conductors allow you to make high-quality holes even in pipes of small diameter.
The size and principle of operation of modern conductors can be different. Some of the models of such devices are much easier to buy, and some are easy to make with your own hands. In favor of making a furniture jig for drilling holes with your own hands, the fact that serial devices, especially for universal purposes, are not cheap, also speaks.
Homemade conductor devices
Conductors the simplest design, for example, those that are used to drill holes for confirmation are relatively inexpensive, so many craftsmen are not puzzled by them self-manufacturing and purchase serial models. Meanwhile, there are those who are even simple devices trying to do it by hand. The question of how to make a jig for drilling with your own hands often appears and, if necessary, drill non-standard holes.
To independently make a jig for dowels or a simpler jig for confirmations, you can use the drawings and videos on the Internet.

In the manufacture of the jig, perfectly precise drilling of pilot holes and hardening of the finished fixture will be required.
For the manufacture of such a device, of course, its drawing is required. You also need a minimum set of tools and equipment:
- electric or hand drill;
- a set of locksmith tools;
- Bulgarian;
- welding machine (for the manufacture of conductor fixtures of a more complex design).
The simplest homemade jig can be made from improvised tools and materials that are abundant in most home workshops or garages. The use of such materials, which include pieces of metal fittings, wooden bars, metal plates, etc. allows you to significantly save on the purchase of a serial model of the device.

Drawing of a home-made conductor for drilling holes for confirmations
Making a homemade jig for a drill or a single-spindle machine takes place in several stages.
- Square reinforcement with a cross section of 10 by 10 mm, using a hacksaw for metal or a grinder, must be cut into pieces of the required length.
- The centers of the holes to be drilled through must be 8 mm from the edge of the jig plate. It is at this distance that the center is located chipboard or MDF, in which a hole is drilled.
- The step between the holes on the conductor in accordance with generally accepted furniture standards is 32 mm, while the diameter of such holes should be 5 mm.
- If you equip a homemade jig with an emphasis, then using such a device will be much more convenient. To create such an emphasis, you need a metal plate 1 mm thick and 25 mm wide, which is bent at a right angle and fixed on a ready-made jig made of reinforcement.
- After the structural elements of the homemade conductor are fixed with a clamp, they must be securely connected to each other using threaded fasteners.

Ready-made jig with swivel stops
To minimize the amount of dust generated when using a homemade conductor, its design can be supplemented with a half plastic bottle. Such a simple device can also act as a pallet in which the chips formed during the drilling process will be collected.
The method described above allows you to make the simplest home-made jig, which greatly facilitates and speeds up the process of assembling any furniture structure.
Attachments, nozzles and accessories for drills

Drill attachment - Malco Turboshear TSNS1 scissors. Able to cope with both slate and slate.
But did you know that a conventional drill can do much more than just drill? Its capabilities are significantly expanded by special attachments, nozzles and various devices.
Surely not every drill owner knows that it can not only drill holes, but also saw, mill, and even turn into lathe or pump for transferring liquids. Such an enviable multifunctionality of an ordinary electric drill is due to the abundance of a wide variety of attachments, attachments and devices. It is hardly possible to find another power tool for which there are so many attachments as for an electric drill.
Of course, the multifunctionality of the drill created by attachments is in no way able to replace the park of a special professional tool (in terms of cleanliness of processing, accuracy and productivity). But at the household level, all the additional functions acquired by the drill will fully satisfy the needs of the home master.


The SC 165 quick clamp ensures fast clamping of the workpiece when drilling. The holder for a drill provides fast fixing of a drill and performance of stationary works. Can be rotated 360 degrees like vertical. Likewise horizontally.
The most widely represented drill stops. The simplest stop, mounted on the auxiliary handle of the drill (accessory set: auxiliary handle and stop with a metric scale), allows you to drill holes to the desired depth. With it, you will never accidentally drill through a workpiece or a thin partition.
Parallel stop more perfect, since it controls not only the depth of the hole, but also its verticality relative to the surface to be machined. This type of attachments is available for both construction (drilling in walls and ceilings) and carpentry (furniture) work. The prefix for construction purposes is professional and is a single unit with an additional handle mounted on a powerful drill. Some models have a built-in dust extractor connected to a vacuum cleaner.

The simplest stop for a drill is an additional handle. It has an adjustable drilling depth stop (metric)

The professional stop is more reliable and has a convenient metric depth gauge scale.

Parallel stop, in addition to the depth of the hole, sets its perpendicularity. Model for working on vertical surfaces.

A dust extractor is also required for a drill. They are equipped with individual models of professional stops. Connect to a vacuum cleaner.
Attachments for carpentry structurally close to the racks of hand mills, but made less accurately and are intended only for home small jobs. And more is not required here: a drill is a low-speed tool (relative to an electric cutter) and does not provide high accuracy in surface treatment. The drill is clamped in a basket that easily moves along two vertical rails.
Attachments and nozzles for drilling at an angle It will allow you to drill a hole where it is simply impossible to approach with a conventional drill. Depending on the version and manufacturer, the drilling angle may be different. The most common nozzles allow drilling at an angle of 90º.


This attachment allows you to limit the drilling depth. provides a strict verticality of the hole and allows you to perform (appropriate nozzles) some milling work. This is especially important when making furniture at home: inserting furniture hinges, holes for assembly fasteners and dowels, or grooving. The stop can be equipped with various inserts for lateral drilling in round or complex profile parts. Some models of stops have a dust extraction device connected to a vacuum cleaner. But a professional will prefer a manual milling machine (same operating possibilities, but high surface finish and precision).
Of course, holes in parts can be made most accurately and quickly on a drilling machine. But also a drill equipped with drilling stand- guide attachment. shows excellent result. As a rule, such a stand is equipped with a convenient clamping vice (for the workpiece). The vise can be moved along the rack frame to the desired position.


The drill (almost any) is easily and quickly clamped in the “basket” of the rack and the drilling machine is ready to work. Its compact size, smooth feed and accurate metric scale make it a valuable asset for the small workshop.
A home master can get by with the simplest parallel stop: made of plastic, dust localizes in itself.

Carpentry rip fence: Guide slot and inserts for lateral drilling in timber and round workpieces.

Removal of dust and sawdust in this attachment is essential. With it, the drill can already work as the simplest manual milling machine.

There are additional functional holes on the attachment platform, with which you can also install a side stop. In this case, the drill is able to perform all the operations of a hand mill, for example, to accurately select the groove (with the appropriate nozzle).
Can't help but arouse interest attachment to a drill that turns it into a wood lathe. The prefix is easily fixed on the table and the machine is ready. Offered in several designs. As a rule, a certain set of devices is offered for it and cutting tool. This type of attachment does not pretend to be a professional tool, but many parts for individual furniture or country house it can be made quite well. But if you start mass production of turned legs for tables or balusters on this console, it will quickly break down, and the drill will not withstand such violence. Our photographs give a visual representation of the design and principle of operation of this console.


Compact wood lathe from a drill
A compact wood lathe is the dream of any home craftsman. There are several types of turning attachments for drills. They differ not only in their design, but also in the set of cutting tools offered for them.
The most famous and common are prefixes that turn drill in electric grinder. Here we will introduce you to only two specialized attachments of this type: one for sharpening circular saw blades and the other for sharpening drills, chisels and planer knives. The value of prefixes lies in the fact that they allow you to refuse the expensive services of professional sharpeners of such a tool. With them, you will not have problems with either the sharpening angle or the perfect cutting edge (even if you have never done this before). Installing such prefixes on a drill does not cause difficulties.

A drill stand plus a drill is a handy drill press. The design of the bed allows you to mount a clamping vice on it to fix the workpiece.

Vice for racks come in different modifications. But their mounting holes must necessarily correspond to the grooves in the rack frame.

The vice on the bed can be displaced. There are options with rotation of the vice around the axis and even with a changing angle of the rack.

A drill mounted in a stand, plus an abrasive nozzle, allows you to create high-quality concave surfaces.
Worthy of attention convenient for work and compact milling attachment grooves in the ends of cabinet furniture or joinery (for corner connections). Working with it is very simple: there is no need to clamp the workpiece on the workbench, the quality and accuracy of processing are high, the depth of the groove and its level are set by a simple adjustment. This prefix will quite satisfy also the professional furniture maker.
For those craftsmen whose work is different great variety, will not be superfluous and long flexible or angle drive for drill. They are simply installed in the drill chuck and have their own chuck suitable for any attachments (drills, grinding stones, bits, etc.). These attachments allow you to work with a drill in the most inaccessible places. It is unlikely that anyone would think of using a drill for pumping liquids.

Nozzle - water pump for Bosch drill

Nozzle - water pump. Productivity up to 2500 l/h.
But it is quite real and not without meaning, if you use attachment-pump installed in the drill chuck. Of course, it is not designed for long-term continuous operation and has a low productivity, but it is possible and quite convenient to pump out paint (viscous) from a barrel or dirty water from a basement. By changing the speed of the drill, you change the speed of pumping fluid. As a rule, the entire body of such a set-top box is plastic: the service life is short, but the price is low.

The attachment for sharpening disk blades allows you to do it yourself, without resorting to an expensive professional service.

Grooves for corner joints can also be selected with a drill, equipped with a special attachment. It has a dust extraction device.

The long flexible drive with chuck is another nice addition to the drill. It works with any attachments.

High-quality sharpening of a drill, chisel or planer knife will help to make a small attachment to the drill. Sharpening angle is adjustable.

The drill can be used as a screwdriver, suitable for working even in hard-to-reach and inconvenient places.

The drill can work as a pump. Nozzles come in different capacities (suitable for paint and even dirty water).

Professional template: durable, reduces the labor involved in marking and drilling standard holes for furniture assembly.

The furniture template for drilling holes has standard dimensions: holes, distances between them and from the edge of the part.
This template ensures the verticality of the hole and its centering. A plastic template is enough for a home master.
It is generally accepted that templates noticeably speed up many operations, increase the accuracy of processing parts and their assembly. This can be confirmed by the abundance of existing drill templates. We show only the most common patterns that are most often in demand when working with a drill. Among them there are both professional (durable and maintaining the accuracy of their dimensions), and for home craftsmen (made of plastic).

Drill template
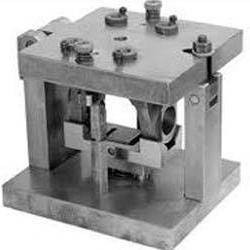
A jig for drilling holes is a device used in mechanical engineering to simplify the process of processing a part. In fact, it is a template that serves to guide or position the workpiece. It can be used on various equipment, such as, for example, or a diamond drilling machine.
AT engineering production conductors are fairly accurate fixtures (up to 0.05 mm (depending on the requirements for the manufactured part)). They come in two main types: overhead (in the form of plates) and box-shaped, which are three-dimensional structures. There are also conductors for drilling of mixed type. These devices are used to reduce labor intensity: from technological process machining of the part, the marking operation is removed, in addition, it becomes possible to drill several holes at the same time.
The drilling jig is used only in serial and mass production. This is due to the fact that for a small batch of parts it is impractical to manufacture a separate fixture, which, moreover, will have to be installed and configured separately.
A drilling jig is usually used to process several holes that lie in the same plane. It is best if the parts are unified in terms of standard sizes, this will allow the device to be used for a wide range of products.
The drilling jig is also used in light industry and construction. Such devices are only of the overhead type, made of or lighter materials, such as wood or plexiglass. These products are not designed for high accuracy, the positioning error is only ±0.5 mm. But this is more than enough to make holes for fittings in furniture or drill a series of holes in the wall of the house. Used as equipment conventional drill or a benchtop drilling machine.

You can make your own conductor for household needs. It will be needed during repairs, when you need to make a lot of holes of the same type and there is no desire to spend time on preliminary marking. For its manufacture, you can use any improvised materials: on a sheet of metal or wooden board mark and drill all the necessary holes that will serve as guides. If necessary, a plumb line is additionally made so that chips or concrete chips do not fall to the floor. It is possible to make a dust-free jig when the template is covered with a specially fitted half of a plastic bottle.
The main advantages of these devices are high accuracy positioning holes without pre-marking, high labor productivity and reduced perpendicularity deviation (due to guide bushings). However, the use of a drilling jig is not always economically justified, especially with small batches of parts in production.
Furniture jig for drilling holes, drawing a kind of template that allows you to accurately install the assembly elements and greatly simplifies and speeds up the assembly.
With this device, you can make holes for:
Dowels
footer
pinch bolt
fixing holes for the mounting plate of the furniture hinge
fixing holes for the furniture hinge cup
center for furniture hinge flange
eccentric brace center
The design consists of two parts:
Marking knot
retainer
MARKING KNOT
It is a "L" shaped plate made of corrosion-resistant steel plate, in which through holes with a diameter of 8 and 3 (mm) are drilled horizontally and vertically. To make the processing tool fit better into the holes, chamfers of 0.25x45˚ are made on its edges. The plate is hardened and ground.
Drawing
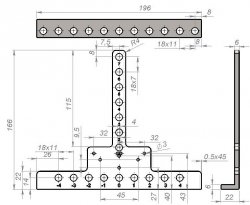
RETAINER

Made from a steel circle, which allows you to install a furniture jig for drilling holes at the required distance from the edge of the processed chipboard. The movement step is ten millimeters.
Drawing

Let's say we want to install a furniture hinge:
1.
We lay the template on the facade.
2.
3.
We drill a hole with a diameter of three millimeters for the fixing screws of the cup to the desired depth.
4.
We drill a hole with a diameter of three millimeters to the desired depth for further processing. The prepared hole will be the guide center for milling the hole for the flange of the furniture hinge with a diameter of thirty-five millimeters.
5.
We lay the template on the body.
6.
We drill a hole with a diameter of three millimeters to the desired depth for the fixing screws of the striker.
Let's say we want to install an eccentric coupler:
1.
We lay the template on the horizontal surface of the chipboard part.
2.
Install the latch in the hole.
3.
We drill a hole with a diameter of three millimeters to the desired depth for further processing. The prepared hole will be the guide center for milling the hole for the eccentric of the furniture tie with a diameter of fifteen-five millimeters.
4.
From the end of the chipboard, along one center line, we drill a through hole with a diameter of eight millimeters to the required depth
In the picture shown

AT different colors shows the center on the furniture conductor for various technological operations.
Precise drilling used to connect wooden, metal and other elements to each other is a guarantee that the product will be of high quality, without backlash, durable and will be effectively used for a long time. In the case of processing chipboard, OSB, MDF and other materials, it is recommended to use a drilling jig to achieve successful results.
Need for an assistive device
A do-it-yourself drilling jig helps both at home and during industrial processing. This product is a thick metal bar. It has several holes, inside of which there are special bushings - sleeves.

Templates can be made in different options, but the task is the same for everyone - marking for drilling
A step-by-step algorithm that involves using a jig to drill holes in blanks consists of the following steps:
- determine the place of drilling;
- we apply a conductor to it;
- fix the device convenient way;
- put sleeves in the holes;
- drill in the indicated places.
Marker classification
A jig for drilling holes with your own hands is used in different areas production activity. Based on similar characteristics, the same type of auxiliary devices are usually divided into several groups:
Overhead jig for drilling holes

Attachment jig with turret is suitable for drilling standard holes for dowels of any size
The group is called this way because of the way they operate. It is customary to install the product on top of the intended workpiece and fix it with screw clamps. Less often at home, it is based on an emphasis on any plane. So you can mark the holes for furniture screws.
Swivel jig for drilling holes

Use such a jig for drilling at an angle. Comfortable processing is obtained due to the guide bushings.
Tiltable jig for drilling holes

Tilting to work on multiple surfaces
The group is involved in drilling on several surfaces located at an angle to each other.
Sliding jig for drilling holes

Demanded in those areas where it is not possible to fix the marker. The guide bushings are attached to the folding strips.
Not only conductors are widely used for drilling holes for confirmation, but templates are also used in mechanical engineering when you need to make many drills of the same type in blanks.
This device has many advantages:
- achieve maximum accuracy in finished goods;
- ease of operation;
- the ability to repeat the center distance on any surfaces at a convenient time;
- affordable cost of the finished product;
- you can make a homemade jig for any workpiece and different center distances.
VIDEO: How to make a self-centering jig for drilling holes for furniture dowels
Scope of application
During the furniture assembly process, some drawings indicate the places for drilling holes, inside which the pins will be located. In such a situation, you can not do without a precise tool. It will not be possible to combine the interfaces on the parts to be joined as clearly as possible with a simple marking, so a furniture jig for drilling holes is useful.

Even a simple fixture in the form of a bar with an emphasis greatly facilitates and speeds up the process of making holes of the same type.
In addition, the template engine contributes to the rapid detection of the desired points after the marker is based. In addition to holes for dowels, recesses are needed for mounting door hinges. They can also be done with a hard stencil.
Marking and drilling many holes at an angle or perpendicular, at the end or on the main surface in a pipe without help is always problematic. This is due to the special geometry of the workpiece. It will also be possible to save time and get the desired result thanks to the conductor. You can supplement the set of accessories with an installation that ensures the perpendicularity of the drill entry.
The difference between store bought and homemade
The importance of this equipment, which performs an auxiliary function, cannot be overestimated. Someone chooses to do it with my own hands so that the product has the necessary functionality and is suitable for a specific job. Other specialists strive to choose the most comfortable product from the products offered in online stores.

When buying, you need to pay attention to the manufacturer. The final price tag depends on the capabilities of the template. At home, it is enough to use household items, and for daily operations it is worth getting a professional product.
Do-it-yourself production does not take much time. Also suitable materials always at hand.
Homemade device
It must be borne in mind that this device includes a certain number of parts:
- body corner element, which must be applied alternately to blanks intended for connection with dowels or self-tapping screws;
- guide bushings-sleeves through which the drill will pass during the drilling process;
- clamps that provide a strong connection between the tool and workpieces due to screw or cam connections.
A homemade template should include drawings and markings that are most often found in the home on furniture and other areas. You will need to stock up on special stops that help in the work. The average cost of finished samples will be about 500-1000 rubles. The difference between them lies in the dimensions, functionality and the number of guide bushings.
Assembly drawing of a homemade marker

How to make a jig for drilling holes with your own hands
Designing begins with the choice of a corner, which will serve as the base blank. It is preferable to choose a base with different sides, as well as the greatest possible thickness of the metal. According to GOST 8510, products with side parameters of 63x40 mm and 8 mm thick will be the most acceptable. With such overall values, it will be possible to use bushings 6 mm long, and there remains an internal space for a drill of no more than 4 mm in diameter.
In most cases, these values \u200b\u200bare enough to make your own template with your own hands. Additionally, you will need bushings, which at home are usually cut from stainless steel corresponding to GOST 9941 or GOST 9940 for seamless and all-welded pipes, respectively.

It is worth starting the choice with the selection of a tube according to the internal section. The 6x1 mm format is usually used, which makes it easy to use a drill with a diameter of 3.6-3.7 mm. It is important to observe the rule that the minimum length of the sleeve can be twice the outer diameter of the tube.
The landing of the sleeve is performed with a slight interference fit or in a transitional format. It is reasonable to perform it in the shaft system, because the stable outer diameter of the tube will serve as the basis. It is under it that voids are drilled in the corner. It is worth using h9/P10 fit.
In some cases, a marker is required to make sufficiently deep holes. This technique implies the presence of a stepped sleeve with collars. Strict GOST 12214 defines the parameters for machine conductors.
How many sockets to drill and how to arrange them, the owner of the tool determines independently according to his needs. Traditionally, one of the following mounting options is chosen:
- using a spring-loaded stop that presses the jig to the part due to the elastic material;
- on self-tapping screws, you can firmly fix the conductor, but when working with chipboard and similar materials, you should refrain from this method;
- external clamps, under which for safety reasons there are rubberized gaskets.
VIDEO: How to make a dowel marker
In the manufacture of cabinet furniture, it becomes necessary to be able to accurately and quickly drill into the end of parts. As a rule, this need is due to the use of euro screws (confirmants), in which holes with diameters of 4.5-5.0 mm are drilled into the end of the parts (depending on the density of the plate) to a depth of 35-55 mm (depending on the length of the euro screws).
Of course, there are special drilling and welding machines for such purposes, but they are not easily accessible to private furniture makers or small organizations due to their high price, plus, the machines are not convenient due to their exclusively stationary use. To simplify the work of a furniture maker, conductors were invented - small devices for precise drilling with a conventional hand-held electric drill. Today there are several manufacturers on the market, paying no small price, you can buy a ready-made jig. This article will discuss how a good home-made jig can be made from improvised and easily accessible material in a couple of hours.We use ball bearings as guide bushings. The bearings are made of durable steel and will last a long time. In order for the drill to be well oriented in the jig, two bearings are used for each working distance (bearings are arranged coaxially one under the other).
To make a conductor (for three working fixed distances), we need:
- A piece of MDF board 16mm thick.
- A piece of MDF board 10mm thick.
- Six pieces (a pair for each working distance) of any ball bearings with an inner diameter of 5.0 mm, an outer diameter of not more than 16 mm. The height of the bearing should be as small as possible and no more than 8mm.
- A dozen self-tapping screws 4x25 mm.
- Glue PVA, "Superglue".
- Futorka furniture with internal thread M6 (see photo).
- Screw M6x50. Nut M6. Washer Grover 6mm.
Manufacture of the body of the conductor.
First, you need to make the case itself. There is no need to explain anything in particular about the case, everything is elementary. Transverse section cases - the letter "P" with one end (closed) wall. This wall will be used as a stop, will set the zero point, the starting point for drilling. When drilling, the stop is pressed against the end of the part. Main dimensions:
- The external size of the conductor is arbitrary.
- The upper part, in which the bearings will be planted, is made of 16mm MDF, the rest of the parts are 10mm MDF.
- The distance between the two sidewalls (where the workpiece will be placed) is16.5mm whatcorresponds to the actual thickness of the plate plus a small gap for ease of installation and removal of the conductor.
- The distances between the centers of the bearings and the stop: 50, 70, 100 mm, are the most common in furniture practice.
To assemble the housing, it is necessary to accurately cut out all four parts (top, two side and one end), measurements are recommended to be performed with a caliper. Further, holes for self-tapping screws are marked and drilled, which will fasten all the parts together. The body is assembled with PVA glue.

The distance between the side walls of the conductor is 16.5 mm (for laminated chipboard with a nominal thickness of 16 mm).
Fitting bearings.
After the glue dries, we proceed to marking and punching the holes for the bearings. We try to be very accurate in this operation! To drill holes for the bearings, we need either a drill fixed in the rack. It is very difficult to perform accurate drilling by hand, but with a certain skill it is possible. We mark the centers of the bearings with a pencil, kernim. By punching, we drill three through holes with a diameter of 2 mm. We clamp a feather drill (punch) into the drill chuck, the diameter of the punch should be equal to the outer diameter of the bearings. We drill two blind (non-through) holes for each bearing on each side of the previously drilled through hole. The drilling depth of the punch (the penetration depth of the central pin is not taken into account) should be approximately 1 mm greater than the height of the bearing. As a result, we should get six mounting holes (three on each side) for the bearings. You can try to insert the bearings into the seats, the bearings should enter freely, but without noticeable play. After fitting, you need to lubricate the outside of each bearing with glue and put it all the way in its place. If "Super Glue" is used (it absorbs and dries quickly), then this operation is performed using a rubber mallet.

Top conductor. Distances between bearing centers and stop.
Making an adjustable stop.
To be able to drill at any arbitrary distance from the stop (not only 50, 70, 100 mm), it is necessary to supplement the jig with a simple adjustable stop - a long screw. We drill a through hole in the center of the end stop with a diameter of 0.5 mm less than the outer diameter of the furniture fitting (see photo). We twist the futorka. We screw a long screw into the futorka, not forgetting to first screw the nut onto the screw and put on the Grover washer. Now, by changing the depth of the screw, you can set any drilling distance from 0 to 100 mm.

Furniture booth. You will need a hex wrench to screw the futorka into the jig body.

The adjusting screw of the conductor is screwed into the furniture fitting.

Conductor. Side view.

Conductor. Inside view.

Drilling a hole in the end of the chipboard using a homemade conductor.


Drill out. This maximum depth can be drilled.The length of the drill used and the depth of its fastening in the drill chuck should be selected taking into account the thickness of the conductor (that is, almost the total height of the two bearings).
If desired, the surface of the conductor can be sanded with fine sandpaper, primed and painted (for example, spray enamel). Practice has shown that the accuracy of drilling with a jig is no worse than +/-0.5 mm and largely depends on how the actual thickness was made (plateschipboard) differs from the calculated thickness. In any case, an error of a maximum of half a millimeter is not critical for end-to-end drilling in the manufacture of cabinet furniture.