Adjustable floor joist. What are adjustable floors? Installing a lag on metal studs
Quite often, professionals and private developers are faced with the problem of leveling the floor. If the draft surface has impressive differences, then in the future the geometry of the room will be violated, so it is imperative to take care of creating a high-quality floor. For this, today they use different technologies. However, one of the methods is the one that provides for the installation of adjustable supports for the log.
Why choose adjustable feet
Floors on adjustable logs have many advantages over other technologies, among them are:
- light weight;
- the possibility of carrying out work on floor insulation;
- speed of work;
- no need for the master to have special skills;
- the possibility of forming a multi-level floor;
- possibility of laying floor covering without underlayment.
Logs are installed on a rough coating. The distance between them should be determined by the characteristics of the future floor. Through each anchor, holes must be drilled in the concrete or wooden beam, there at the next stage a self-tapping screw or dowel-nail is installed. Now you can level with a level. The protruding parts of the bolts are cut off, then you can start laying the rough array.
Do-it-yourself regulating anchor

If you decide to install metal adjustable feet for a lag, then you can perform the anchor yourself. All items must be purchased at the store building materials. For the control device, prepare:
- hairpins;
- driving anchor;
- nut;
- metal plate;
- washers.
The plate is fixed to the stud with a bolt and nut. With the help of the latter, adjustment will be carried out in the future. Another nut with a bolt is needed to fix the beam from above. In order to install the nut, a groove should be made in the log so that the element does not interfere when the flooring is being laid.
Adjustable support on studs and corners
If you do not want to purchase ready-made fixtures, then you can install the floors on studs. The price of the structure will be lower, and in terms of characteristics, the floor will not be inferior to the one assembled using finished structures. If you use corners in your work, then they must be firmly fixed to the base. This method is suitable for cases where the use of studs is not possible. The lag is fastened using this technology in the case when the subfloor has a weak base. The size of the corner will depend on what level you want to raise the surface to.
If you will install adjustable supports under the logs, then it is important to mark the points at which holes will be drilled in the timber for plastic bushings. To drill the first hole, 10 cm should be retreated from the edge. The distance that will remain minus from both ends must be divided into equal segments. A distance must be left between the side plane of the first lag, the ends and the walls.
The step between the lags should be the same. Ordinary logs are arranged so that the edge of each of the plywood sheets rests on the timber. A centimeter gap should be left between the plates. When installing adjustable supports for the log, at the intended points on the beam, holes should be formed for the supports, which are then screwed on with screws. Only the extreme bolts are installed flush with the plane, it is with the help of them that the adjustment will be carried out.
Conclusion
As soon as the lag with bushings is in place, through the inner cavity of the bushings, it is necessary to mark points for installing dowel-nails. After the lag is removed, and holes are drilled in the concrete at the marked points. It is necessary to go deep by 5 cm. The lag returns to its place, and fasteners are inserted into the bolts.
Not so long ago, in the process of laying a log on a rough base, pieces of plywood or wooden stakes were laid under the bars. Thus, it was possible to protect the tree from moisture and level the rough base horizontally. But over time, the substrate dried out and became unusable, which affected the horizontalness of the coating. In the article we will consider modern ways fixing the lag to different types grounds.
Features of the use of fasteners

In the process of attaching the log to the wooden base, there are no special problems. To do this, you can use long screws or corners. But what about a concrete base, into which you can’t easily screw screws? To strengthen the logs on concrete, you need to use special types fasteners. The choice of fasteners required for mounting the bars to concrete floor depends on the following factors:
- The horizontality of the surface. Depending on whether additional alignment is required or not, adjustable or non-height adjustable fasteners can be used;
- Substrate moisture level. If the logs are mounted on a strip foundation, they will have to be laid almost on the ground. To fix the bars, they mainly use brick posts that protect the tree from moisture, playing the role of an insulating lining;
- Degrees of load on the base. You can strengthen the logs on the floor with the help of self-tapping screws and brackets. However, in the case of intensive use of the floor, the screws may not withstand the load. That is why the type of fastener is chosen in accordance with the expected load on the floor covering;
- Underground heights. Wooden floors are prone to condensation under the coating and rotting. For guard wooden base from rotting and deformation, experts recommend using high supports for the log. They form an underground under the bars, in which air can circulate freely, which prevents the formation of condensate.
In order to correctly fix the bars on draft floor, you need to understand not only the methods of fastening, but also the varieties of fasteners. An adequate choice of support will extend the service life of not only the rough, but also the finish coating.
Types of fasteners

As already noted, fastening the bars to the floor involves the use of only two types of fasteners:
- Simple - static supports that do not allow you to vary the height of the installation of wooden elements;
- Adjustable - contain screw structures, thanks to which the fasteners can be set in height, which allows achieving maximum horizontalness of the base.
What types of fasteners can be used to fix the beams to the floor?
- support posts;
- self-tapping screws;
- corners;
- brackets;
- anchor.
To understand the essence and features of the application of the above details, we will consider each of the categories in more detail.
self-tapping screws

Self-tapping screws are simple fasteners that are used to finish a wooden, but not a concrete floor. Sufficiently long rods with external threads are able to attach beams to wooden floors, but only if the following nuances are taken into account:
- Before fasteners and in the bars themselves, and in the base, through holes must be made;
- It is necessary to insert a dowel into the through hole and only then screw in the self-tapping screw;
- So that the logs do not come off the wooden base, self-tapping screws are fixed in increments of 40-60 mm;
- The length of the self-tapping screw is determined by the thickness of the bars, it is desirable that in the process of screwing in the “tail” of the screw goes into the base at least 5 cm.
The affordable price of fasteners has made them very popular among home craftsmen. But, in order to achieve the desired result, in the process of installing the lag, it is necessary to take into account the above points.
Anchor

Anchor is a combined fastener with self-fastening, which, unlike dowels, is not only easily fixed in the base, but also holds the weight of heavy structures. The anchor is one of the most durable and reliable types of fasteners that are used to fasten the log to any foundation (tape, pile). If we discard all "sentiment", the anchor is still the same dowel, but with a more powerful base.
In the process of fixing, the lag anchor is mounted in much the same way as a self-tapping screw:
- Through holes are made in the bars, after which symmetrical, but not through holes are made in the base;
- To disguise the bolt head, the bars must first be countersunk;
- Since the anchor is very strong and able to hold heavy structures on itself, no more than 4 fasteners will be required to fasten one beam;
- The locking parts of the anchors are inserted into the holes obtained, through which the bolts are screwed;
- When flashing the log through, it is necessary that the bolts go deep into the base by about 6 cm.
To strengthen the bars on a rough basis, experts recommend using anchors with a diameter of 8 to 10 mm. Metal rods of this thickness can easily withstand very large loads.
brackets

Brackets are cantilever supports that serve as a static base for fastening parts in a vertical plane. As a rule, they are used in the process of attaching the log to the supporting pillars. Cross-shaped (x-shaped) curved parts have fixed sashes into which the beam is laid. The price of such products is much higher than in the case of self-tapping screws, however, the range of possibilities for such fasteners is much larger.
Very often in the process of laying the subfloor on strip foundation install brick posts. They play the role of supports and protect the tree from moisture. Since the lag breaks over time, without additional fasteners it can be deformed. The only convenient and reliable way fixing the bars on the supports - the use of brackets.
Support posts

Log posts are supporting structures that are assembled from bricks with a cross section of 1-2 bricks. In fact, these elements perform the task of an "invisible" lining, preventing the effects of dampness on the tree. The columns are mounted in the case of laying a rough foundation on a strip foundation or concrete. Since the level ground water can be constantly changed to protect the logs from water, specially form an underground.
To properly strengthen the logs and build columns, you should consider the following points:
- It is undesirable to build supports from hygroscopic materials - artificial stone or silicate brick;
- Do not install posts on loose soils that can be washed away by water;
- Supports that will be installed on non-flowing soil must be made above the level of the soil in the underground by at least 2-3 rows of masonry;
- It is advisable to lay the pillars with a single-row dressing, observing a single height level for all supports;
- You can fasten the bars to the supports using brackets, anchors, or special corners with self-tapping screws for concrete.
corners

Corners - galvanized metal parts with two planes located orthogonally to each other. The price of such fasteners is largely determined by the size of the elements themselves, as well as their thickness. The degree of strength of the corners directly depends on the mentioned parameters. In the process of fixing the lag, it is advisable to pay attention to such nuances.
Professional installation of adjustable floors in Moscow and the Moscow region!
We make an adjustable floor on anchors and polymer bolts!
Sale of component materials for adjustable floors in Moscow and regions of Russia.
We produce chamber drying logs for adjustable floors of any size 45x45, 40x50, 50X50, 50x70 up to 3 m / p.
We will deliver to your facility with fasteners (plastic bolt, anchor rod) or under your fasteners. Pickup available from our warehouse.
Adjustable video floors.
Adjustable floor on merall anchors
Adjustable floor with polymer bolts
At the end of the 90s, Russian construction appeared adjustable floor technology. This completely new type of bases competed with concrete screeds, which were previously widely used in residential premises, apartments, and any buildings.
Adjustable floors
have such an advantage over concrete ones as simple and quick installation. They are used under the finishing floor of parquet, laminate or parquet board in modern buildings. As a result of official tests, it was possible to prove the durability of such floors. Their service life reaches 50 years, subject to proper use.
This floor leveling technology has significant advantages over other methods of preparation:
lack of dirt and water;
the ability to regulate the floor within 6-15 cm and above;
efficiency and manufacturability of the laying process, relative cheapness;
high installation speed - 100 m2 in 2 days;
alignment accuracy;
relative lightness of structures compared to concrete, dry screeds, and, consequently, lower loads on floors.
There are two types of adjustable floor structures, depending on the height of its rise. If it is required to arrange a floor with a height of 4 to 7 cm, then the floor construction will be used, adjustable plywood
on the plate. Most often, adjustable plywood is used in new buildings. If a higher floor is needed or the differences are significant, then the design is used adjustable floors by joists
. It is also used for floors on floor beams. Most often, regulation by lags is used to replace old floors with their dismantling.
Adjustable floors help eliminate significant height differences during the dismantling of the old floor, when the required level is high. For example, during the finishing work, the old flooring was removed, and the height between the required level and the resulting base does not allow resorting to other leveling technologies.
The design of the adjustable floor along the lags is used for:
floor installations in new buildings;
restoration of plov in old premises;
raising the floor to reduce the load on the floors;
installation of a multi-level floor;
hiding under the floor of electrical engineering and engineering networks.
adjustable plywood ( ).
Flooring with adjustable plywood.
The reluctance to raise the floor high or the lack of such an opportunity may lead the owner of houses or apartments to use new technology flooring - adjustable plywood.New buildings or apartments with low ceilings require a special approach. In such cases, it is inconvenient to use logs, and instead of them, take threaded anchor studs, install, fix them at the base of the floor slab. Sheets of plywood are put on the studs with advance drilled holes. For floors, special moisture-resistant plywood sheets with a thickness of 10 mm and dimensions of 1.5 by 1.5 m are used. As a result, we get plywood on legs, because the sheets are on anchor studs. These legs (studs) are attached to the concrete floor. To adjust the height of the sheets, nuts with a washer are screwed onto the studs, unscrewing or tightening which leads to lowering or raising the plywood to the desired height until a flat flooring surface is obtained. In conclusion, a second sheet is laid on top of the leveled layer of plywood and fastened with a self-tapping screw. After that, you can proceed with the installation of the floor covering. Such a plywood base does not rise more than 7 cm from the level of the subfloor.
The cost of an adjustable floor device consists of the volume of the room and additional work.
Are you planning to independently make repairs in your house, apartment, cottage, warehouse or office space? Then our advice, recommendations and step by step instructions for the assembly of an adjustable floor.
There are several varieties of "adjustable floor" depending on the purpose of the room, the quality of the base and the design height of the floor. To solve the problems of raising the floor level to the required height and placing various communications under it, the floor construction on adjustable DNT logs is used, which provides not only the required evenness of the floor for laying any type of flooring, including wooden flooring that requires minimal subfloor differences, such as parquet , parquet board or laminate (no more than 2 mm per 2 linear meters), but also allows you to make a floor frame if wooden beams are used as interfloor floors.
The specified design raises the floor to a height of 5 to 20 cm or more, depending on the height of the polymer bolts and the cross section of the log, and also allows you to fix it to both concrete and wooden or any other base.
To solve the problems of leveling the floor base without loss of height, an adjustable floor construction based on adjustable DNT slabs is used. Its use allows you to prepare the base for parquet, laminate or parquet board with a difference of no more than 2 mm per 2 linear meters. At the same time, the floor will rise to a height of 2 to 5 cm, which does not exceed the thickness of a conventional screed.


All these designs of DNT adjustable floors allow in the shortest possible time (there are no wet and dusty processes associated with concrete) to mount an even and reliable floor with increased sound and heat insulation of the room, the cost of which is no more expensive than traditional types of leveling ( concrete screed, semi-dry screed or Knauff floors), and with a floor height of more than 5 cm, it can significantly save on preparing the base for the finishing coating.
Cons and disadvantages of "adjustable floor"
Disadvantages of an adjustable floor can manifest itself in case of non-compliance with the requirements for the correct installation of the floor, which also applies to other methods of leveling the subfloor.
At correct installation and compliance with all requirements for the quality of the material "DNT adjustable floor" is a reliable and durable base for any finishing coating on which you can not only walk, but also drive a car.
If you do not follow the DNT adjustable floor assembly technology, entrusting it to the “mountain specialists” or use a regular plastic dowel nail to fasten polymer adjustable bolts to concrete base, the adjustable floor will look like this:
Installation technology of adjustable floors DNT
Features of adjustable floors
- You can install the adjustable floor yourself without the help of professionals. To do this, it is enough to purchase necessary materials and stock up on simple tools.
- Floor installation takes very little time: 1-2 days. For comparison, a concrete floor screed should be dried for several weeks.
- An adjustable floor allows you to hide communications in the technological space, which means you can save space and remove all visual flaws under the floor base.
- With the help of an adjustable floor, you can significantly increase the sound insulation of a room, so this type of floor is often used in concert halls, studios and residential buildings.
- The adjustable floor has a fairly low weight. Therefore, you can install it in rooms with weak ceilings - in private houses or on loggias.
- When installing an adjustable floor, dirty work is practically not carried out. Accordingly, this coating option is ideal for rooms in which cleanliness is important.
- The adjustable floor can withstand a load of up to 2.5 tons per square meter. This means that this coating can be used for almost any type of premises (for residential buildings, offices, shops, warehouses).
Use of adjustable floors
Despite all the advantages of adjustable floors, many owners still think about the advisability of installing this type of flooring. So, when is it best to use an adjustable floor?
- If the floor surface is difficult or almost impossible to level (there are strong drops or irregularities).
- If to level the floor according to technical specifications heavy materials cannot be used.
- If you need to make a floor with different height levels.
- If there is a need to hide communications under the floor.
- If you want to create additional insulation from noise or cold.
Before we move on to detailed description installation process of an adjustable floor, let's understand it key features. To date, there are two types of adjustable floors on the market - these are floors on logs and adjustable floors on slabs. The main difference between these floor types is the minimum lift height.
When installing the floor on the logs, the rise is 5-20 centimeters or more. For an adjustable floor on slabs, the minimum lifting height can be from 3 centimeters.
The process of installing adjustable floors on logs or on slabs is almost identical, but we will still describe in detail the installation of each type so that you can do it yourself at home.
Technology for mounting an adjustable floor on logs
Logs are planed timber. Its dimensions, as a rule, do not exceed 50x50 centimeters. So, before we start installing the floor on the logs, we will decide on the materials and tools that we need.
Video - Adjustable logs on homemade racks
Instruments
For self installation floor you will need: logs, wear-resistant bolts, drill, laser or water level, hammer, dowel-nails.
And now we will consider the step-by-step actions that will help you quickly and efficiently install the adjustable floor on the logs.
Preparatory stage of work

Video - Adjustable lags preparatory process
Installation phase
- Spread exactly wooden logs on the base of the floor. The distance between the lags depends on the choice of floor covering. If you plan to cover the floor with linoleum or lay out tiles, the distance between the lags should be small. Experts recommend taking a step between the lags no more than 30 centimeters. It is advisable to leave a distance from the lag to the wall of at least 1 centimeter. This will create the necessary ventilation.
- After laying out the lag, we proceed to the rigid fastening of the bolts to the base. To do this, we take a hard drill and drill a hole in the concrete through the bolt. The depth of the hole should be about 40 millimeters. Next, we insert a dowel-nail into the prepared hole.
- We hammer the dowel-nail with a hammer, fixing the polymer bolt to the base of the floor. Try to hammer in the nails as hard as possible so that the entire floor structure is not mobile in the future. Also, a good fastening will avoid squeaks and noise during the operation of the floor.
alignment
After the wooden logs are installed around the entire perimeter of the room and tightly bolted, we proceed to leveling. To do this, we need a water (or laser) level and a special tool (key) to adjust the height.
- We carefully measure the level data. The height difference can be no more than 1-2 millimeters.
- Using a special key, we raise or lower the bolts, focusing on the level. We try to achieve perfect alignment, because the quality of installation of the final floor covering depends on it.
The final stage of work
- After leveling the lags, we thoroughly fix the nails to the floor using a hammer.
- We cut off the unnecessary remnants of the bolt-racks with a knife or any other cutting device.
- If necessary, we lay materials between the lags for sound insulation or thermal insulation of the room.
- On the upper base of the lags we place the flooring. The choice of flooring materials depends on what kind of flooring you plan to use. Most often, plywood is used as flooring. It is suitable for further installation of laminate or linoleum. GVL or DSP is also used as flooring.
- After installing the flooring, we lay tiles, linoleum, laminate, parquet or any other coating on the adjustable floor.
The second type of floor arrangement is performed on slabs. It is chosen if the height of the floor should not exceed 3 centimeters. It is difficult to hide communications in such a space between the base of the floor and the coating, but it is quite possible to place cables from the telephone or the Internet here.
The installation process of this type of floor is somewhat reminiscent of the installation of an adjustable floor on logs.
Materials and tools
Before mounting the adjustable floor on the slabs, you need to prepare the following tools and materials: sheets of plywood or other material, bushings, stand bolts, drill, self-tapping screws, hammer, water or laser level.
| Type of plywood | Description |
|---|---|
| Plywood FC | moisture-resistant appearance, urea resin is used for gluing veneer sheets. This plywood is designed for indoor use. |
| Plywood FKM | has increased water resistance, is made on the basis of melamine resins. This type of plywood is unique because it is made from environmentally friendly melamine resins. Through their environmental performance plywood is used in furniture production and for interior finishing works |
| Plywood FSF | veneer sheets are glued together using phenolic resin. This type of plywood also has increased water resistance. It is not recommended for interior decoration rooms, so phenolic resins are harmful to health. Usually used for outdoor finishing work |
| Laminated plywood | contains at its core plywood FSF, which is covered on both sides with a special film. The plywood laminated is applied to production of a timbering. This type can be used multiple times. |
| Bakelized plywood | Bakelite resin is used for gluing sheets of veneer. This type of plywood is used in aggressive climates, sea water, aggressive environments, sometimes for monolithic work. |
| marine plywood | similar to bakelized, but less durable. Made from foreign woods |
| Plywood Flexible | foreign option. Distinctive feature is the ability to bend well in the transverse and longitudinal directions |
Video - Which plywood is better
Preparatory stage of work
- As with the installation of an adjustable floor on logs, the installation of a floor on slabs requires a certain preparation of the working surface of the floor. Be sure to remove excess debris and properly distribute communications that you plan to hide under the floor. Remember that the maximum lifting height will be about 3 centimeters.
- Carefully spread the sheets around the perimeter of the room. The distance between the sheets should be 2-3 centimeters on each side of the sheet.
- Mark points for drilling holes. With a sheet size of 1.5 by 1.5 meters, 9 holes will be enough. One hole should be located in the middle (center of the sheet), four holes may be at the corners of the sheet, and four more should be located in the center of each side of the sheet. This arrangement of holes will ensure reliable fastening of the sheet.
First and second layers of plywood flooring
Final stage
- If necessary, we place thermal insulation or sound insulation of the floor on top of the sheets.
- After installing the sheets, we also lay out laminate, tile, parquet, linoleum or any other selected floor covering.
Secrets of a successful adjustable floor installation
After finishing installation work be sure to thoroughly clean the floor surface before installing the flooring. Excess debris, sawdust, pieces of plastic can create creaks and noise after laying the top layer of the floor.
Thoroughly hammer and tighten all floor fixings. The reliability of the entire structure depends on this.
If you are making a high floor, it is advisable to place between the joists soundproof material. This will avoid unnecessary noise during floor operation.
Don't skimp on the quality of materials. It is more profitable to immediately choose more expensive materials for floor installation, instead of already through a short time completely redo all the work.
If, after installing the floor, you need to move communications, simply remove a few strips of adjustable floor in the right place. After doing necessary work you can easily put the floor in its original place.
We hope that our advice, as well as step-by-step instructions, will help you install an adjustable floor in your home, cottage or office on your own, quickly and without any difficulty.
Video - Adjustable floors
In the event that floor lags need to be installed in a building with wooden floors, as a rule, there are no questions. But what about when we are talking about ceilings made of slabs or monolithic concrete? For these purposes, special lag screws are used, which have a number of differences from conventional screws used in construction work.
Anchors or special screws?
There are two ways to fasten the log to the floor: using conventional screws and special adjustable screws. Many experts prefer conventional fasteners, which have a more modest price and are more convenient to use. Simple long screws or anchors securely fix the logs to the floor, but at the same time they have a significant drawback.
Anyone who has at least once encountered the installation of floor structures knows how important it is to observe accuracy in this work. If the overlap is perfectly even, then setting the lags in the same plane with an accuracy of a millimeter is not at all difficult - even an inexperienced master can handle this. But, unfortunately, in our houses and apartments, floors with a perfectly horizontal surface are very rare, and when placing beams, which are to become the basis for flooring, you almost always have to resort to time-consuming and responsible adjustment. That is why, most often, when installing the log, adjustable screws are used, which make it possible to level the structural elements if necessary and at the same time provide the most reliable fixation.
What is an adjustable lag screw?
 Adjustable screwsused to install the floor log, most of all resemble externally studs with double-sided threads. But unlike studs, such a screw has a thread for a nut on one side, and a thread for a construction dowel on the other. The screws can have different lengths and diameters, and their choice depends on how high the joists need to be raised and what load will affect the floor structure in the future. Complete with such support screws, which are also called a dowel-stud, use 3 nuts and three washers of the appropriate diameter.
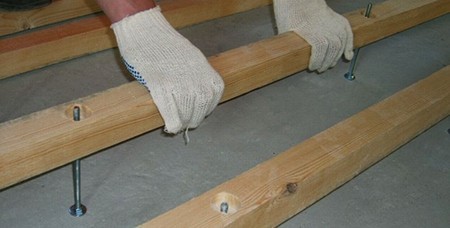
Installing the lag on the screws with adjustment is as follows:
- The floor is marked: the locations of the beams are determined, as well as the places of their attachment.
- In places where the support screws will be located, holes are drilled in the concrete into which construction dowels are inserted.
- Screws are attached to the dowels by screwing them with the side intended for fixing in the base.
- To securely fix the screws in the ceiling, washers and nuts are used to press the hardware to the floor.
- On the part of the screws that has metric thread, screw nuts and lay washers of large diameter - they will be the support for the structure and with their help the height will be adjusted.
- The lags are laid on the support washers by threading the screw rods through the holes prepared in them.
- Wooden elements are leveled, checking horizontality in several directions.
- wooden beam secured with a washer and nut. In order for the mount not to protrude beyond the dimensions of the lag, recesses are made at the fixing points to drown the washers and nuts.
Advantages and disadvantages of an adjustable floor with screws
 In most cases, adjustable log supports are used as a simple and affordable alternative cement-sand screed. This design of wooden floors is ideal if it is necessary to reduce the load on the floor as much as possible - unlike screeds, screws with nuts and washers weigh very little. This method is also well suited for rooms in which it is not possible to perform "wet" processes. Fastening the lag on adjustable screws can be done as quickly as possible and immediately start laying the floor, while the option with a screed will require additional time for it to solidify. In the event that it is planned to install "warm" floors, the described solution is the most optimal - it provides access to communications if repairs are needed and is equally suitable for both water and electrical systems. The space under the floor can also be used for laying various communications, of course, taking care of their fire protection and waterproofing.
The disadvantage of this method of installing a lag is one - such floors do not tolerate high humidity. In this regard, screw-adjustable floors are not used in rooms with high humidity such as washrooms and bathrooms.
Helpful Hints