Homemade polycarbonate. Polycarbonate greenhouse: design options and do-it-yourself construction. Video: watering a greenhouse, how best to do it
Greenhouses and other structures using polycarbonate are now popular among summer residents and owners of private houses. Polycarbonate is relatively new inexpensive material, which has a lot of advantages, which is why a do-it-yourself polycarbonate greenhouse for many is the best choice. It is quite possible to build it yourself, it is easy to maintain, and it is a pleasure to grow crops in it. Today, many tend to grow vegetables on their own, being afraid of GMOs, and any fairly advanced owner of a summer cottage is always proud of his harvest and works in a greenhouse with pleasure.
If we compare polycarbonate with other types of plastic, it is inexpensive, but it looks very attractive and modern. That is, in addition to functionality, the greenhouse will also be an aesthetically attractive object on the site.

Polycarbonate is a modern material, and like most modern materials it has aesthetic appeal. Such a greenhouse, in addition to its direct purpose, will look good on the site
The material has a good ability to scatter light, a high degree of thermal insulation. Resistance to wind and snow loads, impact resistance, immunity to ultraviolet radiation are also considerable advantages of polycarbonate.
It is convenient to build home-made polycarbonate greenhouses by purchasing ready-made arched kits. Before proceeding with construction, calculate the dimensions of the future greenhouse, taking into account the size of the polycarbonate elements, taking into account these parameters, it will be necessary to equip a simple foundation and plinth.
The most common size of a polycarbonate sheet is 2.1/6 m. When the sheets are bent, an arc with a radius of about 2 m is obtained, the height of the greenhouse will be the same, and the width will be approximately 4 meters. To create a typical greenhouse, 3 sheets are enough, its length will be on average 6 m. If desired, you can slightly reduce the size of the greenhouse, or increase it by adding another sheet. And if you need to increase the height of the structure, the base can be raised to the plinth. The most convenient for the greenhouse is a width of 2.5 m. This size allows you to place two beds inside and make a fairly spacious passage between them, where you can even carry a cart.
Important! Polycarbonate is a transparent material, in order to keep the flow of light inside the structure and direct it to the beds, not allowing it to scatter, it would be appropriate to use a special compound with reflective properties to cover the walls.
When building a greenhouse from polycarbonate sheets, we advise you to choose a form where flat sections alternate with arched ones, because. on flat areas, the effect of reflection of the sun's rays is minimized, there will be less glare and the light will give off its heat to the plants, and not dissipate, which is typical for an arched structure. With a competent combination of curved and flat greenhouse elements, you can achieve the effect when the coefficient of absorption of heat and light is close to optimal.
Features of the manufacture of greenhouses:
- the space inside should be organized in an optimal way;
- polycarbonate sheets should be used appropriately so that the amount of waste is minimal;
- the foundation and plinth are constructed taking into account the selected dimensions;
- the climate in the greenhouse is humid and warm, based on this, it is necessary to select the material for the frame - the most convenient galvanized profile, when choosing wood, it must be pre-treated with special solutions - copper sulfate, antiseptics.
Tools and materials needed for work:
- cellular polycarbonate (thickness 4-6 mm);
- materials for the frame (steel pipes, wood or galvanized profile to choose from);
- jigsaw, screwdriver, drills (4 mm), self-tapping screws for polycarbonate (for a metal frame - with a drill).
What foundation is best?
The greenhouse should be located on a flat, well-lit place. The best location along the length is from east to west. There are several options for arranging the foundation for it.

It happens that a place for a greenhouse is located only on an area with an uneven surface - in this case, you can use additional bars or other material to level the soil, then fill in more earth, tamp until the surface is even
If it suits you wooden version the foundation for a polycarbonate greenhouse, which has a short service life - up to five years, vertical supports should simply be immersed in the soil, you can attach them to steel corners driven into the ground. A bar with a size of 100/100 mm is used, it is mounted around the perimeter of the greenhouse. But such a foundation, even if the tree is treated with antiseptics, will not last long.
To create a more practical foundation, curbstones, foam or aerated concrete blocks, and bricks are used. If the soil in the area designated for the greenhouse is loose, laying is done around the entire perimeter. If it is dense, you can limit yourself to individual columns that are set according to the level.
The most expensive, but also the most durable will be a monolithic reinforced concrete foundation, made around the perimeter of the greenhouse. To install it, you need to dig a trench, mount the reinforcing cage and start concreting. The design will avoid repairs, it will be stable, problems such as distortions simply will not arise.
Types of frame structures
Consider the three most convenient for polycarbonate.
Option # 1 - an arched frame for a greenhouse
This option looks the most attractive and is used by summer residents more often than others. It is convenient in that in winter the snow on the roof will not linger, the load-bearing elements will be relieved of overload, the load on the foundation will also decrease. When choosing a standard sheet 6 meters long, the width of the greenhouse will be 3.8 m, the height will be almost 2 m.

Ventilation for a greenhouse is necessary, therefore, in addition to the door, it is also desirable to make a window. This greenhouse has three ventilation holes- two on the side and one on top

Scheme of the construction of a greenhouse with an arched frame. For sheathing, you can use a two-layer roll film or polycarbonate sheets, which will be a more practical option.
It will also be useful material on how to reduce the heat in a greenhouse made of cellular polycarbonate:
Option # 2 - a frame in the shape of a house
This is a design with gable roof and vertical walls. If you choose this honeycomb polycarbonate greenhouse frame option, the greenhouse can be made in any size, but you will need more material.

Such a greenhouse with a frame in the shape of a house transmits light and heat well, the hatches on the roof perform the function of ventilation - all conditions are created for the good growth of seedlings and vegetables
The choice of materials for creating a frame
Wood is a popular material for building an inexpensive greenhouse. But its significant drawback is the fragility and the need for constant repairs. Wood is not often used to create a polycarbonate greenhouse.

Such a shed greenhouse - perfect option for a small plot, you can build it, even if you have a plot of 6 acres, placing it in a convenient corner
frame welded from steel pipe- square galvanized pipes with a size of 20/20/2 mm are used. At correct installation this frame will last a long time. When choosing an arched shape for bending pipes, you will need a special machine, you must also be able to work with a welding machine. Today you can order bent pipes in special organizations.
Omega-shaped galvanized profile – very a good option, quite easy to install, and the design will be durable and lightweight. But the profile for the arch needs to be bent and many holes for the bolts should be made in it.
Example: building a greenhouse with a foundation of pipes
We make markings with the help of a rope and pegs. Then, using a garden drill, we make four holes along the length (depth - 1.2 m), and a couple of holes for installing the door - at a distance of its width. Asbestos-cement pipes are cut into pieces (length 1.3 m), in a vertical position they are installed in holes in the ground. We fill the gap with sand, ram it well.
The bars are cut into pieces one and a half meters long. One end of each piece must be chipped with an ax so that its diameter is equal to the diameter of the pipes. We install the pillars impregnated with a protective composition vertically into pipes, we make a frame of boards that will fasten the pillars in the lower part.
The truss frame is cut out for the roof so that it is more durable, it should be covered. To fasten the pillars at the base of the greenhouse, we nail the lower trim - galvanized iron tapes 25 cm wide. You can use metal scissors for cutting. The ribbons should overlap by 5 cm.

Now you can start covering the walls with polycarbonate. We drill holes in the sheets, cut the sheets with a sharp knife, taking into account the size of the roof, fasten them to the rafters with self-tapping screws
Metal ribbons will also be needed for the roof, but their width will be 15 cm to create a ridge. The tapes are bent at an angle of 120 degrees with a mallet, leave a small gap between the sheets, taking into account their thermal expansion, the gaps can be closed with a tape so that the thermal insulation does not suffer.
The next step is to sew up the walls with polycarbonate, leaving the door openings open. A greenhouse with straight walls for insulation over time can be sheathed with another layer of polycarbonate.

The drawing gives an idea of how to build a stable practical greenhouse with intermediate posts and a gable roof.
We cut the boards prepared for the door in half with a saw, make doors and fasten hinges to them. We put the door frame on a polycarbonate sheet, according to its size we cut the material with a knife and fasten the sheet to the doors. The doors are ready, you can hang them, put handles and locks, if you plan. A polycarbonate greenhouse has been built, the ground around it needs to be leveled and the internal arrangement should begin.
Some important tips for construction:
- when using a non-galvanized profile, paint it so that it does not rust;
- there must be good ventilation in the greenhouse, therefore, in addition to front door, does not interfere with making a window on the opposite side of the structure;
- the minimum width of the greenhouse for comfortable operation is 2.5 m (space for a meter passage and two beds of 0.8 m each);
- for lighting a greenhouse, it is convenient to use energy-saving lamps that give white light;
- if you plan to use heating, an electric heater will do, water heating, "potbelly stove" or heat generator, depending on the circumstances.
To create such a greenhouse does not take much time and high costs for materials. But it will serve you for a long time and will be a great help in gardening, and fresh produce grown on your own, or seedlings to decorate the garden, will delight and cheer you up.
We will send the material to you by e-mail
O outdoor recreation is a great option, especially if you spend time at your dacha or in country house. Most people have a small garden on their backyard plot, where a pretty greenhouse will fit in well. Ordering such a product in a store is very expensive, but a do-it-yourself greenhouse made of polycarbonate, the drawings of which are easy to get, is the most suitable option. Let's find out what we need for this and how to install it.
Polycarbonate greenhouse
Among the advantages of greenhouses made of this material, it is worth noting:
- Durability;
- Reliability;
- It retains heat better and longer than a greenhouse covered with film or glass, provided that the material is of high quality;
- Retains up to 92-95% of natural light;
- Year-round operation;

- Ease of installation when choosing a simple greenhouse frame;
- Fire safety, when exposed to high temperatures, polycarbonate melts without releasing harmful substances;
- Aesthetic look.
Video: how to choose high-quality polycarbonate
How to make a polycarbonate greenhouse with your own hands drawings
If you decide to assemble a polycarbonate greenhouse yourself, you will need a design plan and certain materials, a list of which you can find below.
First you need to decide on the type and material of the frame for the future greenhouse. There is a huge variety of both standard solutions and individual projects. The choice of material is also important. Hardware stores sell ready-made sets of metal profiles, which are assembled as a designer. Related article:
PVC pipes can also be used as a material. They are highly flexible, lightweight and easy to install. And of course, it is impossible not to mention wood, which also serves as an excellent frame for these buildings, is available, cheap and allows you to mount structures of various shapes and sizes. A do-it-yourself greenhouse made of polycarbonate, drawing up a drawing of which does not take much time, will turn out to be large and comfortable, provided that all the necessary rules are followed. First of all, you need to decide on the size of the structure. They will depend on the area of \u200b\u200bthe personal plot, what and in what quantity you are going to grow, and, of course, on the cost of materials. The strength and reliability of the greenhouse will depend on how high-quality foundation you prepare for it. There may be several options here. The most common is a wooden base. For its construction, you will need a beam, a level, a screwdriver, a shovel, a tape measure of 7 meters, a construction knife. It is necessary to cut 2 pieces of 3 meters and 2 pieces of 3.85 meters. When assembling a box from a bar, we put the bar for convenience on a narrow part for further ease of installation of polycarbonate, so that it overlaps on the bar. Three-meter bars should cover the end of the bar 3.85 m. But the most reliable will be a concrete base. If you are going to make a large greenhouse and use a metal profile for the frame or wooden bars, then a concrete foundation will be necessary due to the significant weight of the entire structure. For the installation of a cement foundation, we make a formwork, according to the dimensions of the proposed foundation. We fill it with cement and let the cement harden and harden. If you are going to make the frame yourself, then you will need: metal profile: square pipe 25 x 25 mm, machine, welding machine, corner. And for further assembly of the greenhouse: polycarbonate sheets, metal tapes, metal corners, self-tapping screws, including roofing ones. You can easily make a polycarbonate greenhouse with your own hands, the drawings of which are ready. We take a square metal pipe 25x25 mm, preferably galvanized, we roll it through, as a result of which we obtain an arc of the required size. We cut the pipe to the size of the structure and weld arcs to it, in steps of 0.65-1.0 m. We make 7 arcs: two for the ends, 5 for gaps. We make the ends - we connect the ends of the arcs of a three-meter square pipe 25x25 mm, weld the door frame and vents. Or such a frame can be bought in a specialized store. On the previously exposed wooden frame or cement foundation, we install the lower frame of the greenhouse along the long sides of the foundation. Fasteners on a wooden foundation are carried out with self-tapping screws, in the appropriate technological holes provided by the greenhouse manufacturer or drilled independently, if you made the frame yourself. If you didn’t prepare the base, then the arcs of the frame are attached directly to the wooden foundation with the help of clamps. The frame is fastened to the cement foundation using special anchor bolts or metal corners. We sheathe the ends of the greenhouse with polycarbonate on a horizontal plane. Having fixed the polycarbonate at the ends, we cut out the doors and two vents (since it is convenient to cut polycarbonate on a horizontal plane). We install ready-made ends. We install fittings: handles, locks, hooks for fixing doors and vents. We release the polycarbonate sheets from the protective film, carefully throw the first sheet onto the frame, align it. We bring out 1-3 cm of polycarbonate at the end, align the edge along the end, fasten the sheet on the end arc with roofing screws. Then we take galvanized metal tapes, throw them over the sheet, fasten the tapes with roofing screws, starting from the second arc. We throw the second sheet of polycarbonate and install the remaining tapes. We do the constriction: we carry out the screed of the tapes from the first sheet from the second arc, the overlap of the sheets is pulled together last. And you become happy owners of a new polycarbonate greenhouse. If a do-it-yourself polycarbonate greenhouse, the drawings of which are made according to all standards, is assembled, then the following recommendations must be observed in order to extend the validity period.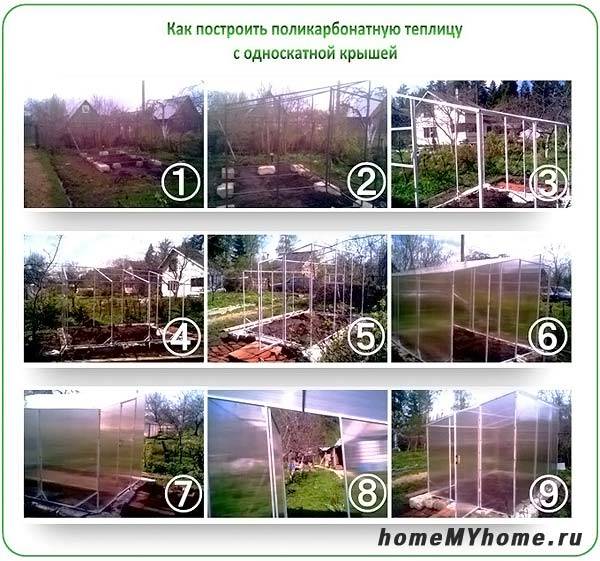
Design choice
Drafting
Foundation preparation
Making a frame from a metal profile
Base fixing
Fastening to a wooden base
Fixing to a concrete base
Installation of polycarbonate
findings
- Durable and has a number of advantages over film and glass greenhouses.
- Easy to install, when choosing a simple design; you can carry out the manufacture and assembly yourself.
Polycarbonate greenhouses in the distribution network are widely represented - for every taste and size. But many people prefer to do it themselves. Because a do-it-yourself polycarbonate greenhouse is many times stronger and more reliable. At the same time, the costs are less or the same.
How to choose a design
If you decide to build a polycarbonate greenhouse with your own hands, it is advisable to choose a design that allows you to use the main advantage of this material - its ability to bend. These are two types with curved roofs with arched supports.
In one design, the arcs extend from the ground itself. If they are curved in the form of a radius, a lot of area is lost along the edges, since it is very inconvenient to work there due to the small height.
Another design solves this problem - with a composite frame welded from several pieces. Straight racks emerge from the ground / from the base, which rise to a height of at least one and a half meters. An arc is welded to them. With this device, the roof is rounded, the walls are straight. Even along the walls you can work without problems, straightening up to your full height.

But the rounded roof of the greenhouse has several disadvantages. The first - it is more difficult in it than in a straight line to make vents for ventilation. You can solve the problem if you make transoms in the walls, and not in the roof. The second minus of a rounded roof in a polycarbonate greenhouse is that snow comes off it worse than from flat inclined surfaces. If you live in a region with snowy winters, you will either have to make reinforced farms, or make a pitched roof - with one or two slopes.

There is a third solution - to make the rounded part of the roof from two arcs welded at an angle, which forms a kind of ridge. With this structure, the snow melts well and the skate can be protected with a wide strip of metal. This will improve the snow removal and protect the joint from leaks.
Do-it-yourself polycarbonate greenhouse: frame material
The choice of materials for the frame is not very large. Profiled (rectangular) pipes, a metal corner and wooden beam. Also use galvanized profiles for drywall.
Wood
The beam is used for small greenhouses, and the design is chosen with a single-sided or gable roof, since bending wood arcs is difficult and time consuming. The cross section of the beam depends on the size of the greenhouse and the snow / wind loads in the region. The most popular size is 50 * 50 mm. Such supports are placed in the Middle Strip. For greater reliability, corner posts can be made from a bar of 100 * 100 mm.
Moreover, to save money, you can not buy a bar, but make a composite one - from boards. Take two boards 50 mm wide and 25 mm thick, three boards 15 mm thick. Fold, knock down on both sides with nails. The resulting racks are stronger, better tolerate loads, less prone to torsion, since the wood fibers are directed in different directions.
Another option is a larger one.
If a do-it-yourself polycarbonate greenhouse is being built on wooden frame, all boards / timber must be treated / impregnated with antiseptics, and those that are intended for the street. Treat the ends that are buried in the ground with compounds for direct contact with the ground. Without such treatment, wood, firstly, will quickly collapse, and secondly, it can become a source of plant diseases.
When connecting racks to the strapping (bottom bar), for greater rigidity and reliability, use steel reinforced mounting angles. They are available at hardware stores. To increase the bearing capacity of the roof, additional jumpers are installed.
Profiled pipes and steel angle
Most of the polycarbonate greenhouse frames are made of profiled pipes. If you have the skills to work with it, it’s easy to do everything yourself - cooking a square or rectangle is easier than round pipes. Another plus is that with the help it is easy to make arcs yourself.
The cross section again depends on the dimensions and natural conditions. Most often they are made from a rectangular pipe 20 * 40 mm. But options are also possible. For that material, another parameter such as wall thickness is also important. It is desirable that the metal was 2-3 mm. Such a frame endures significant loads.
A steel corner is also a good option, but bending it is a difficult task, therefore, greenhouses are assembled in the form of a house - with gable or pitched roofs. The dimensions of the shelves are 20-30 mm, the thickness of the metal is from 2 mm.
Galvanized profiles
Do-it-yourself polycarbonate greenhouse with a profile frame is the most unreliable option. It is good in areas with little snowy winters, and even without strong winds. The advantage of this option is that welding is not needed. And the minus is not the biggest bearing capacity.
One of the frames
The technology is used standard - as for the construction of walls and partitions made of drywall. The only difference is that the frame is sheathed on one side and polycarbonate is attached. It is advisable to make the racks double - splicing two supporting profiles, turning them “back to back” and twisting them with self-tapping screws. For greater rigidity of the frame, make slopes, connecting adjacent racks with inclined jumpers. It is desirable to make the roof pitched, and not rounded, to strengthen the trusses.
Foundation
If you are wondering whether or not you need a foundation for a polycarbonate greenhouse, there is only one answer - you need it. And reliable. They fly very well. Therefore, the foundation should “anchor” the building well.

Belt type
This foundation is for buildings that are planned for more than one year. The most expensive, but also the most solid option. If you plan to use a greenhouse all year round, the foundation is made deep - to a depth just below the freezing of the soil. For seasonal use, concrete-brick or just from a bar is suitable.

Concrete-brick - one of the most common
Concrete-brick (concrete-beam)
Most often they make a concrete-brick version. It is optimal in terms of costs, complexity and duration. Work is carried out as follows:
- By the size of the greenhouse, they dig a trench. Its width is about 20 cm, the depth depends on the type of soil.

- A dense oilcloth or roofing material is spread on the prepared bottom. This is necessary so that moisture from the solution is not absorbed into the soil. It is also desirable to cover the sides, but there formwork panels partially solve this problem. Without this layer, the concrete will not gain strength and will collapse.
- The solution is poured into the resulting ditch. The proportions are as follows: for 1 part of cement (M 400), 3 parts of sand and 5 parts of aggregate are taken. Aggregate - preferably crushed stone of small and medium fractions. Expanded clay should not be used - it absorbs moisture, can cause high humidity.
- The surface is leveled "under the level". You can smooth it out with a wooden block.

- Mortgages are installed in the foundation, at the corners and with a distance of 1 meter - studs or pieces of reinforcement with a diameter of at least 12 mm. Studs are placed if it is necessary to attach timber to them, reinforcement - if brick is to be laid. They stick out above the level of the foundation by at least 15 cm.
- The poured foundation is covered with a film, stands for at least a week (at temperatures below 17 ° C, two weeks should pass). If the weather is hot, it is watered a couple of times a day. To preserve moisture in this case, under the film, it is better to cover it with a coarse cloth (burlap).
- If a bottom harness there will be a bar, on top concrete base waterproofing is being rolled out. You can - roofing material in two layers, but now it is quickly collapsing, so it's better to take Hydroizol or something similar. You can smear concrete with bituminous mastic a couple of times. The result will be more reliable.
- A row of strapping is laid:

- Next comes the assembly of the frame.
There are options for this type of foundation. It is possible to install small sizes in the prepared trench, fill the space between them with mortar. They must be installed so that their edge is below ground level. A layer of concrete is poured on top, leveled. Mortgages are fixed in the seams.
Empty bottles can be used as building material. They are laid in rows, poured with concrete. It turns out a very economical and warm foundation. Its bearing capacity is quite enough for a more serious building.
Timber foundation for a polycarbonate greenhouse
This option is suitable as a temporary solution - it can last two to three years. It depends on the humidity in the area, the quality of the wood and the processing. A beam is used with a large section - 100 * 100 or more (can be made composite, from several boards). It is treated with compounds for wood in contact with the ground. The order of work is as follows:

This option is only suitable for dry areas with a low location. ground water. In this case, we can hope that the foundation will live for at least a few years.
Pile-grillage
Another type of foundation that will not protect against frost. But it is reliable and will serve for a long time. Complete, and we will give a short list of works.

Next, you can fasten the strapping, or you can build on a couple of rows of bricks and only after that install the frame. After that, we can say that the do-it-yourself polycarbonate greenhouse is almost ready. It remains to fix the polycarbonate.
Which polycarbonate to choose
How long a polycarbonate greenhouse, bought or built with your own hands, will last, how well it will “work”, depends on the parameters and quality of the polycarbonate. His choice must be taken responsibly - the amount is considerable.

Types of polycarbonate
There are three types of this material:

What type of polycarbonate is better to use for the construction of greenhouses? Depends on the mode of operation of the greenhouse. If it is heated, you need a cell phone. If this option is exclusively for the warm season, corrugated (or monolithic) is more suitable. Monolithic is also not bad, but corrugated has more rigidity. For greenhouses that are planned to be used from early spring or throughout the winter, cellular polycarbonate is installed. Due to its structure, it has more than its high thermal insulation characteristics - it retains heat better, although it transmits light worse (86% versus 95%).
Choosing cellular polycarbonate
It is not difficult to choose corrugated or monolithic - we are guided by the declared characteristics. It is only important that there is UV protection. There are no other pitfalls. But with a cell phone, there are many nuances. You need to pay attention to the following:

The easiest way to check the quality of cellular polycarbonate is to try to squeeze it between your fingers. If it is not pressed through, even if you make considerable efforts, you can take it. If it squeezes easily, look for another one.
Mounting Features
According to the technology, polycarbonate is mounted using starting and connecting profiles. First, profiles are installed on the frame, a sheet of cellular polycarbonate is inserted into them, which is fixed to self-tapping screws with special press washers, which at the same time protect the attachment point from leaks. Profiles, in addition to holding the sheets in place, also protect the cuts from dust and dirt getting into the bottom. The system looks neat, works well, but all components cost decent money.

Aesthetics for a greenhouse is not the most necessary property, therefore, if you need to save money, they prefer to fix it in a simple way, without profiles and press washers. Here's how they do it:

This is what concerns directly the fastening of cellular polycarbonate. There is one more point that became clear during the operation of polycarbonate greenhouses. Polycarbonate should not be placed close to the ground. It is desirable that it starts at least half a meter from the surface. Why? Because firstly, it gets dirty anyway and almost no light passes through it, so it does not affect the overall illumination. Secondly, it begins to deteriorate - blacken exfoliate. It is not clear what causes this reaction, but it occurs frequently. So when developing a do-it-yourself polycarbonate greenhouse layout, provide half-meter walls from another material - brick, building blocks. Doesn't matter.
Today, quite a lot of urban residents are fond of growing early vegetables and fresh herbs in their suburban areas in greenhouses and hotbeds. Even if this is not done to generate income, but more just as a hobby, for some reason, home-grown products always taste better.
From the point of view of environmental friendliness, what grows in your greenhouse or greenhouse (and here you can grow not only early vegetables and spices or their seedlings for transplanting into the ground, but also ornamental plants or flowers) is always better and cleaner if timely. Making homemade polycarbonate greenhouses is not at all difficult and requires minimal effort, time and money.
A few words about cellular polycarbonate
 Industry building materials today offers us cellular polycarbonate. Today, samples of polycarbonate sheets of various colors and thicknesses can be seen, perhaps, in every hardware store.
The standard factory size of a sheet is usually about 2 X 6 meters, but sellers offer services for cutting it, so you can buy polycarbonate in any size you need(of course, within the factory length and width). If you intend to make a larger greenhouse, the sheets are easily joined together (but more on that below). For the manufacture of a greenhouse or greenhouse, polycarbonate can be considered an ideal material. We have already written about its properties, so we can immediately move on to tips on how to make a greenhouse out of cellular polycarbonate with our own hands.
 Polycarbonate has high bending and tearing strength. This allows you to create structures with a large bending radius, such as a greenhouse. There are others beneficial features and . It has a low specific gravity and also has a high resistance to temperature.
The scope of the material is determined by its size. Read more about the dimensions of cellular polycarbonate. Main parameter- width. Thin polycarbonate is used for small canopies, thick - for roofing.
A greenhouse is not a greenhouse
 The main fundamental difference between a greenhouse and a greenhouse is that the latter is always equipped with an external heating source to create the desired temperature. The greenhouse, as its very name implies, is heated exclusively by natural sources - the sun's rays, overripe manure or foliage. At the heart of its action is elementary physics, or rather the "greenhouse effect" known to us from school lessons.
This is important to understand when choosing cellular polycarbonate for its construction. You are absolutely not suitable for a greenhouse polycarbonate sheets saturated dark colors or completely reflective. It would be most correct to buy transparent polycarbonate or light-colored products - they let in enough light, ultraviolet radiation, and perfectly scatter it inside the structure.
And one more piece of advice - for a greenhouse, buy cellular polycarbonate with a sheet thickness of 8 - 10 mm.mm. Thinner ones are used for decorative purposes, thicker ones are used to create massive building structures on facades and roofs, and it is quite inconvenient to work with them at home.
Cellular polycarbonate of the thickness recommended by us perfectly withstands mechanical loads, a possible large layer of snow, and hail strikes. Unlike glass, this is not a fragile material, it does not break from impacts and bends quite easily.
What tool is needed to install a greenhouse made of cellular polycarbonate
 For work on the manufacture of elements and assembly of the frame of the greenhouse, you may need (depending on the working material):
- Hacksaw with blade for metal (or wood)
- Bulgarian
- Drill with speed control (driver)
- Drill
- A hammer
- Screwdrivers
It is better to cut polycarbonate directly at home with an electric jigsaw with a dust removal system, although the cut can also be done with a hacksaw with a metal blade, but this is a very troublesome and not very convenient process.
For marking on cellular polycarbonate, prepare a thin marker or felt-tip pen. A regular graphite pencil will leave a barely noticeable mark and can be almost invisible or scratch the surface of polycarbonate. So, how to assemble a polycarbonate greenhouse?
Assembling the frame
 The assembly of the frame is usually preceded by a detailed drawing of a drawing of a polycarbonate greenhouse or, at least, a working sketch indicating the dimensions of the structural elements. This will help you not only during the assembly of the greenhouse itself, but also on preparatory stage when you will make its parts and cut cellular polycarbonate, as well as to calculate the need for the amount of material you need.
The frame of the greenhouse is of two types, like the greenhouses themselves - in-depth and aboveground. In any of the options, a greenhouse is a structure that is completely closed on all sides, having a bottom so that heat is retained inside. The shape of the upper part of the frame can be any - semicircular, straight, with a gable or shed roof.
The main requirement for the frame is that it must be stable, have opening elements in the upper or side part that provide you with access to the grown plants for planting and caring for them. These can be fully removable or opening hinged hatches.
 Polycarbonate greenhouse drawing
 After assembling the frame (we deliberately omit the description of this type of work, assuming that you have the skills to work with wood or metal), you have to fix cellular polycarbonate to it.
In what sequence, how and how to properly fix cellular polycarbonate in the manufacture of a greenhouse
 The frame is assembled, sheets of cellular polycarbonate are cut to the required dimensions. It remains to sheathe the frame with them, and you can use the greenhouse for its intended purpose. ? To fix polycarbonate, you need to buy self-tapping screws with a flat bottom of the cap and rubber gaskets (washers). This is necessary to ensure a tight and tight connection of cellular polycarbonate sheets with frame elements.
Work with a drill or screwdriver must be done at a slow speed. If the tool has a force limiter function, set it to the desired values. They can be determined by experimenting with polycarbonate trimmings and frame materials. Sheathing should start from the bottom, after which you sheathe the walls and roof of the greenhouse.
Video about assembling a polycarbonate greenhouse
A master class on assembling a simple and inexpensive greenhouse made of cellular polycarbonate with your own hands.
AT modern world there is an increasing tendency for the population to move towards healthy lifestyle life and proper nutrition. In this regard, an increasing number of people seek to acquire their own summer cottage and independently grow healthy and tasty vegetable crops.
Well, the most reliable and faithful assistant summer resident in this matter for many centuries remains an indispensable greenhouse. It is with its help that it is possible to significantly improve the quality and duration of the yield of vegetables.
Do-it-yourself polycarbonate greenhouse
Before building a greenhouse, it is worth choosing a material for manufacturing. The most popular material in this case is plastic film or glass. But nowadays it is gaining more and more popularity. new material- cellular polycarbonate. It has quite a few advantages:
- strength;
- good light penetration - 87%;
- thermal insulation;
- easily bendable material;
- lightness - you can do without a solid foundation and use a light frame.
Which polycarbonate to choose

To make a choice, it is necessary to study the features of the material.
First, we pay attention to the internal structure of the sheet itself. It can be monolithic or cellular. Cellular polycarbonate is much more flexible, so it is undoubtedly more suitable for building greenhouses..
The second important point is the thickness of the material. It directly affects the thermal insulation properties of the material. Today on sale there are sheets with a thickness of 4 to 20 mm.
A greenhouse located in central Russia and equipped with a heating system can be built from a 10 mm sheet. A greenhouse without a heating system should be made of a thicker sheet.
There is also a special kind of polycarbonate - these are sheets coated with a special layer on one side ("antifog"). This layer prevents the accumulation of condensate on the surface. The use of this type of polycarbonate will protect against the accumulation of moisture indoors.
The main thing during installation is to install all sheets so that the protective layer is outside!
Greenhouse profile


The frame of the greenhouse is best made from a metal profile. It is quite light and has a long service life..
The question often arises, how strong is such a frame and can it withstand heavy snow loads?
Of course, here we are not talking about the fact that the greenhouse can easily withstand layers of snow more than half a meter. But if you plan to grow vegetables all year round, then clearing the structure of snow is a matter of course. Otherwise, your crops simply cannot see the sunlight.
The best option for assembling a greenhouse is a section profile of 50 * 40mm. You should buy two types of profile: rack-mount PS and guide PN. The guide profile is wider than the rack profile, so the connection of these two profiles is tight. All horizontal frame elements should be made from a guide profile.
Diagrams and drawings of a greenhouse
Building a good drawing of a greenhouse may not work for everyone. Below are diagrams of several options for the design of a polycarbonate greenhouse. You can safely substitute your dimensions and proceed to the assembly of the greenhouse.

End part of the greenhouse, drawing

Arched greenhouse - the most simple design greenhouse
How to make a greenhouse with your own hands
Before building a greenhouse, it is first important to choose the dimensions and decide on the shape.
The shape of the greenhouse may be different. Most often there are two options: in the form of an arch and with straight walls. Each of them has its own advantages and disadvantages.

The arch type greenhouse is easy to install. In addition, the snow on the surface will not linger.
An arched greenhouse is considered the most affordable in terms of assembly. It has a high degree of resistance to snow load.
However, such a greenhouse in terms of functional qualities is inferior to a similar greenhouse with straight walls. This is due to the fact that the curved polycarbonate sheet has a lower degree of light transmission. Consequently, the plants will receive less heat and light, and much more effort will be expended on them. Which is detailed in this article.

Plants in a gable greenhouse get more light
A greenhouse with straight walls requires a lot of effort to build. But at the same time, it has higher functional abilities.
Having decided on the size and shape, we need to draw up detailed drawings of the future structure. When drawing up drawings, the size of the material used plays an important role.
As a rule, a regular polycarbonate sheet has a size of 2100 * 6000mm - take this into account when developing a drawing. This will avoid unnecessary cutting of sheets. But what it looks like can be seen in the article by clicking on the link.
When choosing a suitable place to place a greenhouse on your site, we take into account its orientation relative to the sun. The optimal location along the length from east to west. The place for the greenhouse should be relatively flat so that you can easily lay the foundation and install the greenhouse on it.
Having thought through all the important preparatory points, you can proceed to the assembly of the greenhouse itself.
Tools that come in handy during installation

- polycarbonate sheets;
- metallic profile ( best option for the construction of the frame - it is light and easy to use);
- fasteners - self-tapping screws or riveting;
- electric screwdriver;
- roulette;
- level;
- straight cut scissors for metal.
Building starts with a foundation
There are several options here:
- If the greenhouse is installed for a short service life (3-5 years), then you can do without a solid foundation. Racks are hammered directly into the ground or attached to a steel corner hammered into the ground. This is not the best and most reliable option. Such a greenhouse will require constant care and repair.
- those. a foundation made of bricks, monoblocks and cinder blocks is the easiest, fastest and most budgetary way to build a foundation for a greenhouse.
- A monolithic foundation around the perimeter is perhaps the most reliable and long-term option, although the most expensive.
Frame assembly

- First, we cut the profile for one frame element. Using self-tapping screws or riveting, we assemble the first part of the structure.
- We carefully measure the resulting frame and proceed to the assembly of the remaining parts.
- Now you can connect the elements into a single frame and install it on the foundation.
A frame made of metal profile will serve for quite a long time. If the service life of polycarbonate sheets is 15 years, then the profile frame will last no less.
Sheet fastening
There are several ways to attach sheets.
- Method one: using overlays. Rubber strips are laid on the frame of the greenhouse in those places where the polycarbonate sheets will fit. Then the sheets themselves are laid on them. A metal plate is placed over the junction of the sheets and fastened with self-tapping screws.
- Method two: using the H-profile. How to fix polycarbonate sheets using this profile is shown in the figure.
In this type of fastening, it is also desirable to use rubber pads for greater tightness.

The tightness of the greenhouse is one of the most important conditions that should be observed when building a greenhouse.
The junction of the greenhouse and the foundation can be additionally sealed mounting foam. This will increase the waterproofing of the greenhouse.
When working with polycarbonate sheets, it is important to pay attention to the position of the internal stiffeners. Polycarbonate sheets are easily bent in one direction and practically do not bend in the other (this is important with the arcuate shape of the greenhouse). The ribs should be parallel to the frame posts. In this case, peculiar channels are formed inside the sheet. In the future, condensate accumulated in the cells will drain through them.
Greenhouse device
Lighting

When designing a greenhouse, you need to immediately consider how it will be illuminated. Traditional incandescent reflector lamps, which have long been used for lighting and heating greenhouses, are unlikely to be the best option today.
New energy-saving lamps that can increase the growth rate of greenhouse crops.
In greenhouses, modern high-pressure lamps (sodium) are also used. They have a special radiation spectrum and have a positive effect on plant growth.
If in cloudy weather artificial lighting is an additional source of light, and after sunset the lamps are turned on for a few more hours to extend daylight hours, this helps to extend the “working day” for plants and increases yields.
Irrigation system
The most popular way to organize irrigation in a greenhouse is drip irrigation system.
She has many advantages:
- economy (low water consumption);
- uniform watering (plants regularly receive sufficient water directly to the root system);
- protection against diseases (moisture does not fall on the leaves of plants);
- control over plant growth (you can control the flow of water);
- microclimate in the greenhouse (you can adjust the humidity of the soil and air).

Using simple physics, it is very easy to equip irrigation in a greenhouse
- the tank is installed at a height of 1.5-2m, so as not to create strong pressure in the system;
- from it we horizontally display the main hose in the center of the greenhouse;
- drip tapes that come from the hose are laid at a certain slope, this will improve the flow of water;
- we make holes in the hose, insert an elastic band and a faucet, then a drip tape is attached, a plug is placed at the end of the tape;
Tape holes should be near the root of the plant. The presence of a faucet will allow you to regulate the flow of water.
After assembling the entire system, it is necessary to do a test run to flush all the elements. The plugs open. If everything works correctly, you can install the plugs in place and start the watering system.
To organize this irrigation system, you need the following: 
- water tank 200-250l;
- main hose;
- cleaning filter;
- drip tape;
- connectors and plugs.
Heating the greenhouse in winter
The heating method is chosen depending on how severe the winter is in your area and during what period you plan to operate the greenhouse.

Heating the greenhouse in winter, you can harvest several times a year

By being responsible in choosing a heating system, calculating the costs of installing equipment, fuel, etc., you can avoid disappointments in the future.
Even if you do not plan to use the greenhouse all year round, with the help of a heating system you can easily extend the season of plant activity by 3-4 months. In addition, this will protect the plants from frost. in early spring and autumn.
Greenhouse care

A polycarbonate greenhouse undoubtedly needs proper care, although it is considered very picky in operation.
Polycarbonate sheets should be washed simply running water using gentle detergents
. Cleaning and abrasive products should not be used, so as not to damage the top protective layer that protects plants from ultraviolet radiation.
Near the greenhouse it is impossible to make an open fire, despite the fact that polycarbonate is considered a refractory material. Its fire resistance consists only in delayed ignition and the absence of toxic gases. In order to prevent trouble, the greenhouse should be regularly repaired
For long-term use of the greenhouse, it is important to make timely repairs.
At least twice a year, it is necessary to perform a scheduled inspection of the greenhouse: whether the structure has tilted, whether the support posts have washed away, whether the polycarbonate sheets are damaged (cracks, swelling, cloudiness).
If any deficiencies are found, they should be corrected immediately. Postponing repairs "until later" can lead to more damage that will be harder to fix.

The greenhouse can be of any shape, the main thing is to properly equip it inside
After winter, the owner can draw a conclusion about the strength of the greenhouse. If the strength is not reliable, the frame should be strengthened.
Sometimes there is a breakdown of the foundation. If a crack appears, carefully dig a tunnel and fill it with mortar.

The greenhouse can become the main supplier fresh vegetables on your table.
And finally: a well-made greenhouse can be your reliable assistant in the process of growing homemade plants for many years. vegetable crops. Vegetables harvested in your garden are undoubtedly an environmentally friendly and high-quality product. Good luck with your buildings and a rich harvest!