Making a roof with an attic. Mansard roof truss system - drawings. Material for the truss system
Mansard roof is the best way to increase the usable area of the house. This will keep costs to a minimum. With this design, you can equip one or more living rooms. Often in the attic they arrange children's rooms or an office. A comfortable room in the attic can serve as a living room.
When arranging the attic, it is important to remember a few principles that will help create a comfortable and practical room. The mansard roof is a specially equipped attic. When creating such a structure, it is important to carefully approach the stages of thermal insulation, redevelopment and ventilation of the room on the roof. Construction video mansard roof do-it-yourself (step by step) can be found at the end of the article.
Advantages and disadvantages of the solution
When deciding to equip an attic room, you need to know the features of its construction. The advantages of attic rooms include:
- There is an extra room in the attic. It can be equipped depending on taste preferences and purpose.
- Small costs. The construction of an attic room will not cost a large amount. Such work will be equivalent to the construction of an extension near the house. At the same time, the useful area of \u200b\u200bthe house is expanding.
- Great view from the window. Attractive landscapes outside the attic window will not leave anyone indifferent.

If we consider the disadvantages of the attic device, we should remember the need for additional heating of the room.
Types of mansard roofs
When designing an attic floor, it is important to take care of choosing the type of roof. It is necessary to understand not only the choice of the appearance of the structure, but also the methods of its arrangement. There are several options that are most acceptable when creating a mansard roof. They can be selected only taking into account the features of the house:


It is important to deal with the device of the mansard roof, which it was decided to make.

Attic device
Each roof has its own design features. However, attic structures have a number of common features and with simple pitched structures. It is important to know them before starting work:

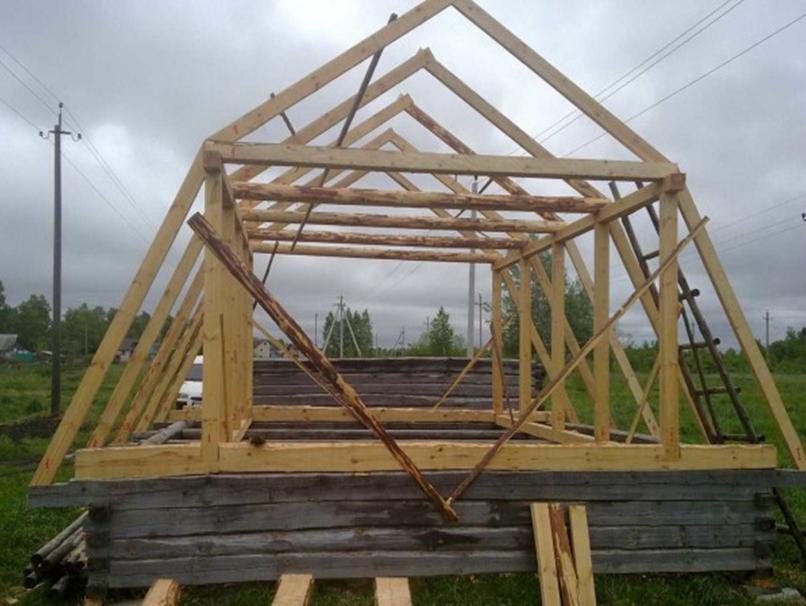
Knowing the structure of the roof, you can start the main work. A photo of the construction of a mansard roof with your own hands (step by step) will help you deal with the stages of the process.

Attic construction technology
Often, when designing a mansard roof, architects do not take into account the errors in the ventilation system and the insulating layer. If there are such errors, the result can be disastrous. Within a few years, the roof will begin to leak. Since the attic is quite close to the wall inside the room, it is quite difficult to ensure the optimal level of heat transfer. The design of the attic must necessarily include elements such as thermal insulation and ventilation.
Important! Elements of the truss system should be pre-treated with various means of protection that will reduce the impact of fire and microorganisms.

The heat-insulating layer is made 20 cm thick. This is due to the cold climate in most regions of Russia. In addition, when creating good thermal insulation in summer, it will be cool under the mansard roof. The advantages of this solution indicate the need to select a high-quality protective material.
In addition, you will need to create a roof ventilation system. In summer, when the temperature is quite high, the roof will get very hot, which can make staying in the attic quite uncomfortable. With a properly equipped air supply and exhaust system, being in a room will become much more pleasant. The same solution will protect the roof from destruction. A layer of sound insulation is laid to create a quiet and comfortable environment inside the attic. At the same time, rain, hail or strong winds will not be heard much.

Advice! when laying insulation materials, it is best to work with an experienced installer. This will avoid mistakes.
Stages of construction of the attic
Step-by-step instructions for arranging an attic floor involve the implementation of a number of subtleties of technology. For the construction of the attic, you must have at least minimal experience construction works. The construction of an attic space will be significantly more difficult than in the case of a conventional roof. This is due to the need to comply with the desired angles of the slopes. You can figure out how to build an attic in a private house with your own hands after studying the construction plan.

You need to start with the drafting of the attic floor. For this purpose, it is better to invite a specialist who can accurately calculate the load and set the required dimensions of the elements. If you have certain knowledge, all calculations can be performed in a special program. You will also need to calculate the slopes of the roof and the expected loads. For error-free work, you will need to study the book "loads and effects on buildings and structures."
The construction of the truss frame
When performing this stage of work, you will need to invite 2-3 workers. It is better to start the roofing device with the laying of Mauerlat bars. They are fixed around the perimeter of the house. For Mauerlats choose bars 100x100 mm.

Then they mount the frame of the future attic room. Its vertical elements will serve as support posts for the truss system. First, vertical supports are installed on both sides. They are fixed to the longitudinal beams. For connection, you need to use metal corners and self-tapping screws.
Advice! In the process of such work, it is better to use a screwdriver. This will speed up the work considerably.

As a result of such actions, two arches are obtained. They should be connected with a twine. It must be strictly horizontal. Even with a slight slope of the tow, one of the arches will have to be shortened. Then, at a certain distance from each other, other arches should be installed. To fix the jumpers, use stamped corners.
Then the upper rafters are installed. This kind of work is quite difficult. Rafters should be mounted in such a way that they are installed at a certain slope. First, a template is made from the boards. It is necessary that they correspond to the connected rafters. When using such a template, you need to cut the rafters that are on the ground. Then they are installed in the right place. Installation of rafters is carried out taking into account the construction of the internal attic room.

Installation ends roof structure nailing the crate. Usually it is made of plywood or chipboard.
Attic roof insulation
After completing the installation of the truss system and the crate, you can create an insulating layer. The vapor barrier film is laid from the inside of the roof. It is fixed to the rafters on building brackets. After that, thermal insulation is performed. It is necessary to monitor the density of laying the insulation on the surface of the rafters. There should be no gaps due to which problems with condensate and thermal protection of the room may arise in the future. the construction of the crate is attached to the thermal insulation with a gap between the boards of half a meter.

Waterproofing is laid on top of the rafters. It will protect the attic from moisture. Roofing is laid on top of the waterproofing layer. Such a roofing pie scheme is optimal when constructing an attic.
Attention! During construction, it is important to take care of compliance with safety requirements.
As you can see, building a mansard roof is a serious job. The durability of the structure depends on the degree of seriousness with which to approach the work. You can find a lot of examples of what design and appearance an attic can have. Among its various types, you can choose the most suitable option. If you want to create optimal daylight, you should install a window large sizes. Often its shape is chosen round or square. In any case, before work, you should carefully prepare and draft a future building.
findings
When building a mansard roof, some features of the work should be taken into account. For example, it is important to create proper insulation and waterproofing the cake. In addition, you need to take care of the choice of roofing. Thanks to this, the mansard roof will be reliably protected from the weather.
Before work, a draft of the future building is drawn up. It is created taking into account the design loads and materials used. The construction plan reflects all the subtleties of the process. It is important to follow the mansard roof construction technology - this will ensure its reliability and durability.
A house with an attic is not just an additional living space, but also a presentable view of the entire building. Even if the room under the roof is not heated and is used only in summer, it still has a powerful “air cushion” that helps retain heat inside the entire building.
It will be difficult to make an attic on your own, especially if you do not have the relevant experience, because this is a rather massive and complex structure.
Attic room can be installed under various types roofs, but the most popular is a broken or gable design. According to the scheme of structure, they differ slightly from each other.
In order to decide which of the designs will be more suitable for your home and will be easier to install, you need to consider both options in more detail. In addition, the master who will be engaged in the construction of the mansard roof must understand which of the two types of structures of the truss system to choose.
Any roof belongs to one of the existing two types of truss systems, it is a layered and hanging structure. Each of them has a different feature, and which one to choose depends on how they are located. bearing walls structures.
Hanging structure
A hanging structure is a rafter system that rests only on the extreme main walls. This happens when in the house itself, except for external walls, there are no capital partitions.
This design can only be used if the distance between two main walls is no more than 8 m, since this system gives a high load on the foundation. To reduce it, various elements are used in the hanging system, such as puffs and grandmas, struts and crossbars. For example, the headstock hangs the puff to the ridge connection, and the struts pull the beams to the rafter legs.
For floor beams in a hanging system, hewn logs or rather thick bars are used that are mounted on the edge. Their cross section must be at least 100x200 mm. The floor in the attic room should be as reliable as possible, and in order not to make a mistake in the parameters, it is better to entrust the calculations to a specialist.
Layered system
The layered system, unlike the hanging one, rests not only on two external load-bearing walls, but also on the main partitions installed on the foundation. Therefore, when planning the construction of an attic, it is necessary to think in advance what the design will be. strip foundation on which capital partitions will be installed. The layered system is perfect for an attic device, as it can withstand high loads, compared to the hanging version. It provides good foundation for floor beams and, accordingly, for the attic floor.If you make a broken version of the mansard roof, then it makes sense to use a combined roofing system, that is, the side rafters are installed according to the layered type, and the ridge rafters are installed in the form of a hanging system.
Do-it-yourself mansard roof: video, photo
When building a house from blocks or bricks with an attic, its front side is often built from the same material. This is convenient, because you do not have to calculate the parameters of these roof elements and assemble them from bars, the field of which should be raised to the wall. But it is important to understand that the walls of the building must necessarily stand on a solid foundation and have good thickness, since such a pediment gives a significant load on the main structure.
If the attic plays the role of another floor all year round, then a gable wall made of foam blocks or bricks is an excellent option for creating a living space under the roof.
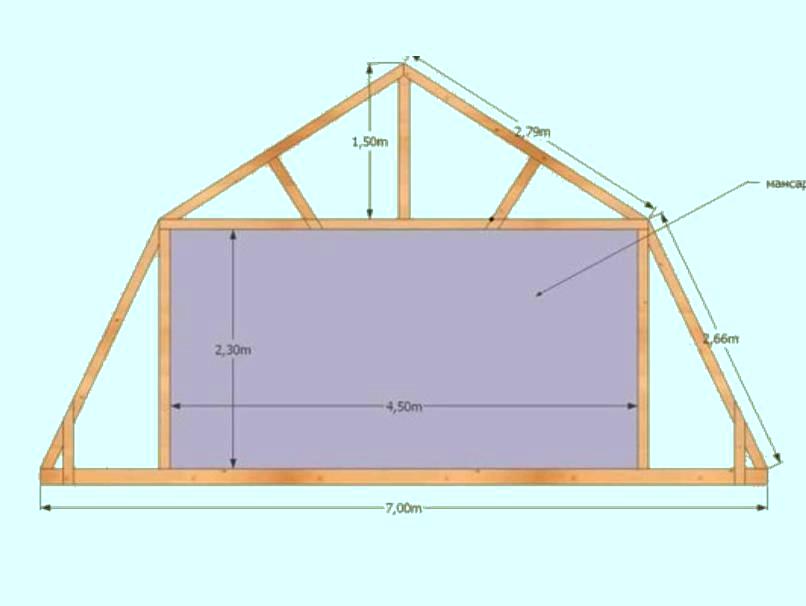
In order for attic rooms with a gable roof to be spacious and have a normal height, the angle of the roof slopes should be approximately 45-50 °, depending on the width of the end part of the structure. If you take a smaller angle, the volume of the room will significantly decrease. An increase in the steepness of the slopes will make the roof unreasonably high, it will become heavier, it will have a large windage under wind load, and the cost of materials will be inappropriate.
Of course, the installation of a gable roof is easier compared to a broken structure, since even rafters are used without additional connections and any kinks. But the broken design allows you to make the room in this part more spacious, and the ceilings are correspondingly higher.
The broken system in execution, calculations, and roofing is much more complicated, but it not only creates a more spacious space under the roof, but also gives solidity to the entire structure. Its main difficulty lies in in large numbers complex connecting elements. All ligaments must be carried out in accordance with the technology, otherwise the roof will turn out to be unstable.If the walls are built of brick or stone, then it is better to lay out the frontal parts in advance during the general masonry. In this case, to create a unique truss system, leveling on the finished gables, you can install intermediate rafters and special retaining fasteners for them.
Before you buy and prepare material for a particular system, you need to draw up a design project with the appropriate dimensions - it will become the main guide for preparing and assembling elements during installation.
Video: broken mansard roof truss system
Attic projectWhen developing a scheme for building an attic, it is better to do this in various projections in order to clearly understand how the elements of the truss system will be placed. It is important to correctly calculate what the height of the roof ridge should be, since the size of the area depends on it.
When preparing a scheme for the construction of a roof for an attic, it is necessary to calculate the height of the ceiling, ridge and total area premises.
The minimum height from the floor to the ridge is 2.5-2.7 m, but if this distance is smaller, then the room cannot be called an attic, the name attic is more suitable for it. This indicator is established by the norms of SNIP.
In order for all elements to be accurately drawn and have the correct location in the overall system, it is necessary to start from a figure with right angles, namely from a square or rectangle - the section of the created attic room. Based on the width and height of the future room, you will never go wrong with the angles at which the roof slopes are located, with the location of the rafters, ridge and other retaining elements. Having found out these parameters, they must be immediately entered into the drawing.
First of all, you need to calculate the middle of the width of the front wall. Further from this point, the height of the ridge, the attic ceiling, the location of the walls (pillars) and the size of the cornice overhang are determined.
Due to the fact that each of these structures has a certain number of connecting nodes with different configurations, it would be nice to draw each of these connections separately in order to understand in detail the features of the pairing of all elements that are connected at this point.
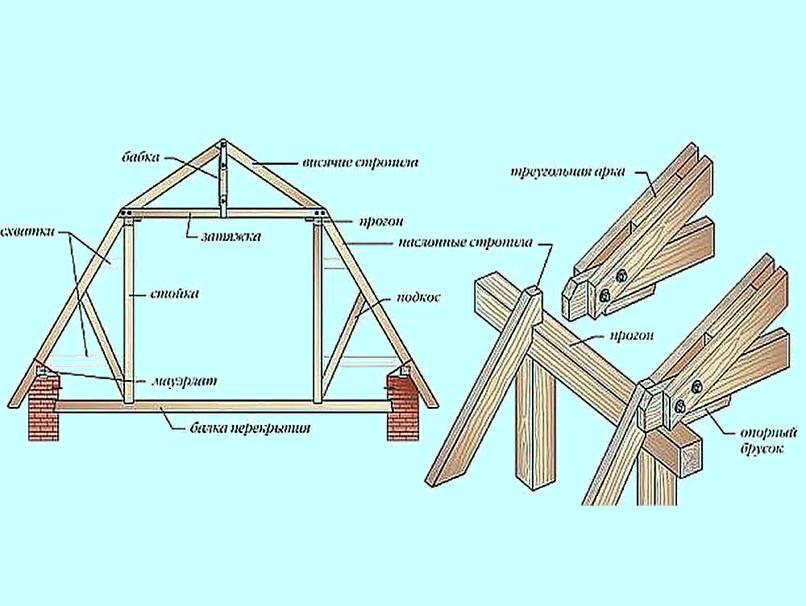
All truss systems include basic and additional elements, which may not be found in every design. The main components of the attic roof include:
- floor beams (the basis for the remaining elements of the system). They are laid on the main walls.
- Rafter leg, consisting of two sections (in the case of a broken pattern) or straight in a gable system. The upper rafter in this case is called the ridge rafter, since it forms the highest point of the roof - the ridge, and the rafters that form the walls of the attic are called side rafters.
- Mauerlat is a powerful bar that is attached to the main side walls. Rafter legs must be installed on this element.
- A ridge board or beam is an integral element for a gable roof, but is far from always used when constructing a broken roof.
- Buildings are supporting elements that are required to strengthen a broken and gable structure. In the first case, a side and ridge rafter is attached to it, and in the latter case, the stand acts as a good support for a long rafter. Moreover, the racks are a frame for sheathing and insulating the walls of the attic.
- Diagonal binding elements additionally fasten the longitudinal beams or posts and rafters, thereby making the structure even more durable.
- Interrafter runs are installed in the case of a broken roof for structural rigidity.
- Attic floor beams are used in both versions of the system - they connect the racks, and they act as a frame for the ceiling device.
In order to be sure that the project is developed without errors, it would be nice to show it to a specialist. It will determine how correctly you have chosen the parameters of the attic to the length and width of the walls of the building.
Video: mansard roof calculation using software
Parameters of materials for the construction of a mansard roof
When the graphic element is ready, then, based on the dimensions set on it, you will be able to calculate the amount of materials that will be needed to build a mansard roof. It is necessary to choose materials according to their characteristics, which must meet the requirements of environmental and fire safety.
For wood, it is necessary to provide for treatment with an antiseptic, which will significantly reduce the combustibility of materials. For construction you will need:
- boards for rafter legs, the section of which is selected according to the results of calculations, which you will learn about a little lower.
- A beam of 150x200 or 100x150 mm - for floor beams, depending on the width between the bearing walls, the truss system, as well as for girders, valleys or diagonal legs - if, of course, they are provided for by the design.
- Beam from 100x150 or 150x150 mm, designed for laying Mauerlat.
- Usually, timber 150x150 or 100x100 mm is used for racks.
- Unedged board for the subfloor, as well as some fasteners.
- Annealed steel wire with a diameter of 3-4 mm - for fastening some parts.
- Bolts, nails, brackets of various sizes, corners of various configurations and other fasteners.
- Lumber for counter battens and battens for roofing material - depending on what type of roofing will be.
- Vapor barrier and waterproofing membranes.
- Insulating materials intended for thermal insulation of the roof.
- Roofing material and special fasteners.
Rafter section
Rafters provide a roofing element that takes the main external loads, which means that special requirements are imposed on their cross section.
The size of the required lumber depends on many parameters - starting from the step between the rafter legs, the length of these legs between the support points and ending with the wind and snow load that falls on them.
The geometric parameters of the truss system are easily determined on the drawing. But to deal with other parameters, you will have to turn to reference materials and perform some calculations.
It's no secret that the snow load is different in different regions of our country. Below in the figure you will see a map on which the whole of Russia is divided into zones demonstrating the snow load.
In total, 8 zones are distinguished (the latter belongs to extreme and can not be considered for the construction of a mansard roof).
Sg - indicator in the table (carefully study the map and the table attached to it).
μ - correction factor, which depends on the steepness of the roof slope.
For example, if the angle of the roof slope is less than 25°, then - μ=1.0; if from 25 to 60°, then μ=0.7; if more than 60°, then the snow will not linger on the roof, and the snow load is not taken into account.
If the mansard roof is a broken structure, then for its various sections the load may have different values.
The angle of inclination of the roof can be determined by a simple ratio of the height and base of the triangle (usually half the width of the span) or by a protractor according to the drawing.

This indicator also largely depends on the region where the structure was built, on the height of its roof and on the characteristics of the environment.
And again, for the calculation, you will need to determine the initial data on the map and the table attached to it.

The calculation for this task will be carried out according to the following formula:
Wp = W × k × c
W - value in the table, depending on the specific region.
k - coefficient taking into account the location and height of the building (see table).

The following zones are indicated by letters in the table:
- A - open areas, forest-steppes, steppes, tundra, deserts, forest-tundra, coasts of the seas, reservoirs and large lakes.
- B - urban areas, terrain with frequent obstacles to the wind, artificial or embossed, at least 10 m high, wooded area.
- B - dense urban development, the height of buildings is from 25 m.
with- a coefficient that depends on the prevailing wind direction (wind rose of the region), as well as on the angle of the roof.
With such a coefficient, the matter is much more complicated, since the wind can have a double effect on the roofs. So, it has a tipping, direct effect on the roof slopes. However, at small angles, the aerodynamic effect of the wind is of particular importance - it raises the slope plane due to the emerging lifting forces.
As you have already noticed, on the diagrams that are attached to the tables, the sections of the roof that are subject to maximum wind loads are marked, as well as the corresponding coefficients used for the calculation.
It should be noted that at slope angles up to 30 ° (in the area of \u200b\u200bridge rafters), the coefficients are indicated both negative (pointing upwards) and with a plus sign. They somewhat dampen the wind load, and in order to reduce the effect of lifting forces, it is necessary to carefully fix the roofing material and the truss system in this area, using additional connections (for example, annealed steel wire).
As soon as the snow and wind loads are calculated, they can be summed up and, taking into account the design features of the system, the section of the boards for the rafters can be identified.Please note that these data are for the most commonly used coniferous materials (spruce, pine, larch or cedar). In the table you can see the maximum length of the rafters between the supports, the cross section of the board depending on the step between the rafters and the grade of the material.
The value of the total load is indicated in Kilopascals (kPa). It will not be difficult to carry out this value in the usual kilograms per m 2. 1 kPa ≈ 100 kg/m².
As for the value of the dimensions of the board in its cross section, it is rounded up to the standard sizes of lumber.


What tools will be needed to equip a mansard roof with your own hands?
Of course, during work you can not do without a set of tools, the list of which includes:
- screwdriver, electric drill;
- building level, tape measure, plumb line and square;
- chisel, axe, hammer, chisel;
- jigsaw, a circular saw, hacksaw;
- carpentry knife.
If the work is carried out in the environment of competent mentors, step by step and carefully, and the tool is of high quality, the process will be much accelerated.
Do-it-yourself mansard roof: main steps + video
It is important to strictly follow the sequence of work, because only in this way the design will turn out to be strong and reliable.
- Mauerlat mount.
The installation of any truss system should begin with fixing a powerful support beam, the Mauerlat, at the end of the side walls of the buildings. It is convenient to install rafter legs on it. It is made of high-quality bar 100x150 mm. Mauerlat is laid on roofing material waterproofing, laid along the upper end of the wall (regardless of the material).
Thanks to the mauerlat, the load is evenly distributed over the walls and transferred to the foundation. It is fixed to the wall by means of metal studs, which are previously embedded in a crown or concrete belt running along the upper edge of the building wall or with 12 mm anchor bolts. They should go deep into the wall by at least 150-170 mm. In the event that the Mauerlat is installed on a wooden wall, then the bars are attached to it using wooden dowels.- Installation of the truss system.
The installation of the truss structure begins with the installation of floor beams, which can be mounted on top of the mauerlat (if you plan to take the beams outside the room, increasing its area). In this design, the rafter legs are fixed directly to the floor beams.
Otherwise, they can be laid on waterproofed walls and fixed with brackets or corners to the inner edge of the Mauerlat. This option is used if the rafter legs need to be fixed directly to the Mauerlat.
Racks should be at the same distance from the middle of the floor beam. In the future, they will determine the location of the walls of the room, namely its width.
Bars for racks must have a section corresponding to the size of the floor beams. Racks are attached to the beams with wooden plates and special corners. But for starters, they are baited with nails, after which they are leveled with the help of a plumb line and a building level, and only then they are thoroughly fixed with the expectation of upcoming loads.
As soon as the first pair of racks is installed, they are fastened on top with a bar (tightening). It, in turn, is connected using metal corners with racks.
When the puff is fixed, you will get a U-shaped design. On the sides, layered rafters are installed on it, which are laid on the Mauerlat or attached to the floor beam with the second end.
A groove (special notch) is cut out on the installed supports for the beam or in the rafter. With its use, the rafters are installed on the Mauerlat beam and fastened with metal brackets.
To ensure structural rigidity, struts can be installed from the base of the rack to the middle of the side rafter. If this is not enough, and you do not feel sorry for the material, then it would be nice to strengthen the overall design with contractions and additional racks.
Then the middle is calculated on the puff. A beam will be attached to this place, which supports the ridge connection of the upper hanging subsystem of the rafters.
The next step is the installation of ridge rafters. They can stick together various compounds- these can be powerful bolts with metal washers or plates or a metal lining.
After their installation, a headstock is attached to the middle of the puff and the ridge.
Upon completion of work on one part of the truss structure, it is necessary to make the rest according to the same principle. The distance between adjacent rafters in such a system should be no more than 900-950 mm, but the best option there will be an interval of 600 mm, which will give the structure the necessary stability and rigidity and will be convenient for insulation with standard mats mineral wool. But this significantly complicates the structure and increases the cost of materials.
First, the side parts of the assembled system are installed, after which the intermediate ones. They are interconnected by runs that are installed between the upper ends of the racks and work like spacers. So, it turns out a rigid structure of the attic rafters, where there will already be a ready-made frame for wall decoration.
Mansard roof waterproofing
As soon as you build the truss system, you can start finishing it with insulation and other related materials.
It is worth noting that the first coating over the rafters should be a waterproofing and windproof film. It is attached to the rafters with a stapler and staples, starting from the eaves. The canvases are overlapped (200 mm), and then the joints are glued with waterproof tape.
A counter-lattice is stuffed on top of the waterproofing, which will better fix the film on the surface and create a ventilation distance between the roofing and windproof material. Usually the counter-lattice is made of boards with a thickness of 50-70 mm and a width of 100-150 mm.
A crate is fixed perpendicular to it, on which the roofing material is laid. As for the step between the slats, it is calculated depending on the size and type of sheet roofing material, taking into account the overlap required for it.
If you are using soft roof, then plywood sheets are usually fixed to the counter-lattice.
How is roofing installed?
Roofing material is fixed on the prepared plywood or crate. Usually, its installation starts from the roof eaves and then alternately, from one of the edges - depending on the type of roof. The roofing sheets themselves are overlapped. If a metal tile or a metal profile is used for coating, then this material is fixed with the help of special self-tapping screws with elastic gaskets. Usually fasteners are matched by color to the material.
The most difficult stage in covering a sloping roof is the transition from layered side rafters to ridge rafters. Some difficulties may also arise if there are ledges on the roof for arranging the roof over windows or balconies.Moreover, if a chimney pipe goes to the roof, it needs a separate opening in the insulation layer and the truss system, and on the roof - a device around reliable waterproofing. It is worth noting that the construction of any roof, including such a complex one as an attic, is very responsible and dangerous, and therefore requires increased security measures. If you do not have experience in such construction processes, then it is better to entrust their implementation to specialists or invite an experienced craftsman, under whose control to perform all actions, carefully and carefully.
A mansard roof is a great option for getting a fairly large living space.
When building a private house with an attic, it is important to correctly design the design and size of the roof. After all, the attic is a living space in which various processes take place: air evaporation, heating of the room. This has an effect on the roof. On the other hand, the roof must fulfill its main purpose - to reliably protect from the weather and keep warm inside.
Therefore, it is important to acquire a high-quality project and calculations before starting construction. Calculations should be carried out by a specialist with experience in designing such facilities. Even small errors can lead to incorrect load distribution of load-bearing nodes and elements. Excessive weight of the roof, exceeding the strength of the rafter legs can lead to weakening general design and sad consequences.
But before dwelling in detail on how to correctly calculate the size, area and other parameters of the attic, let's consider common types of attic roof structures.
Types of mansard roofs
The truss system and its elements are different for different types mansard roofs of private houses. The roof should be light so as not to load the walls of houses, while the reliability and strength of the structure must correspond building requirements norms.

 Forms of pitched roofs
 By types of mansard roofs, the following structures are distinguished:
- Gable. Two slopes and two gables.
- broken lines. Having two or more planes located at different angles of inclination. A sloping roof is much more difficult to build.
- Hip. With slopes of a triangular shape, covering the gables.
- Half hip. The slopes of the facades cover part of the pediment area.
- Dome. Typical for houses with a round or polygonal design.
- vaulted. With arcuate projection of the pediment.
In addition, roof structures are divided according to design features ventilated and non-ventilated. One or another option is chosen depending on the climatic features of the region and the design of private houses.
Advice!
With high rainfall, high humidity Roofs with natural ventilation should be preferred. In addition, the air gap inside plays the role of additional insulation.
Designs without natural ventilation more commonly used in dry climates.

 Private house with mansard roof
 The basis of the roof - truss system
The main and most important element of the roof is its frame or truss system. It bears the main load, determines the strength and reliability, the service life of the entire roof and how often it will have to be repaired will depend on it.
Therefore, the installation of the frame is the most time-consuming process for constructing an attic. The main impacts on the truss system are the loads received from the mass of the frame itself, the weight of the snow cover and the impact of wind pressure. In this regard, calculations of the loads on the rafters should be carried out.
The strength and durability of the entire building depend on the correct calculation of the truss system, loads and all connection nodes. An important requirement is the minimum weight of the frame structure. In order for the load on the walls and foundation to be small, materials with the lowest specific gravity should be included in the project.
 Rafter system of a house with an attic
 Area calculation
If the attic is planned to be used as a living space, it is important to calculate its usable area. For calculations, an important parameter is the total area of \u200b\u200bthe attic room and its usable volume. The latter is calculated along the lines connecting the points where the height from the floor to the ceiling plane is 90 cm. The rest of the space is considered to be non-residential, suitable only for closets and closets.
The total area is taken from the plans of the house and attic. The calculation of the roof area is carried out based on the total area of internal structures. The entire roof frame can be represented as a collection of elements with different geometries. By calculating the area of such figures separately, and adding the values, you can get the total area of \u200b\u200bthe roof structure of the house. This value is necessary not only for further calculations of the strength and weight of the structure, but also for calculating the required amount of materials.

 The calculation of the area and the geometry of the attic rooms determine the ratio of the additional area to the underlying floor of the building
 Mansard roof project
As mentioned above, the key to a reliable and durable roof structure must be a well-designed project. You can use a typical, ready-made mansard roof project, which no longer requires additional calculations. This will speed up work and reduce design costs, but if construction is planned on an individual project, a detailed calculation will be required.
Important!
The project, in addition to the calculation, should contain information about the design of the rafters, the beam installation scheme, the calculation of its own weight and the estimated load of natural factors (wind, snow, rain).
In order to calculate and draw up a competent project, it is necessary to provide for the resistance of all elements to temperature changes.As a rule, the project consists of several sections and drawings. It contains calculations and all information about the roof structure:
- first of all, the project determines the main parameters - the shape of the roof, its dimensions, the slope of the slopes, the presence of a pediment;
- the second, and no less important point, is a list of all materials for each node, indicating their quantity;
- a separate section should be devoted to the calculation of load-bearing structures, indicating the section of the rafter beams, the dimensions of the floor elements and other nodes;
- drawings with different projection and detailing of the main units;
- a section with calculations of the thermal properties of the structure and instructions on insulation and waterproofing with a list of recommended materials;
- recommendations for roofing material based on the calculation of the maximum loads on the structure.

Slope calculation
The slope of the roof determines the size of the roof. The slope angle has great importance when building a house. An improperly constructed roof can be destroyed by strong winds if it is made too high. Conversely, if the slope is insufficient, this can lead to the accumulation of snow mass, which will also lead to destruction. Therefore, when calculating the slope of the slopes, local climatic conditions and the proposed roofing materials (their weight) are taken into account. As a rule, gabled roofs are built in snow-covered areas so that the snow slides down the floor with its weight. And in warmer areas, flat structures are common, reducing windage with an elongated overhang.
Starting a specific calculation of the slope of the slopes, we take as initial data:
- The estimated height of the living space in the attic (desired, but not less than 2.5).
- Weather conditions of the area - the average amount of precipitation, the maximum possible wind strength.
- Planned weight and features of the roofing material.
- Type of roof according to the project.
For gable design the prick of the slopes of the slopes is considered optimal at 45 degrees or more. For a broken structure, angles of 60 degrees for the lower slope and 30 degrees for the upper one will be optimal. This will make it possible to arrange a comfortable room for living inside.

Installation of the attic frame
Before starting the construction of the attic, when the walls of the building have already been erected, it is necessary to lay a beam of 10x10 or 15x15 cm along the top of the walls to support the truss system. This design is called Mauerlat; in a chopped wooden house, the upper crown can serve as it. If the house is built of brick or concrete under a wooden mauerlat, it is necessary to lay a layer of waterproofing (for example, roofing material, preferably in two layers). The main task of the Mauerlat is to evenly distribute the loads on the walls of the house. The beam can be covered with a cladding similar to the front one.
- We begin the installation of the truss system with the device of floors. We lay the beams, starting from the extreme ones, strictly checking the horizontal position. It is recommended to keep the step of the beams at 50-60 cm. The beams should have a projection beyond the walls of about 30-50 cm, which will serve as a cornice. We fix with a Mauerlat with nails and a metal corner on screws.
- We proceed to the installation of the frame. First of all, vertical support posts are installed. At the time of installation, we fasten them with temporary spacers. Starting from the corners, we put the rest at a distance of no more than three meters. The height of the racks must be specified in the project, it will determine the parameters of the entire structure. At the upper end of the racks we fasten the runs (boards 15x5 cm).
- On the runs, puffs are installed (beam 20x5 cm), fixed with a corner. The task of the puffs is to tie the side runs. So that there is no significant deflection of the puffs, they must be fixed, in the future, with suspensions to the roof rafters. At the installation stage, deflection can be avoided by temporary supports.
- We install rafters. Before installation, it is necessary to make a template in the form of a board 15x2 cm. The template sets the same angle of washing down at the junction of the rafters with the Mauerlat with the lower end and the upper with a run.
- The fastening of the layered (lower) rafters to the side runs is carried out with nails, and to the Mauerlat with metal plates or brackets.
- We proceed to the installation of hanging (upper) rafters. We also prepare a template and saw down all the boards according to the template. Mansard construction does not provide for a ridge device, so additional rigidity should be given by installing struts.
- We install puffs on the upper rafters.
- In general, the frame of the truss system is ready. Next, you can sew up the gables, leaving openings for the windows, if they are provided for by the project.
- We make a crate. The design of the lathing depends entirely on the type of roofing material determined by the project. If a soft roll roof is provided (for example, ondulin), we make a continuous crate. For metal tiles or corrugated board, a sparse crate is required. Right choice and competent installation will affect the quality of the roof and its reliability.
Further work is related to the insulation and insulation of the attic roof.
 The basis of the mansard roof is its frame
 Advice!
In cases where the roof slope is more than six meters (the length of a standard board), it is necessary to order a board for the rafters of the required length or splice the rafters to the desired size. At the joints, it will be necessary to install additional support posts.
Roof insulation
To create an atmosphere suitable for living in the attic, the roof must be reliably and efficiently insulated. In addition, vapor barrier and waterproofing films are laid together with heaters. To prevent leakage from the outside and accumulation of condensate from the inside, special modern materials. Thus, it is formed layered cake", laid between the roofing and the attic room. Such a "pie" should include the following layers:
- Vapor barrier. Special, air-tight film materials, laid from the inside of the attic room with sealed joints. The task of this layer is to prevent the penetration of moisture into the upper layers of the "pie".
- Warming. As a heat insulator, foam or foam boards, mineral wool, eco-wool, etc. are used. Laying is carried out with an overlap or with subsequent sealing of the seams with construction foam.
- Waterproofing. Special film membranes that protect the insulation from atmospheric precipitation and prevent the formation of condensate. They are laid along the rafters while maintaining the air gap between the film and the roofing material.

 roofing cake is a multi-layer construction that provides reliable protection against various adverse factors
 attics Attic wall cladding: algorithm of work and choice of material


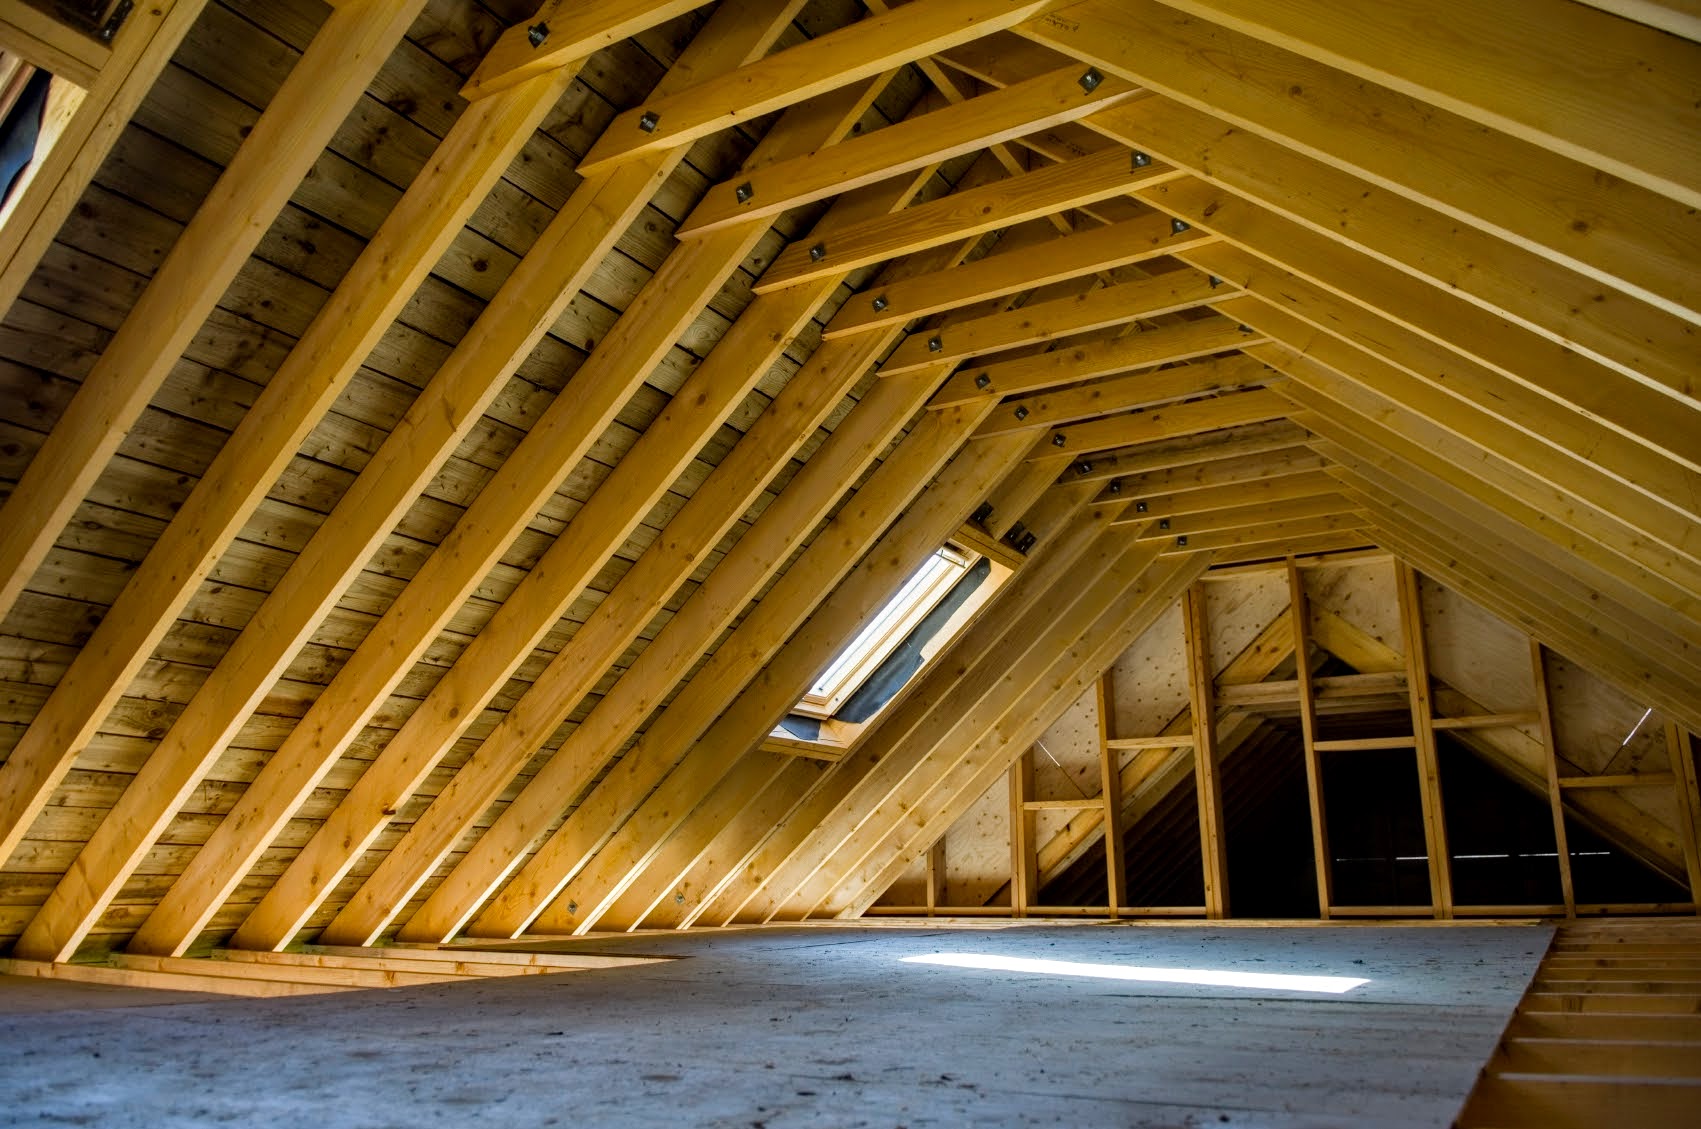
Today we will talk about popular solutions for mansard roofs, their capabilities. After reviewing the illustrations, diagrams of the truss system, you will get a clear idea of their device. And having studied the basics of calculation, you can optimize the cost of lumber. Get information about the important points of space planning. Find out in what sequence the mansard roof truss system is mounted.

The mansard roof is a complex structure and requires careful calculations. Source stroyland.su
Drawings of the truss system
Any mention of an attic is associated with a voluminous "pentagonal" roof in which you can live, but there are other options.
Shed
Extremely simple, reliable shed mansard roof. Thanks to the rectilinear forms, it looks modest, but elegant. Special respectability is added by large panoramic windows“on the floor”, because such a design not only allows, but provokes their installation.

House with shed roof, with windows on almost the entire wall Source drevogid.com
The rafter system is very simple: the straight rafters of a single slope rest on the Mauerlat of opposite walls of different heights, and, if necessary, on intermediate supports. The proportions of the walls are selected for a slope of 35-45 degrees, which guarantees stability to wind loads and normal snowfall.

The volume is used effectively - if desired, this is an additional full-fledged floor, since the usable area is equal to the area of the previous floor.
gable
Relatively simple widespread roof. It looks unpretentious, but inspires confidence, as it maintains the traditions characteristic of the Russian style. As a result, it is rarely designed specifically for the attic, more often it is adapted in finished form.

The gable roof is traditional, and most often the choice falls on it. Source dekoriko.ru
Structurally simple - specifications and a truss system like a conventional gable roof. Straight rafters rest on the Mauerlat, angled into a ridge. Gables are triangular in shape, straight, sheer, almost always glazed, often with access to a balcony.

Most often, a similar scheme is used for arranging an attic in a small house with a gable roof. Source csgoshik.ru
It is problematic to fully use the volume, but it is possible, even necessary. The useful area is relatively small, the ceiling is usually "broken". However, skillful layout of furniture, bold design solutions can turn disadvantages into advantages.
broken line
The most popular option is a sloping roof with an attic. Which is not at all surprising - despite the complexity, it is the most convenient and practical. Overall forms and broken lines symbolize solidity and professionalism. Appearance of this roof "by default" is associated with the "mansard". This is quite natural - it is purposefully designed for living quarters.

To add space on the attic floor, preference is given to a sloping roof Source lbuilding.ru
The rafter system is quite complicated, but its advantages are worth the money and effort spent. Characteristic pentagonal gables, with the functionality of a gable roof - the same opportunity to insert windows, arrange an exit to the balcony.

The scheme is more complex, but gives more space. Source moiton.ru
Spacious attic roof of a private house. The volume is used to the maximum - at full height, the useful area of \u200b\u200bthe room is equal to or slightly less than that of the previous floor.
Calculation basics
The purpose of the calculations is to find a compromise between aesthetics, reliability and cost.
aesthetic side. To begin with, a general sketch of the roof is being designed. The proportions are determined, compared with the size of the house.

The difference between a sloping roof and a gable roof is significant Source homemyhome.ru
After that, a constructive calculation is carried out, where factors are taken into account:
Own weight structural elements of the roof. The load from it acts on each element of the truss system.
Wind loads. They are variables and affect all elements.
. It acts unevenly, it is transmitted from areas where the mansard roof slope is less than 30 °, snow does not linger on steeper areas. In this case, the load can be unevenly distributed over the left and right slopes. Affects beams and upper rafters.The weight people, interior elements and furniture. Loads only the floor.
Factors are processed, summarized. Based on the results, conclusions are drawn about the dimensions of the structural elements. For guaranteed strength, they are rounded up. But technological assembly is hampered by the individual width and thickness of each structural element of the truss system, and their customization is unprofitable. Therefore, the elements are combined into groups of standard lumber sizes. And standard solutions significantly reduce the cost of the project - after all, custom-made is always more expensive.

If the project is individual and non-standard, it is better to order accurate calculations. Taking into account the number of factors, their specific impact on the truss system, the conclusion suggests itself - an accurate calculation is the business of specialists. It makes no sense to do calculations on your own - there is a high probability of error. For standard and standard solutions, a ready-made existing project can be adapted.
In addition to the main points, a few practical recommendations will come in handy:
Rafter step corresponds to the dimensions of the heater.
Rafter width corresponds to the thickness of the insulation.
layout
The stairs are key. Its position must be linked with future floor beams. If the pitch of the rafters allows, we simply orient it between the beams. Otherwise, we design a reliable convenient entrance to the attic.
At the planning stage, it is useful to think over the interior. At this stage, decisions are made about partitions and additional natural light - skylights. Of course, it's too early to think about decorating, but the engineering part should become clear - what functionality will be implemented.

In the attic you can equip an office with a corner for music lessons Source pinterest.co.uk
After all, the features of such premises: broken-inclined ceilings, their reduced height, unusual walls and non-standard lighting.
Therefore, a specific layout of the premises is necessary, and in them, the distribution is correct - space zoning:
For the main life activity, are allocated bright and well ventilated premises.
Uncomfortable areas are equipped under the storage.
"Unusual conditions" to give away at the disposal of children.
Interior design and ultimate comfort are created by the skillful use of potential finishing materials, furniture and accessories.
Assembly
In most cases, the construction of a mansard roof begins with a Mauerlat device. A strictly horizontal position, parallel, reliable fastening of its bars is important.

Mansard roof rafter structure Source kryshagid.ru
For the installation of the rafter system, two options are practiced: the elements of the truss system on the ground are assembled into trusses, lifted and installed ready-made. Or everything is collected separately at the top - "in place", observing procedure:
Roof beams are laid. This takes into account the step of the truss system and the possibility for arranging stairs.
Straightaway laying a rough ceiling, or temporary flooring for safe work.
Racks are mounted. Temporary braces are arranged to keep them in a vertical position. Runs are laid on the racks.
Over runs stacked puffs.
Mounted lower rafters.
Temporary braces change to permanent wind connections in the longitudinal position.
Installed top rafters.
exhibited pediment frame, taking into account the design, openings are organized for: windows, balconies, other options are provided.
Further down the rafters roofing membrane is laid, and is pressed against them with a counter-lattice - bars with a section of 50x50 mm. To organize the ventilation gap. These are preparatory measures for warming. They need to be carried out at this stage. Missing is a huge omission.
On the counter-lattice crate stuffed, with a step corresponding to the roofing.
mounted roofing, its additional elements: wind boards, ridge.

The same house may look different and have different usable area Source 1dom.kz
Video description
About the features of the calculation of the mansard roof in the video:
Exactly according to the same principle, the attic floor is mounted with gable roof. Moreover, its device is even simpler - all the rafters are solid.
The next step is to insulate the roof. Of course, it can be done from the outside, before the installation of the membrane, battens and roofing. But it is safer from the inside - there will be no threat of precipitation and work will be carried out more carefully, because successful operation depends on it.
The insulation from the inside of the room is protected by a vapor barrier film. And between it and the interior trim, a mandatory ventilation gap device - the interior trim is not mounted directly on the rafters. For her, specially, as well as outside for the crate, a counter-rail is stuffed, or a frame is arranged.
On our website you can find contacts of construction companies that offer a turnkey roof calculation and repair service. You can directly communicate with representatives by visiting the exhibition of houses "Low-Rise Country".
Conclusion
A mansard roof is an excellent solution that allows you to increase the usable area of \u200b\u200bthe house without significantly increasing the cost of its construction. There are a lot of solutions for the construction of the attic floor - they can be both standard and designed for a particular house. But in any case, the installation of the attic requires specialized knowledge and this work should be done by professionals.
The attic is a living space under the roof itself. It allows you to significantly increase the quadrature of the area of \u200b\u200bthe building without extensions. It is not necessary to plan an attic in a private house in advance; it can be built on an old building with a conventional roof with an existing truss system.
The budget for such work will come out relatively small - after all, the load-bearing elements are already present, perhaps refinement will only be needed to insulate and bring the attic into a residential state. A do-it-yourself attic is a very real project that can be implemented without involving qualified labor, but with an assistant.
Reconstruction of the roof under the attic without replacing the raftersBefore starting construction
Do-it-yourself attic construction on a constructed building begins with a careful assessment of the situation. First of all, you should make sure that the old building will successfully bear the additional load.
The matter also concerns the material of wall structures. Usually, a sufficient margin of safety is laid in both the foundation and the load-bearing walls, which will make it possible to do without additional reinforcement. However, if in doubt, it is better to distribute the increased load on additional columns, spacers, or to strengthen the floor beams between the lower floor and the attic.
Mansard roofing has its own specific requirements. If the existing elements do not comply with them, you will have to get rid of them and mount new ones that will be designed for new loads.
 Popular attic with a sloping roof shape
 A do-it-yourself mansard roof can be built according to various projects. The shape of the under-roof space depends on how the roof will be formed, in particular, its load-bearing elements - rafters and beams. The most successful roof form requires the implementation of a gable roof scheme with a broken roof line. That is, the angle of divergence of the slopes from the point of the ridge in the middle of the run is replaced by a steeper one, and the roof overhangs descend very steeply onto the Mauerlat of the second floor.
Although shed roofing has the advantage of a simpler truss system design, this type of project has not been widely used in attic construction due to a number of inconsistencies with the tasks of the room. With it, it will not be possible to provide a high ceiling, or the width of the room will be minimal. In addition, the weight of the snow cover in this case is significant and requires an increase in the cross section of the supporting beams, which will lead to an increase in the cost of building a mansard roof.
For this reason, many people prefer to build a broken gable roof, considering it the most acceptable option for houses with an attic room. The advantage of this mansard roof scheme is that the usable amount of space under the roof will be the largest, which brings a properly designed attic closer to a full-fledged room.
 House with a semi-mansard roof
 A half-mansard roof option can be considered a compromise, when part of the walls of the attic floor is a continuation of the building's box. At the same time, the gable shape of the half-mansard roof dictates the sloping side parts of the ceiling of the room.
Features of the mansard roof truss system
The broken scheme of the attic roof is good because it allows you to arrange overhangs longer and place them at a steeper angle. A project of this type gives a peculiar look to the whole house. At the same time, in addition to the aesthetic factor, low overhangs well protect the joint between the wall and the roof from precipitation. On the other hand, the windage of the roof at strong wind increases, therefore, when developing the design of the attic, they find an average solution that satisfies all parameters.
 Steep sloping roof overhang
 We determine the angles of inclination
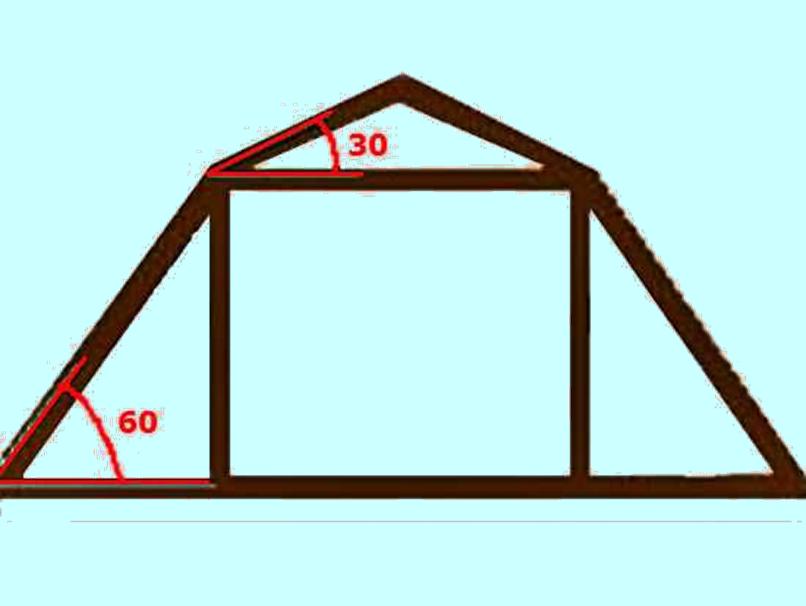
When deciding how to make an attic, it is necessary to determine the magnitude of the angles of inclination of the slopes. To do this, you need to deal with two basic factors: weather conditions with the prevailing wind directions in the region where the construction is carried out, as well as the materials that make up the floor logs, rafter beams and walls. If a lot of snow falls in winter, which lies for a long time and does not melt, then the roof is made steeper.
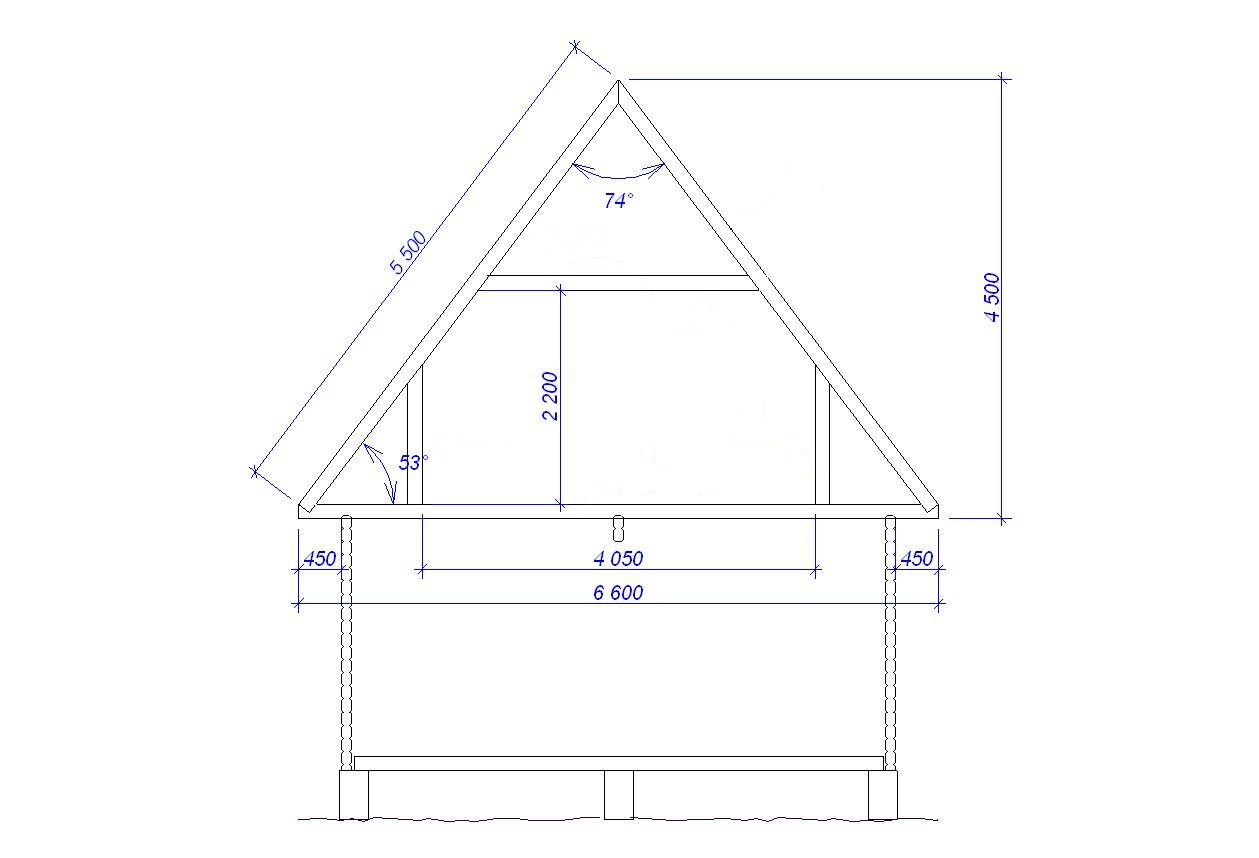
Thanks to this, snow does not accumulate in a thick layer and does not increase the load on the rafters. Taking into account all climatic factors and the fact that a board of standard sections or a bar is commonly used as rafters, the angle of the upper part of the roof is 30 degrees relative to the horizon, and the lower part is 60. The following drawing shows these parameters.
This solution provides a solid structure, which, with a minimum consumption of wood, provides the maximum height of the ceilings in the under-roof space. According to building codes, it should be at least 2 m. Anything lower is considered an attic, not an attic, and is not suitable for a comfortable stay. On the contrary, if possible, the ceiling is raised to a mark of 2.2 - 2.3 meters, since it will be inconvenient for tall people to be in a low room.
It should also be remembered that the steeper the slopes, the higher the skate. This increases the windage of the roof, that is, the wind resistance.
If the winds in the region blow constantly, with high speed or strong gusts, the roof is at risk of breaking, which should not be allowed. For this reason, choosing a mansard roof project with the indicated angles is the best option.
Choosing the type of truss system
In the vast majority of cases, pine is used as a material for rafters in the construction of an attic floor with their own hands, due to its low cost, acceptable weight and ease of processing. The thickness of the beams is usually chosen 40 - 50 mm, width - 200 - 250 mm. The more powerful the rafters, the more it is allowed to take a step between them, and vice versa. The exact parameters are determined in accordance with SNiP 2.08.01-89 and TCP 45-5.05-146-2009.

For the device of the truss system of the mansard sloping roof, two schemes are used: layered and hanging. In a hanging system, the ridge beam does not rest on the racks in the center, and the rigidity of the structure is provided by puffs that form a triangle with the rafters. For long rafters, such a system is not suitable due to the large length of the beams. In the layered scheme, load-bearing beams are erected in the center of the floor, on which the ridge run rests. Thanks to the intermediate support, the roof can withstand heavy loads, but inside the attic there will be supports, or a solid partition.
 Frame size option with hanging rafters
 A broken gable roof is a little more complicated than a straight one. The fact is that in the first there is no rigid triangular structure. For this reason, hanging rafters can only be made if the puff width is not more than 4.5 m. This parameter corresponds to the width of the attic room. However, even in the case of a smaller parameter, it will be necessary to install vertical racks connecting the roof break point with the floor joists.
 Rafter system with struts
 For additional strength, if the roofing is multi-layered and heavy, contractions are made - horizontal braces between the lower inclined logs and vertical posts. Sometimes a headstock is included in the design of the truss system - a rack between the ridge run and the puff. Its installation makes sense only in the case of a heavy ridge and a wide roof; in all other cases, the rigidity of the upper triangle is sufficient.
 An example of a simple truss system
 The basics of calculating a sloping roof at home
For the roof of a house, the width of which does not exceed 6 m, an approximate calculation can be made in order to present the approximate amount of material for construction and the money that will need to be spent on it. In small houses, where the load on the rafters is small, you can focus on the above experience in arranging the truss system, taking into account the characteristics of related materials, for example, insulation and external roofing.
One of the main parameters is the installation step of the rafter beams. If it is planned to use mineral wool insulation as thermal insulation, then this size should be selected based on the format of the material. Mineral wool mats are 60 cm wide and do not require fasteners at the time of installation if they are inserted tightly and held by elastic force. Accordingly, the pitch of the rafters should be chosen 57 - 58 cm.
The width of the rafter leg should allow you to freely lay the insulation with a slight sag. If we are talking about the Urals, Siberia, the northern regions, then the basalt insulation is laid in a checkerboard pattern in two layers of 100 mm each. This means that the beam must be at least 230 mm thick.
There are statements on the Internet that the insulation should be “ventilated”, so the width of the rafter leg should be chosen with a margin. In fact, the insulation itself may not be ventilated, as it is not afraid of moisture, but at the same time it somewhat loses its thermal insulation properties when moistened. The ventilation, which in reality is more likely to be needed for the wood of the frame, is provided by stuffing the crate and counter-crate on the rafters if the width of the beams is not enough for this.
Beams for posts and beams must be selected with a thickness of at least 80 mm on the smaller side. It is allowed to use timber 80*80, 80*100, 100*100. The latter option is relevant for heavy roofs of a large area.
It is better to entrust the exact calculation of all elements of the truss system to the design organization if you do not have experience in construction calculations.
At the same time, a mistake made can make itself felt not only at the stage of purchasing materials and erecting a roof, but also later, when expensive repairs are required.
Do-it-yourself mansard roof installation scheme
Before installing the truss system for the attic with their own hands, first of all, they build a Mauerlat - a belt made of timber that encircles the building around the perimeter. It is on it that the lower overhangs of the rafter legs are attached. Mauerlat is absolutely the same for both broken and straight gable roofs. Depending on the material of the walls, it has features in installation.
In houses built from timber or logs, a separate Mauerlat beam is not required - its role is successfully taken over by the upper crown. Eyelets are cut into it with the desired step, and the ends of the rafter legs are attached to the corners or studs.
 Mauerlat and rafter legs fastening
 In houses made of cellular concrete before laying wooden beam an armored belt is required around the perimeter. Without it, the soft porous material of the walls can eventually sag, and the mount will tear out of the crumbled gas or foam concrete. They make it from concrete along the formwork, reinforce it with two to four rods, preferably fiberglass, so that the structure is lighter.
Brick and cinder block walls do not require armored belts. In this case, holes are prepared at the end of the wall with a perforator, and the Mauerlat beam is attracted by anchors. Rafters are attached to it with the help of corners, as well as large screws - “grouses” with hexagonal turnkey or head caps. It is more convenient to tighten them with a wrench.
Assembly of roof fragments on the ground
There are several ways to assemble a mansard roof frame. One of them is the assembly of all elements on the ground, raising them to the roof, strengthening with temporary struts, and then through "finishing" installation, which provides rigidity to the structure. Consider the execution of work step by step:
- The first step is to assemble the pediments. They are the upper and lower parts of the rafters, which are fastened to the racks and puffs at the break line. All the lower ends of the boards and beams rest on the base. In the middle of the gables, dormers are usually provided.
- Prepared assembly units are lifted and fixed from one and the other edges of the building. The bases are fixed with anchors in the wall, plus temporary struts are added to hold the structure.
- Consistently collect the "ribs" of the rafters and put in the Mauerlat cuts with the provided step.
- After all the elements are assembled, they are sewn together with longitudinal jumpers: with a ridge beam - the tops of the triangles, connecting beams - at the junction of the racks and puffs. So the design acquires the necessary rigidity.
Serial assembly on site
In the second case, all parts of the rafter system are gradually assembled in their places on the roof. Out in the final finished construction. This option is easier when individual fragments weigh a lot and cannot be lifted without special equipment. In this case step-by-step instruction assembly is like this:
- Start by installing racks on the floor logs of the second floor. The step is the same as for the rafters. The upper ends are connected by a puff - a horizontal bar. At this stage, a rectangular box should be obtained from the ribs of the racks and puffs.
- After that, the lower parts of the beams are mounted. They must form a triangle with the uprights and the base - a rigid structure.
- Behind them, you can install the upper segments of the rafters. For the required rigidity, they are fixed by slopes to the puffs. For wide roofs, additional crossbars can be provided. Also, if the span of the puff is too long, a beam is placed to fasten the ridge beam with the puff - this will prevent it from sagging.

For a sloping roof, the problem with the lack of a standard length of lumber - 6 m is not typical. Recall that the rafter consists of two parts. If, nevertheless, such an inconvenience arose, the beams can be increased by placing patches of the same thickness as the beam on both sides, and tightening the joints with bolts and nuts through the through holes.

Drawings of important nodes
The most critical places, the execution of which may require a schematic visualization, are the connections of several planes, as well as places that have a large load. The photo shows drawings of such connections.

For bonding wooden beams and racks use different fasteners. In order of strength and preference, you can arrange them in descending order: bolts with nuts and washers - screws and "grouse" - nails. Nails are bad because after years, when the wood dries out and deforms, they tend to crawl out of the holes. The structure will not completely fall apart, but an undesirable backlash will appear. 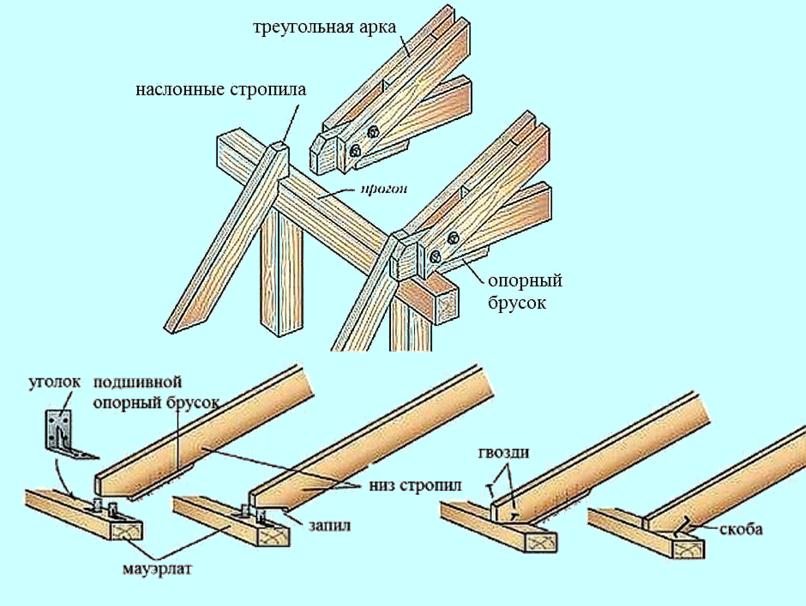
The rafters are attached to the Mauerlat by means of powerful steel corners. For convenience, a stop bar is stuffed on the lower part of the rafter leg, which prevents the end of the board from slipping off and allows you to carefully tighten all fasteners.
Attic window options
The attic, being a living space, should be well lit. SNiPs recommend 10% glazing area of the floor area in the room.
The easiest way to let light under the roof is to provide windows in the gables. If you have provided for load-bearing racks, then putting such a window will not be difficult. Neither special waterproofing nor reinforcement of the attic roof structure is required. If the window is only on one side, this side should be west or south, so more light will enter it during the day.

The next popular and attractive solution is sloped windows. They do not require changes to the roof structure. Also their advantage is in the large amount of light they provide. However, when installing inclined windows, good waterproofing of the frame is necessary. In regions with snowy winters, it is recommended to install reinforced windows, since if there is a thick layer of snow, they will have to experience additional load.
 Inclined windows from the inside
 The steeper the angle of the roof slope, the lower the height of the window can be. In gentle areas, the height, on the contrary, should be greater. Usually, sloping windows are not made wider than the rafter pitch, as this would necessitate a serious strengthening of the adjacent rafter legs, on which the weight of the roof would be redistributed. It is better to do two narrow windows- the light will penetrate through them as much as necessary, and there will be no influence on the structural elements.
 Dormer and slanted windows
 Sometimes dormer windows are made in the attic, for which they arrange a special ledge. The advantage is the vertical arrangement of the frame and the ability to stand in front of a full-length window. Minus - the need to change the configuration of the roof. On a continuous surface, two valleys appear at once - the meeting points of two planes, where the greatest danger of leakage arises.
A window similar to a dormer, but only upside down, that is, recessed inside the attic, is made if they want to provide access to the balcony. Such a solution has no other advantages, since in this case less light enters the premises than through standard inclined windows.
Installation of battens and roofing
The next stage in the construction of the attic with your own hands will be the installation of the finishing roofing. First of all, a waterproofing membrane is stuffed onto the floor logs. It should not let water through to the insulation, but steam should escape through it. On top of the waterproofing, slats are stuffed along the log. Then a carrier crate is attached across the lag. It can be a board of arbitrary width and thickness of 15 - 20 mm. Thanks to the presence of these multidirectional layers, ventilation of the reverse side of the roofing is ensured.

This scheme is suitable for hard roofing materials: slate, metal tiles, seam roofing, corrugated board. A flexible roof requires a solid, solid underlayment. For this, osb plates or plywood sheets are used, a screen is made on top, and soft roof elements are welded on top.
Step-by-step instructions for warming the attic
Most often, when constructing a mansard roof of a private house, it is supposed to be insulated. At the same time, it is more convenient to nail the waterproofing membrane on the outside of the roof. However, if you have not done this, then you can always mount it from the inside. To do this, the membrane rolls are rolled along the roof and shot at the logs with a construction stapler. In this case, you need to leave deflections for the insulation. The joints are glued with a special double-sided tape.
 (3
rated for 4,33
from 5
)
(3
rated for 4,33
from 5
)