Floor in the bathroom - device, waterproofing and cladding. What flooring is best for a bathroom? bathroom floor which is better
When repairing a bathroom, the importance of proper floor screeding is not always taken into account. Often, careful carrying out of this stage is observed only during the arrangement of an apartment in a new building. However, in old houses, it is sometimes simply impossible to perform a quality renovation of the premises without laying a new subfloor.
The screed contributes to the correct distribution of the load on the floor from furniture and household appliances, and will also reduce the negative consequences of small leaks in the bathroom. It is important to know the technology of such work and their features. Let's take a closer look at how to make a floor screed in the bathroom.
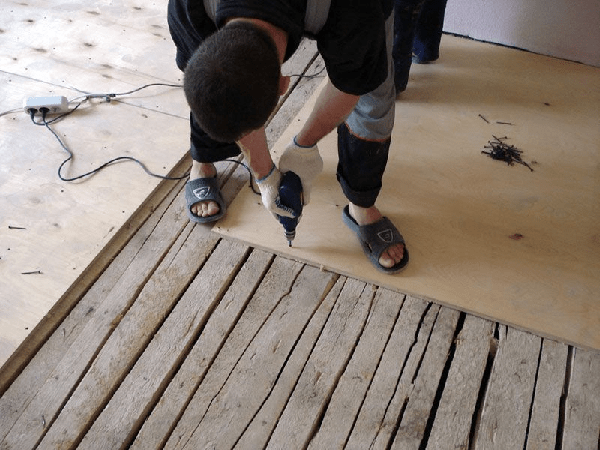
It should be noted that the process of arranging the base screed is quite laborious. Of course, it is necessary to start with the dismantling of the old floor.
Dismantling the floor during the repair
After the old screed is removed, you will have to tinker with cleaning the room. As a rule, you need to collect and carry out a large number of construction debris, clean and prepare the surface well.
Before you make the floor in the bathroom, thorough preparation is recommended. Laying a new screed is accompanied by a lot of additional work that necessarily precedes installation.
Bathroom floor waterproofing
This is the first thing you need to take care of when finishing the floor in the bathroom. It should be noted that standard polyethylene as a waterproofing material is not the best choice. The cement screed corrodes it and a few years after the repair of the insulating flooring simply will not be.
In the bathroom, you can not do without reliable waterproofing. If even a slight flooding occurs, you can fill the ceilings in the apartment from below. This will incur large repair costs for neighbors. Therefore, the materials for laying on the floor should be chosen the most durable. It is better to purchase bituminous mastic or special material in rolls for insulation.

Bituminous mastic for insulation
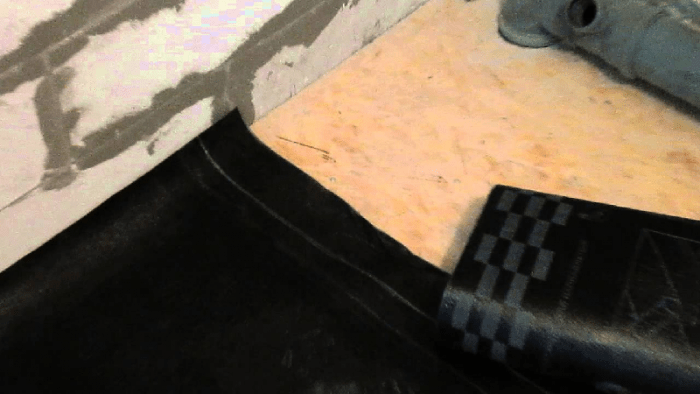
A layer of bitumen is applied to the prepared clean floor surface. Then a waterproofing layer is made on top. It is better to choose rubberized in rolls. The material is heated with gas burner and bituminous mastic glued to the base.
Do not forget to waterproof also sections of the walls from below at a height of about 150 - 200 millimeters.
It is also desirable to cover with insulating material those areas of the floor in which the risers are placed.
Screed and floor insulation
Doing repairs to the floor in the bathroom with your own hands, you need to take care of thermal insulation. Insulation of the screed itself is an important stage of work, but the effect of this procedure will seem insignificant if you do not additionally provide for a floor heating system. By equipping your bathroom with underfloor heating, you can immediately feel all the advantages of these modern designs.

Warm floor in the bathroom
Underfloor heating systems save energy costs, create a cozy and comfortable atmosphere in the room. Heated floors allow you to walk barefoot on tiles without fear of catching a cold.
Today, a wide range of different underfloor heating systems is on sale. Some of them consume very little electricity, so this design will not "eat up" the entire family budget. There are cable models that need only 500 watts to heat the floor in a small bathroom. If you make a choice in favor of a water-heated floor, you will save even more.
In order to properly insulate the floor screed, a foam sheet with a thickness of about 50 millimeters is laid on the waterproofing. A special screen is placed on top of it, which will conduct heat into the room from heating appliances.

Floor insulation with foam
The next stage involves the laying of a reinforcing steel mesh with a cellular structure. The size of the holes in it is 100X100 millimeters, and the thickness of the wire is 2 - 3 millimeters.
In the case of installing a floor with a water circuit, the pipeline must be laid out after the grid. The electric underfloor heating is laid differently - the heating elements of the structure are installed on the finished screed.
Filling the screed with the installation of beacons
Since standard bathrooms and toilets are relatively small, the process of working on a screed or pouring the floor in the bathroom with your own hands is easier and faster. The small area of the room also makes it easier to install beacons.

The process of pouring the floor on beacons
In the work it is necessary to use a long rack level (about two meters). Beacons are laid on hills of cement mortar, laid out in a line with intervals between them equal to 0.5 m. The function of beacons is performed by guide profiles for drywall ud. They are inserted into the solution, and then the position of the beacon is checked using a level. Then, having measured the desired width from the first, the second beacon is set.
Now the level needs to be set to two beacons at once, but general principle installation remains the same. You need to remember to check for a clear horizontal when installing guides. You need to pay attention to the second lighthouse itself, and to the distance between the first and second. Then, following the technique described above, arrange the remaining profiles for the screed.

Pouring the base on the lighthouses
In cases where the floor is poured on top of the foam, it must be cut off at the installation points of the beacons. These are places with located "mounds" of cement. If the foam is left, the beacons may move. Before you pour the floor in the bathroom with your own hands under the tiles, you must definitely take into account this nuance. "Playing" beacons will make the screed uneven, and this, in turn, will complicate the process of finishing the tiles and require a large amount of tile adhesive.
The floor screed in the bathroom under the tiles should not be too thin. Otherwise, cracks may appear in it. The thickness of the fill is usually at least 50 mm. This is important to remember when installing beacons. To install them, the height is marked from the floor itself or from the foam sheet.
The sequence of laying the screed in the bathroom
First of all, in order to make high-quality floors in the bathroom with your own hands, you need to properly prepare the solution. Prepare cement and sand.

Preparation of cement slurry
It is important to determine the proportions. The answer to the question of what mixture to fill the floor in the bathroom with depends on the type of base for pouring. If you need to pour immediately concrete base, a solution in a ratio of 1: 4 is suitable. This is 1 part cement and 4 parts sand. Styrofoam screed involves using a mixture in a ratio of 1: 3. In this case, you need to take three parts of sand.
The mixed composition for pouring is poured onto the floor surface between the beacons and leveled using the building rule. The tool is placed with both ends on beacons located next to each other.

Leveling a cement screed floor with a rule
Thus, the entire screed in the bathroom is gradually poured. During operation, it is necessary to ensure that the mortar is laid strictly according to the level of the beacons.
After a day, the filling will harden a little. Then you can remove the guides, and cover the recesses left from them with cement.
The next step is to level the surface, smooth out all the protrusions and bumps. This is done with the pointed end of the rule. After that, the rough filler floor in the bathroom is covered with a thin plastic film and left to dry.

The finished screed must dry
Polyethylene reduces water evaporation and makes concrete screed more durable.
Types of mixtures for floor screed
As a rule, leveling mortars for floors are made from gypsum or cement. The latter for bathrooms and bathrooms is preferable. Filling mixtures are produced in special paper bags with a polyethylene backing. It protects the material from moisture penetration.

Mix for dry floor screed
Water must not be allowed to enter the package, since damp solutions are absolutely not suitable for creating a strong and even screed.
It is also important to check the expiration date of products. Each mixture is designed for a certain period of use. Stale material can degrade the quality of the finished flooring solution.
Often, manufacturers include various modifying components in the composition of leveling mixtures. Such additives can make the coating better, as well as make the finished solution more plastic, which is important in the repair process.
For example, special synthetic fibers reduce the likelihood of cracking when the screed hardens. A screed made on the basis of a solution with such substances can even be used as a floor finish.
There are such types of mixtures:

The first type of solutions is used as an external surface finish. They allow you to get rid of defects and protrusions of the coating. The mixture must be applied in a thick layer, which makes it possible to end up with a smooth base.
The screed itself is also classified in a certain way according to the property and condition of the material:
- Dry screeds.
- Semi-dry.
- Wet.
So, a wet screed is considered the easiest to perform. It is made up of concrete and sand. The composition prepared in this way is poured onto the subfloor and distributed over its surface.

Pouring screed mixture
However, this filling takes a long time to dry.
Wet screed is made on thermal insulation or waterproofing material. The heat-insulating layer is used for finishing in country houses and in apartments on the first floors of buildings. A wet screed with two leveling layers is also used. This option is required if you plan to finishing from linoleum or parquet. The so-called knitted screed is suitable for living quarters.
Semi-dry screed also includes sand and cement. However, unlike wet pouring, plasticizers and other components are added to these mixtures. Due to the presence of these additives, a semi-dry screed dries faster and with its help you can easily level the base by removing all bumps and protrusions.

Leveling the base with a semi-dry mixture
In addition, less water is required to knead such a solution. This will make the floor structure lighter and more durable.
A dry type of screed is a composite product of several layers. Crushed stone or expanded clay is placed at the lower level, and gypsum fiber is placed on top. Laying such a floor is not difficult, and there is not much dirt left. However, the dry finish of the base has a significant drawback: it is not able to withstand a large load.
Principles of work with mixtures for screed
While doing repair work it is necessary that the air temperature in the room where the floor is poured does not fall below +5 degrees and does not exceed +25. Humidity should be no more than 90%.
Drafts should be avoided during operation, as they impair the quality of the screed. It is necessary to calculate in advance the time for the poured base to dry, sometimes with a margin, since some types of compounds will “set” for a long time.
When preparing a mixture for pouring, it is necessary to follow the proportions and all the instructions that manufacturers list in the instructions on the package.
Some time after the completion of work, while the floor is still freshly poured, it is better not to walk on it. Especially this advice should be heeded by those owners who decide to make a foam base screed. To remove beacons, you can put wide sheets of OSB on the surface after processing. Such protection will prevent damage on a new, recently poured floor.

After the screed dries, remove the beacons
The floor level must be taken into account during the installation of beacons. The floor in the bathroom should be slightly lower than in the rest of the apartment. This threshold helps to avoid flooding.
Thus, the process of self-filling the floor in the bathroom is a type of repair work that is quite accessible to every owner. Only need to be used for screed quality materials and observe the technology and all stages of filling.
Competent installation of the floor and flawless laying of the flooring in the bathroom is a difficult and time-consuming task, the implementation of which homeowners are accustomed to trusting specialized companies. If an expensive event is invested in the family budget, this choice is fully justified. However, laying the coating and preliminary preparation can be handled independently. It is enough to study the information that introduces you to how to make a floor in the bathroom, do not forget about the recommendations of the manufacturers of the materials chosen for the arrangement and strictly follow the technologies developed in practice.
Requirements for the future floor
The list of requirements for the flooring of the room for hygiene procedures includes such characteristics as:
- insulation including protection building structures from moisture, protection of owners from negative noise and heat loss;
- decorative indicators, depending not only on the characteristics laid down by the manufacturer, but also on the skill and diligence of the stacker;
- safety of movement on the floor;
- priority environmental criteria;
- ease of care
- the ability to resist a wide range of influences inherent in rooms with frequent temperature fluctuations and changes in the moisture content in the air;
- durability of the coating, operated with full load in difficult conditions.
At the same time, it is necessary to take into account the likelihood of emergency leaks that threaten the personal property of the owners and the property of neighbors living below.
In principle, the entire list of requirements is based on the observance of two interrelated conditions. This is a competent choice of flooring and careful observance of the laying rules.
The choice of material for the device floor
In the field of hygienic room design, the imagination of the owners is not limited by any strict framework. It can be a plain light or radically black floor, a self-leveling version with an abstract pattern or with a specific optical effect, rock tiles or clinker with a geometric pattern. It is important that the design of a plane that is significant for the bathroom is in harmony with the general decorative solution. Those who wish to lay the floor in the bathroom with their own hands, of course, are recommended to choose a coating that is distinguished by the least labor-intensive and convenient installation scheme.
As a finishing coating for laying the floor in the bathroom is used:
- tiles made of wear-resistant ceramics with or without glazed coating;
- tiles made of agglomerate made by joining crushed mineral raw materials into an array using synthetic binders;
- metal tiles on a rubber backing;
- natural wood flooring;
- rubber tile options with a ribbed safe surface;
- natural cork, which attracts with superior insulating qualities and natural origin;
- water-repellent laminate;
- self-leveling polymer floors, convincing with the simplicity of the device, strength and the absence of butt joints in a monolithic coating;
- budget linoleum, presented on the market with rolled products and convenient for self-laying small square elements like the same classic tiles.
In the abundant range of materials, ceramic and natural stone products in the form of tiles continue to be the most popular for sanitary room flooring. Self-leveling floors are not inferior to them in terms of relevance. Often, buyers choose a cork floor - in the bathroom it can last no less than any type of flooring made from natural woods.
The cork floor is a kind of puff "pie", which includes the main layer of pressed cork, a decorative layer of cork veneer and a protective layer of PVC. Manufacturers offer two types of cork coverings, differing in the method of installation, so you can prefer a floating look, the elements of which are equipped with tongue-and-groove locks, or choose products that adhere to the prepared base using specialized adhesives.
Important. If the use of adhesives is required for laying any type of floor covering over the “warm floor” system, a composition should be preferred, the manufacturers of which have the ability to work in tandem with heating equipment. Such modifications are more elastic and have the ability to compensate for the processes of expansion of the base resulting from the effect of temperature.
Future performers who choose a priority coating for the bathroom need to take into account the thickness of the material. Cork and wooden floors, which have a fairly significant power, will reduce the height of the room. Least of all will affect the parameters of the volume of the room bulk polymer floors, tiles and linoleum. But the last of these types is now rarely used due to low strength and rapid wear.
Not less important. When implementing the idea of \u200b\u200ba drain device in the bathroom, you need to think about the location of the pipes and plan the drain site before starting work. It will be necessary to calculate the height to which the floor is to be raised to form the angle of inclination necessary for the spontaneous movement of fluid through the pipes. An acceptable angle of inclination can be obtained by means of a powerful screed.
Technological stages
The entire cycle of work, which refers to the installation of the floor in the bathroom, is divided into a number of stages common to all schemes, which is justified by equivalent operating conditions, manufacturers' recommendations and building codes. The generalized scheme includes:
- preparation of a rough foundation;
- applying a waterproofing layer;
- performing a leveling screed;
- laying the finish coat.
The first stage is the preparation of the foundation
Most apartments already have a concrete screed in the bathrooms. Future installers can only get rid of linoleum, old tiles, paint layers, greasy stains, materials and dirt that interfere with proper flooring. You can clean the base with a perforator. It is necessary to carefully process the joints of the floor with the walls. Then you will need to carefully close up the cracks, holes and crevices identified during the cleaning, for which you can use cheap tile adhesive. Repair of damage is necessary to prevent too rapid wear of waterproofing and screed, as well as to prevent waste of expensive primer, leveling and insulating coating.
If significant irregularities are detected that exceed the allowable limits, the base should be leveled using mixed ready-made materials. A primer will not be superfluous, which helps to increase the adhesion of the subfloor with waterproofing.
The second stage - waterproofing
To help those who want to make the floor in a hygienic room waterproof, the industry offers several types of waterproofing materials that differ in the principle of applying a water-repellent layer to the surface.
- Pasting materials are chosen if waterproofing is required not only on the floor, but also fragmentarily on vertical planes so that the treated surface resembles a bowl with a wall height of more than 15 cm. They are perfectly fixed and do not require professional skills from the performer.
- Bituminous emulsion applied by painting with a brush or roller. This is the easiest, but short-lived way. Waterproofing will be effective no more than 5 years.
- Coating materials that create impeccable water resistance, represented by ready-made formulations and dry mixes that require preparation.
Often, apartment owners prefer coating, as the most appropriate, easy to perform and long-term option. In the area where the floor joins the walls, it is recommended to lay a special waterproofing tape before coating. Coating waterproof material, in ready-made resembling sour cream in consistency, apply with a spatula or roller to the floor. The walls are also advised to be processed in such a way that a kind of “trough” with a height of up to 10 cm is obtained. The number of layers and the waiting period between their application are indicated in the manufacturer's instructions. Before carrying out subsequent work, it is necessary to wait at least a day for the complete hardening of the coating composition.
Pro best ways and diagrams of the waterproofing device in the bathroom are described in our material:.
Important. For waterproofing the floor in houses with wooden floors, an additional safety layer is often used, for which inexpensive linoleum brands are used. Like the coating composition, linoleum is laid on the floor in the form of a container with five-centimeter allowances for the walls.
The third stage - a quality screed
The screed will help to obtain a perfectly aligned plane and facilitate the further laying process. To perform the screed, you will need to purchase a mixture, the main component of which is non-shrink cement. For those who want to know how to fill the bathroom floor with leveling mortar correctly, the following description will help.
- First, it is necessary to mark the level of the planned floor surface using special marks located along the perimeter of the hygienic room. To do this, a laser level, a special or home-made measuring device determines the uniform height marks of the future horizontal plane. To make a homemade device, you can take two disposable syringes and connect them with a plastic hose.
- Beacons are installed - slats resembling the letter "T". A cord is pulled between them, it is needed to align the profiles vertically.
- The solution prepared according to the manufacturer's instructions is evenly poured onto the floor surface. It is necessary to fill the entire space up to the marks indicated by the beacons.
- Leveling the mixture poured onto the floor is done with a rule or a simple spatula.
- It is advisable to “walk” over the entire area of the screed with a special device - a roller with needles, which allows you to get rid of air bubbles formed when pouring the solution.
Further, it is necessary to strictly comply with the manufacturer's requirements regarding the time required for the complete readiness of the screed for further work, and regarding the climatic regime that ensures the normal setting of the screed.
Important. The leveling mortar for underfloor heating is applied in two stages. Moreover, between the layers of the screed there should be a layer of heat-insulating material.
Laying tiles - a classic of the genre
Recommendation. Before laying, unpacked and checked for defects, the tiles must be spread over the floor area without gluing. This procedure will help you find the best place to start work and exclude the location of cut fragments at the entrance..
Any tile on the floor in the bathroom is laid according to a single scheme. The performer will need a standard set of tools and fixtures, including a level, a container for an adhesive solution, plastic crosses, a trowel and a special spatula equipped with teeth, the size of which depends on the size of the elements and the degree of unevenness of the floor.
In order not to buy excess tiles and not to buy suddenly ended material in the process of work, study the rules for calculating the required amount of tiles:.
The technological sequence of the process of laying floor tiles includes:
- determination of the most acceptable direction of the rows, the choice of a rational location of the starting point;
- preparation of an adhesive solution, performed according to the instructions attached to the material;
Important. After the first kneading, the adhesive composition needs to stand for approximately 10 minutes. Then the secondary kneading is carried out, which is required to obtain a homogeneous mass. An excessively liquid consistency of the glue (broadening grooves will signal it) is corrected by adding a dry mixture to the solution, followed by kneading.
- applying the adhesive composition to the surface, the glue must be evenly distributed over an area of 1 m² with a notched trowel, it is not recommended to apply the adhesive solution over a large area, as the composition quickly hardens;
Should know. The adhesive solution can be directly applied to the tile if the contractor considers that this method is more convenient and economical.
- for the identity of all butt joints, spacer plastic crosses are used, they are placed at the cross intersections of rows of tiles between four adjacent elements;
Important. Excess adhesive material must be removed immediately so that hardened stains and sagging do not spoil the aesthetic performance.
- the gluing of the trimmed elements is carried out after laying the main array, they are placed in areas that are least subject to dynamic loads and in areas that are “not conspicuous”;
- filling the joints with grouting compounds is carried out no earlier than one day after gluing the tiles, with a rubber spatula.
Important. Before laying tiles on top of the "warm floor" system, the heating equipment must be turned off and not turned on until the used consumables have completely hardened.
Do-it-yourself self-leveling flooring in the bathroom
The process of pouring a polymer floor itself will not require effort if the preliminary steps are performed flawlessly. There should be absolutely no complaints about the leveled surface, since bulk coating emphasize the presence of the slightest crack or notch. If the plane to be processed is perfectly aligned, you can start pouring:
- any type of level gauge, preferably a laser device, determines and indicates the points of the surface of the self-leveling floor with beacons;
- the preparation of the composition is carried out in strict accordance with the instructions attached to the material;
- pouring is carried out in areas, and not on the entire surface;
Important. The self-leveling floor in the bathroom is poured parallel to the walls, you need to start pouring in the far corner, finish at the door.
- the floor is leveled with a wide trowel; instead of a trowel, it is better to use a squeegee equipped with an adjustable gap;
- the first layer of filling, which acts as the base base, must be completely polymerized, which will take two days;
- the top coat is applied by analogy with the technology of pouring the base layer.
Do not forget. It takes two weeks for the self-leveling polymer floor to completely harden and stop emitting toxins that are harmful to people.
Strict observance of technological requirements, strict adherence to the instructions of manufacturers, careful preparation will help to arrange the floor in the hygiene room correctly. The right device will ensure long-term operation and superior aesthetic qualities. Armed with patience necessary materials and information about the technological order of floor installation, you can save an impressive amount on paying for the work of installers.
One of the seemingly insoluble problems that arise when renovating a bathroom has always been and remains the problem of arranging the floor and flooring in the room. For a concrete base, the choice of flooring options is quite large, you can use traditional tiles or even underfloor heating, but what to put on a wooden floor in a bathroom, given the fact that wood and water have been and remain implacable opponents?
What should be the flooring in the bathroom
Almost any solid wooden floor has a universal character, it can be put in any residential building, be it a house or an apartment, a cottage or a guest house, except for the bathroom. Putting a simple wood flooring in a bathroom means it will rot in a few months. Therefore, it is necessary to change the structure of the floor, for example, laying an additional layer of plastic or ceramic on a waterproof basis, or using a material for a wooden floor that is not susceptible to the damaging effects of water.
But, before laying decorative tiles or any other flooring option, it is worth considering some specific qualities of a wooden base:
- You will need to strengthen the floorboards that sag under the weight of a person, even if you put plywood or OSB sheets on top of them. The deflection may not be noticeable with daily use, but becomes apparent the first time you try to lay a hard tile;
- Wooden base - not the best the best option for the floor, in addition to the fact that it must be protected from decay, the structure of the material, even with the slightest change in humidity, can change dimensions, not to mention the fact that wooden floors can simply arch in the humid atmosphere of the bathroom;
- All of the above is a serious problem that has to be solved, for example, when arranging a bathroom in wooden house where there are no concrete floors, the floorboards lying on the beams are at best protected by a layer of basalt thermal insulation. In such conditions, it is not enough to put a waterproofing layer; it will be necessary to complete the entire range of protective equipment.
Therefore, no matter what material is planned to be placed on a wooden base, the bathroom floor must be protected from water by all available means, namely:
- Put a double layer of waterproofing;
- heat insulate wooden details from sources of water vapor;
- Do high-quality ventilation subfloor, while the air intake should be carried out from the nearest dry room.
If you just put a decorative coating with waterproofing, then due to the water vapor accumulating in the space around the wooden floorboards, even under the waterproofing layer, the wood will rot and crumble.

Advice! Instead of ventilation products under wooden floors, you can put a few kilograms of powder with good absorption of water vapor. This will help remove most of the water and protect the insulation from flooding.
It is the leakage of water vapor through the fillet welds that causes the rapid failure of the insulation. Paired with an absorber, you can safely put crushed expanded clay or even mineral wool. All this will make wooden floors not only durable, but also safe.
Oddly enough, but you can save the tree in another way, for example, if you put a heating system in the base of the floor. Any warm floor on a wooden base in the bathroom can be used not only for heating, but also for drying part of the condensate and residual water on the surface of the floorboards.

What modern materials can be put on wood in the bathroom
There are not many options for flooring that can be used in a humid bathroom atmosphere, as material manufacturers focus mainly on concrete bases, as the most common in modern housing construction.
If we exclude the most extreme method with dismantling hardwood floor, boards and logs, you can put a floor covering in three basic versions:
- Make a tie on wooden floors bathroom and lay tiles;
- Lay waterproof laminate or linoleum;
- Leave the old plank version as the subfloor of the bathroom, on top of which lay a wooden shield made of moisture-resistant wood.
Note! The wooden floor, made according to modern tracing papers from traditional and new materials, has stunning beauty, while in terms of durability and consumer qualities it is not inferior to ceramics and plastic.
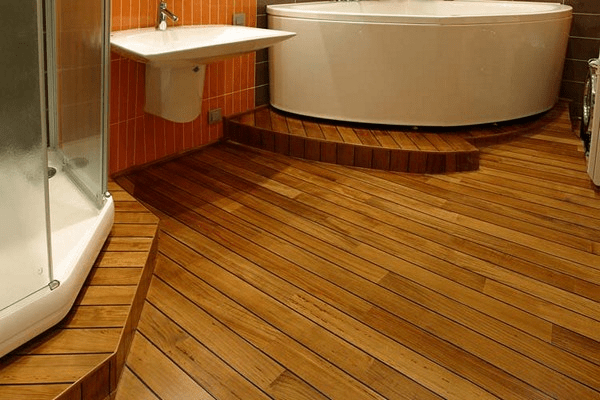
Wooden floor for bathroom
One of the great things about wood is that it's quite easy to make wooden bathroom floors with your own hands. Device wood flooring a little more complicated than ordinary floorboards, but even a novice carpenter will not be difficult to lay a floor in the bathroom. Therefore, before trying to lay cold and slippery tiles in the bathroom, it makes sense to try your hand at building a real sea deck.
Classic wood flooring in the bathroom
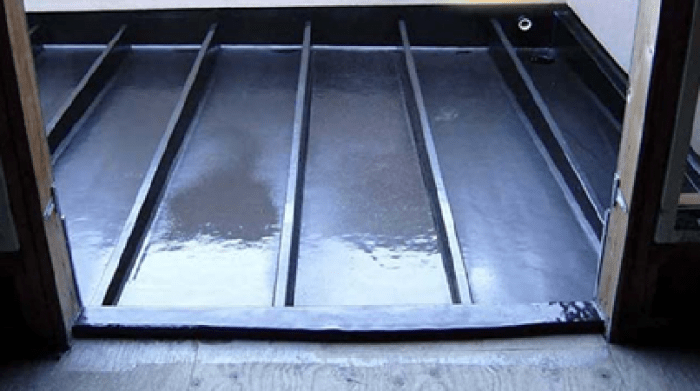
To avoid trouble with warping and rotting of wooden structures, the floor in the bathroom is made in the image and likeness of the structure used in the steam room of a bathhouse or the deck of a fishing schooner. In fact, the wooden floor is double:
- The lower draft floor is called still wet, it collects all the water, dirt and detergent residues that fall on the floor in the bathroom;
- The top wooden floor should be made of waterproof wood, preferably ash or oak.

The lower draft floor must be subjected to thorough waterproofing. To do this, you can use liquid rubber as the first layer, or a special coating of butyl-styrene waterproofing used to insulate pool bowls, ponds and large concrete containers.
If the subfloor is made of boards, then before laying the waterproofing, it is necessary to sew the floorboards at the joints with nails or self-tapping screws, remove the paint and sand the surface with coarse sandpaper.
The base of the subfloor is impregnated with an antiseptic and dried thoroughly. If the base is made of concrete, then you will need to insulate the bathroom floor with foam, put moisture resistant plywood, install the support logs for the finished wooden floor in the bathroom, and only after that apply the coating waterproofing.
After the insulation layer has dried, it remains to lay the top finishing floor. Boards pre-planned and treated with waterproof varnish are laid on logs on spikes or wooden pins. You can not beat nails or screw screws into a tree. Even if you put a layer of protective varnish on top, the attachment points will rust.
The result is a very beautiful and durable bathroom floor.
Bathroom floor wood finish options
The age-old problem of how and what to put on the bathroom floor can be solved in a fairly simple way. To arrange the most beautiful, warm and environmentally friendly coating, you only need to use special types of wood-based material or waterproof wood species:
- Larch;
- Ash;
- Thermostated wood.
All listed types of wood perfectly cope with water. It will only be necessary to waterproof the base with a coating of mastic and lay a thick plastic film. You can lay a wooden floor on slats or stick it directly on the base.
To prevent moisture from seeping through the joints, molten mastic based on pine resin is poured into the seams. Next, you will need to put a fiber cord in the joints and fill the seams with polyurethane varnish or epoxy glue. The service life of a wooden floor in a bathroom is at least 10 years.
Wooden floor and ceramic tiles
The wooden flooring in the bathroom is not designed for a serious load, the tree can be put on the floor only for large bathrooms, where there is good ventilation and airing of the room, providing effective removal water vapor and surface moisture.
If the dimensions of the room are within 2x3 m, or the room is used quite often, so that the moisture on the walls and floor does not have time to dry out, in this case it is best to lay tiles. Laying tiles on a wooden bathroom floor will require significantly more effort and expense, but it is the only way to make a bathroom floor more durable.
If it is important for the room to preserve the appearance of a wooden floor, you can pick up and lay porcelain tiles with imitation of parquet or floorboards. So that the seams do not give out the true origin of the floor material, it will be necessary to lay tiles with a seam width of 0.5-0.8 mm. In this case, there will be an impression, like from real floorboards.
How to tile on wooden bathroom floor
The principle of arranging waterproofing under the tile does not differ from the previous method, with the only difference being that two layers will have to be laid under the tile. The main problem of how to make the base hard and flat can be solved in three ways:
- Laying a self-leveling floor based on ready-made mixtures;
- Cement-sand screed;
- Lay cement board.
Cement screed and self-leveling gypsum-acrylic coatings are made very simply, but their reliability for wooden floors is questioned by many experts. It is best to lay ready-made cement-bonded particle boards on waterproofed floorboards.
If it is planned to equip the room with a warm electric floor, then flat slate can be used instead of DSP. Today it is the most reliable and durable type of tile base.
Sheets need to be laid in two layers with a coating of seams coated waterproofing. At the joints, be sure to put a sickle tape. A gap of 2 mm is left around the perimeter of the room, which is filled with polyethylene and filled with silicone. It remains to apply a primer to the base deep penetration and lay ceramic tiles according to traditional technology.
Conclusion
AT budget option repair, you can abandon expensive tiles and put linoleum or laminate with a waterproof coating on the wooden floor. The technology for laying linoleum does not differ from tiles, only instead of tile adhesive it will be necessary to use a melt of resin mastic. It is clear that for the bathroom it is necessary to use linoleums with a high surface density without lining.
The most difficult stage in the repair of an apartment is considered to be the installation of the floor in the bathroom, especially if you have to do the work yourself. The article will discuss how to repair the floor in the bathroom with your own hands and achieve maximum efficiency from the laid flooring.
Floor installation in the bathroom
The problem of laying flooring in the bathroom is as follows:
- it is necessary to take care of pipelines that occupy a certain space in the floor structure;
- take into account high humidity indoors, which special building materials will help to fight.
If laying work is carried out independently, then it is important to achieve the strength and aesthetics of the coating so that there are no doubts about the quality of the work performed on the photo or during a visual inspection of the floor.
Features of flooring in the bathroom
If the owner is thinking about which floors are best done in the bathroom, then you should know that in any case, the installation will be done in a certain sequence.
The order of installation is approximately the following:
- concrete floor slab;
- bituminous waterproofing layer or any other;
- cement-sand screed about 5 centimeters thick;
- additional waterproofing layer of special grease or paint;
- finishing screed surface in one of the most popular ways;
- flooring (suitable for a bathroom).

DIY bathroom floor
If the work is done without the participation of specialists, then you should be patient, since this process is not the easiest and takes a lot of time. It is very important to follow the technology at every stage, as well as to follow practical advice from professionals. The strength and longevity of a floor can only be achieved if the materials for each layer are of the highest quality and laid with absolute precision.
After laying each layer, you must wait until it dries and hardens. More information about exactly how long you have to wait is available on the packages with many of the materials used. Next, we will consider a detailed algorithm of how to properly lay the floor in the bathroom with your own hands and do it no worse than that of specialists.
Preparatory stage
Before deciding what to lay on the floor in the bathroom and how much it will cost, you should understand that you cannot do without careful preparation of the base for the construction of the floor structure. There are two main areas of work that arise depending on the condition of the floor at the time of repair: just built or already inhabited living space.
The most popular facing material is tiles and floor mosaics. To remove it, you will need a perforator, with which the ceramics will be broken, but the previously created screed will also be deformed. It is recommended not to try to restore the screed, but simply remove it. If the owner decided to replace the floor, then most likely the apartment was built back in the 20th or early 21st century, which is not better side characterizes the quality of the work performed at that time.

If the floor covering in the bathroom is not represented by tiles, then the dismantling process looks slightly different:
- linoleum can simply be torn off by first prying off the edge of the sheet with a sharp object;
- the boardwalk should be sawn from one side of the room, and then manually or with a crowbar remove the remaining boards, etc.
As regards work on draft floor, then everything is much simpler. Initially, the surface should be cleaned of dust, dirt and debris. It is best to vacuum the base after thorough cleaning. Any gaps must be sealed with tile adhesive as these cavities tend to enlarge over time. As soon as the mixture poured into the cracks dries, you can proceed to the next step.
waterproofing layer
Before you start laying the floor in the bathroom with your own hands, it is very important to prime the base. You can apply the primer in several layers. To apply each layer, you will have to wait until the previous one dries. After completing this procedure, you can start laying waterproofing.
Existing types of waterproofing:
- built-up - designed for application to concrete floor slabs. Applied with approximately 25 cm overhang on the walls. Allows you to pour a concrete floor from above, on which it is recommended to apply another waterproofing layer of the same or more modern look;
- rolled - does a good job of protecting walls in those places where they come into contact with a shower or bath;
- painting - has a short service life (3-5 years), but is very easy to apply. Using a brush or roller, even the largest areas can be covered very quickly. The layer is represented by an ordinary solution like paintwork material, which is applied to a concrete base with a slight approach to the walls (10 centimeters);
- coating - has the best characteristics and the longest possible service life.
If you need to decide how to cover the floor in the bathroom and there are no financial restrictions, then it will be more efficient to use coated waterproofing.

It is performed according to the following algorithm:
- it is necessary to add the dry prepared mixture to the water and mix thoroughly. The proportions of water and powder should be 1:1. It is best to interfere with a power tool: a construction mixer, a drill with a special nozzle, etc. Ready can be considered the mixture that looks like a homogeneous mass without lumps;
- the resulting mixture should be applied to the entire surface of the base with a roller or brush, and hard-to-reach places are best treated with a spatula. The layer thickness can be calculated based on the allowable consumption for square meter. This parameter is indicated on the package with a dry mix;
- joints between the floor and walls must be glued with waterproofing tape;
- a waterproofing margin of 10-15 centimeters is also applied on top of the tape directly on top of the tape. Thus, the waterproofing layer will take the form of a “trough” and will reliably protect even the weakest areas from leakage. If all recommendations are followed, then not only the owner, but also his neighbors will be satisfied with the absence of leaks;
- the composition should be applied in two layers with a time difference of 4-6 hours;
- As soon as the coating is completely dry, you can proceed to the next step.
Structural changes in the room
After waterproofing, you can start pouring the leveling screed, but it is at this stage that you should think about whether the owner has any significant wishes regarding the addition of functional parts to the bathroom. After creating the screed, it will no longer be possible to return to the previous floor level in the bathroom and work there.

We are talking about the installation of the following systems:
- warm floor;
- drain for water;
- moving the toilet, etc.
Consider the installation features of such systems:
- Underfloor heating is especially relevant in the bathroom, because in conditions of high humidity, this room also warms up very weakly. The floors in the bathroom will always be cold and without heating this problem cannot be solved. You can install two types of underfloor heating: electric and water. Moreover, the electric version is absolutely safe, despite the high humidity and the active use of liquid in the room. It is worth choosing between the two varieties solely for economic reasons, since in the first case it will be necessary to consume electrical energy for work, and the water-heated floor is quietly connected to the heating system of the whole house or apartment;
- water drain is useful way laying floors in the bathroom, when the coating is at an angle to a certain point in the room where the sewer drain is located. In this case, any liquid spilled on the floor or got there during the flooding process will drain straight into the sewer. However, it should be understood that the level of the floor must be at least 10 centimeters higher. The pipe going into the sewer must constantly protrude above the layer being laid, and so that it does not become clogged with construction waste, it can be clogged;
- if you are thinking about moving the toilet, then you will also need to make significant changes to the structure of the floor. The toilet bowl must be connected to the sewer pipe in such a way that the drain channel enters it at an angle. You can hide the drain in two ways: raise the level of the floor or build an individual pedestal for the toilet.
It is also very important to protect your own home from flooding. To do this, it is very important to make the floor level in the bathroom and the corridor different so that water cannot spread to other rooms. Naturally, this will not save from full flooding, but for a certain time the water will stop.
Naturally, any kind of communications must also be installed before the leveling screed is poured.
Filling the screed
The quality of laying the flooring depends on how even the base will be. It is important to carry out pouring work without departing from the technology, since any violation may occur later during operation. The simplest way leveling is the pouring of a cement-sand screed. Alternative option can become a self-leveling compound, but it is not well suited for floors with large irregularities. It is best used as a top coat.

Concrete screed is carried out as follows:
- along the perimeter of the room on the walls, it is necessary to mark the horizon line, at the level of which the screed will be poured. You can use a laser or liquid building level for marking;
- for high-quality alignment deep into the room, it is worth installing beacon marks, fixing them on small slides of the same solution that will be used for the screed, but with the addition of alabaster. Top part the lighthouse should correspond in level to the horizon line;
- the solution is mixed with a drill with a special nozzle;
- the solution is poured clearly along the horizon line and the level of the beacons. To avoid difficulties, it is best to install beacons with an interval of 1 meter;
- it is necessary to level the flooded areas using the rule - the slats are 20-30 centimeters larger than the distance between adjacent beacons. Stretching a perfectly flat rail over the surface, you can evenly distribute the mixture over all cracks and dents;
- the screed must dry completely. For this, it is necessary to comply temperature regime indoors and avoid drafts for a certain time. In the case of a cement coating, it will take about a month.
If a warm floor is being installed, then the screed is poured in two layers. Bay the first layer, you should wait until it dries. Then you need to lay the heat-insulating layer and the heating elements of the system. A second layer of mortar must be poured over the laid structure.
Bathroom flooring options
Consider how to cover the floor in the bathroom except for tiles, so that its operation does not cause discomfort due to non-standard conditions in the room. Naturally, when choosing, it is necessary to be based on personal preferences, finances and the characteristics of the operation of a particular material.
It is worth noting the most common materials:
- cork is a warm material with a structure that is pleasant to the touch. It does not rot, springs, resists moisture well, and also has protection against the formation of fungi and the reproduction of various bacteria. This coating is natural and will please the owners, as it is absolutely safe for human health. If it was decided to buy just such a coating, then it is recommended to use a cork array with a thickness of 4 to 6 millimeters, which is fixed on the base;
- It has already been said above that it is more effective than finishing the floor in the bathroom with one of facing materials, pour the floor using the self-leveling floor technology. Its popularity is not yet as great as that of ceramic tiles, but the design inspires many owners. This coating can be considered problematic at the pouring stage, since the mixture is highly flammable. The variety of shades and patterns is such that any owner will find something to show off to guests or in a photo in in social networks;
- wooden floors in sanitary facilities are rare, but if you use a moisture-resistant laminate, then it is quite possible that such a coating will last a long time. Externally, the wooden floor in the bathroom, of course, looks very aesthetically pleasing;
- linoleum is a cheap material with good performance, but it wipes off very quickly and its presentability decreases. Usually linoleum is used as a temporary cover or in the absence of funds to purchase a more reliable and durable material. See also: "".
Outcome
Having carefully studied this article, you can easily understand the procedure for arranging floors in the bathroom. It is best to contact specialists to perform these works. A professional builder will quickly and efficiently cope with the laying of each layer in the floor structure. Also, the work performed will be guaranteed.
The floor in the bathroom must be approached very responsibly, as it will be affected by high humidity, since there are a large number of pipes in this room that need to be hidden.
It would be useful to install a system of underfloor heating for additional heating of the room. In this article, we will consider how to cover the floor in the bathroom, materials and their characteristics, how to install the screed, underfloor heating and finishing flooring.
bathroom floor requirements
 Finishing materials for the bathroom must be moisture resistant
 room with high humidity and the threat of possible leakage requires a foundation device using moisture-resistant materials and laying a hydro- and vapor barrier layer.
Bathroom flooring must meet the requirements of:
- should be warm, as we become barefoot on the floor;
- safety of movement, wet coating should not slip;
- ecological cleanliness;
- ease of installation and maintenance;
- long service life.
All these parameters are easy to achieve if you choose the right materials for flooring and adhere to the installation technology.
Floor device
 Warm electric floors - a good choice For bathroom
The base in all houses has approximately the same structure, differing only in the presence of a layer of heat-saving material and a waterproofing layer.
The floor consists of the following elements:
- concrete slab;
- waterproofing layer (not always);
- heat and vapor barrier;
- bulk self-leveling coating of cement or polymer mortar;
- finish flooring.
For a local space heating device, at the stage of installing the screed, we lay a cable or infrared film warm floor.
Choosing a finish
 The most suitable bathroom flooring is:
- ceramic floor tiles;
- self-leveling floor, it can be arranged with a 3D effect;
- moisture resistant laminate;
- linoleum.
We choose the material depending on whether the underfloor heating will be installed, as well as the budget for repairs. The selected coating should harmoniously fit into the overall design of the room.
Self-leveling floors
 Polyurethane is optimal for the bathroom
 Depending on the material used, there are several types of self-leveling floors:
- cement-acrylic;
- epoxy;
- methyl methacrylate;
- polyurethane.
Optimal for the bathroom is a polyurethane floor, it is environmentally friendly, durable and has a smooth, shiny top layer. The latest novelty is a self-leveling floor with a 3D effect.
Advantages:
- beautiful appearance, especially near the floor with a 3D effect;
- high strength and resistance to moisture, when performing the installation technology, the floor will not lose its properties for 10-20 years;
- easy care, the coating has no seams and pores where moisture can accumulate;
- does not lose its qualities when exposed to abrasive substances.
When choosing a three-dimensional floor, it is possible to create a unique inimitable coating with any pattern. Before applying the composition, it is necessary to carefully prepare the surface.
The base must be free of cracks, even and clean.
Ceramic tile
Most often, ceramic tiles are used as flooring, but since they are cold in structure, it is recommended to lay a warm floor under them. 
Due to the fact that water splashes often fall on the floor, in order not to slip, it is better to choose a material with a matte finish (glossy tiles are slippery).
 A wide range of material is available with different structure and shades that are easy to match with the interior of the room even for the most demanding owner.
Tiles create a special style in the room and have many advantages:
- resistant to moisture and temperature changes
- easy care, resistant to aggressive substances;
- can easily support the weight of the bathroom, washing machine and furniture.
The disadvantage is that the seams between the tiles become clogged with dust and dirt.
Ceramic floor tiles do not have to be the same color as the walls. The main thing in this matter is to focus on the complex combination of color shades of each element.
Laminate
 For wet areas, choose a waterproof laminate
 For the installation of the floor in the bathroom, only moisture-resistant and waterproof laminate is suitable, which differ from each other in the features of the materials used in their structure.
Moisture-resistant laminated board consists of high-strength HDF board (from 900 kg per cubic meter). Protects such material not only from dampness, but also from mold and accumulation of bacteria. In stores, it is most often found with greenish surface shades. In some models, a rubber strip is installed along the longitudinal side, which protects the board from moisture.
 Waterproof laminate is based on a plastic board that is treated with a hot wax that prevents moisture from entering.
The surface of the board is additionally covered with a polymer layer, which also protects the material from moisture and mechanical damage.
Whatever type of laminate is used, after taking a shower, the floor surface must be thoroughly wiped so that water does not stand on it, and the room itself must be ventilated.
Linoleum
 A properly sealed coating will last a very long time.
 This material, when properly laid and sealed from moisture, will last from 10 to 20 years. The material must be of high quality (commercial or semi-commercial grade).
Under the legs of the bathroom and furniture, be sure to install linings that will protect the coating from the formation of serious dents and ruptures.
Advantages:
- low cost;
- seamless one-piece coating;
- the coating is warmer to the touch than the tile;
- beautiful appearance.
Properly selected and laid using linoleum technology, you can get an inexpensive beautiful floor covering. It is laid on a completely dried screed and substrate.
All connections to the baseboard must be sealed to prevent moisture ingress.
 Non-porous material will be easier to wash
 Due to moisture resistance, strength and durability, a natural stone suitable for floors in rooms with high humidity.
The stone must be chosen non-porous so that it is easier to wash.
In addition, you need to pay attention to the properties of the material, the action of which should be aimed at preventing the absorption of moisture and fumes.
Optimal views natural stone for the flooring in the bathroom are granite and slate.
Decorative carpet made of crushed stone
 For coating use a fine fraction of 3 - 5 mm
 It is a mixture of mineral particles of semi-precious stones, pebbles, marble and quartz sand with a fraction of 3-5 mm.
Advantages:
- service life of more than 30 years, increased wear resistance;
- resistance to moisture and aggressive substances;
- seamlessness;
- beautiful appearance;
Cleaning will include removing dust with a vacuum cleaner, wiping with a damp cloth and rubbing with polish.
The disadvantages are high cost, fragility and susceptibility to mechanical damage.
The smoother the surface of the stone, the less it is prone to contamination in places of patterns and texture edges.
Do-it-yourself bathroom floor installation
Having skills construction works and a minimum of tools, it is easy to do the floor in the bathroom with your own hands. The first step is to prepare and repair the surface of the plate. Preparatory work are the same for all types of floors. How to make a self-leveling floor in the bathroom with your own hands, see this video:
Preparing the plate surface
 The plate must be cleaned of debris
 The quality of the floor and the durability of the floor covering depends on the correct preparation of the slab for installation.
- We remove all exfoliating parts of building materials from the stove, remove dust. If an empty sound is heard when tapping the floor, then the old screed has peeled off, in which case it must be removed.
- If damage is found, they must be repaired with cement mortar, cracks more than 1 mm wide must first be expanded with a grinder, clean the edges and moisten abundantly. Cement mortar adheres better to a wet surface.
- After the base has completely dried, remove the dust, as it reduces the quality of adhesion of materials.
- We prime the base in two layers; We apply the second layer 4 hours after applying the first and wait for it to dry completely.
A damper tape must be glued around the perimeter of the bathroom walls, which will serve as an expansion joint in case of temperature changes and protect neighbors from below from water leaks.
Waterproofing
When making the floor in the bathroom with your own hands, you need to take care of its waterproofing, which will protect against the penetration of moisture into the pores of the ceiling and the destruction of the base.

Choosing a waterproofing material:
- coating insulation is applied with a roller or brush in three layers, which makes the base waterproof;
- bitumen emulsion has a service life of 5 years;
- gluing insulation in the form of rolled-on materials on a polyester or fiberglass base is laid with a 150-200 mm overhang on the walls. The surface under the material must be pre-levelled.
 Liquid waterproofing best for home use
 We fill the intersections of the ceiling with pipes with liquid waterproofing material.
Walls to a height of 150-200 mm and the floor area adjacent to them are treated with bitumen-based mastic.
Then we apply a layer on the entire surface of the floor, after 6 hours we apply another layer over the entire area. After it is completely dry, proceed to the next step.

 To mark the level of the floor, we place guides parallel to the wall, depending on the length of the rule with which we will distribute the solution.
To fix the beacons to the desired height, we use pieces of moisture-resistant materials. We check the correctness of the markup with a laser or bubble level.
We prepare a cement-sand mortar for screed in a ratio of 1: 3. To make it of high quality, you need to pre-dry the components carefully among themselves and only then add water to them.
We start the installation of the screed from the far corner of the bathroom, we perform the work in one go without interruption. To protect against cracking and increase strength, we add plasticizers to the solution and reinforce the structure with a reinforced mesh. The thickness of the screed should be between 2 and 7 cm, depending on the materials used. For information on how to properly make a screed on beacons, see this video:
Work sequence:
- Pour the concrete solution between the beacons and distribute it with the rule so that it condenses and the formed air bubbles come out.
- When the solution has set well, but has not yet dried, we take out the guides, fill the voids with concrete and level the resulting mass.
Upon completion of all work, we cover the screed with polyethylene. Every day during the ripening period, slightly moisten its surface with water. The total drying time of the base is about 30 days.
Ceramic tiles are best laid on a wet screed, the rest of the floor coverings are mounted after the subfloor has completely dried.
Warm floor
Warm floors are divided into electric and water: electric heating cables and a water floor require the installation of a screed. Heating mats can be laid on an existing base and already covered with a 2-3 cm screed from above. See the details of the process in this video:
Installation of an electric underfloor heating includes laying heating cables and connecting a temperature sensor that maintains the desired temperature in the bathroom. 
Choose best option underfloor heating for the bathroom:
| Heating system | Advantages | Flaws |
|---|---|---|
| cable system | Radiates heat only from heating elements, economical power consumption, service life of 15-20 years; low cost, the cable is protected from mechanical damage, as it is inside the screed, heating temperature control using a sensor. | Needs screed arrangement, emits electromagnetic radiation, labor-intensive installation process |
| Heating mats | Easy installation, virtually no noise | Fragility, energy consumption is greater than when using a water floor |
| water system | economical | Labor-intensive installation, difficult to adjust the temperature |
Electric cables and heating mats can be installed under ceramic tiles. The film infrared floor cannot be installed in rooms with high humidity.
 Consider how to make a bathroom floor with a 3d effect. A polymer self-leveling floor is applied to the finished screed in 3 layers:
- Finishing transparent layer with 3D effect.
We apply the base coat on a perfectly even base with a residual moisture content of no more than 4%. For better adhesion to the base layer, we prime the concrete screed and wet it with water.
Surface preparation of the slab is carried out as for a conventional floor.
base layer
After sticking the damper tape and installing the guide beacons, we proceed to apply the first layer.
 Installation of the first layer starts from the base angle
 Application sequence:
- Pour 5-6 liters of water into a capacious container, gradually pour a bag of dry mixture, mix with a construction mixer or a drill with a nozzle until a homogeneous solution is obtained in consistency like sour cream. The mixture must be used quickly as it hardens within 10 minutes.
- We start installation from the far corner, moving towards the door. Pour out the solution and distribute it over the surface using the rule, remove air bubbles with a spiked roller.
We fill the base coat in one step. Areas in contact with each other should be filled with an interval of less than 10 minutes.
Drawing an image
 The image can be ordered at the printing house on banner fabric
 Image suitable for bathroom maritime theme. You can lay the floor with shells and small pebbles as a decor.
First, we select an image, order a printing company to print it on a banner fabric, which should be the size of a bathroom floor.
Here it is necessary to take into account the places for the bath, washing machine and furniture so that they do not hide the pattern. The image must be placed so that it fits in an open area.
 The image is glued from the middle
 Stages of laying the picture:
- We cover the base coat with a primer, it is possible to mix the polymer with an organic solvent for the primer.
- After it dries, we lay out the drawing on the floor, if the image is applied on a self-adhesive base, we start gluing from the middle, smooth it well so that all the air comes out. We cut off the part of the material that is wrapped on the walls.
When using a composition of shells, it is faster to lay them close to each other in a chaotic sequence. If you decide to create a pattern of volumetric particles, keep in mind that this is a very complex and time-consuming process. For information on how to make such a coating in the bathroom, see this video:
The gaps between decorative elements fill with polymer clay, after which we leave the resulting surface to dry completely.
Finishing layer
 The final transparent coating creates the effect of a three-dimensional image. It is applied to a clean surface a day after drawing.
Walking on the finish layer during the execution of work is possible only in shoes with high spikes (paint-shoes).
Application sequence:
- We mix the components until a mass of a homogeneous consistency is obtained. From the far corner we pour the composition, evenly distribute it over the entire floor area. To obtain a volume three d effect, the layer thickness must be at least 3 mm.
- The coating hardens within half an hour, at which time we manage to work out the surface with a spiked roller to remove air bubbles.
To increase the life of the finish layer, you can open it with varnish. Until completely dry, the coating must be protected from mechanical damage.