Shower room outside. Do-it-yourself wooden shower for giving: installation technology. Multifunctional buildings - two in one
The summer time gives us the warm sun, greenery, flowers and a great opportunity to take a shower on fresh air. After the tightness of a city apartment, this procedure brings a pleasant feeling of renewal and unity with nature.
Despite the simplicity of the outdoor shower design, there are many interesting options its implementation. We will get acquainted with the most interesting and profitable for construction in a summer cottage in this article.
Summer shower options for giving
It's no secret that you can build a summer shower for a summer residence from different materials. For the frame, you can take profile metal or wooden beams. To fill the walls of the booth, cellular polycarbonate, corrugated board, tarpaulin, plastic wrap, siding, blockhouse are best suited.
In addition to using a frame structure, the walls of the shower cabin can be made of blocks or bricks. The washing compartment can be single or interlocked with a toilet. This solution reduces the cost of construction and allows rational use of the area of the site (photo No. 1).

Photo No. 1 "Two in one" - a popular way to combine a shower with a toilet
The simplest and most inexpensive outdoor shower is a frame made of wooden bars sheathed with a planed board (photo No. 2-3).
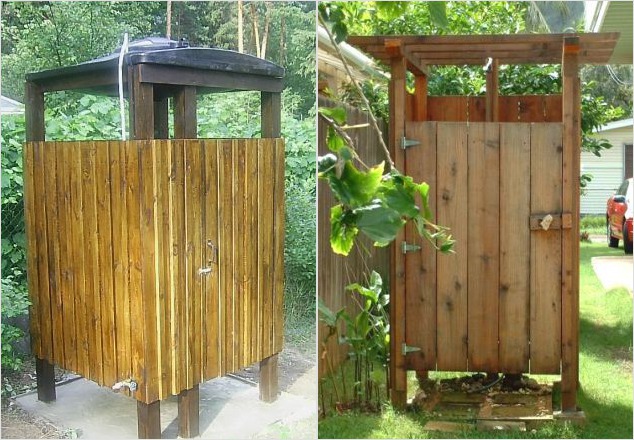
Photo #2-3 Summer shower with a cabin made of timber and boards
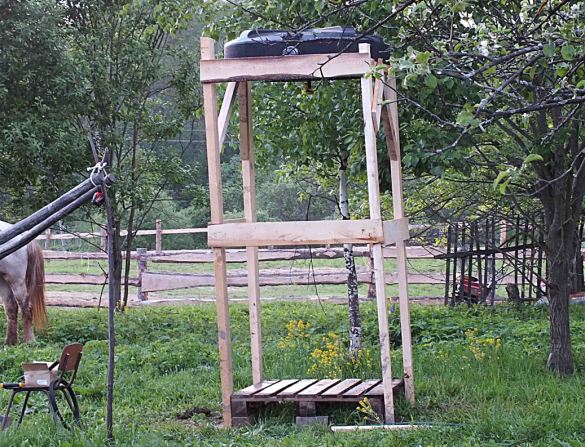
Photo No. 4 An example of the simplest prefabricated structure made of timber and boards, which can be covered with an awning
The main thing to pay attention to in this case is the strength of the frame on which the container will stand. The frame racks must be protected from decay and reinforced with corner braces. The concrete floor can be replaced with a standard shower tray by directing soapy water from it into a common septic tank.

Photo No. 5-6-7 Variants of interesting, but at the same time simple wooden showers
If you have a grinder and welding, then you can make a summer shower with your own hands from a metal profile and cover its walls with a tarpaulin. If there is no welding machine, then the frame is assembled using threaded connections, and the corners are reinforced with steel “kerchief” plates (photo No. 8-9).
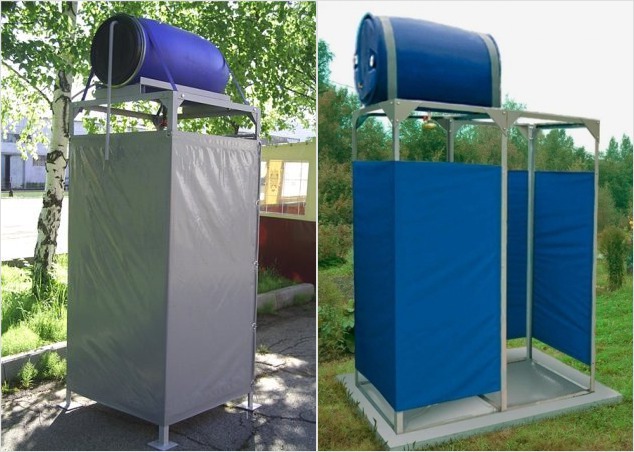
Photo No. 8-9 Summer shower from a metal profile covered with tarpaulin
This version of the shower is more convenient than a single cabin, since it has two isolated compartments: for undressing and washing.
Photo No. 10 shows a garden shower popular among summer residents. It also uses a metal supporting frame, but the filling of the sidewalls is made of a film screen, put on rings and a cord.
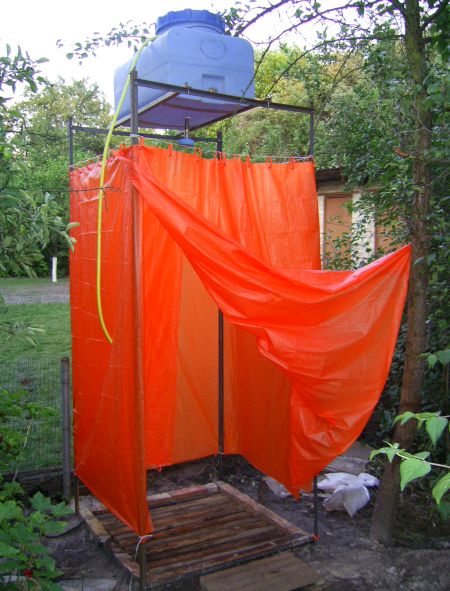
Photo No. 10 Shower stall with a metal frame and a screen made of polyethylene film
The metal base of the booth is easily combined with corrugated board. So it turns out a simple and reliable design, well protected from the wind (photo No. 11).

Photo No. 11 Shower cubicle sheathed with corrugated board

Photo No. 12 Garden shower with a dressing room (220x100) from profiled sheet and pipes
In the factory, summer shower cabins are most often made using two materials: profile pipe and sheet polycarbonate. If you want to save money, the same design can be assembled by independent efforts. It turns out aesthetically pleasing, durable and practical (photo No. 13-14).

Photo No. 13-14 An excellent shower for a summer residence - a profile pipe and cellular polycarbonate
The dimensions of this design are designed for the installation of a flat plastic tank with a "watering can".
The shape of the shower cabin does not have to be rectangular and closed on three sides. Photo #15 shows interesting solution based on a wooden beam wall and a metal pipe along which the screen moves. You can't put a heavy tank on such a shower. It is designed to supply heated water from a domestic water supply.

Photo No. 15 The original "corner" street shower
A frame for a summer shower is not needed if you attach it to the wall of the house. To do this, you need to line it with a waterproof material and bring the mixer with a hose to the surface. By filling the floor with large pebbles and making a simple drainage, you will get what you dreamed of: a cozy corner for water procedures, filled with air and light (photo No. 16). If you don't like open version wall shower, then place a lung against the wall as in photo No. 17.
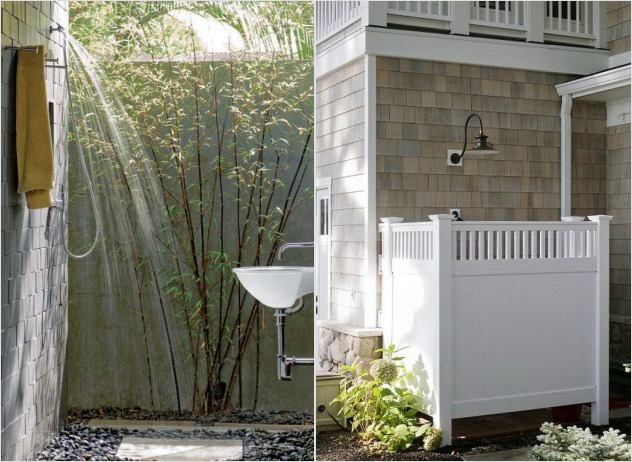
Photo No. 16-17 You can take a shower in summer not only in a cabin, but also near the wall of the building, and the wall shower enclosure will protect you from prying eyes
Weaving plants can be successfully used to fill the walls of an outdoor shower. All that is needed for such a solution is a lattice screen made of mesh, on which ivy, hops or grapes will weave a living carpet.
When considering the materials from which you can build a shower structure, do not forget about natural stone. The option shown in photo #18 will perfectly complement the landscape design.
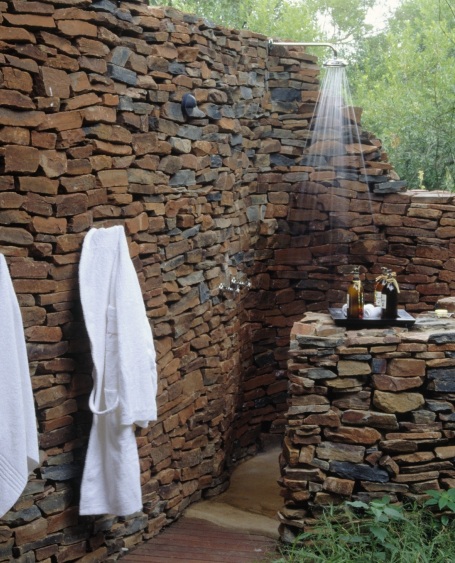
Photo No. 18 Wall of wild stone, curled up "snail" - the best place to accommodate a summer shower
The laying of the fence in this case is made dry, without the use of mortar. It is not needed here, because a flat stone was used in the work. It is securely held in the wall array due to its weight. The considered option does not involve the installation of a container, since its appearance will spoil the beauty of stone lace. The shower head is supplied with water from an external water supply.
If there is an old tree on your site, do not rush to cut it for firewood. Its trunk can be used as an original outdoor shower installation. Surround it with a curvilinear concrete wall, and your creativity will delight neighbors and friends (photo No. 19).

Photo No. 19 An old tree on the site is not a hindrance, but the basis of the original shower design
Continuing the review of the options for a summer shower, we note that it can be built not only from purchased, but also from inexpensive improvised materials.
In photo # 20 you see such a design. Its frame is made of wooden bars. Weaving from a willow vine, which grows next to summer cottages, was used as a fence.

Photo No. 20 Simple, inexpensive and beautiful - a wooden frame sheathed with willow vines
If you are going to build a utility block of bricks in the country, do not forget to plan a shower compartment in it (photo No. 21-22).
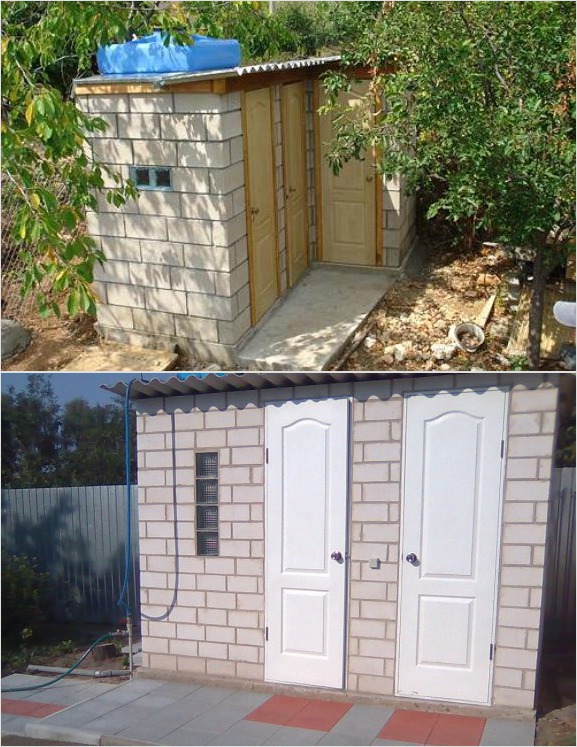
Photo No. 21-22 Compact hozbloki "shower shed" from blocks
On the solid stone walls of such a structure, you can easily install any volume and shape.
Estimated cost of ready-made options
Shower cabins of factory production are presented in several options. In some, the metal frame is equipped with a screen made of synthetic fabric. Others are sheathed with cellular polycarbonate or completely made from modular plastic panels. The buyer is offered two planning solutions: an outdoor shower with and without a dressing room.
The average price of an outdoor shower with a moisture-resistant awning and a 200-liter plastic tank (heated) is 15,000 rubles. For a frame-tent structure, supplemented by a locker room and a washbasin, you will have to pay at least 18,000 rubles.
A single cabin made of cellular polycarbonate on a galvanized frame with a heated 200-liter tank can be bought at a price of 20,000 rubles. This design can be supplemented with a locker room, paying about 5,000 rubles for it.
A summer shower cabin made of plastic on a metal frame, equipped with a heated tank, will cost no less than 24,000 rubles.
Note that prices can vary greatly in the regions of the Russian Federation, so you can get the most up-to-date information from local manufacturers.
How to build a summer shower with your own hands?
The choice of material in this case depends on the set of tools that you have. If the farm does not have a welding machine and a grinder, then the frame is made from planed bars. You can sheathe it with a board, plastic clapboard or simply fix the film waterproof material on the racks.
A summer shower made of polycarbonate on a metal profile is more durable than a wooden one and is not much more difficult to assemble. For this work, you need to prepare a steel corner 50x50mm or a profile pipe with a section of 40x20mm (wall thickness 2 mm). The number of purchased profiles is calculated based on the dimensions of the shower: height 2.1 meters, length and width - 1 meter.
Cabin dimensions may differ from those indicated, since its length and width depend on the dimensions of the purchased tank. The length of the racks must be taken 10 cm more than the height of the frame (for concreting).

It is more convenient to assemble the sidewalls on a flat asphalt or concrete platform, using the welder's magnets to fix the profiles.
The sequence of operations looks like this:
- In pairs, we lay two racks and two crossbars on the site and weld them with an overlap.
- Having installed the side frames vertically, we attach two transverse profiles to them by welding, check the corners and fix the joints with a working seam.
- gulf concrete screed under the shower cubicle we put the finished frame in it so that the legs of the racks are immersed in concrete. We check the verticality of the installation (if necessary, we adjust the depth of embedding the racks into the screed).

After that, it remains to weld the door frame and fix the hinges on it. The work is completed by cutting the cellular polycarbonate and fixing it with self-tapping screws to the shower frame. Can be used to collect water steel pallet or, at the concreting stage, make a drain channel by installing a ladder and a sewer pipe in it.
It is unlikely that anyone will agree to deny themselves the pleasure of taking an outdoor shower, which allows them to refresh themselves at the end of a hard day's work. In this article we will tell you how to make a summer shower with your own hands from various materials(from polycarbonate, metal profile, brick, wood), we will show the exact dimensions, as well as provide photo and video instructions.
Such an approach to the manufacture of a shower structure will allow you to save on expensive materials, and, no less important, to make a structure that best suits your individual preferences.
Site selection and options

A place for a shower is chosen, as a rule, in an open area, located at some elevation above the general level of a suburban area. Since solar energy is used to heat water in structures of this type, the place under them should not be located in the shade of trees and other high-rise objects.
It is known that summer showers of various architectures are traditionally built in our summer cottages (including quite a few original designs). In this case, all of them can be reduced to the following versions:
- buildings of a light type without strong side walls;
- lightweight structures equipped with improvised side walls;
- capital shower houses with walls made of polycarbonate or similar material.
Consider each of the above embodiments in more detail.
Shower cubicle dimensions

Inside the shower cabin should be comfortable enough to easily bend over, turn around and stand freely. Therefore, you can build on these sizes:
- Height 2–3 m.
- Length 1.9 m.
- Width 1.4 m.
These sizes are quite comfortable. Considering the thickness of the walls, the room will decrease slightly. At the same time, the shower cubicle itself will have an average size of 1 × 1, as well as a dressing room of 0.6 × 0.4 m.
From improvised materials

The simplest design of a shower made from improvised materials includes a tank with a tap built into it, a standard shower head and a regular watering hose. Such a simple structure is installed near the house, and the tank is mounted on the wall or roof of the building at a height slightly higher than human height.
The location of the tank should be chosen in such a way that the sun's rays linger on it for as long as possible during the day.
After fixing the collection tank, a valve cock is built into it, on which a hose of suitable length is put on with a shower head installed at its end.
The convenience of this option for a summer shower is that in this case you can do without arranging a separate shower stall. The main thing to pay attention to is to protect the wall and roof of the house well from the damaging effects of moisture that accumulates near the tank. To this end, the area of \u200b\u200bthe building in the area where the latter is located should be isolated with special water-repellent impregnations or simply covered with several layers of ordinary oilcloth.
Note that this embodiment has natural disadvantages, which are as follows:
- the place of taking a shower in this case is completely unprotected from the wind;
- a significant part of the daytime it will be in the shade of the house;
- there is a threat of gradual destruction of the walls of the house from moisture accumulating in this place.
Given all these shortcomings, the use of such structures is, as a rule, limited.

The process of building a wooden summer shower consists of several successive steps. First of all, you need to prepare a place. It must be well ventilated, as under the influence of constant exposure to moisture, the structure can quickly become unusable. Next, you need to dig a hole 1 × 1 m and a depth of 0.4 m. You fill it with rubble. This must be done so that the soapy water does not spread over the summer cottage, but has time to soak into the ground.
If you have organized a drain of sewage waste into a drain pit, then you skip this stage of preparation.
- Sheathing frame clapboard.
- Painting.
- Tank installation.
Frame construction
Take boards with a section of 30 mm × 15 cm and make a 1 × 1 base. Attach 4 side beams to it, the section of which is 100 × 70 mm. They will serve as the basis for installing the tank. They must be installed in the grooves.
Frame sheathing
For sheathing the frame, you can use a false beam, blockhouse or lining. When mounting them, leave a gap of up to 3 mm between each bar. This also applies to the first at the base. In this case, under the influence of moisture, the product will be able to expand freely. If this is not taken into account, then the summer shower will turn into an "accordion".
Painting
When the plating is completed, you can start painting. To do this, the entire surface should be covered with antifungal impregnation. The next layer will be facade acrylic water-borne varnish. It is applied in 3 layers.
You should not save on varnish, so it is better to apply it in sufficient quantity. It is important to ensure that water slides easily over the surface of the walls and does not linger in the shower. Such painting is carried out both outside and inside.
Tank installation
To store water, you can install a tank of 100 liters. The tank can be made of different materials, stainless steel, plastic, etc. You can buy a ready-made tank just for this purpose. Some homeowners often find one or another container to install on an outdoor shower.
In conclusion, it remains to hang the curtain on the hooks. On average, such a shower can be built in 1-2 days.
Photo instructions for making a summer shower from wood


Another option for building a shower is to use polycarbonate. To build it, you will need to purchase the following building material:
- Polycarbonate. The sheet size is 2.1 × 1.2 m. For arranging a shower, a thickness of 8–15 mm will be enough. As for the choice of color, then choose one that is less transparent milky or bronze.
- For fastening, special hardware, tapes and corners will be required.
- Material for the frame, such as wood, metal corner or pipe, brick, aluminum profile etc.
- Shower tank.
- Shower diffuser.
- If necessary, a plastic pipe for the drain.
We have already discussed the general principle of constructing a frame for a summer shower made of wood above. Therefore, it is worth paying attention to some specific features in working with polycarbonate.
Any material, be it stone, wood or metal, can support the weight of polycarbonate. But there is one caveat. This material is distinguished by its windage, so the frame should be equipped with a sufficient number of cross-shaped, vertical and horizontal jumpers.
The thickness of the frame material for polycarbonate may be less than for wood.
Tank installation
The tank is mounted on an installed frame. Due to this, the water is heated in it by the sun's rays. Usually a flat tank is installed, but there are no strict rules here.
It is better to install a tank in a polycarbonate shower under the roof. Thus, there will be a greenhouse effect and the water will heat up much faster and cool down accordingly.
Installation of polycarbonate
If you want to make a locker room, you will need two sheets of polycarbonate. For walls, use opaque, and for the roof, use transparent, so the water will heat up faster. First of all, make blanks by cutting the sheets to the desired dimensions.
A polycarbonate sheet can be cut with an ordinary knife both along the voids and across.
Be sure to process the cut with sandpaper. Check for sawdust getting inside the comb. If yes, then they can be removed with a vacuum cleaner. To prevent chipping when drilling holes, step back from the edge of 3-4 cm. Drilling should be between the stiffeners. Be sure to cover the edges of the sheet with perforated tape. This is done so that debris, dust, water, etc. do not get inside the cells. As for the end part, use the end profile, H-shaped or angular.
To prevent condensation inside the honeycombs, drill thin holes in several places. Enough 3 holes per 1 m profile.
A photo


Video
In this video you will see how to make a wooden shower:
This video will talk about the possibility of a quick shower construction:
Scheme


Photo instruction of a summer shower on a plank base


An outdoor shower is a necessary building in every dacha, especially if there is no pond or other places where you can rinse in the immediate vicinity. In the shower it is good to freshen up after a hot day, or wash off dust and dirt after gardening. You can try to build such a building with your own hands. Tips and instructions on how to do this with a minimum of money and effort, we provide in this article.
A little about the benefits
The main benefits of a summer shower are:
- efficiency - in order to heat bathing water in the simplest design, only the sun is needed; you can wash without costly and time-consuming communications;
- convenience;
- availability for making with your own hands from improvised materials;
- the possibility of receiving water procedures at any time of the year with good thermal insulation;
- some models allow you to take a shower anywhere;
- minimum maintenance costs.

Did you know? The prototype of modern showers are the primitive baths that were built by the ancient Indians, Egyptians and Mesopotamians. They were partitions behind which people doused themselves with water, or ordered servants to do it. But the first showers in which water flowed upwards were invented by the ancient Greeks. This is evidenced by images found on Athenian vases dated to the 4th century BC. BC e.
Possible options
There are many options for building a summer shower. There are very simple and light structures, the equipment of which takes several hours; there are capital ones that will serve for many years. Having become acquainted with various options, you can use some ideas or use ready-made instructions as a basis.
Simple ways to arrange a summer shower
The simplest option for bathing in the country is a portable shower, which is sold in stores. It is a 20 liter water tank with a hose. The tank is hung on a tree or other vertical surface in a place that is well lit by the sun, and filled with water. Once the water has warmed up, the hanging shower can be used. There is enough water in it to take water procedures for 10 minutes. 
A tank equipped with a crane can also be used as a hanging tank. A hose is attached to it, ending with a shower head. The tank will need to be attached in a sunny place at a height slightly higher than human height (however, so that a person can reach the faucet with his hand).
Another in a simple way bathing area is a lightweight shower structure that can be attached to the wall of any building. In this case, the wall will need to be covered with a special material that protects it from contact with water, for example, tiles or film. Such a shower can be either open or closed with a screen.
The rack is convenient in that it can be equipped in any place where the water supply reaches.
Common disadvantages for the first three options is openness to prying eyes and winds. Usually, under such a shower, they bathe only in a bathing suit and in very warm weather. 
An option that is gaining more and more popularity due to its simplicity, compactness and affordability. To equip it, you will need two corrugated hoses, two rubber pedals with valves (a rubber mat with a built-in pump), a container of water, a shower head. The principle is that a person tramples on the pedals or the rug with his feet, thereby pumping water from a container that enters the hose.
The treadmill shower can be purchased at ready-made in a store or do it yourself using a car pump. 
This design involves driving four wooden (or other material) racks into the ground. They need to place a plastic tank into which water will be poured. It will also serve as the roof of the structure. A hose is attached to the tap in the tank, on which a watering can is put on. Racks are covered with waterproof material. The floor is a rubber mat.
Frame shower can be made from various materials. The simplest option is built in a couple of hours. It can be made temporary, collapsible. That is, on winter time can be cleaned indoors and taken out at the beginning of the new summer season. 
Important! When building a summer shower, you should choose black water containers. So the water will warm up faster, because this color best attracts the sun's rays. In addition, the water temperature will be much higher.
The most complex and serious version of the execution of a summer shower without a foundation. This is a finished stationary shower cabin with a door, equipped with a water tank and a tray. It is made of wood, polycarbonate, profiled sheet, plastic or tarpaulin. The water tank can be heated both by the sun and by electricity. The cabin can be equipped with a dressing room-tambour, in which things and shoes are left. It can also be made fully closed or semi-closed.
In addition to the design options described above, there are many summer shower design ideas. Using them, you can create a corner for washing for every taste and budget.

Capital buildings
In this subsection, we have selected an overview of models that are made with foundation pouring. Their walls are made of different materials:
- tree,
- gland,
- slate,
- plastic,
- polycarbonate,
- plexiglass,
- plywood,
- profiled sheets,
- bricks.

Basic principles for installing a country shower
To build a high-quality durable shower, several conditions must be met:
- choose a suitable place;
- determine the materials from which the tank, base and foundation will be made;
- think about how the drain will be arranged;
- estimate whether the shower will consist of one room, or whether it will be necessary to install a vestibule, toilet, etc.;
- depending on how you plan to use the shower - throughout the year, or only in summer period- provide for the possibility of heating water.

Location selection
The first thing to do is to choose a good place for construction. The following factors influence his choice:
- the water will warm up natural way, or automatic;
- its filling into the tank will be carried out manually or automatically;
- from what materials it is planned to implement the foundation and walls;
- building dimensions.
 The shower will need to be installed close to the water supply so as not to carry water far, or so that a hose can easily reach it.
 The choice of location will also be determined by what materials the body is made of, how much space it will take, whether it needs to be hidden from human eyes, or whether it can harmoniously and beautifully fit into the complex of the entire summer cottage. If you plan to install a tank with a heating element, then the shower room will need to be located in close proximity to the mains.
Tank selection
The tank can be plastic, metal, polymer. A similar container can be purchased at a specialized store. You can also use any suitable thing - for example, an iron barrel, etc. - that is found on the farm. Its volumes should be calculated based on the requirement of at least 40 liters per person. The maximum volume of the tank is 200-250 liters. Dimensions are selected according to the area of \u200b\u200bthe building. 
As for the shape, a flat tank is considered the most rational - it is easier to install it on any structure, and the water is heated evenly. Also today, round and square tanks are common.
If you prefer metal tanks, then you should pay attention that they should be treated with anti-corrosion agents and paint (except for stainless ones). The service life of metal tanks with proper processing is about 10 years. Stores usually sell containers made of galvanized, stainless, carbon steel. The best and most expensive option is a stainless steel tank. Usually they are rectangular containers with a capacity of 40 to 200 liters.
Plastic containers can serve for 30-50 years. Their advantages are lightness, ease of installation, efficient water heating, undemanding maintenance and inexpensive cost. Without heating plastic containers hold 100-200 liters. They are equipped with lids in the upper part, into which water is poured. Tanks without heating can be round and square. 
Under a homemade tank, you can adapt a plastic or metal barrel by cutting out a threaded outlet at the bottom. In the future, you can insert a pipe or pump there.
Drain Options
So, you have decided on the place of construction, the materials from which it will be made, the type of tank. Now is the time to think about where the used water will go.

Important! If the withdrawal is organized incorrectly,or not organized at all, then some time after operation in the shower stall may appear bad smell, rot, mold.
Foundation and foundation
The foundation for the building can be different types. The main ones are:
 The choice of foundation will depend on the type of materials from which the walls are made, as well as the volume of the water tank and specifications soil.
 Availability of a toilet
The country shower can be combined under one roof with a toilet. This will save space and materials. It will require pouring only one strip foundation, as well as equipment for only one drain. In addition, this will allow you not to litter the site with small buildings, because most summer cottages cannot boast of vast territories. And this is a significant time saving - it will be much faster to build one compact structure than two.
Possibility of water heating
If you plan to use the shower not only on warm sunny days, you need to consider the possibility of automatic water heating.
A heating element with a power of 1.25-2 kW can be inserted into the heated tank. In this design, the water will heat up for about three hours.  Heating element for hot water
Important! If you plan to install just such a tank, you should know that you will need to constantly monitor the presence of water in it - a bare heating element will burn out when turned on. Therefore, a constant supply of water by a pump or water supply must be established in such a container.
It is also desirable to equip it with a sensor that will show the water level. 
How to build a budget outdoor shower
A budget shower can be built from metal pipes and wooden planks. You will need the following materials:
- metal pipes (40 x 40 x 3000 mm) - six pieces;
- pine boards (20 x 95 x 3000 mm) - 21 pieces;
- plastic tank with a volume of 250 l;
- screws;
- sand;
- crushed stone;
- wood oil;
- enamel for metal pipes;
- geotextile.


From the tools you will need:
- Circular Saw;
- magnetic corner for welding;
- Miter saw;
- screwdriver
 To reduce the cost of construction, instead of wooden walls, you can use, for example, a tarpaulin or other material. However, in this case, the building will be very short-lived.
 Capital building
If you are planning a long-term high-quality construction of a shower that can be used in all seasons, we suggest that you consider the following option: on a pile foundation and with a septic tank drain. Recommended dimensions of a comfortable shower room with a dressing room: height - 2-2.5 m, width - 1.40 m, length - 1.90 m. A drawing is required for accurate calculations of materials and dimensions.
Foundation laying
The pile foundation can be made of metal pipes with a diameter of 100 mm and a length of 2 m each. For the foundation, draw a rectangle corresponding to the size of the shower enclosure. In the corners, you need to drill four holes 1.5 m deep for piles with a garden or ice drill, or dig them out with a shovel. To prolong the service life of metal pipes, they are treated with machine oil before being placed in the ground.  Laying the pile foundation
After digging in the pipes, at least 30 cm above ground level should remain. The pipes must be poured with concrete.
After the concrete has completely hardened, it will be necessary to install the timber and the strapping. The frame is fastened with long bolts.
Digging out a septic tank
For the most simple option a septic tank in the immediate vicinity of the shower room, a hole is dug, consistent with the size of the receiving chamber, about 2 m deep. The walls are sheathed with brick or cinder block. Under the receiving chamber, you can use a barrel or other containers that are closed with a lid. A chute is brought to the receiving chamber and connected to the drain pipe. The gutter for the drain is laid out with waterproofing material. 
Frame installation
The shower frame is a welded structure made of metal pipes with a section of 40 x 40 or 50 x 50 mm. This design will allow you to withstand a 200-liter tank of water. The booth itself can be made of wood, siding, profiled sheet, lining. You should consider the presence in the walls, closer to the ceiling, ventilation windows.
If there is no welding, then the structure is made of wooden bars 60 x 80 mm. In this case, the booth will also be wooden. Such a shower will come out cheaper. The tree must be impregnated with special water-repellent agents.
After installing the vertical supports, the upper trim is produced. The side frames are fixed with spacers. 
The floor is made of wood. In this case, it will be warm, and it will be possible to stand on it without shoes. The boards in the floor are made with a gap so that water flows freely.
The door is installed last.
The plastic tank is placed on the roof and fixed with straps. Selected desired scheme water supply.
Shower arrangement
A capital shower will require wiring for electric lighting. In this case, it is necessary to adhere to safety rules and insulate the wiring to avoid contact with water. 
All interior decoration must be performed from moisture resistant materials. For a shower room that is planned to be used throughout the year, insulation from foam or other materials will be required.
You should consider the location of the shelves for detergents, hooks for clothes and towels, an internal lock for doors.
Another option for the capital construction of a warm country shower- on a concrete slab with a frame of wooden boards and OSB sheets- you can watch the video https://www.youtube.com/watch?v=vwhv_668wwo.
Did you know? Remains of an ancient shower complex, presumably dating back to the beginning of the 2nd century BC. BC e., were found by archaeologists in the territory of modern Turkey. It consisted of seven installations, the water to which came from the main system, was supplied from above, flowed from installation to installation, and then flowed into the outlet system.

An outdoor shower is a necessary outbuilding for summer residents who prefer to use country cottage area both for the purpose of recreation and for the purpose of growing fruits and vegetables. It is easy to make an outdoor shower cabin with your own hands, without having special skills. However, even for a simple structure, certain conditions will need to be met: choosing the most suitable place with prolonged exposure to sunlight, ensuring unhindered drainage of used water. For more complex capital structures, it will be necessary to carry out design and purchase necessary tools and materials.
Video: how to make a summer shower in the country with your own hands
A summer shower made of a metal profile is an inexpensive, convenient and reliable option for those who like to spend hot weekends not in a stuffy city, but among the greenery in their own country house. A profiled sheet can resist corrosion for up to 50 years, is easy to install, and, most importantly, even a complete novice in construction can build a summer shower in the country with their own hands. Detailed step-by-step instructions on how to do this can be found in this article.
![]()
Summer shower from a profiled sheet - photo of a variant with wooden support pillars and a decorative top bar
Water drainage: drainage or drain hole
Construction begins with the selection on the site of the most suitable place for a summer shower from a metal profile. Since it is desirable to use as much as possible for heating water solar heat, the shower should be located in an open area, lit throughout the day.
- Performing drainage.
- Organization of a drain hole.
The first method is relevant if a corrugated outdoor shower is needed only to freshen up, and is not intended for prolonged bathing. Then you can simply level a piece of land and pave it with paving stones, stone waste or rubble.
Creating drainage on clay soils
If the soil is clayey, then it is worth digging a hole 0.5-1 m deep, which then needs to be filled with alternating layers of gravel and sand 10-15 cm thick. Gravel should always act as the top layer, and sand as the bottom. To save money, gravel can be replaced with small construction debris, such as broken bricks. You can install a shower in the country directly on such a drainage.
The second case is when a country shower made of corrugated board will be used specifically for the purpose of clearing dirt using detergents, not only by you, but also by your family members. Then, to organize the flow, a small drain pit for a shower in the country is arranged.

Drain hole for a shower from a profiled sheet - a photo of an already equipped drain on the side with a connected pipe
The walls of the drain pit should be lined with stone or brick to prevent collapse, and the bottom should be left to absorb moisture. In addition, a shower drain in the country can be arranged by digging into the ground plastic pipe or large diameter car tires.
The size of the hole depends on the soil and your needs. If a summer shower for a dacha made of corrugated board is needed for a family of 4 people and is located on sandy soil, then a depth of 1 m is quite enough. If we are talking about the clay the best option will be 2 m.
If the size of the site allows, it is better to organize the drain a little away from the shower itself, but if not, then it is possible right under it.
Do-it-yourself shower in the country: drawings and diagrams with dimensions
In order to make a summer shower from corrugated board, you need a drawing, or at least a diagram of a future building. They do not have to be detailed - it is enough to have basic dimensions, focusing on which you can plan your purchase with materials and further work with them. In addition, the presence of the scheme allows you to plan the technology with the stages of construction.

Drawing of a shower from a profiled sheet with wooden poles and concrete floor
The country shower drawing above is a simplified version. It shows not only the dimensions, but also a schematic appearance soul. The diagram below shows a smaller building with the proposed installation of a tank on the roof, as well as a metal frame. Making a soul of just such a design, I will consider in this article.

Do-it-yourself scheme for a shower in the country house: drawings with dimensions
Creating a foundation for a shower from a metal profile
The foundation for a shower in a country house is usually made very simple, since the structure itself is light. Before making the floor, you need to install and concrete racks from a 60x40 mm profile for attaching the frame. This will increase the reliability of the structure and ensure that the summer shower in the country house made of corrugated board does not tip over from strong gusts of wind. The above-ground height of the racks can be from 2 to 2.5 meters, depending on the chosen shower design.
Since it is necessary to make a shower from corrugated board as reliably as possible, then to install the racks, you need to dig holes with a depth of 1-1.2 meters. This is enough for central Russia, however, for northern latitudes, it is worth additionally clarifying the depth of soil freezing in your area and deepening the racks below this value. At the bottom of the pits, a small layer of rubble should be poured and carefully compacted. Then the pillars are placed strictly vertically and the pits are filled with concrete.
Take your time
Before you mount a shower for a summer residence from a metal profile on racks, you must wait about a week. During this time, the concrete will have time to gain at least part of its strength. While doing concrete works and the installation of racks, it is imperative to use the building level.
Floor making
Making a floor for an outdoor shower is a simple process and, first of all, depends on what type of drain is chosen. If this is a drainage, then you need to bring a pipe from the drain to it, if it is located to the side, or put a wooden grate directly on top of it, which will act as a floor in the shower in the country.
On top of the pit, you can, again, install a wooden grate, or close it with a removable concrete cover with a drain hole. Fill the rest of the floor cement mortar, having previously installed formwork from boards 70-80 mm high at the edges. To ensure a good drain for the shower in the country, it is necessary to make a floor with a slope towards the drain. Otherwise, water may begin to flow down the sides of the concrete screed.

Do-it-yourself construction of a shower in a country house begins with the installation of supports and the manufacture of a concrete or wood floor
If a summer shower for a summer residence from a profiled sheet is not located above the pit itself, but not far from it, then it is necessary to organize a drain. Again, this can be done by concreted plastic drain and pipe to the floor, or by using special plastic or metal pallets.
In the latter case, you can either pour a concrete screed under the country shower from a profiled sheet, or make a floor-platform from wooden boards. However, regardless of the material, the site should not be solid, but with a square hole in the center. Its size should be such that the chosen shower tray for the cottage can easily fit there with its deep part, while it should be held by the protruding sides. The height of the floor can be greater than the depth of the pallet if it is made of metal, and must be equal if it is made of plastic.
This is due to the fact that the plastic shower tray for the country house is not very durable, and if it is “hung” without a stop, then under the weight of a person it can simply fall apart. If the depth of the pallet is small, then the problem is solved with the help of special supports. The cheapest way to do this is to use an ordinary wooden grate.
Drain pipe rules
If you decide to use a concrete screed as a floor, then the drain pipe is concreted, if a wooden platform, then it passes under it.
Frame device
Before you make a shower from a metal profile, you need to make its frame. To do this, after the concrete foundation has hardened, we connect the installed racks with light metal profiles or wooden bars, while leaving room for installing the door. If the frame for the shower in the country is made of wood, then it must be treated with an antiseptic composition that will prevent it from rotting, as well as the appearance of mold and fungus.
There are two ways to fix the harness on the racks. If it is made of metal, then it will be most reliable to weld the profiles to the racks. If you are unable to work with welding machine, and therefore you cannot weld a summer shower with your own hands from corrugated board, then you can use metal screws or screw connections for fastening. For the latter, holes will need to be pre-drilled in the profile. Wooden crossbars are fastened only with self-tapping screws.

Fastening the frame strapping for a shower from a metal profile - a photo of a bolted connection
Lower transverse profile must be fixed at floor level, the second from the top - along the height of the used corrugated board. In order for the frame for the country shower to be sufficiently rigid and reliable, another 1-2 crossbars are installed between them. Finally, the last, uppermost transverse profile is attached 20-25 cm higher than the previous one. It is needed for making a shower roof from a profiled sheet and installing a tank.
The subtleties of fastening the shower door
When installing the frame trim for a summer shower made of corrugated board with your own hands, do not forget about the door. Therefore, only the two upper crossbars are fastened on all four sides, and all the rest - only on three. In addition, the hinges for the door must be welded in advance, before the walls are sewn.
Thus, it is quite simple to make a frame for a shower from a metal profile with your own hands. Decking is light and does not require a strong and heavy frame. Even for installing racks, a profile of 40 × 20 or 60 × 40 mm is quite enough. Do not be afraid that this whole structure after assembly can be movable. Rigidity will be provided by the walls of the profiled sheet fixed to the frame.
This material is one of the best options one of those that sheathe a shower in the country is cheaper and easiest. It is not only reliable and durable, but also not afraid of moisture and looks very bright and attractive.
Wall lining
The next step after making the frame is finishing the shower with a metal profile on three sides. For its fastening, again, use self-tapping screws or rivets. It is necessary to fix the corrugated board every two waves. The self-tapping screw must be screwed into the bottom of the wave and always evenly, otherwise the attachment points will quickly corrode.
Sometimes, for greater reliability, the profiled sheet is fixed at the bottom and at the top with a bolted connection. However, if you are building a shower from corrugated board with your own hands, then this is difficult to implement physically - you will need help with fixing the sheet. In addition, this measure is not necessary, since self-tapping screws are reliable if done correctly.

Sheathing the walls of the summer shower with corrugated board with bolted fastening
For fastening, it is better to use roofing screws with special washers made of self-vulcanizing rubber. On the inside, the attachment point must be covered with special waterproof sealants or simply painted. Finishing the shower in the country should be done with sufficiently short self-tapping screws or rivets so as not to punch through the profile of the crossbars.
Making a summer shower from a metal profile with your own hands, the last stage of sewing is this door installation.
Production and installation of doors
Since corrugated board is made of thin sheets of steel, you cannot simply weld hinges to it and use it as a door - in this application, the sheet deforms very quickly under its own weight. Therefore, in order to make a shower door from a profiled sheet with your own hands, you need to weld a frame, on which you can then fix the metal profile.
For the manufacture of the frame, you should use a profile of the same section as for racks with crossbars. If the width of the summer shower side is 1.5 meters or less, then the width of the door should be the same. If the width of the side is greater, then it is necessary to leave 1.5 meters for the door, install an additional profile parallel to the racks, and sew up the metal shower for giving with corrugated board in the rest. The height of the frame is determined based on the height of the corrugated board.

Trimming parts of the door frame at 45º and checking the correct angle
For the manufacture of the door frame, it is necessary to measure the profile of the desired length, then cut the joints at 45 ° and weld. If you make a door to a summer shower from a profiled sheet with your own hands, then before welding, without fail, lay out the profiles on a thick sheet of plywood or OSB (at least 10 mm) and secure them with clamps. If this is not done, then the frame will “lead” during welding, as a result of which it cannot be used for its intended purpose.
After the frame is ready, two crossbars and hinges are welded to it, and then sewn up with a profiled sheet. After sewing, a handle is screwed onto the door, and two hecks are placed: inside and outside. If desired, a small latch can be installed directly into the profile, then the shower from the profiled sheet can be used to store various bath trifles. In addition, coat hooks can be screwed onto the crossbars.
Roof and tank for country shower
Finally you have reached last stage and almost finished the shower in the country with their own hands from a profiled sheet. All the hard work is over - it remains only to choose a suitable water tank and install it.
In any building supermarket you can buy a flat plastic tank. This shape is specially designed for a summer shower. The capacity for a shower in the country is usually taken with a volume of 200 liters - this is enough for not big family. Since the construction of a shower in a country house from a metal profile involves a light frame, it is impossible to take a metal tank for installation on the roof.

Plastic tank for a country shower with an already embedded fitting with a watering can
Plastic tanks for a summer shower for a summer residence are usually sold with a fitting already installed. It remains only to screw a valve with a shower screen into it and you're done.
If there is no fitting, then you will have to make a hole yourself. However, it is not difficult - just follow these steps:
- in the right place, draw a circle of the required diameter;
- drill holes around the circumference with the smallest drill you have;
- with a sharp knife, simply connect the holes;
- insert the pipe into the resulting hole;
- clamp it well on both sides with washers with rubber gaskets.
If you do not have a small diameter drill, then you can take a medium one, only the places for drilling will need to be marked in advance, and not along the circle itself, but a little inside it.
You need to install a shower tank in the country house on the roof. If its dimensions are smaller than the dimensions of the roof, then it is necessary to weld the attachment point for it. This can be done with a single 60x40 profile, which is welded parallel to the door so that the tank can be placed on top of it and the top crossbar at the back, but it must not protrude beyond them.

Installing a tank on a corrugated shower - a photo of two options of different sizes
Next, along the perimeter of the tank, you need to weld or fasten metal strips, a profile or wooden blocks. They should protrude from above, forming sides, and from the bottom of the profile by about 5-7 cm. Thus, it is possible to fix the tank on the summer shower for giving, and also provide an opportunity for attaching the insulation from the bottom of the tank. Instead of a combination of a profile and a steel sheet, you can immediately use the corners with a wide shoulder.
After the container for the country shower is installed, open openings must be closed with corrugated board. It must be installed with a slope so that the water drains without lingering on the roof. You need to fasten the profiled sheet in the same way as on the walls.
In order for the water heated by the sun to retain heat longer, it is better to insulate the tank. If a top part the tank and its walls are illuminated by the sun and serve to heat the water, then the lower part, inaccessible to the sun's rays, contributes only to heat loss. It is she who should be insulated with the help of any material that does not lose its properties when exposed to moisture. In this case, for another 1-2 hours after sunset, a summer shower made of corrugated board will delight you with pleasant warm water.
Subtleties of tank modernization for more comfortable use of a summer shower
Typically, a shower head for a summer residence is selected from inexpensive - often even plastic - options, since they can better withstand outdoor conditions. The same applies to the faucet - it is better to take the cheapest Chinese faucet for a country shower with the expectation that it will have to be replaced in a year or two. It is also desirable that soap dishes and shelves for shampoos and other accessories be made of thick plastic and mounted on crossbars.
Finally, let's dwell on a few subtleties:
- In order for the water from the tank to be warmer, it should not be taken from the bottom, but from the surface, since warm water always rises to the top, and cold - sinks to the bottom. This is implemented using a flexible plastic tube, one end of which is attached to the nozzle, and the other to the float.
- You should buy a black tank - it heats up much faster.
- For faster water heating, you can use the roof. Two holes should be cut: 5-10 cm above the bottom of the tank and at the very bottom. Then insert the pipes into them and connect them with a long flexible black tube. This tube must be laid out on the roof of the shower in the form of a coil. In this way, cold water from the bottom will circulate through the tube, heat up and rise to the top.