How to install a steel pallet. Installing a shower tray - do it yourself or do it entirely? Shower tray installation
Installation of a shower cubicle begins with the installation of a pallet. Before installing a shower tray with your own hands, you need to properly prepare: understand the nuances of installation, assign a sequence of work, following the instructions and the calculation scheme.
Types and forms of pallets
Models of pallets of different shower stalls may differ both in shape and in the material of manufacture. Acrylic, ceramic and steel are considered the most common - it is not difficult to install such a shower tray with your own hands, while cast iron and marble products are quite heavy, so it is better to entrust their installation to specialists.
In terms of shape, pallets come with or without a rounded edge, square, rectangular, etc. Regardless of the material and shape, the principle of installation of all models is similar. Let us consider in detail the process of equipping acrylic and ceramic pallets, what are their fundamental differences and the subtleties of installation in order to simplify the independent work and avoid possible mistakes.
You will need the following set of tools and supplies:
building level, hammer, jigsaw, screwdrivers, screwdriver, pliers, adjustable wrench, marker / pencil, drill, puncher, electric, copper cable, sewer pipes, trowel, concrete mortar and silicone sealant
Preparing a place for a shower
Mounting shower tray carried out by one of the following methods:
- on a special metal frame;
- on plastic supports;
- directly onto a flat surface.
To begin with, the place where it is planned to place the future shower stall is carefully prepared. Particular attention should be paid to leveling the floor surface if it is planned to install the pallet directly on it, that is, without using a frame or support. When installing a pallet in a frame or wooden structure, the walls are additionally insulated using roofing material or a polyethylene film.

In addition, you should make sure that the pallet being installed is strong: if the structure sags under your weight, the pallet must be reinforced using boards, mounting foam, brickwork or expanded polystyrene boards. One of the most simple options reinforcement - fill the space under the base of the booth with concrete. You can do the work in one of two possible ways: you can make an initial concrete floor screed only in the place where the cabin is planned to be placed, or you can completely fill and level the entire area of \u200b\u200bthe bathroom.
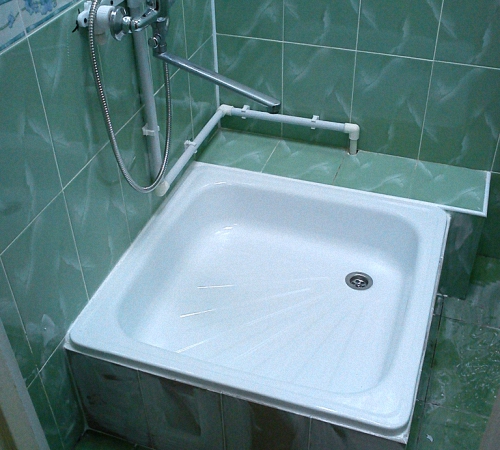
Advice! The steel tray is noisy, so when installing it, be sure to pour mounting foam under the bottom of the shower stall - this will help eliminate or at least reduce the loud noise from the stream of water pouring from above.
In addition to preparing the floor, it is necessary to properly mount the pipes, as well as lay the electrical wiring for the shower cabin. All pipes should have convenient outlets so that it is easy to connect hoses to them. As for the electrical wiring, it is made hidden and necessarily moisture resistant, while it is important to make as few twists as possible. The power supply cable is connected using a three-core double-insulated copper cable with a cross section of 2.5 mm or more. An RCD must be installed, the cable is laid directly from the electrical panel.
Attention! If you do not have the appropriate skills and experience in working with electrical wiring, it is better to entrust the work of connecting the shower stall to the electrical panel to an experienced specialist!
How to install an acrylic shower tray
Acrylic models are usually equipped with adjustable legs, which may already be attached to the product, as well as brackets for easy mounting and other types of fittings that facilitate the installation process.
To adjust the legs, an adjustable wrench and a level are used, which allows you to install the product as horizontally as possible in relation to the floor.
Acrylic products have one weak point - there is often no support under their central part. Therefore, acrylic pallets are often placed on stable podiums or special supports. The strength of the pallet will directly depend on the size of the available mounting clearance. At the same time, it is important to leave unhindered access to sewer pipes without fail.
After strengthening the bottom proceed directly to the installation of the product:
- marking is being applied - the structure is set horizontally using building level, a line is drawn with a marker / pencil along the walls / tiles in order to accurately mark the markings not only of the profile, but also of the drain holes;
- the pallet is temporarily removed, all parts of the drain hole are disconnected, the drain outlet is connected to the sewer pipe;
- the siphon for the shower tray is combined with the drain into the siphon drain hole - the so-called pipe gluing is performed, a seal is installed on the drain hole, and the tray itself is placed on top of it, then the drain funnel is screwed on;
- the central part is fixed - bricks are laid under the base, serving as a support, or steel pipes, and on top is a layer of thick rubber, after which the structure slides in and is attached to silicone;
- the cabin is connected to all necessary communications;
- along the lower perimeter of the entire structure, decorative panels are clad, while the joints are carefully sealed with silicone sealant.
Ceramic shower tray installation
Attention! Installation of any ceramic pallet must be carried out very carefully. The product is very fragile and can be easily damaged or broken even with a slight blow or a heavy object falling!
A distinctive feature of ceramic models is that under this design is not left free space, which means that no additional supports are required and you can install directly on the floor. This is convenient in that any manipulations to strengthen the structure are excluded, but there is a drawback - there are difficulties in providing access to the drain and all other communications.
Work order:
- markup is indicated - with the help of a marker / pencil, the future location of the drain is indicated and borders are drawn along the entire perimeter of the structure;
- a drain hole is equipped (it is important that it is as close as possible to the drain pipe) - the part of the floor where the siphon will stand in the future is carefully cut out with a jigsaw;

- unimpeded access to sewer communications is provided - not far from the already made cutout, another small recess is made in the floor so that the floor area is outside the boundaries of the structure and it becomes possible to lay a siphon and a grid of pipes under the floor;
- from a piece cut with a jigsaw floor covering a small removable viewing panel is made, and PVA glue, previously diluted, is applied in two layers to the location of the pallet a small amount water;
- the siphon is connected to the drain;
- the pallet is fixed with a solution, while maintaining a horizontal position;
- when the solution is completely dry, the siphon is carefully connected to the pipe through the viewing panel;
- all joints are carefully sealed with silicone sealant.
For long-term operation of the shower cabin, it is necessary to properly install the shower tray. The technology for performing work must be accompanied by a competent installation of all structural details. In this article, we will describe the features of installing a shower tray in accordance with the rules and recommendations of experts.
Types of pallets
The shower room is a great addition to the bathroom, which saves space in the room. The installation method of the shower tray must be installed in a safe manner. Installation options depend on the type of pallets and the technology of fastening to a certain material. However, it is important to remember that not all pallets can be installed independently, and in some cases, you need to seek help from specialists.

Shower trays are distinguished by the type of material from which they are made. So, the following types of structures are distinguished:
- cast iron products;
- pallets made of marble and ceramics;
- steel products;
- acrylic trays.
Marble products are considered the most durable and reliable, however, their cost is quite high, so not everyone can afford such an acquisition. Ceramic pallets are also expensive and have excellent decorative properties, but are too sensitive to various damages.
An affordable option is to install a shower tray made of acrylic materials. To mount the structure, it is necessary to build a special frame that would support the pallet, because such products tend to sag under weight. Special fixing legs are added to the kit, as well as reinforcing parts, which ensure the strength and reliability of the future installation. For example, cast iron pallets are the cheapest among other types of products. The peculiarity of such pallets is durability and reliability, which is indicated by the material used.

Pallet Installation Aspects
The cost of a shower cabin depends on the variety of functionality of the product. For example, a shower room with hydromassage, telephone, lighting and other effects will have a high cost. At the same time, it is important to take into account the payment to workers for the installation of the entire structure. With your own hands, it is easiest to install acrylic or steel products.
During the do-it-yourself installation process, it is important to remember to level the surface under the shower for the vertical position of the legs. The assembly technology of the structure can be seen in the instructions for the product. They indicate the features of installing a product made of plastic or metal, and also describe tips for connecting the sewer system to the shower. Pallets can be installed on plastic support elements, which can be replaced with bricks.
It's important to know! To insulate the shower tray, as well as to seal all voids, it is necessary to use mounting foam in the work. However, this method can complicate the dismantling or repair work. For check correct installation shower trays, you need to get into it with extreme caution, after which you will determine the stability and reliability of the structure.
Do-it-yourself installation of an acrylic pallet: features of work
The main disadvantage of acrylic products is the lack of support under the central part of the pallet. Thus, the surface may be damaged by careless movement. This will cause the installation to break down and damage the human body as a result of the fragment.
Therefore, when installing an acrylic pallet, it is important to follow the sequence.
Preparatory work
During repair work in the bathroom, special attention is paid to connecting the sewer system and water supply. The shower cabin must be connected to several systems, which are the supply and removal of water, as well as the wiring of electricity. At the same time, the last part must have a high resistance to moisture and water.
To install a shower tray for showers, you need to purchase high-quality pipes and other products in order to avoid leakage in the future. After installing all communication systems for the bathroom, it is important to carefully check everything, especially the water supply and the operation of the sewer. All pipe openings are closed with temporary plugs at the time of installation work.
Installation process
During installation, it is important to align all pallets strictly vertically. This is due to the need for proper flow into the sewer, only if the product is perfectly level in a horizontal position. This will prevent the formation of puddles in the shower. To install the pallet, it is important to do level ground tile or ceramic.
To properly mount the pallet, you need to fix the central part of the product, while the horizontal structure should not be disturbed. To simplify the work, draw a contour around the entire perimeter of the pallet to establish the exact position of the product. After that, you can start connecting sewer pipes and other elements.
Strengthening the shower tray
For the strength of the installation of shower trays, it is necessary to measure the distance between the product and the floor. At the beginning, it is important to leave space for the sewer so that the sewers can be cleaned or replaced later. Additional details supports can be bricks or steel pipes, depending on the design parameters.
Rubber is laid on top of pipes or bricks, after which the supports must be firmly pushed under the base of the acrylic pallet. After that, you can connect the communication systems.

Detailed instructions for installing shower trays
Before proceeding to installation work need to prepare essential tool. For installation you will need the following materials:
- FUM tape;
- sealant or special glue;
- twin to the sewer network;
- if there is no siphon in the kit, then you need to buy it at any plumbing store.
1. The pallet with legs must be leveled in a horizontal position. To do this, the legs are separately unscrewed and fixed in special locking screws. If you purchased a booth without supports, then you need to fill the floor with cement mortar. The level of the base must correspond to the position of the floor in the bathroom. After that, they proceed to the installation work and do the finishing, using ceramic tiles or other products.
2. It is important to fix the pallet from the side of the wall using adhesives. Joints and fastening points must be additionally sealed with sealant. All work must be carried out carefully to avoid further leakage of water between the wall and the structure. A double is attached to the sewer system, in the presence of other types of connection, a tee is installed.
3. All parts and connections of the pallet must be carefully sealed to avoid water leakage and destruction of the pallet.
4. It is important to install the pallet above the level of the sewer pipes. This is necessary for further access to communication items for their repair or dismantling in case of breakage or damage.
5. In conclusion, it is necessary to check all attachment points. Also check the supply and drainage of water. If there is a leak in some areas, then it is important to tighten all connections more carefully. If necessary, carry out additional insulation.
Features of installing other types of pallets
Pallet for cheap cab can be installed different ways, for example, on a brick base, on plastic supports or a metal frame. The technology of work depends on the characteristics of the product and the materials from which it is made.
For a ceramic pallet, you do not need to install supports or other racks, because the structure is mounted directly on a flat floor. In this case, there will be no mounting clearance, therefore it is important to lay everything with high quality and professionally communication systems. To carry out repairs or to replace sewer parts, you will need to dismantle the pan. Answering the question: how to install a shower tray without ceramic legs, you need to attach the product with glue or cement mixture for tiles. Lastly, install the drain hole.

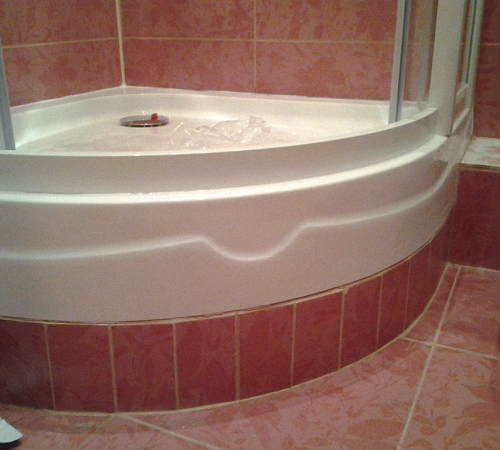
For the installation of steel or cast iron products, it is necessary to use more reliable support elements, which are bricks. Initially, the boundaries of the pallet installation are set on the floor. After that, a cement mortar is prepared and masonry is made of bricks. The height of the masonry must correspond to the parameters of the pallet and have the same shape. The pallet must not come into contact with the floor in order to be able to install the communication system.
Three days after drying cement mortar tray needs to be installed. A layer of cement must be applied over the masonry, after which the product must be applied and leveled in a horizontal position. A hose must be attached to the drain system. Tiles, decorative panels, mosaics and other finishes are used as facing materials. This is necessary to give completeness to the installed structure.
Unlike installing a low shower tray, for other products you need to use a metal or plastic frame, which makes the DIY installation process easy. The process of performing work consists in aligning the legs, installing the pallet and fixing the drain hole.
At the end of the installation, it is necessary to check the stability of the structure. If the pallet staggers or fastens, then additional support elements must be made as a brick laying or attaching steel pipes.

The process of making a pallet with your own hands
It is quite possible to install a pallet with your own hands without buying such products in plumbing stores. The main thing is to follow the rules and detailed instructions for performing work. The shape of the base for the shower cabin can be different, you can also use different materials for decoration, creating your own design design. The work process has the following sequence:
1. First, we designate the place of drainage and installation of the drain system. We cover the surface of the base under the shower tray with a waterproofing layer, and the height of the wall covering should be 30 cm.
2. A barrier of bricks is installed along the perimeter of the structure, the height of which should be more than 5 cm above the position of the drain hole. Next, the screed is poured, which should be 6 cm below the drain point.
3. After the screed has hardened and brickwork, the barrier is covered with a layer of insulation. The pouring of adhesives or cement mortar is carried out with a slight slope towards the drain system. The technology for applying the mixture starts from the edge and moves towards the center. It is important that there are no steep angles of inclination, as this creates significant and sloppy transitions.
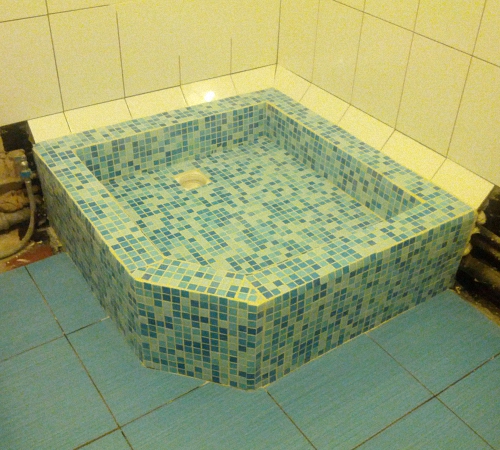
4. At the end of the work, the surface is finished different materials, for example, ceramic tiles, mosaics and other products at the discretion of the owners.

Features of installing shower tray bumpers
After determining the installation features of the shower tray, the video of which is presented at the end of the article, you can proceed with the construction of the sides. If the pallet has a large height, then it is necessary to build one or more steps for the shower cabin. Masonry can be made of bricks with the installation of formwork, however, the type of material used does not matter, because the surface will be tiled.
After laying the steps and removing the formwork, it is important to cover the surface of the sides with a primer and a layer of waterproofing. After that, the processed and correctly erected structure can be covered finishing materials. It is important that the shade and type of finish match the look of the shower enclosure and the style of the bathroom. It is important to tile the walls behind the pallet if they are not treated with waterproof materials. As a tile adhesive, you need to choose waterproof products without the addition of silicone, as it darkens and spoils over time appearance shower cabin.

To equip a shower cabin in an apartment, it is better to seek help from specialists. This will allow you to properly distribute the load on the base, as well as lay all communication systems. It is easier to install such a structure in a private house or in a country house, where there is no danger of flooding the lower floors of the house. In the process of performing work, it is important to fasten all parts and elements firmly and securely in order to extend the life of the shower tray.
Installing a shower tray is the first step in installing a shower enclosure. Read how to install a semi-circular acrylic shower tray. It's easier than you think!
Do-it-yourself installation of a shower tray is not difficult if you skillfully choose a model that matches the place where the installation will be performed. When buying a pallet, you should choose the one that is easiest to install. First of all we are talking about the height of the pallet and the location of the hole for draining water. Look at where the entrance to the sewer in the bathroom is, and at what height. You can connect a low pallet if the entrance to the sewer is very low, directly above the floor or even in the floor. If the entrance is slightly higher, choose a higher one, because only then will it be possible to ensure that the pipe from the siphon into the sewer can be lowered.
The second question is the location of the drain on the floor in the bathroom. Contrary to popular belief, the small distance between the drain of the pallet and the entrance to the sewer does not facilitate the connection, because it is difficult to fit the siphon and bend the pipe. It is better that the drain is a little further away so that there is room for making a connection to the sewer.
The third question is the choice of the siphon itself, which, as a rule, needs to be purchased separately. Choose the lowest siphon, especially if you plan to install a low drip tray.
Preparing the bathroom
Before installing the pallet, the walls and floor must be tiled. Be sure to make waterproofing under the tiles. This will prevent flooding of neighbors or adjacent premises. The entrance to the sewer with a diameter of 50 mm must be located.
Assembly and installation

1. Attach the legs to the bottom of the pallet as shown in the photo. Measure the height of the panel in advance and set the desired length of the legs so that the panel fits under the pallet. Do not remove the protective layer from the pallet, so as not to scratch it.
2. After installing the legs, check the horizontal plane with a spirit level. Apply a bubble level from different sides - along the sides of the pallet, and diagonally.


3. Screw the brackets for the side panel.
4. Place the tray in the corner of the bathroom and check again if it is level. If necessary, adjust the height of the legs again. Try on the side panel to see if it fits, make a trial installation of the panel, and then remove it.


5. Mark the drain on the floor with a pencil. This is where you will install the siphon.
6. Connect the lower part of the siphon with a flexible pipe to the sewer drain. Usually the drain in the sewer pipe has a diameter of 50 mm, the pipe has the same diameter. Remember to observe the slope towards the drain.


7. If the tube is too long, cut off the end with a metal saw. Level the edges after cutting with a knife or sandpaper. To facilitate the connection, grease the ends of the sewer pipes and gaskets with dishwashing liquid.
8. Carefully lay the gasket on the bottom of the siphon.


9. Install the pallet in the right place, as shown in the photo. You can apply silicone or mounting adhesive and stick the tray to the wall in this way. Some models may have mounting brackets, these must be screwed to the wall with dowels.
10. Insert into the drain hole upper part siphon and connect it to the bottom of the previously connected sewer. Remember about right order installation of gaskets (this depends on the type of siphon). Be careful not to damage the gaskets. Insert the rest of the siphon and the top cover. Now you can remove the protective film from the pallet.


11. Fill the siphon with water and check if the water is well sucked into the drain. If the floor remains dry, you can continue with the installation.
12. Glue the feet to the floor to keep the pallet from moving during use. Apply silicone from the gun around the legs and rub with your finger.


13. Press the side panel tabs.
14. Wipe dry and securely cover with masking tape the edges adjacent to the walls and the edges of the side panel adjacent to the walls and floor.


15. Fill the gap with silicone. Squeeze out the silicone from the gun along the entire length of the crack, and then smooth the seam with a rubber spatula or finger.
16. Immediately tear off the molar band while the silicone is wet.

17. Do not use the shower tray for 24 hours until the silicone has dried. Then you can mount the cabin.
How to choose a pallet
It does not take up much space, which will allow you to make a functional interior even from the smallest room. In the shower stall, one of the important elements is the tray. Below we will advise what to look for when choosing.
The form
Available Shapes: Square, Rectangular or Half Round (based on a quadrant). For a small bathroom, corner - semicircular or square models are better suited. For a spacious bathroom rooms fit a rectangular pallet in which we gain freedom of movement. It is better that the appearance of the chosen model refers to the character of the rest of the elements in the bathroom, this will create a single whole with them.
The size
Common sizes of square and quarter shower trays are 80x80 cm, 90x90 cm, 100x100 cm. It is worth noting that in the case of identical quarter shower trays, their radius is essential. Most often they are with a radius of 45 cm, 50 cm and 55 cm. When choosing a rectangular one, models with a size of 100 × 80 or 120 × 80 are available.
The selection of the size depends on the place that we can allocate in the bathroom.
Depth
Another aspect in this regard is the choice between a shallow tray (low) and a deep one. Low, look more modern and elegant. Moreover, their use visually increases the space of the bathroom. They are suitable for use by the elderly who have difficulty crossing high thresholds.
Deciding to choose a deep model, we acquire, in particular, the possibility of bathing a small child or soaking laundry.
With or without seat
On the one hand, his presence takes up space, which can be unpleasant when using the shower daily, on the other hand, on the seat, you can sit or put soap and shampoo on it.
Siphon
The last element is the choice of siphon. Depending on the diameter of the drain, we have a large siphon - 90 mm in diameter or a small one - 50 mm in diameter.
From which material to choose a pallet
The choice is not limited to the well-known cheap acrylic. There are many materials available on the market, each with its own strengths and weaknesses.
Acrylic - popular and affordable
Pros: Lightweight, smooth, warm to the touch and durable. Their installation is not difficult. On acrylic can be easily hidden small scratches or chips, using ready-made care kits (paste and sandpaper) or repair (liquid acrylic and hardener). Acrylic trays also have decorative qualities - available in a variety of shapes and colors.
Cons: Poor quality acrylic can quickly become dull and yellow. So that it retains its original appearance for a long time, it cannot be cleaned detergents containing abrasive substances - use only polishing agents for their care.
Made of enamelled steel - strong but prone to chipping
Pros: Quite durable, scratch resistant and relatively inexpensive. Easy to keep clean - the enameled surface can be safely washed with any type of chemical cleaner.
Cons: Enamelled steel is prone to chipping. Tin pans are cool in contact with feet and quite loud when a jet of water hits their surface. Luckily, you can install a custom rubber mat that will make up for both.
Ceramic - durable, heavy, expensive
Pros: More stable and durable than acrylic pallets. For their installation, a frame is not needed - they are attached directly to the base. They are resistant to damage, have a stylish, elegant look, and are easy to keep clean.
Cons: much heavier (pallet 90×90 cm weighs 33-46 kg) than acrylic or steel, several times more expensive than acrylic counterparts.
From conglomerate (artificial stone) - style has its price
Pros: They are made from 80% marble, 20% plastics, resins and dyes. This type of joint is indistinguishable from natural marble at first glance. The pallet is durable, resistant to chipping, scratching, temperature changes and impact chemical substances. They are warm and smooth, bacteria and fungi do not develop on the surface.
Cons: Price - Conglomerate shower trays are significantly more expensive than acrylic, steel or ceramic shower trays.
From stone - luxurious granite and marble
Pros: luxurious, stone shower trays, elegant and pleasant to the touch, resistant to mechanical stress and dirt. Suppress water impacts and accumulate heat.
Cons: high price. In addition, when cleaning shower trays made of stone (especially marble), it is necessary to pay attention to the alkali content of the cleaning agent, as it can cause discoloration. These type of shower trays are slippery, so a rubber pad is needed to minimize the risk of falling. Absorbent stones require frequent polishing and constant impregnation.
How to make a shower tray with your own hands
If none of the listed types of material suits you, you can make a shower tray with your own hands from ceramic tiles. There are even ready-made kits on the market that contain the necessary elements.
Now you know in what sequence do-it-yourself installation of a shower tray is done, as well as what forms and materials from which they are made are.
The shower cabin is a great alternative to the traditional cast iron bath. It is great for a small combined bathroom, allowing you to save a lot of space, as well as for taking water procedures in the country. The main element of the cab is the pallet. It depends on it the service life and comfort. It is important to properly install the base, subject to special requirements. You can cope with this task with your own hands by doing a few simple steps. The installation procedure depends on the material of manufacture and the coating of the bathroom.
Types of shower trays
Before buying a shower tray, it is important to choose a specific sample that will meet all the necessary requirements. Such products differ from each other in the material of manufacture, installation method and cost.
The most popular today are pallets made of the following materials:
- sheet metal;
- cast iron;
- acrylic;
- ceramics.
Metal products are distinguished by their availability and excellent strength. The inner surface is covered with abrasion-resistant enamel, which increases the service life. The main disadvantage is the significant noise that drops of water will make when falling. This problem is especially relevant for large families, since getting up early with a shower will interfere with the rest of the neighbors.
Acrylic bases are the most popular among consumers, due to their low cost and a wide variety of products. Modern technologies allow you to give the plastic any shape. It is difficult to call the pallet absolutely silent, but in comparison with sheet metal discomfort scores are significantly lower. Among the shortcomings, low strength is noted, since under heavy load the product is able to lose shape or crack.

The most expensive model will cost cast iron. It is distinguished by good indicators of strength, noiselessness and reliability. Heavy weight requires a solid base and supports during installation. The main disadvantage of cast iron is its low thermal conductivity. Without additional heating, it heats up for a long time. That is why in the first few minutes of taking a shower, the legs will experience slight discomfort.

A less popular material is ceramics. In all respects, such pallets occupy an average position. Sufficient strength, lack of noise and affordable cost make them a good option when choosing a product in terms of price and quality.

The list of distinctive characteristics includes the size of the walls, the geometric shape and the location of the drain hole. Large sides, more than 20 centimeters high, minimize the likelihood of overfilling the pallet and leakage. However, they can become an obstacle for the elderly or children. For mounting great importance has a shape and a place for draining. Therefore, you will have to devote some time to the correct placement of the pallet in the bathroom, so as not to carry out extra pipes and not to hollow out the walls.
Step-by-step instructions for installing the pallet
Professional builders most often use three main ways to install a shower tray. They differ in the type of base on which the product is installed. The choice will depend on the floor in the bathroom, on the materials from which the product is created. A concrete or tile floor is ideal. Wooden structure will require additional reinforcement.
Installation on a foundation of foam concrete blocks
Foamed concrete blocks are used as the basis for the future pallet, which are placed at all corners of the frame. If necessary, they can be replaced with a brick. Add to list the right tools will include a building level, tile adhesive, a sealant bottle with a gun, a trowel, a hacksaw, a tape measure, a pencil, a corrugated hose and a siphon for organizing the sewer system.

It is necessary to put the pallet so that the sewer hole is closed by the plane of the product, and the drain is located as close as possible. By choosing right place for placement, trace the contours of the product with a pencil or marker. 4 rectangles no more than 10 centimeters high are cut out of foam concrete. The floor in the room must be clean and level. Pre-prepared tile adhesive is applied to one of the faces of the stand, after which it is fixed along the perimeter of the contour.
It is important to fix all the blocks perfectly evenly using a building level and a trowel.
Pieces of foam concrete placed in the corners will serve as beacons for the foundation. Using a hacksaw, cut out rectangular strips, apply glue and fill in all the gaps, forming an even square along the contour of the pallet. Don't forget to use a level and constantly check the perfect horizon..
The foundation will take several hours to finally harden. At this time it is worth doing sewer system and installation of a siphon. The drain hole is located next to the sewer, adjusting it with a corrugated hose. The siphon is assembled in accordance with the instructions, special attention is paid to the tightness of all connections and correct installation sealing rings. The resulting base is smeared with a thin layer of tile adhesive, no more than 1 centimeter thick.
Before fixing the pallet on the foundation, the assembled drain system is mounted. After the glue has completely hardened, it will be very problematic to remove the product without damage. Therefore, it is especially important to immediately set the ideal level.
Processing the joints between the pallet and the wall requires close attention. Poor sealing will lead to the formation of unpleasant black streaks around the perimeter of the shower and harmful mold. Experts recommend a special plumbing composition with elasticity and quick-hardening.

The final stage will be the process of facing the foundation. To do this, use tiles and decorative aluminum corners that hide the cut points.
Product on factory metal legs
Most modern products are equipped with metal legs made at the factory. This method of installation is much faster and requires less money. If you act in accordance with detailed instruction, which lies in each box, the shower cabin will be absolutely stable and will last for more than one year.

The fixation points of the legs are specially marked and stand out with an influx of more material to give strength. The bases are fixed to the pallet on the floor, with the obligatory use of the building level. After installation, proceed to the installation of the drain system. A siphon must be supplied with the shower cabin. If it is not there, a wide variety of such devices is presented in the plumbing store. Right choice will help to make a sales assistant.

Assembling a siphon will require precision and painstaking work. All connections must be tight, to prevent water leakage. It will be impossible to correct defects after the installation is completed. You will need to completely disassemble the structure and do all the operations again. The package may include side clamps that will provide maximum stability. They are fixed with self-tapping screws, so you have to use a drill. Professionals advise not to drill holes at the joints of the tiles, as this will cause cracks to form.
Do not use the drill in hammer mode, as the impact load will destroy the ceramics.
After the pallet is installed and connected to the drain system, the attachment points to the wall are treated with sanitary sealant. To make the layer perfectly even and uniform over the entire surface, use a construction gun. It will take from 12 to 30 hours to completely dry the composition.
Styrofoam base
Some manufacturers include blank stands made of durable polystyrene foam in the package. Such structures are very low, easy to install and will serve as an excellent basis for a future shower cabin.

Due to the presence of transverse cuts, polystyrene strips break easily, allowing you to form a foundation to the desired size. Turning the structure over, it is necessary to outline the places for attaching the stiffeners and the drain hole. Plastic legs are screwed into pre-prepared sockets, which will ensure maximum stability of the entire system. By adjusting the height, a minimum clearance between the stand and the floor is achieved. The construction level will help to cope with this task.
The structure is installed on the floor so that the siphon is located directly under the hole. The contour is outlined with a pencil or marker both from the outside and from the inside. Fastening will be carried out using mounting foam, which is applied over the entire surface of the marking.

The stand is carefully installed on the circuit, the compliance of the siphon and the drain hole is checked. After degreasing the surface and cleaning the pallet from dust and moisture, it is fixed on a plastic base mounting foam and press firmly. For greater reliability, use heavy objects. It will take up to 24 hours for the tiles to fully cure.

At the final stage of work, all joints are coated with sanitary sealant, guided by general rules. Like the foam concrete base, the plastic contour is covered tiles or decorative mosaics. If you pre-determine the height of the pedestal for the shower enclosure, you can choose the right size cladding and avoid unpleasant trim marks.
The choice of installation method for a shower tray depends on the area of the bathroom, the material of the product itself and the strength of the base. By following all the instructions step by step, it is easy to create a solid and reliable foundation for the cabin with your own hands.
A shower cabin without a pallet is not always convenient in an apartment, so you should choose a bathtub, because it is easy to install it yourself. Which shower trays are best?
To figure out how to make a shower cabin with your own hands, you need to explore all possible options. This also applies to the design, the choice of a water drainage system, and the selection of materials for the construction and decoration of walls, as well as internal arrangements. Since the number of combinations of all these elements is very large, then, at the output, we can get something unique, and is this not a reason for the pride of a real engineer and designer.
So, the shower cabin is built approximately according to the following scenario:
- The choice of shower design;
- Pallet installation;
- Sloping floor device;
- Installation of cabin partitions;
- Choice of interior fittings.
Cabins made by yourself can be equipped with a shower tray purchased from a suitable store, or equipped with a sloping floor, through which water flows towards the drain hole. If in the first case everything is clear, then the device of an inclined floor will require some additional knowledge from you. If you do not have sufficient skills in working with concrete, then it is better to stop at buying a ready-made pallet, since such pallets are produced in a huge assortment and are not so expensive.
The shower room provides for a fence, also made by hand. It’s good if there is a suitable niche for its device, in which case it remains only to install special doors, or get by with curtains.
When the area of the bathroom allows you to install a cabin without sacrificing comfort, then the partitions can be made in a common style with the rest of the room, which will have a beneficial effect on the overall atmosphere and comfort.
In addition, it is necessary to measure the bathroom space, determine the places where pipes for supplying and draining water will be laid, and provide for the possibility of installing light. You also need to decide in advance on the type of mixer, or maybe a shower column with additional options, such as hydromassage.
Pallet installation

If you decide not to tempt fate and buy a ready-made pallet, then to install it you need to prepare a flat area, it is advisable to arrange concrete screed on the bathroom floor, after laying a waterproofing material. This is necessary in case of an accident and subsequent repair of the spillway system. Before you install the pallet on the racks included in the kit, you need to bring the pipes to drain the water and install the siphon. Pay attention to the installation height of the pallet in advance, this will help you choose the right siphon. The installation of the shower tray must be done using a long building level. To simplify the sealing of the junction of the wall and the pallet, it is recommended to make a small recess in the wall and slide the edge of the pallet into it. It is better to perform facing with ceramic tiles or other material after installing the pallet.
Inclined floor device

If you decide to refuse to buy a finished shower tray, then you can independently build a cabin with an inclined floor. With the size and shape, in this case, nothing will limit you.
The main difficulty associated with the installation of a shower cabin with a sloping floor is the need to raise the level of the floor to such an extent that water can drain on its own into the sewer system. To do this, you can lay out a shower board around the perimeter. For these purposes, you can use brick or foam concrete. The latter is more convenient to process and give it rounded shapes. The board must match the shape of the shower cabin. Next, you need to bring sewer pipe and install ladder. It is not worth using siphons designed for installation in a pallet, as there will be problems with cleaning it. The ladder is installed lower than the height of the sides to provide the required slope, which should be 3-4 centimeters. Channels for pipes can be arranged in the wall. Such channels are cut through with a perforator, and after installation they are sealed with concrete mortar. Also on sale were ready-made sets of spillway channels with ladders.

After installing the channels and ladders, you can start pouring the sloping floor. For these works, a concrete solution with the addition of silicate glue is used. When pouring, it must be taken into account that the grate of the ladder must be flush with the sloping floor, so it is necessary to leave a gap for the thickness facing material. The final surface should be sufficiently even, so that when facing it would not be necessary to gouge protruding places.
After the work with the sloping floor is completed, you can start laying the facing tiles. Since such a floor is not a flat surface, it is most convenient to do this with small ceramic tiles, which are sold as ready-made mosaics on a special substrate. For styling, use a special waterproof glue.
Cabin partition device

For the device of enclosing elements, you can use various materials and their combinations. It is better to build a frame from a metal profile, but if you stop on a tree, then you need to dry it well and treat it with a special protective compound, in order to avoid decay processes, larch has the best waterproof properties. For walls, many people prefer to use a material such as drywall, but we recommend staying on gypsum fiber boards, they do not contain cardboard, as a result of which they are more moisture resistant.
From gypsum fiber boards, you can build a seat and shelves, which are subsequently lined with the same material as the partitions. Facing work must be done with the same waterproof glue.
Partitions made of glass blocks look good. They are produced in the most different colors, and some contain various decorative elements such as: plant compositions, shells or starfish.
As a cheap alternative, you can use polycarbonate or plastic panels. These materials do not need to be decorated, just screw them onto the frame with screws.
It is very important to ensure good tightness between the pallet and partitions; for this, a special sealant is used. When working with such a sealant, use an excess amount of it, the excess can be removed with a soft spatula or cut off with a knife after complete drying.
To equip the entrance to the shower, you can use simple curtains that are hung on a bar with rings. The lower ends of such curtains are usually located inside the pallet so that the water that falls on them does not flow out. If you want to see a more rigid structure in this place, then there are ready-made sets of special hermetic doors on sale. These doors can be hinged or sliding. The latter are convenient in that they do not take up much space in the open position. If you decide to install hydromassage in your shower, then ordinary curtains will not work for you.
In the case when the ceiling of the bathroom is too high to bring partitions under it, it is necessary to install a ceiling on the shower cabin itself. For this, plastic panels on the frame are best suited. In such a ceiling it is convenient to mount additional lighting and a hood.
Tag Cloud:
do-it-yourself shower cabin without a pallet
The acrylic shower tray collapses around the steam generator jet. Two years ago, acrylic was repaired, but now cracks have appeared over a larger area.
Last time you were told that the Chinese steam generator produces too hot steam for acrylic, although the pan itself is very good.
We'll fix it again, but now we have to think about what to do with the steam.
Chinese acrylic pallet cracked, leaking.
From hot water the plastic warped and peeled off the fiberglass.
The reinforcing layer is full of holes, so the sawdust rotted under the bottom. Now the bottom bends a lot, so it cracks even more. We need to make a new bottom.
Cracks and chips on the bottom acrylic bath. I put a glossy magazine so that you can see the color of the acrylic in the photo. What can be done and how?
The crack runs along the frame channel. So the bottom is weak. The chips are nonsense. We'll have to reinforce the bottom. The color of the bath is understandable and is available. We'll get through the day. It will be strong and quite beautiful.
Shower cabin Aqua Joy AJ-A-120A L (size 120x80x215). Country of manufacture, when we bought, they wrote that it was
Kaliningrad, although most likely China. Two thin parallel cracks about 35 cm long each formed at the bottom of the pallet.
Water does not leak from them to the floor. It seems to me that if you step between the cracks, then in this place the bottom bends down. But it is difficult for me to understand whether this place falls on the convex or concave part of the bottom relief (the photographs show the bottom relief from below).
After the formation of cracks, the cabin began to creak strongly when you are in it, but after a while, in the process of washing, the creaking almost ceases.
Chipboard stiffeners are glued under the bottom of the pallet.
In theory, there should be a solid chipboard, not pieces. Savings on sawdust. The plastic is very thin and bends, works for a break along the stiffener.
The acrylic was already cracked, and the polyester putty with the fiberglass underneath hadn't yet torn. That's why it hasn't leaked yet. In the process of washing, the reinforcing layer gets wet and creaks less. We need to strengthen the bottom well. It is pointless to do something under the bottom, only if you build an additional support. We will work with front side. It seems that it will turn out to be done very firmly and almost imperceptibly. It is hard to say exactly how many hours you will have to work, but we will meet it in one day.
I have a drip tray on the shower cabin Serena SE-12013G high tray, 90x90, rounded.
Apparently, the stratification of acrylic, and maybe a break (it is pressed through when pressed). There is a small crack inside and outside (but a little in different places, not through). The pallet is sinking. How much will the repair cost, and is it possible to repair, or do I need to change the pallet?
Judging by the description, the Chinese acrylic pallet broke under the weight of a person.
Since the cracks on the pallet and under it are in different places, this means that the plastic has deformed and peeled off from the polyester resin with fiberglass. The strength of the trough has decreased significantly.
How to install a shower cabin with your own hands
It needs to be reinforced on both sides. The cost of the work will be slightly higher than the minimum order value.
The acrylic shower tray is cracked and leaking.
It bends a little. What can be done?
An ordinary Chinese grayish flimsy pallet, which is why it broke through.
It is necessary to strengthen well the place where the hole is, and at the same time the whole bottom. It can also be propped up from below. Picking a color is not a problem.
My pallet broke in the “first step zone”, a crack 1.5-2 cm long, falls just on the entire length of the “pimple” (the pallet has a bumpy surface, squares).
From below in this place passes one of the beams of the fastening cross, at the end of which legs are installed. And if you look at the pan from below, there is a layering of acrylic (as I think) to the right of the crack, brown stains are visible through which water drips (collects and drips).
But they are not transparent. I send photos. From the inside, the plumber smeared the pallet with something like liquid rubber, I don’t know for sure, but it pours, if you pull it, easily. The pallet itself
tall, quarter circle, 90x90cm. Is it possible to repair the pallet? In what time frame can this be done?
The cross profile of the frame hardly touches the bathtub.
Under pallet no for strength chipboard. There is only fiberglass, which safely broke through. The acrylic has peeled off the polyester resin.
The sump is leaking as the acrylic and fiberglass are torn. You have to work under the pallet and in the pallet.
We'll get it done in a day. It will turn out beautifully.
Tell me - how much will the repair of the bathtub cost - see the through damage in the photo - it was temporarily covered with adhesive tape. Approximate dimensions: 30*5 mm. The sliding door fell off.
In the photo, you can not see if there are cracks around the hole.
This affects the complexity of the repair. In any case, you can fix it. It will turn out more beautiful if you can reach the hole with your hand from the outside.
The shower cabin is installed in the beauty salon. I would like to update the coating that would look good.
The photo shows damage from chemistry under the intake hole and on the nozzles, most likely there are cracks there.
Near the steam generator, the acrylic is tainted with hot steam and possibly aromatic oil. Cracks on the bottom of the shower tray. The sawdust under the plastic is swollen and in those places where the frame profiles are located, the acrylic is torn. It seems that this Chinese pallet makes little sense to repair, it will not work out beautifully.
Hello!
We retail shower enclosures that we imported from China ourselves. During transportation, some pallets were damaged - approximately 20 pallets (scratches, cracks and chips). Would you like to offer you to repair / restore our pallets (for further sale)?
It is impossible to RELIABLY repair CRACKS on Chinese pallets so that it is not visible at all.
Fixing the shower low pressure. One of the eternal questions that every person meets in his life is the choice of a bath or shower.
A low level shower can be considered one of the most hygienic and practical options nowadays. Cabin installation instructions will help you deal with all possible problems.
By installing this format in the bathroom, you can reduce water consumption in water treatments, in addition, you do not spend much time when you are lounging in the bathroom and relaxing.
One of the most important issues is the height of the side of the pallet. Depending on what the owners of the house.
Low range showers are those that have a side height of 0.5-1 cm. For all people, this height is comfortable. If, however, elderly people or small children live in the house or house, it is important that the cabin is as comfortable as possible for all family members.
Shower enclosures with a low palette are a modern and aesthetic option.
You can easily step on the bottom to use the shower.
Benefits of a low pallet
Using a low pressure shower has many benefits:
- all models are sorted by models, so they fit perfectly into any interior and become more alive;
- shower for low temperatures perfect for small room, its installation does not take much time;
- models of this type are very diverse, fully complement the interior and are ideal;
- Due to the low palette and the presence tight door water does not fall on the floor, in addition, the interior is very simple;
- Taking water in the bathroom is very convenient to accompany the child or help the elderly.
However, the cabin installation with a low defect spectrum.
weak sides
Drawbacks of low level pallets include the following:
- such models do not always have good tightness, so you need to install curtains or doors;
- The low sides make it impossible to collect water to buy a baby. You will also not be able to use the storage tank various kinds products;
- the tray heats up very slowly, so many people may experience discomfort.
Variety of low range showers
Shower enclosures differ depending on the materials from which they are made, and depending on the type, shape and availability of certain functions.
How to install a do-it-yourself shower with a palette
Pallets are often made of cast iron, steel, spores, or acrylic:
- cast iron is a material that is not only heavy, but also very expensive. Significantly retains heat compared to steel and acrylic;
- the steel tray is more "loud", it can also bend under the weight of a person;
- many people prefer acrylic because it softens the sound of water, it is more durable and comes in a variety of colors;
- quarrel - very interesting material, which combines the advantages of acrylic and the beauty of a stone product.
If desired, the shower cabin can be made of natural stone by individual order.
If your bath size allows you to buy a large cabin, you can choose a model with a sitting seat.
In some low concentration showers, you can use fragrances, musical accompaniment. These models have a touch screen that allows you to switch modes.
Shower cabins with sliding doors are very popular.
But if there is enough space in the bathroom, you can install a model with a pivot door.
Low end corner shower enclosures are a great option for very small bathrooms.
In addition, if you want to install such a device, you do not need to have special skills - it is very important to just approach this issue responsibly and familiarize yourself with the installation scheme of the stands.
Shower cable installation
When shopping for a shower, consider your bathroom options.
Don't forget that cast iron pallets are a good choice as they are durable and easy to use.
If you bought a simple low-light model, you can watch installation videos online. Here you can find out what tools you will need to install the structure.
The installation of a shower product can be roughly divided into the following steps:
- siphon installation, which means that the placement is below the bottom of the shower.
The lower part refers to the installation site, an example and drains are described. When it moves into the intended area, a low siphon is established.
Then the cabin is fixed and the pallet is loaded and compressed;
- Wall installation begins with the assembly of locks or a frame, as well as with a vertical stand. After that, the fabrics are inserted into the recesses and secured with rubber parts. For strength, the walls are screwed in. Use self-tapping screws and fasteners to perfectly fit the profile.
If you want to more tightly close the shield of the closed rain cable, you need to connect the canvas to the frame brackets, then pull it and grease the profile parts;
- door installation. The fabric door is attached to the top and bottom through specially prepared holes.
First, the doors are connected to the rollers at the top, and then the buttons are used for alignment. On a suspended canvas in the upper part mounted on the lower rollers by a spring. This completes the installation process.
If you are confident in your abilities, you cannot invite professionals to install a shower and do everything yourself using special drawings.
Installing a short range cab is not complex process but requires certain skills. If you are careful and pay attention to details, you will get a shower that will satisfy your strength and safety.
The differences in a deep bowl setup aren't that big, so you shouldn't have too much trouble.
Reinforcing tall shower traysShower cabins are available with low and high trays, and high ones stand quite high above the floor, which will allow you to install a drain even if the inlet pipe is located higher than usual. How to install a shower tray with your own handsThe high tray resembles a bathtub small sizes, you can pour water into it and small children can swim in it. In such trays, the drain is equipped with a special device, when pressed, the valve closes the drain and the tray is filled with water. The first models of cheap cabins had thin-walled pallets, and in the latest models, the pallet is reinforced for rigidity. wooden slats soldered into the construction of the pallet, and the pallet itself is placed on a metal frame made of a square, hollow pipe. There are designs where the metal base is already poured into the pallet. However, any structure can be strengthened independently if you have a weight of about 100 kg. As a rule, such people prefer 80x120 cabins, where the pallets are more spacious, however, inexpensive Chinese pallets do not fit snugly against the metal frame, and although the frame is screwed to the pallet with screws (screws are screwed into wooden flooded bars), the rigidity of the pallets is not sufficient and they creak when bending. We suggest adjusting additional linings, and it is best to fill the resulting non-adherence with sealants or mounting foam, and it can be filled with the entire bottom, then the pallet will not only be more durable, but its sound insulation will also improve. It is important to remember that the foam increases in size after it is released. And most importantly, given that the supporting metal frame is made with very thin-walled pipe, reinforce it by installing along or across a 40mm thick board that will support the metal frame and pallet. Such a board will rest on the floor supporting the frame and the pallet, and to make adjustments, thick long screws are screwed into the board as additional supports (70x10) with a hexagonal head. |
|
|
Any use of materials is possible only with an active link to vnegorodov.ru! |
![]()