Do-it-yourself potbelly stove for long burning. How to make a potbelly stove yourself at home
In Russia, then the USSR, potbelly stoves were used where there were none district heating: in front-line dugouts and dugouts of the Great Patriotic War, in state institutions of the same time, in heating cars. See a photo of a potbelly stove made by yourself on the website.
Who are the authors of homemade products?
Many Russians are sure that this is only a simple Russian invention. And some are wrong. In the United States, the same homemade products have been used for centuries, being called "fat belly", in Japan - "darums".

The revival of the bourgeoisie took place in Russia in the second half of the 20th century due to the massive appearance of garages, garden plots, where they were the only means of heating thin-walled buildings.

After the improvement of these mini-ovens - and for cooking: a pot or pan was placed on a stove attached to the top.

Until they were replaced by a centralized supply of methane, gas-balloon stoves or wood-burning bricks. They also came in handy in the 90s of the crisis years due to interruptions in gas and other types of fuel. It's good that at least there was plenty of firewood.

What is attractive bourgeoisie?
Its main feature is the simplicity of the design. Even with many additions to it, the principle of operation of a metal stove remains the same: everything that is at hand burns and heats summer residents.


Although at the same time half of the thermal energy escapes through the direct-flow pipe. But no one writes off even a heating source that has rusted from time to time.

It is easy to make such a temporary stove in a day or two. But first draw up the drawings of the potbelly stove with your own hands. Much of what is stored in the closets of rural houses and dachas goes into action. These are milk and water metal (but not duralumin) cans, barrels from diesel fuel, vegetable oils, pipes, boxes, corners.

Nothing expensive, including a tool - in the villages every owner has it at hand. High-quality assembly using gas or electric welding.

But neighbors who have units will help with this. welding machines ensures greater reliability and rigidity of the assembly. How to make a potbelly stove with your own hands, step-by-step instruction below.

We make a potbelly stove from a steel can
Stock up on a hardened chisel, a hammer, a chimney, a piece of rod with a diameter of 0.6 - 1.0 cm. Prepare an electric drill with a drill one centimeter in diameter. If there is a grinder, you will speed up the assembly twice.


In one part of the cover, at the very bottom, drill 5 - 7 holes for future traction. Bend a long rod with a snake and with legs, at least four. These will be the grates when you insert them into the can.

Straighten the snake inside so that it lies horizontally and firmly just above the holes. Firewood will burn on this “grill”, and good air draft will go through the holes and with the help of a chimney. It will be the catalyst for combustion.

For the chimney, fit a piece of water pipe, even used, with a diameter of 7-8 inches. Near the bottom or on the very bottom, strictly perpendicular to the grate, cut through with a chisel or saw through a circle with a grinder.

Insert the pipe into it a few centimeters, and from the outside fix it tightly with a clamp on the bolts or weld it to the can. The can stove is designed for a horizontal position.

Weld legs to it and put it where the potbelly stove will heat the house, garage. This is a very flammable device, so place it on a metal sheet and at least half a meter from wooden structures.


The disadvantage of the stove: you can’t even heat the kettle on it - there’s nothing to put on. And yet it will be an effective potbelly stove with your own hands, and read about the improvements below.


barrel stove
She will correct the situation, and even cook borscht and fry cutlets on this potbelly stove. Not only an old barrel will do, but it's better if it's decommissioned gas bottle for 50 l.

His walls are thicker, they will heat up a little longer, but they will also hold more heat. This is the perfect sauna heater. And if you impose sea or river pebbles, other strong stones, then it will be easy to raise steam in the room.

It will stand upright. The blower will also have enough space, and a lot of firewood can be laid in the firebox above it. exhaust pipe you can make not a straight line, but with knees for a greater return of thermal energy in a steam room.

If a potbelly stove is needed for country house, then weld a metal platform on top, you will cook food and tea on it.

Preservation of heat in a potbelly stove
To do this, it is necessary to overlay two-thirds of its parts with refractory bricks, placing it on horizontal ribs, leaving free access to the firebox and blower. It will be a heat shield that will keep the generated energy much longer. Holes must be drilled in bricks for better heat transfer.


The second option: a potbelly stove plus a water heater. Scald the gas cylinder from which the stove is made with sheet steel of at least three millimeters thick.


So that in the resulting container can hold at least 30 liters of water. Weld the water inlet and outlet pipes to it, connect the pipelines for heating the adjacent room. For better convection, connect a small circulation pump.

Propane stove
The ideal stove is a do-it-yourself gas stove. She doesn't need chimney because no smoke is released when the gas is burned. Its analogue is room gas stove with oven.

It’s not difficult to make - take ... a finished potbelly stove, insert a steel pipeline with a nozzle from the old one into it gas stove. Connect it to a standard gas hose with a reducer from a household gas cylinder.

There is no exact cost for a potbelly stove, you can navigate by cooker for 4 burners. The capacity of the cylinder (for 50 liters) with 21 kg of propane-butane is enough for 34 hours of operation of such a stove.


DIY potbelly stove photo


Often homeowners prefer to assemble simple and useful homemade from improvised and unnecessary materials, instead of buying ready-made. And the potbelly stove is one of such useful devices.
The main feature of the potbelly stove is that it heats up as quickly as it cools down. Therefore, the scope of its use is narrowed mainly to those rooms where it is necessary to provide rapid heating, while appearance device for the user is often completely unimportant.
A do-it-yourself stove-stove can be made, and if desired, upgraded to achieve more efficient heat transfer.
Have you also thought about assembling such a homemade product and do not know where to start? We will help you in the implementation of the task - the article describes the assembly order various options homemade ovens, drawings and diagrams are given.
Also, ways to improve a home-made potbelly stove are analyzed in detail, as a result of which the efficiency of the stove will become noticeably higher.
The choice of furnace design depends on what material is used as fuel. Each user himself determines the degree of its availability and economic feasibility.
It is combustible material that has different temperature and the nature of combustion, dictates the principles for creating various modifications of the device.
The shape of the potbelly stove may be different, often it depends on the availability suitable material. It can be an old can, a gas cylinder, a metal container - everything that is at hand. The main thing when choosing it is the thickness of the metal and the shape, which requires a minimum of alterations.
Image gallery
In the lower part of the chamber, a grate is placed from the grate (it can be welded from reinforcement), under which ash will accumulate. You can also organize hob. It is easier to do this on a horizontally located cylinder by welding corners on it on both sides.

Well, if the barrel initially has legs. If not, you need to weld them or install the stove on bricks.
A potbelly stove from a gas cylinder can also be used as a basis for the further construction of a hot water column, as it is also called - "Titan". To do this, a stainless container is installed on top of the stove, through which the chimney pipe passes.
The water in a wood-fired boiler heats up quickly, and little wood is used - in summer time one bookmark in a small firebox is enough.
A metal container with walls at least 3 mm thick is also suitable for a potbelly stove. The open top of the container is closed with a circle of metal sheet and brewed.
A hole is cut in the lid or wall for the chimney. Its diameter should be at least 100-150 mm. The top in such a potbelly stove will heat up so much that it will be possible to cook food and heat water on it.
We also have more detailed instructions with diagrams and drawings for manufacturing.
Features of a stove on sawdust
If there is no shortage of sawdust on the farm, then this type of fuel will fully justify its use. Such a potbelly stove does not require frequent loading - compacted sawdust inside does not burn, they slowly smolder, releasing thermal energy gradually and providing warmth for a long time.

Do-it-yourself potbelly stove on sawdust works on the principle long burning. The slow combustion process allows you to save resources - heat does not fly out instantly into the chimney, heating the atmosphere
The basis of the furnace can be a metal barrel with an open top (if the container is airtight, then the top is cut off) or a pipe with a diameter of 300 to 600 mm.
Then a metal circle is cut out of a sheet, three or more millimeters thick, which should be smaller than the inner diameter of the barrel. In its middle, a hole with a diameter of 100 mm is cut under a cone for ramming sawdust.
The workpiece is welded to the walls of the barrel. With the help of this circle, the ash pan is fenced off - in it, with the help of chips or chips, ignition will be carried out. The height of the ash pan should be 100-200 mm.
A window is cut out below the welded circle, which will serve as a blower. Curtains are welded to the cut piece of metal, making a door for the same hole.
In the lid of the container make an exit to the chimney. The lid should fit tightly on the potbelly stove and be made of a sufficiently thick sheet, otherwise it will quickly burn out.

In order for the sawdust to burn gradually, it is necessary to provide a limited supply of oxygen to the fuel compartment. To do this, a cone-shaped core is inserted inside the firebox, sawdust is poured around it and rammed. The cone is carefully removed, scrolling, put a lid on the barrel
You can improve the same model by adding an additional cylinder. In this version, sawdust will be in the inner chamber, and the space between the two compartments will serve to burn gases and increase the heating area. In this embodiment, the exit of flue gases is arranged in the lower part of the stove.
How can a potbelly stove be improved?
An ordinary potbelly stove has a mass positive qualities but also has many significant drawbacks. She is unable to accumulate heat and heats the room while the fire is burning. Requires continuous fuel supply, on average - every 30-40 minutes.
Besides, a large number of heat flies out through the chimney into the atmosphere, without benefiting. That is why work on improving the potbelly stove is carried out without stopping.
The standard design of the potbelly stove has many modernized designs that allow you to:
- save fuel;
- increase the efficiency of the stove;
- increase heat capacity;
- reduce the frequency of refueling.
The most common methods for improving the efficiency of a potbelly stove are the creation of a slow burning mode, a gas afterburning system, and the installation of heat-resistant lining of the inner walls.
You can also improve the quality indicators of the stove by increasing the heat transfer area with the help of welded pipes and an installed fan that will drive air flows through them.
The industrial model of such a potbelly stove is called Buleryan, but besides it, there are many more various designs made in a handicraft way. We recommend to see detailed master class on homemade production.
You can increase the heat transfer time by lining the oven with brickwork. Such a potbelly stove will heat up more slowly, but it will also give off heat longer, maintaining the temperature in the room for some time after the fire has died out.
Are you interested brickwork? We have on the site detailed guide by hand with diagrams and drawings.
Option # 1 - an oven with an increased fuel load
This model is designed to increase efficiency and continuous burning time. They take a horizontal rectangular potbelly stove with massive, stable legs as a basis and supplement it with a cassette from a deaf sealed cylinder. Such constructive additions significantly increase its efficiency.
A flange is welded to the cassette cylinder with a height of about 400 mm. After installing the cylinder in the burner hole, its edge should fall 5-10 mm below the stove. To make it convenient to install and remove the cylinder, handles are welded to its body.

The cylinder is filled with firewood in such a way that there is some space between them and when it is installed on the stove, they can immediately fall on burning coals
How does a potbelly stove work:
- The lower part of the firewood, having fallen on the coals of the pre-ignition, flares up. In this case, the upper part, located in the cassette, will not burn due to a lack of oxygen, but will be dried under the action of hot smoke.
- Under the weight of its own mass and as it burns, the firewood gradually sinks into the firebox.
- The hot gas, which has been in the cylinder for some time, gives it heat, thereby increasing the heat transfer area in the room. In this case, the cylinder cover can serve as a cooking surface.
- At the same time, the temperature of the outgoing smoke decreases, which means that the heat capacity and efficiency of the potbelly stove increase.
As a result of such modernization, the time interval between laying firewood increases and the efficiency of using the stove increases.
Option # 2 - long-burning potbelly stove "Bubafonya"
The low efficiency of an ordinary potbelly stove is a fact that has long been known and verified by many users.
One of the methods to increase it is to slow down the combustion process by limiting the flow of air into the combustion chamber. This improvement can be found in such stoves as "Bubafonya", "Filipina".
Use this model of a potbelly stove in non-residential premises - workshops, greenhouses, and other outbuildings. For work within 9-12 hours, one bookmark of small firewood, chips, sawdust is enough. In this model of the heating device, coarsely chopped and damp firewood cannot be used.
Potbelly stove can be created from any metal tank. Most often they use a barrel of fuels and lubricants or an old cylinder.
Production is carried out in the following sequence:
- A combustion chamber is prepared from an accessible cylindrical container, in the upper part of which a hole is cut out for the chimney.
- From metal (at least 10 mm in thickness), a circle is cut out, slightly smaller than the inner diameter of the barrel.
- A hole with a diameter of 100-150 mm is made in the center of the circle (the exact size depends on the diameter of the pipe used for the rod).
- Ribs up to 50 mm high are welded onto one of the planes of the circle.
- A pipe is welded to the center of the circle. Its length is calculated in such a way that the piston in the lowered state rises above the tank cover by approximately 100 mm. If you leave the pipe longer than necessary, draft will appear in it, it will begin to smoke.
- Next, they construct a lid that will fit tightly on the barrel and cut a hole in it suitable for the piston pipe
You can further increase the efficiency of this model by organizing the flow of air into the furnace from the street. Thus, the heated air from the room will not fly out into the chimney.
Option # 3 - Filipina secondary afterburner
In the operation of the furnace, two methods were used to increase its efficiency, based on the principles of long-term combustion and pyrolysis. For its manufacture, you will need two gas cylinders, which will serve as chambers for primary and secondary combustion.
The sequence of steps for making a potbelly stove is as follows:
- Cylinders are prepared for work by releasing the remaining gas from them and filling them with water. Without this procedure, it is absolutely impossible to cut them, otherwise the sparks that form during the operation of the grinder can provoke a gas explosion, some of which always remains in the cylinder.
- In the first cylinder, which will serve as a chamber for the furnace and ash pan, the tap is removed and the top is cut off (it is used to make a door), a hole is cut out for installing a chimney.
- Opposite the hole for the chimney, a pipe is welded, the other end of which should not rest against the cover of the second chamber, leaving free space to exit the smoke.
- At the outlet of the pipe from the first cylinder, a metal ring is welded, it will serve as a support for installing the upper cylinder. Holes are drilled in it.
- A metal ring is also welded to the second cylinder at the place where the top is cut, in which holes are marked, focusing on the holes already made in the first ring.
- Before finally installing the second cylinder, an air supply pipe is inserted into it.
- The upper chamber is put on the pipe, aligning the holes, a heat-resistant tourniquet is wound between the rings, and the connection is fixed with screws.
- The chimney outlet is made from the bottom of the secondary afterburner chamber.
To obtain a stable structure, reliable legs are welded to the lower chamber. Install awning doors. It can be further improved by adding the ability to regulate the air entering the furnace.
Most of us have probably heard of such a stove as a potbelly stove. According to its design, it is a metal structure equipped with a chimney. Such ovens were very popular in the first half of the 20th century. But after some time, when they began to install gas ovens and central system heating, they began to be forgotten.
Subsequently, they were remembered during the Second World War: in these years, when there were no apartments and institutions central heating, potbelly stoves helped maintain heat in the rooms. These handicraft stoves are often used to heat dugouts, dugouts and wagons. In the 50s of the XX century, these stoves were remembered by the owners of summer cottages, who installed them in their garden houses. Today, they are still popular primarily as a means of heating utility rooms with an area of 10-15 square meters. m. They do an excellent job when used in garages, small country houses, greenhouses, etc.
The high popularity of potbelly stoves ensured their dignity, which they have in sufficient quantity:
However, potbelly stoves cannot be considered an ideal heating device. Therefore, getting acquainted with their advantages, it is also necessary to pay attention to the disadvantages. Although the heating of such an oven takes a minimum of time, achieved They don't keep the temperature for long.. For this reason, you have to regularly put fuel in them. In this regard, they are noticeably inferior to long-burning stoves, which do not need to be paid attention throughout the day. The amount of thermal energy generated by the potbelly stove is not enough to provide comfortable temperature in a large room. It has a rather small efficiency equal to 5-10%. According to this indicator, it loses to most modern heating installations.
How to increase the efficiency of the furnace?
 This problem is relevant for many masters of industrial production and ordinary craftsmen. To get an idea about this process, you should first find out how the potbelly stove works, and familiarize yourself with some important points.
Chimney diameter
When using potbelly stoves, the main thing is to make sure that a smaller amount of flue gas comes out through this chimney compared to the volume produced by the furnace. If this problem is successfully solved, the gases will remain in the pipe and move through the furnace space a certain number of times. This will lead to air circulation, which is a prerequisite for fuel combustion. As a result, leaving through the chimney, these gases will already have a lower temperature.
This problem can be solved by defining optimal diameter chimney. This may be the size three times the volume of the furnace kilns in cubic meters. However, in the case of gas circulation in a metal box, it will quickly lose its temperature.
To avoid rapid cooling of gases and to ensure their complete combustion it is necessary to change the process of fuel combustion in such a way that it takes place in the pyrolysis mode. You can create it with the help of high temperature. Moreover, even if you try to use dry furniture as fuel, you will not be able to achieve the desired effect.
You can try to regularly add coal, but with the help of such raw materials you cannot create optimal conditions for the pyrolysis process. This is possible only on the condition that the furnace will operate in the smoldering mode and will naturally switch from one mode of operation to another. Now we come to the next important point.
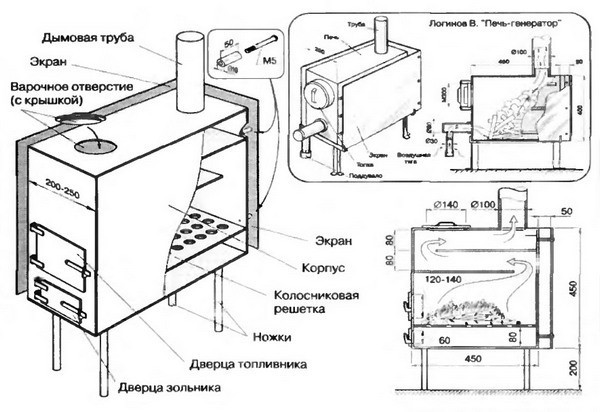
Steel three-sided protective screen
 It should be placed in such a place that it is removed from the body of the stove at a distance of 50-60 mm. Thanks to him, more than half of the infrared radiation will be reflected towards the furnace, which will ensure the temperature that the firebox needs. It is very important to choose the correct distance between the furnace and the shielding element, as this can significantly affect the economic component of the design. The use of wood and coal at the very beginning of the combustion process provides heat generation in great numbers.
Keeping in mind that the supply of firewood and coal is constantly in short supply, it is important to make sure that the very first portions of heat are in the room, and do not go into the chimney.
Among the currently known methods of heat transfer in terms of efficiency, there is no equal to convection. In practice, it is implemented in that, after heating the air near the stove, make it so that it spreads throughout the room. This problem can be solved using the screen.
Although the heating temperature of the lower layer of the potbelly stove is not so high, the heat still comes down from it. Because of this, there is a risk of fire in the room. For this reason, as the base on which the potbelly stove will be placed, it is necessary to use a metal sheet that provides removal 30-40 cm from the stove. Moreover, under it it is necessary to place an additional sheet, which can be made of asbestos or basalt.
It is worth noting that the potbelly stove is not able to 100% maintain the pyrolysis mode. This is due to the fact that after entering the chimney, the gases leave it without having time to give up their heat. This can be achieved if you correctly approach the device of the chimney pipe, choosing the most optimal design for it.
This problem is solved as follows: the design of the chimney must include a vertical part reaching a height of at least 1 meter. It should also provide for a layer of thermal insulation, which can be used as basalt wool.
 A pipe should go from it, located at a slight angle and having a similar diameter. She has special name - boar. With its help, conditions will be created under which it is possible to ensure the combustion of gases, as a result, the heat supplied to the room at their expense will increase by 30%. In length, such bars can reach 2.5-4.5 meters. It should be placed no closer than 1 meter from the walls and ceiling. Between the bottom of the furnace and the pine forest there must be a space 2 meters wide. It would be useful to provide protection for it based on a metal mesh.
Ever since its appearance and popularization of the potbelly stove changes were made to their design.. As a result, today they are long-burning furnaces that are easy to operate and high level efficiency. Modern version these furnaces no longer provide grates, while an air throttle appeared at the blower, the main purpose of which is to regulate the heat output and combustion mode. To ensure long-term combustion, air enters the fuel from above.
Among the various options for bourgeoisie, the highest energy intensity is demonstrated by cast iron stoves. Such devices could work even without a screen. It was this feature that was taken into account when it was decided to use them. for heating army barracks. In our country, they have long been engaged in the manufacture of army bourgeois, and there are no complaints about the quality of their work. These installations differ in many parameters, including dimensions.
We assemble a potbelly stove with our own hands
In terms of design, such a furnace includes a firebox with a grate, a blower ash collector and a chimney. Any building is suitable as a place for installing a potbelly stove. The main thing is that there should be an opportunity to bring the chimney out. If you have an empty gas cylinder lying around idle, then you should not get rid of it. You can find a use for it if you make a potbelly stove case out of it.
Materials for assembling the stove
 To make a potbelly stove with your own hands, you will need the following materials:
- steel grating;
- steel corners;
- chimney pipe;
- steel sheet;
- door.
Necessary take a gas bottle and mark the place in the upper part where the iron rim with the tap is located. It must be removed, for which you can use a hammer.
Then you need to cut a hole for the door, having calculated its dimensions in advance.
The corners will serve you for a frame under the door, for the manufacture of which you will need welding.
After the frame is welded to the cylinder, it is necessary to install the door on the bolts, for which at the beginning it will be necessary to make the necessary holes for them.
In a place corresponding to the bottom of the oven, you should cut holes for the grate, after which it must be welded. On the other three sides, it is necessary to install steel sheets using welding. They will serve as walls for the future furnace. The result should be a box with a door that does not have a top. The box must be welded to the bottom, and this must be done so that the open side is adjacent to the door. Next, you need to install a damper, with which you can change the mode of air supply to the furnace furnace.
To give stability to the stove-stove, it is necessary to weld the legs to the gas cylinder. A hole is made on the back side through which gas will exit the chimney. After that, they begin to assemble the chimney, providing for a turn in it, which will allow the heat to leave the room with a slight delay.
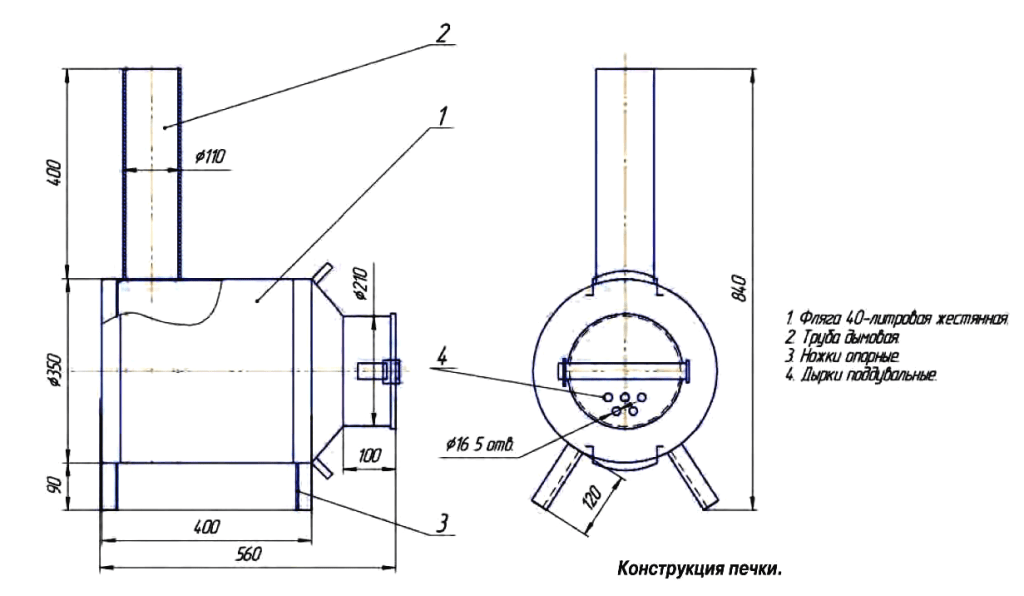
The above scheme is applicable for making a do-it-yourself potbelly stove based on a 40 liter milk can.
How to make a potbelly stove from sheets of steel with your own hands
The design of the firebox of such a furnace should include partitions that will save you from having to spend a large amount of fuel to maintain the operation of the furnace.
Furnace assembly materials
To make a similar version of a potbelly stove, you you will need the following materials:

The first thing you need to do for a potbelly stove being built with your own hands is a drawing that will simplify the task of making it for you. Next, you need to take the sheets and cut out elements for the stove body and two partitions from them. The latter must be installed in the upper part of the furnace, in the future they will provide a complex, winding path for flue gases, which will ensure a higher efficiency of heat generation by the furnace.
At the top, you need to hole for a chimney with a diameter of 110 mm. You also need to position the hole under hob, the diameter of which should be 150 mm.
Next, we take the sidewalls and fasten them by welding to the bottom of the case. Steel strips 30 mm thick must be welded to the walls. They will serve as the basis for the lattice. It can also be created from a steel sheet, in which you must first make a hole with a diameter of 20 mm. To create a grate, you can use reinforcing bars or purchase finished goods in the shop.
Conclusion
Although a potbelly stove seems to be a rather outdated version of a heating device, it is still remains in demand. In stores you can find many options for modern stoves, but it would be better if you make a drawing for it yourself. This will allow you to create with your own hands such a stove that will completely suit you in all respects. In addition, there will be no problems with this, given that such a furnace has a simple design, and its manufacture requires available materials, which can be found in almost every household.
Many are faced with the need to organize heating in small utility rooms. Here, efficiency, compactness and expediency of financial costs are important. Potbelly stove of long burning - perfect option for heating change houses and garages, and our instructions will help you with making it yourself.
Housing: make or adapt
Firewood in a long-burning potbelly stove does not burn, but smolders very slowly. At the same time, a strongly heated pyrolysis gas, which is formed due to the thermal decomposition of the fuel, burns in the chamber adjacent to the furnace. In such a "strangled" mode of operation, the oven does not generate very high temperatures, so the metal can be quite thin - about 2.5 mm. Naturally, with a full supply of air, the oven will heat up red-hot, so if you want a high power mode, make the case massive.

The duration of the stove operation between bookmarks depends on two factors: the mass of the fuel put in and the activity of its combustion. Therefore, you should not expect that a compact garage oven can work up to three days, it simply does not have enough fuel for such a period. Temperature also plays a role. environment: the lower it is, the more actively the combustion process takes place.

Sheet steel is ideal for making the body. It is also possible to use any profile rolled product, folded in vertical rows into a ring or rectangle. There is a problem in scalding all the seams, but in this case the furnace receives multiple stiffeners and gives off heat as efficiently as possible.

The body of the potbelly stove is made very simply: deaf sealed walls and bottom. Loading can be vertical and horizontal, in the latter case, the role of the furnace door is performed by the top cover. We will consider both spatial positions of the potbelly stove, but the body will be unified for each. For example, let's take a 50 liter propane tank with a cut top- the cylindrical body has the advantage of more uniform heating.
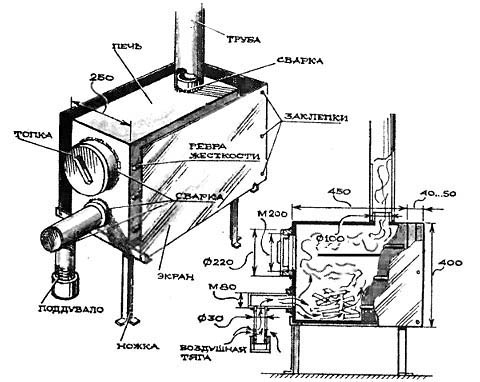
 Scheme of operation of a long-burning potbelly stove with a horizontal combustion chamber. 1. Chimney damper. 2. Door shutter. 3. Combustion chamber. 4. Pyrolysis gas post-combustion chamber. 5. Stove door
 Scheme of operation of a long-burning potbelly stove with a horizontal combustion chamber. 1. Air damper. 2. Chimney damper. 3. Air supply pipe. 4. Combustion chamber. 5. Stove cover. 6. Pyrolysis gas post-combustion chamber. 7. Piston
How combustion chambers are arranged
To obtain the coveted pyrolysis gas, it is necessary to almost completely limit the flow of oxygen into the main furnace, where a hotbed of high temperatures is formed, leading to the transition of carbon fuel to a gaseous state. The minimum air that is needed for slow smoldering enters the furnace due to various leaks.


Having laid the balloon horizontally, we divide the circle in height into 4 parts, put marks on the cut edge and mark the length of the upper and lower chords. According to the size obtained, we cut out a steel plate 3 mm thick. Its length should be less than the depth of the body by 150 mm.
Stepping back from the short edge of the plate 100 mm, we weld a transverse partition 150 mm high and fit it in shape to the cylindrical body so that the plate is directed towards the center of the furnace. We install in place and weld the plate, forming a residual combustion chamber.

Potbelly stoves with vertical loading have a different principle of operation. The direction of combustion is opposite to the natural one - from top to bottom. The stove itself has a syringe device, the piston of which is made of sheet steel, or a lid from a barrel or cylinder with bent edges. It is important that the “piston” enters the body as tightly as possible.


From the bottom side, several spacer ribs are welded onto the plate from a conventional corner of 50 or 75 mm. A hole is cut out in the center of the plate and a 75 mm pipe is welded through which the required minimum of air will flow. The principle of operation is clear: the piston sags under its own weight as the firewood burns, leaving a small space for pyrolysis decomposition. The air flow is controlled by a damper at the end of the pipe.
Simple and convenient "ash pan"
In a potbelly stove of long burning, an ash pan is not needed, a small amount of light ash after combustion remains directly in the firebox. But it is still possible to adapt the stove for easier cleaning, especially if you plan to add coal to the firewood.
 1. Stops from the corner. 2. Grate above the "ash pan"
With a horizontal potbelly stove, you need to cut out the same plate that was used to form the upper chamber. Instead of a partition, it has the usual 35 mm corner welded transversely. In the front part, a handle is made from a thin rod. The plate is mounted on two guide angles welded along the body. To tightly adjoin the plate and exclude strong air leaks, it is recommended to do this:
- weld the corners under the bottom of the plate with the shelves up on small tacks that are easy to beat off;
- insert the plate into the body and weld the corners to the walls, filling the thick weld well;
- insert scrap into the lower chamber and undermine the plate, if possible, clean up traces of welding.
Through small gaps, the minimum of oxygen necessary for combustion will enter the chamber.
 1. Disk. 2. Reinforcement holder. 3. Side "ash pan"
For a vertical potbelly stove, you need to cut out another flat disk and weld a piece of thick steel reinforcement to it in the center. Along the perimeter of the circle, a side of a steel strip is bent and welded. In both cases, the removal of ash is carried out after the potbelly stove has cooled down: the ash pan is removed, cleaned and put in place before a new bookmark.
Installing the furnace door
We grab a steel strip to the body of a horizontal potbelly stove and wrap it around, forming a ring. It is necessary to cut the edges several times so that after welding such a mandrel sits very tightly on the edge of the body. The ring is welded to a cut lid from a barrel or cylinder, or to a steel sheet, then the seam is carefully scalded from the outside. The strip should protrude above the plane of the lid by about 12-15 mm, this is enough for a tight porch, at the same time, the firebox will open relatively easily.

Several steel plates are welded on the inside of the door, forming grooves for the internal partitions of the firebox. The door itself, due to the annular porch, must be installed on a remote canopy, respectively, the clamping lock must also be moved to the side by 40-60 mm.
 1. Cover. 2. Air duct with damper. 3. Canopy

When loaded vertically, the lid plays the role of the outer wall of the afterburning chamber, so it does not require careful sealing. The edges of the vertical body are bent inward with a hammer, on the contrary, the side of the lid needs to be flared a little. In this case, it is important not to bend the cover itself, then the abutment will be tight under its own weight. A hole is cut in the center 1-2 mm larger than the diameter of the air supply pipe.

Chimney channel and draft adjustment
Removal of combustion products to horizontal potbelly stove carried out in the upper part and as close as possible to the firebox lid. For the chimney, it is recommended to use a pipe with a diameter of at least 150 mm. Air is supplied through a sleeve welded through the door, which enters the lower chamber by 70-100 mm. To adjust the air supply, it is better to use ready-made blocks with a damper. Quickly and on the spot, a small bolt can be welded to the pipe from the outside, which will tighten the butterfly valve.


The chimney of a vertical potbelly stove cuts into the same place in the body, but now, accordingly, it is located horizontally. If you drill a through passage and pass a stud through it, on which a round plate is fixed, you can get a damper to adjust the thrust and fully control the combustion process.


A potbelly stove is an ideal solution in conditions when it is necessary to provide heating for small-sized premises (garage, utility room, bath heating), spending a minimum amount of money. You can save money by using materials that almost everyone has, as well as by the ease of doing it yourself. Next, we will consider what a potbelly stove can be made of and give specific drawings.
What tool is needed?
Regardless of the selected drawing or design features potbelly stove, for work on its manufacture, in addition to materials, you need to prepare the following tools and equipment:
- A hammer.
- Bulgarian.
- Welding.
- Drill.
- Drill.
- Brush.
- Chisel.
- Pliers.
- Roulette.
It is understood that each of the listed tools is designed to work with metals.
Choose a view and get started
Potbelly stove can be made by hand from:
- Sheets of metal.
- Pipes.
- Can.
- Gas bottle.
The type is selected from the availability of materials, as well as the preferred complexity of the work performed.
Potbelly stove from sheets of metal
Here are the features of making a stove from metal sheets that use different raw materials for heating: mining and firewood.
Furnace in production
To start working with your own hands, a metal sheet of about 5 mm is prepared (it is this width that allows the stove to warm up quickly and effectively heat the garage) and pipes (needed for a chimney and some other elements). For a more accurate understanding of the manufacturing principle, see the drawing: 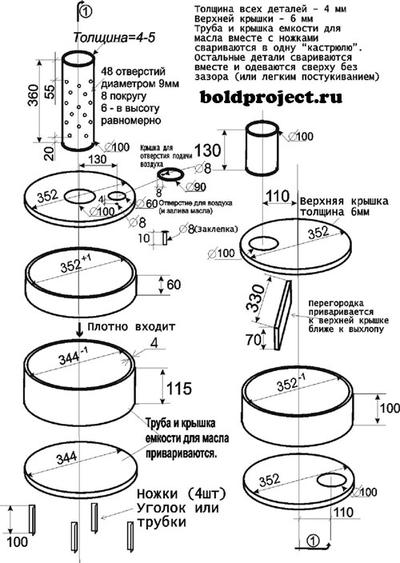
Let's get started:
- According to the given dimensions, it is necessary to cut out the elements from the sheet, from which the furnace will be made. Try to clean up the cut edges as much as possible.
- A part is being prepared for attaching the components of the potbelly stove - a pipe with holes.
- Parts of the upper tank are being prepared for the installation of a chimney pipe. To do this, according to the data given in the drawing, make a hole shifted to the left in relation to the center. Also, another hole is made at the bottom of the tank (shifted to the right) - it is intended for installing a connecting pipe.
- The constituent parts are welded together and a finished tank is obtained.
- The lower tank is welded in the same way. Only a hole is made to install the pipe in the center. You also need to make another hole with a slight offset - processing will be poured into it. A special sliding cover is made above the filling hole.
- The lower tank is attached to the upper one (they are welded to the connecting pipe). Structural strength should be given with brackets.
- Don't forget to lower tank weld the legs.
- To increase the service life, the furnace is cleaned and painted.
Attach the potbelly stove to the chimney and try to heat the garage. To do this, pour fuel into the lower tank and set it on fire. When it flared up, you need to close the processing hole with a sliding lid.
Important: To paint the structure, use special heat-resistant paints.
Rectangular wood stove
This option is suitable when you need to heat a garage or sauna rooms designed for relaxation.
The features of the model, the manufacture of which we will describe further with our own hands, lies in the high heat transfer and the ability to adjust the traction force.
Our oven will measure 45x45x80. Such dimensions are enough to heat the average room. It will fit long firewood and is easy to move.
In this case, we will not give a specific drawing, and will try to explain as much as possible in words. Before starting work, we buy:
- Steel 3-4 mm thick. A sheet and a half by two meters will be enough.
- Piece of pipe. Choose from diameters from 90 to 100 mm. Length: 0.4 m.
- Rebar 16 mm. You need exactly 6.2 m.
- Five kilograms of electrodes.
- Four door hinges.
- A steel rod, half a meter long and about 10 mm in diameter.
- Seven meters of a corner with a 40 mm shelf. The walls must be 5 mm thick.
When everything you need is prepared, we begin to work with our own hands in the following sequence:
- The future walls of the structure are cut out of the sheets.
- The corner is welded in such a way that a frame is obtained. When performing this and the first paragraph, you need to remember the above dimensions of the stove (45x45x80).
- The reinforcement is cut and welded to the frame with an interval of 2 cm.
- The finished frame is scalded with tin.
- According to the diameter of a smooth bar in the pipe section, which will be the chimney, 2 holes must be made. The pipe is welded to the frame (before that, you need to make a hole under it).
- A curved rod is inserted into the chimney openings. It must be in the form right angle. A piece of round tin is welded to it, slightly smaller in size than the inner diameter of the chimney - it will be used for adjustment.
- The potbelly stove must have doors. They are cut straight out of the body. Loops are welded onto the removed piece of metal, with the help of which they are attached to the furnace.
- Bolts and handles are installed on the doors, which can be made by anyone. comfortable look. The main thing is that they guarantee the maximum fixation of the door (if you do not want to burn down the garage).
- When the work is finished, you can check the result of the work with your own hands and start heating the garage.
Important: To ensure traction, the doors are attached so that there are small gaps.
Potbelly stove from a pipe
This option implies the simplicity of doing the work with your own hands and an aesthetic appearance, which will allow you to heat not only the garage, but also small rooms in the country.
Work algorithm:
- The pipe is taken and cut to the desired length.
- 2 holes are cut in the side part: for the ash pan and the firebox. The distance between them is approximately 15 cm.
- The cut out parts of the metal will serve as doors. Their size increases with the help of welding on top of metal strips. You also need to immediately install the handles that secure the door.
- Corner brackets are welded inside the future stove (the grate, welded with your own hands from reinforcement or bought in a store, will be held on them).
- The grate is installed.
- In the circle of metal that will close the pipe opening (the upper part of the potbelly stove), you need to make a hole for attaching the pipe (chimney).
- The bottom and top of the stove are brewed.
- The pipe is welded.
- Hinges are welded and doors are installed.
- The furnace in the places of welding joints is cleaned and painted with special paint.
- The last stage is the connection to the chimney brought outside the premises.
If everything is done correctly, the potbelly stove will be able to completely heat a garage or other small room.
can stove
From any old can, a potbelly stove can be made with your own hands. For this you need:
- Can.
- Piece of pipe.
- Armature or wire.
Let's get started:
- On a can installed in a horizontal position, we mark the location of a rectangular blower. It must be placed under the cover.
- Cut out a hole for the chimney. It can be in the bottom or wall.
- We make a grate. It is easier to make it from steel wire, which, in a bent form, is brought into the middle of the future stove and straightened. It is necessary to arrange the zigzag in such a way that it is most convenient to fill the potbelly stove with firewood.
- We attach the legs.
- We weld the chimney.
The design implies a minimum of manufacturing costs and you do not need to have professional skills to perform the work. With its help, you can safely heat the garage and other utility rooms.
Gas cylinder stove
If you have a gas cylinder lying around on your site, use it to create a potbelly stove.
Work sequence:
- Cut off the faucet and make a hole plug.
- Cut a hole in the bottom for the door. From the resulting piece of the bottom, with the help of scalding it with a strip of metal, doors are made.
- A lock-handle is attached to the doors and they are mounted on the cylinder using hinges that are welded.
- In that part of the cylinder, which will be the bottom, you need to make a grate. To do this, it is enough to make holes.
- A tin box is welded under the holes in the bottom, into which soot and waste will fall. Doors also need to be made in front of the box - they will be used to adjust the thrust.
- The stove must be raised from the ground with the help of legs. For their manufacture, an ordinary pipe is suitable.
- A chimney is welded into the upper part of the cylinder.
- If necessary, a hob can be arranged on the surface of the structure.
Such a stove will heat a garage or a small house in the country.
A potbelly stove is a fairly simple device for heating rooms. When doing work, remember that the oven must not only heat, but also respond minimum requirements fire safety.