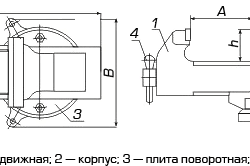
Making homemade locksmith vise. Homemade locksmith vise: video, photo, drawings How to make a curved vise
The vise seems to be an important tool to help organize locksmith work. They allow you to properly organize any operation related to the exact observance of dimensions that require the concentration of attention and composure of the master. Any detail can be firmly fixed in the desired position, thereby allowing its owner to concentrate on work.
Locksmith vise is designed to clamp the product in the process.
A vice in any workshops is used especially actively, because it is impossible to imagine the processing of wood or electrical devices without the use of holding devices. Homemade locksmith vise can be made independently. How to do it right? To answer this question, you should study the varieties of this clamping mechanism, the components and elements of the device.

Types of vices: A - metalwork; B - machine tools; C - manual.
Machine vices are used for rough fastening of parts, the processing of which is associated with the following activities:
- drilling recesses;
- base grinding;
- finishing the coating with a file;
- gluing elements;
- milling of the outer layer.
Machine vices allow you to strengthen the workpiece with the support of the following elements:
- screw with holder;
- wedge constipation;
- diaphragm;
- pneumatic mechanism;
- eccentric.
An example of elementary devices will be the first item, which allows you to create one of the primitive structures.
Read also:
What and why is needed.
On one's own.
To strengthen the part in the desired position, it is attached to workplace. In the house, an ordinary table serves as such a coating. Traditionally, machine vices are represented by such elements as:
- bearing body;
- main lead screw;
- handle and nuts;
- a device that allows you to attach a vice to the desired point;
- set of heads, including flattened jaws, fixing rounded parts.
Such homemade products most often have two slats, one of which has a movable base. Its movement is associated with the operation of the main lead screw. The second part is fixed, it allows you to fix the base of the device on the table. The holder helps move the clamping structure.
Back to index
Tools and fixtures
For the manufacture of a bench vice, you will need: a hacksaw, a drill, a hammer, a tape measure, etc.
To cope with the task assigned, namely with the independent manufacture of locksmith structures, you must be able to handle elementary tools:
- Metal rod with cross section in 20 mm.
- Iron pins for making handles and hairpins.
- Wood from pine and birch.
- Steel plates.
- Hacksaw.
- Electric drill.
- Rotate.
- Bolts.
- Hammer or small sledgehammer, file.
- Roulette or ruler with a metal base.
Back to index
Independent production of locksmith vice
You can make a machine vice yourself by making a lead screw or by purchasing ready-made samples. Its length corresponds to 140 mm, and the thread is M20. Similar elements are available on structures for sports purposes. For self-manufacturing you need to buy a strong steel rod, its diameter is equal to 19-20 mm. The thread is cut by hand or made in a special workshop on lathe. In this case, you can count on more accurate measurements.
In accordance with the specified thread dimensions, the distance between the jaw holders is 75-80 mm. These dimensions are suitable for a personal production device. A cut must be made at the top of the screw to secure the holder. When using this element from a sports plan projectile, such a hole is available in ready-made, you just need to slightly increase it with a rounded file. The use of a self-made bolt gives rise to the construction of such an opening with a drill with a calibration corresponding to 8-9 mm. The handle can be an iron pin 10 cm long. For its reliable fixation, it is necessary to make openings of 5 mm along the edge, cut in the thread and screw in the M5 screws, their length is 3.5-4 cm.
After that, the machine vice must be equipped with studs in the amount of 2 pieces. In this case, the fixing elements are taken from the mirrors of the scooter. Most often they have a slightly curved shape, which can be corrected with a hammer or a small sledgehammer. The studs will allow you to move the moving sponge. They can be made independently from a steel bar with a transverse position of 8-10 mm. A hacksaw cuts off small elements from this iron pin. The edges must be filed.
To hold the machine parts in the devices under consideration, sponges are used. They can be made of wood, provided that items that do not contain any of the metals are used as an example of fixing parts. Pine boards can serve as such material, their height is 40-50 mm. They will be required for the manufacture of an immovable sponge, it is immediately fixed to the surface of the table. Of course, this is done if the structure will not be moved to another location. To build a movable element, take a birch board 50 cm long and 18-22 cm high.
Then recesses are drilled with a feather drill for the bolt, the studs allow the use of an ordinary drill, the diameter of the tip is 10 mm. Then the design is drawn up: the studs and the lead screw are fixed in the holes made, the washers and nuts are placed in the right places. The assembled mechanism can be operated in full.


If you have to change your workplace several times a day, you can equip each of them with a personal, home-made, do-it-yourself vise. Their design, like everything ingenious, lies on the surface and is simple but very effective, like much of what the famous home master V. Legostaev offers.
Any self-respecting do-it-yourselfer has a vise. However, a real full-fledged tool today is not only expensive, a good vise is also bulky and heavy. My workshop is actually the whole site: I have to work in different places, and the vise is needed very often. It turns out that you need to drag a heavy tool every time or run back and forth all the time to process details.
Vise=Two tubes
It is known that gas and water pipes are produced in such a way that any pipe must fit tightly inside the pipe of the next size. Given this, I decided to take two pipe trimmings of two adjacent sizes. I inserted it into a large pipe and, using electric welding, attached it to one of the ends
flange with large diameter nut - M16. On a smaller pipe, I installed a similar flange with a nut using the same electric welding, but bigger size-M18. The M16 threaded stud in such a hole should rotate smoothly.
It was to this stud at a short distance from the end that he installed a nut, which he securely fixed with the help of electric welding. After that, I inserted the threaded stud into the cavity of the small pipe so that the fixed nut was inside the pipe and rested against the flange with a large hole. I screwed another nut onto the protruding end of the stud and also fixed it by welding. Between the flange and the nuts, I pre-installed intermediate sliding washers. Now screw the end of the threaded stud that is sufficiently sticking out of the pipe into the nut of the large pipe. It turned out the main working element of the vise. It only remained to install the pressure plates (sponges) and support plates (paws) on the vise. I made sponges from a square pipe, paws from a corner. And the vise is ready!
For ease of maintenance, a nut was welded to the protruding end of the threaded stud in such a way that, by inserting any rod into it, it was easy to rotate the axis and control the vice.
Do-it-yourself vices have disadvantages
When working on such a vise, the inner tube can rotate behind the pin, but this does not scare me at all. You just need to hold this pipe in the right position when fixing. Yes, and it is not difficult to eliminate this drawback - it is enough to install a latch.
It is even easier to make a vice from two pieces of similar size square pipes. All technology remains the same.
Do-it-yourself vice - photo
Do-it-yourself vice: drawing
 1 PC. A3-A5 LED luminous drawing graffiti drawing board ...
202.24 rub.
Free shipping★★ ★★ ★★ ★★ ★★ (4.20) | Orders (114)
 A3 A4 A5 LED Luminous Drawing Graffiti Drawing Board ...
If necessary, making a suitable vice with your own hands is easy. The point is not only that the tools offered by manufacturers are expensive, bulky and heavy: they often do not meet the needs of the home master. This is especially true when needed high accuracy parts, strict parallelism or perpendicularity of their surfaces, the ability to easily move the vise from one place to another, etc.

Figure 1. Locksmith vice V. Legostaev.
Precise drilling of holes, high-quality processing of workpieces, holding them with hands or pliers, is very difficult, and often simply impossible. Need a vise. Convenient work with wooden products, woodcarving is impossible without a carpenter's vice. Both of them do not have to be bought in a store - if you have the appropriate skills, it is not difficult to make them yourself.
Homemade locksmith vice

This simple, light, but at the same time very effective design was developed by the famous home craftsman V. Legostaev. The operation of the proposed model is based on the fact that water and gas pipes are produced in such a way that a sample of a given diameter fits snugly into the product of the next size.
On fig. 1 shows its device. The individual structural elements are indicated there by the following numbers:
- The inner (moving) part of the vise is a piece of a water pipe.
- The outer (fixed) part of the vise is a piece of pipe of the next size.
- Lead nut (M16).
- Lead screw (M16).
- Vorotok.
- Front support.
- Back support.
- Clamping jaws - pieces of a rectangular pipe.
- Fixing nut (M16).
A flange with a nut having an M16 thread (3) is welded to the end of the pipe section (2), which is the outer, fixed part of the vise. The same flange with a larger nut (M18) is welded to the end of the pipe section (1), which is the inner (moving) part of the vise. This nut on the inner surface of the flange serves as a kind of bearing for the stud (4) with M16 thread.

Elements of the design of a vise made of metal.
A fixing nut (9) is screwed onto the left end of the threaded stud and fixed in this position by welding. Washers are installed between these nuts and the flange to reduce friction. The right, long end of the stud is screwed into the nut of the large (outer) pipe. A thick washer or nut of suitable size is welded to the left end of the stud, into the hole of which a knob (5) is inserted. With it, you can conveniently rotate the axis to control the vise. As a result, the main working unit of the proposed design will be obtained.
Sponges (8) made of sections of rectangular pipes are attached to the inner and outer pipes by welding. To get the finished design outer pipe supports (6 and 7) are attached. They can be made from a metal corner and rectangular pipes. Homemade vise ready.
In order to prevent the inner pipe from rotating, it is possible to make a longitudinal slot in the outer one and screw it into inner part fixing screw. This will not be necessary if sections of two similarly sized square or rectangular pipes are used as the outer and inner parts of the main assembly.
Back to index
Homemade carpentry vise
In the home workshop for a workbench on which to process wooden crafts there is always a place. Doing this by placing workpieces on a workbench or fixing them with clamps is not always convenient, and sometimes impossible. This is especially true for the processing of the ends of workpieces, since the metal spoils the surface. wooden parts leaving marks on them.

Figure 2. Homemade carpenter's vise from bars.
And this means that you can’t do without a carpentry vice, and in order not to spend money, you can also make them yourself. An example of such a design is shown in Fig. 2. The body (1) is usually attached to the tabletop of the workbench, and the movable plate (2) moves along the guides (3). The movable plate moves due to the rotation of the screw pin (4), which is screwed into the fixed nut fixed on the reverse side of the vise body.
The carpenter's vise is attached to the workbench with long screws or bolts with nuts. Overlays - wooden, plastic or metal can be fixed on the vise jaws. Without them, damage to the workpieces during processing is possible. This is especially important when working with soft woods.
One of the main units is a screw pin (4) with an M20 thread. You can order it in the workshop or look for it in a sports store. The longer it is, the wider the sponges can be spread. With a thread length of 15 cm, they can be separated by a distance of about 8 cm. To attach the handle, a hole of a suitable diameter is drilled at the end of the screw. You can try to find blanks for making guides (3) in a hardware store among fasteners or at a flea market.
Sponges (1 and 2) are made from two pine boards. A hole for the screw and guides is drilled in each of them. For accuracy, it is better to connect the boards before drilling them, for example, with nails, which are then carefully removed. For processing long workpieces, a vice with longer jaws and two clamping screws can be made.
Thus, it is really easy to make a metalwork or carpentry vice with your own hands at home.
And having become acquainted with the principle of operation and the structure of the proposed clamping devices, it is quite possible to develop your own design.
A vise is one of the most important tools in any workshop. It allows you to expand the range of work and increase efficiency: thanks to them, the hands of the master are free, and the processing of parts is carried out on high level and without outside help. Few people know that enough high-quality vise can be made by hand. It is only necessary to show a share of ingenuity, skills and attentiveness. Next, about the intricacies of the tool creation process.
Vices are widely used in construction work as a holding tool for various parts. The product in question is presented in the form of a base (body) with two clamping tubes that allow you to firmly hold the part during milling, planing or drilling.
A vice is considered one of the main locksmith tools, because the quality of their final processing will depend on the strength of fastening parts. In addition, such a product frees both hands, thus allowing you to carry out certain processes as accurately as possible.
Depending on the operational features, the vise is divided into two categories: carpentry and locksmith. The latter, in turn, are divided into rotary and static. Static locksmith vise are chair and parallel. The former do not have elements for permanent fastening and are more easily mounted / dismantled. The latter differ more overall dimensions and are firmly attached to the work surface.
Locksmith vices are designed primarily to work with enough soft materials: plastic, wood, etc. They have high clamping jaws that are either fixed statically or rotated on the base.
Machine tools are designed to work with hard materials, for example, metal. Their clamping jaws are less high for greater convenience and work efficiency.
Making an instrument at home
To make a vice with your own hands, you need to prepare a certain set of materials and tools:
- metal plates;
- pins;
- boards;
- Metal rod with a diameter of about 2 mm;
- fasteners.
From the tools you will need a minimum: an electric drill, a sledgehammer, a file and a hacksaw. With your own hands, it is easiest to make a bench vise, so the following is presented step-by-step instruction to create just such a tool:

Advice. Homemade vise can be more efficient and convenient because it is quite possible to adapt them to any specific operation.
If you plan to make a vice with your own hands, you should take into account some of the nuances that will determine the strength and durability of the tool:
- Material. Steel is most often used to create a product. It is advisable to choose high-quality, since the reliability and durability of the product, as well as its ability to firmly hold the part during its processing, largely depend on this.
- Product size. If you plan to work mainly with small parts, it is better to give preference to a compact model: it will be more convenient and easier to work with it.
- Thread pitch. Important point which is often overlooked by many. The thread should be clear and fine if spot work is planned.
- Sponges. It is important to pay attention to the size and shape of this element. The first indicator depends on the type of products to be processed, the second - on the materials of the workpieces. If you plan to work only (mostly) with soft materials, it is better to make the jaws flat.
Advice. Because you're making your own vise, you can go beyond the standard model to make the best tool for your needs. Remember that with the help of an additional option, you can make the vise more efficient in work. So, for example, the presence of a rotary mechanism in the product will allow you to work with small parts.
That's all the subtleties that you should know about creating such a tool as a vise with your own hands. As you can see, this process is quite simple, and the result of the work will please even an experienced craftsman. Good luck!
How to make a vice with your own hands: video
The presence of a vice allows you to expand the range of work, increase their efficiency. After all, securely fixed parts are easier to process, their quality is higher. Depending on the work being carried out, the characteristics of the processed objects, a vice of certain sizes and parameters is selected. These can be small models that easily fit on kitchen table, stool and more massive for large parts. Any of them, with a little ingenuity and diligence, you can make yourself.
Features of the assembly of clamping devices
A vice is used to hold various parts in a given position, which facilitates and increases the accuracy of their processing. All of them are divided into two groups: carpentry and metalwork. The latter are primarily designed to work with soft materials: wood, plastic, etc. Machine tools are used to work with hard materials, so the clamping jaws have a lower protrusion height for ease of processing products.
When making a vice at home, you can make any changes to the design of the standard model in order to optimally adapt it to your needs. For example, for processing small parts, provide for a rotary mechanism. When planning to make a vice with your own hands, pay attention to the following nuances:
- Material. To increase the reliability and durability of the product, high-quality steel is chosen.
- Product size. If you have to process mainly small parts, then it is better to make a compact model.
- Thread pitch. The fine thread ensures efficient clamping and smooth running.
- Sponges. Their size and shape are chosen taking into account the material, type of workpieces. Flat jaws do less damage to soft materials.
Tubular vise design
Homemade clips can be made from any improvised materials. For example, the construction of metal pipes. To do this, it is necessary to select pipes in such a way that one of them fits snugly into the other. Productsmust be solid-drawn without an internal weld. The size is arbitrary, since it is selected based on the purpose of the clamping device and the characteristics of the workpieces.
The production order will be as follows:
- From the bottom of the pipe of a larger diameter, which will serve as the basis of the structure, supports are welded. On the back - back wall made of steel sheet 3-5 mm thick, pre- drilled hole and welded running nut. Opposite the front support, a rear fixed jaw is welded at the top point.
- On the outer side of the movable pipe, another steel plug 3-5 mm thick is welded. To move it, a mount is made from a stud, lock nuts and thrust washers. At the protruding end of the stud, an eye is welded to insert the collar. At the top of the movable tube is attached to the front sponge.
- At the final stage, hardened steel plates with pre-cut notches are screwed onto the jaws. Their presence will increase the clamping area and ensure reliable fixation of the processed objects.
For ease of movement on all moving parts: surface inner pipe, stud thread - grease is applied, which is characterized by low fluidity.
Similarly, clamps are made from a square or rectangular profile. Their main advantage is the longitudinal movement of the moving part in the absence of rotation, which is typical for a tubular structure.
Vise from the corners
Simple locksmith vise can be made from metal corners of any size. In addition to them, you will need the following materials and tools:
- a metal rod with a diameter of 20 mm for the manufacture of a lead screw;
- pins for guides in the amount of two units, but in a simpler design they are not used;
- bolts, nuts, washers;
- electric drill, welding machine, hammer, file, hacksaw.

The sequence of actions will be as follows:
- A lead screw is made from a rod. Since it is difficult to make a screw of the required characteristics at home, it is better to entrust this operation to specialists.
- A base is created from two longitudinal and transverse corners, in the lower part, plates with ready-made holes are necessarily welded through which the machine vice will be attached to any stable surface.
- The fixed jaw is already welded and is part of the base. Therefore, having drilled a hole of the required size (equal to the diameter of the screw) in it, a nut is welded under the lead screw. The thread can be cut directly in the body of the angle, but the nut is a more reliable option..
- The movable sponge is made separately, necessarily providing for a fastening mechanism. To do this, a U-shaped plate is welded on the reverse side. At the end of the screw, a hole is drilled for the stud, which fixes the pre-inserted washer.
- On the sides of the jaws, guide pins are fastened, but their presence is not a prerequisite.
On the last step, fixing ready product to the working base, check the operation of all mechanisms.