Design of paving slabs in the courtyard of the house. The right technology for laying paving slabs: from the layout of the courtyard of a private house to completion. Paving slabs FELDHAUS KLINKER
Exist various options arrangement of the yard in a private house. Some provide the aesthetics of the territory of the house, others make it functional. The most popular way to decorate the yard is to use paving slabs. This solution is practical and at the same time quite nice.
If you decide to decorate the courtyard of your house by creating a coating from this material, then this is a completely reasonable decision. However, if this is your first time facing such a challenge, then you will probably have a question about how to lay paving slabs correctly. In order not to be mistaken with this, you need to familiarize yourself with general principles this case. This will be discussed in this article.
Material Advantages
Today, paving slabs are the most common material for paving sidewalks and laying out garden paths, as well as areas near private and country houses. Such popularity of this material is mainly due to the benefits it has. The main ones include the following:
- ease of installation. If you use paving slabs to decorate your yard, then you can do all the work on your own, without involving specialists;
- this material is distinguished by a variety of shapes, colors and structures. A person who purchases this material for the first time is faced with the problem of choice, since the range of paving slabs is quite large. However, this has a certain plus, since it is possible to implement any design solution with the help of this material, to find an option that will be in perfect harmony with the features of the site. This gives the owner the opportunity to create unique design which will be practical and at the same time pleasing to the eye;
- moisture protection. Even with heavy rainfall, puddles do not form on paving slabs. Water flows gently without changing appearance coatings;
- durability. The coating of this material is able to withstand heavy loads for decades, while maintaining its performance characteristics;
- simplicity repair work. If damage occurs in the process of using paving slabs in a separate area, then the owner will not have to change most of it. All that needs to be done is to replace the damaged elements. This work, even for a beginner, will not be a great difficulty;
- environmental friendliness. Under the influence of high temperatures, asphalt begins to release harmful substances that adversely affect human health. However, this does not apply to paving slabs, which, regardless of the temperature acting on it, continue to be an environmentally friendly material.
disadvantages
However, paving slabs cannot be called an absolutely ideal material, since for it have certain shortcomings. True, we note that they are insignificant.
Before making a choice in favor of a tile, you need to familiarize yourself with all its advantages and disadvantages, and after that, carefully weighing everything, make a final decision.
Preparing for styling
There are a number of steps that must be completed before actually laying the tiles. One of them - territory preparation for the subsequent creation of a covering from paving slabs. It involves the implementation of certain activities.
Before starting laying the material, it is necessary to remove the turf from the area where the coating will be created to a depth of 15 cm. Then the cleared space should be cleaned. Seeds and plant roots should be removed.
If clay soils predominate at the place of laying the coating, then in this case the device is mandatory. drainage system. It is necessary to make a slight slope, due to which water will drain from the coating.
After that it is necessary perform a competent ramming using hand tools. For example, you can use an ordinary log, which will do an excellent job with this task.
Then you need to prepare concrete pad on which curbs or stones will be installed. When the pillow is created, the prepared stones are laid out, which will indicate the boundaries of the coating.
Base for paving slabs
When the surface for laying paving slabs is prepared, you can lay out the material in the yard. And then you need to start preparing the foundation, on which then it will be material is laid out.
Laying tiles
Laying tiles is a rather difficult moment, especially for a beginner. Many people are interested in the question of how to properly lay this material. First you need solve the drawing problem which you want to have on the cover. It must be marked in advance in the prepared area. It is necessary to pull the cord so that the layout is carried out as evenly as possible. Experts recommend installing tiles diagonally away from you. When laying paving slabs, it is necessary to ensure that the particles of the future coating fit snugly together.
Main stages

Installation nuances
Paving slab laying may seem like a simple task. However, not everything is so simple here. There are certain subtleties that you should be aware of. Let's take a look at the most important details below.
- Doesn't have of great importance what paving slabs you decided to lay out in the yard. The material almost always does not fit evenly. At the end of the work, unwanted waste remains - wasted money. Therefore, they should be included in the price so as not to spend too much. Most waste occurs when parallel tiling is performed. It is best to lay the material diagonally. This will save money on material.
- If you are faced with the task of fitting the plinth to a certain shape, then it must first be cut with a grinder, and then broken off. Cutting the tile to the end is not the best solution, as this leads to more dust that will have to be removed from the surface.
Conclusion
 Many owners of private country houses want to have beautiful yard area. This is pretty easy to achieve these days. Thanks to paving slabs, which is a common material, you can easily transform the courtyard of a private house, as well as paths in parks and sidewalks.
To many, laying this material may seem like a simple process. However, it is not. There is certain nuances that you should be aware of. First you should get acquainted with the technology of laying the coating from this material, and only then engage in independent laying of paving slabs. In this case, you can avoid mistakes and get a beautiful yard that will please the eye for many years.
Beautifully and evenly laid paving slabs in the yard are not only an aesthetic exterior of the site. but also the practicality of operating garden paths and sidewalks. Despite the simplicity of laying technology, you need to know it thoroughly, only then high-quality tile laying will turn into a durable surface. Therefore, let's start with the advantages and disadvantages of this material for paths and sidewalks.
What is the tile made of?
Products have two working layers: front and main. These layers differ in composition, and a solution is prepared for each of them. The mold for casting one product is first filled with a face solution, which as a result should have a glossy surface, be resistant to abrasion and have a thickness of ≤ 1.5-2 cm. The remaining volume is filled with the main composition - the substrate.
The solution for the front layer is done like this:
- Portland cement M 500;
- A mixture of sand and crushed stone is being prepared in a ratio of 1: 1, and the crushed stone should be fine (screening out), gravel or granite crushed stone with a grain size of ≤ 5-10 mm can be used;
- Clean industrial water;
- Dyes;
- Dispersant (a solution that consists of two or more substances that do not mix with each other and do not react with each other). Used to improve fluidity concrete mix paving slabs, accelerating the hardening process and obtaining a glossy surface.
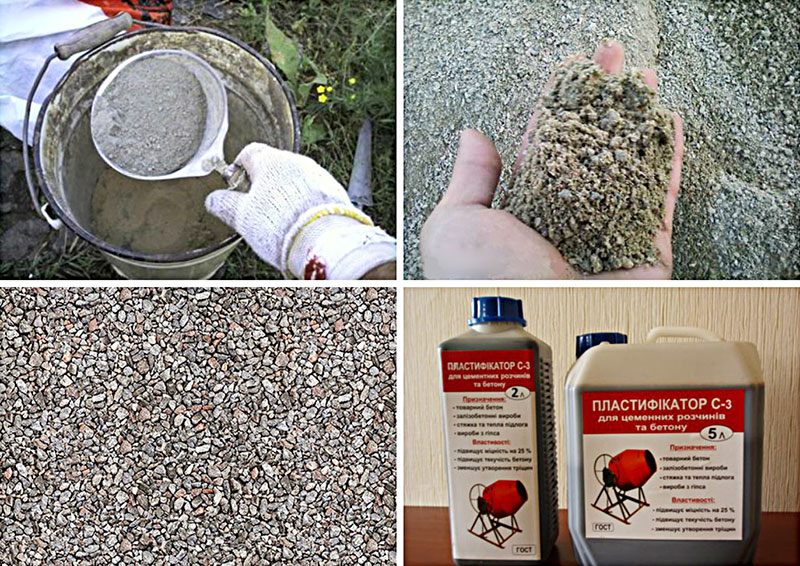
The most widely used dispersant is the NF plasticizer (it contains formaldehyde naphthalene), the substance is produced in two varieties: A and B, and C-3 plasticizer can also be used. Both of these brands excellent result, but grade B of the NF dispersant is more expensive, as it has a more complex composition.
Preparing the mixture for adding to the tile mortar in the yard is quite simple: the dry powder must be mixed with water heated to 60 0 C, the proportions are 1 part of the powder and 4 parts hot water. Consumption: 1 liter of ready-made dispersant solution is poured into 50 kg of Portland cement. After preparation, the mortar may cool down, and it is not necessary to heat it up before adding it to the concrete mixture. The storage time of the dispersant is no more than 5 days. Consumption of dispersant powder for cement mass - 0.5-0.7%. When preparing a dispersant, be sure to use the means personal protection(PPE) to prevent dust from entering the respiratory tract and on the skin.
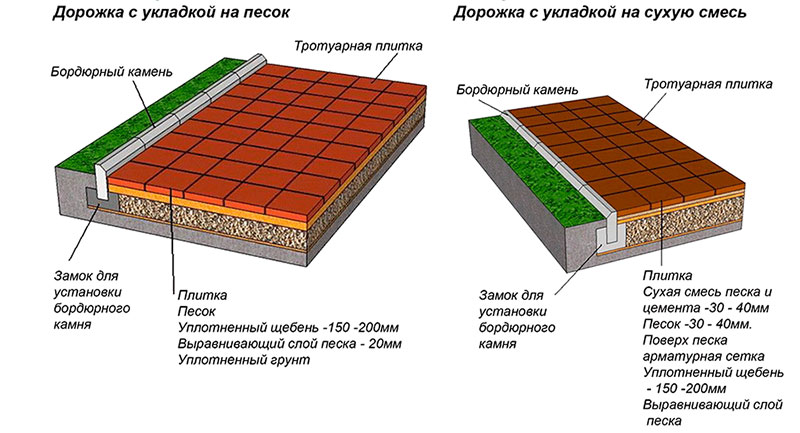
After the preparatory work lay the tiles on the construction site so that they are easily and quickly accessible from all sides. Next, prepare the surface of the base for laying tiles:
- Pour 5-7 cm of clean sand or fine gravel (screenings) onto the soil without sod. Sand is preferable, as it retains moisture better;
- During the construction of a garden or pavement on a site with heaving or slightly heaving soil, two or three layers of geotextile material are also laid on the sand, which will improve the quality of waterproofing;
- From above, geotextiles are covered with a layer of gravel or crushed stone of medium grain size - up to 20 mm and a thickness of up to 10-15 cm, no more. After filling this pillow, it is moistened and rammed, and a layer of sand of the same thickness or a little less is poured on top (you need to look at the depth of the excavated turf layer - usually 25-30 cm - to the depth of the shovel bayonet). The sand is leveled with a rule or a wooden block;
- You can not pour sand, but lay reinforcing tiles as a strength enhancer for the future surface of the track. It is also possible to fill a crushed stone or gravel cushion with a concrete solution up to 10 cm thick, so that after it hardens, start laying paving slabs on it.
Despite the fact that the statement that laying paving slabs is a simple matter, for a novice builder it will present a certain difficulty. Before laying, you must have a laying scheme ready according to the developed pattern or pattern. If the tile is plain, then the whole process is much simpler. The pattern or pattern should first be marked on the prepared surface (on the sand), and the edges of the track should be marked along the stretched cord. If the track has a curvature, it is recommended to prepare patterns (templates) for constructing the angle of rotation. The tile is laid away from itself, the seams between the products should be minimal, but taking into account the fact that the tile may differ by 1-2 mm in the dimensions of the sides.
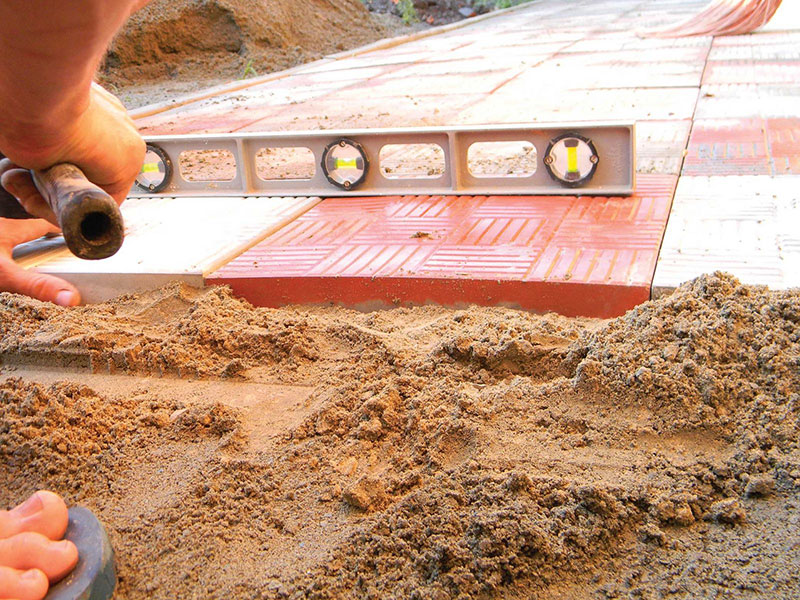
- Constant monitoring is carried out with the help of building level- to level the common surface, you need to use a rubber or wooden mallet so that you do not break the tile with a metal hammer. If the tile, on the contrary, is sunk into the sand, it is taken out, a little sand is poured in, laid back and driven in with careful blows to the general level. It is easier to check a large surface for evenness not with a level, but with a wide bar or rule;
- After manual laying of tiles over a large area, it is desirable to compact it with an electric vibrating plate;
- Flat surface does not mean horizontal. Observe the general slope of the sidewalk to the side storm sewer or a drainage system so that water can quickly and freely drain from the track;
- After laying the entire track, it is sprinkled with dry cement - iron. Cement, getting into the cracks between the tiles and getting wet during operation, provides a dense and durable sealing of the cracks. If rain is not expected in the near future, the tiles sprinkled with cement are forcibly moistened.
Schemes for laying tiles for paths and sidewalks
And finally - about some of the intricacies of laying tiles:
- When making an expense estimate, do not forget that there will be waste - broken, defective products, cut tiles, calculation errors. Therefore, it is better to play it safe and order or make more tiles, as well as include increased costs in the estimate. There will be more waste if the tiles are laid in parallel, so it will be much more economical and more beautiful diagonally;
- If the tile needs to be cut (and this will have to be done anyway), then it is better to do this by cutting the surface along the seam with a grinder to a depth of 2-3 mm, and then split the tile with a light blow of a mallet. It is not recommended to cut the tiles to the full depth, as there will be more dust, and even cut ends will still hide in the sand.
Paving slabs for paths in the country are made from the most different materials. Rubber, wood, stone, concrete - all have their own pros and cons, different types, the nuances of manufacturing and the specifics of styling, which you need to be aware of in order to be able to choose. The more knowledge, the easier it is to choose the material that is suitable for your dacha, making the area around the house not only utilitarian, but also beautiful.
You also need to take into account color, shape, size, styling methods, and other nuances with which you can turn design planning into a creative process and search for beautiful combinations. But it's easiest to start with materials.
Varieties of tiles
Before buying, it is important to take into account all the nuances of a particular type. Consider the most relevant tile options.
plastic
Plastic is the cheapest existing materials in any area. It does not require complex processing, polymers are cheap for it, and the performance properties are not too high as a result, but the price compensates for them.
There are different types:
Modular. Looks like cellular lightweight tiles bright color, which has special fasteners to tie disparate modules into a single canvas. The material is pure plastic. The cost is very low. It looks cheap, in two or three years it becomes unusable, because it is unstable to temperature extremes, it easily cracks from frost, and melts from heat. It has a specific advantage - it will not be possible to slip on it if it is not completely covered with ice.
Polymer sand. It looks like solid plastic tiles in a bright color, also with fasteners. Material - plastic mixed with sand in different proportions. The cost is small, but more expensive than modular. It also looks cheap because the plates look plastic. Not suitable for an old wooden or stone house, it would be appropriate only for a house sheathed with siding. More resistant to temperature extremes and lasts longer. It has a specific disadvantage - it is very easy to slip on it, since the surface remains smooth.
decking. It's also a deck board. It looks like a wooden parquet, consists of two layers. Below - a modular tile with fasteners, on top - several strips with gaps to allow moisture to pass through. The material is plastic mixed with wood chips in different proportions, most often one to four. It is quite expensive, it looks respectable and beautiful, on a par with a natural wooden surface. This is the main plus - aesthetics in the absence of the main disadvantages of wood.
Plastic tiles in general have a list of advantages:
But there are also disadvantages:
- Instability to sudden changes in temperature, weather conditions. In the sun, the plastic burns out, cracks from the ice formed in the cracks, swells in the heat, and can be deformed.
- resistance to aggressive chemicals. Household acid spilled on the coating will cause it to deform.
- Instability to high weight. A person can withstand easily, but a car is no longer there.
- fragility. Wears out much faster than rubber and concrete coatings.
- Unaesthetic. In very rare cases, plastic tiles look good if they are not decking.
Advice
Plastic is a good solution if you do not want to spend a lot of time and effort on styling. You can put it near outbuildings in the depths of the site, forgetting about the problem of paths for several years.
Rubber
For the manufacture of rubber tiles use secondary raw materials - used car tires. At the same time, its price is higher not only than that of plastic, but also than that of cheap clinker or concrete tiles.
Pluses include:
- Security. Rubber - soft material falling on which it is difficult to get injured. If children or the elderly will rest in the country, rubber paths will be very convenient for them.
- Durability. Rubber slowly wears out, its service life is ten years.
- Ease of installation and repair. Rubber does not have fasteners like plastic, but it cannot break, does not require special alignment, and is easily replaced if any element of the finished track fails.
- Resistant to temperature extremes and moisture. Rubber does not melt in the sun, does not crack in frost, is completely insensitive to moisture. Doesn't rot.
- Light weight and resistance to mechanical damage. Rubber cannot be broken, cannot be crushed, it is easy to transport without thinking about accuracy. It does not crack, easily withstands the weight of not only a person, but also a machine.
- UV and chemical resistant. Will not fade in the sun, will not suffer if you spill gasoline or household acid on the track.
- Noise isolation. For tracks in the country, this factor is not so important, but if you are annoyed by loud sounds, the clatter of heels, the noise of steps, choosing rubber is a good solution, because they are completely drowned out.
But no material is perfect, rubber also has disadvantages:
- Lack of ice resistance. In summer, you can’t slip on rubber even after rain, but in winter, when ice freezes on top, it’s just as easy to fall on it as on a slippery stone path.
- Flammability. Rubber burns, although it takes time to ignite. In the process, emits black suffocating smoke.
- Possible dishonesty of the manufacturer. If the concrete tile is just going to be brittle and it will be obvious, then poorly made rubber can release harmful substances. Therefore, it is necessary to check its quality especially carefully.
Advice
Rubber is a good option to lay by the pool or in a place where children will play. But in order to give this material an aesthetic sufficient for the front yard, considerable effort will have to be made.
From natural stone
Natural stone is made simply - it is simply crushed and leveled so that beautiful shapes are obtained. Apply:
- slate;
- quartzite;
- granite;
- shungite.
For people who are not sorry for the money, there is an option to pave the paths with marble.
The stone has its advantages:
- Durability. Natural stone practically does not wear out - this can be seen on the paving stones of old cities, which were laid many centuries ago. The paths from it are actually eternal, the maximum that can happen to them after a couple of decades of rain and snow - a beautiful even shape can become somewhat more free, grass will grow between the plates.
- Natural beauty. A natural stone - beautiful material which only a tree can match. It is not painted like artificial materials, but the simplicity, naturalness of its colors in itself looks good, especially if they are chosen with taste, so that they fit the garden and buildings.
- Moisture insensitive. Nothing will happen to the stone, even if it lies in the mud or in a puddle for six months.
- Insensitivity to temperature changes, to ultraviolet, to ice. The stone does not crack, does not fade, does not melt - nothing can happen to it.
- Reliability. Stone tiles cannot be broken, a person can pass through it, or a car can drive through it - it will withstand any weight.
But of course there are disadvantages:
- Color uniformity. Yes, the natural colors of the stone are beautiful with their veins, with their different scales, with their variety of shades. But the brightness that artificial material possesses, the abundance of colors with which you can lay out any pattern or pattern, is not characteristic of them.
- Big weight. Stone is a heavy material. It needs to be loaded onto vehicle, you need to unload, you need to lay out tracks for them - all this requires human labor, time, effort. In addition, not every foundation will withstand a stone.
- High price. Natural stone is an expensive material, especially some of its varieties tend to be the most beautiful. Using a different coating can be much cheaper.
- Instability to some biological threats. Moss can grow on the stone, fungus or mold can grow. In itself, this will not harm him, but it can change the overall appearance of the track for the worse.
- Difficulty with form. Hard types of stone are difficult to cut into tiles of the same size and shape, because they are often sold in a rather bizarre form, with many angles, with irregular bends. It will take effort to make a decent path out of this chaos.
- Icing. The stone has no protection against ice; even in summer, on some of its varieties, you can slip and fall.
Advice
Stone is a versatile material. It is better not to place it near water sources, but otherwise it will look good in any area of the site.
Clinker
paving slabs, which came from Holland, invented back in the nineteenth century. It is made from clay with an admixture of dyes - first it is formed, pushing it through a hole under high pressure, then it is fired once. The resulting result is highly dense and has a whole list of advantages:
- High durability. Clinker wears out almost as slowly and reluctantly as natural stone. You can walk on it for decades before the effect is visible.
- Durability. Can last almost as long as natural stone. Neither rain, nor wind, nor the scorching sun can harm her.
- Resistance to temperature extremes, frost. No heat, no cold, no ice will affect the clinker, as well as biological threats.
- Variety of colors, shapes. Clinker is made artificially, so it can be given any color and any shape, from banal plain rectangles to fancy polygons with a complex pattern.
The cast variety is considered somewhat more fragile, but big difference between the results of technological processes.
They have the same benefits:
- Variability. Many colors, many shapes, patterns on the surface - concrete tiles are perhaps the most diverse and can even be made to order.
- Low price. Concerning stone and clinker, concrete is starting to look like a cheap solution, although of course it costs more than rubber and plastic.
- Sustainability. Does not suffer from temperature changes, is not subject to biological threats, does not fade in the sun, does not crack under ice, wears out for a long time.
There are, of course, downsides:
- Relative fragility. Concrete begins to crack and crumble earlier than clinker and natural stone - these are its characteristics. This happens especially quickly if the goods were produced in one region and are used in another.
- Installation difficulties. If a mistake was made during the installation process, it will be difficult to correct it and you will have to start from the very beginning.
Advice
Concrete is a versatile material that is suitable for any part of the site.
Planning and design
If you can choose a material, guided by a general idea of \u200b\u200bthe site and tastes, then this will not work with the rest of the characteristics. The design of the tile should match the design of everything else, it should fit into the overall concept.
To make this possible, you need to approach planning sequentially:
- Make a site plan. It is necessary to put a house, outbuildings, the largest flower beds and beds on it - everything that has at least something to do with the landscape.
- Make a plan for future tracks. Paths should lead from the house to the outbuildings and to the gates, and they should go the way the inhabitants of the house walk, and not the way it seems beautiful on the plan. Go around large obstacles, take into account "little things" like hanging over the place where the path should pass, branches.
- Assess prospects. According to the plan, you can figure out what the tile should be so that everyone is comfortable. If the site has a well or a pool, you need to take a rough texture and material that is not afraid of moisture. If the site has weak soil, which crumbles easily and does not hold gravity well, it is better to forget about natural stone. Also estimate the budget of the enterprise and whether cars will drive along the paths, think about how much the maximum temperature difference is. How much heat and how much cold will the path have to endure? How many will walk on it?
The rate of abrasion depends on how much they walk. From maximum temperatures and differential - the necessary frost resistance. If a car will drive along the paths, the tiles should be thicker. And it depends on the budget how expensive it will be.
Deciding what to be specifications, you can move on to more pleasant and complex matters: to design.
You need to take into account:
Advice
According to the norms, footpaths should be no narrower than seventy-five centimeters, so that an adult can easily walk along them.
When the plan is ready and the final laying pattern is selected, you can take on the selection.
The nuances of choosing a tile
First you need to focus on the exact characteristics. Size, shape, frost resistance, wear resistance - all this you should know before you go to the store. And already directly in the store, you need to imagine how it should look good tile how it differs from low-quality and what documents to ask the seller.
Characteristics
Each tile has a set of characteristics that you need to consider when buying. The first one is size. Exist:
- Small. This is good because you can lay out any pattern or pattern on a narrow cottage path, and also because you don't have to think too much about the foundation and whether it will hold up. But there is a big minus - it will take more work. After all, laying out three large tiles in a row is much easier than forming a row of a dozen small ones.
- Average. Universal option. The drawing will no longer work, but here is a beautiful complex pattern - completely. It is not necessary to think about the foundation yet; difficulties with laying should not arise either. Ten by ten centimeters is an example of a good medium tile.
- Big. The patterns are only the simplest, and you will have to think about the base - if it is not strong enough and even, the tile can sag on one side or crack. But if you have the strength and time to prepare, and you prefer the monochromatic beauty of a geometric order to complex patterns, this is a good choice.
The average size of the product is a universal option
After the size, you should decide what shape should be:
- Square. For square tiles, simple patterns are suitable - they can be laid out in a checkerboard pattern or create a semblance of a brick pattern. It is best if they are multi-colored and this will make them look more fun.
- Rectangular. It is also possible to lay out a chessboard, but not so effectively, but a brick pattern, a “herringbone”, laying in waves will look. different colors you can create a drawing.
- wild stone. This is what the tiles are called. natural stone, which are not made according to the shape, but according to the way the stone was split. Patterns with them will not work, and in order to form a path, you will have to make an effort. To facilitate the work, you can first carry it out on paper.
- complex shapes. Clover, hexagons, circles, stars - they are all a pattern in themselves. It is enough just to lay them according to the picture.
Very small tiles can be used to make a meaningful drawing, regardless of the shape - a stained glass window is made according to the same principle. Also, if you want to do something specific, fantasy, invented on your own, for which there are no necessary forms, you can always contact the manufacturer and place an order.
It will cost twice as much as a regular product - or even five, depending on the complexity of the form.
Then choose the thickness:
- Two to four centimeters. Used for footpaths. If you are going to lay paths in the country solely in order to walk on them, this option is suitable for you.
- Six to eight centimeters. Will withstand very intensively moving people or a car. Hardly needed in the country.
- Eight to ten. It can withstand the weight of any cars, it is usually used at enterprises, gas stations and in private yards where a car will be parked.
To give a thick tile is definitely not needed - and this is good, because the thicker it is, the more expensive it is.
After that, you need to choose purely technical parameters. Abrasion resistance is indicated on the package, the higher it is, the more reliable the track will be that you get. Frost resistance is indicated next - the value shows how many freeze-thaw cycles the tiles can endure.
At the best options the indicator is more than two hundred and it is worth focusing on them.
The last parameter to pay attention to is color. It depends on him how impressive the resulting track will look.
Lots of options:
Having decided for yourself what the material should be according to all its characteristics, you can go to the store and choose a specific batch there.
What to look for when buying?
The tile must not only fit the site in terms of design, it must also meet quality standards. Determining whether they are going to deceive you is quite simple. Need:
- Ask the seller for documentation. Any batch of goods must be accompanied by a certificate of conformity, which confirms that it is manufactured in accordance with state standards, as well as a test report, which contains all information about wear resistance, frost resistance, and other qualities of the product. If the seller is hustling, trying to change the subject, there is a high probability that something is wrong with the goods - it is better to go to other people.
- Check a random tile from a batch. Even if the product that you are offered is bad, the top, visible layer in the package will be done well so that you do not guess anything. The request to get the tile from the middle is normal, especially if you are ready to buy this particular package later.


High-quality laying of paving slabs in the country largely determines not only the appearance of the entire yard, but also the durability of paved paths and areas around a private house. Figured paving element (FEM) is the most popular material for arranging the territory of recreation areas and paths leading to them. In order to pave the canvas beautifully and correctly, you need to know some mandatory requirements. Using them, you can do the work with your own hands, bringing to life the conceived solutions.
Today it is difficult to imagine a house or country cottage area without garden paths laid out sidewalk paving stones. Recently adjoining territories rolled into asphalt. With the advent of tiles, the situation has changed dramatically. The technology for obtaining FEM by pressing made it possible to create a laying material, which today received wide application.
Paths made of paving slabs have a number of advantages over concrete or asphalt counterparts:
- Environmentally friendly. In the production of tiles, components containing carcinogens are not used, therefore, when heated, no hazardous substances are released.
- Long service life. Greater wear resistance is provided by manufacturing technology.
- Ease of installation, repair and maintenance. Damaged fragments of the track can be easily replaced with whole ones, and in case of dismantling to repair communications, the coating can be reused. Thanks to the simple laying technology, it is possible to do the work yourself.
- Weather resistance. Withstands over 200 full temperature cycles. Can be used in any region of the country.
- Wide range of and color range. It is possible to choose material of various sizes, shapes, thicknesses and colors, which allows you to implement the intended design solutions.
The main disadvantage is the high cost quality material. However, paving stones are easier to maintain and install than other types of flooring. A yard made of paving slabs looks more attractive than an asphalt one. The service life is at least 15 years, and when using material with the addition of granite chips - more than 25 years.
Step-by-step laying plan in the country
Prior to the start of work on paving the site, the installation of communications must be completed. The width of the track is selected based on the dimensions of the material. The base for the canvas is equipped with necessary bias, which is 1 cm per 1 m of coverage. The technology of laying paving slabs in the courtyard of a private house involves the sequential implementation of several stages:
- selection of materials and calculation of their quantity;
- marking of paths and platforms on the ground;
- ground preparation;
- laying paving stones and curbstones;
- backfilling of seams, completion of works.
For paving garden paths, both vibrocast and pressed tiles are suitable. If a car is supposed to be parked on the site, then pressed paving stones are preferred, because. it withstands heavy loads. The thickness of the FEM on footpaths is up to 4-6 cm, and in parking lots - 6-9 cm.
The calculation of the need for tiles should be carried out at the stage of preparation of work. It includes expenses for contingencies. This can be a battle, a large waste when cutting a stone, etc. To compensate for these losses, material is purchased 3-5% more than necessary. If it is planned to lay colored paving stones, then additional FEMs of all colors are purchased. The stones remaining after installation will be used to repair the canvas.
Preparing Instruments and Selecting Consumables
To lay paving slabs in the yard, you will need sand, crushed stone, cement and curbs. Volume Supplies will depend on the length of the tracks and the depth of the trench. For 10 m² of the track, you will need 0.8-1.0 m³ of crushed stone, 0.7-0.8 m³ of sand and 180-200 kg of cement.
To carry out the work you will need:
- tape measure, level, fishing line;
- rubber mallet;
- grinder with a diamond cutting wheel;
- surface vibrator or hand rammer;
- Master OK;
- rule;
- lighthouses.
As the latter, you can use segments of water or profile pipes, corners, wooden slats.
Choosing a scheme for laying in the courtyard of a private house

The tile laying pattern depends on the shape, size and color of the material. Using a rectangular stone, you can get a large number of path options. Among them, the most used tile laying patterns are:
- geometric;
- chaotic;
- artistic.
In the first option, by choosing colors, you can create a unique pattern of a garden path. Most often, the laying of road tiles on curved sections is carried out using paving techniques such as "run-up" and "herringbone". A more costly option is pruning. Here, each stone adjacent to the curb is cut to the desired size.
The chaotic laying of the scheme as such does not have. It involves laying out the material in an artistic mess. With a single-color stone, material of different sizes is used, and if the tile is multi-colored, then dilution is made with color.
Artistic schemes are aimed at laying out a drawing, the complexity of which depends on the skill or perseverance of the master.
Planning and marking work
At this stage, the marking of the shape and size of the tracks on the ground is carried out. To do this, pegs are installed and a thread or fishing line is pulled between them, which completely repeats the shape of the paths or the platform.
Carefully carried out marking will allow you to properly lay the tiles in the country.
Bedding preparation
For laying a garden path, it is necessary to properly prepare the base. The scope of these works will depend on the type of soil on the site. Over the entire width of the planned path or site, the top layer of earth is removed to a depth of about 40 cm. Then the trench surface is compacted with a manual rammer. In order for the tiles not to move apart, mount the borders on cement mortar.
A sand cushion 10-15 cm thick is arranged along the bottom of the trench. It is better to use river or washed sand, because. it does not contain clay. Crushed stone with a fraction of 5-20 mm is laid on top and rammed with a surface vibrator. The layer thickness should be at least 15 cm, and if the soil is soft, then more. Sand is laid on top of the rubble, leveled and spilled with water. After that, you can start laying tiles.
Border

It outlines the contours of the track or platform and protects the canvas from spreading. The installation of the curb can be with a visible edge, flush with the tile, or FEM can be laid without it. In this case, a retaining (limiting) rail is mounted, which fixes the stone and prevents it from slipping.
If the canvas is laid with a protruding border, then it is installed with a bevel towards the path, and if flush, then away from it. When arranging the path around the house, the frame is made only from the outside, while the tiles are laid 5 mm above the edge of the stone.
Mounting
To lay tiles well in the country with your own hands, you need to know a few simple rules:
- Start laying the stone from the lower level upwards.
- Installation is carried out from oneself, i.e. the worker is on the laid canvas.
- With circular laying, work is carried out from the center.
- The layout starts from the place where the eye falls first.
- Installation of tiles is best done with a shift (diagonally). This makes mistakes less visible.
Laying the first row is carried out along a cord stretched across the level across the track. During work, the horizontal installation is checked after 3-4 rows. The installed material is settled with light blows of a rubber mallet. Lay the tiles right next to each other. The resulting gap of 1-2 mm will be sufficient for water drainage.

Final stage
At this stage, the gaps between the tiles are backfilled. Depending on the type of base (drained or non-drained), the joints are filled with either dry screened sand or sand-cement backfill. Such a mixture can be made independently or purchased in the distribution network.
The seams are filled with sand using a broom or a rubber scraper in several stages. After the first backfilling of the gaps, the entire area of \u200b\u200bthe track is spilled with water from a hose with a sprayer. After the sand settles and the tile dries, the process is repeated.
Care garden paths consists in the timely repair of damaged elements, the removal of sprouted grass and the addition of sand to the seams. Periodically, the roadbed is washed with a jet of water to remove adhering debris. Do not use metal tools to remove snow, so as not to damage the coating.
The main components of the success of the use of paving slabs in a private house are reliability, ease of installation and dismantling, as well as high aesthetic qualities. Thanks to unique characteristics material, an architectural ensemble striking in its beauty and individuality can be created.
Why paving slabs?
When choosing building material it is necessary to carefully approach the main characteristics. A true assessment of the positive and negative qualities paving slabs has far-reaching implications.
The benefits include the following.
Price
The price of the material, even when compared with the traditional asphalt pavement, is at an accessible level. The difference in cost is such that it is quite possible to afford the purchase of tiles in reserve for repairing the canvas in the future.
Frost resistance
Low temperatures do not negative impact on the performance of the tile. This distinguishes it favorably from other materials with a similar purpose, since any of them lose their qualities in frosty conditions and are destroyed.
High manufacturability
Laying tiles does not require the use of special equipment and specialists of appropriate qualifications. It is possible to carry out local repair of the coating with the replacement of damaged areas. Installation and dismantling is simple and carried out in a short time.
Installation is not difficult
Durability
A high indicator of the ability of paving slabs to resist abrasion is the key to long-term operation of such a coating. When exposed to sunlight, the material does not fade for a long time.
Aesthetic qualities
A variety of colors and shapes do not limit the imagination of the owners of the house, and provide an opportunity to fully express their individuality. In addition, the material harmonizes well with the surrounding landscape and architecture.
Environmental friendliness
The material is safe for environment and a person. When heated, it does not emit toxic and harmful substances.
The disadvantages of the material include:
- increased requirements when performing tiling work. In general, the technology is not complex, but requires careful implementation of the regulations. For example, tile displacement or layer deformation is not allowed;
- the need to care for the surface of the tiles in winter time. This is due to an increase in the injury risk of the coating in the event of ice or snowfall.
Methods for the production of paving slabs
The main components necessary for the production of this material are cement and sand.
Special additives are introduced to obtain the required performance properties. Also, in the manufacture of colored tiles, various pigments are used, which allow you to get a wide color scheme products.
Currently, the following types of technological processes for the production of paving slabs have become widespread.
Vibrocompression
The matrix is located on a frame that can vibrate. After loading the prepared mixture into the matrix, a force is applied to it using a vibrating punch. Pressure is applied until the mixture reaches the required density. At the end of this process, the punch and die are raised, and ready product remains on the bed. High process automation increases equipment productivity and product quality. The durability of tiles produced in this way reaches more than 25 years.
 Paving slabs (vibrocompression)
 Hyperpressing
This type of production consists in removing from technological process vibration and replacing it high pressure. The high quality of the products obtained is achieved by obtaining a homogeneous composition of the mixture. The process is fully automated and has a high production speed.
vibrocasting
Compared to pressing, this technology is simpler, but time consuming. The plastic form is installed on the vibrating table. The mixture fed into the mold has a fairly liquid consistency. Under the influence of vibration, milk appears on the surface of the mixture. In this state, the forms are covered with a film and moved to racks with a horizontal surface. The state of readiness of the product occurs after 24 hours, and the concrete gains its full strength in a month.
 Paving slabs (vibrocasting)
 Due to small energy costs on production and low automation, the process has become widespread.
Paving slabs. Photos and characteristics
Clover
 Clover tile shape
 The starting material is concrete, into which crushed granite is introduced. Due to the smooth surface, contamination during its use is minimal. A shape similar to clover harmoniously fits into any design decision and ennobles the courtyard of the house.
English cobblestone
This type of coating is produced in the process of vibrocasting a concrete mix, the appearance of which is similar to natural stone. A simple and strict form with a brown or gray tint will add some simplicity and style to the architectural ensemble.
 English cobblestone
 Wave
The shape of the tile in the form of a wave increases the manufacturability of the product, as the probability of displacement of the tiles is reduced, which increases the reliability and service life of the structure.
 Tile in the form of a wave
 Kipichik
The product repeats the brick in miniature. The shape of the tile provides maximum strength and reliability.
 Brick in miniature
 Tumbled
This tile is characterized by the presence of rounded corners. The strength of such products is not high, while the structure assembled from them looks beautiful, has individuality and charm.
 Rounded tile corners
 How to lay paving slabs?
Drafting a project
The importance of this stage lies in the fact that when drawing up the drawing, the laying scheme, ornament and color solution mosaics. On it, the dimensions of the land plot are plotted on a scale, which makes it possible to determine the need for tiles and materials for the construction of the foundation.
markup
In accordance with the drawn up project, the marking of the territory is carried out. To do this, you need a construction tape measure, pegs, cord or twine. After completing this type of work, it is recommended to check the correctness of the choice made. For this purpose, it is enough to walk around the site to determine how convenient and rational the project is. If deficiencies are found, adjustments should be made.
Foundation construction
A properly prepared base determines the quality and durability of the entire structure.
If there is an old coating, it should be removed. If the coating is laid again, then the turf layer is removed to a depth of 150-200 mm. In this case, it is necessary to ensure that there are no remains of plant roots or their seeds.
 How to do it right
 Next, you need to organize the drainage of water. If the soil is very clayey, drainage is recommended. To create a direction of water flow, slopes are provided in the transverse and longitudinal directions.
The foundation of the structure is always done by creating a cushion of crushed stone or sand. To strengthen it, if necessary, a concrete screed is arranged.
Work begins with falling asleep and tamping the pillow material so that its height is the same. The base obtained by compacting is covered with sand, the layer of which in the compacted state has a height of 30-50 mm. For free penetration of water between layers of sand and gravel, it is recommended to place geotextiles. With the free movement of water, the sand will not be able to wake up, which will provide additional strength and increase the life of the base.
To create a laying layer, both ready-made mixtures are used, and they are prepared on their own from cement and sand. This mixture is poured in such a way that a layer of 30-40 mm is formed. In order to create a layer of material with the same thickness, tubes are used as guides.
A rake is used to evenly distribute the mixture. To obtain a flat surface of the screed, a channel is used.
In order for the prepared base not to be deformed, they choose the direction of the work from themselves.
At the same time, it is recommended to lay each subsequent tile diagonally with respect to the previous one with the smallest possible gap. A joint width of about two millimeters is enough to fill it with sealant (sand, dry mixes). When laying, each element of the coating is compacted with a mallet. If the tile is laid with an offset, it should be paved with sand and compacted again.
Having completed the process of laying the tiles, all areas where there are protrusions are leveled with a rubber hammer. The progress of these works is controlled by the construction level.
 Laying tiles
 If the plan implies curvilinearity of forms or the use of curly elements, then there is a need for cutting tiles. At the same time, it is necessary to understand that it is necessary to start these actions at the end of the installation of whole tiles. The tile material is cut with a special knife or a grinder equipped with a disc for working with concrete. Before making a cut, it is applied to its location and a cut line is drawn.
 Tile
Tile To create a covering with regular geometric shapes, as well as to fill in unfinished areas with cut tiles, borders are installed. Their installation is carried out in a special trench with pouring concrete.
After the tile laying is completed, the resulting surface is checked for horizontality. If there are defects, they are eliminated and the seams are sprinkled with a mixture based on cement and sand. After removing the excess amount of the mixture, the material is abundantly moistened in the cracks. If there is a drawdown of the mixture in the gaps, then you need to add a portion of it. The correct distribution of the mixture ensures the reliability and rigidity of the coating.
Pattern laying paving slabs
The main paving options are as follows.
Network
Suitable for creating coverage on areas with rectangular shape. It is a classic way when tiles are laid in pairs. Two tiles are laid sideways around the perimeter, then the next two are placed at right angles to them. The following pairs repeat the arrangement of the previous ones.
spoon
In this case, caterpillar paving is used, that is, the tiles are laid sideways along the length. In this case, the difference in the visual perception of the coating should be taken into account. The horizontal arrangement of the tiles makes the path wider, and the vertical arrangement makes it longer.
Herringbone
Tiles are laid at an angle of 45° or 90°. The method has gained wide popularity due to the increased load-bearing characteristics of the structure.
circular pattern
As a rule, it finds application in the design of sites with small size. To implement this paving method, it is necessary to use wedge-shaped tiles.
random mix
To create a coating, a combination of shapes and colors of tiles is used. They are placed in random order. Most often, the entire material has a shade of one primary color.
 Types of tiling
 Options for laying paving slabs. Photos of original solutions
 original design flower beds
  Interesting solution
 in the form of stars
  Staircase tiling
 Paving slabs in the courtyard of a private house: photo of the architectural ensemble
 The path enhances the beauty of the house
  You can combine different types of styling
  Pool tiling