How to make a lamp from improvised means. How to make a chandelier with your own hands - tips on choosing a lamp, decor, a master class and photo ideas. Threads and weaving - a suitable basis for creativity
The cosiness and comfort in the room depends on the lighting. You can make your home atmosphere full of warmth by making a lamp with your own hands. Ideas to help you personally and with minimal cost to make an exclusive and fashionable lampshade, you can learn from this article.
Pendant lamp in the interior
Training
What you need to know before making a lamp:
- It is recommended to use LED or energy-saving light bulbs, creating your own designer lamp. Standard incandescent bulbs get too hot and can damage its structure.
- If the finished lamp is disassembled, you need to be extremely careful with the wires, and after finishing, make sure that they are intact.
- There are bulbs of several color temperatures. When creating a pendant lamp for the home, it is worth opting for a “warm” shade.
A clear example for distinguishing color temperature: the larger the number on the box, the higher its temperature, and the colder the shade of light it has.
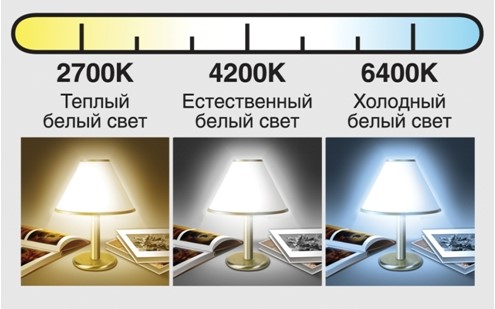
Light bulb color temperatures
Frame selection
Before you make a lamp, you need to prepare the base. Most often, it is a pair of rings to which a backing of cardboard or plastic is attached to give shape.
The following ideas will help resolve the issue of finding the basis of the future lampshade:
- You can make this type of frame yourself, with only wire and pliers on hand.
- Frames are sold in hardware stores or in needlework shops.
- Often in the flea market there are old lamps, where you can get the frame.
- Instead of a frame structure, the lamp holder can hold the neck of a 5 liter plastic bottle. Therefore, there is a solution in the figure below.

DIY lampshade
Lighting Ideas
There is nothing complicated in decorating a pendant or table lamp with your own hand. But it is better to draw a sketch on paper before starting work. The process will be simple and fast, and changes can be made along the way.
"Live" lamp
This designer lampshade is called "Photosynthesis". It was designed and implemented by an author from Tel Aviv. The frame is shown here. metal mesh, at the base of which is placed indoor plant. As it grows, the flower fills the entire interior space of the lamp and makes the design of the room look summery and fresh. It is not necessary to use a special light bulb here, a regular LED light is suitable for plants. Making such a pendant lamp is not too troublesome. You can add variety to its decor, given what accessories and tools will be available.

Suspended "live" lamp
When making such a lamp with your own hands, you can not use an overly heavy pot with a plant. Particular attention should be paid to the insulation of the wiring and run it along the supporting wire.
Making a lamp with your own hands from fabric is a great solution, because a large selection of colors and textures allows you to realize many creative ideas and create decorative lampshades for a room with any interior. First of all, you need to prepare the necessary materials:
- the cloth;
- adhesive tape or self-adhesive film;
- ruler or centimeter;
- scissors;
- simple pencil;
- metal rings for the frame;
- binders;
- tassel;
- glue;
- strip of paper.
Sequencing:
- Before you make a lamp, you need to determine its shape. For a fabric product, a cylindrical base is ideal.
When deciding on the height and width, you should take care that the base is not too close to the light bulb.
- It is necessary to cut a rectangle from the adhesive film and a flap of fabric, the edges of which are 5 cm larger. Attach the fabric to the table with the film, face down.
- Find the most beautiful pattern on the fabric that should be on the lamp and use a ruler to draw corners and a dotted line.
- Align the fabric and stick a film on it.
- Using paper clips-binders, fix the lampshade on the surface of the frame from below and above.
- With a pencil, mark the edges and the side that will be on top. Glue the parts of the lampshade to each other, let them dry.
- Turn the structure over, apply glue to the edge and insert a wire ring. Fasten with binders, let dry. Repeat the procedure on the other end.
- Glue a strip of paper from the edges. After it dries, glue the fabric strip on top. Do the same on the seam on the side of the lamp.

DIY fabric lampshade
If you make small triangular cuts in the paper while gluing it, it will bend better.
There are other ideas on how to make a lamp with your own hands. Using various materials and accessories, you can create no less impressive decorative lampshades from threads, paper and other improvised means.
photo collage
To make such a designer lampshade-photo frame, you will need:
- frame, as in the previous example, or a finished purchased lamp with a clean white lampshade;
- several sheets of tracing paper;
- scissors;
- PVA glue;
- simple pencil;
- printer (recommended to use an inkjet).
Selecting your favorite and beautiful pictures, with the help of photo editors you need to make a collage. You can collage images by cutting them out of paper. This method leaves a lot of space for a creative idea: any decor can be applied to the lamp, not just a photo: a drawing of a child, a motivating aphorism or a map of a favorite area.

DIY table lamp photo collage
Before you make a lamp out of photographs, you should make sure that the paint dries. It is strictly not necessary to bend paper sheets of tracing paper, because the place of bending will always be evident.
Rope Sun
Creating such a pendant designer lamp is much easier than it seems. Required tools:
- threads;
- glue (for wallpaper or PVA);
- petrolatum;
- balloon.
Initially, the already inflated balloon is lubricated with petroleum jelly. This is necessary so that threads do not stick to it. The threads are dipped in glue and wrapped around the ball. After the product dries, it is blown off and removed. Rope sun crafting completed.
What needs to be done to make the decor of the lamp as successful as possible: firstly, you should first “get your hands on it” and make a couple of small lamps for testing. Secondly, before winding the threads on the ball, you need to mark the place where there should be no threads. Through this hole, the ball will be removed, and the light bulb will be inserted.
Making a lamp
To carry out the decor of the lamp is half the battle. The main thing is a quality work done without sad consequences. Therefore, the following factors must be taken into account:
- If a luminaire hanging from the ceiling is connected, the junction of the wires and the product itself must be covered with a protective cap.
- If during operation, the light bulb becomes very hot, the designer lampshade surrounding it should not be too close. That's why you should use low incandescent bulbs.
- If the product is heavy, it is strictly forbidden to hang it on wires. For this, special rods, cables or brackets are specially provided for mounting on walls or ceilings.
- To illuminate a room with high humidity: a bathroom, sauna or bath is better not to implement your own ideas for making a lamp with your own hands, but to buy and install a special product that has moisture protection.
- During the installation of the lamp, the wiring must be insulated to exclude the possibility of injury to the master and his relatives.
With my own hands. Video
How to create a LED lamp with your own hands from improvised materials, this video will tell.
Decor made of paper, photographs, threads, fabrics and any other means has its own advantages over finished products bought in a store. With a minimum of costs and time, decorative lamps not only decorate the home, but also emphasize the originality of its owner. DIY modeling of lighting fixtures is an opportunity to realize your creativity, decorate the interior and bring relatives together for joint work.
materials
most suitable and available materials is paper and the cloth. They are easy to transform, they are well known to each of us and can be found in everyone. home. wonderful lamps obtained from threads or yarn. Naturally, glass can also be used for ceiling lamps. At home, these are ordinary or unusual, with an interesting shape, jars or bottles. In particularly daring projects, plastic containers, and coffee packaging, and plastic children's toys.
In addition, do not discard options such as rattan, bamboo and rubber. As a basis for a future product, both raw materials and a finished product can serve. So, for example, designers got the hang of creating amazing lampshades from beads, globes, parts of sets, mirror fragments and even crumpled music sheets! You just have to look at the things around you...
Understanding how difficult it is to move from thought to action, especially to see an exquisite accessory in an ordinary jar, we have prepared several master classes for you. Following step by step instructions, you can easily make cute handmade new clothes for any room in the house.
Ideas and their implementation
Since we have already voiced the materials suitable for the manufacture of shades and lampshades, let's start with paper.
Plafond with butterflies
For work we need:
- white thin cardboard
- thin twine or fishing line
- glue gun
- wire for frame
- utility knife or scissors
- round nose pliers
Advice! Before starting work, determine the dimensions of the ceiling in ready-made. In our example, the diameter is 30 cm, so we need a piece of cardboard 90 cm long.
- We make a frame. We cut off a piece of wire 96-98 cm long. We turn the wire into a circle with a diameter of 30 cm and fix the ends with round-nose pliers.
- We cut 3 hanging elements from twine or fishing line. We measure the length of the pieces, based on the height at which you plan to hang the lamp. We tie them to the wire in three places, evenly distributing the load.
- We draw butterflies of different sizes on cardboard and cut them out.
- We fold the cardboard, glue the joint with a strip of thick paper or stitch it with a stapler.
- We fix the upper part on the wire. To do this, you can use both glue and thin wire.
- The places of joints and cuts can be decorated with butterflies remaining after cutting.
Look what an elegant lamp we have turned out. It will fit perfectly in the children's room and in the bedroom. You will see a special chic when you turn on the lamp and butterflies flutter along the walls.
Advice! Instead of butterflies, you can cut out snowflakes, stars or flowers. Decide for yourself what you like best.
In the style of the 60s
If you ask our grandmothers, they will certainly remember floor lamps with lampshades in the form of an inverted bucket, tied with colored threads. We can do exactly the same with our own hands.
We will need:
- lampshade frame - 2 pcs.
- decorative braid (3 colors, choose a combination to your liking)
- scissors
- crochet hook
Let's start manufacturing.
- We tie the first braid to the lower ring of the lampshade, leaving a tail of at least 5 cm.
- We pull it on the upper ring from the outside, throw it over it and stretch it through the inner side of the lower ring. We alternate actions until the beginning of the next frame sector.
- We fix the first braid and take the braid of a different color to work. We knit it to the next sector, not forgetting to leave the tail on the first knot.
- We do the same with the third sector, filling it with the remaining braid.
- We stretch the tails along the bottom of the lampshade with a crochet hook.
Here is our plafond from the distant 60s and it is ready, it remains only to insert the cartridge and assemble the chandelier in random order.
Braid with fringe
Another one original idea for a lampshade with your own hands, it is also connected with a braid, but not a single layer, but with a fringe. What do we need for this?
Prepare:
- two metal hoops or take an embroidery hoop
- braid with fringe
- fishing line
- acrylic paint, the same color as the ribbon
- glue gun
- scissors
Advice! Fringed tape can be purchased at stores selling curtain and furniture decor.
- We paint the hoops or hoops with acrylic paint. If they are already covered with varnish or other paint, it is better to sand and clean them.
- We wait until the paint is completely dry, and make three marks on each lampshade ring, placing them at an equal distance from each other.
- Cut off three identical pieces of fishing line.
- We tie them to the smaller ring of the lampshade, leaving the upper ends with a margin, so that later we can tie them to the lamp cord.
- We measure the length of the fringe, subtract 2 cm from it, and tie the fishing line to the second ring for the resulting length. So we can get a cascade.
- We heat the glue gun and carefully glue the braid along the lower ring.
- We do the same with the upper ring, pulling it out of the lower one.
Advice! Keep in mind that hot glue can melt the line, so try not to apply it directly to the line. Drop the glue on the paper, let it cool a little, and then apply it to the fishing line.
Do you want to transform your interior, adding a touch of originality and modernity to it? It's time to learn how to make a lamp with your own hands, because thanks to this piece of furniture your home will stand out from the rest and become unique. The creative process itself will be very interesting and useful, so if you wish, you can invite children and create your masterpiece together. Dekorin has selected for you the most beautiful lamps and lampshades for lamps, which can be made from paper and other improvised means.
1. Paper lamp: how to make it yourself?
From such a simple material as paper, everyone can make incredibly beautiful and modern lamps with their own hands. In the photo below, we presented several unusual options for homemade paper lamps. Happy viewing!


Chinese lanterns: do-it-yourself paper lamp
Thanks to such a simple and at the same time interesting piece of decor as Chinese lanterns, you can add some brightness, lively colors and a sense of celebration to the interior.
The materials you will need for this:
- Colored or white paper;
- A cartridge that you can remove from an old lamp or buy;
- LED light bulb (note that you should not use a heated light bulb, because we make the lamp out of paper);
- Pencil and ruler;
- Stationery knife;
- Thread;
- Awl.
Making a lamp with your own hands (step by step with a photo)
First, on the back of the paper, you need to draw lines that will create the relief of the lamp. Below is a drawing according to which it is proposed to make markups.

We fold the paper along the marked lines in order to get a kind of accordion. On the this stage it is important not to rush and do everything carefully so that the lamp comes out smooth and beautiful.
Now we create a lampshade for the paper lamp around the cartridge. At the junction, the sheet can be glued with ordinary PVA glue or joined in any other way. Please note that without gluing the edges, it will be easier for you to change the light bulb in this lamp.
Our Chinese lanterns are ready! In the photo below you can see what happened in the end.


For more ideas on how to make a paper table lamp or pendant lamp, see our article.
2. How to make a wooden lamp with your own hands?
From such a simple material as wood, you also have the opportunity to make a very creative lamp with your own hands. It is enough just to look around: nature itself inspires us with its extraordinary forms for creativity. Each of us at least once in our lives noted the beautiful shape of a branch or snag. Dekorin proposes to reflect their beauty in interior design as an original and functional lamp.
Using a branch, you can make a lamp out of wood yourself without the use of special tools and skills. You can easily find the necessary material in the forest or near the house. The main thing is that this snag should be already dry, but not too rotten, because it will have to hold the weight of the shades and at the same time last you as long as possible.

DIY floor lamp from a wooden branch (photo)
In fact, depending on your wishes, you can make floor, table or ceiling lamp. Here we will consider the option of manufacturing a floor lamp.
First of all, you need to make a solid base for the floor lamp (for example, pour cement mortar into any container and insert our branch for a wooden lamp into it). After a while, the container can be removed, after which there will be a reliable and stylish cement base and lamp base. Also read how from a simple cement mortar can do .
At the next stage, it is necessary to attach a cord with a cartridge and a light bulb to the snag using improvised means. Our floor lamp is ready!

Also very beautiful in the interior will look ceiling and even Wall lights from a branch. You can decorate them with both ordinary light bulbs and vintage shades or lampshades. Examples are in the photo below.


3. How else can you make a lamp with your own hands from improvised materials?
Do you have a favorite lamp that you do not want to part with, but appearance her ceiling leaves much to be desired? Don't worry, we'll fix it! Dekorin will tell you how to make a lampshade for a lamp with your own hands. Just look at the photo: what original and even intricate lampshades for lamps you can make yourself!


Also read:Do-it-yourself vases from glass and plastic bottles
How to make a lampshade for a lamp with your own hands from threads
Such a lamp will become a creative and unique decoration of your interior. It will easily fit into both the kitchen and the bedroom with the living room.

So, what you need: a balloon (you need to take into account the size and shape of the inflated balloon, because the shape of the lampshade will depend on this), thick cotton threads (twine is better), PVA glue about 250 gr., A cord-suspension that will hold the lampshade, an energy-saving lamp, scissors, a needle, any cream, a brush, a cotton pad, and a cotton swab.

Step 1. Inflate the balloon to the desired size and tie it securely.
Step 2 Using a cotton pad, lubricate the ball with any cream so that later it is easier for the threads to detach from the base.

Step 3. Thread the needle and pierce the glue bottle through. Wind the thread around the ball as you see fit, however, do not pull it too tight.


Step 4. When all the threads are wound, go over the glue a little in those places where it is not enough. Now the lampshade is almost ready and should be removed to dry overnight.

Step 5. In the morning, take a dried lampshade and start pressing the ball with a cotton swab to help it separate from the threads. Carefully and most importantly, slowly blow off the ball, because by doing it quickly, you risk creating a dent on the lampshade with your own hands.


Step 5. Mark the future hole and make 4 cuts in all directions so that the bulb with the cartridge can enter the lampshade.

Finally, you need to insert a cartridge with a light bulb, and carefully attach the lamp holder between the threads. The lampshade is completely ready, now it remains only to hang it in the room that you have chosen and enjoy the results of your creativity.


How to make a lamp with your own hands: 15+ ideas and photos updated: March 27, 2017 by: Oksana Krutsenko
For creating lighting device they use almost everything that can be found at hand: wooden sticks, pieces of plinth, containers, saw cuts of wood, metal sticks and pipes, glassware, fabrics. Homemade lamps are made futuristic, classic, glamorous, minimalist. For each type, several step-by-step master classes have been invented. It is customary to decorate designer rooms with unusual lamps. These can be products with slots, many separate fragments, in the form of a large ball or cube. The same lamps are made with their own hands, from any material. This is done not only by craftsmen selling their products, but also by ordinary owners of apartments and houses. Homemade chandeliers can be similar to store-bought ones, or they can be made in an unusual way: from graters, cans etc. The form depends on the characteristics of the material and the imagination of the performer.
What can be used as materials
You will need:
- fat cream;
- PVA glue;
- cotton buckle;
- dye;
- balloon.
There are several interesting options. From ordinary threads you get a beautiful glowing ball. First you need to inflate the balloon and grease it with cream. It is placed in a container with water and PVA diluted in it. Then it is wrapped with threads. The design is left to dry for 24 hours - all that remains is to put the product on the ceiling. The second way is to use tubes. The sheets are twisted diagonally, the protruding tips are glued. It will take two hundred tubes: they are glued together into a round or triangular figure. The next option is a wire lampshade: it is twisted into a spiral or conical shape. You can create a lamp from plastic bottles: they cut off the bottom and neck. Need a wire acrylic paints, sealant and marker. There are many other techniques for creating a lamp with your own hands.
Options for creating lamps made of wood
Making a lamp with your own hands is primarily an art, not an economy. Despite the fact that the tree is simple and inexpensive material, products made from it can compete with the rest in terms of quality and aesthetics. The process of their manufacture will not be the easiest. You will need to carry out complex calculations, work with a large number of tools, remove a lot of garbage. Lighting fixtures are made from saw cuts, branches, veneer, wooden slats, wooden boxes and frames, wheels, logs, beams, etc. A wooden lamp is an ideal solution for an antique-style interior. It can be made from a piece of wood or from worked materials, such as a complex geometric structure of sticks, a ring, a cylinder, or a square made from four or eight bars.
Master class: how to make a lamp from wood cuts
You will need a tree trunk, a grinder, a hacksaw, LED Strip Light(2 m), brushes, wood varnish, glue, matte plastic pipe. First, the trunk is cut into sections of the same thickness - about 2 cm. Then a template is made in the center of one of the cuts. He and all other sections are drilled according to the markup. Measurements must be carried out carefully, because of poorly marked fragments, the whole process will have to be started anew. After that, they need to be sanded. The next step is strengthening with glue and laying on pads to dry. After that, the log cabins are varnished. In parallel, you can prepare a frosted tube - a rod for the structure. Its surface is processed to the maximum effect of haze. The saw cuts are put on the tube and after that it remains to take one more step. The last step is to mount the tape. It must be folded in your hands and in this form placed in the tube.
Add to list necessary materials and tools include: self-tapping screws, drill, chipboard, brush, acrylic lacquer, electric block, 4 cartridges and 7 two-meter rails. From chipboard, you need to cut blanks, and glue their edges with an edge. Reiki is assembled into a single structure in the form of a cross with a diamond shape in the center. The base is cut out of a 5 mm plywood sheet. In places where the slats create intersections, pieces of bamboo sticks or dowels are installed. At the base, it is necessary to drill 8 holes: 4 are intended for the ceiling, and the same number for the main part of the lamp. From the tin you need to bend 4 corners with beveled edges. They are mounted with self-tapping screws so that the open parts of the corners are directed inside the lampshade. Whole wooden frame varnished twice, with a break for drying. At the end, the cruciform structure is screwed on with confirmations.
It can be made from twelve strips. For the inner part, a smaller one is taken - 60 cm, for the outer one - 70 cm. The strips are made from a sheet: they are cut along the fibers with a steel ruler and a knife. On a large paper sheet, you need to draw a circle with a diameter of 350 mm or more. It is divided into sectors of 30°. On the left and right side from the lines separating the sectors, parallel lines are drawn along the perimeter of the circle to determine the desired position of the veneer strips. Then a disc is prepared with a small hole in which to lay the strips. They are glued clockwise in the form of a snowflake, first three short ones, then three long ones. After the glue dries in the strip construction, you will need to make a hole about 1 cm wide. A wire is pushed through it, and a sleeve is attached to the disk. The hanging ends of the strips are fixed with a flange and bolts.
Lamps made of textiles and threads
To create a lampshade, you can use old clothes: jeans, knee socks, damaged dresses, etc. Products are decorated with bows, pockets, threads with beads. In almost all cases, the fabric needs to be put on some kind of frame. It can also be made by hand. As a material, it is better to choose metal, sometimes wood. The basis for a homemade fabric chandelier can be factory lamps, both new and old. The fabric of an ordinary old lampshade can be removed, and a modern one can be fixed instead. stylish drawings. To create and design homemade chandeliers, threads of different thicknesses are used. They wrap various jars and frames, connect parts of the lamp and hang the structure. Lampshades made of hardened threads look interesting. In addition to them, twine or ropes are also used. They pair well with different fabrics and paper.
Master class: spherical thread lamp
To create this product you will need:
- Table lamp base.
- Glue.
- Thick threads (up to 4 balls).
- Air balloons.
First, the balloons are inflated. Several are better, because they can burst. Their shape should be perfectly round. On each of them, a ten-centimeter circle is drawn with a felt-tip pen. A light bulb stand will be inserted through a hole of this size. The ball is placed on the oilcloth. The adhesive solution is being prepared. Wear rubber gloves on your hands to dip the threads into it. When they are saturated with a solution, they are taken out; then the glue clots are removed. The end of the thread is tied to the balloon knot. After that, it is wrapped around the entire ball, this must be done evenly over the entire surface, but randomly. It is advisable to use several threads different colors. The ball is then suspended until the structure dries. Then they burst it, and the knot is cut off. The ball is removed through a large hole, into which you will then need to insert a cartridge with a light bulb.
DIY fabric lampshade
You will need thick paper, glue, fabric, threads to match the color of the fabric, pins, a ruler, a pencil, an iron. You will need to make a template to calculate the required amount of fabric. If the frame for the lampshade should have cylindrical shape, then measure the circumference and height and alternately draw the corresponding lines, creating a right angle. The opposite sides of the rectangle are drawn. The desired shape is cut out of paper. It is applied to the fabric. From it you need to get a rectangle bigger size. It is cut out after the desired fragment is selected. Then the matter is fixed on the template with the help of pins (its edges must be bent). After that, you need to use a sewing machine. The processed fabric is ironed. After that, it is glued to the base. Raw cuts are hidden. The seam is made so that the base is closed with a stitched edge.
Plastic chandeliers and lamps
Plastic has become one of the most sought-after materials in modern interior. This also applies to lamps - a wide variety of models are sold. You can make a chandelier with your own hands, which will not be inferior to finished products in anything. The plafond of the lighting device is constructed from anything. It can be disposable cups, various sticks, painted plastic bottles. They are sometimes decorated with decorative devices: figurines, luminous details. As an auxiliary material, various metal frames can be used. The easiest way to make a table lamp. You can use cut-out parts and molds with holes. Instead of throwing away unnecessary plastic items (used disposable tableware, etc.), it is better to try to make a small lamp out of them that can brighten up the room.
Master class: we make a ceiling lamp from plastic spoons
You need to find a large number of identical plastic spoons, up to 200 pieces. It will be more difficult to construct a product from whole devices, but if you cut them off, then everything will work out quite quickly and simply. The handles of the spoons must be cut off and removed, leaving only the scoop. Then you can use the finished lampshade for pasting the elements or cut it out of the eggplant. They make the lower part of it and make a hole for the light bulb, or cut off the top of the neck, leaving a fairly wide hole. Next, you need to decide on the pattern. The upper surfaces of the cups will create a shell-like pattern, while the lower surfaces will create a "scaly" surface. If you choose the second option, then jumpers need to be glued to the eggplant. Finish first upper part laying out rows of spoons one after another. When the process reaches the open part, then you need to calculate everything so that the last row hid the cut edge of the eggplant.
As a fastener, you can use:
- glue;
- office plasticine;
- scotch.
You will need steel wire for the frame, thin wire, a soldering iron, scissors, ten plastic bottles of various shades of green. From the bottles you need to cut out leaves of different sizes and shapes. Fragments in the form of birch leaves and other leaves with a more or less compact shape are ideal. Thus, more elements will be obtained. Slices imitating plates are best processed with a soldering iron to make them slightly bent. You also need to make veins with the edge of the sting: the leaves will take on a more natural look. Since the bottles are cylindrical, the blanks will be with curvature. Holes for thin wires are pierced with a hot needle. You need at least two on each leaf, but four is even better to thread the wire in a figure-of-eight. As many sheets as possible are put on each. Then the flexible wires are securely twisted around the frame of steel wires.
Handle the soldering iron as carefully as possible so as not to burn your fingers or burn the leaves.
You can make several types of such lamps. Materials you will need: rubber feet, silicone sticks, fluorescent lamp, fiberboard circle, CDs. Tools such as a triangle ruler, pencil, compasses, glue gun, screwdriver, pliers, tongs, drill are needed. In a round form, a hole is made from fiberboard in the very center, twelve sectors are drawn on it. On the lines that separate them, one small hole is drilled. Steel wires will be stretched through them, on each of which a stack of disks will be placed. The design will turn out to be quite heavy, so metal wires are needed. A wire with a cartridge is inserted into the hole in the circle of fiberboard, a light bulb is inserted into it. You can also make a polyhedron lamp, a ceiling lamp in the form of a ball, petals, a ring lamp from disks.
Ways to create paper lamps
This material is popular because of its flexibility. You can design an interesting figure or fold sheets of paper several times and make flowers. Folded paper sheets are joined into rounded shapes. Paper lamps are made in the form of plants, animals, abstraction. Some people like to make patterns and cutouts. In some countries of the East, chandeliers made of rice paper. To make a lamp, you can use the origami technique. Paper lamps are created in two main ways, namely using one or more large sheets or gluing a large number paper elements. Over the past ten years, desktop and floor lamps. From paper you can make lamps, carved pumpkins and houses. This material is also suitable for creating a lampshade of a traditional shape:
- conical;
- cylindrical;
- elliptical.
Rice or parchment paper
Rice paper is useful for making a Chinese lantern. Additionally, you will need a thread, an awl, a clerical knife, a ruler and a pencil. First, you need to make a markup on paper. The flashlight circuit consists of many diamond-shaped sectors. Half of them are filled with vertical intermittent markings. After that, the sheet is folded into an accordion. He curls up into a circle. Painted covers can be glued to the top and bottom. To make a parchment paper cover, you will need a marking board, a circular knife, two sheets of parchment paper, two rolls of waxed paper (similar to parchment), scissors, silk ribbon, a hanging frame. Strips of satin ribbon 18-20 cm and 40 cm long are attached to the frame structure. The final step is to paste on the ribbon circles of parchment and wax paper. You need to attach them with an overlap.
Paper bag origami chandelier
To make such a lamp with your own hands, you will need a wire with a switch, an LED lamp, two paper bags with a pattern. First you need to learn how to make simple origami. The next thing is to cut off the bottom of the bags, remove the handles. They stick together in one big paper bag. It is folded in half. Both parts are "turned" into harmonicas. You need 16 identical strips. The outermost ones are folded diagonally. A hole is pierced with an awl. One of the two open sides is securely fixed with a thick thread. It is necessary to leave the possibility of regulation. The second will be open. The LED bulb is connected to the cartridge, the top of the lampshade opens and closes back. Such lighting is necessary, incandescent lamps cannot be used. The wire is fixed on a branch of high decorative tree- the product is ready.
Corrugated paper products look very original, which is why the material has become so popular. You will need an LED lamp, cable, thread, glue, knitting needle, ruler, fragment corrugated paper 44 × 88 cm. First of all, you need to take a ruler and a pen and mark the paper on lines with the same width. Focusing on the drawn lines, you need to make an accordion out of a flat sheet. With the help of a knitting needle, it folds diagonally from one end, then returns to its original position and folds on the other side. The paper needs to be unfolded again - rhombuses should stand out on it. The entire sheet now consists of double shapes. The first and subsequent folds must be made according to the width of the strips, otherwise the appearance of the paper will deteriorate. The workpiece is twisted into a spherical shape, and its upper part is fastened with a thread.
Butterfly chandelier
There are two ways to create such a lamp:
- One big butterfly.
- "Swarm" of small moths of different sizes.
Preschool children will like the lampshade in the form of many hanging figures more. Separate parts of the lamp can be lowered up to one and a half meters from the ceiling. An old lampshade or its frame is taken as a basis. If there are no such blanks, then you can use a metal or wood rim or a thick wire twisted into a circle. It is necessary to prepare sheets with butterfly templates in order to select the butterflies of the required sizes and shapes. It is recommended to make moths at least five different sizes. Then the design will be visually larger. Butterflies are cut out with small scissors or a clerical knife. It is desirable that the paper is thick. Cut out figures are painted with different colors, decorated with sparkles, however, on some templates, butterflies may already be colored. To bring the product to readiness, the butterflies are fixed on the fishing lines and attached to the base.
The finished Chinese lamp can be used as a basis for other products. They are cheap. You need a perfectly round model. The first option: cut out circles of different colors from the fabric and glue them with an overlap. From a Chinese ball, you can make something like a round lamellar cone. The second way: from sheets of paper square shape circles are cut out. They are connected in the center, the edges are raised until a perfect flower is obtained. The elements are attached to the ball in ordered rows. Paper sheets make beautiful tartlets. They should be filled with something. The paper is also folded into square envelopes that can be turned into four conical molds. Some use an old wall map instead of paper. A newspaper lampshade with printed images in gray or brown will look stylish in any interior.
Lamps made of metal pipes and tubes in the loft style
Non-functioning water pipes with taps can be assembled into a single structure, equipped with light bulbs and thus create a stylish and useful thing. It is better to place it on the wall. This is a very popular loft style decoration element. Steampunk lamps are created from large and small pipes. These are complex designs, without special preparation it will not work to make them. However, it is possible to construct a small robot with a "head" in the form of a light bulb. Beautiful ceiling chandeliers are made from pipes. In addition, there are various models of lamps from metal pipes. Brass is often used as a material. Chandeliers are created in the form of compositions from several tubes. Pipes, as a rule, are made in one piece, but lamps are also produced with various patterns and openings. They are not inferior in popularity to lamps in the loft style.
You can make a beautiful product in the form of diamond faces. In addition to the pipes themselves, you will need sandpaper, a jigsaw, twine or wire, and gloves. To create an original chandelier, you will need 20 pipes: 10 short (6 cm), 5 medium (12 cm) and the same number of long (25 cm). You need to find several long blanks, mark them and saw them with a jigsaw. After that, you need to do grinding with sandpaper so that the edges of the tubes are perfectly smooth. Further, the fragments are collected on a thick wire or twine. First, horizontal rows are created: the bottom of five short and the middle of the same number of medium tubes. Then they are connected by five more short tubes. The upper part of the structure is made of five long fragments that need to be combined with the already prepared part. Long pipes do not come down completely, in this place you need to fix the cartridge.
Fixtures from plumbing pipes
It is necessary to prepare such devices as an electrical cable, electrical tape, adhesive tape, various screwdrivers, a two-wire wire, cartridges, hinges, fittings that match the parameters of the pipes. One of the tubes should be larger - it will serve as a mount to the ceiling. The assembly process is quite complex. It is necessary to create a scheme on paper, and only then get down to business. At this stage, the design configuration is determined. Splitters must be connected correctly. All parts of the upcoming structure can be polished and painted. It is better to give preference to white, red, gold and black colors. You need to wait about a day for everything to dry completely. After that, all pipes are assembled together. Light bulbs are on them. Final stage- connection. Since the scheme is complex, it is better to invite a specialist.
Using glass to create lamps
You can hang a composition of several empty liquor bottles on the ceiling. Three-liter cans can be hung from metal chains. Glassware is also suitable as a ceiling lamp. A lamp made of many glass fragments can imitate a crystal chandelier. Broken glass objects find a new purpose in the form of an original lighting fixture. Fine table lamps are made from glasses and wine glasses. Various glass boxes, glass from old wall sconces, headlights, interior doors. A homemade glass chandelier can be painted with watercolors or stained glass paints. Get beautiful stained glass windows. To create pendant lamps, craftsmen use a variety of decorative containers from oils and perfumes. Unlike wood and paper, glass has a high fire safety.
The list of necessary devices includes wire cutters, screwdrivers, screws, glass cutter, silicone, a rag or brush, stain, pine boards, hooks, a chain, ten light bulbs, wiring, wine bottles. The first step is processing the containers. Labels and glue residues are removed from the bottles. With the help of a glass cutter, you need to remove the bottom of each bottle: it rests at a height of 1-2 cm, and the bottle rotates around its axis. Cracks must be tapped with a hammer until the bottom falls off. After that, the electrical wires are placed in bottles and connected to the cartridges. Light bulbs are screwed into them. Now we need to prepare the boards. In the lower, larger one, holes are drilled for necks and wires. The top will collect them in one bundle. Hooks for chains are screwed into the bottom board, which will hold the structure. Can be done for the kitchen table lamp with a bottle base and a wooden shade.
Wooden boards can be stained to give an "antique" effect.
Using old cans to create lamps
Old jars can find a new purpose. Lamps can be created using threads, electrical wires, can handles. Containers must be equipped with handles. They will need to be tied with threads attached to a pre-prepared iron frame. Electrical wires with cartridges and light bulbs are lowered into the banks - the chandelier is ready. You can make an option for giving - the threads are tied around the branches of a tree, and candles or small lanterns are placed inside the cans. Containers wrapped with multi-colored threads or decorated with patterned napkins look beautiful. Inner part jars can be painted in White color, and while it has not yet dried up, apply a pattern in the form of chaotic lines. Some paint the container on the outside with different colors, and draw an image on top with the help of glitter shadows. Banks can also be pasted over with small cullet.
Shabby chic chandelier/lamp
Beads and fabric are used to create beautiful decorative items, including lamps that are typical for this style. Shabby chic decoration provides that the room is designed for a girl or woman. You will need beads, beads, threads, chains, a cartridge with a lamp, a finished wooden or metal frame. The first step is to paint the base in some of the soft shades. After that, it can be wrapped decorative elements or cloth. The top of the ceiling is wrapped with smaller beads, but in larger quantities - up to 40 beads must be strung on one thread, while about 20 beads on the lower threads. This is an approximate proportion, it, like the tension of the threads, can be changed depending on the size of the structure. The lamp is usually covered with a pink cloth. All decorations are hung so that they flow down.
Conclusion
The chandelier is the single most important element in the upper part of the room, it can create symmetry and other geometric accents. To hang a beautiful, stylish, designer lamp in your room, it is not necessary to buy it in a store. Every home has enough items and tools to do everything on their own. In most cases, a blank, scissors, paper, glue, thread, frame, varnish and paints are enough. Sometimes you may need the help of an electrician. Most "handmade" lamps are made of wood, plastic, paper, glass, textiles or metals. There are also more exotic options using different designs, small parts, molds. A homemade chandelier should not only perform an aesthetic function, but also illuminate the room with high quality. It must be designed wisely.
For all chandeliers, except glass, it is better to choose LED bulbs. They heat up less during use.
CBC Life YouTube channelWhat do you need
- Yarn;
- small photo frame;
- scissors;
- 3 sets of wooden hoops of different diameters;
- 3 identical short and 1 long metal chains;
- pliers;
- bulb;
- lamp hanger.
How to do
1. Wrap the yarn around the photo frame many times and cut off. Take a small piece of thread and tie it on top of the yarn so that the ends remain. Cut the threads on one side, where the frame hole is located.
 CBC Life YouTube channel
 2. Remove the yarn from the frame and fold in half. Place the knotted thread in the middle so that its ends are at the bottom, and the loop is at the top. Details are in the video below. Cut another piece of thread and tie a tassel with it just below the loop.
 CBC Life YouTube channel
 3. Do the rest of the brushes in the same way. The quantity depends on the diameter of the hoop. Threads should tightly frame them.
 CBC Life YouTube channel
 4. Remove the center hoops from all hoops - you won't need them. Open the large hoop and put some of the tassels on them by the loops.
 CBC Life YouTube channel
 5. Close the large hoop. Put the tassels on the rest in the same way.
 CBC Life YouTube channel
 6. Make nine pieces of thread. Place the middle hoop in the large hoop and tie them in three places at the same distance from each other.
 CBC Life YouTube channel
 7. Put a small hoop inside and tie it to the middle one in three places. These threads should be located approximately in the middle between those with which the large and medium are connected.
 CBC Life YouTube channel
 8. Turn the design over and straighten the brushes. Tie short chains to a large hoop at an equal distance from each other.
 CBC Life YouTube channel
 9. Using pliers, open the last link of the long chain. Put the attached chains on it and close it.
 CBC Life YouTube channel
 10. Attach a suspension to the ceiling, screw in the light bulb and thread the lampshade from the bottom. A long chain can be hung, for example, on a hook attached to the ceiling next to the base of the chandelier.
What other options are there
There is another way to fix the chandelier. Put a metal ring on the lamp hanger and attach the chains tied to the hoop to it. Detailed Process shown in the video below. By the way, the technology of making brushes in it is slightly different. And the author does not use hoops, but metal hoops.
The tips of the brushes can be painted in a contrasting color:
Or make a gradient chandelier from colored threads, like this:
 Coral YouTube channel
 What do you need
- The globe;
- drill;
- stationery knife;
- marker or pencil;
- lamp hanger;
- bulb.
How to do
1. Remove the globe from the stand. At the bottom, go around the circle with a drill and cut a hole. Details are in the video below.
 Coral YouTube channel
 2. On the other side, at the top, mark a circle according to the size of the bulb holder. Also go through it with a drill and cut a hole.
 Coral YouTube channel
 3. Make several holes on the globe with a drill in any places. You can walk along the edges of the continents or highlight some countries. Through the holes, light will ooze beautifully.
 Coral YouTube channel
 4. Fix the hanger for the light bulb, screw it in and hang the chandelier.

What do you need
- Balloon;
- PVA glue;
- water;
- felt-tip pen;
- thick threads, such as yarn or twine;
- scissors;
- lamp hanger;
- bulb.
How to do
1. Inflate the balloon. Mix glue and water in a ratio of approximately 2: 1. You can take even less water.
On the part of the ball where the air enters, draw a small circle the size of the lamp hanger. On the reverse side, draw a circle of a larger diameter: for convenience, you can circle, for example, a glass.
 YouTube channel The DIY Cottage
 2. It is better to cover the working surface with newspapers or oilcloth and put on gloves on your hands. Wet the threads well in the glue solution and start wrapping the ball with them.
 YouTube channel The DIY Cottage
 3. Continue to thread the ball, trying not to touch the outlined circles. Arrange them randomly. The density of the layer depends on your taste: you can completely cover the workpiece or leave free space.
 YouTube channel The DIY Cottage
 4. Leave the structure to dry for about two days. Then deflate the balloon and carefully remove it.
 YouTube channel The DIY Cottage
 5. Pass the cartridge through the smaller hole, screw in the lamp and hang the chandelier by the hanger.
 diynetwork.com
 What do you need
- Glass bottles;
- machine for cutting glass bottles;
- sandpaper;
- decorative wire;
- pendants for lamps;
- light bulbs.
How to do
1. Rinse the bottles thoroughly and peel off the stickers, if any. Cut off the bottom with a machine and go over the edge of the cut with sandpaper.
 diynetwork.com
 2. Pass the wire through the neck and attach the cartridge. Randomly wrap the bottles with decorative wire and screw in the light bulbs.
 diynetwork.com
 What other options are there
In this master class, the bottles were attached to wooden base and decorated the chandelier with artificial greenery:

What do you need
- Veneer in rolls (very thin sheets of wood);
- measuring tape;
- pencil;
- scissors;
- iron;
- parchment;
- paperclips;
- glue gun;
- lamp hanger;
- bulb.
How to do
1. Cut six strips of 90 cm from the veneer.
 YouTube channel Søstrene Grene
 2. Iron them through the parchment so that the veneer evens out.
 YouTube channel Søstrene Grene
 3. Lay the two strips crosswise on top of each other and secure with staples. Attach another ribbon to the side.
 YouTube channel Søstrene Grene
 4. Make another piece of the same shape out of veneer. This triangle should be larger than the previous one.
 YouTube channel Søstrene Grene
 5. Put the parts on top of each other, as shown in the photo.
 YouTube channel Søstrene Grene
 6. Mark the outlines of a small triangle on the bottom part. Circle also the outlines of the intersecting stripes on both parts. All the details are in the video below.
7. Remove the top part, remove the paper clips from the bottom in one place. Lubricate the junction of the strips with glue and glue.
 YouTube channel Søstrene Grene
 8. Treat the veneer in the other two places in the same way. Glue the top piece. Put it on the bottom according to the marked marks and attach with a gun.
 YouTube channel Søstrene Grene
 9. Connect the adjacent tapes of the upper part with staples, as shown in the photo and video below.
 YouTube channel Søstrene Grene
 10. Fasten the adjacent strips of the bottom part, pulling them under the top ones.
 YouTube channel Søstrene Grene
 11. Glue the places connected with paper clips. On the reverse side in the middle, attach the part into which the light bulb is screwed, circle the inside and cut off the excess.
 YouTube channel Søstrene Grene
 12. Insert the suspension, fix it to the ceiling and screw in the light bulb.
What other options are there
Here is a more classic light fixture made from veneer:
This is the process of creating an unusual large chandelier with draped over wooden beam bulbs:
And here is how to make a beautiful wooden frame for an old unsightly lamp:

What do you need
- 20 l plastic bottle;
- gold spray paint;
- black spray paint;
- lamp hanger;
- bulb.
How to do
1. Carefully cut off the top of the bottle. The bottom one is no longer useful. Remove the cover.
 Elyasaf shweka YouTube channel
  Elyasaf shweka YouTube channel
 3. Cover it with black paint on the outside. Let the future chandelier dry completely.
 Elyasaf shweka YouTube channel
 4. Put the chandelier on the hanger and screw in the light bulb.
What other options are there
To make this chandelier, they took a five-liter bottle and decorated it with the remains of wallpaper folded using the origami technique:
 YouTube channel Wayfair.com
 What do you need
- Basket (for example straw);
- pencil;
- knife or other suitable cutting tool;
- lamp hanger;
- bulb.
How to do
1. Circle the cartridge in the middle of the bottom of the basket. Cut a hole along the line.
 YouTube channel Wayfair.com
 2. Insert the cartridge there and secure from the inside.
 YouTube channel Wayfair.com
 3. Screw in the light bulb and hang the chandelier by the hanger.