How to make a spotlight with your own hands. DIY lamp (58 photos): options for desktop, pendant and wall lighting design. Lamps made of textiles and threads
Today, a chandelier is not just a source of lighting. It is one of the main elements of the decor of the room. The most popular lamps handmade because they represent the individuality of homeowners and their extraordinary creative abilities.
Undoubtedly, man-made creativity is a rather difficult task that requires a lot of patience and accuracy. However, doing something with your own hands is always quite exciting and informative. The topic of this review is how to make a chandelier with your own hands.

The choice of material for a homemade chandelier
In order to make a handmade lamp, the most different materials:
- glass;
- wood;
- plastic.

In addition, sometimes, to make a chandelier at home, they use very unusual things:
- paper;
- cardboard;
- disks;
- straw;
- branches;
- wine bottles and more.

When choosing this or that material, it is necessary to take into account your own preferences and the style used in the design of the room.

In addition to the material, the devices may differ in manufacturing techniques. The most common are:
- Japanese origami;
- macrame;
- weaving;
- thread;
- knitting;
- application;
- embossing.

Ideas for creating a chandelier with your own hands - step by step instructions
Nowadays, there are many unusual ideas on how to create a beautiful lamp for an apartment with your own hands. Consider those of them that are more popular.

Chandelier made of plastic spoons
Ordinary disposable plastic spoons are the easiest and most affordable type of material to make a chandelier. The advantages of such raw materials are:
- low cost;
- manifold color solutions;
- durability.

To make a lamp, you will need:
- plastic bottle with a volume of 5 liters;
- disposable spoons;
- PVA glue;
- bulb socket;

Procedure:
- Prepare a bottle. To do this, remove the label, cut off the bottom, wash the workpiece thoroughly and dry it.
- Prepare your spoons by cutting off the handles.
- Paste the entire bottle with scoops with the convex part outward.
- Fix the cartridge in the made ceiling.
- Attach the chandelier to the ceiling and plug it in.

Chandelier from plastic bottles
An interesting solution from a decorative point of view would be a lamp assembled from plastic bottles.
- We take scissors and cut out various patterned shapes and unusual figures. From them we will collect a chandelier.
- We attach several thin rods to the frame of the old lamp and connect them, removing the central one. At this stage, the lighting device takes the form of a hedgehog.
- We fix all the prepared figures and forms on the frame of the chandelier. The product is ready!

Consider a particular example - the process of creating a lamp in the form of leaves:
- Cut out blanks from bottles small size imitating leaves. Usually birch leaves are chosen.
- Using a soldering iron, slightly fuse the sections of the leaves, and draw the veins - this way they will look more spectacular.
- Poke holes in the stem of each leaf with a heated thin needle.
- Use wire to form branches. Screw them to the frame of the future chandelier.
- Attach leaves to branches. ceiling lamp original design ready!

Chandelier with paper butterflies
The lamp with paper butterflies is also popular. This model looks very impressive and luxurious, although it is quite simple to manufacture.

Sequencing:
- The role of the base is played by a frame from an old lamp or a simple rim made of metal or wood.
- Take paper and cut butterflies out of it according to pre-prepared templates.
- Attach the cut insects to a fishing line or nylon thread.
- Attach the resulting threads to the frame of the future chandelier and decorate it.

fabric chandelier
This type of lighting device is also based on a solid frame or thick wire. First of all, prepare the base, and only then it will be possible to cut out the material to create the lampshade.

The length of the finished product depends on your wishes, and the width must correspond to the size of the frame. After completing the pattern work, be sure to try on. The next step is to sew the fabric to the base of the chandelier.

In order for the lampshade to retain its shape, you need to correctly approach the choice of material. If you are using light material, then the lower part of the lampshade should be weighted.

As decoration, you can use fringe, braid or lace. But try not to overdo it with the decor.

Plafond of threads and a balloon
To create such an original ceiling, you will need to prepare:
- thick thread or rope about 1 m long;
- old cartridge;
- petrolatum;
- glue and brushes;
- balloons - 1 - 2 pcs.

Manufacturing process:
- Inflate the balloon to the required volume, and use a felt-tip pen to mark the boundaries of winding threads.
- Coat the entire surface of the ball with petroleum jelly using a brush for this.
- Pour the glue into a wide container and start processing the threads with it as you wind it around the ball.
- After you fill the ball with threads to the marked borders, it should be left to dry.
- After a day, burst the balloon and remove it.
- Cut a hole in the top for the cartridge and insert it. You also need to cut a hole at the bottom of the ceiling - it will be more convenient to insert a light bulb. The product is ready!

Wine bottle chandelier
Such a chandelier is more time consuming to create than the options described above. It is quite difficult to make it. This requires patience and attention. But the effort is worth it!

Necessary materials:
- wine bottle;
- cartridge;
- cable;
- sandpaper;
- metal or wood base.

Of the tools you will need a glass cutter.
Production order:
- Preparatory stage. Wash and dry the bottle, get rid of the labels, mark with a marker a line along which to cut off the bottom using a glass cutter.
- Finish the cut with sandpaper.
- Pass the wire through the bottle neck, and attach the cartridge.
- Fix the bottle on a pre-prepared frame.

The number of shades for the chandelier depends on you - you can leave one or make five or six.

Chandeliers from laser discs
If the apartment has accumulated a large number of old CDs - do not rush to throw them away. They will make a pretty creative lamp.

To make an unusual accessory from laser discs, you will need to prepare a pair of round planks. Their size should slightly exceed the size of the disks. Still needed:
- fluorescent light bulb;
- steel or wooden racks;
- old magnetic starter;
- many CDs.

Take a board that is thicker and make a hole in it for the starter. Attach everything to the lamp. Then start stringing CDs on it while mounting the racks. Attach the second plank at the end. Work completed.

Wooden chandeliers
Wood is the most common material for all kinds of crafts. The chandelier is no exception.

To make such a lamp, you need:
- wooden planks 0.4 m wide;
- glass jars 1 liter volume for ceiling lamps;
- sandpaper;
- self-tapping screws.

Manipulation order:
- Treat the planks with sandpaper.
- Make notches in them from the back for mounting the wire and three holes for the shades.
- Coat the planks with varnish.
- Attach cartridges, screw in bulbs.
- Plafonds will serve as ordinary liter cans painted white.

Choosing a lamp for a homemade chandelier
To make the chandelier made from scrap materials made by you look even more attractive, you need to choose the right light bulbs for it. The following recommendations will help you:
- Choose a lamp of suitable power. Remember that overly powerful products can cause a fire.
- Look at the number of lumens. The larger it is, the more natural the lighting.
- Consider matching the shape of the light bulb to your appliance. For some models of chandeliers, light bulbs of a strictly defined shape are required. Only then will they work efficiently and correctly reflect the light rays.
- Be sure to check the expiration date. If you plan to use the lamp often, then look at the lamps with the longest lifespan.
- Take an interest in what kind of light the lamp will glow - cold or warm. For the home, it is better to purchase an option with a warm shade of light. So the situation will seem more comfortable.
- Do not ignore the energy consumption of the light bulb. Products with low energy consumption are considered the best choice.
- Check for the presence of mercury in the lamp - this determines how it is disposed of. Mercury-containing products cannot simply be thrown into the trash. They must be handed over to special collection points.

Product decoration
As a decoration for homemade chandeliers and lamps, you can use a variety of things:
- paints and varnishes;
- lace;
- satin ribbons;
- fringe and braid;
- beads, beads, rhinestones, pebbles.

A good decor is artificial or dry flowers, feathers cut from butterfly fabric. In general, how to decorate ready product, depends only on you. You can use any improvised means that your imagination indicates.

In conclusion, we note that such a homemade light fixture as a chandelier will definitely bring a touch of freshness and style to the room's decor. Your relatives and guests will definitely note the originality of the accessory and your skill. In addition, a handmade lamp is a great gift for a friend or colleague.
Original photo ideas for homemade chandeliers


The idea to make a lamp with my own hands came to mind when, after laying the linoleum in the house, there was a cardboard pipe left (on which the linoleum was wound).
To make a lamp with your own hands, it remains to buy just a little bit of 2 meters of black and red wire, 2 meters of adhesive-based LED strip, a 12V 1A power supply, spray paint in a can. The LED strip, of course, was a little expensive, but it is easier to work with. It was possible to use super-bright LEDs separately, but there is a lot of trouble with them in terms of soldering together and mounting inside the pipe.

Making a lamp with your own hands began with drawing preliminary sketches on paper. There was a desire that the lamp not only be curved in a plane, but also in space, and have a bizarre 3d wave shape.
After the sketch on paper satisfied my desires, I started making a lamp. Each pipe in the figure was measured and the pipes were cut to those dimensions. To get the necessary angles, templates were cut out of paper and fastened with tape on the pipe.

All tubes were laid out on the table, and adjustments were made to the waveform.

The cuts were made on a stationary circular saw. Thus, smooth cuts without burrs with a width of 2 mm are obtained.

Now you need to connect all the pipes into one. The main task is to make smooth bends, for this it does not hurt to apply a template (fiberboard sheet) on the table. Since the pipes are cardboard, they can be respectively connected using glue PVA, but I would recommend using adhesives that are stronger and harden faster (moment, superglue).
On the reverse side, wooden planks were screwed onto the screws so that the homemade lamp could be hung on the wall. And holes were drilled in each pipe for the output of wires from the LED strips.

The pipes were painted with ordinary paint in a spray can. Red was used, since the wall on which the lamp should be located was white, I wanted to get some contrast.

The paint dries very quickly, so you can proceed with the installation of LEDs. The main thing to remember is what to cut led strip only available in designated areas. The tape must be marked in advance so that it is enough for all 12 pipes.
We solder red wires to the “+” contact, and black wires to the “-” contact, so as not to confuse the polarity later.

We place the LED strips inside the pipes and fix them with the adhesive side to the pipe wall, and we bring the wires out through the holes made in advance. It remains only to connect all the wires in parallel (connect red to red, and black to black) and connect to the power supply.

There are all sorts of lamps in electrical goods stores - manufacturers go to all sorts of tricks so that each buyer finds exactly what suits him both in design and in his pocket. But a hand-made sconce is still the most original functional home decoration.
Electricity and creativity
Electrical appliances require the manufacture, installation and operation of compliance with all the rules that are prescribed by law, safety standards and the laws of physics. Therefore, if there is no special knowledge and skills to work with electrical appliances, then it is best for creativity to use the base from the old sconce, at least its electric filling. It is possible to assemble a wall lamp, as they say, from scratch only to someone who understands the materials, tools for collecting such equipment, knows the section of physics called "electricity", knows how to assemble electrical circuits that meet the requirements for household lighting devices. If all knowledge about this sphere of life comes down to a successfully forgotten school physics course, then it’s not worth the risk. It is better to use that wall lamp that has been asking for a trash heap for several years. Different types of creativity and craftsmanship allow you to create a sconce with your own hands. Photos of similar works are presented on this page. Therefore, the question of how to make a sconce with your own hands does not require a complicated answer, you just need to turn on your imagination.
Plafond for sconces - the essence of the lamp
Wall sconces perform an interesting functional task - lighting a small area of the room. They are located on the wall, and most often the light from the sconce falls down, slightly scattering on the sides. That is why wall lamps are popular for creating comfort in the bedroom, in the kitchen above the table where the whole family gathers, near the seating area with an armchair or sofa. Such a local lighting device can have any design in any style - from eco-style to hi-tech. Only the interior of the room decides what the sconce lamp will be like. Therefore, for man-made wall lighting, you can use a variety of materials. The only condition is that they must be resistant to a sufficiently high temperature of the light bulb in operation. Although thanks to modern lighting fixtures on LEDs, this question disappears by itself - the LED bulb during operation heats up to 64 degrees in the lower part, where the necessary lamp elements are located. The flask itself heats up to approximately 33-34 degrees, i.e. you can easily hold it in your hands. That is why LED lamps allow you to use almost any material for the ceiling. Having thought of making a sconce with your own hands, you can refer to materials in available sources or print publications to choose suitable option and for your creativity.

Threads and weaving - a suitable basis for creativity
Different types weaving from threads: macrame, tatting, knitting, crocheting, on a fork - are actively used by needlewomen to decorate the interior of their home. Creating a lace sconce with your own hands for a craftswoman is not a problem, you just need to find a suitable scheme or develop it yourself. In preparation for work, you should first consider the basis of the ceiling. Will the lace be stretched or will it hang down, what shape is the ceiling and how to put the lace on it: observing the pattern, or will it be abstract, or undemanding to a clear correspondence to each rapport. Lace will look very elegant on a rounded ceiling of a classic shape. And for a non-trivial solution for a do-it-yourself sconce lamp, lace can be appropriate. For example, for a high-tech style, you can use Lurex or metallic threads. But even those who do not know how to knit will make a lace sconce with their own hands, using ready-made lace. Measure the area of the frame for the ceiling and buy the required amount of the material you like with a margin for some shortcomings or unforeseen circumstances in the work - and an interesting, unusual lamp will decorate the room. In general, threads always turn out beautiful lamps. Even the chaos created from textiles can be presented in an unusual way, for example, by wrapping threads around a balloon, having previously smeared them with PVA glue. When the threads dry, the ball must be gently blown off by piercing with a needle. The resulting spider sphere is used as a lampshade for a lamp.

wood and light
Wooden objects look very original in any interior. Natural wood is beautiful - with its pattern, shades and color transitions. Using the natural curves of the branches, you can get interesting objects and their details. How to make a wooden sconce with your own hands? You can use several options. For example, you can take special blanks that are sold in stores for creativity. They are assembled or glued together, forming a ceiling for the lamp. You can try to make an unusual sconce from the most ordinary twigs collected during a walk in the park. Rinse small, 1.5-2.5 cm long twigs, clean them of dirt, and dry. Then inflate an ordinary balloon and stick branches on it in a chaotic manner using glue that does not destroy the rubber of the balloon, for example, building PVA. When the branches are well grasped, the ball must be pierced with a needle, it will deflate and fall behind the resulting ball of branches. The ceiling, if necessary, is covered with furniture varnish. The only thing is that it will be necessary to prepare the base on which the ceiling of the resulting diameter is attached. A lamp on the wall with your own hands can be made from unusual wooden parts. For example, by disassembling wooden clothespins for spare parts. They are assembled together so that they form a circle, gluing to the base and to each other. Each half of the clothespin has an interesting shape with recesses that are just perfect for jute cord or decorative braid, chain, or any other material that is most appropriate for a particular interior solution. You can also use colored pencils - creating a chaotic lamp-ball or gluing them into a slender circle or semicircle to form a ceiling.

Sconce with your own hands from dishes?
Craftsmen just do not come up with something to create something interesting. For example, using a disposable plastic utensils- junk cheap material - for creating interior items, including sconces, with your own hands. Plastic spoons, cutting off their cuttings, are collected in the shape of a flower, gluing them together in circles and in rows. Disposable forks, also without cuttings, are assembled, like a designer, with the help of cloves into a sphere for a ceiling. The plates are bent, getting two semicircles, and also fastened together. This is an interesting do-it-yourself sconce solution, which is actively used in decorative art.

And you can not throw away!
Unusual wall lamps are obtained from tin cans. Banks themselves already represent a rigid form that is easily suitable for a ceiling. You just need to decorate it. You can do this like this - draw a pattern on the bank like a dot painting and use a nail and a hammer to punch holes according to the pattern. So that the jar does not wrinkle when they work on it with a hammer, you need to put a wooden block inside it. The drawing should be built neatly, and the distances between the holes should be the same. When the drawing is completed, the jar needs to be painted.

An unusual do-it-yourself sconce is obtained from ordinary plastic bottles. They are different color, are easily cut with scissors and melted with a candle. Figures (flowers, butterflies, ribbons) are cut out of plastic, melted, shaped, and then glued to the base from the same bottle or to an old glass ceiling with glue. By the way, lost appearance the glass ceiling can be decorated in any way and give it a second life.
"Delicious" sconces with their own hands
A lot of interesting things can be done using natural materials. For example, pumpkin. Yes, magic can be done on your own, without magic wand fairies, if you only want to do something with your own hands. And the pumpkin is just asking for a desktop. There are varieties of pumpkin that can only be eaten, and there are those that are not very suitable for delicious dish, but the hard shell serves as a unique creative material, for example, to create a DIY wall lamp. The pumpkin is prepared for processing, and then pictures or a mandala drawing are cut out of it, whatever you want. Such a ceiling lamp for a wall lamp will not only decorate your home for Halloween, but also give a smile on any other day.

As easy as pie
The simplest sconce lamp can be made from an ordinary box, for example, from juice or milk. It is good when such a package is covered with a layer of metallized foil from the inside, which is the best suited for creating a lamp. From such a box, an original sconce will turn out if you cut out the walls in it and tighten them, for example, with parchment paper or lace fabric, or make plot pictures on the walls of the box. Such a lamp is suitable for a children's room, because a kid can come up with a picture, and parents will help cut it out. Joint creativity will make the room more comfortable, and the family more friendly.
If there is a desire to needlework, decorating your world, then there will always be materials for creativity, and interesting solutions. You just need to want to create beauty with your own hands. Good luck!
There is no doubt that the right kitchen lighting sets the tone for the entire interior. A chandelier can become central element in this cozy and warm space.
Using improvised materials - or even junk - you can make a lampshade from threads, an eco-style lamp from jute twine or plastic bottles, or you can make a real masterpiece - a beautiful chandelier from wooden or glass beads.
And a lamp made by yourself can not only be hung in the kitchen or in the dining area, but also presented to loved ones.
Method 1. From improvised materials - everyone can!
The simplest do-it-yourself lamp is made of threads. Indeed, even a child can handle such a design. So, to make a chandelier of threads, we need:

- Threads - you can take ordinary jute twine or thick cotton threads, with a total length of at least 100 meters, the color is chosen based on your imagination and the existing interior;
- PVA glue and a brush for its application;
- Petrolatum;
- 2 balloons- one for work, the second for testing; it is better to take a ball not ordinary, but round, then the shape of the lamp will be the correct shape.
Advice! A children's or rubber beach ball is also suitable. For very large fixtures, a fitball is suitable, for example.
Work on creating a ball of threads is carried out in the following sequence:
- We inflate the balloon of the required size. Do not forget that the resulting lampshade made of threads will repeat the shape of the ball. Draw with a marker one or two circles at the top and bottom (more below).
- Pour the glue into a container and carefully process the threads. And the ball itself can be coated with Vaseline with a brush.
Advice! Do not immediately apply glue to all the threads - it is better to move along the place of winding.
- This is followed by winding the threads on the ball, taking into account the drawn holes - it depends on the density of the winding how your lampshade will turn out in the end.

- After the ball is wrapped, you need to leave the future chandelier to dry for at least 24 hours.
- The ball bursts and its remains are easily removed from the solid structure that has become. As a result, a lampshade made of solid threads was obtained.
- A hole is cut from above - under the cartridge.
- It is necessary to check the strength - another ball is inserted into the lamp and inflated. This will demonstrate the flexibility of the design.
In this way, you can also perform local lighting in the kitchen by creating several lamps from threads with your own hands. And you can hang it in the dining area, as shown in the photo.


Do not forget that for a ball of threads you can make additional decor in the form of interesting coloring, beads, butterflies or artificial flowers, or you can make a whole bunch of balls of different sizes.

By the same principle, you can come up with your own unique design lamp. For example, from lace, or ceiling lamp as in the photo below.


Method 2. Create a masterpiece - you need to try!
Excellent kitchen lighting will turn out if you make a lamp of beads or fabric with your own hands. Get a lamp in style or a real chandelier-chandelier.
For this job you will need:
- Old hoop, garden basket, hanging metal planter, or wire to create a frame;
- Decorative chains;
- Beads, beads, ribbons, strong threads;
- Cartridge with a lamp.


The lamp will be a two- or three-level structure of rings located one above the other and connected by chains or wire.
Rings can be taken in different sizes, creating a lampshade in the spirit of vintage classics, or the same - this is the lighting that is done in.


The base of the lamp is certainly painted, wrapped or decorated, after which they start stringing beads.

The consumption of beads in this project is as follows:
Lower part: beads with a diameter of 16 mm, 15 pcs. on a thread;
Upper part: beads with a diameter of 12 mm, 31-32 pcs. on a thread.
Here you can vary the degree of tension and the number of threads.
Advice! Work should be carried out by first hanging the chandelier and inserting a cartridge into it.
By analogy, you can create a chandelier made of artificial fruits for the kitchen. And subdued lighting will turn out if you use fabric for covering the frame. As a rule, such a lampshade is made for country styles and.
Method 3. Lamps made from waste materials - for a modern kitchen!
Most original lamp can be made from such junk material as plastic bottles and disposable spoons - it's beautiful, cheap and environmentally friendly!
We make a lampshade in the style of minimalism and - no additional decorations from threads and beads, only matte white or colored plastic. To make such subdued kitchen lighting with your own hands, we need:
- Base made from a 5 liter plastic bottle;
- Cartridge with wire and lamp;
- Glue for high-quality fixation;
- Lots of disposable spoons.
To make a chandelier with your own hands, cut out the bottom of the bottle and cut off the handles of the spoons (not completely, so that a small stalk remains). Using glue, we fix the cut spoons on the base bottle. They need to be placed evenly, in order, then the lampshade will look attractive.
Advice! Each next row is overlapped, without gaps.
The resulting chandelier will resemble fish scales. However, it should be remembered that such a design is quite dense, which means that additional lighting will definitely be needed in the kitchen.
The shape of the lamp can be different, for example, in the form of a lotus.

From disposable spoons you can make such decorations.

A lamp made of plastic bottles, or rather from their bottoms, made by hand, may seem lacy or consisting of many small flowers.

Advice! Such a lampshade can be made not white, but colored - which means that you need to take colored bottles or paint it with paint of the original color: copper, gold, steel, pink, black, etc.
The resulting lampshade can be hung in the kitchen or over the dining table.
Let your kitchen be cozy and bright! We wish you creative success and present some more great ideas for making kitchen lamps with your own hands from improvised means.


Handmade items fill the house with special warmth and comfort. Plus, they are exclusive. We offer an overview of lamps that will completely change the atmosphere in the room, turning into an object of envy from the groans of friends and relatives. Moreover, they are made from everyday items that are usually thrown away.


A cardboard bag for juices or other drinks is a common thing in most homes. Most of the time it gets thrown away. But the Malay designer Edward Chu spent a lot of time to cut them into hundreds of strips and build amazing lamps from them without a drop of glue, a simple origami principle.

Yaroslav Olenev proposed to make lamps from disposable plastic spoons and became the winner in the nomination "Ecology and Design" from the magazine "Future Now".


No less original application was found by Natalie Simpson for ordinary wooden hangers. But they look amazing in the form of a chandelier.
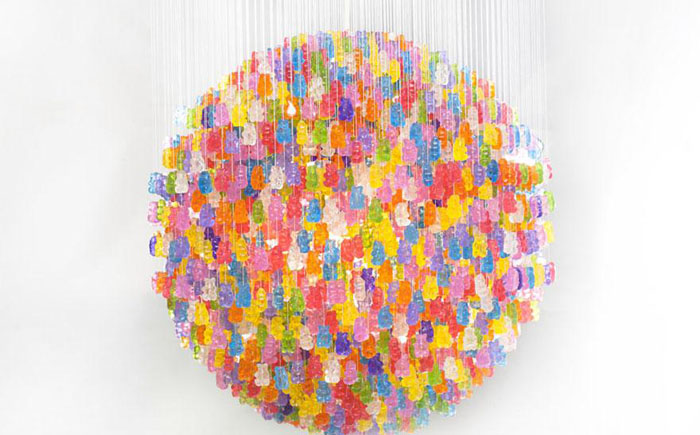

Kevin Chempeny must be given credit, not everyone has the strength and patience to string 14 thousand bears to get a chandelier.

Tira Hilden and Pio Diaz have their own vision on the problem of housing lighting. Thanks to their lamps, the room becomes like a forest. All walls come to life and turn into trees.

Talented welder Matt Ludwig was also an excellent designer. For the JJ's Red Hots restaurant, he made an incredible original chandelier from an old drum kit.

Texan artists Joe O'Connell and Blessing Hancock made stunning lamps from old bike parts and hung them in a tunnel under the highway.

It will probably be difficult to find a more original chandelier than a pumpkin from a Polish artist. It carves stunning patterns on the peel that do not repeat.

Lampshades from felt hats by Jeeves & Wooster.

Once Heather Jennings saw an amazing Rhododendron chandelier in the store, only it cost more than $ 800. Then the designer decided that she could do just as well with her own hands. To do this, she needed paper molds for cupcakes.
11. Chandelier in the kitchen

A chandelier made of ordinary metal tetrahedral graters will look incredibly beautiful.

Still fresh in my memory are vases and candy bowls made from openwork napkins. Now it's time to knit chandeliers.

A strange option is offered by Fansois Lego, he believes that the most The best way cutlery storage is a chandelier.

A large cloud is cut out of wood, but the rest and the switch are made of cardboard.

A few globes can make a wonderful cascading chandelier, a great way to light up a flight of stairs.