Do-it-yourself garage door designs. Do-it-yourself lifting garage doors. Install locks and locks on gates
Garage doors are a very important part of the entire garage. They protect it from breaking, cold and precipitation. Today, many different companies and manufacturing enterprises offer their services for the manufacture and installation of shutters for garage-type premises. Such firms do everything professionally, but quite expensive. Is it possible to build such structures yourself? If yes, how to do Garage Doors with your own hands, and what is needed for this? This article will try to answer all of these questions.

First of all, it is worth clarifying what types of garage doors exist today:
- Swing - old, good and proven garage doors. Our grandfathers made them, and they never let them down. Making such a garage door with your own hands is quite simple.
- Retractable - a fairly new type of gate. Sliding gates to the garage imply the presence of one or more leaves, which, when opened, move off to the side. It is customary to use such shutters only in large rooms with a fairly large side space for the doors to move in, or as a gate to the courtyard.
- Up-and-over doors in the garage are a single leaf, which, when opened, rises and is fixed under the ceiling. Such a system is a very big plus for owners of garage spaces, as it saves space inside and in front of them. The disadvantage of folding gates is the likelihood of freezing of their mechanisms and systems in severe frosts. That is why such shutters are suitable only for heated rooms. Making them yourself is difficult, but possible.
- Overhead sectional doors consist of several panels that, when opened, drive under the ceiling. The advantage of such a system is considered to be the same space savings. Its disadvantage can be called the impossibility of creating such a gate at home.
- Roller shutters are a lattice of aluminum plates, which, when opened, go up and hide in a special compartment. The disadvantage of such a system is the impossibility home production, fragility and unreliability, as well as poor thermal insulation.
As can be seen from this list, at home it is easiest to make only swing gates. It is their production that we will consider in the article.

Handmade production
Before you make a gate to the garage with your own hands, you need to create their scheme. The drawing of the garage door should display all the components of the structure and them.
swing gate in the garage consist of three main parts:
- Frames for the opening (internal and external);
- Shutter frame;
- Cloth for shutters.
Dimensions

When drawing up drawings of garage doors with your own hands, it is advisable to adhere to the following requirements and tips:
- The width of the shutters should be such that the distance from the sides of the car to the garage box is at least 30 cm;
- The standard for the width of garage doors is a width of 2.5-3m, and a maximum of 5m;
- The height of the gate directly depends on the height of the car that will stand in the garage - the standard for cars is 2-2.2m, for minibuses - 2.5m.
What do you need to stock up for work?

In order to make a swing garage door, you may need the following materials:
- Metal corners 65x65mm;
- Reinforcing steel rod;
- Steel strips 3-4mm thick and 2-3cm wide;
- Reinforced hinges;
- Cloths of steel 3-4 mm thick or corrugated board.
Of the tools useful:
- Measuring tape;
- Square;
- Level;
- Bulgarian;
- Welding machine.
frames
Before building the entire garage, it is advisable to stop at the fifty percent stage of building its walls in order to build a gate frame into them.

Algorithm of actions in the manufacture of a frame for the gate:
- We cut out eight segments from a metal corner, four of which will be equal to the height of the garage opening for the gate, and four to its width.
- We lay out on bricks or other materials of the same height four parts of the first frame at an angle of 90 ° - be sure to make sure that all its parts are in the same plane.
- We fix the segments of the corner between ourselves by welding, while regularly checking compliance with the angle of 90 °. It is advisable to weld the corners with an overlap - this technique will provide a better hitch.
- We carefully clean the outer part of the outer frame from traces of welding, since it is very important that there are no gaps between the wings and the frame.
- We do the same procedure with the second frame.
Shutter frame

When making a frame for sashes, the following instructions should be followed:
- We cut out four pieces from a metal corner or a rectangular profile, each of which should be 10-15 mm shorter than the height of the gate frame.
- We cut out four more segments, each of which will be equal to the value of half the width of the frame minus 30-35mm.
- We lay out the resulting pieces of the profile on a flat plane and set angles of 90 ° between them - for convenience, you can impose a profile on an already welded frame.
- We weld both frames in turn.
- In the center of the frames in a horizontal position, we weld one more piece of the profile to strengthen the structure.
- We carefully grind the traces of welding on the side of the frame to which the leaf blades will be attached.
sashes

The algorithm of actions in the production of gate leaves is as follows:
- From sheets of metal we cut out two rectangles of the appropriate sizes.
- The height of the rectangles should be 3-4 cm higher than the height of the garage opening.
- The width of one of the rectangles should be 1-2 cm more than the width of the frame, and the second, respectively, should be equally less.
- We weld the cut sheets of metal to the sash frame so that their upper and lower edges protrude 1.2 cm above the frame.
- We weld the smaller sash in such a way that a frame peeks out from under it 1 cm wide.
- We weld the large sash so that it overlaps the edge of the frame by 2-4 cm.
- The resulting indentation is necessary for a tighter joint of the doors.
- In the process of welding sheets, it is advisable to first grab them a little along the edges and center of the frame, and only then carefully weld the entire sheet in increments of 10-15 cm.
- Welding at the corners of the gate is desirable to grind.
Door and frame connection
In order to connect the sashes and the frame, it is necessary to use reinforced hinges. Their upper part must be welded to the leaf, and the lower part to the gate frame. For greater welding coupling, welded pieces of metal and a reinforcement tab can be used.

A metal strip 5-7 mm thick can be welded to the junction of the upper part of the hinges and the sash. The reinforcement tab must be welded from the inside.
When the welding work is completed, it is necessary to test the entire structure for strength and effectiveness. During testing, it is desirable to pay attention to the following points:
- All parts of the structure must be in the same plane.
- Shutters should be adjacent to the frame and point to each other.
- When opening / closing the sash should be easy to walk and not cling to anything.
Mounting
As mentioned above, it is advisable to mount the gate frame even at the stage of building a garage, when only half the height of the walls has been erected. It is necessary to install the frame in the unfinished opening, making sure that it is correctly installed vertically and horizontally.
For greater strength and accuracy, both frames are best welded together with metal plates 4 cm wide. The plates must be attached to the frames every 60cm.

When the frame is ready, you can continue to lay out the walls of the garage, while it is desirable that all the space between the frames be bricked up. In the process of laying, it is necessary to wall up the frames themselves. To do this, they need to be welded to 3 rods of reinforcement on each of their sides. It is desirable to take rods with a length of 20-30 cm. In the course of laying, they must be embedded in the seams between the bricks.
At the final stage, the upper part of the frame must be fixed with a ceiling - a concrete or metal beam.
When the masonry dries and sets, it is advisable to test the new gates - they must be opened and closed, listen to see if there is any opposition during these actions.
If the tests were successful, then you can start cutting locks, installing valves and welding special lugs for padlock.
It should also be said that, if desired, swing gates can be made with a gate. Such a convenient device allows in winter, without the need to drive the car out, not to open all the shutters completely and not to run into the garage cold air. We hope you are?
We hope that this article will help you build your garage and make high-quality and inexpensive swing gates for it.
A garage is a building that receives special attention, especially in terms of burglary resistance. And such an element as a gate should have twice the strength and reliability, and of course, an attractive appearance. Traditionally, garage doors are a two-leaf hinged structure hung on a box. Making them with your own hands is not a problem if you have the skills to work with simple plumbing tools and a welding machine. This will be discussed in the article: options for swing gates, manufacturing technology and the nuances of the installation process.
Types of garage doors
In addition to the fact that swing garage doors are traditional and very reliable, they have other advantages.
- The cost of construction is cheaper than all other models.
- The swing modification can be insulated using various heat-insulating materials.
- Can be installed in limited space.
- They can open outside or inside the garage, depending on the requirements of the owner.
- Possibility of installation of the electric motor for automatic opening.
The only big drawback is that free space is required to open the doors of the structure. This is sometimes problematic in winter when snow piles up in front of the garage. Therefore, you have to wave a shovel.
Minus swing gates - in front of them you have to clear the area from snow
In addition to swing gates, other varieties are also installed in garages.
folding
This is a sectional type of gate, the elements of which are installed vertically and connected to each other in a hinged way. The extreme sections are attached, like the swing ones, to the box with loops. Additional fastening - on the top or bottom rail. Sections are made from different materials, often made of aluminum alloys or wood.
Design advantages:
- unusual appearance,
- ease of opening and closing
- do not take up much space when open
- sections can be individually changed, repaired,
- low price.
Cons: rapid wear and low protective functions.
Folding gate
lifting and turning
Purely constructively, this is a one-piece shield that covers the entire entrance opening. To open, the gate is raised and rotated 90° so that it is at the top in a horizontal plane. For this, a system of levers, a gearbox and an electric motor are used.
Model pluses:
- high reliability,
- when open, the gate does not take up any space,
- are insulated,
- amenable to automation.
- required high accuracy installations,
- the gate remains in the opening, reducing its height by 20-30 cm,
- it is not recommended to use them intensively.
Overhead gate
Lifting sectional
This is a construction of several sections arranged horizontally and interconnected by special loops. With the help of a lifting mechanism located on the ceiling, the gates are lifted along the guide profiles and positioned horizontally along the ceiling. Sections are mainly made of sandwich panels.
Model pluses:
- versatility in terms of opening dimensions,
- saving free space when opening,
- good resistance to deformation and mechanical stress,
- full automation,
- presentable appearance,
- high heat and sound insulation qualities,
- long term operation.
- high price,
- constant maintenance is required: lubrication of hinges and guides, checking electrics and automation,
- low burglary resistance.
Overhead sectional doors
Rolled
These garage doors got their name from the way they open. Purely constructively, these are several strips (lamellas) assembled into one canvas, which is twisted into a roll. Therefore, in addition to the leaf, the structure of the gate includes two guides that hold the structure in the opening, a shaft on which the lamellas are wound, and an electric drive.
Advantages:
- compactness,
- acceptable price,
- ease of installation,
- long term service
- presentable appearance,
- possibility of automation.
- almost zero burglary resistance,
- there is no way to conduct insulation, because there are always gaps between the lamellas,
- do not work well at low temperatures.
roller shutters
Rollback
In this design, there is one sash, which rests on a guide profile located on top, and rests against the rail from below. The device is opened by rolling to the side along the wall.
The advantages include:
- functionality does not depend on snowdrifts,
- does not take up space when opened,
- high burglary resistance,
- possibility of automation.
- rapid wear of rollers,
- the width of the wall along which the gate moves must be greater than the width of the sash.
Sliding gates
Do-it-yourself manufacturing technology for swing garage doors
So, swing gates for a garage are two leaves (often the same in width), which are hung on a U-shaped box through hinges. Therefore, when the task is set - to make a gate of this type, then several questions are solved:
- sash manufacturing,
- manufacture of a box (frame),
- installation of the last
- installation of shutters on the frame.
Before you start making swing gates, you need to decide on their size.
garage door dimensions
There are no strict size requirements. The main thing is that the car can freely enter the garage without hitting the gate. And this allows you to make any opening, the width and height of which is 30 cm more than the dimensions of the car on each side. But this is inconvenient, especially for novice drivers.
- height for cars- 2.0-2.2 m, for minibuses - 2.5 m;
- the optimal width is 2.5-3 m, the maximum is 5 m.

Standard swing gate sizes
Preparation for the manufacture of the gate
Required tools:
- welding machine and electrodes;
- grinder with cutting and grinding disc;
- tape measure, ruler and marker (chalk);
- level and angle.
Required materials. The outer side of the gate is a sheet steel sheet with a thickness of 3-4 mm or corrugated board with a thickness of at least 1.2 mm. If the first material is used in the design, then the entire connection process is carried out by electric welding. If the second, then fastening the corrugated board to the frame can be carried out with metal screws.
As a material for assembling the frame, you can use either a 63x63 mm corner or a 40x40 mm profiled pipe with a thickness of 2-3 mm. The second option is cheaper and easier to use.
Swing garage door drawing profile pipe
And the last element is the hinges, which are made of a steel bar with a diameter of at least 25 mm. There should be at least four loops, two for each leaf.
Now, as for the U-shaped box. It consists of two racks and a crossbar (crossbar). The first can be made from a 63x63 corner or pipe round section with a diameter of 80-100 mm, or a profiled pipe with a cross section of at least 80x60 mm. Crossbar from the same materials. If construction is planned two-storey garage, then it is better to use channel No. 12 as a crossbar.
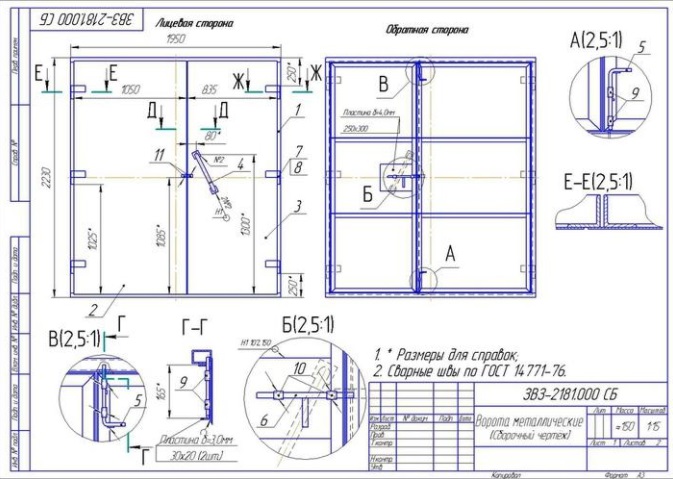
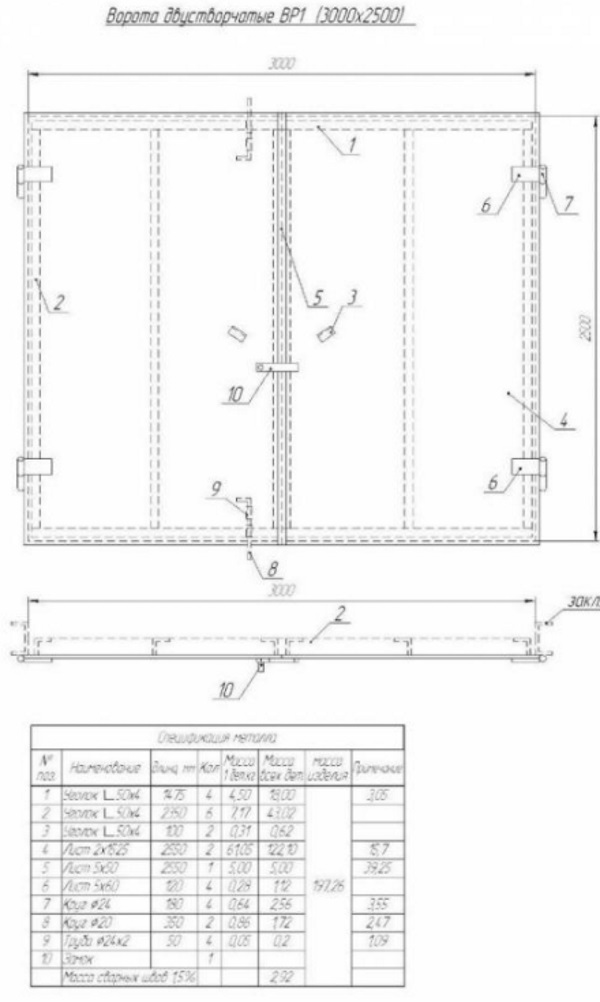
Assembly drawing of the gate
Manufacturing of sash frames
The first stage is cutting eight pieces of material prepared for frame assembly. Four of them should be equal to the height of the gate minus 1-2 cm, four to the width of the leaves, that is, half the width of the gate structure minus 2-3 cm. For example, if the total width of the gate is 3 m, then it is necessary to cut four elements by 1, 48 m
Setting the frame on blocks in a horizontal plane
An important point - the assembly of frames should be carried out on a horizontal plane. It is not necessary that it be a flat area, any type of stand is suitable, the upper ends of which are set in the same horizontal plane. To do this, you can use bricks or blocks. They are installed in the corners of a rectangle, the length of which is equal to the height of the leaf, the width is equal to the width of the gate section. Respectively cut segments are laid on them, and then they are checked with a level whether they lie on the horizon. Deviations are leveled by lining under blocks of thin boards, pebbles or sheet metal.
The laid segments are fixed to each other by spot welding with precise alignment of adjacent elements to each other at 90 °. For this, a building corner is used. it important point, which determines the exact dimensions of the future gate structure, which will fit exactly into the box without distortions and large gaps.
Diagram of stiffeners
Two frames are formed, now it is necessary to increase the rigidity of the structure by installing additional elements: horizontal or vertical If the gate is large, then both are used. Sometimes they are supplemented with oblique elements. As a material, a corner or a smaller profile pipe is used. For example, if the frames were assembled from a 40x40 mm pipe, then 40x20 mm can be used for reinforcement. Additional elements are evenly distributed relative to each other.
After assembling the frames, it is necessary to weld the joints on both sides and grind them from scale and metal smudges.
The rigidity of the frame structure is determined by additional elements installed vertically and horizontally
Connection of frame and steel sheet
From a sheet of iron for each sash, you need to cut a rectangular segment. There are certain requirements for their sizes:
- the length of the segments should be 3-4 cm more than the height of the gate opening;
- one of the rectangles in width should be 2 cm less than the width of the frame, and the second one should be larger by the same size.
For example, if the width of the wings is 1.5 m, the height is 2.5 m, then one sheet will be 1.52x2.54 in size, the other 1.48x2.54 mm.
Now, in height, two sheets are stacked on the frames so that their edges protrude beyond the frame structure by 2 cm on each side. The protrusions of the sheets will close the gap between the doors and the box. As for the width, from the side of the hinges, the sheets are laid flush with the profile pipe. In one sash, the sheet will protrude from the opposite side by 2 cm, in the other, on the contrary, its edge will not reach the edge of the frame. This is done so that when the gate is closed, the protruding leaf closes the gap between the leaves.
Attention! Sheets are welded to the frame pointwise from the edge to the center. After that, welding is carried out in small segments within 3-4 cm in increments of 10-15 cm.
The sheet is fastened to the frame with short seams.
Swing gate box assembly
The dimensions of the box are determined by the dimensions of the opening. At the same time, half a meter is added to the length of the support posts, with which the structure will be recessed into the prepared pits, followed by concreting.
The box is assembled using the same technology as the sash frames, with installation on bricks or blocks. The dimensions of the box along the inner contour in width are slightly larger than the total width of the valves. The difference is 2-3 cm. In height, the difference can be significant - up to 5-6 cm. Although optimally - 3-4 cm.
Swing gate box
Hinge installation
To do this, the sashes are laid on a U-shaped box with an exact location in a plane with the formation of gaps between all elements. Assembled hinges are applied at the place of their required location and welded: their lower parts to the box posts, the upper ones to the sash frame.
To strengthen the fasteners, metal strips or fittings can be additionally welded to the hinges.
Correct and high-quality welding with a loop
Swing gate installation
Ideally, the gate box should be mounted during the construction of the garage, when the walls are already half raised from bricks or blocks. But regardless of this, the installation is carried out according to the same technology.
- Pits are dug under the racks with a depth of 0.5 m.
- One or two crossbars made of reinforcement or a corner 10-20 cm long are welded to the lower edges of the racks, the purpose of which is to perform the functions of retaining elements in concrete.
Preparation of the rack before concreting the pit
- From the bottom of the supports, metal plates are welded in the form of a penny to rest on the ground.
- The half-meter ends of the racks are treated with a waterproofing compound, for example, with hot bitumen or covered with roofing material.
- The box is being installed in the pits with precise alignment in the opening, for which the building level is used.
- Racks are welded to embedded parts that are installed during the laying of the wall. Reinforcement with a diameter of 12-16 mm and a length of 50 cm is often used as mortgages. The laying step is every 6-8 rows.
- Concrete is mixed at the rate of cement-sand-crushed stone in a ratio of 1:2:2, if the grade of cement is M400.
- Pouring concrete into pits with a rammer. This is done not only in order to compact the concrete solution, but also in order to squeeze out of it the air that got there during the kneading process. Air pores are a decrease in the strength of concrete.
- You can hang the sashes on the box after the concrete has set and dried.
How to make a gate with a gate?
The process of assembling a swing gate with a door is exactly the same. Just four elements are inserted into one of the wings, forming an opening for the door. Vertical are installed in full height, horizontal between them in the form of crossbars. The design of the doorway is assembled at the stage of manufacturing the frame for the sash.
Location of the door in the gate with standard dimensions
The door itself is made in exactly the same way as the gate sections, with the assembly of the frame and the installation of a metal sheet. The complexity of the manufacturing process of the sash itself, in which the door is installed, lies in the fact that the doorway remains an uncovered sheet of metal, and the remaining planes must be closed with them. All of them will not be equal to each other, so each section must be accurately measured, transferred to the sheet and cut out. After that, each cut piece is transferred to the frame with spot welding around the perimeter. In this case, the stacked sections of sheets must be joined on additional profiles that create rigidity of the frame structure.
Drawing of a garage swing gate with a gate
The size of the gate is selected taking into account the convenient passage through it, as well as the dimensions of the gate leaf. For example, if the leaf width is 1.5 m, then the width of the gate should not exceed 1 m. As for the height, the height of the gate and the location of the door itself relative to the lower elements of the gate frame are also taken into account. At the same time, the maximum location height is 40 cm. The very same door height is within 1.8-2.1 m.
Welded gate for garage doors
Swing gate options
Video - how to make a garage door with your own hands
Conclusion
With the seeming simplicity of the assembly process, it should be noted that the manufacture of swing garage doors requires attention from the manufacturer, the ability to accurately carry out all measurements and calculations. In this case, do not let go of the measuring instruments. A slight deviation in shape or size may cause the sashes to simply not fit into the frame. You will have to make adjustments in place, which will affect the evenness of the elements.
Detailed information about
For any car owner, a garage is a must-have building. Those who do not live in the city build a structure near the house, some have to park their cars far from their homes, since there is no other parking place. Any place serves for the safety of the car, and the main protector of the territory from penetration is the gate.really do it yourself, or use ready-made materials from the article.
There are many types of products that differ in design, complexity. Some get ready-made, others prefer to make them with their own hands, making them as reliable and convenient as possible.
Garage door comparison
There are several types of products that are used in our locations to ensure reliability. There are the following types of structures:
- Swing. Used in any place, under the most difficult operating conditions. You can cover them well, leaving no possibility for penetration, not only strangers but also cold. For fastening, hinges and sashes are used, they hold the box. Many people have a question how to make a garage door with your own hands . It is easiest to manufacture this type of product, since it is the simplest in design.
- Rollback. They began to be used from the middle of the last century. There is one sash moving sideways to the wall, where it remains until closing. You can make bivalve when 2 halves of the structure are moving apart, but this private option this product. To design functioned normally, you need a lot of empty space in the territory where the product will be traveled. Usually they are installed not in garages, but on the entrance territory.
- Lifting and turning. A new generation of structures that look like a sash. When opened, they disappear under the ceiling, hiding at the top, becoming parallel to the ground. A hinge mechanism is used that guides the product in the right direction. They are comfortable and do not require a lot of free space. It is recommended to use if the garage is heated, as the hinges are a whimsical mechanism that can fail under incorrect operating conditions.
- Sectional. The new kind locking mechanism. The product is refracted and drives under the ceiling automatically. Chain springs are used. Significantly save space.
5. Roller shutters. Not very reliable, therefore rarely used for garages. Aluminum plates, connected in one place under the ceiling. Do-it-yourself garage swing gates, if there are drawings, it is realistic to perform. Roller-type products cannot be made with your own hands.
Do not forget that it is quite possible to automate any constructions so that the closure occurs after a key is pressed. If you plan to buy a product, it is important to take into account the durability, reliability of the design, the ability to work in certain conditions. The most reliable swing, which have been used for more than one hundred years.
How to make swing gates with your own hands
The structural part of the gate of this type is simple, therefore it is quite possible to make them yourself. For manufacturing, you will need corners, profiles, sheets. In terms of size, you need to figure it out yourself, since it all depends on the size of the garage. You can try to make lifting structures, but it will take a lot of skill in making all the necessary parts.
You should not start manufacturing without drawings, so that when performing work there are no bevels, uncertainties. It is not difficult to make documentation, it is enough to put the dimensions on paper, where all the parts, the material used will be shown. First of all, the height and width are selected. It is important to consider that the distance from the edge of the car to the doors of the locking mechanism was at least 30 cm. The higher the distance, the more convenient it will be to drive the transport inside. Huge DIY garage door it is inconvenient to perform - the bulky part takes up a lot of space, it is more difficult to open it.
The height of the product should be approximately 2-2.5 m. Here it is better to be guided by the size of the car. If you plan to drive a minibus, you need to provide a larger height.
Parts of the gate: the frame that is located at the entrance, in the opening of the garage, the leaves and the hinges that hold them. It is optimal to make a frame from steel corners with a thickness of about 60 mm. The frame can be made of steel or a rectangular profile. After that, the part should be sheathed with iron 2-3 mm thick. It is important to strengthen the loops from the outside so that there are no deflections or distortions. Looking at the proposed drawing, you can choose the dimensions for your garage, purchase the necessary materials.
Frame manufacturing

The first step is to make a frame, which is the main part to hold the entire structure. It is better to make it from the moment the walls were built. You can start after the construction of about half the volume of the garage. After break off, run frame for DIY garage doors and keep building.
You will have to spend money on acquiring the necessary parts for the gate, but it is much cheaper than purchasing a finished structure from the masters. The frame consists of two parts located inside and outside the object. Proceed as follows:
1. With the help of a grinder, a corner is cut, equal in length to the width of the gate - 4 parts. Next, 4 segments are cut, equal to the height of the gate opening. You can do it both with a small margin and flush.

2. The corners are laid on a flat plane, all this is checked using a level. The angles are set strictly at 90o.
3. The corners are welded so that a solid frame comes out.

4. All welding residues are removed by grinding. The outer side must be perfectly flat.
Execution of the frame and sashes
This part is made slightly smaller than the frame. It should fit effortlessly into the opening of the sashes and fit well against the outside of the frame. To make it, you need a steel corner. Fits the same as for the frame. If there is no material, a rectangular profile will do. The difference will be in the comfort of the welding work. Everything is done as follows:
- 4 parts are cut out, which are 10 mm smaller than the gate frame. The gap is needed so that there are no difficulties when this part enters the frame. There are two sashes, so you need the same number of parts that are cut out.

2. The parts are laid on a horizontal surface and an angle of 90 is set between them about . as an option, it can be laid in an already finished frame in order to see small bevels of parts that have not yet been welded.
After you need to make the sash. They are made using steel sheets. It is optimal to use material 2 mm thick. The following operations are performed:

If all parts lie flat, you can install garage doors, made according to the scheme personally, to the garage, continue laying bricks.
A garage is a mandatory building for a car owner. Those who live outside the city in private houses build garages next to the house or even attach to the house. And those who live within the boundaries of a big city have to store the car in a garage cooperative away from home. But wherever the garage is located, the safety of the car in it is ensured by the gate, the design of which may differ depending on the preferences of the owner and the possibilities of the premises, space and expediency.
The easiest solution would be to buy ready-made gates and install them in place, but you can make garage doors with your own hands, be sure to take into account all the design features and customize them, as they say, “for yourself”. In this case, you will be sure of their quality and reliability.
At the moment, there are several types of garage doors. Each of them has its own advantages and disadvantages. To install some types of construction, a lot of free space is required inside or in front of the garage.
Lift-and-turn design
Most types of garage doors have appeared relatively recently. For example, a structure that, when opened, rises and then leaves under the ceiling. In this case, it is enough to press a certain button on the control panel. This design is based on a hinged-lever mechanism, as well as guides. The main advantage of such gates is that they do not take up free space in front of or inside the garage. However, such a design should be considered only if the building is heated.

swing gate
The most reliable and ancient option is swing garage doors. Similar designs are used everywhere. Often they equip not only garages. After all, such gates work flawlessly even in harsher conditions. A similar design consists of several doors equipped with hinges, as well as a box that is installed in the doorway. These gates close quite tightly. There is no gap between the wings. You can make such a design yourself. After all, the mechanism is quite reliable and simple.

Retractable structures
Sliding gates appeared in the first half of the 20th century. The design consists of one leaf, which moves parallel to the front wall to the side. In fact, there may be several such sashes. This design has a drawback. It takes a lot to install free space in the front wall of the building. That is why retractable structures are installed mainly in industrial or hangar premises.

Overhead sectional doors
This species appeared not so long ago. The design is a canvas, which consists of sections. When opening, such gates gradually drive under the ceiling, refracting at the same time. These gates are based on guides with a chain transmission and a spring mechanism. The main advantage of the lifting-sectional design is space saving.

Roller shutters
Rolling structures are rarely used as garage doors, as they do not provide adequate reliability. Such gates are aluminum plates, which, when opened, fold into a box placed under the ceiling. It is worth installing such structures only if the garage is located in a protected area and is heated.

Lifting gates are divided into two types:
- Lifting sectional. The door leaf consists of several parts, which are interconnected by a rigid structure. As they rise, they bend and gather. When lowered, the assembled sections are straightened and aligned to their original (flat) position.

- Swivel. Unlike the previous type, in this case the main door leaf is not capable of being deformed. The principle of their operation is that the sash rises along a curved path. Wherein top part slightly deeper inside. The rest of the sash rises from the outside.

Installing a garage door with a lifting mechanism in two cases is almost the same. And you can do it yourself.
Lift gate advantages and disadvantages
Homemade lifting gate for the garage have a number of undeniable advantages that distinguish them from other types of devices. The main advantages are:
- Space saving. To raise the sash, a place under the ceiling is used, which, as a rule, is never used. Due to this, you do not need to waste useful meters on the ground next to the garage.
- The sashes are a single piece. And this is a reliable protection against the penetration of strangers.
- It is possible to insulate the doors. Most often, polystyrene foam is used for this.
- It is possible to install a mechanism for automatic lifting.
- Suitable for installing not only single, but also double garages.
- External finishing can be any, due to which the gate will harmoniously fit into the decoration of the garage and the design of the entire site.
Cons of lifting gates follow from their design.
There are not many of them, but it is not necessary to write them off. The disadvantages include:
- The whole leaf of the sash cannot be partially repaired. If damaged, it must be completely replaced.
- Doors can only be installed in rectangular openings.
- Installation requires some knowledge.
- The gate rises up, due to which the height of the opening decreases.
- Warming must be considered in advance. The fact is that the lifting gate mechanism is designed for a load of a certain size. An additional layer of insulation will entail an increase in the load on the mechanism.
The device of the gate and the principle of their operation
The main structural elements that carry the load are the frame, guides and a mechanism for moving the web. The gate opens automatically (using remote control) or manual mode.

Leverage is attached to the bottom of the sash. At the upper ends there are two more guides along which the rollers move. With the help of these elements, the sash is raised. To do this, you just need to pull the handle, which is located at the bottom of the canvas. There are no difficulties with this, since springs that are in a stretched state come to the rescue. The sash lifting scheme can be seen in the picture above.
Lifting mechanisms
The lifting mechanism can be of two types:
- Lever-spring. This is the most popular mechanism among garage owners. It is characterized by simple design and reliability. The manufacture of metal gates with a similar mechanism involves precise adjustment of the springs, precise installation of the guides (along which the rollers will later move).
- If the sash is heavy, a counterweight mechanism is preferred. In this case, a winch is used. A counterweight is fixed on one side, which is connected to the other edge of the sash with a cable.
The choice of a suitable mechanism is made taking into account the specific situation.
Preparatory work
Before you make and install a lifting garage door with your own hands, it is necessary to carry out preparatory work.
The surface of the walls and ceiling must be flat so that the guides are installed without tilting. Any dust that gets on the rollers or guides can disrupt the operation of the entire mechanism. Therefore, all construction and finishing work inside the garage must be completed. This does not apply to gender. This is due to the fact that the frame goes inside at least 2 centimeters. Therefore, it will be necessary to complete the construction of the floor after the installation of the garage door has been completed.
The opening must be ready for the installation of the gate frame. It is used for basic calculations. Therefore, you need to know its dimensions. The dimensions required for the construction of the gate are described in the drawing of the overhead garage door in the picture below.

Necessary materials and tools
Depending on the dimensions and the selected door design, the number of necessary materials may change. But at the very simple solution for the manufacture of metal gates will require:
- Wooden blocks 120x80 mm for the box;
- Wood bars 100x100 mm for the ceiling;
- Metal pins for fixing the structure;
- Metal corners 35x35x4 mm for the manufacture of the frame;
- Metal corners 40x40x4 mm for rails;
- Channel 80x45 mm;
- Spring with an inner diameter of 30 mm;
- Metal rod with a diameter of 8 mm;
- Cloth for the sash.
This is a set of necessary materials for the manufacture of gates with manual lifting mode. If desired, you can purchase a drive to automate this process. The list of required materials may be changed or supplemented. It is difficult to describe everything in detail, up to a self-tapping screw or a bolt. After all, even a slight change in the design of the gate will entail a change in this list.
In order to assemble and mount a lifting gate for a garage with your own hands, you will need a grinder, a drill with drills for metal and wood, and a welding machine. You will also need other tools that every owner has: a hammer, a tape measure, a screwdriver, spanners, level, pencil.
Construction stages
Gates from a professional pipe are made in accordance with the following steps:
- Frame preparation and assembly;
- Installation of rollers;
- sash manufacturing;
- Attachment of accessories.
These steps explain how to make your own overhead gate. Next, we will consider each stage in detail.

Frame manufacturing
The basis on which the gate will be attached is the frame. It is on it that most of the load of the entire structure will lie. With its manufacture, work begins.
The list of required materials includes wooden bars. This is the simplest and most economical option. They can be replaced with a metal structure, which will be a more reliable option. But everyone makes their own choice. It practically does not affect the installation process.
A box is assembled from the bars. For their connection, metal corners or plates are used. The bottom bar must be at least 2 cm deep into the floor. This must be taken into account during the assembly process. When the box is twisted (in the case of metal - welded), its control check is carried out. It is placed in the opening and the position is checked vertically and horizontally. If the frame stands correctly, it is fixed with anchors (metal pins) from 30 cm long. They are taken at the rate of 1 pin per 1 linear meter.
After that, horizontal guides are installed, which are located under the ceiling.
Installing rollers
When the frame is installed, you can begin to attach the brackets for the rollers. To prevent the gate from clinging, the upper brackets are attached a little deeper than the lower ones. You can clearly see this in the picture below. Bolts are used to fasten the rails. At this stage, it is very important to accurately measure the level.
Clamps are installed at the edges of the rails. They will hold the rollers, thereby keeping the canvas in the open (closed) position.

Leaf preparation
The shield itself, which will serve as a gate leaf, can be made of various materials. But, since it will provide reliable protection for the garage, be subject to external climatic influences, it is better to choose more stable materials. These may be the following options:
- Frame made of wooden blocks, upholstered on the outside with a metal sheet;
- Use a solid metal sheet;
- Sheathe the frame of metal profiles with metal.
Anything can be used as a finishing (outer) layer, even plastic. To protect against frost, the shield can be upholstered with a layer of insulation.
In order not to open the gate from the professional pipe completely every time, a gate can be made in the shield. It will be possible to enter (exit) through it without using the entire structure completely. Some garage owners also provide a window in the sash. If necessary, it is easy to install.
When the shield is ready, it is installed on the rails and the operation of the mechanism is checked.
Additional elements
Installation of the gate is completed by installing additional elements. These include handles, locks, heck for fixing the gate.
Handles are necessary in order to open (close) the gate more conveniently. If they are present, you do not need to cling to the edge of the sash. It is more convenient if the handles are located at the bottom of the shield. And both outside and inside.
If the gate is equipped with a gate, then inside you can make a latch. This allows you to secure your property. This technique will allow you to open the sash only from the inside. The same solution can be resorted to if the garage is attached to the house and a door connects them.
If the garage is separate and there is no gate, locks must be provided. If it is not possible to buy special ones, then you can hang ordinary ones. This is done with the help of shackles that are attached to the canvas and the outer side of the vertical frame.
Production of metal gates with a lifting mechanism is being completed exterior trim designs. They are processed protective equipment, paint, fasten finishing materials.

Automation system
The automatic drive can be installed on the overhead garage door. The prices for the whole structure will increase from this. But the level of comfort will also increase significantly. It will not be necessary to open (close) the gate manually. Everything can be done by remote control. It is important to choose the type of drive that suits your overhead garage door. Their prices are in the range of 300-800 euros.
Installing the drive will not be a problem. The instructions indicate the sawing of the contacts, which will need to be followed. It is difficult to give an example, since each manufacturer has its own connection standards.

By connecting the automatic opening system, the lifting gates, manufactured and installed on their own, will not differ from the factory ones. This will enable remote control using the remote control.
So, by following a few simple steps, you can get a lifting garage door. In addition to significant cost savings, this will also entail a host of other benefits. This design saves space. The gate does not require free space in front of the garage, as is the case with the swing option. They take up space under the ceiling, which is not used in other situations. An independent choice of materials for the manufacture of the structure will allow you to do everything in accordance with your views and requirements. Complementing the device with an automatic drive will increase the level of convenience when using the gate.
Some secrets to protecting garage doors from burglary
Even installing a good lock may not protect your car and protect it from robbery. After all, you can always cut the hinges with a grinder and just remove the sashes. This is exactly what they did in the turbulent nineties. What to do?
- From the inside of the sash frame, in the area of the same loops, we weld a piece of the corner to the frame. It should turn out like this: when closing the sash, the corner will enter 1 - 2 cm into the wall (for this you need to chip the brick a little) and cling to the garage frame. Even by cutting off the hinges, intruders will not be able to remove the sashes, as they will firmly adhere to the garage frame.
- Install a spider lock, the pins of which will enter the walls, floor and ceiling of the garage. It is desirable that, in addition to the "spider" itself, a locking mechanism be installed that locks the "spider" in the closed state until this mechanism is opened using a unique key.
When protecting your garage from burglary, the main thing is not to be too smart, so that in case of losing the keys there is at least some chance to get into the garage without resorting to taking out the walls.
Making a garage door with your own hands takes about 1 - 2 days of work. In this case, your product will have a unique size and design, if you want something special.
Most men are crazy about their car and are ready to spend a lot of time in the garage. But in order to build a capital garage and finish it the way you want, you need to invest a lot of money. Fortunately, you can master the intricacies of self-manufacturing some elements of the structure, for example, garage doors.
About all the nuances associated with the manufacture, installation and care of them, and will be discussed in our article.


Kinds
The following garage door options are available:
- swing;
- sliding;
- lifting and turning (folding);
- lifting sectional (folding);
- retractable;
- rolled (roller or roller shutters).

Now we will consider in detail the design features of each type, the schemes of their functioning, advantages and disadvantages. We will also tell you about what material to choose in order to make garage doors on your own (wood, galvanized iron or corrugated board), how to strengthen the doors and how to paint them.
Design features
To make reliable and high-quality gates with your own hands, you need to take into account the main nuances of the structure of each of their types.
Swing
Swing garage doors are the most common option, known since ancient times for their reliability and convenience.

The design principle is extremely simple - swing gates consist of two wings, which are based on a metal frame. They can be wooden, iron, made of corrugated board. Closed on external and internal locks and bolts. For additional comfort, a gate can be cut in one of the doors.
Main advantages: cost-effectiveness, ease of manufacture, high degree of safety. Disadvantages: Requires space in front of garage to open fully.
Sliding
If a drive is connected to the swing gates, then they can be automated and turned into sliding ones.

Lifting and turning (folding)
A modern, neat and compact option, more suitable for insulated garages located on the territory of protected cooperatives. The basis of the design is a door made of galvanized steel or aluminum, which rises up and is fixed parallel to the floor using a hinged lever drive, special guides and a latch.
Main advantages: space saving, ease of operation. Disadvantages: high cost, low level of protection, manufacturing complexity.

Lifting sectional (folding)
A very convenient type of gate, providing high tightness and not occupying a large space. circuit diagram is based on the refraction of a metal sash, consisting of horizontal sections, in the process of opening and placing it under the ceiling.
The functioning of the mechanism is carried out due to the hinged loops connecting the segments, and the rollers moving along the guide rails. Folding gates are distinguished by good sound insulation, since each section is reinforced with a seal.
Main advantages: versatility. Disadvantages: high price, low anti-burglary.

Rollback
Relatively inexpensive, effective and easy to use option. The design works on the principle of a wardrobe and consists of one metal door moving along garage wall using a system of guides and rollers. Sliding gates can be installed both outside and inside the garage.
Main advantages: budget, strength, durability. Disadvantages: the need for a garage with a wide facade.


Roll (roller)
A rare type of lightweight gate. Roller blinds are best used in protected cooperatives. By their mechanism of action, they resemble roller shutters and consist of aluminum plates that are assembled into a special block fixed at the top.
Main advantages: space saving, easy operation. Disadvantages: fragility and unreliability.

Studying the design features various kinds, we can conclude that it is easiest to manufacture and install swing garage doors. Their production does not require the construction of complex drawings, the availability of professional skills and the use of specialized tools.
And how to do it yourself, read below.

Manufacturing
Unhindered installation and easy operation of the gate directly depend on the strict adherence to manufacturing technology. We present to your attention a universal step-by-step guide to the production of swing gates for the garage.

Purchase of necessary materials and tools
For work we need:
- roulette;
- square;
- level (both construction and hydraulic can be used);
- Bulgarian;
- welding machine.

In the course of work will be used:
- corners for assembling the mounting frame (it is better to give preference to corners made of steel 65x65 or 40x40 mm);
- sheathing for sashes (most often used wood, corrugated board or solid metal sheet);
- a set of external and internal locks (latches or bolts at your discretion);
- profile (for example, 60x30 mm in size);
- hinged iron hinges for fastening doors.

Measuring the opening and creating a drawing
To make a reliable and neat gate without gaps and all sorts of irregularities, you need to carefully approach the measurement of the opening and the subsequent transfer of the data obtained to the drawing.
Garage opening measurement algorithm:
- We measure the width. As a rule, this indicator varies from 3 to 5 meters, depending on the dimensions. vehicle. Ideally, the distance from the machine to the frame frame should not be less than 30 cm on both sides.
- We measure the height. This size is also removed taking into account the parameters of the car.

We transfer the received figures to paper and indicate the materials. The drawing can be arbitrary, the main thing is its accuracy.
fixing frame
Swing gates consist of 3 basic elements: a frame frame (battens), doors (leaves) and hinges.
First of all, you need to prepare the parts and weld the crate, following the technological order:
- We take the prepared corner and cut it into several equal parts. The first half should be proportional to the width of the garage door, the second to match their height.
- We lay out the resulting segments on a flat surface at right angles, carefully checking the degrees with a tape measure-gon.
- Now we need to weld the crate from finished parts.

sash frame
Work at this stage should be carried out with special attention, because the tightness of the gate and the convenience of their operation depend on it.
The manufacture of the door frame includes the following points:
- We take a cut of a profile pipe and divide it into 4 pieces with a length that differs from the height of the crate by 20 mm, and another 4, the size of which is calculated by the formula: crate width / 2 - 35 mm. All these calculations are made in order to ensure the ease of entry of future doors into the opening.
- We lay out the parts on a smooth straight surface at 90 degree angles, checking them with a square.
- We weld the segments together and get the finished frame.

sheathing
Sheathing is also one of the most important stages of work, since the appearance and functionality of the structure depends on the literacy and clarity of its implementation. How to sheathe doors correctly?
Here is a detailed guide for you:
- We take pre-purchased material. For example, a solid sheet of iron.
- Cut it to size. Moreover, the lining of the left sash should overlap the right sash by 2 cm.
- We weld the canvases to the frame, first in the center and along the edges, in order to fix them, and then around the entire perimeter.

Hinge installation
Before starting work, we purchased hinged iron hinges for fastening doors. Now is the time to install them.
This is very easy to do:
- First you need to weld the lower hinge element to the frame frame, and the upper one to the outside of the sash.
- We strengthen the connection by applying a bent metal strip to the top of the loop and weld a reinforcing insert to the inside.


Constipation and stopper
Choice and correct installation a reliable lock guarantees the safety of your car. Therefore, one must approach this stage with all responsibility.

From the outside, garages are usually closed with a mortise or padlock, and from the inside - with a pin stopper.
Installing a mortise lock is not difficult, but how to mount the stopper, we will consider in more detail:
- First, we drive a piece of pipe into the ground - the movable part of the stopper will enter it.
- As a moving part, we use a reinforcing pin. It must be passed through the hinge of the gate leaf.
- In order for the design to function successfully, it is necessary to constantly monitor the cleanliness of the pipe.

Painting
Before the final installation of garage doors, the leaves must be painted in order to protect the metal from corrosion and improve the overall aesthetic qualities. After a preliminary primer, frost-resistant paint for metal or enamel is applied to the door in 2-3 layers.


Warming
At the end of the gate manufacturing process, it is necessary to perform them internal insulation, otherwise at least 50 percent of the heat will leave the room. And, you see, warm garages are much more comfortable. Styrofoam, polystyrene foam or glass wool is usually used for insulation. Thermal insulation material fastened to the inside of the sashes and closed on top with clapboard or wooden planks.


So, we examined in detail the main stages of the independent manufacture of swing garage doors. It remains to figure out the issues of their installation: how to raise the frame, hang the doors, fix the structure and install a drive for its automation.
Mounting
After you have completed the manufacture of all the elements of the gate structure, you can proceed with their installation.
The installation algorithm is also quite simple:
- First you need to install frame frames. They are attached to the slopes of the garage opening using long metal pins (15-20 cm).
- We cut off the excess pins protruding from the outside, grind it and mask it with paint so that in the future they do not interfere with closing the doors.
- Now you need to connect the inner and outer crates with iron jumper plates.
- It remains to hang the sashes on the hinges and evaluate the finished work.


For greater ease of use, swing gates can be equipped with a special drive powered by electricity - this will make them automatic. The scheme of operation of such a device is based on the use of guides from the profile, set in motion by an electric motor.

Folding and rising rolling shutters can also be mounted independently if there are ready-made opening-closing mechanisms (sashes, sliding parts, slats, rollers and clamps) that are sold in hardware stores. You only need to make a frame and assemble the structure, in accordance with the attached instructions, and also seal it.

You don't even need a frame to install sliding gates. All that is needed is to make a profiled sheet and seal a large sash. If desired, you can cut a gate in it. Installation is reduced to the location of the hardware parts according to the instructions.
To make everything work out as best as possible, we will take into account the opinion of professionals:
- Do not limit yourself to reading a couple of articles with a guide to self-manufacturing garage doors. Now on the Internet there are a lot of detailed video tutorials and reviews on this topic.
- When choosing materials for work, give preference to lighter and more modern ones. Then further operation finished construction will not be difficult and will not require effort.

