How to fix the heating battery on the wall. Features of fastening to the wall of the radiator. Traditional Battery Locations
Most often, the replacement of heating radiators is encountered during the overhaul. They are usually changed after installing windows and window sills.
Radiators create a warm and comfortable stay in the house, which means that their installation must be competent and durable.
It is very important to understand how to install a heating radiator correctly.
There are several ways to mount radiators. Most often they are mounted under the windows, and sometimes on the walls and in the hallway at the entrance. To install batteries, brackets or racks are used, which are fixed on the wall surface.
Pipes are connected to the battery from two (or one) sides and from below. If pipes are provided on one side, then you need to clearly calculate the number of sections, since half of the radiator may remain cold. Experts recommend not to install more than 12 sections if the water circulation occurs naturally. With artificially created circulation, the number of sections can be increased to 24.
How to install a radiator?

If you want to install a large number of sections, then you need to worry about how to bring the pipes to the heaters.
When calculating the number of sections and installing a radiator, you need to take into account the throughput of the pipes. It is determined by the internal diameter of the product and the roughness coefficient.
In order to properly install the heating system, which will provide maximum heat output, you need to follow several rules when making calculations:
- to make it convenient to clean under the battery, the distance from the floor to the bottom of the battery should be about 10 cm;
- there should be a gap of up to 5 cm between the wall and the radiator. If the distance is smaller, heating will start not of the room, but of the wall;
- from the radiator to the window sill should be 10 cm.

In order to be able to adjust the heat output of the heating battery automatically or manually, it is necessary to take care of the installation of thermostatic fittings in advance. In the event of a leak or other emergency, it will be possible to autonomously turn off the heating system. Automatic control of the heating system is possible due to the installation of thermostatic valves directly on the valve.
If the installation of valves is provided for a heating system with one pipe, then in advance you need to make sure that the two pipes have jumpers between them. If they are not available, installation of thermal heads is not allowed.
In addition to the listed elements, the heating radiator must be equipped with a Mayevsky crane. The tap serves to remove air from the batteries and from the entire heating system. This procedure is carried out at the beginning of the heating season and then periodically during the operation of devices for heating the room.
Stages of installation of a heating battery
- It is necessary to mark the wall surface for future brackets, and then fix them.
- Put the Mayevsky crane on the heating battery together with the control valves (if necessary) and the plug.
- Using a level, it is necessary to fix the radiator on the brackets.
- Connect the radiators to the pipes of the heating system.

To make sure that the battery works smoothly, you need to make the first start. If you do not have the necessary plumbing skills, then. in order to properly install radiators, it is better to use the help of specialists. If the heating system is installed incorrectly, a pipe rupture may occur with all the unpleasant consequences.
To ensure the smooth operation of thermal valves and increase heat output, it is better not to put various decorative grilles on the radiator. It is also better to put furniture away from heating radiators.
When choosing radiators, you need to remember about maximum temperature heat carrier in centralized system heating. Usually it is 65-105 degrees. In apartment buildings, the pressure level is usually 10 atm.
How are bimetal radiators installed?

Since hydraulic shocks occur on the heating system at the beginning of the heating period, it is worthwhile to give preference to bimetallic batteries or those in which the operating pressure is more than 16 atm when choosing batteries.
Panel steel batteries are best installed in private homes. You should be aware that the declared power of radiators can be much higher than it actually is.
Currently, bimetallic radiators are considered one of the most efficient batteries. They have a high heat dissipation. Them modern design suitable for almost any interior.
The following tools and materials are required to install batteries
- water tanks;
- torque wrenches;
- perforator;
- building level;
- pencil;
- roulette.
Installation steps for bimetallic batteries

Norms and rules for installing a heating device: distances from the floor, walls, window sill.
First of all, you need to find out the diameter of the supply pipes. After that, you should order a mounting kit. right size. The scope of supply of the bimetallic radiator includes:
- air release valve;
- adapter for Mayevsky valve;
- two adapters;
- plug;
- brackets;
- gaskets under the plug and adapter.
It is necessary to prepare containers in advance, turn off the water and drain its remnants from the heating system. After that, the old radiator is dismantled by unscrewing the threaded connections of the outlet and inlet pipes.
Bracket installation locations are marked. During operation, it is recommended to attach radiators to the pipe connections. Via building level checked for horizontality. Fasteners are applied to the installation site and mounting holes are marked with a pencil.
Holes of the required diameter are drilled in the designated places with the help of a perforator. If the number of sections is not more than 8, then three brackets will suffice. If sections are from 8 to 12, then 4 fasteners must be installed.
On the prepared brackets, the radiator is installed in such a way that all horizontal collectors are on hooks. One of the features of the installation of such radiators is that the entire kit must be in the package until it is installed.
Each radiator should be equipped with a Mayevsky valve, which is included in the delivery. To tighten the valve, use a torque wrench. After that, thermostatic and shutoff valves are installed.
Next, the bimetallic radiator is connected to the heat pipes of the heating system. It is not recommended to clean the surfaces to be joined with a file or sandpaper: this will lead to leaks.
The technology for installing heating batteries is quite simple. Having studied the sequence of work and preparing necessary tools and materials, the installation can be done independently.
The efficiency of the heating system of an apartment or a private house depends not only on the power of the heat sources. Proper installation of heating radiators will reduce the cost of heating the room, make it more productive and improve the microclimate.
Regardless of which system you use, either autonomous or centralized, where the radiator will be located - in an apartment or house, the rules for installing heating batteries are the same. There are three options for the location of radiators:
Types of heating systems
There are three options for radiator connection systems - serial, single-pipe, two-pipe and manifold (parallel). They differ in the wiring diagram. Depending on which system is installed, it is necessary to choose the type of batteries. It is important to remember that improper connection of heating radiators leads to a decrease.
Proper installation of heating radiators in a niche
It happens that in apartment buildings there is a niche for old cast-iron radiators. This method of installing radiators is ineffective, but sometimes there are no other options. So let's take a look at it.
- Distance between side and back walls niches to the radiator must be at least 5 cm.
- Air access from below should not be obstructed, as well as its exit from above. The distance from the bottom and top of the radiator to the walls must be more than 10 cm.
decorative grille should promote convection. Diagonal planks work best. The gap at the bottom of the radiator should not be closed with a grille to ensure optimal air convection.
If a niche is made in a parapet located along the wall, it upper part it is better to close it with a decorative grille, and not with a solid overlay.
The battery in the niche under the window should be located so that there is a distance to the window sill. It should be twice as far as the window sill protrudes from the wall. For example, if the window sill extends 15 cm beyond the wall, the distance from it to the niche should be 10 cm.
Read also:
How to drown the batteries into the wall without heat loss
The radiator in the niche under the window must be positioned so as to ensure good air convection. There should be at least 10 cm between its top and the edge of the niche.

How to properly install the battery under the window
Most heat loss occurs through windows. Therefore, the correct installation of the battery under the window is especially important.
- The radiator should be located exactly in the middle of the window - so it will cut off cold air and will not let it spread around the apartment.
- The installation height of the radiator from the floor should be 5-10 cm. If the gap is larger, a layer of cold air will form. If less, it will be difficult to clean under the battery.
- The distance from the wall must be at least 5 cm, so as not to impede air convection. Otherwise, the battery will heat the wall of the building, not the room.
If the radiator is equipped with air separators (see photo), the distance from it to the window sill should be more than 5 cm. If the window sill is wide and protrudes beyond the radiator, for every 1 cm of this difference, add 2 cm to the gap between it and the battery.

For radiators without an air breaker, the minimum distance to the window sill is 10 cm plus 3 cm for every 1 cm of protrusion. Installing heating radiators under the window close to the window sill will prevent air convection. And this will lead to a decrease in heat transfer.
Installation of heating is a serious stage in preparing the house for operation. Fixing heating radiators to the wall is not the only, but quite a big difficulty in this process. To do everything right and get a good result of your work, you need to understand what mounting options exist, the types of batteries, the subtleties of work.
The first question is still to consider the types of batteries that you can use in both country house as well as in the apartment.
Types of radiators for heating systems
An important factor when choosing a battery is the price-quality ratio. In this market segment, the heat transfer coefficient is considered to be an indicator of quality. But each material has its own advantages and disadvantages. To make the final choice, you should familiarize yourself with all the parameters of the main types of radiators.
Cast iron batteries
The advantages of this type are:
- Cast iron batteries have very thick walls, which adds to their durability.
- Cast iron is resistant to corrosion formations.
- Such radiators give off heat for a long time even after you have turned off the heating system.
- Compared to other types, cast iron batteries have the longest lifespan.
Cast iron battery
disadvantages
- Mounting cast iron radiators to the wall is difficult due to their heavy weight. When installing them, it is imperative to use supporting stands.
- The disadvantages also include their unattractive appearance and massiveness.
Steel radiators
Producers and consumers consider the advantages of this type:
- Light weight, which facilitates the installation process.
- High heating rate of the system, and as a result, rapid heat transfer.
The cons are:
- Low heating temperature and rapid cooling of the system.
- Short service life.
- The operating pressure of such batteries must not exceed 10 bar.
- Low resistance to hydro and pneumatic shocks.
Aluminum radiators
The advantages of this type:

The negative properties of this type of battery are poor resistance to corrosion and the rapid destruction of the junction with another type of metal.
Bimetal radiators
This is the most universal view, combining the charms of steel and aluminum batteries. Fastening bimetallic radiators to the wall is also simple, and the steel inside the battery prevents corrosion and increases the working pressure to optimal values. Often, professionals recommend opting for this option.
Stages of work
If you decide to do the work of installing the batteries yourself, you need to know what steps this process involves.
The instruction for carrying out such work divides it into:
- Preparation of materials and equipment.
- Location calculation.
- Installation of brackets.
- Production of actual installation.
- Soldering or sealing the joint.
- System check.
Preparatory stage
This step applies to all types construction works. First of all, pay attention to what type of systems your heating system belongs to. They are single-pipe and two-pipe. If you are the owner of a single-pipe heating system, you will need to additionally purchase a bypass, which will allow you, if necessary, to turn off any part of the system without resorting to its complete shutdown.
These operations are not recommended to be performed in winter, especially during severe frosts - this is unsafe. Even if you decide to do all the work yourself, you still have to call a plumber from the ZhEK to disconnect your apartment from the common riser. In preparation for installing the system, you will need to purchase or obtain the following tools and Additional materials, such as the:
- Keys.
- Tow.
- Valves.
- Drives.
- Couplings.
- Adapters.
- Brackets.
- Bushings.
- Nipples.
- corners.
If you nevertheless chose, for example, cast-iron batteries, you will probably have to buy Mayevsky cranes and install them yourself. In bimetal and aluminum sections they are already built in. This device allows you to bleed excess air from the system and maintain its functionality, preventing airing.
How to properly install
Installation of the battery, including the bimetallic type, has a number of rules. You must determine for yourself the parameters that you must adhere to.

Mounting the battery to the wall
You must know that the battery is attached taking into account the distance from all surfaces and planes next to which it is located. To ensure the necessary air flow to the system, you must leave a gap of at least 10 centimeters from the floor. In order for the air to evenly spread throughout the room from the windowsill to the radiator, it is also necessary to leave a space of 10-15 centimeters. The distance from the wall to the radiator should not be less than 3 centimeters.
So, you already understood how to fix the heating radiator correctly and place it in the appropriate niche, but in addition to the indents, you also need to know other nuances. You must observe the correct angle of inclination, calculate the required number of sections, brackets. Very often people come to the store and do not know certain parameters, without which the choice of quantity does not make sense and is made at random. We do not welcome such experiments, since you can buy fewer materials, which will lead to the fact that the system will not cope with the heating of the room and you will be cold. The next part of the article is devoted to the issues of correct calculation.
Heating installation
How “superficially” everyone represents, but you can make the correct calculation only if you have accurate information.
The first nuance is the cubic capacity of your room. Here, not only the area is important, but also the height of the ceilings. Carefully study your premises and only then, with the help of a consultant in the store, select the required number of sections.
The number of brackets can be minimally limited to a pair, this is if the area is about 1 square meter. For each next square, one more bracket is added. Not to do too weak system fasteners, the number of brackets is always calculated taking into account the stock of one piece.

Radiator connection
So, all calculations are made. The preparation is over, we proceed to the actual installation. You need to measure everything carefully, double-checking all the marks several times with the help of a level and a ruler. If you are sure, then drill. After the holes are made, special dowels are inserted into them and fasteners are screwed in. It's time to sample. Hang the battery and take a good look at how you did it. If you did everything right, then as a result you will see a well “shrunken” radiator, densely and evenly distributing the weight on the mounts. Try to move the resulting design. If the battery is firmly fixed, you can proceed with the connections.
The tightness of the joints is the main thing you need to achieve. Since any leakage leads to malfunction or deviations in the operation of the entire system. In order to avoid this, you should use sealants, which are suitable for tow, silicone or sealant, sealing tapes. The system should not work when connected! If you have valves that you can dehydrate and turn off part of the system, be sure to do so!
Let's start assembling the connections. We screw in all the necessary parts of the dock, carefully sealing. If your battery has a protective film, it should be removed only after all connections have been crimped. For insurance at this stage of work, you can ask for the presence of a plumber, this will facilitate your work and give you confidence in the correct implementation and implementation. If you make any mistakes in the process, an experienced craftsman will immediately help you eliminate them, which will save both time and money for rework in the event of an unsuccessful installation process.
As for cast iron systems, everything is a little more complicated here. You must completely unwind it before installation (this is done mainly on a workbench and not alone), check, blow through, adjust, and then assemble it back in a strict sequence, the reverse of the promotion process. Before choosing cast iron batteries, think carefully, because due to the heavy weight of the structure and the complexity of the assembly and disassembly process, not everyone dares to use this type of battery.
If you doubt whether the walls of your house or apartment will be able to withstand the mass that “hangs” on them, but you have already made a purchase and, as they say, cannot be exchanged, purchase stands that will help distribute the weight of the battery and remove some of the load off the wall. When using them, the dimensions of the distance from the floor to the battery must be such that the stands will fully fulfill their function, you should pay attention to this.
As you saw, fixing heating radiators to a wall is a process that is not only technically complicated, everything is important here - the material of the walls, the type of batteries chosen, taking into account distances and angles of inclination, but still these difficulties are not so terrible if you carefully plan everything and enlist the support of reliable assistants!
The creation and repair of a heating system, as a rule, involves the replacement or installation of heating devices. Fortunately, if you wish, you can carry out these works with your own hands, saving a lot of money. In what order should the installation of heating radiators be carried out, what is necessary for the performance of work and what nuances can await during the repair - we will tell about this in our article.
What is needed for installation?
Installation of any heating radiator does not take place without the purchase of certain Supplies and the use of special devices. At the same time, regardless of the type, the set of necessary materials always remains practically identical. The differences are only in small points, for example, larger plugs are used to install a cast iron battery, an automatic air vent is placed above the system, and the Mayevsky crane is not used at all.
Unlike cast iron products, the installation of bimetallic and aluminum radiators heating is the same.
As for the placement of steel panel products, the installation procedure has slight differences, affecting the moment of hanging the battery. In this case, the set must include brackets, in addition, on the reverse side there must be metal temples, through which the heater is installed by the hooks of the brackets.
Shut-off valves
During the installation of a heating radiator, a pair of shut-off or ball valves is also needed. In the first case, they must be regulated. Products are placed at the output and input of each battery.

Ordinary ball valves are used for emergency repairs to turn off and dismantle the radiator, for example, at the time of the heating season. With this approach, even if something goes wrong during the repair, the system will still function without the part being repaired. The main advantage of this solution is the low cost of ball valves. But on the other hand, you deprive yourself of the opportunity to adjust the heat transfer.
Shut-off control valves do almost the same, with one exception - they can also adjust the intensity of the coolant flow. Of course, here the issue price will be slightly higher, but this will make it possible to further change the heat transfer. In addition, outwardly, such devices look much better, especially in angular and straight versions. As a result, you get a more accurate strapping.

If necessary, near the ball valve on the coolant supply, you can install thermostat. It is a small element that makes it possible to adjust the heat transfer of the battery. However, if your heating radiator itself does not heat the room well, then you should not install a thermostat! Otherwise, the flow will decrease, and the battery will heat up even worse.

Today there are different kinds thermostats, ranging from electronic automatic to conventional mechanical. The latter, by the way, are used in homes more often than others.
Stub
When connected sideways, radiators usually have 4 outlets. One of them is covered with a plug, the second is equipped with a Mayevsky crane, the other two are diverted for the return and supply pipelines. Like the vast majority of modern heating batteries, the product is usually painted with white enamel, nicely complementing the interior of the house.
Automatic air vent or Mayevsky tap
These elements are small devices for venting air accumulated in the radiator. Installation is made on the collector, mandatory when using bimetallic and aluminum radiators. The dimensions of the device are significantly smaller than the diameter of the collector, on the basis of which an additional adapter may be required. However, Mayevsky cranes are usually supplied with adapters. The only thing that is required from the buyer is to know exactly the diameter of the collector.

As for automatic air vents, they are also installed on radiators. Compared to Mayevsky taps, they have larger dimensions, which is why they are made only of nickel and brass. Over time, air vents can become enameled, spoiling appearance radiator. Based on this, the installation of these elements is carried out not so often.
Additional tools and materials
In addition to the listed elements, for the installation and hanging of heating radiators, you will definitely need brackets and hooks. Moreover, their number will directly depend on the dimensions of the battery itself:
- If the dimensions of the product do not exceed 1.2 meters or the number of sections is not more than 8, then a pair of fixation points will be sufficient - one at the bottom and one at the top;
- Each next 5-6 sections or 50 centimeters of length are required to use an additional retainer from below and from above.
To seal the joints, you will need fum tape, plumbing paste or linen winding.

At the same time, during work, dowels, a level and a drill with drills cannot be dispensed with. In addition, special equipment will be required for fixing fittings and pipes, although this largely depends on the type of pipe.
Location of the radiator
It is accepted that heating systems are placed under the window. This is necessary to cut off cold air from the window with warm air rising up. It is possible to avoid fogging of windows due to the dimensions of the heater, where the width indicator should not exceed 70-75 percent of the window width. During installation, the following parameters must be taken into account:
- The distance from wall to wall should be from 2 to 5 centimeters;
- In the center of the window opening, where the maximum allowable deviation should not exceed 2 cm;
- The gap to the windowsill is 10-12 centimeters;
- Between the floor and the radiator - 8-12 centimeters.

Battery Installation Procedure
Now let's talk about how to properly install heating radiators. Work will be much easier if the surface of the wall behind the battery is as even as possible.

The middle of the opening is outlined on the site, a horizontal line is drawn under the windowsill at a distance of 10-12 cm. The heater will be leveled along this line in the future. The brackets should be placed in such a way that the top matches the drawn line, in other words, remains strictly horizontal. This arrangement is acceptable for apartments and systems using forced circulation. In the course of the coolant in systems with natural circulation, a small slope is made, equal to 1-1.5 percent. It is impossible to exceed these values, otherwise stagnation will form.
Floor installation
Usually, heating equipment is mounted on walls, but it happens that they are not able to withstand even lightweight aluminum products. This happens when sheathing walls with drywall or plaster with lightweight concrete. In these cases, floor installation is used.

Some types of steel and cast iron radiators are initially equipped with legs, but they do not always suit the owners in terms of their characteristics and appearance.
Bimetal and aluminum products can also be installed on the floor. This provides for special brackets, which are fixed to floor surface. Further mounted heating equipment, the lower collector is installed on the legs with an arc. The legs themselves come with a fixed leg, as well as a customizable one. Based on the material, fastening can occur with dowels or nails.
Fixing to the wall
Hooks are selected depending on the type of dowels. A hole of the required size is drilled in the wall, where a plastic dowel is later installed. Next, the hook is screwed. Gap between heating device and the wall is adjusted with a hook due to screwing / unscrewing.

During the installation of hooks, it should be borne in mind that most of the load will come to the top of the structure. In this case, the bottom is necessary only to hold the system in the desired position. Installation is made 1.5 centimeters below the lower manifold. If this is not done, then in the future the radiator simply will not be able to hang normally.

The brackets lean against the place where the installation will take place directly. For this purpose, the battery is first applied to the wall, after which the points of contact of the brackets are marked. Next, holes are drilled, dowels are hammered in and brackets are screwed in. Having placed all the fasteners, then the battery is hung.
Methods for tying heating radiators
Installation heating systems carried out with subsequent connection to the pipeline. There are 3 main connection methods:
- Diagonal;
- Unilateral;
- Saddle.

When choosing radiators with bottom connection you don't really have to choose. This is due to the fact that each manufacturer himself indicates the supply and installation instructions that must be followed! Otherwise, there will simply be no heat in the house. When choosing systems with side connection, there are noticeably more installation methods.
saddle connection
With hidden piping or bottom wiring, installation by this method is considered less noticeable in the finished result and more convenient.
With the lower one-pipe wiring and saddle connection, as a rule, 2 methods are used - without and with a bypass. The taps can be mounted without a bypass, if desired, the radiator is dismantled with the placement of a temporary jumper between the taps.

Much less often this type of connection is used for vertical wiring, for example, in risers in high-rise buildings. This is explained increased heat loss which make up 12-15 percent.
Diagonal connection
In terms of heat transfer, the diagonal connection of heating radiators is considered the most optimal of all. Heat dissipation is considered the largest.

In apartments with vertical risers and a one-pipe system, the finished result is not the most attractive, although many tenants still put up with this because of the increased efficiency.
It is important to note that the bypass will again be needed with a one-pipe system!
One way connection
In an apartment, a one-way connection is most often used. It can be single-pipe, which is most likely, or two-pipe. Today, apartments are most often used metal pipes, and therefore it makes sense to disassemble the strapping method steel pipes. In addition to pipes of the required diameter, installation will also require a pair of tees, a ball valve and a drive.

Everything connects. Bypass is considered mandatory when using single pipe system. With it, it is possible to turn off the radiator without having to drain the systems. It is impossible to install a tap on the bypass, otherwise in this way you will block the movement of the coolant, greatly upsetting the neighbors. Yes, and it will be difficult to get rid of the fine in this case.
Threaded connections are sealed with linen winding or fum-tape. Next, paste is applied on top. It is not necessary to use a lot of winding when screwing the tap into the manifold. With a large amount of it, the formation of microcracks is not excluded, which in the future will lead to further damage. This point remains relevant for almost all heating products, not counting cast iron appliances.

The bypass can also be welded if you have the appropriate tools and skills.
With a two-pipe system, a bypass is not required. The return line is connected at the bottom, the supply is connected at the top.
This type of connection is rarely used when the pipes are located at the bottom, for example, when they are laid on the floor. This is due to not the most attractive view. Instead, a diagonal connection is more commonly used.
Independent installation of heating devices is a task for which you need to carefully prepare. The slightest violation of the simplest process in the opinion of an amateur often leads to negative emergency consequences. Therefore, it is advisable to entrust the replacement of batteries in city apartments to plumbers, on whose powerful shoulders the entire burden of responsibility will fall, and in a private house, installing heating batteries with their own hands can be successfully performed by the owner. However, in order not to have to repair the floors and re-paste the wallpaper after a hot "flood", you should familiarize yourself with the information about the basic rules and nuances of installation.
Preparatory stage of work
The first step is to find out what type of wiring was used when organizing the heating system. The owners who arranged it on their own should know whether the heating network provides heat to their country estates.
Before you start installing a radiator, you should find out a single-pipe or two-pipe heating circuit in the house, the choice of parts and their number depend on the wiring diagram
Parts required for installation
Depending on the design features details are selected. For a battery built into single-pipe heating, it will be necessary. This element will allow, in case of any malfunctions, to turn off only the device equipped with a bypass without shutting off the entire heating system, which is extremely undesirable in frosty weather.
The connection scheme and type of radiator also determine the number of connecting and functional elements required for proper installation. According to the scheme and dimensions, adapters, couplings, nipples, corners are selected.

An inexperienced performer should not get carried away with details for mounting a radiator that are too complicated to install: 1) corners, 2) radiator shut-off valve, 3) "American", 4) tap with an American
The future installer will also need shut-off valves. It is recommended to choose the radiator type stop valves, without being carried away by too complex ball valves with an "American" that require professional skills from the performer. Ensuring tightness without experience is problematic. To connect the battery to the pipeline, you will need spurs with a thread corresponding to the size of the radiator and pipes. A sleeve will still be screwed onto the sleeves, which is then twisted and inserted into the battery.

With the help of spurs, it is easier and easier to connect the radiator to the heating circuit - there is no need to weld the joints of the supply and pipeline
It is important to note that when purchasing for installation, you must first check whether the brackets included in the kit correspond to the type of material from which the walls are built.
In order to let air out of the battery, it must be equipped with a Mayevsky crane. Usually it is available in the factory, but if not, you will need to buy it.

An important detail for correct installation heating radiator - Mayevsky tap, necessary to release air from the device
How to calculate location?
Those wishing to carry out the installation of the radiator on their own should be aware that the sections of pipes leading to the devices must be positioned with a slight slope in the direction of movement. In the case of strictly horizontal laying, as well as in the case of a slight distortion in the radiator installation, air will “collect” in steel or cast iron batteries. It will have to be constantly blown by hand to avoid a decrease in heat transfer.
It is desirable that the central axis of the radiator coincides with the axis passing through the center of the window opening. Deviations of 2 cm are permissible, absolutely not determined visually. This recommendation is not a strict requirement.
In the list of strict rules:
- The elements of the connection to the heating devices should be located so that the slope is 0.005, it is recommended to increase it to 0.01. That is, one meter of the pipeline must be inclined towards the circulation by at least 0.5 cm. The angle of inclination should be calculated according to the length of the installed pipe sections.
- From the floor plane to the battery 6-10 cm or more.
- From the bottom line of the window sill to the top line of the radiator 5-10 cm.
- From the wall surface to the radiator 3-5 cm.
When installing a radiator, a prerequisite is the observance of horizontal and vertical directions.

Norms and rules for installing a heating device: distances from the floor, walls, window sill
In order to increase the performance of the radiator, a specialized shield made of heat-reflecting material can be installed on the wall behind it before installation. You can simply cover the surface of the wall with a composition with similar properties.

For aesthetic and technological reasons, radiators in the same room are located on the same level.
Marking batteries with brackets
The sectional principle of selecting heating devices allows you to accurately determine the number of sections required to heat a room with specific technical conditions. Information about the rules of payment must be found and studied before buying. But according to the installation rules, 1 m² of the area of \u200b\u200bthe heating surface of the battery is equipped with one bracket.
Brackets for mounting radiators: home-made on top, factory-made on the bottom, if desired, a home master will be able to do it himself by analogy with factory-made battery mounts
So, here's what to do:
- Taking into account the above rules, we mark the installation points of the brackets.
- Before drilling holes, all distances are checked again.
- We insert dowels into the drilled holes, into which we then screw the fasteners.
If the markup was done correctly, the battery will “lie down” tightly on all installed supports, firmly resting on each of them. Further installation of the radiator with your own hands is to connect the device to the communication system.
Tools and Consumables
The performer will need torque wrenches with dimensions that allow high precision observe the dynamometric moment. Since the coolant moves through the system under pressure, insufficient tightness will lead to a jet from the junction. Overtightening will cause thread stripping with similar consequences. Therefore, you should carefully follow the instructions that come with each device. They indicate the value of the dynamometric moments.
You will need to stock up with sealant, tow, impregnated oil paint, or special sealing tape.
Direct installation process
Before starting work, it is necessary to completely shut off the heating circuit, drain the water from the system, and the pump will help to qualitatively remove the remnants of which. Carefully check with the help of a level the battery hung on the supports vertically and horizontally.
- All plugs must be unscrewed from the device.
- Connect a valve-equipped bypass, required only for a one-pipe circuit. A bypass is not needed to connect to a two-pipe circuit; only a squeegee with a valve attached to it is used for connection.
With the help of threaded rods, we connect the battery to the system, to seal the joints using tow or other sealant (if you have experience in welding, the joints of the rods and the pipeline can be welded).

A bypass is required for connection to a single-pipe circuit - connection diagram: 1 - tee for metal-plastic pipes; 2 - direct control valve; 3 - direct shut-off valve; 4 - adapter for metal-plastic pipes; 5 - rotary valve for air release
It is important to note that until the end of the installation with, and devices, it is not necessary to remove the packaging shell.
Installation completed, but more needed. For its implementation, you will need to call a plumber. Both his experience and the device will come in handy, which does not make sense to buy for the sake of installing several batteries.
The specifics of installing a cast-iron radiator
No matter how intensely the manufacturers of innovative batteries promote their aesthetic ultra-light aluminum and bimetallic products, there are still quite a few adherents of cast iron. The material, which is not pleasing with elegance, retains heat for an incredibly long time, gradually transferring it to the heated space. Those who wish to learn how to properly install a heating radiator made of heat-intensive cast iron should familiarize themselves with the specific design features of the device and its installation:
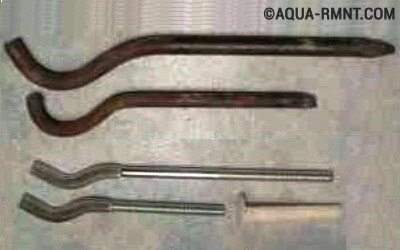
- Before installation, the cast iron battery will need to be unscrewed, the nipples adjusted, and then the device must be reassembled. Disassembly is carried out on a workbench, using a pair of radiator wrenches inserted into the nipple holes. To increase the applied force and to fix it, a crowbar is inserted into the eye of the key designed to unscrew the lower nipple. To avoid distortion, both nipples located above and below are unscrewed simultaneously. It is more convenient to do the work together. When unscrewing a cast iron radiator, pay attention to the direction of the thread. On different sides of the cast iron radiator, threads with the opposite direction. Have you deployed? Take off the section.
- By analogy, you need to unscrew all the sections, and then group them in a strict reverse order into a single device with the number of sections required to heat a particular room. The assembled battery must be pressed, if a leak is detected, adjust the nipple in the problem area.
- Cast iron wall-mounted batteries can be fixed on brick and foam concrete walls. Wood walls will not support the weight, so the owner wooden house you will need radiators with special floor stands-supports. However, supporting fasteners must also be installed on the walls.
- Since in private houses heating is mainly single-pipe, a bypass is being installed. In the connection diagram, there must be a Mayevsky crane and the corresponding shutoff valves.
Connection to the pipeline is carried out using threaded spurs. in wooden buildings welding machine better not to use.
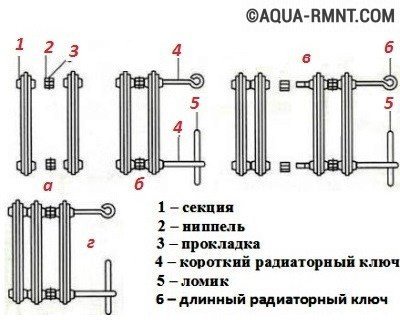
The technology of unscrewing and assembling cast-iron batteries: a - nipples capture the threads of sections (2-3 threads); b - twist the nipples, dock the sections; c - mount the third section; g - group two radiators

The difference in the schemes for attaching a cast-iron battery to walls made of different building materials:
a) wooden wall: 1) support bar, 2) stand
b) brick wall: 1) window sill, 2) niche, 3) brackets
Whether or not it is worth saving on installing batteries is a personal matter of the owner. In fact, there is not a single particularly difficult moment in the installation technology. By strictly following the sequence, knowing the rules, having studied the information on how to install a heating radiator, you can safely get down to business with your hands, confidently holding radiator, torque wrenches and other tools. True, to achieve success, confidence alone will not be enough. Thorough observance of the installation rules and the formation of impeccable tightness, which guarantees the complete absence of leaks, will definitely help.