How to make a window with your own hands better than the factory one. All about making wooden windows with your own hands Wooden windows for a summer residence with your own hands
Joinery work on the manufacture of windows is considered to be one of the most difficult, it requires considerable skill and understanding of window construction. Do not flatter yourself and think that a wooden window can be made on your knee, with a couple of simple carpentry tools. In the process of making a wooden window with your own hands, the carpenter has to spend a lot of time and effort preparing the material and making additional hanging elements, from glazing beads to awnings and fittings. Therefore, wooden windows simply cannot be cheap and at the same time of high quality if they were made by hand.
How to make a wooden window
In addition, you will need equipment for cutting grooves, cutting chamfers and internal transitions, otherwise it simply will not work to make a wooden window with high quality. To build a window you will need:
- A circular saw;
- Milling cutter for wood easel and manual;
- Grooving and slotting machine;
- Hand drill, tape measure, a set of carpentry clamps.
The window can be completely blank, for example, if you plan to make glazing in a barn, garage or utility room. For residential premises, as a rule, a ventilation system is used with the help of a window leaf and an opening sash. A general view of the window device is shown in the photo. You can make the main part of the window frame in the presence of tools, equipment and prepared material in a day, if you have a clear idea of \u200b\u200bhow to make a wooden window with your own hands, and drawings for the manufacture of the main parts.
Note! In order to make a window with an opening sash, you must first prepare a set of canopies and two window locks.
It is clear that before making a window out of wood, it is necessary to take the dimensions of the window opening and the box into which the window block will be inserted. In this case, a window will be made with an opening sash-window window measuring 130x110 cm.

What is the best way to make a window
In order to make a wooden window quickly and efficiently, you first need to choose quality material. Forget about oak, larch, Karelian pine, all kinds of options for making a window frame from glued laminated timber. In order to make a wooden window soundly the first time, you need to buy a well-dried pine blank without knots, without fiber defects and traces of wood damage by microflora or bark beetles.
To make a wooden window frame, we need:
- Three blanks 115 cm long and 40x140 mm in section for vertical window pillars;
- Two blanks 140 cm and a section of 40x140 mm for horizontal crossbars;
- Two blanks of 50 cm each and two blanks of 110 cm each, with a section of 40x50 mm, for the manufacture of an opening sash.
Note! All workpieces must have an ideal geometry, without "propeller" and cracks.
If wooden blanks have been stored outside for a long time, before starting work, let the material mature and gain initial moisture. Wooden planks and beams should not be dried in the sun, in drafts or in a warm, dry room. It is clear that it is necessary to process wooden blanks with protective compounds in advance, after which they fold the material into operation and dry it thoroughly. If possible, for the first experiment, it is better to make a stock of blanks, since often, due to errors, it is necessary to redo or restore joints or entire elements of the wooden window frame.

How to make a wooden window
If you have at your disposal necessary equipment, then cutting the material under wooden frame it’s quite easy to make it on the window in 2-3 hours, you will need a circular saw and a groove cutter.
The order of work is as follows:
- Quarters are stretched on vertical and horizontal blanks;
- Wooden beams are trimmed and cut to size for assembly;
- At the ends of the blanks, an undercut is made on gusset in a frame;
- On the central crossbar and the left pillar, a selection is cut out for the arrangement of the opening sash.
It remains to assemble a wooden window box, make a window, install awnings and fittings. In order to install canopies and make locks, you will need to spend at least 4 hours. About as much as it took to make the main part of the frame.

Making a wooden window frame
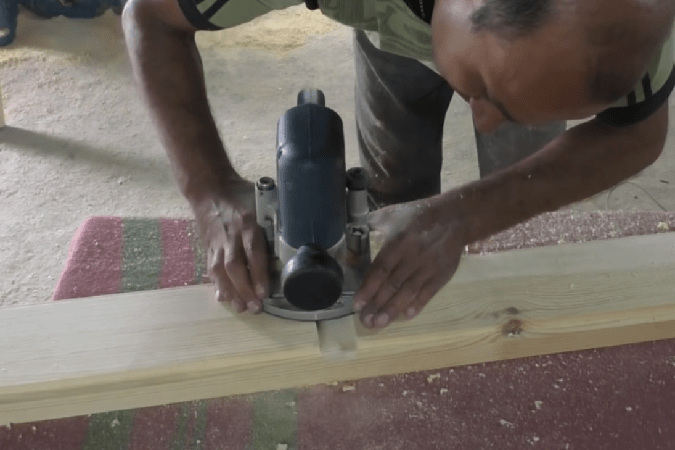
The first operation for joiners involved in the manufacture of wooden windows is called the selection of quarters. On the understandable language this means making rectangular cuts at the ends of the blanks, which, after the frame is assembled, will be used to install the glass. Groove dimensions 10x12 mm.

On the side vertical racks, the selection must be made at the corners of the wide side of the beam, facing the inside of the frame. On the central vertical rack, quarters are selected along all four faces of the timber.

This can be done on a circular saw, a hand mill or any end mill. If the tree is very dry, then before cutting the corner grooves, it is necessary to remove a small chamfer from the edges. This will avoid chipping.
After milling the quarters, it is necessary to trim the vertical posts and horizontal crossbars to size. That is, the vertical posts are cut to fit 104 cm. The design height of the window is 110 cm. The thickness of the horizontal crossbars of a wooden window is 40 mm. In order to ensure that the vertical post is inserted into the upper corner of the horizontal beam, it is necessary to make a sample of 10 mm in it, the rest of the body is 30 mm. The same selection must be made for the lower corner and horizontal beam.
The vertical post must be installed in the upper and lower recesses on the crossbars. This means that the size of the rack is 1100-2x30 \u003d 1040 mm or 104 cm. In a similar way, you need to trim the second side and central pillar of a wooden window.

Let's make lateral selections in the horizontal beams of the window under the sidewalls.

With the side posts, everything is more or less clear, it remains to choose a place for the grooves in the upper and lower crossbars to install the central post, on which the opening sash of the wooden window will close.
For the opening sash, we selected four wooden bars, two of 110 cm and two of 50 cm. At the ends of the upper and lower horizontal beams, we have already made samples of 40 mm. Set aside the width of the future sash from the edge - 45 cm.

On each transverse beam, we make two cuts with a hand saw to a depth of 10 mm and cut a groove 40 mm wide.
We assemble a box of a wooden window using self-tapping screws.

We make an opening sash and install it on the frame
Unlike the box, we will assemble the wooden frame of the sash on tongue-and-groove joints. This connection option will provide high rigidity of the frames and guarantee the absence of deformation and sagging of the sash. If you try to make it on self-tapping screws or even on the corners, the sash will still deform and crack the glass.
First you need to cut grooves in horizontal segments with a cutter. Best suited for these purposes end mill or a groove cutter, but in their absence, the grooves can be made manually with an ordinary chisel and a mallet.

On the vertical racks of the sash, spikes 40 mm long are cut out. Before making spikes, it is necessary to make a selection of quarters under glass, as was done earlier for a large box.

We assemble the frame on spikes, after having smeared the joints with carpentry glue. After an hour and a half, the assembled sash frame is doweled and ground along the plane of the sash to the main wooden frame of the window.

The size of the sash frame is 50x1100 mm. In order for the sash to close into the window opening, it is necessary to cut a sample along the perimeter of the frame in the size of 1040 mm.

The sash frame of the wooden window is almost ready, now it easily fits into the main box. It remains to make canopies and install locks. Small window hinges can be used as awnings, but their installation is quite long and requires careful cutting of hidden grooves for awnings. In addition, the strength of a conventional canopy for a heavy sash is not enough, and sculpting three loops will already be ugly. Therefore, barrels with pinned fastening are used as canopies.

You can install the barrel in a couple of minutes, but only if there is an appropriate tool for drilling holes in the frame and sash. The problem of installing the barrel is how to perform perfectly precise drilling in the wooden beam of the frame at an angle of 45 o, the drill diameter is 6.8 mm, the thread on the barrel is M8. Trying to do this by eye does not make sense, it is better to spend an extra hour, but to achieve a high-quality result.
In order to make a fixture, you will need an oak bar with a section of 40x40 mm. one facet wooden block cut along the entire length. The block is set on a drilling machine and drilled exactly diagonally.

On the reverse side of the bar, a quarter of 6x12 mm is selected along the edge. This is necessary so that the fixture fits tightly and rigidly on the edge of the sash and frame of the wooden window.
Before drilling the sash and frame, you need to make markings for installing the barrel. To do this, we apply the risk of installing a canopy on the frame, step back up the rack by 13 mm and transfer the risk to the sidewall of the sash, along which drilling will be performed for the counterpart of the barrel.

After drilling the holes, it remains to wrap the barrel screws into the frame and into the sash, after which you can hang the sash on the installed canopies.


Cut handles and finish
It remains to make pens and execute finishing wooden window. For convenience, it is best to use balcony handles with hidden locks of domestic production made of steel, aluminum ones will not work, they last for 2-3 months, no more.
We fix the sash on the frame with clamps. On the front part we mark the points for the output of the lock handles. From the points we transfer the line to the end plane of the sash. To install the lock, you need to make groove milling. It will be most convenient to cut the groove with a hand router with an 8 mm drill. The depth of milling the groove is 28 millimeters, it is impossible to drill less - the lock will not fit, more - too, can break through wooden beam through.

At the second stage, you need to mill a shelf to hide the mounting flange of the lock. Next, you need to drill holes for the installation of handles and fix the "ears" of the handles on the wooden plane of the sash.

To install the reciprocal part of the lock, you need to get the entry point of the lock tongue on the frame. To do this, simply turn with a little effort to make a dent in the surface of the B-pillar. We cut a groove along this dent and install the reciprocal metal bar of the lock.

Conclusion
Before assembling the window, it is necessary to carefully sand the entire surface of the frame and sash, especially the ends and quarters. After grinding, we process the wooden surface with impregnation, varnish and install glass. After the varnish or oil-paraffin impregnation has dried, we sew up the glass with a glazing bead and install locks and slats, and the wooden window is almost ready.
Is it possible to make high-quality wooden windows with your own hands? — It turns out that if you have tools, skill and a detailed plan, you can, and in this article we will tell you how.
This material is about handicraft production in "home conditions", about industrial production eurowindows we tell in this article:.
Plastic windows are in high demand among consumers, but wooden windows and doors are a budget and more environmentally friendly option. Since it is not difficult to make a wooden window on your own, many install them in their summer cottages. The main thing is to understand how the window structure works. In order for the product to turn out to be of high quality, it is necessary to follow the production technology, the rules for processing wood and the assembly method. BUT step-by-step instruction with detailed description will help with this.
Do you want to order ready-made wooden windows from the Moscow production of Dentro Windows with a 5-year guarantee? Below are examples of prices per m2:
| single leaf | double leaf | tricuspid | balcony block |
| from 12 500 rub | from 12 800 rub | from 13 400 rub | from 12 500 rub |
Calculate the cost of wooden windows in the company
(Only for residents of Moscow and the Moscow region), send a request to calculate the cost:
In the manufacture of wooden windows with your own hands, it is necessary to observe accuracy in work. A discrepancy of a few millimeters can lead to a distortion of the entire structure during its installation. As a result - the risk of violation of thermal insulation.
However, if plastic double-glazed windows are produced only at the factory, then wood products, if available, the right tools and work experience really make it yourself. Especially such a design is in demand in country houses and at cottages.
Profile selection
Khrushchev and long-built private houses are especially in need of replacing window frames. Replacing old shutters with wooden windows is the best option. Important to do right choice product profile. Sometimes single glass is used. Another method is double-glazed windows.
If in the first case the advantage is low cost, then double glass provides better heat retention due to low thermal conductivity. This is especially important for those areas where frosty weather sets in in winter. An inert gas is pumped into the gap. Over time, it comes out, but from this the double-glazed window does not lose its characteristics.
There is another type of window - a Finnish 3-chamber double-glazed window. On the one hand, a system of 2 glasses is installed, and on the other, a single version.
Selection of wood type
Before starting production wooden structure with your own hands you need to make the right choice of type of wood:
- 1. Oak. Good material for these types of work, but very costly.
- 2. Birch. Is the best option. Wood is well processed and has a low price. The disadvantage is the difficulty of acquisition.
- 3. Pine. With proper use, it lasts a long time. The material is inexpensive. Given its accessibility, even a beginner can work with it.
Making a wooden product
Before starting work, a drawing of the future window structure is created with your own hands. Then materials and tools are prepared:
- wooden beam;
- boards;
- glass;
- glazing beads;
- self-tapping screws;
- PVA glue;
- a hammer;
- drill;
- glass cutter;
- milling machine with a set of cutters;
- saw.
Step by step instructions for the manufacture of wooden windows consists of the following steps:
- 1. Formation of the box.
- 2. Making a frame.
- 3. Glazing.
It should be remembered that wooden material selected with precise geometry and without cracks.
Box formation
The manufacture of the box is carried out when it is absent in the structure of the house. The need for it is to take on the main load and unload the frame.
Stages of its manufacture:
- 1. An L-shaped groove is made in a board with a section of 15x5 cm. Its depth is 1.5 cm.
- 2. Four boards are connected in the form of a box.
- 3. Holes are drilled in the corners to a depth of 3 cm.
- 4. Wooden pins are hammered into them. This gives the structure rigidity.
Frame manufacturing
In the manufacture of the frame, the drawing provides assistance.

A quarter is taken on the side and intermediate slats. This is a sample of wood where the glass will be inserted.

At the end of the bars, grooves are made according to the type of thorn-groove. For this, an end mill is used. If it is absent, then the usual chisel is used.

Places are filled with PVA glue, fastened and pressed.

A sash is placed in one part of the frame. To do this, samples are made in the bars. The sash is made according to the same principle as the frame. It should fit snugly into its intended place. After that, marking is carried out for fastening the loops.

Holes are drilled in marked places, loops are fixed. Then comes the installation of handles. To do this, a groove is milled in the sash rail and a mechanism is inserted. In the response part, a place is formed for the tongue to enter.

Glazing
When installing glass, it is required to cut it accurately with a tolerance of no more than 0.5 mm. For this, a diamond screw is used. The final polishing is done with sandpaper.

If the deviation in size reaches 1 mm, then a cold bridge is formed. The window will not perform its function.
Glazing work requires compliance with safety regulations:
- 1. In order not to injure your hands, put on gloves.
- 2. Be sure to have glasses. The eyes are protected from glass microparticles entering them.
- 3. It is not recommended to breathe through the mouth and talk. Together with air, glass crumbs settle on the mucous membrane of the throat.
The order of work is as follows:
- 1. The glass to be cut is pre-measured. For this, a meter ruler is used that exceeds the dimensions of the material.
- 2. A line is drawn with a diamond glass cutter.
- 3. A plank is applied to the glass so that its cut coincides with the line, and it is well pressed.
- 4. By pressing the hand, the glass breaks off with a characteristic crack along the fracture line.
- 5. Fitting is underway. If the cut is made accurately, then the glass is installed and pressed with glazing beads, into which thin nails are driven in.
- 6. When installing double panes, a beam with selected grooves is attached between them.