Proven ways to build a tandoor with your own hands from bricks. Do-it-yourself tandoor in a country house made of bricks Stone tandoor project
To diversify the country menu, you can lay out a brick tandoor with your own hands, spending very little time on the device of this unusual stove. The design of the tandoor has historically developed among the steppe nomadic peoples, who were forced to conserve fuel. For heating such a hearth, very little firewood is required, after which you can bake bread or cook food in the heat that the heated walls give. In a dome-shaped oven, the desired temperature is maintained for quite a long time without fire, and if necessary, it can be maintained by adding wood chips or dry plant branches.
Currently, Asian hearths are one of the types of exotic stoves. Traditional ways making them from clay is quite complex and labor-intensive. Therefore, more and more often you can find country mini-ovens made of bricks. There are both electric and gas models industrial production.
But anyone who is a little familiar with the masonry technique can make a brick tandoor with their own hands. There are several varieties of homemade foci:
- vertical square;
- vertical cylindrical;
- horizontal (Central Asian).
Cylindrical vertical models are especially popular. They are made both submerged in the ground, and ground, and even mobile. This design allows you to use the hearth for different purposes: bake cakes or samsa, fry barbecue, cook pilaf or other dish in a cauldron, and even just boil water in a kettle.
The vertical square tandoor is also quite versatile, but its design is less perfect, because the interior of the furnace will warm up worse in the corners. But you can bake bread in such a hearth, although you will have to place the cakes closer to the middle of each side. In all other cases simple design quite justifies itself, allowing you to bake meat in the same way or cook something in a kitchen utensil installed on top of the hole.
The horizontal tandoor is traditionally molded from clay, which makes it possible to make an arched vault without much effort. But also brick tandoor With front loading it is quite possible to do it yourself. When cooking in a container, you will need to place it inside the firebox. This gives the horizontal hearth a distant resemblance to a Russian stove. Cakes or samsa in Central Asia in this case are still baked, attaching them to the walls of the firebox.
Preparatory stage
Before you make a brick tandoor, you need to perform a number of preliminary work. They depend on the design of the hearth, but in general they boil down to the preparation of the base and the selection of materials. An important point in the manufacture of mini ovens cylindrical shape is the manufacture of the template. It is needed in order for the rounded arch to turn out to be even.
Brick for the tandoor can be taken as usual: red full-bodied or even facing. But the best choice there will be a refractory fireclay stone, which is designed for exposure to high temperatures. The heating and cooling time for all brands of brick is approximately the same.
In addition to building stone, a number of additional materials will be required:
- cement, sand and gravel - for the foundation of the ground variation;
- masonry mortar for stoves and fireplaces (dry mix);
- a pipe with a diameter of 10 cm (asbestos cement, sandwich, tin) - for some models of tandoors;
- grate;
- clay;
- reinforcing mesh, wire;
- cutting boards and plywood;
- grinder and disk for ceramics;
- measuring tools.
If you add a building decorative elements, then the tandoor can even decorate the site. In this case, it is best to sketch the building in color, and then make drawings according to the desired dimensions of the hearth.
The place for the mini-oven must be chosen so that the building is flooded with water as little as possible during the spring snowmelt. If necessary, you can build a raised platform for its installation. For a ground model, you will have to fill in the foundation, and for an in-depth model, you will have to dig a hole.
How to make a ground tandoor
For a furnace of this design, a foundation is required. Even a small tandoor will weigh quite a lot, so during the period of thawing and freezing of the soil, it can lead and the masonry will simply crumble. But since the building is still not very large, you can get by with a slab foundation, the dimensions of which should exceed the diameter of the furnace by at least 20 cm around the entire perimeter.
Under the foundation, you need to dig a pit up to 50 cm deep. A layer of sand or ASG should be laid at the bottom of the pit, leveled and tamped. The thickness of the pillow is 10-15 cm. After that, a solution is kneaded from 1 part of M400-M500 cement, 3 parts of fine sand and 4 parts of crushed stone, adding water until a plastic mass is obtained.
Concrete must be poured into the pit, filling it to the level of the soil. Then install the formwork from the boards along the contour of the pit and raise the level of concrete by another 5 cm. If you want to protect the homemade brick tandoor from melt water, the site can be made higher. After preparing the base, work will have to be interrupted for 7-10 days until the concrete gains strength.
Cylindrical tandoor masonry
Before you build a brick tandoor, you need to make a template. The construction of boards and plywood is traditionally used:
- Pick up a pole with a length not less than the height of the future tandoor (about 1.2 m).
- Attach slats to it in increments of 30 cm (along the height of the pole). The length of the bottom and the one following it is 30 cm. Then you need to make smaller boards, forming a bend: the length of 3 supports is 25 cm, and 4 bars are 20 cm.
- Attach a strip of plywood to the free ends of the laths, bending it in accordance with the profile formed by the shortening parts. The length of the rails can be chosen arbitrarily, depending on the size of the hearth, and be half its diameter at the base and at the top. A convenient height of the oven is about 1 m.
The laying of a vertical configuration tandoor begins with the formation of its bottom. To do this, several fireclay bricks must be laid on the foundation without mortar. Draw a circle on them, with a diameter equal to the future building. Taking out 1 piece, cut off the excess parts of the stone with a grinder with a ceramic disk. After sawing, the bricks must be put in place. The result is a round base. In order not to confuse the parts during masonry, you should number them.
Remove the base parts from the foundation, prepare the solution. You will need a refractory mixture for laying stoves and fireplaces. In the dry composition, add water according to the instructions on the package, kneading a viscous clay dough. Apply the mortar to the foundation, lay out the numbered bricks, pressing and lightly rubbing them to the base.
The construction of walls can be done in different ways:
- install the brick vertically, with a long narrow edge outward;
- perform the usual masonry in 1 brick around the circumference;
- place the stones with the poke side out (for this method, halves of bricks are usually taken).
If the masonry elements are installed vertically, you need to slightly trim the ends (butt sides) of each brick. So they will easily form a vault.
Set the template on the bottom of the future tandoor. At the same time, the pole should be located in the center of the brick circle, and the plywood strip should be 12.5 cm from its edge. A bed of mortar should be applied to the free space.
After that, the laying is carried out, pressing the inner edge of each brick to the template plywood. Turning the pole, lay out 1 row in a circle. At this level, you need to leave a small hole for blowing. Therefore, 1-2 bricks in the masonry are not installed.
The next level is raised according to the same principle, pressing the edge of the stone against the template. The masonry parts must be shifted relative to the lower ones in order to get the dressing of the seams. Block the blower hole, completely closing the ring of fireclay bricks. Tie and tighten the row with thin steel wire or reinforcing mesh.
Continue to raise the walls of the tandoor, orienting the narrowing of each circle along the pattern. When laying bricks vertically or with a poke, it is imperative to ensure that the inner faces of each of them are in contact with the neighboring ones. As a result, small gaps are formed between the outer sides. You can fill the space between the parts with the same masonry mixture during work.
After the construction of the brick tandoor is completed, the template must be removed through the upper hole. Align the internal surfaces by applying a clay mortar or a refractory mixture to them. Cover with clay and the outer surface, finishing it to taste: facing with stone or tiles, decorative mosaics or otherwise.
The side of the hole on top must be carefully smeared with clay dough, giving it a roundness. Very often, at this moment, supports for suspensions are formed. To do this, you just need to make 4 cross-shaped recesses in the upper edge of the tandoor. It will be possible to put sticks in them, on which skewers with meat, a grill for roasting vegetables, etc. will be hung.
Square tandoor
A very simple hearth model can be made by hand even without a template. To build a square brick tandoor oven, a rough order of 2.5x2.5 masonry stones can be used. If desired, you can choose other sizes, the principle of construction will not change. The coarse pattern has a hole for the furnace door. Since the vertical tandoor does not have this detail, you need to lay out bricks where the door opening is indicated.
The slab under the foundation must be poured in the appropriate form, and after the concrete has hardened, lay bricks on it, forming the base in the form of a square. Elements of the next level should overlap the joints of the lower bricks. In the middle you need to leave a small hole for blowing, bringing it to one of the sides of the square. Raise 1 more row, install the grate.
At the next level, overlap the blower channel by laying out a solid hearth with a hole above the grate. For the walls of the furnace, several rows should be laid around the perimeter of the square, carefully aligning the verticals of the sides and the horizontality of the upper edge. At a convenient height, you need to start narrowing the dome.
To get a kind of furnace roof, you need to slightly move each element of the masonry inward. In this case, you will have to cut the bricks so that they fit on the ever-shortening sides of the square. When the top hole reaches a size of 20x20 cm, you need to slightly raise the side. Clean the internal surfaces from the influx of the solution; if desired, the stove can be plastered from the outside.
How to make a tandoor in the ground?
On a dry and elevated area, you can make a furnace, wholly or partially immersed in the ground. Such a building can become the center of a recreation area, replacing the Scandinavian hearth. Before you make a tandoor with your own hands out of brick, for such a design it is necessary to find a sufficiently long asbestos-cement pipe for making a blowing channel.
Given that the height of the tandoor is about 1.2 m, you need to be prepared to dig a pit of the specified depth. With partial deepening, the pit may be smaller. Its width is chosen arbitrarily. At the bottom you need to lay a layer of ASG, tamp it down and pave the pit with bricks.
1 row of masonry is laid out on this impromptu foundation. The shape of the stove can be round or square, and the building stone can be laid both with a spoon and vertically. After 1 tier is formed, a pipe for blowing should be installed. To do this, a trench must be dug with a slope that will allow the other end of the pipe to be brought to the surface of the soil. To fill the gap between the wall of the pit and the masonry, you can use excavated soil or ordinary clay, sand, crushed stone.
At the next levels, the furnace walls simply need to be raised to the desired height above the ground. If the building will have to perform decorative functions, finish the edge according to your own taste. In order for the tandoor not to cool too quickly, you need to choose a lid that is suitable in diameter for the upper hole.
What is a horizontal tandoor?
The Central Asian oven is also very interesting, in which there is no upper hole. Its pharynx is located on the side, which makes such a design related to the Russian or Pompeian oven. The manufacture of a tandoor of this design is traditionally made from clay mixed with straw or sheep's wool. Near such a hearth it is convenient to bask in the winter cold, it is often installed under the roof, indoors. But the construction of a brick tandoor is also possible in this case.
To create it, you need a circle, or a template made of plywood and boards. It will help you quickly build a tandoor with your own hands, ensure ease of laying the vault and give support to the bricks until the mortar sets. A template is made in the form of 2 connected arches, the width of which is equal to their height. You can draw a circle of the desired size, draw a horizontal diameter and lower 2 straight lines from the points of intersection of it with the circle. Transfer the resulting figure to plywood and cut out 2 identical parts.
Connect them with bars along the top edge. The length of the rails is equal to the desired oven depth. Sheathe the upper edge with thin plywood, bending the sheet along the contour of the arch and attaching it to the bars.
Prepare the base of the oven. Traditionally, it is built in the form of a table about 1 m high. For the base, you can use cinder block, brick, natural stone. You can weld the construction of a steel corner and put a metal worktop on top.
A layer of bricks on a clay mortar is laid on the finished base, forming a furnace with a channel for blowing. On the next row, you need to block the channel, leaving a hole in the center.
After that, install the circle on bars 3-5 cm thick and align it horizontally and vertically. For masonry, it is best to use wedge-shaped bricks, specially designed for the manufacture of vaults and arches. In their absence, cut off a part of an ordinary masonry stone, giving it the desired shape.
Lay out the uncut stone with a spoon in 1 row to the left and right of the template, close to its plywood vault. When shifting the bricks for dressing the seams, evenly raise both sides to the beginning of the arch. After that, use only cut or wedge-shaped stones, gradually closing the arch in the middle. Leave a small hole for the chimney. Dry the masonry for 4-5 days.
Carefully knock out the bars from under the wheel. At the same time, it will drop a little, which will allow you to freely remove the template from the firebox. Install grate.
Brick the open back of the arch. On the facade, you can make a damper or decorative doors. Press in the chimney pipe and bring it outside if the stove is located indoors. For an outdoor stove, a chimney is optional.
Preparing the tandoor for operation
But the work on the made tandoor is not over: the hearth laid out with your own hands must first be burned. They do this only after the clay has dried, that is, a few days after the construction of the building itself is completed.
Make a fire out of paper and small chips. Heat the oven until the outer surface is heated to +350°C (warm to the touch). Extinguish the fire and let the stones cool completely. Next time bring the oven temperature up to about +700°C (hot). It can cool for several hours, you can leave it overnight.
The last heating should heat up the tandoor to the operating temperature (+1500°C or more). After that, it is completely ready for use.
To bake bread and samsa, you need to heat the oven well and let the firewood burn down to coals. Dough products are glued directly to the walls. The cauldron can be installed on round hole from above, and skewers with meat are hung on sticks in a vertical position. You do not need to turn them, as they heat up evenly from all sides.
Staying in the country is a unity with nature. I want to cook food on the fire, sit by the fire, listening to the twilight rustles. For cooking on fire, a barbecue or barbecue is most often used, and we suggest you make a tandoor with your own hands. What it is? This is an oriental oven-brazier, which allows you to cook a lot of delicious dishes that are simply impossible to cook otherwise. Samsa, pita bread, oriental meat - all this can be done in the tandoor. Moreover, the meat turns out to be very tasty, because it is suspended in a horizontal position, as a result, the fat does not drip onto the coals, but flows down the pieces of meat, making it juicy and soft.
Barbecue in the tandoor is much tastier because of the vertically arranged skewer. On the grill, the meat needs to be poured with marinade or sprinkled with water, but here it turns out tender and juicy
It is very interesting, in the opinion of a European, tortillas and samsa are prepared in the tandoor - they are attached directly to the walls of the oven and baked in this way.
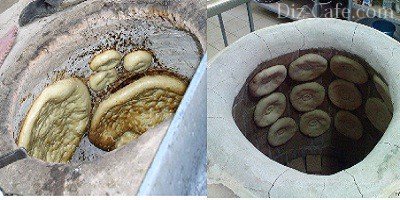
Oriental cakes and samsa are baked in the tandoor, stuck to the walls of the oven. This bread has a special taste. Having made a tandoor, you can bake samsa, pita bread and delicious cakes
The traditional shape of such a furnace is round. It can be located both above ground and underground. Today, many summer residents build a brick tandoor, it is not so difficult to make it, but oriental cuisine will bring a lot of pleasure to both family members and guests.
In the East, the tandoor can also be located in the house, it is installed in the center of the room to warm the air in the room during the cold season.
A small tandoor can be made on a platform with wheels, you can transport it to any place in the garden.

You can also buy a tandoor if funds allow. Here is a ready-made tandoor with a platform on wheels that can be installed anywhere in the garden or in the house
If the stove is stationary, it is better to place it on rocky or sandy soil, away from buildings and green spaces. The ground under the tandoor must be dry.
How to make a tandoor? Stone blocks, ceramic clay bricks, or white refractory bricks can be used for construction. The base is laid out first. The brick tandoor is quite heavy, so the base must be strong. The base of the furnace is like a foundation in which an opening is made where fuel is laid.
You can build a tandoor directly on the ground, in this case you need to dig a hole in the shape of a circle under the base, with a diameter of 120-130 cm. We fill the bottom with sand (a layer of 15-20 cm), and we begin to lay out a brick well.

The base for the tandoor - a sand cushion is made at the bottom of the base, the area around is also covered with sand. At the bottom it is convenient to place the grate under the coals
As a mortar for masonry, you can use a ready-made oven mixture. It consists of a plasticizer, red clay and quartz sand. The masonry can be both horizontal and vertical, in the first case the stove will keep heat longer, the second is more economical - much less bricks will be needed.

Tandoor, lined with vertical masonry with a pipe for venting gases. Material for the manufacture of such a furnace consumes less

Brick tandoor, lined with horizontal masonry - the thickness of the wall is greater, so it keeps the heat inside longer. In any tandoor, there should be a hole for flue gases from below
To visually see the dimensions of the future furnace, you can first make an order - masonry without mortar. We work with a brick with a grinder with a cutting diamond wheel for ceramics.
Ordering is done for a visual representation of how your tandoor will look like. After such a calculation, you can start working with the solution. Tandoor can be built on the ground or on a brick base
It is not easy to make round masonry, a full-size drawing made with a protractor and a compass will help you, and the ability to handle a grinder is also important.

The diagram clearly demonstrates the device of a brick tandoor. Features of the manufacture of the furnace may differ, but the basic principle of construction is always the same - a base with a hole for fuel and a body that is rounded up
A pattern of bricks is the basis for forming a circle. Do not spare the mortar when laying, and use a level to check the horizontal position.

Oriental craftsmen used a similar pattern to make the tandoor. Laying bricks according to the pattern, the oven will gradually acquire a rounded shape tapering upwards
The tandoor is narrowed up - this is done so that the heat is kept inside. In order to achieve this effect, the bottom layer of the brick must be cut off; when laying, the shape will resemble a vault. After the masonry is ready, the interior of the furnace should be cleaned of traces of mortar. We use dry clay to fill the seams from the outside. The inner surface is also coated with clay, which is mixed with finely chopped grass.
When the kiln dries, it is first heated with paper, and then the firing temperature is increased. This is the easiest way to make a tandoor, and if you want to ennoble it, you can coat the structure with clay. In the east, stoves are decorated with mosaic tiles, sandstone, and ceramics.
The video demonstrates how to make a brick tandoor using a template:
Option # 2 - tandoor from a wooden barrel
Of course, a brick tandoor is the most durable and practical, but if you wish, you can use other methods, which we will now discuss. Here you need the skill of working with clay.
You need to find a small barrel with ill-fitting hoops. The barrel is impregnated from the inside with refined sunflower oil, for impregnation we leave it overnight.
Then we prepare a solution - sheep wool for reinforcement (length up to 15 cm), fireclay clay, fireclay sand. The ratio, respectively, is 0.05 - 1 - 2. We make a thick solution and fashion the furnace body on the inner surface of the barrel (thickness - 20-30 cm). The solution is smoothed and dried for a week using incandescent lamps. Then the hoops can be removed, and the barrel disassembled. After that, the product is subjected to secondary firing.
Option #3 - Brazier using a plastic barrel
You will need plastic barrel classical form. We fill it with water, after filling the barrel slightly increases in size, its outer surface is coated with fireclay solution, it is compacted, smoothed until the furnace contour is formed. The product is also dried for a week, and then the water must be drained. The barrel will become smaller and can be removed from the new tandoor.
A cauldron can also be placed on top of the stove for cooking pilaf and other dishes, but for this you need to adjust the crown to the volume of the cauldron, the crown is coated with clay.
Building the oven is the highlight, but you will also need to make the metal skewers. For example - these are three brackets with a metal hoop in the center. The easiest option is to use a strong rod, laying it along the crown, and attach skewers to it

If you have the skills of pottery, the tandoor can also be made a decoration on the site. For example, create such a “house” for cooking delicious oriental dishes
We examined several simple ways to make a tandoor in the country. These are the simplest answers to the question of how you can make a tandoor with your own hands. More complex options offer the manufacture of a structure resembling a Russian stove, but this is a bulky structure and it is quite troublesome and difficult to build it, and a simple tandoor is quite suitable for giving and the dishes in it are very tasty, try it and you will see for yourself.
For most city dwellers, being in the countryside is associated with unity with nature, when there is an irresistible desire to sit by the fire in the open air and cook food on the fire, inhaling the exciting aromas. In most cases, residents country houses they prefer to use a brazier or barbecue for cooking, which is widely used by residents of the middle lane. The oriental tandoor, less common among the European population, is in no way inferior to the listed devices and, on the contrary, allows you to cook a lot of delicious dishes, the cooking technology of which involves the use of only an oriental brazier. The unique taste of homemade samsa, pita bread and oriental meat is a weighty argument in favor of building a tandoor in the country with your own hands.
The principle of operation and design features of the tandoor
Before considering the construction of a tandoor oven, we advise you to familiarize yourself with the principle of operation and the main features of the traditional design, the performance of which has been tested for centuries:

- Initially, the tandoor was a clay cauldron, located upside down and equipped with a hole in the upper part;
- There is also an additional hole at the bottom for blowing;
- Outside, a kind of clay cauldron is lined with bricks, filling the space between the tandoor and the brickwork with sand, clay or salt;
- These materials have low thermal conductivity, as a result of which the clay oven becomes an ideal accumulator of heat, which it absorbs from fire, and then slowly releases it into the structure where food is cooked;
- In this regard, a uniformly high temperature is created inside the oven, which makes it possible to bake and fry delicacies in conditions of complete absence of coals.

Features of modern construction: design and materials
At present, few people observe the traditional features of the building, greatly simplifying the manufacture of the structure.

Despite this, the tandoor, built in modern conditions, does not interfere with enjoying home-made oriental delicacies. The most common form of modern tandoors is considered to be a “well” or a jug, narrowed in the upper part, which prevents the outflow of heat and contributes to the uniform heating of the furnace.

Since the brick is used as the basis of the building, according to experts, it appearance does not play a special role, and in this regard, they offer to choose any red heat-resistant brick for making a tandoor, even those that have already been in use.

And to facilitate the work, to prepare the solution, you can use the factory oven mixture based on red clay. The solution prepared using this mixture is resistant to high temperatures, dries quickly and, due to its high plasticity, does not form cracks.

Do-it-yourself tandoor: preparatory work
Before you build a brick tandoor, you need to decide on the territory on which the structure will be located. According to safety regulations, it should be located at a distance of at least 3 meters from trees and outbuildings. It is desirable that the groundwater level is as low as possible and the soil is dry.
The selected site, the length and width of which often do not exceed 1.2-1.5 m, is carefully leveled and covered with a layer of sand equal to at least 20 cm. asbestos cement pipe. Those who are afraid of the harmful effects of asbestos can replace the asbestos-cement pipe with a metal one.
Sequence of work: foundation and walls of the structure
The next stage of construction involves laying out a site consisting of three rows of white silicate bricks. In the process of arranging it, there is no need to use a concrete solution, since in any case it will crack under the influence of excessively high temperatures.

In the future, you need to do the arrangement of the walls.

To install them, you will need a red heat-resistant brick placed on the end, with which you will get a circle of the required diameter. In this case, it is 40 cm, and consists of 19 bricks.

For greater accuracy, you can use a round template. In total, the design of the tandoor, the photo of which is presented below, involves the installation of three rows of bricks installed in a similar way, which took a total of 57 bricks.

To increase the strength of the structure, the rows are aligned and then tied with wire. As a result, the height of the brick walls of the tandoor, as the video confirms, is 75 cm.
Structural strengthening: reinforcing mortar, metal mesh and other techniques
Next, you need to start preparing a solution based on fireclay clay, which will be required to cover the seams between the bricks. carry it out manually. So that the brick does not absorb moisture from the clay longer, it is moistened before smearing the cracks.


After the first layer has dried, a second layer is applied, called reinforcing.
For its preparation, in addition to clay, straw is added. Thus, with a break of 2-3 days, necessary for the clay to dry, two layers are applied. It is important not to forget to cover the structure with polyethylene at night, which will protect it from moisture in case of rain.


To give even greater strength, the structure is reinforced with reinforcing metal mesh and again coated with a layer of clay.

Answering the question: “How to make a tandoor with your own hands?” let us clarify that the next step involves welding, which is carried out for the manufacture of a metal ring. It is installed in the upper part of the structure and the structure is again reinforced with a reinforcing mesh, which reaches the metal ring from above.

Having carried out the above activities, they coat the almost finished tandoor cement mortar. To prepare it, you will need sand, cement and granite screenings, the composition of which allows you to prepare a "light" concrete solution.

Experienced specialists involved in the construction of a tandoor with their own hands are advised to add a teaspoon to it when mixing the solution. detergent, explaining this by the fact that the solution in this case does not shrink. To mix the solution, it is best to use a drill with a nozzle. After coating the tandoor with concrete mortar, leave it to dry completely for about 7 days.

To design long time kept warm, care must be taken to make a wooden cover.

In addition, for these purposes, the tandoor is often additionally covered with a quilted blanket. Also, the design of the eastern stove implies the presence of a metal stand, on which skewers are subsequently hung.
Tandoor is a vertical brazier used in Asian countries. Fragrant cakes, barbecue, real pilaf and much more can be cooked in this wonderful oven in a few hours. How to make a tandoor with your own hands from brick? The portal site will help you figure it out and provide several options for building.
Types of buildings
Depending on the availability of free space and the dishes being prepared, a tandoor can be built
Collapse
- elevated (has the largest dimensions);
- earthen;
- on the mobile platform.
Large stationary brick tandoor
The structure is made of fireclay bricks on a concrete base.
To preserve heat, a solid lower row of fireclay bricks is laid out on the foundation slab. The design consists of two jugs of different diameters, without a bottom. One inside the other. Between them is basalt wool.
Dimensions of a large brick tandoor:
- height - 1-1.5 m;
- inner diameter — 1 m;
- neck diameter - 0.5 - 0.6 m;
- outer diameter - 1.9 m.
Materials and calculations
Accept:
- diameter of the base according to the outer measurement - 1900 mm;
- internal diameter of the furnace - 1000 mm;
We will need:
- sand;
Determine the area of the base:
From here
V sand \u003d S * h \u003d 2.8 * 0.1 (with h pit \u003d 300 mm) \u003d 2.8 * 0.1 \u003d 0.28 m 3
- reinforcing mesh 5Vr-1;
S \u003d p * R 2 \u003d 3.14 * 0.95 * 0.95 \u003d 2.8 m 2
- concrete B12.5 - B15;
V concrete \u003d S * h \u003d 2.8 * 0.2 (with h pit \u003d 300 mm) \u003d 0.56 m 3
- fireclay brick;
a) inner contour
a \u003d p * D \u003d 3.14 * 1.46 m (according to external measurement) \u003d 4.58 m
V1 brick \u003d a * h * b \u003d 4.58 * 1.5 (with wall h \u003d 1500 mm) * 0.23 (masonry thickness) \u003d 1.58 m 3
b) outer contour
a \u003d p * D \u003d 3.14 * 1.89 m (according to external measurement) \u003d 5.94 m
V2 bricks \u003d a * h * b \u003d 5.94 * 1.5 (with wall h \u003d 1500 mm) * 0.115 (masonry thickness) \u003d 1.02 m 3
c) bottom
S \u003d p * R 2 \u003d 3.14 * 0.95 * 0.95 \u003d 2.8 m 2
V3 bricks \u003d a * h * b \u003d 2.8 * 0.075 (brick thickness) \u003d 0.21 m 3
V brick total \u003d V1 + V2 + V3 \u003d 1.58 + 1.02 + 0.21 \u003d 2.8 m 3
Taking into account losses, we accept brick consumption - 400 pcs. per 1 m 3. Hence 400 pcs. * 2.8 m 3 = 1124 bricks.
- Basalt wool;
S \u003d p * D * h walls \u003d 3.14 * 1.46 m (outside the inner contour) * 1.5 (with wall h \u003d 1500 mm) \u003d 6.9 m 2, rounded up to 7 m 2.
2.8*470kg=1316kg
- various auxiliary material - you need to include cutting wheels for a small "grinder", rags, etc.
Instruments
- "Bulgarian";
- shovel "bayonet";
- shovel "scoop";
- trowel;
- putty knife;
- wooden mallet;
- pliers, etc..
Stages of work
- base;
- foundation concreting;
- strength set;
- contour marking;
- laying of the internal contour;
- pug;
- drying;
- warming;
- masonry of the outer contour (circle or square);
- drying;
- hatch installation;
- burning.
Scheme
General circuit diagram tandoor installation looks like this:
Brick tandoor scheme
There must be insulation between the outer and inner contours. The outer contour may have a different shape. In this case, concrete blocks were used as the foundation.
Be sure to arrange a blower. This part facilitates maintenance and increases safety.
Step-by-step instruction
How to build a large brick tandoor? Step-by-step instruction:
- We draw the project. We dig a pit with a diameter of 1 m to a depth of 200-300 mm.
- Doing sand base under the foundation. Pour sand in a layer of 100 mm and carefully compact.

We fall asleep with sand
- We reinforce the foundation. We use a wire mesh VR-5 with a cell of 150x150 mm. Sold in hardware stores, in rolls of 6 meters.
- The mesh must be completely filled with concrete. The minimum thickness of the protective layer is 40 mm. To do this, the grid is laid on bricks.
- We fill the resulting structure with concrete. For the construction, concrete grade B12.5 is suitable for us. The recipe is beyond the scope of this article. Concrete must be carefully compacted. Horizontal control is carried out using a level.

Checking the level
- To gain strength, we withstand the base for seven days. In summer, be sure to moisten with water.
- We insulate the bottom with fireclay bricks.
- We mark the inner contour of the future furnace at the bottom. In a clockwise direction, we begin to arrange the bricks along the contour. Lay out in 2 rows of ½ bricks. To make the design look neat, we will make a wooden template. In the bottom row we leave an opening for the blower.

We start laying

We leave a place for a blower and an ash pan

We put the grate

Don't forget to check the level.


- We are waiting for the structure to dry (the site recommends waiting at least a day).
- Outside, we insulate the inner contour in 2 layers. As a heater, basalt wool is suitable.
- We mark and lay out the outer contour. The top row is carefully coated with clay. Verticality is controlled using a template. We adjust the brick to the template, cutting off the end with a grinder.

Laying out the outer contour

End of work
- You can weld a fixture for attaching skewers.
Brick tandoor on a mobile platform
Primarily, excellent choice will become a mobile tandoor on a mobile platform.
Advantages:
- lighter and more compact version;
- easy to move;
- does not require a foundation device;
- does not require large material costs.
Improvised means are used as a mobile platform. The old wheel frame from the trolley is quite suitable.
Materials and calculations
We will need:
- fireclay brick;
a) inner contour
a \u003d p * D \u003d 3.14 * 0.8 m (according to external measurement) \u003d 2.5 m
V1 brick \u003d a * h * b \u003d 2.5 * 1 m (with wall h \u003d 1000 mm) * 0.115 (masonry thickness) \u003d 0.3 m 3
b) outer contour
a \u003d p * D \u003d 3.14 * 1.23 m (according to external measurement) \u003d 3.9 m
V2 bricks \u003d a * h * b \u003d 3.9 * 1 m (with wall h \u003d 1000 mm) * 0.115 (masonry thickness) \u003d 0.5 m 3
c) bottom
S \u003d a * b \u003d 1.3 * 1.3 * 0.075 \u003d 0.78 m 2
V3 bricks \u003d a * h * b \u003d 1.3 * 1.3 * 0.075 \u003d 0.1 m 3
V brick total \u003d V1 + V2 + V3 \u003d 0.3 + 0.5 + 0.1 \u003d 0.9 m 3
Taking into account losses, we accept brick consumption - 400 pcs. per 1 m 3. Hence 400 pcs. * 0.9 m 3 \u003d 360 bricks.
- basalt wool;
S \u003d p * D * h walls \u003d 3.14 * 0.8 m (outside the inner contour) * 1 (with wall h \u003d 1000 mm) \u003d 2.5 m 2, rounded up to 3 m 2.
- ready-made refractory mixture for masonry;
We accept a consumption of 470 kg per 1 m 3 of masonry, from here
0.9*470kg=423kg
- decorative stone for outdoor decoration;
S \u003d p * D * h walls \u003d 3.14 * 1.23 m (outside the inner contour) * 1 (with wall h \u003d 1000 mm) \u003d 3.86 m 2, rounded up to 4 m 2.
- various auxiliary material - we will include here cutting wheels for a small "grinder", a grinding wheel for concrete, rags, etc.
Instruments
The list of tools is standard:
- "Bulgarian";
- trowel;
- putty knife;
- wooden mallet;
- pliers, etc.;
- grinder.
Stages of work
Briefly consider the stages of work:
- preparation of a mobile platform;
- contour marking, sleeve installation;
- laying of the internal contour;
- pug;
- drying;
- warming;
- masonry of the outer contour;
- drying;
- hatch installation;
- decorative trim;
- burning.
Step-by-step instruction
The schematic diagram of the device is similar to a large stationary stove.
However, there are the following differences:
- instead of a foundation - a wheelbase from a cart;
- thinner walls;
- the design is smaller and lighter;
How to make a mobile brick tandoor?
The procedure should be like this:
- On the mobile platform we fix a square or rectangular asbestos sheet, 10 mm thick. Size 1300x1300 (1400) mm.
- We lay out a continuous row of refractory bricks on a sheet. It will serve as the bottom. and prevent heat loss.
- We lay out the second row, leaving room for the blower.
- As a metal clip, we use a piece of pipe Ø 820 mm. Length - 900 mm.
- We mark the order and prepare the first row of bricks. We process them grinding machine to get a circle of the desired diameter.
- We are building. First lay the bricks dry. Then put on the solution.
- So we lay out 4 rows.
- We close the tandoor with special circles for stoves (sold ready-made).
- We wrap the tandoor outside with basalt wool in 2 layers, before salt was enough.
- We lay out the outer contour of refractory bricks.
- During laying, we coat the tandoor with clay inside and out.
- We wrap the structure with a reinforcing mesh made of wire, 2-3 mm thick.
- We carry out external facing with a decorative stone.
- Dry and burn.
- You can start cooking fragrant barbecue or meat.

Mobile brick tandoor
Homemade earthen brick tandoor
The classic earthen tandoor is simply a hole dug in the ground about 35 cm deep and 45 cm in diameter. Later they began to use ready-made forms in the form of eggs, which were buried in the ground. This design provides a high heat capacity.
The advantages of such a furnace are obvious:
- simplicity and space saving;
- does not require the construction of an above-ground structure;
- saving materials;
- does not require external finishing;
- the construction is strong enough.
Disadvantages:
- need additional holes for air exchange;
- not suitable for a large campaign;
Materials and calculations
We will need:
- fireclay brick;
a) inner contour
a \u003d p * D \u003d 3.14 * 0.73 m (according to external measurement) \u003d 2.29 m
V1 brick \u003d a * h * b \u003d 2.29 * 0.375 m (with wall h \u003d 1000 mm) * 0.115 (masonry thickness) \u003d 0.1 m 3
b) bottom
S \u003d p * R 2 \u003d 3.14 * 0.37 * 0.37 \u003d 0.43 m 2
V2 bricks \u003d a * h * b \u003d 0.43 * 0.075 (brick thickness) \u003d 0.03 m 3
V brick total \u003d V1 + V2 \u003d 0.1 + 0.03 \u003d 0.13 m 3
Taking into account losses, we accept brick consumption - 400 pcs. per 1 m 3. Hence 400 pcs. * 0.13 m 3 \u003d 52 bricks.
- basalt wool;
S \u003d p * D * h walls \u003d 3.14 * 0.73 m (outside the inner contour) * 0.375 (h walls) \u003d 0.9 m 2, rounded up to 1 m 2.
- ready-made refractory mixture for masonry;
We accept a consumption of 470 kg per 1 m 3 of masonry, from here
0.13*470kg=61.1kg
- various auxiliary material - we include here cutting wheels for a small "grinder", a grinding wheel for concrete, rags, etc .;
- steel pipe.
Instruments
Standard list:
- "Bulgarian";
- shovel "bayonet";
- shovel "scoop";
- trowel;
- putty knife;
- wooden mallet;
- pliers, etc.;
- grinder.
Stages of work
- excavation;
- lay out the bottom of the tandoor;
- exhaust pipe installation, organization of air supply;
- masonry walls of the tandoor made of bricks;
- dome manufacturing;
- installation of the dome and hatch;
- insulation of the structure with expanded clay.
Scheme
The photo shows a schematic diagram of an earthen tandoor device:

Brick earthen tandoor device
The furnace in the ground can be located vertically or horizontally. A ready-made clay mold is used, which is lined with fireclay bricks on the outside. A do-it-yourself brick tandoor will easily find its place in the country.
This drawing shows a diagram of the organization of air inflow and removal of combustion products:

Before the first use, it is necessary to carry out the firing procedure for at least 30 minutes.
This photo shows a ready-made earthen tandoor:

Earthen brick tandoor
Step-by-step instruction
The construction of an earthen tandoor is in many ways similar to the ground one. How to build an earthen brick tandoor with your own hands? Your actions should be like this:

In the ground, it is no more difficult to build a brick tandoor with your own hands than its ground-based counterparts.
Advantages and disadvantages
In total there are more than 30 types of this device for cooking. The content is different, but the principle of operation is the same for all. Food is cooked not from fire, but from the heat that the walls have accumulated.
A brick oriental miracle oven has its pros and cons.
- does not require the use of expensive materials;
- a properly folded stove will last for many years;
- food processing at high temperature;
- high heat transfer;
- allows you to preserve the juiciness and useful qualities of products;
- due to the high efficiency, fuel is saved significantly;
- low requirements for fuel quality;
- easy maintenance;
- can be made by hand.
- the vertical arrangement of the barbecue is not familiar to a Russian person;
- soot constantly forms on the walls during melting;
- there is a risk of burns when removing cooked food;
- the food is cooked in the same cauldron where the firewood burns.
We built a brick tandoor with our own hands according to the drawings, photos and step-by-step instructions above. Here are some tips for use:
- Prepare the tandoor properly before use. Remove old coals and soot.
- Do not fill the entire available volume with firewood. The maximum load is 2/3.
- Lubricate the inside of the tandoor with sunflower oil.
- When the firewood burns out, evenly distribute the coals over the entire surface of the bottom.
- After cooking, the tandoor should cool down on its own, in natural conditions.
findings
You can build a brick tandoor for cakes or barbecue with your own hands, following the step-by-step instructions above. First, decide what dishes you are going to cook and for how many people.
Advantage self-manufacturing tandoor are as follows:
- you can use improvised materials
- your friends will admire the dishes with which you can surprise them for a long time
- loved ones will appreciate your efforts
- it's just interesting to try your hand and make a brick tandoor with your own hands.
The disadvantages can only be attributed to the fact that tandoor romance has not really taken root in our country. Today it is rather exotic. Horizontal brazier and barbecue are more in demand. But, with an increase in the flow of emigrants from Central Asia, making a brick tandoor oven in the country with your own hands is gaining more and more popularity.
If you have a large family or a private business, your choice is a large stationary tandoor.
Mobile tandoor - useful for a small family, in the country. If there is not enough free space on the site, use a do-it-yourself tandoor made of bricks in the ground.
In any case, your family and friends will be delighted with fragrant cakes and juicy barbecue. You will be captured by the process of cooking vegetables. The Asian miracle stove will become an indispensable assistant. original recipes creating culinary masterpieces at home, look at the video on the Internet.
←Previous article Next article →How to make a brick tandoor? In this article, we will get acquainted with the step-by-step construction of the Tandoor furnace with our own hands, we will build the furnace from refractory bricks, the step-by-step masonry will be shown in the photo.
What is Tandoor? This is a jug-shaped oven made of clay, stones or bricks, which has been widespread among the peoples of Asia for more than 5000 years. The stove is used for cooking, as well as for heating the home.
The peculiarity of this oven is that the food in it is not fried, but baked, because the main heat comes from the walls of the heated oven, which allows you to quickly bake bread cakes or cook meat.

How to make a brick tandoor yourself.
Materials for building a furnace:
- Refractory brick (fireclay) - 50 pcs.
- Oven mixture for refractory bricks (you can buy it ready-made at a hardware store).
- Steel wire.
- Water-based paint.
- Cement, crushed stone, sand (for the foundation).
- Ruberoid (for waterproofing).
Tool:
- Bulgarian (cutting wheel for ceramics).
- Container for mixing concrete.
- Master OK.
- Device for masonry Tandoor.
- Paint brush.
- Construction level.
Base for the Tandoor oven.
You need to install the furnace on the foundation, best option make a pillow of crushed stone and sand and cast a slab measuring 1 x 1 meter, 10 cm deep. The shape of the slab can be any.

Brickwork Tandoor.
What kind of brick can be used for tandoor? Do not use silicate or red brick, it is not intended for furnaces and gradually collapses under the influence of high temperatures. It is optimal to build a Tandoor oven from refractory fireclay bricks, such a furnace will be reliable and last a long time.
Before you start brickwork you need to take care of waterproofing so that the brick does not draw moisture from the foundation; it is enough to lay a piece of roofing material or similar material on it.
On the basis, we need to draw a circle with a diameter of 750 mm under the furnace itself.
We need 16 bricks for laying the bottom of the furnace, focusing on the circle, try on the bricks and lay out the bottom of the furnace, cut the brick with a grinder with a cutting wheel. After fitting and fitting the bricks, we lay them on the masonry oven mixture.

Knead the mixture for masonry Tandoor in small portions, as you lay the brick, you need to constantly adjust it, file it with a cutting circle, a large number of the solution will quickly seize and become unusable.
We lay the well-mixed mixture in an even layer on the roofing material, lay the already prepared cut brick, and also fill the seams between the bricks with the mixture. As the brick is laid, we check building level everything should be in a strictly horizontal plane.
The bottom of the Tandoor is ready, now let's let it stand for a day so that the solution gains its initial strength.
In the meantime, we will make a device for Tandoor brickwork, which will greatly facilitate the process of bricklaying.
Fixture dimensions:
- Height - 1000 mm.
- The width of the lower part is 300 mm.
- The top two 250 and 200 mm.
- Step between horizontal bars 250 mm.
In fact, when laying bricks, we get the inner diameter of the base of the furnace 600 mm, the uppermost part 400 mm.
We lay out the first row of bricks, the brick is laid upright, in order to fix the structure, we fasten it around the circumference with wire, you can leave the wire, then it will still be covered with plaster.

We lay out the second and third rows, the bricks need to be cut with a grinder under the wedge, the cut bricks are laid through one, alternating with the whole ones.


After laying the final third row, we cover our Tandoor with mortar from the outside, the thickness of the plaster must be at least 10 mm, otherwise the plaster will crack and quickly fall off when heated, it is unnecessary to plaster inside the oven.

The top edge of the oven must also be plastered.

Now the furnace needs to stand for three days in order to gain sufficient strength, for this period it is advisable to cover it with plastic wrap so that moisture does not evaporate quickly.
The final stage - we cover the oven from the outside water-based paint for outdoor work.

The oven inside must be thoroughly cleaned with a brush and once well heated, then you can already cook food in it.
Another important feature of the Tandoor is that it consumes a moderate amount of firewood, you can heat the stove well with one armful of firewood.

Do-it-yourself tandoor made of brick video.
Brickwork Tandoor.
And of course a video on how to cook cakes in the Tandoor oven.
(3 ratings, average: 5.00 out of 5) Loading...
sam-builder.com
How to make a brick tandoor with your own hands: diagrams, photos, videos, instructions
Tandoor is a special jug-shaped brazier designed for cooking. These furnaces are most common in the East. Now they are increasingly used in Europe, as they have a lot of good qualities. They are stationary, or small, portable. Historically, a tandoor is a clay product, but in modern conditions it is much more convenient to build a brick tandoor with your own hands.
History reference
The first such ovens appeared in Asia. According to legend, they were invented by a shepherd named Tandoor. He saw that tulips close up at night, and insects protect themselves from the cold. The young man made a bud out of clay and began to cook food for himself in it, kindling a fire inside. The food was delicious and stayed hot for a long time. The young man made a fortune by making and selling tandoors. Became a respected person.

Brick tandoor
Another legend attributes to the tandoor sacred meaning. Allegedly, it was invented by the Sarts in the tenth century. They lived on the territory of modern Uzbekistan and were fire worshipers. They believed that the tandoor is a spiritual dwelling of beautiful spirits - peri, an analogue of European fairies. Only after many years did it acquire practical significance. This happened when the Sarts were conquered by the Mongols, and they were able to appreciate their invention.
The manufacture of the clay tandoor is shrouded in mystery, which is guarded and passed down from generation to generation. If you make a tandoor without skill, it will crack from the heat. There are secrets that are known. Clay is carefully sifted like flour for dough. Sheep or goat wool is added to the clay. After firing, it burns out, and pores remain in the vessel. During construction, a barrel is often used - wooden or plastic. She keeps her shape. After construction is completed, it is removed. Knowledge of these secrets is not enough to make a clay tandoor. In the country, they usually build a brick one.
This does not detract from his excellent qualities. The ancient nomads at each of their camps made stoves out of anything, keeping the principle, and the food turned out delicious. That is, initially the tandoor is a fire in a recess that saves it from the wind.
Tandoors are common in Armenia, Kazakhstan, Turkmenistan, Azerbaijan, Tajikistan, Mongolia, Japan. They have been used there for centuries. It is difficult to say who is older - the tandoor or the Russian stove.
Tandoor is the most famous name of this oven. The term is of Turkic origin. In Armenia they are called tonir, in India - tandur, in Tajikistan - tanur, in Georgia - tone, in Azerbaijan - tandir. All of them have differences, but one principle of manufacture and operation.
In former times, this stove also served to heat the room. Now it is not recommended to use it indoors.
Construction
Building a tandoor, like any other business, requires preparation.
Training
It is necessary to choose and prepare a place for the furnace. It should be located far from the house and landings. A site with minimal moisture is desirable. Everything superfluous must be removed from it. It must be level.
- refractory brick;
- sand, clay, fireclay mortar;
- grate (lattice);
- cement;
- asbestos pipe;
- shovels;
- trowels;
- level.
Foundation
The best place for a tandoor is sandy. If there is no such place on the site, a shallow round pit is dug and wakes up with sand, compacted. On this site, a foundation is made of brick or concrete. You can use a reinforced concrete slab. This is a good option, but it increases the cost of the furnace. In addition, the slab must be laid very evenly.
The construction of the furnace
Walls are laid out on the finished foundation. The brick is placed on the end or in 3 rows. The first row is placed around the circumference and linked with a solution. The inner diameter of the circle is 0.5 meters. An asbestos pipe is inserted into the second row, it will serve as a blower. Internal coating is made with fireclay mortar or clay. It is more convenient to do it immediately as the next row is installed.

Brick tandoor scheme
On the second row grates are installed. You will need four rows in total.
When the oven is laid out and dried, all joints are sealed from the outside. Clay cement is used. When plastering, the brick should be moistened, otherwise it will take water from the solution. When this layer dries, a second layer is applied - from clay mixed with straw. It will play the role of a reinforcing and insulating wall, it is allowed to dry for three days. If it rains during the laying of the tandoor, the construction must be covered with a film. At the end, the tandoor is covered with a third layer. In composition, it is like the first.

Top part tandoor
The oven is ready. The lid can be made from an iron sheet by welding a handle. It will help keep you warm as much as possible. You can ennoble the tandoor externally, overlay it natural stone. They start working when everything is dry.
Earthen tandoor
Sometimes a brick tandoor is buried in the ground. It will be more convenient to use - there is less danger of getting burned, it is easier to lower products. The principle of construction is the same. The pit must be dug deeper, three-quarters of the height of the furnace. The blower pipe should be longer, it is brought out. Savings on exterior finish, it will be required only for the part coming out of the ground.
See also: oven brick
It is advantageous to build a brick tandoor on your own, since the work of a master will be very expensive. The simplified construction itself is not difficult, it can be carried out by anyone whose hands are not rooted to their pockets.
Of course, these are not the only ways to build such a furnace. There is, for example, a horizontal tandoor, which is easy to use. It can also be built with bricks. In such ovens, mainly dishes are cooked on a baking sheet. Outwardly, they resemble a Russian stove, but without a chimney.
Terms of use
The first ignition must be carried out carefully. The temperature must be raised gradually. Firewood is laid on two-thirds of the tandoor, they must be dry. They are set on fire through the blower. Products are loaded into the oven when the firewood burns out, about an hour after ignition. Coals should be evenly distributed on the bottom of the oven. One dressing is enough to prepare two dishes, and the second will take twice as long to cook.

Using the tandoor
If the tandoor needs to be used again, it can be heated to operating temperature much faster than during the first ignition.
It's easy to check if it's ready to go. The stick must be drawn along the wall inside. If the soot disappears and the wall is clean, the stove is ready for use.
The degree of roasting can be adjusted by supplying air to the tandoor through a blower or a lid.
The coals should smolder without burning, so the blower is not closed after heating. To avoid unnecessary traction, at the same time slightly open the lid.
Do not pour water over the tandoor to cool it. It will give irreparable cracks. He must cool himself, naturally.
It must be remembered that when ignited, the height of the flame above the stove can reach one and a half meters. The temperature inside reaches 480 degrees, the outer walls also heat up. Children should not be around, everyone should behave carefully to avoid burns.
Do not forget about fire safety.
Advantages
Cooking in the tandoor is becoming more and more popular. What contributes to this?
The flame is not blown out, the heat is long and uniform.
Cooking is like an oven. No harmful substances are formed in food during cooking. Even barbecue turns out dietary.
A brick brazier or its counterpart from America barbecue cannot replace the tandoor. A much larger number of dishes are prepared in the tandoor. No need to wave over the coals, water, the food cooks itself.
See also: oven brick
Skewers with barbecue in the tandoor are placed vertically. There is no need to turn them. This time can be devoted to friends.
Food is tastier than cooked in other ways. Cooking is fast. It's faster to just boil eggs or make sandwiches. Food is affected by the heat from the coals, and even more so by the heat from the walls. Meat is cooked in 15 minutes, fish in ten, vegetables in five.
Tandoor saves firewood He comes from places where there has never been an abundance of them. The design has been perfected for centuries. The firewood needed by the barbecue to fry five kebab skewers is enough for the tandoor for 12, plus it will fry the cakes and boil the tea while the cakes are being cooked. Tea will be like from a samovar.
Bad weather will not spoil the picnic. The fire burns in a jug, where it is not afraid of rain.
In addition, it is possible to build a tandoor with a roof. For example, in the outbuilding. This is usually a bulky structure, and it is better if the work is done by specialists.
What to cook?
You can cook many dishes in the tandoor. It has already been said about cakes, tea, shish kebab. Cakes are baked both inside and outside. Bread is usually baked inside, muffins are baked outside. There is no chimney part in the oven, so cakes, samsa and other oriental products are applied to the walls of the oven. If you remove the lid and place a grate on it, you can use the oven as a barbecue. A kettle or a cast-iron with cabbage soup is also placed there. They will be like from a Russian stove. In general, in the tandoor you can cook everything that is in the Russian oven. To do this, hang the grate on hooks and put dishes on it. And not necessarily in cast iron, pans are also suitable.

Chicken, vegetables, meat, fish, fruits are baked in tandym. Anything. At different peoples have their own recipes for tandem. In India, this is chicken chikentanduri, Uzbeks love baked lamb. Everything is prepared quickly, it turns out juicy and tasty.
A brick tandoor is an almost eternal structure. It requires almost no maintenance, sometimes you have to clean out the soot from the inside and rake out the ashes.
Video
And what will you make the tandoor from?- From brick 89%, 100 votes
kirpichfaq.ru
Do-it-yourself tandoor made of bricks - drawings, photos and step-by-step construction instructions
Unlike the traditional country house hearths of barbecue and barbecue tandoor made of bricks with your own hands allows you to additionally bake cakes, boil water or cook pilaf in a cauldron without additional devices. It has the shape of a cylinder, ideally a barrel or a large jug. 
The main advantage is high efficiency from fuel combustion, high temperature regime product processing and high service life. However, the unusual placement of kebabs (vertically, not horizontally) did not allow this hearth to gain sufficient rating, like a barbecue and barbecue.
Features of the tandoor
To build a tandoor with your own hands on the site, you need to know what kind of dishes this hearth is intended for, the temperature regime and design features. There are tandoors buried in the ground and structures raised above the surface. 
Depending on the qualifications of the home master and the presence of a power tool in his arsenal, a cylindrical “barrel” or a jug-shaped structure is constructed. Usually they choose a simpler version of the classic barrel with arched sides.
Assortment of dishes
The main task of the outdoor hearth is to cook meals during the reception of guests or family holidays in the countryside. However, the tandoor is quite suitable for regular baking of bread / cakes, cooking mass dishes, side dishes, boiling water. Therefore, it is considered a full-fledged summer kitchen.
Information on how to build a brick tandoor in the yard should begin with an assortment of dishes:
- cakes - require the skill of fixing the formed dough on the inner surface of the hearth;
- shish kebab - skewers are arranged vertically in a circle, so special devices are needed to fix them in a “pot” or “barrel”;
- barbecue - by analogy with the previous dish, the grate somehow needs to be placed in the “well”, and then safely removed without getting burned;
- first courses - cooked in a large cauldron, mounted on the neck of the tandoor;
- barbecue, roast - are also prepared in a cauldron in a similar way.

If necessary, you can boil water for tea in a large pot on this hearth.
Temperature regime
Using different sizes and shapes of the inner surface of the hearth, it is possible to provide a temperature inside it of 250 - 400 degrees, which is unattainable for barbecues and barbecues by default due to significant heat losses.
Initially, the earthen tandoor looked like a pit, in which firewood turned into coals, and the wind could not blow out the flame. Then the walls began to be made of clay, which turns into ceramics during high-temperature firing.
There are vertical and horizontal tandoors, however, it is the first designs that are considered multifunctional. The horizontal hearth-barrel is more suitable for industrial baking of cakes.
External and internal dimensions
For the above reasons, the construction of a tandoor should take into account the following factors:
- ease of maintenance - firewood and products are loaded inside, and the ash is taken out through the same neck;
- dimensions - the standard for the tandoor is 1 - 1.5 m in height, 1 m in diameter in the middle part of the barrel and a hatch 0.4 - 0.6 m in diameter, reinforced with a metal ring.

To preserve heat and increase efficiency, additional masonry is usually erected around the tandoor (a well or a square of 4 walls), the space between them is filled with refractory material (expanded clay, slag).
The quality of the combustion process can be improved by blowing from below, and operation by a chimney on the side and an ash chamber under the grate (only for ground structures of the tandoor). From bad weather, the neck is closed with a sealed lid. 
Even with the occasional use of the hearth, extreme temperatures affect the brick. Therefore, it is better to use refractory fireclay, and outdoor structure made of ordinary or facing ceramic bricks.
Brick tandoor technology step by step
Any brick structure erected on the ground is subject to the forces of frost swelling and shrinkage, since it has a solid weight and is made of small-format structural elements. Therefore, the brick tandoor must be based on an individual monolithic slab foundation.
There are several masonry options, each will be discussed in detail below. Then, internal walls structures are necessarily coated with clay. Outside, it is also better to plaster the tandoor with clay and fill up the space between the decorative outer masonry and the refractory material that is not subject to frost heaving. Therefore, clay is not suitable for this, slag or expanded clay of a fine fraction (sand) is used. 
The tandoor is decorated at the discretion of the owner. If necessary, a chimney, a cutting table, a washbasin / sink are attached to the hearth, the structure is equipped with a canopy from the weather.
Foundation
With an uneven increase in the volume of clay soil, which has absorbed moisture in autumn, frozen at negative temperatures, the masonry will inevitably crack. In addition, organic matter in the fertile layer of chernozem / gray soil will rot under it, the heavy structure will sag. Therefore, the foundation of the tandoor is made according to the technology:
- soil extraction - the topsoil is removed entirely (usually 0.4 - 0.6 m deep), can be used in landscape design or in beds, ideally it is better to dig a pit 20 cm more along the perimeter of the outer masonry to a depth of 0.6 m;
- separating layer - the bottom of the pit is lined with geotextile, which prevents the mutual mixing of soil with non-metallic material poured on top of it;
- the underlying layer is a “foundation cushion” of a layer of crushed stone with a fraction of 5–20 mm, each 10–15 cm layer is compacted with a manual rammer or vibrating plate;
- waterproofing - crushed stone is leveled with a thin layer of sand, on which a waterproofing membrane or pieces of rolled bituminous material are laid in one layer with an overlap of 10 cm along the edges of the sheets;
- reinforcement - since the structure is mounted on a shallow foundation and has a large weight, two lattice reinforcing belts made of bars of a periodic section ("corrugated") with a diameter of 6 mm, a cell of 20 x 20 cm should be used;
- concreting - a layer thickness of 8 - 15 cm, depending on the budget, the formwork should be 10 cm higher than the concrete mirror so that the structural material does not spill over the edge when compacted with a deep vibrator or a piece of reinforcement;
- concrete care - the surface is covered with a polyethylene film or sawdust / matting, periodically moistened from a watering can for at least two days.

Attention: To provide a protective layer of reinforcement, the lower grating is laid on waterproofing, on polymer or concrete pads 2–4 cm high. It is forbidden to use trimmings of reinforcement and pieces of crushed stone.
If the external decorative masonry is designed in the form of a square, the classic panel formwork is used on 4 sides. For masonry of an annular shape and a foundation under it of a similar configuration, the boards will not work. Therefore, the formwork is constructed from thick fiberboard or sheet steel strips.
To increase the operational life of the masonry, it is better to raise the upper edge of the foundation above ground level by at least 5-10 cm.
Brickwork
The main mistake of the home master is the manufacture of the annular first row of the tandoor for the following reasons:
- the foundation, in principle, is not intended for high-temperature exposure;
- making refractory concrete at home is very difficult and not economically feasible;
- therefore, the annular masonry of the first row should be filled with bricks entirely, and the seams should be clogged with masonry mortar;
- “Under” brick ovens will last much longer than concrete, it is easier to remove accumulated ash from it.

Depending on the budget of the home master and the skills of the mason, masonry is carried out in several ways using various devices. Regardless of this, an opening is left in the second row for the ash pan door, through which the corresponding combustion products will be removed. The “blower” hole is located a little higher, but under the grate of the grate. The metal hoop is mounted on the neck of the last row of masonry.
First, the tandoor itself is laid out, then erected decorative wall of the required configuration, expanded clay sand or slag is poured between the two structures.
Attention: Instead of a cement-sand masonry mortar, it is better to use special blends for furnaces or clay packaged in bags containing special additives to increase plasticity.
Cylinder
The easiest way to make a tandoor is in the form of a cylindrical well. However, with a diameter of 1 m, a whole brick with a spoon is unsuitable for this. It will be difficult to cover the inner surface with clay, which is later fired to the state of ceramics. When laying with a poke, the material will take twice as much, which is very expensive for the construction budget. 
Therefore, a brick split in half or its vertical installation with a spoon, poke is used. The cylindrical hearth is easier to maintain, but the heat in it is retained worse.
Barrel
It is more difficult to make a brick tandoor in the shape of a classic barrel with convex sides, narrowing at the bottom and top. But the temperature inside such a hearth is higher, it lasts longer, the internal volume and the area of \u200b\u200bthe walls for attaching the cakes increase. 
The arched shape of the vertical walls of the tandoor is considered more durable, which allows to increase the operational life of the structure. For laying furnaces of a similar configuration, the use of devices is recommended, since it is impossible to control the arc with a plumb line and a rule.
For a home craftsman, it is recommended to pay attention to the domed fireclay brick tandoor, which is easy to make. on their own. Since refractory bricks are easily cut with an abrasive angle grinder, such a design is quite affordable for self-production. 
From halves
In principle, the ordering scheme for the tandoor is not needed, even if it is supplemented with a chimney. When using halves of a standard brick, they are stacked with a poke, taking into account the following nuances:
- on the inner diameter of the masonry, the width of the joints is 1 cm maximum;
- seams of outer diameter are filled with mortar additionally;
- depending on the configuration of the inner surface of the brick tandoor, do it yourself with the help of the following devices.

Attention: In this version of the masonry, it is easier to choose the sizes of the holes for the ash door, the hole for the blower and the chimney. 
You can watch more related videos:
vertical spoon
When using any masonry from a brick standing on the edge, it is recommended to use 4 full rows in the tandoor. This corresponds to 1.04 m in height, when choosing the “well” shape, the bricks are absolutely parallel to each other, the two lower rows of the “barrel” expand outward, the upper ones narrow inward.
For these technologies, ordering drawings are needed in order to correctly place the grate, the chimney and blower holes, the ash pan door in the internal space, as in the bottom photo. 
A vertical spoon is called a laying of ¼ bricks per edge. This is a budget option tandoor is practically unsuitable for the cylindrical shape of the hearth. In the “barrel”, such masonry is reinforced due to the self-wedging mutual arrangement of individual elements in space and relative to each other.
Here is a video on how you can also make a portable design:
Vertical poke
For this technology step-by-step instruction looks like:
- trimming the ends of the bottom row - a wedge of 1 - 2 cm is cut off from one corner;
- installing a brick on an edge close to each other - the last brick should jam the ring, so it should be cut, giving the appropriate shape;
- masonry of the second row - the upper and lower ends are cut with a wedge.

When installing the third and fourth, last, rows, the operations are similar to the previous ones, but in a mirror image. In principle, it is not necessary to cut the brick, laying the mortar with a wedge for each row. In this case, use a special device - a template is a must.
Devices for ring masonry
Before making a tandoor on your own for a novice bricklayer, it is recommended to study devices that drastically reduce the labor intensity of work and increase the quality of masonry to a professional level. The main ones are:

The last fixture freely rotates around the circumference, allows you to control the geometry of the masonry at all its levels.
More simple option tandoor is a dome design inside a well. The lower part of the dome is laid out in an annular masonry of halves to a height of 0.5 - 0.6 m. Then, with each row, the ring rows are narrowed until a neck of 0.5 m is obtained. 12 - 25 cm recede from the finished structure, lay out a cylindrical well without constrictions. The gap is filled with refractory material, a chimney pipe and an ash door are mounted. 
Reinforcement and coating
When placing a tandoor in the ground, only its inner surface is coated with clay mortar. 
At the ground structure, the outer surface should also be coated, as in the lower video.
Reinforcement is made with a soft mesh, which can be bent according to the configuration of the hearth:
- a spray is applied to the brickwork without leveling the mortar;
- after 5 - 7 minutes, the mesh is pressed into this layer;
- then the next layer is applied with surface leveling.
 The photo can be enlarged by clicking on it.
 Backfilling the space between the main hearth and the decorative masonry is possible after the solution has completely dried.
Earthen (pit) tandoor
When constructing a homemade brick tandoor below ground level, the following nuances should be taken into account:
- the diameter of the pit must be at least 80 cm larger than the design size of the furnace;
- for convenient maintenance, it is better to raise the neck above the ground by 15 - 20 cm;
- refractory bricks for the tandoor will dramatically increase the service life, since the design of the underground hearth is practically beyond repair;
- the grate is not used here, the ash is removed through the top, the blower is mandatory;
- external masonry of a square, annular or rectangular shape is not needed, these walls are replaced by the soil itself.

After coating and reinforcing the outer walls, all layers of clay mortar and concrete should dry out within a half month. Then the clay is fired for 3-8 hours. Ideally, when tapping the inside of the hearth, a ringing sound should be heard.
Only then can the pit be backfilled. Moreover, not with excavated soil, but with non-metallic material, in which the forces of frost swelling cannot arise. 
Sand, slag and crushed stone are suitable for these purposes. However, the first material has capillary suction at negative pressure, so crushed stone is used in 90% of cases. Non-metallic material is compacted with a manual rammer.
Attention: Waterproofing of the tandoor from the outside is not needed, since with intense heating it will collapse and provide an unpleasant bituminous smell.
Hearth decoration
The design of the outer surface will make it possible to make the tandoor with your own hands attractive when receiving guests or satisfy the aesthetic needs of family members. Facing bricks do not need to be decorated, however, ordinary ceramic stone is often used to reduce the construction budget.
Its surface can be revetted in several ways:
- coat with a refractory mortar and drown a decorative natural stone of any format in it;
- putty and cover acrylic paint, not afraid of moisture and ultraviolet;
- veneer with tiles or porcelain stoneware.

Decorating a pit tandoor does not make sense, since the design is recessed into the ground by default.
To improve the comfort of use, additional functions are used:
- canopy - protection from precipitation;
- countertop - cutting products;
- washing - ensuring hygiene;
- woodpile - storage of fuel in the immediate vicinity of the hearth;
- ring with slots for placing skewers.

Thus, the construction of a tandoor is much more complicated than a brazier and a barbecue oven. However, the temperature regime of the hearth provides a high speed of cooking and their wide range of not inferior to a full-fledged summer kitchen.
mangalka.com
Do-it-yourself brick tandoor: how to make, instructions, drawing
 Any vacation in the country cannot do without the preparation of mouth-watering, fragrant and incredibly delicious kebabs. What could be better than juicy, wood-fried meat, poured with a spicy sauce? The answer is simple - barbecue cooked in a tandoor - an ancient oriental oven, through which you can make a lot of delicious dishes. Therefore, we propose to build a tandoor with our own hands, especially since the simplicity of its construction is simply amazing.
What is a tandoor and why is it needed
Tandoor is a special oven-brazier of a special configuration, which is designed for cooking. As a rule, it is made of clay, which has a high heat capacity and heat transfer. Thanks to this, the oven begins to gradually cool down, giving off heat evenly for perfect cooking. 
The tandoor has significant advantages over other similar devices:
- the cooking process takes much less time: for example, a large piece of pork meat will cook for about 20 minutes;
- there is no need to control the cooking process all the time, because all that is needed is to put food in the oven and then take it out after a certain time;
- the minimum amount of firewood required for cooking;
- versatility in use, because through such an oven you can cook the most different kinds dishes: meat, pastries, vegetables, moreover, you can cook porridge and even make tea in it.
Learn also how to make a brazier from metal and brick with your own hands.
The key advantage of the tandoor is the ability to cook meals without the use of oil and fat, which is especially important for those who adhere to the principles of a healthy diet. 
How does a tandoor work?
The principle of functioning of the miracle furnace is based on two aspects: design features tandoor and the material from which it is made.
The oven, made of loess, clay or other similar materials with high thermal conductivity, warms up from the inside and begins to gradually release heat, evenly heating the cooked food.
Thus, the food is not fried, as on a fire, but is evenly baked, using the languishing method. It is thanks to these properties that the tandoor is radically different from the barbecue.

Types of tandoor
Depending on the installation site of the tandoor, there are several types of it. Let's consider each of them.
Ground classic
The ground tandoor belongs to the classical form; during construction, it is installed on a special platform made of clay, upside down. To ensure the high heat capacity of the structure, the outer walls are coated with a thick layer of raw clay.
For the manufacture of a ground furnace, two methods are used:
- Sculpting - the walls of the furnace must be at least 5 cm thick, a thickening of up to 10 cm is made at the base of the device, and a square hole of 15x15 cm is made at the bottom, which serves as an inflow fresh air and ash recovery. The dimensions of this design are: height - 55 cm, diameter - 60 cm.
- Tape method - during construction, clay is mixed with sheep or camel hair to strengthen the walls and additional heat. Next, the clay is rolled into rollers up to 6 cm and laid out in tiers, by pressing and pinching. The height of the tandoor can reach up to 70 cm.

earthy
Earthen tandoor or pit is considered the oldest and simplest in design. It is made from clay, previously mixed with gravel or fireclay.
There are two subtypes of earth kiln:
- For the first type, they dig a hole up to 50 cm deep and up to 35 cm in diameter, which is lined with bricks. At the bottom of the structure, two holes are made to ensure good combustion.
- The second type of oven is ready-made egg-shaped tandoors. Such structures are immersed in a previously dug hole, and only the neck is left on the surface. From the bottom of the device, special air is blown, which is brought to the surface.
There is evidence that the pit tandoor was used even before our era. 
portable
The portable tandoor appeared relatively recently, but has already managed to gain great popularity. It has the shape of a jug and is made of heat-resistant chamotte or kaolin clay.
For ease of use and mobility, the design of the furnace on both sides is supplemented with two metal handles. From above, the neck is closed with a special two-level lid, from below there is a blower necessary for kindling the furnace and extracting coals. 
Building a tandoor
The design of the tandoor is quite simple, so even a non-professional can handle its construction. To start building, you should prepare the appropriate materials and tools.
Necessary tools and materials
You can make a tandoor with your own hands on the site in just one weekend, if you prepare all the necessary materials and tools in advance. During the work you will need:
Instruments:
- container for mixing building mixtures;
- spatula about 12 cm wide;
- grinder for cutting bricks with a cutting diamond wheel;
- building level and plastering rule.
Materials:
- water and ordinary table salt;
- chamotte clay;
- fireclay, refractory bricks;
- steel wire.
Construction example
In this case, we will focus on the construction of an egg-shaped portable tandoor. To do this, you first need to build a round metal platform with wheels, the diameter of which will be equal to the diameter of the future furnace.
DIY tandoor: video
Like any construction process, the construction of a brick tandoor consists of several stages:
- Making a wooden template. In order for the walls of the furnace to be even, a special wooden arc-shaped blank is made, the parameters of which correspond to a certain geometry of the furnace: height - 75 cm, upper inner diameter - 40 cm, lower inner diameter - 60 cm.

- Preparation of mortar for the construction of the furnace. The height of the tandoor from the floor is only three refractory bricks, which must be planted on the mortar. To do this, mix: water, fireclay clay and ordinary table salt. The resulting solution is well mixed until a homogeneous, thick mass is formed, resembling sour cream in consistency.
- Bricklaying. A template is placed in the center on a pre-prepared round stand on wheels. Next, bricklaying is carried out: it is installed on the edge, in a circle, one after another. When the circle is completed, check the evenness of the structure with a level. So that it does not deform, it is tied with wire.

- Walling. By a similar principle, equaling the walls according to the template, the second and third rows of bricks are laid. When laying the third layer, which has the largest rounding, the first brick is cut from both sides in the form of a trapezoid and installed at a slight slope on the structure. All subsequent bricks are cut on one side only.

- Tandoor lining. So that the heat and heat do not go away, the walls of the furnace are coated on the outside with a thick layer of fireclay clay with a spatula, in the direction from bottom to top.

- Drying design. To dry the oven, a small fire is lit in the middle. After a few days, the tandoor is ready for work.

Important! If the structure dries out summer time, it is necessary to moisten its surface systematically to prevent the formation of cracks and chips.
Dishes that can be cooked in a tandoor
Tandoor is a unique miracle oven in which you can cook many delicious and fragrant dishes: from bread to traditional kebab. Recipes for the tandoor are not limited to any category; here you can perfectly cook meat, fish, vegetables, make amazing pastries and even bake fruits.
Cooking in the oven is especially good because it does not require constant monitoring of the condition of the products, the main thing is to carefully study the instructions for cooking a particular product.
The traditional dish made in the oven, of course, is bread. Churek is a national food, which is a flatbread with crispy edges. 
For its preparation, the following ingredients are needed:
- water - 300 ml;
- flour - 500 g;
- yeast - 1 tbsp. l.;
- sugar - 1 tsp;
- salt - to taste.
From these ingredients, knead the dough and leave in a warm place for 1 hour to make it fit. Next, a cake weighing 500-600 g is made and sent to the oven. The finished cake is smeared with an egg and decorated with cumin, which gives it a special aroma and taste.
No less tasty, juicy and fragrant is samsa with lamb. 
For its preparation you will need:
- water - 550 ml;
- flour - 1.5 kg;
- mutton fat - 100 g;
- salt - to taste;
- yolk - 1 pc.;
- meat (mutton) - 1 kg;
- sesame - 2 tbsp. l.;
- onions - 4-5 pcs.;
- spices for the filling - to taste.
Important! In order for the dough to get the desired consistency, it should be kneaded for at least 15 minutes, wrapping the edges clockwise.
Samsa preparation technology:
- From flour, water, fat and salt knead the dough. It is cut into small strips, then into cubes, after which a cake is formed from each cube.
- The resulting cake is rolled out in a very thin layer, a filling of minced meat, spices and onions is placed in the middle, the edges are pinched in the center.
- Pies are smeared with yolk and sprinkled with sesame seeds.
- The samsa is sent to the tandoor and baked until golden brown.

Tandoor is a universal device that will allow you to spend time in the country not only fun and interesting, but also very tasty. In the oriental oven, you can cook several different dishes at the same time, which will appeal to both children and adults.
Don't have such a device yet? It is not necessary to run around construction markets to purchase it, you can quickly and easily make a miracle oven with your own hands, following all the requirements and recommendations of specialists.
Was this article helpful?
agronomu.com How to build a pond in the country with your own hands