How to make a log house from logs. How to cut a log house - technology. The process of making a log
Currently, an increasing number of people are starting to build a log house with their own hands from profiled timber or round timber. This is not just a tribute to fashion. Cutting a wooden frame is not so difficult process, materials are relatively inexpensive, and the result is reliable, simple and brings a lot of positive emotions to the master.
Advantages wooden house that it is environmentally friendly, has a low thermal conductivity, which provides comfortable temperature inside the building at any time of the year. There are not so many disadvantages: the service life of a wooden structure is in the range of 50-100 years, it is problematic to make an extension to it, the fire hazard of the building is high even with special wood processing.
Necessary materials and tools
You can build a log house or a log cabin with your own hands in one season if you have the material and necessary tools. For this you will need:

- chainsaw;
- axes;
- chisels;
- mallets and hammers;
- electric drill;
- staples, nails and other fasteners.
We remind you that dry logs or special profiled beams are used for a wooden log house, so the material must be prepared approximately 7-10 months before the start of construction, but the foundation for a log house can be prepared even 1 month in advance. The wooden elements of the structure are light, so the probability of shrinkage of the foundation is very low. The exception is foundations that will be built on light soils. Sandy ground and too deep clay layer indicate that the foundation must be reliable and prepared at least 6 months before the start of the main construction phase.
The order of construction work

So, the foundation has been made, all the tools are available, there is the required amount of dry logs at hand (pre-prepare them before cutting the log house), you can begin to build the bowl of the building. A layer of waterproofing is laid on the foundation. You can apply roofing material (in 3-4 layers) or use more modern materials. The lower part of the log will have to be cut under the cord to give it a flat plane. The same operation is recommended to be done with the upper part.
Two prepared logs are laid longitudinally on the foundation. In the place where there will be a connection with a transverse log, it is necessary to give it the appropriate profiling. Usually the connection is made in a paw: the edges of the log are profiled so that they have the shape of a rectangular trapezoid in the end part and are reduced to a rectangular shape at the junction with the round part of the log.
The transverse log is profiled in the same way. The connection of the angle to the paw requires accurate measurements and calculations in order to avoid gaps. Sometimes additional wedges driven between the profiled parts of the logs help to eliminate miscalculations. But this cannot be considered a way out: as a result, a cold zone will form in the corners, which will cause the structure to freeze and the material to be damaged by a fungus from excess moisture entering the joint. The dovetail connection resembles the same paw, but in the central part it has a protrusion that helps to make the corner more airtight.
The first crown and reliable connections

The first crown of the log house is the key, so its quality must be taken very responsibly. For additional strength of the joints, a vertical tenon is often used. To do this, both logs need to be drilled through and a wooden spike (oak) of a slightly larger diameter should be hammered into the resulting hole. To prevent spikes from falling into each other, arrange them in a checkerboard pattern. Properly organized connection with spikes will not allow the walls to walk.
An important point is the longitudinal density of the walls. Between themselves, the logs should be connected as tightly as possible. In this regard, felling can be carried out different ways. Specially prepared profiled beams do not need to be adjusted. Round timber does not have this quality, so it must be customized. The two most commonly used options are:
- Logs from opposite sides are given flat profiling. In the log crowns, these planes lie on top of each other and provide a tight connection.
- Each log initially needs to be “selected” - to make a longitudinal recess of a rounded shape. This recess will provide a large area of contact with the log of the lower crown. The advantages of this method are also that the wall elements will have an additional opportunity to avoid precipitation from entering the junctions. The service life of the building will be much higher.
The second profiling option seems to be more practical. To prepare such a chopped log, it is advisable to use a special ax (in the form of a chopper) or a regular one, but it will be somewhat more difficult to work here.
The need for sealing
In any case, the walls will require additional sealing. The crowns are stacked on top of each other by additional processing of the seams. Various modern means for this are available in specialized stores.
Since you are building your own house or bathhouse from environmentally friendly wood, you should not use synthetic products for sealing. It is better to return to tradition and use moss to seal the seams. It is easy to prepare, it dries very quickly. And it is easy to caulk the seams with moss: we lay it at the joints, seal it with a wooden wedge and a mallet.
A simple tapping will allow you to detect all the shortcomings in the connections in a timely manner and eliminate them in time.
The antiseptic properties of moss will allow logs long time stay dry and unharmed.
With such a careful approach to the material and finish, you yourself will be able to give advice to friends on how to make a log house yourself.
A wooden house is an aesthetic, environmentally friendly and safe housing, which is distinguished by high heat and sound insulation properties, durability and reliability. Many are interested in whether it is possible to assemble and install a log house with your own hands. It is possible to do this, but it is difficult. When installing, it is important to take into account a lot of factors, including the quality of the log, lumber calculations and the layout of the house, installation features, etc.
Please note that poor-quality materials and assembly errors will reduce the operational properties and service life of the house, lead to the appearance of rot and mold in the structure, warping of the walls and many other equally serious problems. But if you decide to build your own country house or baths, this article will tell you how to make a log house.
Design and material selection
Assembling a log house with your own hands begins with designing a house, taking into account the characteristics of the land, future engineering systems and room design. The layout of a log house can be rectangular or square, as well as figured in the form of a semicircle, hexagon, etc. Of course, the construction of the first option will be much easier.
After creating the project and calculating the estimate, lumber is carefully selected. round logs - best option for those who want to assemble a log house and build a house on their own.

Such logs are characterized by a smooth and even surface, the same dimensions and diameters. This will make installation quick and easy. In addition, logs that fit snugly together will provide good thermal insulation. Due to the aesthetics and naturalness of materials, a house made of roundwood fit harmoniously into environment. The wooden structure will look elegant and original. Read more about the benefits of a log house.
To get a reliable and durable house, you need to use only high-quality logs. It is desirable that lumber be from forest regions and undergo special processing. In the MariSrub company, logging takes place in the Kirov region, the republics of Mari El and Komi. These regions are famous for good, large and damp-resistant wood.
Raw materials and logs are carefully selected and processed in the company's own workshop. Wood is impregnated and treated protective equipment from the negative effects of moisture and insects. Such materials will last longer, retain their original appearance and properties.
Choose logs harvested from the winter forest. Since such wood is stronger and more resistant to moisture. On sawn timber, small diameter knots and a small natural marriage are allowed. Trunks quality materials characterizes yellow or dark yellow colors. These should be unrolled logs of the same diameter and the same tree species. There should be no mechanical damage, rot and wormholes on the surface.
How to tie a log
After the materials are selected, and the foundation for the wooden house is installed, they begin to assemble the log house. There are two main types of lashing or ligation of logs. This is “in the bowl” and “in the paw”. Both methods characterize the stability and strength of the structure of the future home, and they differ in the creation of grooves.
Cutting “into a bowl” or “into an oblo” is a traditional Russian method of assembling a log house. He assumes that the corners of the structure are connected to the release of the ends with a length of two log diameters. Because of this, the cost of lumber increases. The construction of such a house will cost more, but at the same time the heat inside will remain for a long time. In addition, the corners of the building will not be adversely affected by wind and precipitation.

The “paw” method assumes that the logs are stacked in a bracket, aligned along the outer edge and the excess is cut off from the inside. This is a colder room, therefore, for insulation, the ends are closed with boards. This is also necessary in order to protect the sawn wood from decay. Please note that the log house “in the paw” needs to be cut inside.

Bandaging logs “in the paw” is more modern and aesthetic appearance and less wood wasted. But to create a warm and durable home, a lot of additional work will be required. Therefore, such cutting will become a laborious process.
Log installation technology
- Waterproofing is laid on the horizontal surface of the poured foundation. Roofing material is suitable as a material. For laying, the foundation is lubricated with heated and ruberoid sheets are applied on top. After drying, make another layer;
- At least 5 centimeters thick boards are stolen onto the waterproofing layer, and a layer of tow or jute is laid on top of the boards. This will enhance the thermal insulation properties, because up to 40% of heat escapes through the floor and foundation!;
- A log house is installed on the insulation layer. As a rule, production logs are numbered. Such a wall kit is easy to assemble according to the attached scheme;
- Lay the crowns strictly according to the level row by row and fasten with dowels. Make sure the logs lie flat!;
- A layer of insulation is also placed on each laid crown, also in the form of tow or jute. The insulation is fixed with a construction stapler;
- In addition to ligation at the corners, the logs are connected every meter of length with spikes. Additional fastening will make the structure stable.

The final stage
After assembly, the log house is left for 0.5-1.5 years for shrinkage, while it is better to cover the structure with plastic wrap for waterproofing. During this period, you can sew up the floors and install rafters for the future roof. The floors are sewn up using boards with a thickness of 60 mm or more, which are laid on beams. Boards are connected with spikes. The ceiling can be laid in the same way.
After the installation of the roof, they proceed to finishing work. First of all, it is the insulation of the floor, ceiling and walls. Don't forget about engineering systems, including electricity and plumbing, ventilation and sewerage. These communications must be carried out before interior decoration. At the same time, the location and installation of these systems is calculated at the design stage of the house!
Mounting a log house and building a wooden house with your own hands is a complex and time-consuming process that requires knowledge and skills. Wrong sequence and technology of work, poor-quality materials and lack of experience will lead to serious problems. Therefore, it is better to entrust the work to professionals!
The masters of the MariSrub company will build a wooden house, cottage or turnkey bath! We offer services for the creation of your dream home project, assembly and installation log cabin, installation of the foundation and roof, arrangement of communications and finishing buildings. The company has its own workshop for the production of rounded and chopped logs. Self-production is a guarantee of careful quality control and low prices!
Even our ancestors preferred to build houses in Russia from wood, and in our time this building material has not lost its relevance. This is determined by the fact that wood is a unique, natural and environmentally friendly material. Most wooden buildings were erected by Russian architects without the use of nails by cutting into a bowl. The method received this name, since the logs are connected into a single structure. The principle of such a log house is that in the log, which is located below, a recess is cut down, which has a semicircular shape in the form of a bowl. The upper log is placed in this bowl so that the angle is straight. A log house built according to this principle is not only durable and warm, but also beautiful.

Construction methods
Two types of log construction are used by the method in the bowl.
- "In the cloud"- another name for the Russian felling. The bowl is cut in the lower crown. In most cases, it is smooth, but sometimes a small protrusion in the form of a spike is left in the bowl to prevent possible displacement. This method was used in the construction of most of the architectural monuments that have survived to this day.
- "In the hood" or Siberian felling. In this case, the bowl is cut at the bottom of the top log, which is laid on top of the bottom log. This is how the construction process takes place.

Experts recommend using Siberian felling in the construction of houses. They explain this by the fact that it is more reliable and better protects the log house from moisture and cold. But application modern species thermal and waterproofing, as well as competent heat engineering calculation, can minimize this disadvantage.
Learning how to chop with your own hands into a Canadian cup is not difficult if you follow the recommendations of experts. The article presents step-by-step instruction how to make a log house, its correct size, for example, 6x6 cm, work technology and technique, how to sheathe this construction material.

Advantages of erecting a log house using the method in a bowl.
- It turns out a very strong nodal mount. As a result, the design is very stable.
- Such houses have a high degree of thermal insulation, since the corners are windproof.
- Houses built in this way are environmentally friendly.
- The result is a beautiful and majestic building made of wood.
- Not required additional finishing, as the tree itself is a beautiful material.
- The stability of the structure allows the construction of several floors.
If we compare the method of building in a paw and in a bowl, then it is better to use the second method of construction, since it has proven itself with better side, and it was in this way that our ancestors built houses.


It is worth noting the disadvantages of the method.
- Only professionals can build houses with this method, as this is a rather difficult job that requires professional skills.
- There are difficulties in exterior finish log house, as the corners protrude for a considerable distance.
- The useful length of the crowns is significantly reduced due to the presence of protruding corners, which leads to a significant increase in the cost of the log house. This disadvantage acts as the main one when choosing the method of building in a paw or in a bowl. But a house cut down by the paw method requires additional thermal insulation, so you won’t be able to save a lot on this. In addition, a log house built in a paw is not stable enough.


The choice of material for construction
As building material when erecting a log house using the method in a bowl, materials from coniferous species are used. In most cases, pine is chosen for construction., which has a smooth trunk, the same thickness, a small amount of defects, and resistance to decay. Preference is given to material prepared in winter time years in northern latitudes. This is due to the fact that in winter the tree contains a small amount of juice, so the blanks crack less when dried.
Building material should have approximately equal dimensions.


The blanks are carefully processed, for this they are sanded and cut off. In order for the log house to be resistant to climatic conditions, they try to orient the material along the growth rings. The material that has thin rings is placed outside, and the one with thick rings is placed inside.
Thus prepared material is subjected to drying, covering it from atmospheric precipitation. It takes at least six months to dry the material.


Marking methods
An important role in the construction of a log house is the correct marking. Markup specialists use a tool called a dash. This tool has a handle and two rigid plates, the ends of which are pointed. The distance between the plates changes. A line can be used to draw two parallel lines.
To perform marking, two logs are laid on the ground, observing the parallelism between them. It is necessary that the edge of the third log, which is laid across the parallel logs, be located so that the distance from the edge of the log to the bowl is at least 25 cm. Check the correct placement of all logs in the crown. To facilitate marking, all logs are connected with staples. In the event that the bowl is cut out in the upper log, the line is moved apart so that the distance between its plates is equal to half the thickness of the lower log.

When working on the markup, they try to ensure that one plate of the line is on the upper log, and the second is based on the lower log. To trace the outline of the bowl, one leg of the instrument touches the arc of the log below, while the other leg traces a parallel line on the log above. Thus, the outline of the future bowl will turn out. Mark a special semicircular groove along the log so that the logs are in close contact with each other.
In the event that the bowl is cut in a log located below, one plate of the line outlines the lower part of the log located above, and the second plate outlines the lower element. Between the tool plates, a distance equal to the thickness of the log located on top is selected.
Trait requires experience, so traditional markup tools are sometimes used.


The process of assembling a log house using the bottom bowl method.
- To assemble the structure, first of all, it is necessary to prepare the foundation. Waterproofing is laid on the upper surface of the foundation.
- Larch boards are laid on the waterproofing material. These boards are immersed in an antiseptic solution. Then the horizontality of the laid boards is controlled using a level.
- They install logs on boards along the sides of the house under construction. Make sure that the distance between them is the same and equal to the length cross log. The length is measured with a tape measure, and the horizontal position is determined with a level.
- After checking the structure with a level, two transverse logs are laid on it.


- Logs are marked with a carpenter's line.
- Start cutting out the bowl. A notch is cut out with a saw and finished with an ax or a chisel. Process the bottom of the recess in such a way that it is as smooth as possible so that when the top element is laid, the gaps are minimal.
- The degree of conjugation of logs is checked, after which the upper log is removed. Then a semicircular longitudinal groove of small depth is cut down in the lower log. This work is done with a rounded axe.
- After the lower crown is worked out, they begin to work on the second crown. The logs are stacked with butts and maintain their horizontal position.


- Work is underway on the next crown. The insulation is laid in a longitudinal groove. Currently, jute or linen ribbons are used as insulation. In the past, our ancestors used moss for these purposes. For a tighter fit of the upper log, a wooden chock is tapped on it. When laying the crowns, carefully monitor that their horizontal and vertical positions are observed.
- Using special clamps, the stacked crowns are fixed in a checkerboard pattern. The clamps are driven into the prepared holes with a sledgehammer. Pins or spring knots "Strength" are used as clamps.
- After the assembly work is completed, all seams are caulked and excess insulation is removed. After about six months, this operation is repeated.
- When all work is completed, all wooden structural elements are antiseptic. This procedure is repeated twice.


- It is not uncommon for a log house to be built on bare ground first, and the horizontal position checked using a building level. It is necessary to ensure the horizontal position of the logs laid at the bottom of the log house, while using boards of the required thickness.
- If the building material is a round log of the same diameter, then it will be convenient to use a template made of tin, which imitates the upper log when working on cutting the bowl in the lower log. This template will allow you not to lift repeatedly heavy logs during the construction of the log house.

One of the most important advantages of a log house is the ability to retain heat well, which helps to save on heating during the cold season. However, the energy efficiency of a wooden house largely depends on the log house assembly technology. Cutting into a bowl is the best option, because in such houses the corners do not freeze and do not get damp.
A log cabin made “into a bowl” can be built with your own hands if you have a carpentry skill and a suitable tool. If this is your first time building a log house, it is important to work carefully, carefully marking and fitting each log. It will take a lot of time and effort, but the result will please for many years.
Features of pairing "into the bowl"
On the surface of the log, a semicircular recess is cut out under the element of the next crown of the perpendicular side. When assembling the frame, the crowns are wedged together and after shrinkage form a solid structure, windproof due to its configuration (the protruding part of the log should be 25-30 cm to the edge of the bowl) and the use of insulation.
Such corners do not freeze through, which reduces the heat loss of the house, there is no condensate that provokes the development of fungus on the wood. In Canada and Norway, cutting a log house using the “bowl with a spike” technology is popular - this is an even stronger connection, but it is much more difficult to do it yourself without experience in such work.
DIY construction tools
The technology for making a log house requires the use of the following tools:
- manual, electric or gasoline saws;
- a carpenter's ax with a well-sharpened blade;
- hammer;
- wood chisels;
- features of a carpentry (special tool for marking logs) or standard marking devices;
- building level;
- sharp nail or indelible chemical pencil, building marker.

You will also need to use coal to blacken the recess when fitting the crowns, an antiseptic composition for processing cut bowls, which prevents wood from being damaged by rot and pests. As a heater, it is more convenient to use high-quality tape material made from natural fibers.
Preparatory stage
On the preparatory stage cutting technology is selected. Traditionally used:
- cutting "in the oblo" - the bowl is cut out in the lower log;
- cutting "into the hood" - the bowl is cut out in the upper log.
For non-professionals who decide to assemble a log house with their own hands, it is recommended to choose the second option, in which the crowns are stacked bowls down. Since the work will progress relatively slowly, there is a high risk that the log house before the end of the finishing, final assembly, gets caught in the rain - if the bowls are cut into the lower logs, moisture will get into them, which will cause the wood to rot.
Construction requires high-quality wood, preferably winter felling. It is easier for a beginner to make a frame in a bowl from rounded wood - the geometric accuracy of the elements simplifies the marking of the bowls and the fitting of the links.

Marking
In the question of how to cut a log house, special attention is paid to correct markup. Professionals use a special tool - a "line", which consists of a handle and two hard plates with pointed ends, the distance between which can be changed. "Dash" allows you to run two lines in parallel, marking out during construction with your own hands.
In order to markup, lay two logs on the ground strictly parallel to each other. It is important that the edge of the third, transverse link, laid crosswise, is located so that the distance from the end to the bowl is at least 25 cm. Check the placement of all logs of the future crown. So that when marking the log does not spin and does not move, it is fixed with a bracket.
If the bowl is to be cut in the top log, the "feature" plates are moved apart so that the distance between their tips is half the diameter of the bottom log (this is important if the construction is being carried out from unrounded logs).

When marking, one tool plate must always rest on the upper log, the second on the lower log. To mark the contour of the bowl, the leg of the “feature” should move, touching the arc of the lower log, while the second one will draw a parallel line on the upper log - the contour of the future bowl. A semicircular groove should be marked and selected along the log so that the crowns fit snugly against each other and are not blown through.
If the bowl is to be cut into the bottom log, one leg of the tool should outline the bottom of the top log, and the other should draw a line along the surface of the bottom wall element. The distance between the legs should correspond to half the diameter of the top log.
To quickly markup a “line” according to a template, you need to have a skill. If it is not there, then when assembling a log house with your own hands, it is easier to use traditional tools and mark each pairing individually.

As you work, remember to number the fitted crowns using a sharp nail or indelible pencil, as you would for marking. The numbering of each whip will further simplify the final assembly of the log house.
Cut grooves and bowls
When a frame in a bowl is made to order at the factory, longitudinal grooves and bowls are cut with special cutters on high-precision equipment. When working with your own hands, such accuracy cannot be achieved, but relatively small errors are further compensated for by using a sealant.

If you are confident with a gasoline or electric saw, the main selection of wood can be done with this tool. For beginners, it is recommended to use a hand saw to mark the notches. For the rough cutting of the bowl, a cleaver or a carpenter's ax is used, and then the recess is finished with a chisel.
If you find it difficult to understand how to cut a log house with exact mates, use charcoal to blacken the bowl when fitting it to the log to make it easier. After examining the log, you can determine how much material and in what places have yet to be selected.
The frame in the bowl is roughly assembled on the ground, while adjusting the links, the horizontal location of each crown is checked building level. Therefore, it is important to ensure that the lower logs are horizontal, if necessary using board linings of suitable thickness.

When working from one diameter, it is possible to make a template from durable tin that imitates the upper log when cutting the bowl in the lower one - in this case, you do not have to repeatedly lift the logs when fitting the elements.
The felling of the log house into the bowl ends when the rough frame of the building is fully assembled. Next, the numbered log house is disassembled and re-mounted with their own hands using a heat insulator already on the strapping laid on the foundation.
After dismantling the rough log house, each bowl and groove must be covered with an antiseptic. Processing is carried out twice with a break for complete drying of the wood surface.
Log house assembly technology involves the use of natural - jute or flax fiber, moss. These are gas-permeable materials with a good modulus of elasticity, they remove moisture, preventing the formation of condensate and the formation of foci of wood decay.
If too much material was removed during the selection of the groove or bowl, additional layers of insulation will help correct the situation. When assembling a frame into a bowl with a sealant, do not forget to check the horizontality of the crowns and correct it with a sealant.
Before you start building a wooden house or a bath with your own hands, you need to carefully figure out how to cut a log house from a log.
The first thing you need to learn is the professional language that carpenters speak and that we will communicate with you throughout the book. So let's start with terminology.
It is known that the house should stand on the foundation, and you should start from it, but this is a slightly different topic, therefore, instead of the foundation, temporary linings are shown in the figure 1. When the opportunity arises (even after a few years), they will not prevent you from starting a permanent foundation .
A log house is a log structure without a floor, a batten or a roof, that is, the main structural part of the house. It consists of several crowns, the number of which determines the height of the frame. The crown is a rectangular structure, consisting of perpendicularly laid logs, fastened together in the corners by a lock joint.
The first crown of the frame is the crown crown 2, the second and main one is the lower harness 3, into which the logs 4 are cut. bottom strapping and protects it from decay. Over time, it can be replaced. Crowns from bottom trim to start window opening are called window sills 5. Next come the window crowns 6, then the window crowns. The first crown crown is the closing crown 7. The structure that serves as the basis for the roof is called the upper trim. It consists of two upper runs 8 and rafters 9. What is 10 rafters and 11 corner veranda pillars is clear from the figure.
Let's agree to call the logs in the crowns, lying perpendicular to the girders, transverse, and the crowns, in which there are window or door openings, - split. The logs that form the openings are called "shorty". They can be of various lengths depending on the location of windows and doors.
Traditionally, as a log house was being built in Russia, logs were processed at a height. In some films, you probably saw how a carpenter, sitting astride a log, famously and quickly wields an ax. Let's take a closer look at what operations it performs. First of all, he needs to drag the prepared log up. Then, having made the markup, make a felling along it and lay the log in the place determined for it. Agree, such work at height requires great qualifications and skill. You, as a novice carpenter, are unlikely to be able to process the log with the required accuracy the first time. Surely you will have to repeatedly remove and re-lay the log, adjusting it in place. The slightest carelessness in such manipulations leads to injury. You can make your work easier and significantly protect yourself by installing scaffolding. They must be made comfortable and reliable, supporting not only your weight, but also the weight of the processed log. Therefore, the installation of such scaffolding requires a lot of additional building material and time. But even if all the requirements are met, working at height with an ax (including scaffolding) without sufficient skill is dangerous!
We offer you to build a log house in parts, each of which has a height of human growth. This method is called cutting with subsequent shifting. It consists in the fact that the individual parts of the log house, after being made on the ground, are disassembled and transferred to the main log house. Relays will allow you to do all the work with the ax while standing on the ground, and outdoor scaffolding will not be needed. In this case, we use two relays, since, in our opinion, this is the best option for a novice builder. Let you not be confused by the time spent on additional disassembly and assembly of crowns. They are more than offset by the convenience and safety of work, for a well-equipped workplace- guarantee of high labor productivity. You will learn more about how the translation is carried out later, but for now we will continue our acquaintance with the terminology.
 The part of the tree trunk adjacent to the root is called the butt. Starting to cut a house, you should know that there is no perfectly even log. Any log has a slope, that is, it decreases in diameter from butt 1 to top 2. Therefore, when stacking logs one on top of the other, it is necessary to alternate butts and tops.

When assembling the frame, in order for one crown to adjoin the other more closely, a groove 3 is selected along the logs. Another frequently performed operation in the processing of logs is the manufacture of edging 4.
The end of the log, hewn from two parallel sides, is called a "block" 5, the planes formed in this case are called cheeks 6, and the raw, convex surface is called wane 7.

The main structural elements of the log house, which serve as locking joints of the logs, are the "paw" 8 and the "dovetail" 9. For additional fastening of the logs in the crowns, the dowel 10 - pocket 11 connection is used, and the pillars and rafters are securely installed with the help of spikes 12.

You should pay special attention to the selection of the tool.
The most important of them is a carpenter's ax 1. It should fit your weight and fit comfortably in your hand. The purpose of tools such as chisel 2, plumb line 3, hacksaw 4, two-handed saw 5, bracket 6, bayonet shovel 7, as well as tape measure 8, ruler 9, square 10, colored pencils or wax crayons 11 should not raise questions. A low-stretch cord 12 and an awl 13 are used for marking, and a level 14 is used to check the horizontal position. To make a level, take an elastic rubber hose 5-8 m long, about 1 cm in diameter, the ends of which are put on two transparent glass tubes of the same diameter, 15-20 cm long. The resulting device is filled with tinted water. In addition to the level, you yourself need to make a template 15 from plexiglass 2-3 mm thick and line 16 - the main marking tools, as well as "babu" 17 - the main "impact" tool made from a birch chock with two staples hammered into it.


If you have the opportunity to purchase a chainsaw - do not miss it. A chainsaw will greatly facilitate your work, save your time and energy.
To avoid injuries and other "troubles" during construction, we suggest that you familiarize yourself with the pages of special working methods and safety precautions.


You need to start construction with logging.
Best to apply conifers- pine and spruce. Aspen is good for making log cabins for baths and wells - it is not afraid of water. But birch cannot be used, as it quickly begins to rot and behaves very "capriciously" during processing. Since it burns well and gives off a lot of heat, save it for your fireplace. After the forest is cut down, it must be debarked and dried.
| Structural element | Number of logs | Log length | Log diameter |
|---|---|---|---|
| crown crown | 2 pcs. 3 pcs. |
820 cm 620 cm |
30-50 cm |
| Bottom trim | 2 pcs. 3 pcs. |
820 cm 620 cm |
30-50 cm |
| lags | 5-6 pcs. | 620 cm | 20-35 cm |
| window crowns | 10-13 pcs. | 620 cm | 20-40 cm |
| Split logs (window and door) | 22-27 pcs. | 540 cm | 20-35 cm |
| Closing and overhead crowns | 5-9 pcs. | 620 cm | 20-35 cm |
| Top runs | 2 pcs. | 820 cm | 20-35 cm |
| Subrafters | 7-9 pcs. | 720 cm | 20-35 cm |
| rafters | 14-18 pcs. | 520 cm | at least 10 cm |
| porch poles | at least 2 pcs. | 300 cm | at least 20 cm |
| Note: the indicated dimensions are chosen with a margin for trimming. | |||
Now let's choose a place for the construction site.
From the side of the future veranda, it is necessary to provide a place for assembly constituent parts log house. Then you can start marking the plan of the future home, which is done using a low-stretch cord and pegs. Our task is to get right angles.
BASIC RULE OF THE BUILDER - MARKING DEFINES QUALITY

We will implement it in the following way. We determine point 1. Set aside 800 cm from it and get point 2. On a cord 1600 cm long, measure 600 cm and tie a knot. We fix the ends of the cord at points 1 and 2. Taking the knot, we stretch the cord and get the desired point 3. Similarly, we find point 4. We mark the points obtained with pegs and check with a tape measure all the required distances and the equality of the diagonals with an accuracy of ~ 3 cm.

Next, we will make and install linings for the log house (temporary foundation).
Choose wooden chocks about 1 m long and at least 30 cm in diameter. Aspen is good for lining. It is resistant to moisture if it is pre-barked.
Linings must be installed under the purlins of the flashing crown, near the corners of the log house, in order to ensure the correct distribution of the load. The pads are installed according to the level with an accuracy of ~ 5 cm.

Making edging is the most common operation in the processing of logs..
In order to complete it, it is necessary to trim the log to size, choose a side for the edge, position the future edge plane approximately vertically, and fix the log with brackets. Do not be alarmed if the log has a curvature. It won't stop you from using it.
On a plumb line at the ends of the log, we draw vertical lines that define the plane of the edge.

We fix the cord with awls in the plane of the edge. Then we make a visual check, looking from the end of the log, and adjust the position of the cord. With a colored pencil we transfer the projection of the cord onto the log. To obtain the second edge line, repeat the same operations by turning the log over.
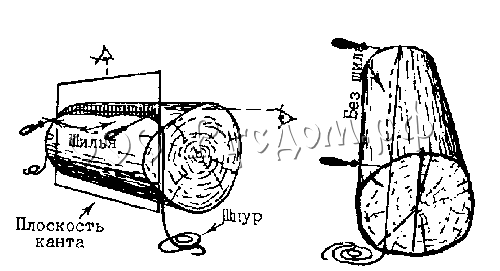
After that, we fix the log for the teska with brackets, but not much, so that you don’t have to knock them out later with a crowbar. Let's position the plane of the future edging vertically, make notches and, having hewed the log, we will get the edging.

Having a chainsaw, instead of notches, you can make cuts, which will significantly speed up the work.

Finally, let's proceed directly to the manufacture of the log house.
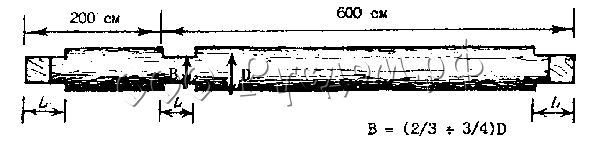
We begin to make a frame from eight-meter logs (runs) of the overlay crown, on one side of which an edging is made about 10 cm wide. Now we need to process the ends of the runs.
First, cut down the "boobs" with a width of 2/3-3/4 of the diameter of the log. The length of the "doodle" L is a constant value equal to the maximum diameter of the logs of the log house.
At the end of the "doodle" we select point 1, through it we draw the line of the "paw" according to the template with an extension inside the house.


Similarly, according to the template, through point 2 on the outer cheek and through point 3 on the inner cheek, draw a line of "paws".

We draw vertical lines on the cheeks of the log, spaced from the end by the width of the "doodle" of the counter log, and we get points 4 and 5. We make a vertical cut down to line 4-5.


Then it is necessary to lay transverse logs on the "paws" of the runs with "blocks" and, fixing them with brackets, check and correct the dimensions of the log house.

Now you can fasten the runs with linings tightly with brackets.

Drawing is a parallel transfer of the points of the pairing lines of the lower log to the upper.
The opening of the line when drawing the "paw" of the overlay crown is chosen to be minimal, but such that the line of the "paw" of the transverse log does not fall on the wane.

In the process of drawing a log, the solution of the line cannot be changed! Let's draw the lines washed down from top to bottom, mark the top of the "paw", and then cut it down. Let's make an average "dummy" on the runs.
To simplify the cutting out of the cheeks of the middle "boob" we will make cuts.
According to the width of the "doodle" of the transverse log, we will cut down the "dovetail" in the run. With the help of the line, we transfer the lines of the "dovetail" to the "doodle" of the transverse log and cut it down. Let's lay the middle transverse log on the runs of the crown crown.

Now let's take a look at the bottom trim..
Let's make "doodles" on the runs of the lower strapping, lay them over the runs of the flashing crown. Using linings and a level, it is necessary to ensure that the upper parts of the runs are horizontal and lie in the same plane with an accuracy of ~ 3 cm. It should be borne in mind that the butts and tops in the crowns alternate. We fix the runs with brackets.

For drawing, we select a line solution corresponding to the maximum gap between the logs, plus 1-1.5 cm.


Let's check the selected solution of the feature along the ends of the log. It must be greater than distance 1-2 on both ends. Point 2 - the border of the wane and the inner cheek.

Let's mark the top of the "paws" under the transverse logs.
For further work, we need to master the operation of selecting a groove.
Along the entire length of the groove with the "heel" of the ax we will make cruciform notches, and with the "toe" of the ax along the lines of the groove we will select wood. When these two operations are combined, a groove is formed.

After that, you should cut down the "paws" and, having laid the log in place, check the tightness of its fit. To do this, the stacked log should lie on the inner cheeks with a slight overhang. When tilted, it will easily fall into the right place. Then we return the log to its original position and evenly lay tow (moss) on the underlying log. Now you can finally lay the top log on it.

Next, three transverse logs of the lower trim should be made and laid on the runs. To complete the lower trim, it remains only to embed the logs. On the runs of the lower strapping, we outline the places for inserting the lag. As a zero mark (upper lag level), we select approximately the middle of the transverse log of the lower trim. Let's move the zero mark to the corners of the log house and make notches. We put the finished logs in place, outline, and then cut down their contour to the level of the tie-in. Let's beat the lags with a "woman".

In the course of work, you may encounter typical errors.
- The log "plays" (the gap between the "paws", loose fit of the log in the groove):
the reason is a knot on the lower log or a poor selection of the groove; correction - cut down the knots on the lower log, knock the upper log with a "woman", select the places of wrinkling in the groove. - Gap between legs:
the reason - the opening of the line when drawing the "paw" was greater than the opening of the line when drawing the groove, or there was a "blockage" of the line; correction - with a line with a solution equal to the width of the gap, draw a groove on both sides of the log and make a selection. - The log "hangs" on the "legs" (loose fit of the log in the groove, there is no gap between the "legs"):
the reason is that the opening of the line when drawing the groove is greater than the opening of the line when drawing the "paw"; correction - with a line with a solution equal to the width of the gap 1, draw "paws" 2 and trim them.


It should be said that the following gap sizes are acceptable: in the "paw" - 0.5 cm, in the groove - 1.5 cm.
Now it's the turn of laying the first window sill.
Let's mark first doorway. It should be noted that openings (both window and door) are made 5-10 cm smaller than the design size. Split logs are fixed with dowels, for which markings are applied on both sides of the logs.

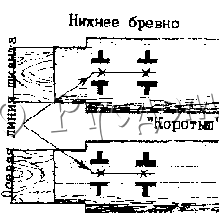

To mark the center lines of the dowel on both logs, it is necessary to remove the "shorty" (log in a split crown). Then, along the center line, the pockets for the dowel are selected with a chisel. The total depth of the pockets should be 1 cm more than the height of the dowel. The dowel should fit tightly into the pocket.
When laying the crowns, a constant check with a plumb line of the verticality of the corners should be carried out. The last window sill in doorway goes uncut. The uncut log of this crown is also planted on two dowels.

Tow (moss) does not fit under the logs of the last window sill crown, since this crown is removed for the first re-laying. Starting the shifting, first from the zero level we set aside the same distance upwards and make notches at the corners of the removable crown. Then we will remove the last window sill crown and install it on the ground, placing linings 15-20 cm high. In this case, it is necessary to observe the verticality of the cheeks. Using the level, restore the horizontality of the crown along the notches. Let's check the equality of the diagonals in the corners.
Let's start laying out the window crowns, having previously marked the window openings.
Recommended height of openings: windows - 110-130 cm, doors - 180-190 cm. "Shorty" window rims are fastened with dowels. Let's lay the closing crown, which consists of continuous logs, and put it on the dowels, transferring the zero mark to its corners. Draw a vertical line at the corners of the frame to be moved, which serves as a control during assembly.


Now it is possible, having marked the logs, to shift them to the main frame, laying each crown with moss or tow. For convenience in work, we recommend making simple scaffolding inside the house at the level of the window sill, for which you install chocks in the corners of the house and fasten them together with poles (two poles along each side of the frame). For the stability of the scaffolding, the poles in pairs must rest against the opposite walls of the log house.
The upper harness consists of two upper runs and rafters. At the ends of the runs, "doodles" are performed, and in the middle - only the inner cheeks. For correction, we will lay the upper runs (eight meters) on the transverse logs of the last window crown (the top of the "paws" on them is not necessary).

Check and correct dimensions A-B, S-D.
Using linings and staples, we will achieve the horizontal top of the runs.


Let's transfer the lines of the inner cheeks of the runs to the transverse logs. Having rolled back the run, we will cut down the “paw” on the extreme transverse log, and the “dovetail” on the middle one. Let's make the cheeks in the upper runs, respectively, the "dovetail" of the transverse log. On the underside of the girders, we will make pockets 4 cm deep for the spikes of the veranda pillars. Again we will lay the runs and, having drawn them, we will cut them into the appropriate place.
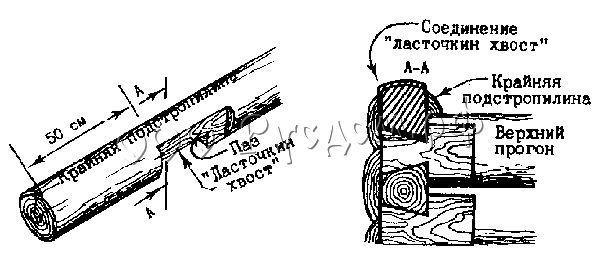
We will prepare logs for rafters with a length of 7 m. All of them, except for one, should be hewn into two parallel edges, obtaining sleepers of the same thickness (at least 15 cm). We will cut the raw extreme rafter " dovetail"in the run so that its top is horizontal.
Let's mark the tie-in points of the remaining processed rafters on the upper runs. Then we cut the rafters (checking by level), cutting the run by no more than 1/4 of the diameter.


You can also correct the upper level of the rafter by cutting it itself, but not more than 1/4 of the thickness.
Next, we make platforms for the rafter legs and under the wind board on the extreme (first) rafter (flush with the rest). If necessary, it should be precipitated by re-drawing. Pull the cord along the ends of the extreme rafters and align the rest along it.
Make marks on the substrings and runs for subsequent alignment and mark them.


On the cord on all the rafters, mark the pockets for the rafter legs. Cut them out with a chisel and check with a template.

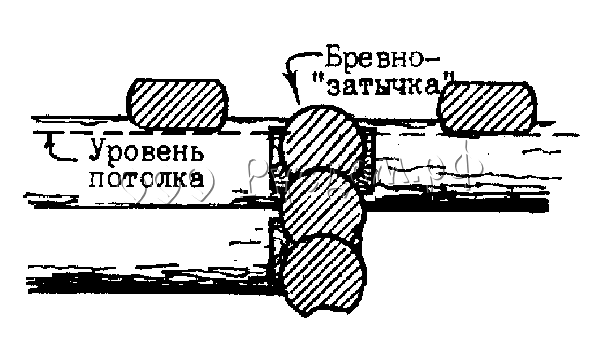
On the veranda sub-rafter, make pockets for poles (the number is determined by the design of the veranda). To eliminate the gap between the level of the lower edge of the rafters (ceiling) and the last log of the veranda wall, draw and cut in a log - a "plug".
Now let's start making rafters.
The choice of material, marking and manufacturing of rafters require special care and accuracy, since the strength of the roof depends on their quality. Rafter blanks are selected with the least number of knots. In no case should knots fall on the top of the workpiece, because the tenon in this place will be significantly weakened. It is allowed that the rafters have a slight curvature in the plane of the roof slope. The length of the blanks is determined by the angle of the roof and the length of the rafters. In our case, the angle of inclination is 45°.

Prepared blanks of rafters must be disassembled in pairs and numbered. On the blanks of the rafters, the side on which the crate will be attached should be flat, without protruding knots.
Let's start marking the base of the rafters
Let's make a wash down along the ellipse line and cut the workpiece under the spike, and then, having made the end cut, cut down the spike itself. Next, mark, cut down and cut down the tops of the rafters. We will disassemble the finished rafters in pairs and install them to fit and check the quality of the connections to the rafters. Adjustment is carried out by trimming the spikes or widening and deepening the pockets.

Sometimes they simplify the work on the manufacture of rafters. At the tops they are connected into half-logs, and the bases are attached to the rafters with nails without making a spike. By simplifying the task for yourself, you significantly weaken the rafters and reduce the life of the roof in advance.


Now let's remove the rafters and proceed to the last shift, not forgetting to lay the tow (moss). Then we will lay all the rafters, except for the veranda, and fasten them with brackets apart, in order to avoid their reversal along the axis.
We have come to the final stage of construction - the manufacture of pillars
In a log house, the pillars form the frame of the veranda and, according to their functional purpose, are divided into corner, door, window and intermediate ones. Corner posts are a support for the upper runs, door and window frames are attached to the door and window frames. Intermediate pillars do not carry any additional load and are only a frame for sheathing. The corner posts should have the largest cross-sectional area, and the intermediate posts should have the smallest. The distance between the intermediate pillars is determined depending on the length of the boards used for sheathing the veranda, but in any case should be no more than 1.5 m.
The manufacture of corner posts begins with determining their length and marking pockets. For the convenience of marking, we will make a "fishing rod", at the end of which we will fix a plumb line. With the help of such a device, we will design any of the corners of the upper pocket onto the platform of the verandah transverse log of the lower strapping, while obtaining the distance H. Using the designed corner, we will restore the reciprocal pocket at the bottom.


Corner posts must be processed into three edges, and the distance between two parallel edges should be at least 16 cm. Next, the post should be cut to size.
Then we will make a pocket for the lower spike with a depth of 7 cm. We will install the corner posts, placing linings 5 cm high, which should be removed six months later, after the log house shrinks.


Having installed the corner posts, we put the verandah rafters in place and fix them with brackets. The rest of the pillars must be made and installed after shrinkage of the log house. Door and window pillars, as well as corner ones, are processed into three edges, the rest - into two. The lower spike of all pillars, except for the corner ones, should be 3 cm long.
The installation of the remaining pillars should be started from the side of the log house, grabbing the already installed pillars to the upper run (veranda sub-rafter) with brackets.
The final operation is the installation of rafters.
For its implementation, it is necessary to lay walkways from poles (boards) across the rafters, prepare jibs from poles about 1.5 m long according to the number of rafters and nails 100 mm long. Lay out the rafter legs on the rafters, orienting the spikes opposite the pockets.
We will collect the tops of the rafters with nails and install them, securing them with jibs. When installing the extreme rafters, a plumb line should be used.
Rafters are more convenient to install with three people. Raising the rafters, you should simultaneously move forward, and fixing the spikes of the rafter legs in the pockets, fix them with jibs, checking the verticality of the rafters.

It remains only to fasten the rafter legs with rafters with thin brackets.


So, ! But a log house is not yet. Next, you will need to make a foundation, sew up gables, cover the roof, lay down a stove or fireplace, lay floors, sheathe a veranda, cut in window and door blocks, etc., in general, you will find a lot more interesting work.
The project of a log house offered by us is universal. If its dimensions are proportionally reduced, it will turn out to be very good log house baths, for example, with a size of 4x4 m. By the way, with such a building it is better to start learning carpentry, gain the necessary skills, gain self-confidence, and then you can safely offer your services in construction to other gardeners.