Aligning and marking the walls, laying tiles and how to correct possible errors? Correct wall layout
Tiling is difficult process, which includes many successive stages. If the basic rules are not followed during marking, preparation or installation, such a coating will not last long. In addition, violations will affect the aesthetic component. Let's consider in detail how to lay the tiles correctly.
When facing, it is important to follow the technology of work
Installation steps
- Procurement of materials. Here the purchase of tiles is carried out and the availability is checked necessary tools.
- Surface preparation. Take care of dismantling the old coating and level the rough base. Remove any other defects identified during the repair process.
- Markup. The layout scheme is selected, the coverage level is marked, control points are set.
- Tile laying. A laborious process that requires attention. During this stage, trimming of individual elements may be necessary.
- Finishing. Excess mortar is removed, and after the glue dries, a grout fugue is applied. This also includes final cleaning work.
Considering the features different surfaces, the issue of laying tiles must be considered in the context of each individual situation.
The whole process takes several days. Much depends on the initial surface quality and the type of materials used.

Laying tiles requires knowledge of technology
Materials and tools
We divide the entire list into separate categories corresponding to each stage of facing work:
- Dismantling : perforator, chisel, chisel, grinder, grinding nozzle.
- Surface preparation: primer, brushes and roller, concrete screed, starting and finishing putty, spatulas, as a rule, antiseptic solution, waterproofing, construction mixer.
- Markup: pencil, thread, beacons, layout scheme, tape measure.
- Facing: tile, tile cutter, nippers, drill with various nozzles, plastic crosses, level, tile adhesive, mallet, clean water, mortar container and mixer.
- Finishing: rubber spatula, grout, sealant, sponges and rags, clean water, seam corrector.

Instruments
Let's take a closer look at what exactly you can glue tiles on. As a rule, a special glue or an ordinary mortar based on sand and cement is used.
The first option is more profitable, since it allows you to choose a mixture that is suitable for specific conditions. For example, drywall adhesive is not suitable for concrete surface. For interior work, compositions based on Portland cement with the addition of special modifiers or polymer mastics are usually used. Outdoor work is carried out using frost-resistant mixtures with specific characteristics. In the bathroom and kitchen, it is better to use a composition with a latex filler.
The tile adhesive is applied with a spatula. To level the layer and make it more convenient for work, use a gear model. The larger the tile and the thicker the mortar layer, the larger the teeth should be.

Glue is applied to the tile with a special spatula
Surface preparation and marking
First, remove the old coating. Often we are talking about tiles. A puncher with a chisel attachment is used here. If you need to do everything carefully, then it is better to use hand tools and Bulgarian. The latter will be needed when cleaning the old mortar and jointing.
Before laying tiles, treat the work area with an antiseptic against fungus and mold. Additional alignment is also often required. Floors are adjusted with bulk screed and the walls are plastered. The rough layer is applied with the starting mixture, and minor defects are eliminated with the finishing mixture. Considering that it is planned to lay tiles in the future, you can get by with a coarser putty. After drying, apply a primer to improve adhesion and protect against moisture.

Stages of preparing walls for tiling
If surfaces in contact with water are being finished, waterproofing is a prerequisite. It is laid under the leveling layer and can be made in the form of a film flooring or a liquid waterproof mixture.
The next step is to decide on the layout of ceramic tiles:
- straight line "seam to seam";
- with an offset "off the beaten track";
- diagonal.
With the right scheme, you can visually expand the space and achieve a special decorative effect.

The most popular tile layouts in the bathroom
To facilitate further work, lay the tiles on the surface without using glue. On the walls, marking is done using plumb lines and a level. Base lines are applied to the surface along the perimeter and along the boundaries of the rows. It is better to make a grid taking into account the gaps in the seams. This will guide you through the drawing.
Floor and wall cladding
Now consider the process of laying tiles on different types surfaces. First of all, start flooring. To properly lay the tiles on the floor, start work in one of two directions:
- From the center. Find the central point in the room and mark it with a cross. Each corner is the beginning of a new section. You need to work so that there is a way to exit the room. It is convenient to lay tiles in diagonal rows.
- From the far corner The most noticeable corner should look perfect, so work starts from it. Ceramic tiles are laid in rows or diagonally.

Two ways to mount on the floor: from the center or from the far corner
How to put tiles on glue:
- The solution is applied to the floor and leveled with a comb trowel.
- The tile is placed on top and pressed.
- The position is corrected with a mallet, and crosses are installed in the seams.
- The level of coverage is checked each time.
If the floors are not even enough, glue is also applied to the tile itself.
Now consider how to properly glue the tiles on the walls. It is recommended to start from the second bottom row so that only solid elements remain on top, with the exception of the side ones. Unlike floor tiles, such products must be supported. To do this, a fixing bar is screwed to the wall at the level of the second row. It will be supported from the upper tiers, which will prevent the cladding from slipping until the mortar dries.
Ceramic tiles are laid in rows. You need to move from a visible corner. Try to place the tile in such a way as to reduce the number of threaded elements to a minimum. Glue can be applied both on the wall and on the cladding. Try not to make too thick a layer of mortar.
First lay the tile over the support rail. Take your time, work in two or three passes so that the glue has time to grab. After drying, the bar is unscrewed and the final installation of the bottom row is performed. Here you can move all the rifled fragments.

Stages of laying tiles on the wall
How to lay tiles on a flat surface is clear, now let's look at working with more complex areas:
- Angles. The best option is to lay tiles using moldings. Look for models with a 90 degree angle. A simple option is to join two adjacent tiles through a seam. For an inconspicuous connection, you can cut the chamfer at 45 degrees.
- Ledges. Facing borders and shelves is carried out from the outer edge.
- roundings. Since it is very difficult to lay tiles on radius areas, it is better to use a mosaic or other material altogether. Otherwise, you will have to cut the tile into smaller parts. At the same time, there is a risk that the finished coating will look rough and not aesthetically pleasing.
Final stage
After you have glued the tiles and the mortar layer has passed the initial drying stage, which usually takes 1-2 days, proceed to the next step.
To prevent the formation of fungus, re-treat with an antiseptic.
Finishing involves bringing the surface to the ideal. The main task is to apply grout to the seams. Dilute the puffer if it is in the form of a powder. Using a spatula, apply a small amount of mass to the joints between the elements and tamp it down. The surplus is collected and used in the next section.

Quickly, easily and at no additional cost, you can lay the tiles yourself if you carefully study all the nuances of this process in advanceTile is one of the high-quality and very popular materials for wall cladding. It is known for its durability, practicality, as well as the variety of shapes and colors. Most invite professionals to perform the cladding, however, few people know that there is nothing complicated in the process of laying tiles with their own hands, the main thing is to follow some rules and remember the nuances.
Tile laying: which one to choose
Wall tiles happen different types. Porcelain tiles are very durable, resistant to damage such as scratches and wear. It has a smooth facing surface similar to glass. Mirror tiles - usually used as a decorative element in combination with other types of finishing materials.
A distinctive advantage of any tile is durability and high strength.

Popular and in demand today is ceramic tile, which is characterized by durability and good quality.
Porcelain tiles - resistant to damage of any origin. The surface of such tiles imitates natural materials, such as granite and marble. Terraglia is a glazed tile made by double firing. It is considered the highest quality and environmentally friendly.
Ceramic tiles are the most popular, most in demand, due to their:
- Unpretentiousness;
- strength;
- Inexpensive cost;
- Variety of species.
- Great popularity is also due to the variety of choices;
Clinker tiles are incredibly durable and are guaranteed to last for decades. Possesses the increased moisture resistance. Cotto - matte, made from a base of clay with special properties. It resists moisture very well, so it is ideal for the bathroom.
Laying tiles on the wall: the choice of the purpose of the premises
Tile is a kind of material, the laying of which occurs once and for a long period of time. It is very important not to make a mistake, so you should take into account the purpose of the target space. Wall tiles for decorating a kitchen apron must be resistant to both mechanical and chemical influences. In the slab area, tiles with high thermal and moisture resistance are placed on the wall.
If you want high-quality tiles - do not save. For public spaces, majolica is suitable - it is made from red clay. There are different price categories for tiles, which generally correspond to its quality.

When choosing a tile, you must additionally take into account the type of room in which it will be located.
Tile surface:
- Glazed;
- Embossed;
- Basically, it has a patterned pattern.
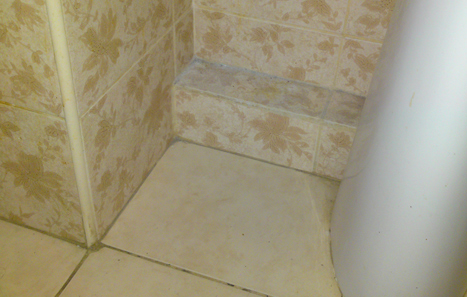
In the cladding of wet rooms (bathroom, lavatory) it is required to lay the walls with tiles with the highest moisture resistance. It should perfectly withstand changes in humidity and temperature. For laying in these rooms, mosaics are especially popular. You can add luxury to the design of the bedroom by decorating some elements with tiles that imitate natural material.
When choosing tiles individually for each room, it is necessary to be guided by different criteria, depending on the type of room.
To prevent contamination from entering the premises (hallways, balconies, loggias), the design of these spaces with ceramic tiles or porcelain stoneware would be an excellent solution. Decorating the space of offices, living rooms with wall tiles can be an excellent design solution. A fireplace decorated with tiles imitating a natural stone or clay surface.
How to properly lay tiles on the wall: the necessary tools and materials
Proper laying of tiles is not complete without components. You will definitely need tile adhesive, sealant and grout, primer and putty, plastic crosses, a device for mixing glue (you can use a spatula).

Before you start laying tiles, you should prepare all the necessary tools and materials in advance so as not to be distracted during the work
Responsibly, it is necessary to approach the choice of such elements as:
- Hacksaw for tiles;
- Ruler and pencil;
- Master OK;
- Level;
- Wooden slats;
- Bucket for solution;
- Spatula for tiles.
And another integral component is the tile itself. In order not to be mistaken with the quantity, you just need to add an additional 10% to the resulting number.
Ways of laying ceramic tiles on the wall
Ways of laying tiles on the wall can be very diverse. Diagonal laying - most often, this method is used for the floor. Deck laying - in this way most often imitate brickwork.

For arranging the kitchen and bathroom, laying tiles in a checkerboard pattern is often used.
Parallel Laying Row - Standard tile laying:
- in a checkerboard pattern;
- lines;
- Ornament;
- Often moldings are used.
Herringbone laying - a combination of diagonal and deck, difficult to perform. Carpet laying - lining that imitates a wall carpet. In the center is a part of a mosaic of a certain size.
Thanks to the variety of options for laying ceramic tiles, you can create a spectacular design that will not leave anyone indifferent.
Modular grid - a composition of tiles of different textures and sizes, followed by its repetition along the diagonal or parallel laying.
The right technology for laying tiles on the wall
The technology of laying tiles on the wall takes place in 4 stages. The preliminary stage - for starters, you need to decide on the type of tile, its size, color. Then you need to measure the parameters of the room and decide how many of the selected tiles will be required.
It is necessary to stock up on additional tiles in reserve, in case of unforeseen damage to the tiles.
Before facing, you need to lay wall tiles on paper near the wall and count the number of tiles in each row horizontally and vertically. So you can understand whether it is necessary to cut the tile into pieces, and where it is better to lay it. You can also make marks on the wall with a ruler - in this case, the tiles lie flat.

After laying the tiles, it is imperative to grout the joints
It is necessary to prepare the surface - this is a very important step. Without this, it is not possible to properly tile the tiles. The surface is leveled using a special leveling mortar (plaster is also used instead) and a special spatula. Experts also recommend priming the walls.
Step-by-step instruction:
- Dilute the glue in a bucket and prepare the selected tiles.
- To avoid slipping of the laid tiles, attach wooden lath along the marking line.
- The first tile must be laid in the lower corner, bounded by the rail.
- To begin with, we apply glue to the wall with a notched trowel and begin to lay out the tiles, the thickness of the applied adhesive layer should not be more than 5 mm.
- From the very beginning we use special plastic crosses, inserting them between the tiles. This is necessary so that the laying is even. It should be remembered that plastic crosses will need to be carefully removed within 10 minutes, otherwise they will stick.
- Make sure that excess adhesive that has fallen on the tile is removed immediately, otherwise it will be very difficult to remove it later.
The glue will dry within a day. After complete drying, you can start grouting. This is done with a sealant or putty. The grout must be applied with a rubber trowel diagonally across the laying boundaries. In conclusion, it is necessary to wipe the surface with a dry cloth, and then remove the remaining traces of grout with a damp sponge. Be careful when tiling, often check the even position of the tiles.
How tiles fit on the wall (video)
Laying tiles on the wall is a very important part of the repair and transformation of the decorated room. Laying out a tile for the first time yourself may not be possible without errors. Do not rush, do not try to lay out all the rows of tiles at once, 5 rows - best option. This will ensure the necessary quality control, and the process will not be a burden. If all the rules for facing are observed, properly laid tiles will delight with their appearance for many years.
5061 0
Repair. A word that terrifies almost every homeowner who has waited for this “happy” moment of his life. It is terrible not only because of the “destroyed” housing, dirt and debris, strangers in the apartment, but also the need to spend large sums on holding this event. Basically, financial costs will consist of two items: acquisition necessary materials and remuneration of specialists employed in work related to the repair.
Facing can be done using various adhesive compositions
Repairs associated with facing any premises, for example, tiles, are especially costly. In addition to the high cost of finishing material, the services of professional tilers cost a lot. And therefore, it would be absolutely reasonable to want to lay tiles with your own hands, saving a lot of money on this. In addition, this task is quite feasible, you just need to know how to properly lay ceramic tiles on the wall and floor.
Choice of materials and tools
Any work, including do-it-yourself tiling on a wall, begins with the purchase Supplies and preparation of the necessary tools and fixtures. So, the technology of wall cladding with ceramic tiles requires the following elements:
Materials:
- primers;
- tile or other finishing material;
- adhesive mixture;
- crosses;
- fugue.
Instruments:
- tile cutter or any device for cutting tiles
- a set of spatulas (rubber for grouting, conventional for applying glue to the surface, notched for distributing the adhesive);
- level;
- roulette;
- pencil or marker.

To get started, you need to prepare materials and tools
The choice of a device for cutting ceramics depends on how much tile you need to lay with your own hands, the scheme for laying it and physical characteristics facing material. It can be either a professional electric tile cutter with great performance, or a modest manual glass cutter.
Foundation preparation
Before laying the tiles, the surface to be finished must be inspected and a decision made on how to bring the base to acceptable parameters. After all, how smoothly the surface will be made depends on the final quality of the lining, the complexity of the process and the consumption of material.
If the base does not have significant depressions and bulges, then the preparation may be limited to one or two leveling and plaster layers and the work steps will look like this:
- dismantling of the old lining;
- cleaning the wall of adhesive residue and dirt;
- surface treatment with antiseptic and primer;
- base plaster.

A modern range of waterproofing materials allows you to choose reliable and easy-to-use products.
In this case, you can do the preparation yourself, because the described works do not require special qualifications and many home craftsmen can do it with their own hands.
For relax plastering works with your own hands, laying plaster, it will be correct according to special plaster beacons.
There are options when the differences are so large, or the wall is significantly "littered" in one direction or another, that it is not possible to level it with plaster. Then you need to do this by building a new base from drywall or OSB sheets mounted on a frame from a special profile. The surface is then treated traditional methods and you can start laying tiles on the walls.
Choice of scheme, markup and laying method
Correctly laying tiles on the walls can be done in several ways, here are the main ones:
- classic layout or seam to seam;
- in a run;
- diagonal or rhombus layout;
- combination of various schemes (modular layout, carpet, offset, etc.).
If you want to lay tiles on the wall with your own hands, but you don’t have enough experience with ceramics, then it would be right to dwell on the first two options, since the remaining methods require certain skills in handling the facing material.
Choosing the scheme according to which it will be laid tile on the wall, you need to mark the base. So that during subsequent installation, the tile lays flat on the wall, with the least amount of trimming, and, accordingly, waste, this must be done very carefully. For this, a laser level is used, which provides the most accurate marking, but in its absence, you can get by with a regular tape measure and a plumb line.

When facing vertical surfaces, it should be remembered that it is necessary to indent from the floor surface
In order not to mark the wall with a directly laid fragment (which is also allowed), for convenience and speed up the process, you can prepare a wooden lath, on different sides of which draw several dimensions of the length and width of the tile, taking into account the thickness of the seams. At the first stage, we determine the position of the ceramics horizontally, applying a measuring rod to the wall, we find the optimal location of the tile, and the place where the elements will be trimmed if necessary. It can be both at the floor and at the ceiling, or half of the fragment is at the bottom and half at the top.
Then we move on to marking the location of the ceramics vertically. To do this, the measure is set horizontally on the wall and it is determined in which direction it is better to shift the stacked elements in order to obtain an aesthetic appearance of the wall surface to be lined.
Before laying ceramics on the wall, you still need to decide which method is better to put ceramics on:
- From the center. With this method, the cut fragments are symmetrically located on both sides of the wall.
- from one of the corners. Laying tiles in this case should be from the most visible angle.
Mounting
The technology of laying ceramic tiles on the wall consists of several stages:
- Dilution of the required amount of tile adhesive.
- Applying the adhesive mixture on a small surface of the wall and spreading it with a notched trowel in such a way that the adhesive evenly covers the area to be lined. If the base is uneven or in hard-to-reach places, the mixture can also be put on the tile, also leveling it with a comb.
- Laying begins with whole fragments from the vertical axis or from a visible angle. At the same time, you constantly need to monitor the vertical and horizontal level of the elements. Crosses are used to form a uniform width and aesthetic seam.
- To put the fragments exactly one relative to the other, the protruding ceramics are easily tapped with a mallet until they are set in the desired position.
- As the work progresses, the seams between the ceramics must be cleaned of adhesive residue.
- Having faced the surface with whole fragments, you need to trim the tiles. If there is little trimming, then you can get by with a manual tile cutter, but in the case of large amounts of work or if you need to make the cut fairly evenly, it would be more appropriate to use an electric tile cutter.
- After the tile is completely laid on the wall, the remaining adhesive is removed from it and a pause is made for a day until the final setting of the adhesive mixture with ceramics.
In order to avoid excess consumption of glue, due to its rapid drying, it is not recommended to prepare a lot of adhesive mixture. The optimal amount of the mixture should ensure the laying of one square meter of tiles on the wall.
Grouting
The technology of laying tiles on the wall is completed with the processing of seams and their jointing with special fugue grouting compounds. After removing the crosses from the seams, the stage of final surface finishing begins:

Grouting is carried out 24 hours after wall cladding
- preparation of the grout in accordance with the instructions, usually located on the packaging of the fugue;
- using a rubber spatula, the grout is distributed between the tiles. The movement should be in the form of a "Christmas tree" relative to the seam line;
- excess composition is removed with a plastic spatula and a damp sponge;
- you can give the seam a rounded shape with a piece of electrical cable or other suitable object;
- joints of tiles with furniture or plumbing equipment are treated with silicone sealant.
After the final hardening of the fugue, to improve the moisture-resistant qualities of the cladding and give an aesthetic appearance to the tiled floor, ceramics can be coated with a polish.
So, the tiles on the walls are laid, the seams are properly processed, so that the repair can be considered complete and enjoy the work done by your own hands.
If you decide to save money on apartment renovation and want to try laying tiles yourself, then I advise you to think again - this is a complicated, nervous and dirty business. Further you will understand why. And another important point, if you are redoing, then the old tile must be beaten off using a puncher and a special chisel attachment. Be sure to wear a mask or goggles.
So, let's start with laying tiles on the floor
I want to warn you right away that before laying the tiles, a MORE OR LESS EQUAL SCREED (evenly poured cement) must be made throughout the apartment.
Necessary tools and materials
Primer, for example, the brand "Prospector"
Paint roller to prime the floor

paint tray (trough with a primer, where we will dip the roller)

Level, e.g. ERMAK rail, 1.2 meters long

A large metal bucket of 30 liters, and even better 40

Special needle roller for rolling out self-leveling floors

Powerful perforator (Energomash PE-25900)

Nozzle mixer on the perforator

Self-leveling floor "Found T-45" (the number of bags depends on the degree of slope and area)

A bucket of 10 liters for dosing water when mixing the self-leveling floor

Tile adhesive. I prefer LITOKOL LITOFLEX K80 eco (number of bags based on area)

Toothed trowel (toothed trowel) for spreading glue on the floor

A narrow spatula or scoop to scoop up tile adhesive from a bucket


Tile cutter, for example, Zubr Expert

Grout for jointsGERESIT

Bulgarian

Attention! Before laying tiles in the bathroom and in the kitchen, do not forget to coordinate the pipeline communications with the plumber, since, for example, piping must be carried out before laying the tiles:
A threshold (in the center), in which the bathroom drain pipe and a sanitary cabinet (left) pass.
Floor leveling
The first thing to do is to level the floors.. Now it is quite simple, since self-leveling self-leveling floors have appeared. Personally, I liked the Founding T-45 the most.
Take, for example, the kitchen. With the help of a level (preferably at least 1.2 meters long), we will see the general slope of the floor and determine the lowest place in the kitchen. Sweep the floor and prime it with a paint roller.
Let it dry for an hour, and then you can start pouring. Further, depending on what large bucket you have, you need to calculate the dosage for the self-leveling floor mixture. I had a bucket of 30 liters. I poured about 8 liters of water into it and one bag of self-leveling floor “Found T-45” (20 kg). Proportion is important! No more and no less than 7.5-7.7 liters of water per bag!
Recipe and mixing method: We measure about 8 liters of water into a small bucket and pour it into a large bucket. Next, pour out TWO THIRD bags of self-leveling floor, take a perforator with a mixer nozzle and mix (spray, of course, will fly). We interfere until a homogeneous solution is obtained (if at the same time we still drive in a circle with the perforator itself, it will turn out very quickly). Next, pour the remaining powder from the bag and mix again. Let the solution brew for 5 minutes and stir a little more, and SLOWLY pour it into this lowest place. Slightly roll out the puddle with a special needle roller for rolling.
The floor dries within an hour, after which it can be carefully stepped on. Again, check the “improvements of the floor” with a level and repeat the whole procedure - of course, the place where we will pour the second time must be determined again. On the small kitchen I think that it will take 5 or 6 bags of self-leveling floor, but again it depends on the curvature and area. After leveling, it is recommended to wait three to four days before starting to lay the tiles.
Tile laying
So, we proceed directly to the masonry.
I advise you to lay the tiles in a rhombus, and it’s more beautiful to the eye and small irregularities are hidden very well, which will be different, since the tile itself is also slightly curved, and, for example, the geometry of a new house may be uneven due to shrinkage:
Diamond laying allows you to hide inaccuracies from the eye:

With rectangular masonry, irregularities are possible that the human eye will immediately notice when entering the room:
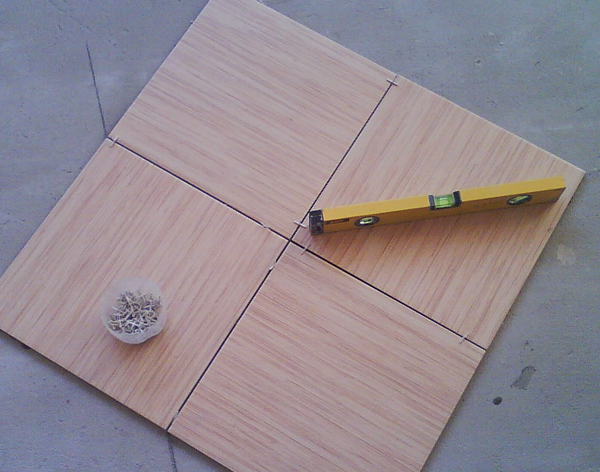
The first thing to do is to measure the center of the kitchen by drawing lines from the centers of opposite walls:

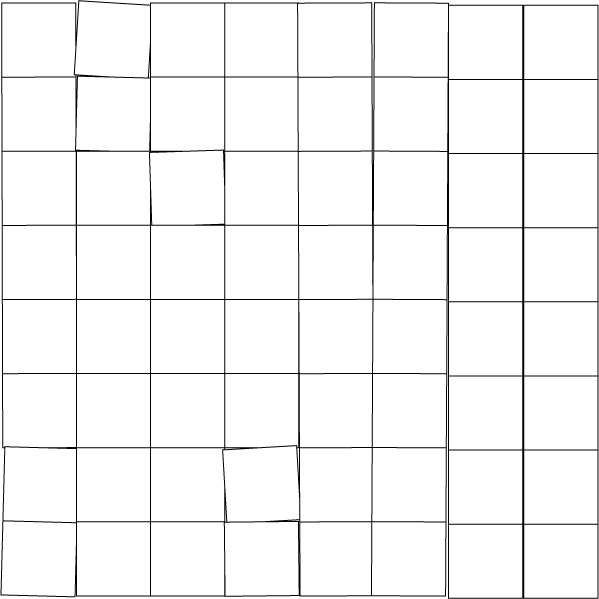
And, starting from the point of intersection of the lines, lay out ALL the tiles on the floor (estimate the big picture).
Thus, it will be seen whether the overall picture is even, and how many tiles will need to be cut and how:

Red shows those tiles that will have to be cut:
.jpg)
The most important thing here is the central 4 tiles, which are placed first.
Mark with a pencil the position of the central four tiles, then remove all the tiles:

In a small bucket, using a perforator ( PUNCH, OF COURSE, IN SIMPLE DRILLING MODE) and a mixer nozzle, knead a solution of tile adhesive. For proportions, read the instructions on the bag. From myself I can say that the glue should be, well, like thick sour cream. After the solution is ready, we spread it with a notched trowel (trowel) on the floor, in the place where these four tiles will lie. We take the part of the solution necessary in height from the bucket with a scoop or a narrow spatula and plop in the middle of the outlined square, then smear it with a trowel. It is not necessary to smear to the edges of the outlined square. The area of the adhesive solution must be at least 70% of the tile surface. But it’s better not to spare the glue and smear it completely over the surface with a layer of at least 5 mm, put it for yourself!

We glue the tiles according to our marks.
ALWAYS use crosses for seams!
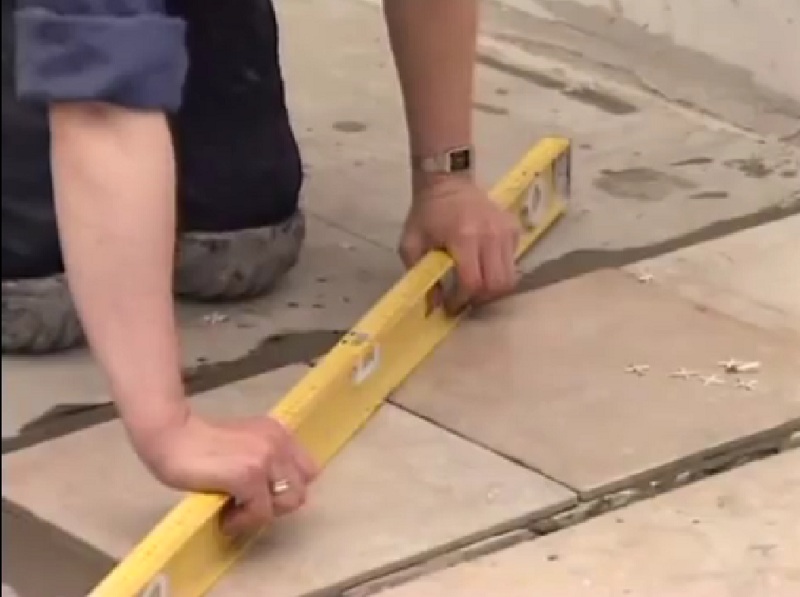
Well, after the first four tiles were glued, the rest with glue, as it were, in a circle. You need to constantly monitor the level, because. surface curvature is always present.
I will add that after you have glued sixteen tiles, if everything is even for you, then everything else will be fine.

After the tile is glued, we wash it and clean the seams (I did this with an awl, it’s not necessary deep). Well, we cover them with grout - it's not a difficult matter, but read the instructions on how to dilute the grout on the package.
The most difficult (nervous) in this work is that the seams begin to diverge, as it were. Therefore, I advise you how to lay the main part at a time, because, while the tiles have not yet stuck, they can be trimmed. From myself I can say that, as it were, I learned to catch these seams only the third time, having spent a lot of strength and nerves.
Laying tiles on the wall
As a rule, tiles are laid on the walls in the bathroom. In general, it’s easier to put on the wall than on the floor, but the whole difficulty here is that we have a bathtub, and taps go to it, as well as a heated towel rail, a plumbing hatch, all this must be taken into account. Trying to describe the whole process of laying tiles in the bathroom is simply not possible, because. bathrooms and baths are different for everyone, but I will describe at least the general provisions.
The number of tiles will help you determine the store. Well, or you can do it yourself - take the width of the wall, multiply by the height and multiply by two. Then we measure the second wall and in the same way. But still, it’s better with the seller, who will deduct the door area for you and so on.
Please note that before laying tiles on the walls, the walls must be leveled, plastered!
On my own, I can add that laying on an uneven wall is fraught with crooked seams, one tile is deeper recessed than the other, and it’s just that the overall picture immediately deteriorates.
Also an important point - at the beginning, plan where and what you will have, consult with plumbers, since, for example, pipes must be laid before laying tiles!
So, laying tiles in the bathroom should start from the floor, which we already know how, but here the floor level should be perfect! In addition, before we started trimming it with a self-leveling floor, it is possible to treat the floors with waterproofing. Important point- this is the fact that there will be no baseboard in the bathroom, that is, the gap between the walls (before the wall tiles were glued, so that later this gap could be closed with it) and the floor tiles should be no more than 1 cm. Then you need to cover the floor with something, so as not to chip the tiles on the floor during work - best of all, cardboard or hardboard, or some old unnecessary carpet.
A small digression - if you want to have a warm floor, then of course, first you need to choose the warm floor itself. According to the laying technology, warm floors differ: some are walled up in a screed (which, accordingly, requires the removal of the existing screed and the creation of a new one, but already with a warm floor), some in a layer of tile adhesive (of course, laying such floors is easier). I chose the one that is laid in a layer of brand glue.

The choice is due precisely to simplicity - there is no need to remove the old screed, lay a special heat-reflecting material, and most importantly - this floor heats up faster. Although after reading reviews of warm floors in general, I realized that they break down very often and cannot be repaired (well, do not open the floor?!). So let's hope it lasts a long time.
Well, let's get back to laying tiles. I advise you to choose tiles with dimensions of at least 20x30 cm. You should start from the bottom from the middle of the wall, but you need to approximately see how the tiles will lie in the corners. That is, we will have to cut the extreme tiles, but we need them to be the same. It will be much prettier that way.

From the picture, we see how the tiles in the corner are cut off, and it is desirable that cut tiles of the same size be inserted into all corners! Also, cut tiles in the corner will help to hide small slopes of the walls - this is important! You will put, you will understand why!
So, we all measured and marked the position of the tiles and you can start gluing them.
We spread glue with a notched trowel - just like on the floor, only now on the wall.
And we begin to glue the tiles in horizontal rows.

From this photo you can see what determines the importance of the evenness of the walls.
During the laying process, you need to carefully monitor the level of EACH tile.

After gluing the tiles, an urgent question arises - we need holes for taps, a heated towel rail, for a toilet (mainly a drain), and for an exhaust hood.
And this is precisely the biggest difficulty in laying tiles in the bathroom, because in some cases, the tile needs to be drilled, or cut, before laying. Again, keep everything straight. You can see it well in the picture below.

In order to cut a corner in the tile, as is done in the figure, where the hatches under the bathroom will stand, use a grinder with a special disc (INTERSKOL diamond cutting disc is solid on the tile).

To make holes in the tile, there are special crowns (or they are also called ballerinas) of different diameters, which are mounted on a drill.

The drill must necessarily have a sensitive pressing function, that is, the harder you pull the trigger, the more revolutions. I also advise you to practice on scraps first. And do not forget to cool it more often in water.
Conclusion
In the bathroom, bedside tables, a mirror, a corner, hooks, a toilet paper holder and more are hung. To do this, you need to drill the walls and screw in the dowels. But for those who do not know, there is a special drill for drilling in tiles (it is also used for drilling glass).

I highly recommend using this drill. And here's why: for convenience and accuracy, I use a screwdriver and these drills fit very well with it.

The advantages here are as follows: the screwdriver is light, the rotation speed is small, but residual in order to drill through the thickness of the tile itself (those who have already tried to drill on the smooth surface of the tile will understand me). Well, then, to go deeper, you need to use a drill and a regular drill bit.
Well, in general, everything.
And the main advice: compare the cost of tools, evaluate your nerves and time and think that maybe hiring a professional is not so expensive.
Ceramic tiles are the most popular today finishing material. It can have a wide variety of textures, colors, sizes and shapes. Tiles are most often used for or in a bathroom. As practice shows, you can lay tiles on the wall with your own hands or invite a master for this work. The layout of the tiles can be horizontal, vertical or diagonal - as you like.
How to lay ceramic tiles on the wall?
If you decide to do the laying of tiles yourself, then first you need to prepare a room for work: take out all the furniture, turn off the water. If the work will take place in or in the bathroom, then it is necessary to dismantle the plumbing. Moreover, if you do not plan to change it, then you should remove the washbasin or toilet bowl with care so as not to damage them.
- For work you will need the following tools and materials:
- tiles in the required quantity;
- glue;
- grout;
- plastic crosses;
- guide profiles;
- self-tapping screws;
- a hammer;
- roulette;
- level;
- tile cutter or grinder;
- drill with nozzles and drills;
- spatulas - wide notched and small rubber.


As you can see, laying tiles on the wall is not a particularly difficult job. It is necessary to carefully make the markup, as well as follow the technology of work.