How to get rid of the smell of sewage in the bath. Question about the sewerage in the bath? Bath external sewerage device
Sewerage in the bath - how to do it right? How to eliminate the smell in the bath from the drain hole
Question about the sewerage in the bath? | Page 2
Xolod423 said:In addition to the smell, communication with the atmosphere still has some function?!
Click to reveal...
An unpleasant smell from the sewer in the bathroom, toilet or kitchen sometimes appears due to different reasons. It is not possible to single out any one of them, unfortunately. Often, only by checking and eliminating several possible sources of odor, you can achieve a result. A hydraulic seal as a cause of odor A water seal or, simply, a siphon, is a bent pipe or a device filled with liquid in a special way, designed to separate two adjacent gas media in this way, while preventing them from mixing. That is, siphons are just provided in order to prevent penetration bad smell to a living space. And if nothing interferes with the water seal, then it copes with the task. However, due to pressure drops in the sewerage system relative to the room, all difficulties arise:
- if the pressure in the system after the siphon exceeds atmospheric pressure, then the air from sewer system, sometimes almost imperceptibly - in the form of small bubbles, and sometimes with a large and loud splash, it will penetrate the room along with an unpleasant odor;
- if the effluents moving through the pipe completely fill its cross section, then the siphon will be emptied under the action of rarefaction (vacuum), thereby establishing free access of gases from the sewer to the room.
- sewer pipes should be laid with a maximum (within reasonable limits) diameter, because the smaller the cross-sectional area of \u200b\u200bthe pipe, the higher the likelihood of it being blocked by drains and, accordingly, the occurrence of vacuum.
- deposits on the walls of pipes and blockages should not be allowed, which usually leads to a decrease in the pipe diameter, and as a result, the situation described in paragraph one is obtained.
The same is observed both in the autonomous sewerage system and in the city centralized one, when sewage is drained. A blockage forms in the sewer, which, moving down, rarefies the air. As a result, water is sucked out of the siphons.
That is why ventilation is necessary, which will prevent the appearance of unpleasant odors. It is also worth noting the fact that if there is a local sewage system in the house, then without ventilation it will not work at all.
www.baniclub.ru
device and installation of the system, how to do it yourself?
A real Russian bath has long been a full-fledged symbol, along with bears and vodka. The time when it was used only for its direct sanitary purpose has passed. Today, a bathhouse is a place of relaxation, communication with friends, which is accompanied not only by washing and wellness procedures, but also by various cultural events. If earlier the sewerage in the bath was arranged at the most primitive level, now, in order to create comfortable conditions, it is necessary to approach this issue more carefully.
Water drainage methods
There are several ways to drain water from the bath, the choice of which depends on:
- the presence of sewer networks,
- soil's ability to drain water.
by the most the best option ohm will, of course, be the drainage of water into the central sewerage system. Unfortunately, this option is only suitable for places with a well-developed infrastructure. Therefore, in many cases, when deciding how to make a sewer in a bath, you have to resort to other solutions. A similar result can be provided by an autonomous sewage system, which many country houses are now equipping. The cost of such a system is quite high. Water is drained from the bath using standard sewer networks, which are installed using conventional technology.  Water drainage using local drainage is the most common sewage device in the bath. Water is diverted to local drainage wells, which provide cleaning Wastewater. It can be used in soil conditions that absorb moisture well. With poor drainage qualities of the surrounding soil, water is discharged into special pits, from which water is simply discharged through laid sewer pipes outside the bathhouse. In doing so, all sanitary requirements in terms of the distance from the place of water discharge to other buildings.
Installation of internal sewerage in the bath
In a traditional Russian bath, the steam room is usually combined with a washing room. True, modern trends reach such a primordially Russian building, so quite often now there are steam rooms with showers or even a pool. Consider the installation of a bath sewer for various cases. In a traditional bath, water must be drained from only one room - the steam room. This is done in the following way. The flooring is carried out with a slope to one of the walls.
A special gap is left between the wall and the floor covering, where water is drained.
Under the floor, along the entire gap, a special gutter is mounted, which used to be usually made of asbestos-cement or steel pipe. The first of them cannot be called healthy, and the second quickly rotted away. Now most often used plastic or other composite pipes that are not susceptible to corrosion. The gutter is installed with a slope towards the outlet of the sewer pipe from the building. If it is necessary to drain water from several rooms, it is advisable to install a similar gutter under the partition separating the rooms, so the laying of the bath sewage system will be simplified. More modern way is the removal of water from washing rooms through specially arranged drain holes, the so-called ladders. They can be mounted on any type of flooring, the main thing is to plan the slope of the floor correctly so that water gets into the drain and does not stagnate into the room.

Removing the smell of sewage in the bath
Mistakes that an inept sewer installer can make often lead to an unpleasant sewer smell in the bath room. In order to avoid such a problem, the following recommendations should be followed.
Each water outlet must be equipped with a so-called water seal. Most often it is performed using a drain siphon. It may have a different shape, size, but the principle of operation for all models is the same.
In such a device, there is always a kind of water plug, which prevents the penetration of odors of the system into the room. For the same purpose, ventilation of the bath sewer must be provided, in addition, such a system ensures that water is drained without unnecessary noise effects. Ventilation ensures the flow of air into the sewer system when draining water. If there is no such inflow, when water moves through the pipe, a rarefaction zone is formed, which leads to the so-called disruption of the water seal. At the same time, water from the shutter goes into the system, and the smell of sewerage begins to enter the room. The easiest way to make such ventilation is from an ordinary 50-mm plastic sewer pipe, it is advisable to bring it to the roof of the building, closing it with a special cap.
Installation of local drainage wells
As already mentioned, very often the output of water is carried out in drainage wells. Therefore, before you make a sewer in the bath, you need to take care of its arrangement.

The area of such a well depends on the volume of flow, but for a bath it must be at least 1 square meter.
The well is arranged at a distance of 4-5 meters from the building, its depth should be at least 1.2-1.5 meters, and should be at least 60-70 cm more than the freezing depth.
Top part the well and its bottom are covered with a layer of clay, then backfilled with expanded clay, crushed stone or other similar drainage material. The withdrawal of water from the bath will be carried out through sewer pipes to this layer, passing through which the effluents will be cleaned and absorbed into the ground.
Connecting sewerage to a central or autonomous system
In the modern version, the sewerage for the bath is mounted from standard plastic pipes and fittings. When laying external sewer lines, it is necessary to observe the slope angle to ensure the normal operation of the system.
For pipes with a diameter of 50 mm minimum slope should be 0.03, and for 100 mm pipes 0.02 (2 cm per 1 meter).
 Do not forget also about the device of viewing and rotary wells. Usually the walls of such wells are made of special concrete rings, although it is quite possible to lay them out of stone, brick, or other similar material.
From the outside, the well must be waterproofed to prevent sewage from entering the soil. In the case of passing the sewer line to the tie-in central system in a straight line, it is necessary to make one manhole, with the installation of a revision (cleaning) on the sewer pipe. This is necessary to clean the system in emergency situations.
Do-it-yourself sewerage in a bathhouse can be done with even a little construction experience, and there is a real opportunity to save on these, in principle, simple works, for which most contractors will ask for a considerable amount. Independent laying of sewers in a bathhouse, especially a small one, provides a wide field for gaining experience in such work. And since in many cases the bathhouse is the first building on the site, you can consider it a training, construction site for laying sewer networks.
canalizator-pro.ru
Drain in the bath
Before starting the construction of a bath, it is necessary to carefully consider the water drainage system. At the same time, it is important to design the sewage system in accordance with building rules and regulations. Installing a drain structure helps prevent fungus and rotting materials. It also helps eliminate bad odors. Before you make a drain in the bath, you need to calculate everything in advance and familiarize yourself with the rules for creating a sewer system.

Water drainage methods
There are several ways to drain water, each of which can be used for any such structure. But in order to remove water more efficiently, it is necessary to choose the most suitable option:


Drain pipe installation
The efficiency of water drainage largely depends on a properly installed pipe. The pipe is laid even at the stage of creating the foundation for the structure, since after construction is completed it will be problematic to do so. A drain hole is usually dug at a distance of about 5 meters from the bath. The depth of the pit and its width depends only on the number of people who will use the building at the same time.
The edges of the created pit are protected from collapse with the help of reinforced concrete rings. To install the pipe from the bath towards the well, a trench is laid with a slope. After that, the pipe is laid on a sand cushion.

Important! The drain pipe throughout must ensure the unhindered passage of water.
Creating a well for draining
When creating a bath, it is recommended to make a well below the freezing point of the soil. Drainage is made at the bottom, for which expanded clay is used. During the laying of the pipe to the well, it must be insulated. If this is not done, the wastewater will freeze at sub-zero temperatures.

When choosing pipes, it is necessary to take into account the requirements for such products:
- they must have a diameter of at least 50 mm;
- asbestos-cement and cast-iron pipes are more reliable;
- metal products cannot be used, as rust appears on them;
- the most common are their PVC pipes, as they are strong enough and have a low cost;
- after connecting the pipes, the joints are connected with a composition that allows them to be sealed.
It is worth remembering that the sewer well has one significant drawback - some time after the start of using the water drainage system, the soil becomes clogged with soapy water and it begins to accumulate in the well. After that, you need to clean up. The best way- diversion of the drainpipe into the sewer network, which is located nearby.
Floor device
As a rule, when creating a water drainage system in a bath, a concrete floor is created with a drain hole. After that, it is covered with tiles or wood. To prevent the hole from clogging, a mesh is installed on it. Usually floor insulation is not required. This is due to the fact that when the air temperature rises, the finishing material warms up quite well.

If the tiles during the use of the bath heat up too much and become hot, it is necessary to use wooden grates. Such products can be dried after each use of the room so that the tree does not begin to collapse.
Septic cleaning method
Since the system needs to be cleaned periodically, the most practical way is to use the septic method. Cleaning is carried out in several stages:
- mechanical cleaning. On the this stage wastewater is purified from lime and other impurities.
- Filtration and biological treatment. It involves the use of septic tanks.
For a group of sites, local septic tanks are installed. If a water purification system is installed for one site, autonomous septic tanks are used. To prevent unforeseen blockages, it is necessary to make a manhole at a distance of about 5 meters from the bath.

standard drain hole
Creating a drain pit is the easiest way to drain and dispose of water. A pit is created a few meters from the bath, the walls of which are lined with bricks or reinforced with cement. The disadvantage of this method of draining is that if there is a slope of the soil, the water from the pit will drain to lower areas. When filling the pit, it has to be cleaned.

It follows from this that the place for creating a pit must be chosen in such a way that a sewage truck can drive up to it. It is worth remembering that periodic cleaning of the pit will entail additional costs.
Leaking wood floor
by the most simple option creating a drain in the bath is the installation of a pouring wooden floor. It is created from inexpensive materials, which significantly reduces the cost of creating a bath. When choosing this option, the boards are laid in such a way that the distance between them is at least 5 mm. Due to this, water quickly flows to the ground and leaves through the ground or through the sewer system. The arrangement of a drainage system is not required only if the soil does not prevent the rapid drainage of water. The foundation for a bath with a drain in this case is made tape.

Depending on the type of foundation, several types of underground space under the leaky floor can be selected. This is necessary in regions with clay, loam and other types of soil that do not allow water to pass through. In this case, a pit is created, in which the system is located, designed to remove wastewater.
If the soil is sandy, it is enough to dig a hole about 400 mm deep and fill it with a mixture of sand and gravel to a height of about 250 mm. Thanks to this, water is purified and removed through the soil.
Important! The distance between the created sand cushion and the joists must be more than 100 mm.
Creation of a pouring floor
When creating a pouring floor, the boards are not fixed on the logs, but are nailed to additional bars. This allows you to take out the flooring to dry after using the bath.
Important! The foundation for the stove in the bath is created only after the floor lag has been installed. This is necessary to accurately determine the height of the floor.
Before creating the floor, you need to consider some points:
- the drain hole must be prepared before the floor is created;
- the distance between the boards must be at least 5 m, otherwise, when the wood swells, some slots may overlap;
- support posts for logs must be waterproofed with a double layer, since one is not enough to protect them.
Support posts are made of bricks. They are installed on a concrete or sand cushion. The distance between them should be about 1 meter. After installation, the columns are plastered, and roofing material is laid between them. If the soil is sandy, this material is not laid, since all the water will immediately go into the pit.
Fixing the lag on the posts is carried out using metal channels, which are then covered with bitumen. This is necessary in order to protect them from corrosion. Logs are usually created from larch, as this material is less susceptible to moisture. Before installation, the lags are covered with protective compounds.
To create a leaky floor, a board with a thickness of 40 mm is usually used. It is worth remembering that pine boards are not suitable for creating a floor, as this wood is resinous. After the preparation of the boards, they are either attached to the logs, or they are connected to the bars, which will then be laid on the supports.
bouw.ru
How to make a sewer in the bath
One of the questions that the owners of a country house face when building a bath is: how to make a sewer in a bath. The fact is that the solution to the question of how to arrange a sewerage system in a bath is one of the most important, providing, with the correct installation of the system normal functioning the entire bath complex.
In order for the sewerage system to function normally, all design parameters should be carefully calculated. In order to know how to properly make a sewer in a bath, you should study in detail the basics of installing various sewer systems, think over the design of the system and install it correctly, in accordance with the developed drawing.
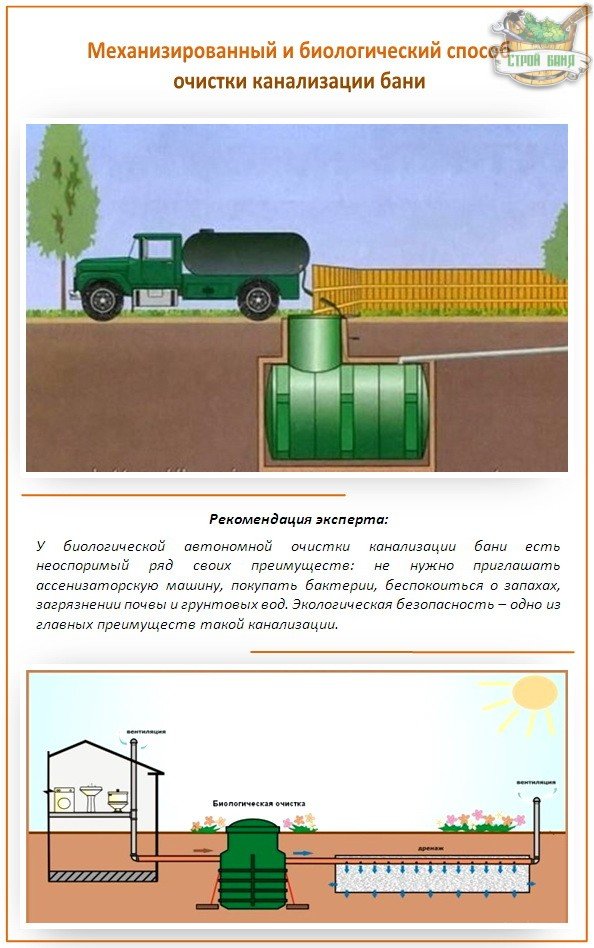
 In order to avoid unpleasant odors when using a sewage disposal system, it is required to study the question of how to make sewage in an odorless bath. Most often, a sealed septic tank is used for this purpose, or a wastewater collection system is connected to a centralized wastewater disposal system.
Types of wastewater collection systems
To know how to properly make a sewer in a bath, you need to study all types of modern waste systems. At the moment, several sewerage systems can be used to equip the bath complex.
 The main systems among them are the following:
- non-pressure;
- pressure;
- component CKS.
A non-pressure system is a system that operates on the principle of gravity. Wastewater is transported without pumping liquid into a septic tank and a drainage well using special devices, where the wastewater is settled and cleaned, after which the water is discharged into the ground. For normal operation of such a system, a drain pipe slope of at least 2 cm per 1 m of pipe is required. This sewage disposal system is the cheapest.
A pressurized wastewater collection system is a system for transporting wastewater, the device of which uses special pumps that pump wastewater and redirect the latter to a wastewater discharge system, and then to a drainage or septic tank. Effluent discharge after treatment is carried out by a forced method. Such a system is used when the level of groundwater rises.
The discharge system of the complex as part of a centralized wastewater collection system is the most optimal option for arranging a wastewater disposal system. The use of such a sewage system makes it possible to exclude the installation of treatment facilities during its installation. The disadvantage of such a system is the need to obtain permission to connect to a centralized system.
Arrangement of a drainage sewer system
If the bath complex is being built for use a small amount people, a good option for creating a sewer system would be to create a sewer that has a drainage type.
The construction of such a system can be carried out independently on your own. During the construction process, you must adhere to certain building codes and rules.
 For correct installation it is required to dig a drainage well in a pre-selected place near the bath complex. The size of the well on the surface of the earth should be 100x100 cm. The volume of the prepared well depends on the number of users of the bath complex using it at the same time. When preparing a drainage pit, the depth of freezing of the earth should be taken into account. This indicator in the middle latitudes is about 70 cm. With this level of freezing of the soil layer, a drainage hole should be dug to a depth of 1.5 m.
After the preparation of the drainage pit, the soil located around the foundation base, the bottom of the drainage ditch and the bottom of the pit are compacted with a clay composition. The thickness of the clay layer should be at least 10 cm. The clay at the bottom of the trench should be laid and compacted in the form of a tray and at an angle towards the drainage pit. This is required so that water does not seep into the thickness of the soil layer and does not pollute it. In addition, the presence of a slope will prevent erosion of the foundation.
After laying the clay layer on the bottom, the well is covered with a layer of gravel or crushed stone, which plays the role of drainage and must be at least 50 cm thick. After the drainage field is arranged, the well is covered with earth and compacted. When using the drainage method of wastewater disposal, a septic tank will be required for their treatment.
In order for the drainage system to function properly, it is extremely important to observe all technological processes. Failure to comply may result in bath waste water accumulating under the flooring and increasing the level of dampness in the bath. AT winter period these drains will solidify, disrupting the normal operation of the sewage system. An increase in humidity in the premises will contribute to the decay of the material used in the finishing process.
Arrangement of a gutter for a drain
Before you make a well-functioning sewer system in the bath complex, you should remember that the flooring of the bath room should have a slight slope directed towards the sewer grate. A chute is mounted under the floor grate for receiving wastewater, which is used as a pipe with a diameter of 50 mm or more. Pipes can be used from asbestos, cast iron, concrete, ceramics or galvanized iron. Steel products are not recommended for use, as this material quickly becomes unusable under the influence of corrosive processes.
 Water that enters the gutter is quickly discharged through it into the sewer system or drainage well.
Sewerage in the steam room can be arranged in a different way. For this purpose, the floor in the bath room is arranged with small gaps between the boards, in the underground, in this case, a pit with concrete walls is arranged to collect wastewater. To prevent the penetration of unpleasant odors from the sewer system into the premises of the bath complex, a movable metal plate is installed in the pit, which prevents the penetration of odor. When arranging a toilet bath in the system autonomous sewerage it is mandatory to have a septic tank designed for the disinfection of wastewater.
Arrangement of a manhole of the sewer system of the bath
In the process of arranging and laying the sewerage system for the bath complex, the construction of a manhole is required if the length of the sewerage pipeline is more than 10 m. Manholes are also installed at the points of elevation and at the places where the sewage transportation system turns.
 These structural elements are required in order to inspect and clean pipelines if necessary.
The distances between manholes are regulated by special building codes and depend on the diameter of the pipes used in the installation of the sewer pipeline.
When carrying out the arrangement of the sewerage system for the bath complex, pipes with a diameter of less than 155 mm are used, which makes it possible to arrange manholes at a distance of 35 m from each other.
For the installation of wells, concrete and plastic rings are used through which the pipeline is passed. During the installation process, it is better to use rings made of concrete, as they more reliably protect the vulnerabilities of the sewer pipeline. Installation of rings involves making holes for pipes in a concrete body. Prepared rings are lowered into special pits dug along the pipeline route. Pipes are launched into the holes of the rings, so that the joints between them are inside the ring. Joints between rings and pipes, as well as between individual pipes, are sealed with special sealing compounds.
 The space around the installed ring is sprinkled with a dry mixture consisting of sand and cement in a ratio of 1: 1.
In some cases, when arranging the system, it is possible to use ready-made manholes, which are made of plastic. The advantage of such components of the sewerage system of the bath complex is the ease of installation and the low weight of the product. These components of the system are equipped with special nozzles for connecting pipelines and sealing joints.
To collect sewage, you can make a drain pit, consisting of used car tires. In order to properly manufacture this element of the sewer system, it is recommended that you familiarize yourself with the videos and photos located on the pages of specialized thematic resources that are devoted to the topic of organizing sewer systems.
 A properly made sewer system will allow you to operate the bath complex for a long time without thinking about the need for repair work.
Modern Russian baths are far from the same hut on chicken legs with one room inside. On the contrary, it has now become fashionable to equip a whole bath complex on your site - with a guest room, a shower room and even a pool. Yes, and the bathroom has long become something ordinary for a bath. And more comfort - the sewerage in the bath should be more perfect, and this time the hole under the foundation will no longer pass.
Construction of a drainage well for water drainage
If the bath is designed for two or three people, and it is used infrequently, then you can not spend money on an expensive system and not do something super complicated - it will be enough to equip the primitive withdrawal of water from the bath and its escape into the ground. To do this, a drainage well is made near the bath - the depth that is necessary for a certain degree of freezing of the earth: for example, if this value is 70 cm, then the pit should be at least 1.5 meters. So, the order of work:
- Step 1. 10 cm of clay is placed at the bottom, and the bath is also lined with it around the foundation and a trench for water drainage.
- Step 2. Along the trench, the clay must be well leveled and given the appearance of a gutter with a slight slope towards the drain.
- Step 3. Next, expanded clay, crushed stone or a mixture of gravel and sand is poured over the clay cushion - a layer of about half a meter. This is the drainage.
- Step 4. The earth is poured on all this and compacted tightly.
- Step 5. The sewer is insulated - so as not to freeze in winter.
Such sewerage in a do-it-yourself bath is not bad, it is only important to remember that periodically gravel and sand will become clogged and will need to be cleaned.

By the way, if the soil is sandy, such a well can be replaced with a so-called horizontal drainage cushion. This is a trench a meter deep, the same length and 30 cm wide. A 20 cm layer of crushed stone is placed on its bottom, and on top it is covered with earth. It is on this pillow that the drain water will be discharged. But if close ground water, there are some points to be taken into account. Read more here:
Here is another fairly simple method of constructing a drainage well for a bath: two meters from the steam room, six old tires from the car are buried in the ground - on top of each other. And in the middle of the uppermost side, a drain pipe just enters.
The diameter of the well turns out to be what is needed, and the tires will not allow the pit to collapse. From above, all this is closed with a metal sheet and covered with earth. Video example:
If you need something more serious, then you can already think about a septic tank or a deep cleaning station:
How to make a sewer on "capricious" soil?
So, if the soil near the bath does not pass water well, then it is better to equip a sewerage system with a pit - to collect runoff and its subsequent removal. It is made from waterproof materials.
It is only important to make a water seal during its arrangement - so that unpleasant odors do not get into the bath. To do this, the entrance of the drain pipe must be made at a height of 10-12 cm above the bottom, a plate is placed above the pipe, which is not fixed from below, and a distance of 5-6 cm is left from the bottom of the pit to it.
As for sewer pipes, ordinary polyethylene pipes are quite suitable for a bath - they are durable and inexpensive. Can also be cast iron. But steel will quickly become unusable due to corrosion. The minimum pipe diameter is 50 mm, but 100 mm is better, especially if you plan to connect additional equipment.
If there is nearby centralized system sewerage - excellent, it is always more profitable than the most thoughtful sewerage for a do-it-yourself bath.
And, finally, no matter how long the sewer system of the bath is, there must be a well for its inspection and cleaning. It is called a viewing hole - it is a special pit with a concreted bottom and often brick walls. It is important to protect it in winter with a double lid - so that the water does not accidentally freeze: provide the inner one with heat-insulating material, and cover the outer one with earth.
What can cause bad breath?
Many attendants are also worried about how to make a sewer for a bath without the slightest hint of smell? Indeed, it is precisely because of many that they refuse elementary convenience in the steam room ...
An unpleasant smell where there is a sewerage system is not uncommon. But it’s not at all necessary for a steam room - and therefore you can and should get rid of it. There may be several reasons for this:
- hydraulic shutter
It is also called a siphon - this is a specially curved pipe or other device that is filled with liquid and is designed to separate two adjacent gaseous media so that they do not mix. It is the hydraulic shutter that is needed so that the unpleasant odor does not penetrate into the bath. But he copes with his task only when nothing interferes with him. And this is what can happen: the pressure in the system itself after the siphon will slightly exceed atmospheric pressure - and air will come out of the sewer system in the form of small bubbles or with a loud splash. And the air is bad. Or the effluents that move through the pipe will completely fill its section, then the siphon will empty under the action of vacuum - thereby giving gases access from the sewer to the bath.
How to prevent it? Initially, the sewer for the bath should be made of pipes of the maximum allowable diameter. The lower this indicator is, the higher the risk of overlapping with drains and the occurrence of this vacuum. Further, it is important to prevent deposits on the walls and blockages, which lead to clogging of the bore diameter of the sewer pipe.

- Ventilation
In the bath, sewer ventilation is mandatory - these are pipes that are combined with the sewer system and provide air flow for constant pressure - so that household drains leave silently. But if there is no such ventilation or it is done incorrectly, during the draining of wastewater from the bath, air will be rarefied and an unpleasant odor will appear.
Not difficult, right?!
A well-planned bath project not only increases the operational life of the building, but also protects it from the appearance of mold and pathogens, and also increases the heat transfer of the heating installation. The main requirement of the bath is a thorough draining of wastewater.
A properly designed structure using concrete and boards will eliminate odors and reduce the growth of pathogens.

How to make a drain in the bath with your own hands? You will find the answer to this question in our material.

How is the sewerage system arranged?
The correct outflow of wastewater in the bath can be done in several ways:
- flowing;
- not flowing.

In the first case, it is collected in a special section, where the waste liquid flows into sewer pipes. In the second option, during the construction of the building, a certain angle of inclination is made with additional gutters to drain dirty water.


A detailed diagram helps to avoid common mistakes in self-construction. It includes:

Trench preparation for pipe laying. The depth of the grooves must not exceed 0.5 m. During the laying process, the correct angle of inclination must be observed. To do this, each subsequent pipe is fixed 3 cm above the previous one.

The bottom of the trench is sprinkled with sand. The height of such a substrate should be 16 cm after tight tamping. In the process of laying, it is important to observe the angle of inclination.

Further, all the pipes are interconnected and laid on the bottom of the pits. If there is a bathroom in the bath, then it is necessary to install an additional sewer riser. To do this, it is fixed at the wall surface with a special fixative.

For proper circulation of air masses in the toilet, it is necessary to install additional ventilation. This will reduce the lingering of unpleasant odors indoors.

After that, proceed to laying the flooring. In the process of installing the sewer, it is necessary to attach additional metal gratings. They will prevent large debris from entering the drain hole.


To eliminate an unpleasant smell, special water seals will help. They are rubber pads that are fixed in the area of \u200b\u200bthe drain hole.

The main parameters for choosing a sewer system for a bath
How to make a drain in the bath? Before proceeding with the construction of an external sewage system, it is recommended to consider several main factors:
- intensity of use of the bath room;
- building dimensions;
- the type of soil composition in the area where the premises will be located;
- the level of freezing of the soil cover in winter;
- connection to the central sewer.
These factors are an integral part of early stages bath design. For frequent use of the premises, it is necessary to design complex system drainage of sewer water.

In addition, ground filtration is carried out. In addition, it is enough to use a sewage pit. Waste will gradually be absorbed into the thickness of the soil cover.

If the site is dominated by sandy soil, then drainage rings are used for reliability. For clay soil optimal solution there will be strengthening internal walls. As the pit fills with waste, it must be cleaned with special equipment.

Advantages and disadvantages of sewer drain devices
To date, there are a huge number of devices for arranging drain sewers for a bath. They have both positive and negative sides. These include:


Drainage well. It is a deep pit, the walls of which are filled with filtrate. For this, sand, small gravel, pebbles are used.

The advantages of this method include: low cost of materials, ease in the process of arrangement. The disadvantages include the laborious process of replacing filtered masses with new ones.

Drain well. This is a large container for collecting sewage liquids, in which waste from the bath gradually accumulates. As it is filled, it is cleaned using special equipment or a machine.

The advantages of such a system are: ease of installation and arrangement of the drain pit, low cost. To negative qualities include: frequent cleaning, inconvenient location of the drain well. As a rule, installation should be carried out at the lowest point of the site.

Pit. It is located under flooring baths. Drainage waste is collected in this pit and is self-cleaned through a filtrate of fine materials.

To positive qualities systems include: low cost of materials, easy installation. The disadvantages of such a structure are: low throughput, it can be used on sandy and sandy loamy soils.

Ground filtration. This is a system that consists of a septic tank and several pipes. Purified water flows through them. The pipeline is laid at a certain angle, due to which all the liquid will independently drain and be absorbed by the soil.

The advantages of such a system are considered: it can be used for the entire sewer network, it is used to thoroughly clean the liquid from harmful impurities. The photo of the drain in the bath shows the process of filtering sewage waste.

Photo drain in the bath


Where does the unpleasant smell come from in the steam room in the bath or sauna? The answer to this question is both clear and unexpected. It smells like a stove along with a stone. It may smell, or it may not. Why? Experts’ conclusions. I’ll add a little gag and put in 5 kopecks about this topic, because I have never heard from people who went to the bathhouse with me (including the public one) that they smell an unpleasant smell carbon monoxide. I started with this question, so as not to return to it again.
Carbon monoxide is odorless, so you can smell anything but the smell of carbon monoxide.
As a rule, this is due to poor draft into the pipe from the furnace, or, worse, the presence of holes in the structure of the pipe or furnace.
Although this is doubtful. Even if there are holes directly in the stove, due to the draft force in the chimney, air from the steam room is drawn into these holes, and not pushed out of them. Because there is a reduced pressure in the combustion zone, which sucks in air not only through the blower, but also through these holes.
The situation is more complicated with an unpleasant smell in the steam room of the bath, which appears during steam procedures or at the stage of preparing the bath. It looks like this: before you kindle the stove - there is no smell, but immediately after kindling the smell appears. What reasons?
Why does an unpleasant smell appear in the steam room in the bath?
This happens for the following reasons:
- a bad stone, which inside contains inclusions of minerals and salts with a sulfur component. It is the cause and will spoil your mood for a long time - until you simply replace the stone in the heater. This is especially sinned by loose rocks of self-assembled stone.
- application of paints and varnishes and finishing materials not intended for high temperatures (their smell is different from others and its nature is immediately clear)
- warmer air is more likely to show faint odors (come into the steam room clean...)
- the second reason is the most tricky and not always clearly manifested. Symptoms of bad breath look like this:
You purchase, for example, a certified soapstone stone and cover your furnace with a grid from the outside, covering all the sides of the steel furnace. Every week you take a steam bath, pour oil solutions and herbal infusions over the stone, and then you start to notice. that the unpleasant odor in the bath increases. What's the matter? - you make a claim to the seller of the stone. And he just has nothing to do with it. The mode in which you use the stone is very important.

Soapstone - good for use in batch furnaces. Those. where the stone is licked by fire directly, and not heated through the sides of a steel firebox. Characteristic soapstone at high temperatures - to form a strong crust resistant to aggressive environments on the surface. It is thanks to her that it does not crumble and withstands many cycles of fire exposure.
When the stone is located outside the furnace, the heating temperature of the stone is unlikely to exceed 300 degrees and a protective crust is not formed. The stone absorbs moisture well with low evaporation. And the water contains the smallest particles of herbs and roots, berries - other organic matter, which I saturate with solutions and infusions. A weakly heated stone and particles of its dust absorb this organic matter. So it provokes an unpleasant odor the next time the stones are heated. Getting on the hot metal of the bottom of the furnace at high temperature, the biomass particles begin to burn, smolder and give off a smell.
To prevent this from happening, it is necessary to have a very high temperature of the stone so that these particles do not have time to absorb or settle during evaporation, or use only oils that give completely transparent solutions for bath procedures.
As you can see, the presence of a certified and “correct” stone does not always save you from an unpleasant smell in the steam room and bath.
Pay attention to the flowability of your stone. When exposed to heat, stone dust is released and scattered from the stone - this is the first sign that an unpleasant odor may soon appear. But if you are not lazy and shift the stone once every half a year, this dust can be removed from the bottom of the stove furnace.
Bath odor protection
In a way, I also use such a preventive method of protecting the stone from precipitation of plant residues - a dense canvas bag in which I infuse herbs. The water has a color, but the remains of chamomile, mint and other herbs do not float in it, which crumble and sometimes turn into dust.
So I prevent that an unpleasant smell does not appear in the steam room in the bath or sauna. Hope. These simple tips will help you get only the most pleasant sensations from steam and bath procedures. I try to carry out the aromatization of the steam room - by laying out brooms and branches of herbs directly on the shelves. With light steam, friends!
Other causes of bad smell from the sauna stove
- remnants of factory unburnt paint
- factory grease inside the pipes
- not completely removed and burning protective film from scratches from stoves with a stainless convector
- use of mineral and stone wool for sealing chimney joints instead of asbestos and other cords
- poor-quality backfilling of chimneys-sandwiches
- smoldering broom leaves fallen between the stones of the heater
- the presence of mold under the upholstery of the steam room and poor drying
Secret life hacks for attendants: in stoves with steam generators on the sides of the furnace walls in the form of plates, lay stones so that the dust from them does not fall into the gutters. to remove it from there is very difficult and it is necessary to disassemble the convector.
Video of the first firing of the kiln before operation
The Russian bath is, first of all, a tradition, a place where you relax with your soul and body, feel hot air and the pleasant aroma of an oak broom, well, or the smell of sewage, if the sewerage in the bathhouse is done in a blunder. How to organize everything correctly so that the process brings only pleasant impressions - read on!
Drainage sewage as the easiest option
Its essence is quite simple. A leuko-shaped floor is made in the bath, which collects water, then it is sent along plastic pipe(as a rule, several of them are placed) into a drainage well, in which it is absorbed into the ground. This method is ideal for a room in which they wash relatively infrequently, say, 5 people a week. Then the system will easily cope with the amount of water for many years. If there is too much load, you need to make high-quality shambo (we will describe it in the next section). Let's take a closer look at how to make a drainage system.
>Step 1: Dig a well.
At a distance of 4-5 meters from the bath, you need to dig a hole to a depth of 2-3 concrete rings + 30 centimeters around them in diameter. It is advisable to calculate the place so that there is black soil, sand, but not clay on the sole. Otherwise, the hole needs to be made deeper by another 1 meter to be sure. It is also necessary to take into account the level of soil freezing, if this line passes at a depth of 1 meter, then you need to go deeper by at least 2.2 meters. Be sure to do drainage. We fall asleep large gravel (50 cm), coarse-grained sand (30 cm) to the bottom, sprinkle sand around the rings 30 cm. Then, with a puncher, we punch holes with a diameter of 3-4 centimeters, 10-15 pieces per 1 concrete ring.
>Step 2: Make a leuco-like screed under the bath.
The main task of this design is to completely collect all the water that will get there, transport it to the entrance to the sewer. Warming is not required, because even in cold weather hot water quickly remove possible icing, and from stagnation we will make a good bias. We just fill the screed under the bath, in the place where our sewer outlet fits, we make the bottom of the watering can, an angle of up to 10% is desirable.
>Step 3: We lay the pipe.
Here it is already necessary to pay attention to the depth of freezing, since in cold winter can be different variants. We lay it from compacted plastic to a depth of at least 50 centimeters underground. One edge goes into the foundation of the bath, the other - 80-90 centimeters from the top of the drainage well. A slope of 10-15% will be ideal, so it is better to place the bath on a hill .. We put a heater on top of the pipe, preferably mineral wool, crushed polystyrene, layer 10 cm. We fall asleep on top of the earth.
>Step 4: Water seal or siphon.
This is the most important part of the system for you. If it is not there, you will have to breathe not in a pleasant vapor, but incense from the sewer. In fact, the secret of happiness in the bath is very simple, just install a metal damper at the exit from the foundation or put a siphon, shaped like a toilet, so that air does not pass through the water. But the siphon must be installed if sub-zero temperatures are not expected in that node, otherwise it will crack or simply will not let water through in winter. The damper in the drain is much more efficient. You screw a piece of polyurethane to the outside (foam plastic is possible, but it wears out faster), the water in the ladder raises the damper, the water escapes, the damper falls and closes the hole. Air in any case does not pass through the water and the closed hole.
>Step 5: We hide traces of actions.
We warm the knee that moves away from the bath. We bury the ditch, it is best to lay concrete slabs up if you are thinking of driving through this area by car or installing heavy structures. We close the top of the drainage well with a slab, make a hole for the hatch, put it in and insulate it from above. We close the bottom of the bath with boards, we make normal conditions for soaring.
Important: use only coarse-grained bulk materials, since the larger the fraction, the longer the system will work without cleaning. If you use very fine sand, slag or just earth, the water in the drainage well will take a very long time to pass and if the bath is heavily loaded, problems will arise with the elimination of liquid.
If the soil is sandy or from a shell rock, the well can be replaced with a drainage cushion, which is placed directly under the structure itself. To do this, you need to dig a hole under the foundation, fill it with rubble, insulate the foundation in a circle and make air vents. This is the easiest way, but it does not solve the problem, since the moisture will be increased, the throughput of the soil will disappear over time.


Installation of shambo and sewerage systems of the 21st century
Before you make a sewer in the bath, you need to determine the load on it. If you want to swim often, bring friends, guests there, or even rent it out, you need to make sure that the sewerage system is trouble-free and serves for many years. Let us consider in more detail how to make such a design with your own hands, what is needed for this.
>Step 1: Manufacture of a pit.
It must be done in good faith and exactly as described below, otherwise unpleasant air, dampness will constantly rise to the boards of the bath. First, we create a leuko-shaped concrete screed, exactly as in the first case. We make an outlet pipe at a height of 6 centimeters from the bottom of the pit - this is our future water intake. It should be 15-20 centimeters in diameter, the larger the better. We construct a metal damper that will close the exit, we make it exactly the same as described in the section above. Actually, the pit is not particularly different, only the pipe should be a little larger (pay attention to the exit by 6 cm), the slope can be made up to 6-7 degrees, and the depth of the pit should be reduced.
>Step 2: Large-scale earthworks.
At this stage, you will have to hire an excavator or sweat a lot. You need 2 tanks of 3-4 cubes each, that is, approximately 2 pits located 70-100 centimeters from one another, each of them will have 3 concrete rings. On top of the pit there will be a concrete slab and a manhole, which should be flush with the ground on the site. That is, you need 2 holes with a depth of about 360 centimeters and a diameter of 150 centimeters (we do it with a margin).
>Step 3: Installation of "infrastructure" of tanks.
Throw 3 concrete rings each, connect them with an asbestos bridge (metal is impossible - great corrosion) at a level of 80 cm from the floor and 80 cm from the top, make a ventilation shaft from a second container with a diameter of 15 centimeters, install a fungus on it. Next, you need to bring the sewer pipe to the first container, break through the concrete, enter it, fill it with a solution at the outlet so that there is no backlash.
In order for the sewerage system to never make itself felt, and also to significantly reduce labor costs for eliminating possible faults, you need to know a few basic plumbing commandments:
- There must be 2 sewer wires that go from the bath to the first tank. The first is constantly muffled, the second is working. This is done so that at the moment when the first one gets clogged (and this will happen anyway), you calmly open the second one and start using it. At this time, the first pipe will dry out, all the plaque will fall off the walls and pour out into the pit. This will happen in a couple of months or a year, but you have nowhere to rush - you have a second one working. If you install only one, you will have to call a plumber, fool your head, waste time, spoil your vacation.
- It is imperative to maintain a slope angle of at least 10% from the foundation to the entrance to the first sump. It is better to do even more, a difference of up to 5 centimeters per 1 meter of sewage.
- Never make a second tank near places where bad air can interfere with rest. It is better to remove it towards the garden or even take it out of the area. Even after biological treatment, the air will be unpleasant, give off wastewater.
If you follow these instructions, then your bath will not only work well, but also always smell good.
Observation well - what is it
The essence of this structure is extremely doubtful if you make 2 sewer pipes, as described in the section above, but the miser pays twice, as you know. Still, it is better to make a viewing well, especially since it costs only a few hundred rubles, and the benefits can be significant.
It is 1 concrete ring, which is ½ way to the first tank. As a rule, this is the junction of two PVC pipes (well, or durable plastic). The ring is buried in the ground, a slab and a hatch are on top, and even higher - a heater or earth. The pipe should pass through a concrete ring 25 centimeters from the floor, the joint should be in the middle.
If any problems occur, for example, when the channel is clogged, it will be possible to unsolder them, clean them, solder them again in just 1 hour of work. This is much easier than trying to do something with one pipe 4-6 meters long. Actually, the relevance of the viewing ring very rarely arises, because with a well-made sewerage system, it is perfectly cleaned by itself, no additional actions are required.


