Roofing aerator, what is it? How to properly install roof aerators The number of aerators on a soft roof
People living in their private homes may face such a problem as the accumulation of excess moisture under the roof. This adversely affects the properties of the thermal insulation layer. There is a cardinal decision - dismantling of a roof with the subsequent replacement of all heater. This method is quite expensive and takes a lot of time, not to mention the fact that it can not be used in any season. The second way is to install a device such as a roof aerator.
What are roof aerators?
A roof aerator is a device that is designed to provide ventilation to the space under the roof. With it, you can avoid the accumulation of moisture, extend the life of the roof and the safety of its properties. This process is called "aeration", hence the name of the device.
Aerators are designed to provide air condensation and are installed directly on roofing. Since roof devices and coating materials vary, aerators have their own installation and operation features for each type.
Principle of operation
Roof mounted aerator
The principle of operation is based on one of the laws of physics, in which excess moisture can be evaporated - this process directly depends on the circulation rate of moist air. The temperature of the air in the street and in the room is very different, in this regard, it becomes necessary to provide diffusion processes in which mixing is carried out different types gas environment. This can lead to a decrease in the temperature inside the premises, and moisture will collect under the surface of the roof. In contact with the external environment, ideal conditions will be created for its extrusion. It is on this law that the principle of operation of the device is based, in fact, it all comes down to using an aerator for ventilation.
Important! Aerators are both iron and plastic, so before installing them, you need to calculate whether the roof and corrugated board can withstand the load from the device.
There are several varieties that fit under different roofs. For example, aerators for metal tiles are sold, for shingles other. If there is no knowledge on how to properly install these devices, then it is best to use the services of a wizard.
Pitched roof aerator
The pitched roof has a sloping surface. However, often the space in the attics becomes impassable and often resembles a warehouse. It follows from this that the need for insulation and installation of additional ventilation disappears completely. The optimal angle for this roof is usually between 30 and 50 degrees. On a pitched roof, snow does not actually accumulate, since it simply rolls down, but there is an undesirable load from the winds.
Note! A roof aerator is usually installed exclusively on insulated roofs directly above living quarters.
Installed aerators on a pitched roof
The supporting structure consists of timber rafters and battens. The insulation is usually laid between the rafters and the inside, after which it is insulated with a vapor barrier coating. In the air of the living quarters, in any case, there is moisture, the coating protects the insulation from moisture. On the outside, a special film against moisture and water is arranged, which protects the insulation from rainwater and condensates.
At first glance, the design has no flaws, but not a single coating is able to absolutely protect the roofing pie. Consequently, moist air accumulates and stagnates under the roof covering, due to which wood rots and steel corrodes. Installing aerators allows you to deal with this problem, as the devices create fresh air circulation.
Important! For this type of roof, 2 types of aerators are installed: point and ridge.
Point-type devices are mounted at the highest point, approximately 150 mm from the ridge. Outside, the air is colder, and when it gets into the under-roof space, it becomes warmer, respectively, according to the laws of physics, it tends to rise up. The result is simple air circulation.
Flat roof aerator
In flat versions, the roof has a different device: the floor slabs are leveled using cement-sand screeds, after which the insulation is laid. Then another cement-sand screed is mounted on top of the insulation, or two layers of flat sheets of asbestos cement are used. The built-up roofing carpet is firmly bonded to the screed after installation. However, during operation, materials may experience temperature fluctuations in the external environment. The coefficient of thermal expansion for concrete, cement, asbestos and bitumen varies quite a lot, so undesirable stresses follow from this. Cohesion and bonds are broken, respectively, air bubbles appear.
Aerators for flat roof
Important! Aerators on a flat roof are mounted under the built-up layers, which allows you to remove stress and remove bubbles. In this case, it is preferable to use a roof aerator for a soft roof or an aerator for a flat roof.
Aerators that are used for roofing of bituminous materials of a directed nature do not differ in special design features, they consist of the usual elements:
- skirts;
- tubes;
- cap.
As a rule, aerators are made of high-strength polypropylene and withstand temperatures ranging from -50 to +130 degrees Celsius. Similar devices for a roof area within 80–100 m² should be located at a distance of 12 meters from each other.
Advantages and disadvantages
The main advantage of the devices is the ability to remove most of the moisture, which helps to avoid damage to the roof. This leads to the durability of materials and even protects the roof from leaks. Removing moisture can cause the metal shingles to not corrode or cause the problem to show up later. Plus, a dry roof retains its thermal insulation properties better. This will make it possible to significantly save on heating. It also helps to maintain a favorable microclimate in the building, which, in turn, helps to avoid the appearance of fungus and mold.
Also aerators are quite a budget option to eliminate unwanted moisture in the roofing cake. In 2018, their cost varies from 300 rubles to 5,000 rubles apiece. There is a huge variety of aerators on the market today. different firms both foreign and domestic ones.
Important! The device is suitable for installation on any type of roof, combined with all types of roofing materials. Installation can be carried out on roofs of complex shapes, where there is a height difference. The aerator can be mounted at any stage of construction or already during the operation of the building. Installation does not require special skills or tools.
Among the shortcomings, one can single out the inability of point aerators to provide proper ventilation of the entire roofing, this can lead to the appearance of a zone where air will stagnate.
Classifications
Aerators have many classifications. Below is the most popular:

Top Models
There are many devices on the market designed to remove moisture under the roof. Below are the most popular in Russia.
"Polyvent"
Aerator "Polyvent" is a line of devices for ventilation of the roof space. It contains both ridge and point aerators. The manufacturer of this line is the TechnoNIKOL company from the Russian Federation.
Docke ("Deke")
The products of this German company are designed for installation on horizontal skates. The ridge aerator "Deke" provides excellent ventilation and has unsurpassed German quality.
Airridge Felt
Aerators from the Finnish company SKTuoteOy. They are made using new technologies, which helps to avoid deformation of the ridge, and the unique arrangement of air grooves provides the best ventilation and prevents moisture from entering inside from atmospheric precipitation.
Tegola
Special aerator "Tegola" is a device Russian production, perfectly protects from moisture and provides excellent air circulation.
vilpe
Devices from the already well-known Finnish campaign SKTuoteOy. Available in a wide range of colors, the devices are characterized by ease of installation, corrosion protection and durability.
Ridge Master Plus and Hip Master
A couple of American companies that produce mainly high quality ridge aerators that are good at eliminating condensate and regulating the microclimate.
Ridge Master Plus and Hip Master aerator
Aquasystem
The KTV Aquasystem aerator is a chiseled type model from the Russian manufacturer Stroymet. It has proven itself in the market, it is simply mounted and functions properly for many years.
Installation of roof aerators
Each type of aerator has its own characteristics and installation methods, which are described in detail in the instructions for them.
Installation of ridge aerators
This type of aerator is the easiest to install, but due to the fact that it must be installed along the entire length of the ridge, you need to have the exact dimensions of the roof and correctly calculate the number of devices. They are recommended to be installed on a roof with a slope of 12-45 degrees.
Important! Such an aerator is mounted exclusively on a ridge, which ensures excellent air circulation in the attic.
Operating standards:
- Be sure to have holes in the overhangs to facilitate air flow.
- Installation of devices along the entire length of the ridge so that they form one system.
- Tiled skates are usually placed on top of the aerators, thus masking the devices and not spoiling appearance roofs.
The installation technology is carried out in compliance with the following steps:
- Using a circular saw, a groove is cut in the base for ventilation and other needs of the system. If only 1 aerator is installed, then the hole should be located on the top of the ridge, if two - on the sides of the ridge. The slots are made in such a way that they break off 30 cm from the edge of the ridge.
- Ridge shingles should be located on the sides of the ridge.
- All segments must be stacked with each other, using the example of the details of the designer. The aerator is attached to the roof using special elongated nails or screws.
- The profile of the aerator is covered with tiles. Petals are attached with an overlap.
- After that, it is necessary to seal the ends of the aerator where it comes into contact with the roof.
Installation of point aerators
If it is not possible to install ridge aerators, then they can be replaced with point ones. They need a few more, but you also need to calculate the area for mounting them.
As a rule, they apply:
- On roof coverings where the slope is less than 12 degrees, or on flat structures.
- For more efficiency ventilation system or as a supplement.
- A hole is cut, which should fit in size with the internal gap of the channel next to the aerator.
- After that, the aerator skirt is mounted, which is fastened with special roofing nails or other fasteners.
- The top of the skirt is glued with waterproofing materials.
- The skirt is glued with tile shingles, trimmed a little at the points of contact.
- An aerator mesh is put on over the skirt, after which it is fastened with self-tapping screws. After installing the cap and also fix it with fasteners.
Thus, using tips and instructions, you can quite successfully install aerators of any type of model on different types roofs Devices will improve the situation with moisture in the house, extend the life of the materials from which the roof is made.
Roof aerators- These are special devices, the function of which is to free the under-roof space from excess moisture. Aerators are installed on roofs with different roofing materials and slope angles. Their presence on flat roofs with soft roofing material prevents the destruction of the roofing carpet under the influence of precipitation, moisture formed in the under-roof space.
The need to dry the roofing
The duration of the life of the roof depends on a variety of factors: high-quality performance of heat and waterproofing, proper use of the material, timely preventive inspection and repair work.
Experts believe that the main disadvantage of a soft roof is the accumulation of moisture in the screed and insulation. It can lead to serious consequences.
Blistering is one of the most common defects in soft roofing. It happens for two reasons.
In warm and hot seasons, the surface of the roof under the influence of sunlight can heat up to 90 degrees or more. The composition of rolled roofing includes bitumen-polymer materials. These are thermoplastic substances, the physical properties of which change under the influence of temperature fluctuations. The foregoing refers to such qualities as fragility, plasticity.
On the basis of research, it was found that heating above 50 degrees leads to an increase in the plasticity of the mastics included in the bitumen-polymer materials, and the increase in the degree of adhesion to the base depends on the viscosity of the mastic, and not on adhesion.
The vapor barrier layer included in the soft roof (in the lower part roofing cake) and a waterproofing carpet (in the upper part) form an airtight enclosed space.
When the roof is heated under the influence of the heat emanating from it, the moisture in the under-roof space turns into steam, which significantly increases the pressure exerted on the roof carpet. It can reach up to 2-2.5 tons per square meter.
Due to the special qualities of the thermoplastic substances included in the waterproofing materials, under conditions of high temperature and high pressure blisters form on the roofing due to delamination of the bitumen-polymer coating. The destruction of the roofing carpet also begins.
Even if the installation of the waterproofing carpet is carried out at a high-quality level and it is completely glued, it is not possible to avoid the formation of blisters.
The increase in the level of thermal conductivity of the insulation. The moisture accumulated under the layer of waterproofing material leads to a deterioration in the thermal insulation characteristics of the insulation layer.
Even when moistened by 1 or 2%, the level of thermal conductivity of the insulation increases by 30-40%. As a result, you have to spend much more money on heating.
As a result of waterlogging of the insulation, not only heat losses increase, but mold also develops rapidly.
Destruction of the waterproofing carpet and screed. The screed in most cases consists of sand-cement mortars, which are capillary-porous material. All pores are filled with air and connected to each other. When moisture enters the roof space, the pores are partially filled with water. As the temperature drops environment water crystallizes and increases in volume significantly.
As a result this process crystallization pressure of enormous force is exerted on the walls of the capillaries, due to which microcracks are formed. Over time, the leveling screed breaks down. A similar process also occurs in the waterproofing material.
Where does moisture come from?
Humidification of the insulation layer can occur in two ways.
Moisture can penetrate into the space between the layers from the environment (fog, rain, high humidity) through defects in the roofing carpet. It also enters from the interior of the room (vapours condensing in the under-roof space) through the places of damage in the layer of vapor barrier material.
Since the amount of moisture in warm air is much higher than in cold air, then in winter time the movement of water vapor through the layers of enclosing structures occurs from the inside of the room to the outside.
 It should be noted that in residential premises the air is saturated with vapors, since a person exhales about a liter of water in a vapor state per day. If we add to this indicator moisture from the process of cooking, cleaning, washing, taking a shower and bath, then the figure increases to 12-15 liters.
The presence of high levels of moisture in thermal insulation material also due to the climatic factor - precipitation, air humidity during the work on the installation of the roofing carpet. For example, if work is being done in winter period, it is almost impossible to avoid getting snow or moisture under the roof.
With a significant increase in the level of moisture, eliminating its local entry through the roofing carpet and areas of intense moisture is not enough. Additional drainage of the insulation layer is necessary, otherwise the roof will have to be completely dismantled and the insulation replaced.
However, complete dismantling of the roof is not always possible.
In this case, condensate and excess moisture are removed by evaporation - without expensive and complex work to replace the waterproofing mat and insulation.
It also makes it possible to avoid leaks during repair work.
Evaporation efficiency is determined by the speed of the ventilation flow of the air mass and its circulation.
Since there is a big difference between the temperature and vapor pressure from inside the roof and outside (during the hot season, the inner layers heat up to 70 degrees, and the outer layers up to 90), measures must be taken to ensure that the external and internal air mix.
As a result, it is possible to achieve a decrease in the air temperature inside the room and a displacement of moisture to the upper layers of the insulation. This will lead to the creation of favorable conditions for its evaporation and partial drying of the insulation layer.
As the thermal insulation layer dries up, the parts of the building and the roofing carpet also dry out. Drying insulation with natural ventilation leads to the restoration of its operational properties, since this process does not affect the physical and mechanical properties of the heat-insulating layer.
The principle of operation and functions of aerators

To drain the insulation, ventilation pipes (aerators) are arranged. The principle of their operation is based on the creation of thrust in the device pipe by forming an area low pressure due to external wind flows and the use of pressure differences in the under-roof space and in the environment.
Functions of aerators are as follows:
- contribute to the removal of water vapor rising from the interior towards the roof - before it has time to cause any damage
- roof structure;
- reduce the pressure arising in the structure, which causes the formation of bubbles on flat roofs with a soft coating;
- prevent the formation of condensate (later flowing into the thermal insulation layer) in the lower part of the waterproofing material.
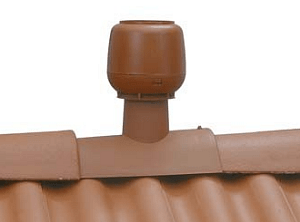
The roof aerator is essentially a pipe with a diameter of 63 to 110 mm, covered from above with an umbrella to protect against rainfall.
In most cases, the material for the manufacture of aerators is low-pressure polyethylene.
Varieties of aerators
Roof aerators are different models and sizes. They are used to ventilate the under-roof space, remove condensate and remove moist air to the outside.
They can be installed both during construction and on an already erected roof.
During repair work, aerators are essential to timely prevent the occurrence of foci of decay in the roof structure and eliminate the risk of roof leakage.
Installation of aerators for metal roofing is carried out in the upper part of the roof, as close as possible to the ridge. The case of the device is made on the basis of a material resistant to acid, ultraviolet radiation, corrosion, and temperature extremes. Currently, stainless steel and durable plastic are the best choice.
On the roofs soft type installation of aerators is carried out evenly over the entire plane at the highest points.
Roof aerators can withstand temperatures ranging from minus 50 to plus 90 degrees. They are installed on all types of roofs and roofing.
The number of required aerators is determined by their technical specifications and the area of roofing slopes, as well as the condition of the roofing carpet and the level of moisture concentration in the interior.
For buildings with a specific purpose with a high level of humidity (pools, baths, saunas, laundries), the number of required aerators should be calculated at the design stage of the building.
Aerators are point and continuous. With the help of devices of the first type, ventilation of individual sections of the roof is provided. Aerators of the second type are installed along the entire length of the roof and serve for general ventilation.
Point aerators
Produced in two versions:
pitched– for installation on roof slopes;
skating- for installation on a skate.
Pitched aerators are installed in areas where it is necessary to increase the movement of air masses:
- on slopes of considerable length or slopes of complex design;
- on ridges and roof valley;
- in those areas where the interruption of the ventilated gap occurs.
An obstruction to the free circulation of air can be an attic window or a lantern. In such places, it is advisable to install aerators on both sides of the interfering part.
 To improve ventilation efficiency, it is necessary to take care of the correct placement of aerators. They should be located at a small distance from the ridge (about 15 cm). If the insulation of the roof structure was not carried out “under the ridge”, then a pressure chamber is formed in the upper part, in which vapors are concentrated. When using an aerator, they evaporate from the roof into the surrounding space.
Skate options are used for attics with insulation "under the skate". They contribute to the elimination of vapors throughout the ridge structure. Such aerators work on the basis of the use of convection - the properties of warm air masses to rise up. There, under the ridge, they find a way out. At the same time, cold streams penetrate through the ventilation channels from under the eaves.
One of the advantages of the ridge model of aerators is the removal of harmful fumes from bitumen, a material used in the construction of a soft roof.
Since these devices are hidden under the roof covering, they are almost impossible to notice from the outside.
How to install an aerator
The technology for installing aerators is as follows.
- In the place where it is planned to install a ventilation pipe, a window is cut out in the screed. It is necessary to ensure that it passes through the roofing carpet to the point where the insulation is located.
- If for some reason the insulation in this place turned out to be wet, it must certainly be replaced with dry material, the thermal conductivity of which meets the required standards.
- After that, in order to securely fix the aerator on the roof, a layer of special mastic must be applied to the bottom of the pipe base.
- To attach the aerator to the screed, use self-tapping screws, which must be evenly distributed around the circumference of the aerator "skirt". They will need 6 pieces.
- Protection of the base of the ventilation pipe is carried out by using an additional layer of waterproofing material.
As already mentioned, the need to install ventilation is determined depending on the shape of the roof, its dimensions, the degree of indoor air humidity, and the general condition of the vapor barrier of the roof structure.
If the roof is flat, with a simple configuration and parameters that meet the standards, then for every 100 sq. meters it is recommended to install one aerator.
It is necessary to ensure that the distance between the aerators is no more than 12 meters.
When located on a roof with a pronounced ridge and valley, aerators are installed along the ridge and at the border of the valley watershed.
Prices

The modern construction market offers a wide selection of different models of roof aerators. The minimum price for the device is 260 rubles, and the maximum can reach up to 3000 rubles.
You can navigate the cost of aerators based on the examples given.
- A three-piece aerator equipped with a special clamping ring to the roofing for absolute insulation around the pipe. The height of the device is 260 mm, the weight is 330 grams. One device is designed for 50-60 square meters roofs.
It costs 450 rubles.
- A similar device, also with a clamping ring for reliable sealing and improved aesthetics, designed for use in regions with a lot of snow. One device serves 50-60 sq. meters of roof. Aerator height - 360 mm, weight - 320 grams, cost - 550 rubles.
- The aerator, consisting of 4 parts, is equipped with a unique cap to create additional traction in the pipe, which greatly increases the efficiency of its use. It is successfully used in areas with significant snow cover. The height of the device is 470 mm, the weight is 1.23 kg. Designed for 80-100 sq. meters of roof. Price - 850 rubles.
- Aerator of 4 constituent parts(clamping ring, 2 “skirts” bases, cap) is used in cases where ventilation is necessary both above the insulation (especially when it is a vapor barrier) and under the vapor barrier. Designed for 50-60 sq. meters. Height - 340 mm, weight - 780 g. It costs 950 rubles.
- A 3-part aerator whose principle of operation is based on the difference in pressure caused by air currents. The specially designed cap contributes to the creation of additional traction. It is recommended to use for 80-100 sq. meters of roof. Height - 450 mm, weight - about 1 kg. Price - 1150 rubles.
When buying aerators, it is better not to try to save money, to purchase a quality model. In this case, it will be possible to avoid unscheduled repairs of the roof and ceilings of the premises of the upper floor.
FINDINGS:
- The aerator is a device for freeing the under-roof space from excess moisture and protecting the roof structure from decay and destruction.
- Removal of excess moisture is necessary, since it leads to the formation of bubbles, an increase in the level of thermal conductivity of the insulation, and the destruction of waterproofing and screed.
- In order to evaporate moisture, measures must be taken to mix the external and internal air.
- For effective drainage of the insulation, ventilation pipes, or aerators, are arranged.
- Aerators are point and continuous.
- Point aerators are divided into pitched and ridge.
- Installation of aerators can be carried out both during construction and on an already operated roof.
- Prices depend on the specific model and vary between 260-3000 rubles.
Video instruction on how to mount a point aerator on a flexible tile.
Frequent problem roof structures is the accumulation of moisture and condensation. A device called an aerator will help solve it. It can also be called a wind vane or deflector. What is its functional purpose?
Main functions
They consist of three items:
- Prevention of condensation that forms in the bottom layer of waterproofing. It negatively affects the material, reducing its waterproofing properties.
- The output of steam to the surface, rising from interior spaces. Its accumulation under the roof damages wooden structures.
- Protection against blisters and blisters by reducing pressure between layers of roofing materials.
Now it’s worth finding out what causes the increased humidity of the coating.
Moisture formation in the roof structure

The most common and widely used is soft roofing. Especially if we are talking about industrial and civil buildings. It consists of several layers, which are called a pie:
- reinforced concrete floor;
- layers of vapor barrier;
- screed of sand-cement mixture;
- thermal insulation coating;
- waterproofing layer;
- roofing;
Of the items listed above, the vapor barrier is the most susceptible to moisture accumulation. This can happen due to various factors:
- environmental influences;
- raising vapors from the upper rooms through the attic floor.
In the first case, dampness appears if a violation of the coating has occurred. Different climatic conditions can lead to direct penetration of moisture, as well as its accumulation from moist air.
In the second option, the rising steam settles on the vapor barrier and the cement screed in the form of condensate. A wet vapor barrier layer increases thermal conductivity in the range of 30-40%. In addition, fungus and mold form in the closed, unventilated space of the cake. (We recommend reading the article on the protection of walls from various types of destructive effects for a more complete disclosure of information. ?) In addition to this trouble, the dampness of the roof can also lead to other negative factors.
Effects of exposure to moisture

roof aerator - wind vane
- Destruction of the screed. In most cases, it is made from a cement-sand mixture; after hardening, it is a porous structure. The pores are normally filled with air. At high humidity, such a surface is able to absorb moisture and accumulate it. At low temperatures fluid in the pores freezes. In this case, crystallization and expansion occur, which lead to the formation of microcracks and the destruction of the screed structure.
- Impact on the waterproofing layer. The processes occurring in the screed also affect the waterproofing, as a result of which its structure is destroyed.
- Surface swelling. This defect is caused by two factors:
- steam is generated in the space under the ceiling. This occurs between the vapor barrier and waterproofing layer. The water accumulated between them at high temperatures turns into steam, due to this, the roof swells;
- exposure to high temperatures in the summer season. Heating leads to changes in bitumen-polymer materials, that is, to their softening and increase in plasticity, which causes the formation of blisters;
A roofing aerator for a soft roof will help you avoid high humidity, as well as destruction and defects with it. It is only necessary to decide on the choice of device.
Varieties of aerators

There are a huge number of materials from which the roof aerator deflector is made, but the most effective of them are plastic and stainless steel. They are resistant to the following factors:
- temperature fluctuations;
- exposure to ultraviolet rays;
- corrosion;
- acid environment;
Whatever material the roof aerator is made of, its main task is to remove condensate, weather moisture and ventilate the roof space. Various sizes and modifications are provided for by a roofing aerator, a photo of some of them is presented . They can be of various sizes and modifications.
by the most the best option for soft roof is a roofing technonicol aerator 160x460mm, the photo shows that it consists of three parts. Its design provides:
- long service life of roofing;
- removal of the resulting moisture from all layers of the roof;
- improvement of thermal insulation properties;
One of the newest models is the technonikol eco roofing aerator. It not only provides all the requirements of a "breathing" roof, but is also made from environmentally friendly raw materials.
If you want to receive quality roof with a long service life, you should install a roofing technonikol aerator. Its price varies depending on the design and modification. You can always pick best option by cost.
Calculation of the number of aerators

First of all, you should decide on the number of ventilated deflectors. To do this, you need to know the surface area of the roof and the technical data that the roof vane aerator provides. If the roof plane is sloped, they should be evenly spaced at the highest elevations.
If the coating configuration is simple, then the norm provides for one roof aerator per 100 m², it is necessary to buy the calculated amount for installation.
Important point! The distance between the ventilated pipes should not exceed 12 meters.
You can install roof aerators yourself, but for this you need to have minimal building skills. If there are none, then it is better to turn to the services of specialists.
Installation of a roof aerator

It can be carried out both during the arrangement of the roof, and already on finished construction. In the first case, they must be laid down by the project. If the premises will have obviously high humidity rooms, such as a bathhouse or a sauna. Ventilated outlets must be provided at the design stage of buildings. Such projects should be carried out only by special design organizations. In the second version, the roofing polyvent aerator is installed in the following sequence:
- The required number of places on which the deflectors will be located is marked.
- In the right place, a window is cut in the screed. It must go deep to the location of the insulation.
IMPORTANT! If the vapor barrier layer is wet, it must be replaced with a dry one so that it meets the thermal insulation standards.
- Roofing aerators for a flat roof are installed in ready-made nests. The lower part of the pipe, which must be connected with a special mastic.
- Fastening must be done with self-tapping screws. They should be evenly spaced around the entire perimeter of the aerator skirt. Their total number must be at least six.
- The base of the pipe from above is also additionally protected with waterproofing.
The roof aerator for metal tiles has a different design and is mounted on both sides of the ridge with an indent of at least 60 cm. It is advisable to carry out installation work in the summer.
Installation of a soft roof does not tolerate trifles. Sometimes, thinking to save money on such a seemingly optional detail as roof ventilation, the developer is faced with a lot of trouble. The roof begins to leak, the house smells of dampness, icicles accumulate on the cornices. And, the apotheosis of everything, is the fleeting destruction of an expensive roofing material. Such troubles occur because moisture penetrates into the soft roof cake, seeping into the insulation, roof structures and the bituminous coating itself. You can solve the problem by installing artificial ventilation ducts - aerators on the roof. Air will circulate through them, pulling out excess moisture and drying the inner cake of the structure.
Thus, the installation of aerators on soft roof- the process recommended by experts, and in some cases (over attic floor, for example) - mandatory, preventing damage to it and ensuring a comfortable stay in the house.
It is clear that aerators provide ventilation and drying of the roofing cake from moisture. But where does she come from? After all, manufacturers initially position a soft roof as airtight. Moreover, in the composition of the roofing pie there are layers of hydro- and vapor barrier (vapor barrier - in the case of a heater).
But this does not save from the presence of wet vapors. They are an indispensable attribute of any living space, formed in the process of cooking, washing, taking a bath and even, in the end, human breathing. According to studies, every day in a house where a family of 4 lives, 2-4 liters of water vapor is formed, some of which accumulates in the under-roof space.
When warm vapor comes into contact with a cold surface (during sharp jumps in temperature from outside to inside), it condenses. As a result, the smallest droplets of water begin to impregnate any structures and materials that they can “reach out to”. First of all, it is rafters, crate, insulation.
Another way for moisture to penetrate is from the outside of the roof. Warm steam, accumulating in the attic, heats the roofing from the inside. In winter, the snow on the roof starts to melt. Ice crusts form, which, when the situation worsens, also melt. Water penetrates into the joints of the coating, the roof begins to leak.
In addition, the coating itself suffers, which in any case has microcracks. Moisture penetrates there and, when the temperature drops, breaks the material. Cracks become visible, sometimes through. The cover is deteriorating.
On a soft roof, the consequences of excess moisture drinks manifest themselves quickly enough. You may notice:
- The appearance of bubbles on the surface. A soft roof pie, as a rule, incorporates a waterproofing layer (top) and a vapor barrier layer (bottom). In fact, it is a closed hermetic circuit. In summer, the roof cake heats up to 80-100°C, as a result of which the moisture accumulated in the circuit forms steam and tries to evaporate. A similar situation entails the appearance of blisters and the destruction of the roof.
- Reducing the efficiency of the heat insulator. Wetting the heat-insulating layer even by 2% leads to an increase in its thermal conductivity (and a decrease in insulating properties) by 40%! Accordingly, such a roof ceases to fulfill its functions in terms of retaining heat, and heating costs increase.
All this leads to the destruction of the structure of the roofing material and the occurrence of leaks.
Appointment of aerators
How to prevent moisture from settling on roofing surfaces? Or to drain structures already saturated with moisture?
The laws of physics will come to our aid. Moisture can be removed by its evaporation, which occurs during the movement (circulation) of air flows. Since there is a significant difference between the internal (in the house) and external (on the street) pressure indicators, for air circulation it is enough to ensure the process of communicating two media.
If the attic is cold, then effective ventilation can be provided quite simply - through dormer windows, loose fit of cornice overhangs, gaps in the ridge. For warm attics and attic, this solution is not suitable, since in the cold season unregulated ventilation will reduce the temperature in the room.
In such houses, the most acceptable is the use of roof aerators - ventilation ducts connecting the under-roof and over-roof spaces. After installing the aerator, due to the pressure difference, forced draft is created in its pipe, which draws wet vapors from under the roof.

Highly important point: in order for the process of extracting air through the aerator to become possible, it is necessary to provide a supply of fresh cool air in the overall system. Otherwise, air masses will not circulate. To do this, ventilation products are equipped in the cornices, where Fresh air. Passing through the attic space, it heats up and rises up - to the roof.
Thanks to the created draft in the aerator, it passes through its pipe and is thrown out into the street. With well-equipped ventilation, in just 1 hour, the air flow passes through the roofing cake 2 times, drying and ventilating it.
Accordingly, by installing aerators for a soft roof in the right amount, you can not worry about the dryness of the coating and insulation. Therefore, it is more correct to proceed with their installation at the construction stage. But, if for some reason this did not happen, you can do it later. The main thing is not to wait for the occurrence of irreparable defects in the roof (swelling, destruction of the material). Fortunately for many developers, with the help of aerators, you can not only prevent the accumulation of moisture in the new roofing pie, but also drain the old roof already saturated with moisture.
Varieties of aerators
For soft roofs, aerators are used, made of impact-resistant plastics that can withstand temperature extremes, corrosion, and UV rays. Depending on the design features, purpose and mode of action, there are 2 types of aerators: ridge continuous and point.
The ridge aerator is classified as a continuous ventilation system, as it is installed along the entire length of the ridge to aerate the entire under-roof space. In appearance, the design is a corner piece with holes protected by special barriers - from insects, dust, snow.

Point aerators are installed on separate sections (points) of the roof, as a rule, on slopes, less often on skates. Each such aerator is a ventilation pipe, protected from above by a cap of various configurations. Usually the general appearance of the structure resembles a "fungus" or "box".
The point pitched aerator has a flat base (skirt), through which it is connected to the roof. The base of the point ridge aerator is angular, designed to mate with the roof in the area of its upper horizontal edge.

Differences in the designs of existing types of aerators also implies a significant difference in the technologies for their installation.
Installation of a ridge aerator
The ridge aerator is the easiest to install, it does not require a special calculation of the quantity, as it is usually placed along the entire length of the ridge. Installation of a ridge aerator is recommended on roofs with a slope of 12-45°. At the same time, it is mounted only on the ridge, providing air circulation in the attic space.
Usage norms:
- it is necessary to have ventilation on overhangs to ensure air flow;
- it is recommended to install the aerator along the entire length of the ridge, connecting its segments into one structure;
- ridge tiles are mounted on top of the ridge aerator, so the appearance of the roof does not suffer from an “alien” element.
Mounting technology:
- In a solid base circular saw cut through the ventilation slot. It can be one (at the top of the ridge) or two (on either side of the ridge). The total thickness of the ventilation gap should be 3-8 cm (depending on the recommendations of the manufacturer of a particular aerator). The slots are made so that they end 30 cm before the edge of the ridge, that is, the roof remains solid on both sides of the ridge.
- Ridge shingles are laid along the edges of the ridge (where the ventilation gap has not been cut).
- Install a ridge aerator. Each of its segments is fixed with elongated roofing nails or screws, screwed through ready-made factory holes. At the same time, the segments are connected to each other, like parts of a designer.
- The profile of the aerator is covered with ridge tiles. Its petals are mounted overlapping, according to the usual method, which does not differ from the technology of its laying along the ribs. The only difference is in the fasteners. In this case, the tiles are nailed to the aerator with elongated roofing nails.
- The ends of the aerator, in places of interface with the roof, are sealed with silicone sealant.
An example of work in the photo:

The video plot will help to understand in more detail the intricacies of the roof aeration device on a soft roof:
Installation of point aerators
In addition to the ridge aerator, it is possible to use several point analogues. These aerators are used:
- on roofs with a slope of less than 12 °, as well as on flat roofs;
- to improve ventilation efficiency, in addition to a roof aerator;
- if the installation of a ridge aerator is not possible, for example, if there is no ridge or if there are adjoining roofing materials to vertical surfaces and walls.
Usage norms:
- installation of point aerators is performed on slopes, at a distance of 0.5-0.8 m from the horizontal edge of the ridge;
- it is imperative to ensure air flow on overhangs;
- one aerator provides effective ventilation of 5-100 m2 of roof (depending on the diameter and shape of the structure), in accordance with these data, their number is calculated - from 2 pieces or more.
Installation technology:
- A hole is cut out in a continuous crate that matches in size with the internal gap of the aerator channel. To do this, the base (skirt) of the aerator is placed on plywood (OSB) and the contours of the hole are drawn on the roof, through the passage channel. Marking is done with a pencil or a nail. Using a jigsaw, cut a hole along the line.
- The aerator skirt is placed over the hole and fixed with roofing nails or self-tapping screws (at least 6 pieces). Some manufacturers recommend using an adhesive fixation method in addition to fasteners. In this case, the reverse side of the skirt is smeared bituminous mastic, glue it to the base, and only then - fix it with fasteners.
- Glue the top of the skirt with bituminous glue for waterproofing the junction.
- The skirt is covered with tile shingles, cutting them at the junctions.
- An aerator mesh is put on top of the skirt, screwing it with self-tapping screws. Then they mount the cover (cap), snap it on and also screw it with self-tapping screws.
- Similarly, the rest of the point aerators are mounted (in accordance with the calculation), which in total mass will form a single ventilation system.
Here's what it looks like:

More visual information about the installation steps point aerator can be obtained by watching the instructional video:
Thus, the installation of aerators is not a difficult job, even self-taught masters can do it. However, the benefits are enormous!
Thanks to aerators, water vapor is drawn out of the roofing cake, condensation is prevented, mold, fungus and mustiness are prevented. All this has a positive effect on the duration of operation. wooden structures(rafters, battens, sheathing), the work of thermal insulation, the microclimate of the dwelling.