How to glue wallpaper in the corners of the kitchen: glue the corners with wallpaper correctly, decorate the outer corner, non-woven trellises, instructions, video. How to glue wallpaper in uneven corners of the room, saving money and nerve cells How to glue wallpaper on the outer corner
Tsugunov Anton Valerievich
Reading time: 4 minutes
Wallpaper - universal finishing material, the main advantage of which is the relative simplicity of working with it. With their sticking, you can successfully cope on your own, without resorting to the help of specialists. But if the decision is made to change appearance rooms on your own, it is important to understand how to properly glue the wallpaper in the corners. It is this part of the work that is the most difficult.
Preparatory activities
Criteria for choosing wallpaper for uneven walls and corners
If there is no desire or opportunity to engage in leveling the base, you need to approach more carefully.
- The material for curved surfaces should be loose so that those joints where overlapping strips will have to be glued are not conspicuous. Non-woven fabrics are well suited.
- The drawing should be small and frequent or completely absent.
- The unevenness of the walls will help hide the material with a relief structure.
- For heavily damaged surfaces, fiberglass wallpaper is suitable for painting.
Work materials
Regardless of the type of canvas chosen, before gluing, it is necessary to prepare the following tools and materials:
- rolls in the right quantity;
- wallpaper glue suitable for the selected type of wallpaper;
- roulette;
- a long ruler made of metal or a piece of profile;
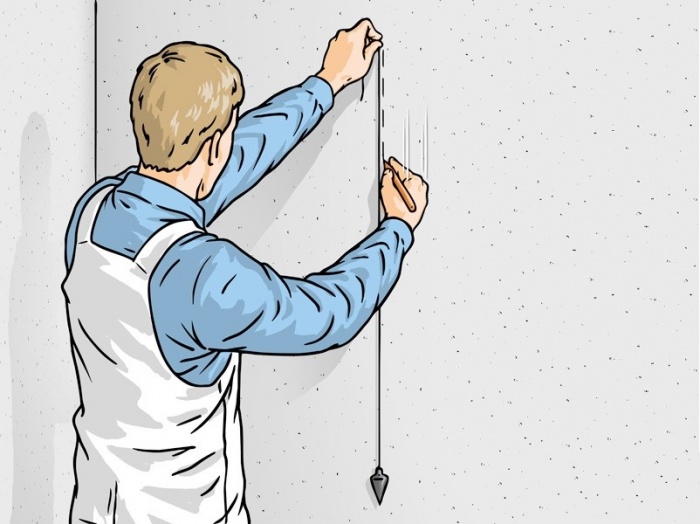
- plumb;
- pencil;
- construction knife or sharp paper blade;
- rubber roller, brush or clean cloth.
Tip: do not start gluing wallpaper from the corner, to start work, select a flat part of the wall.
Experts have their own secrets for pasting corner elements.
- I glue it on. When gluing wallpaper in a butt corner, there is a risk of the canvases diverge after drying and the appearance of a gap that cannot be imperceptibly removed.
- We do not glue the whole canvas, even if the corner is perfectly even. Otherwise, after drying, folds and distortions are almost inevitably formed.
- Coat the wall with glue. It is in the corners that the probability of material lagging is especially high, therefore this rule applies to all types of canvases: paper, non-woven, vinyl.
Wallpapering inside corners
For pasting the inner corner, follow the following procedure.
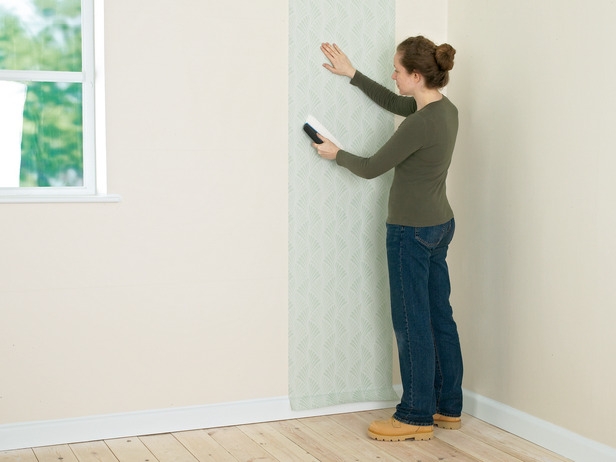
- We measure the distance from the edge of the strip that was last pasted on the wall to the corner. We add 2 cm to the obtained value. We cut the canvas, bend it according to the added allowance and transfer it to the wall smeared with glue. The excess must go to the adjacent side. The glued sheet must be smoothed with a roller or a rag so that all the air comes out from under it.
- We also bend the second sheet by 2 cm and glue it on the other side of the corner so that the allowance overlaps on the previously glued sheet. The correctness of gluing this canvas must be checked with a plumb line. While smoothing the sheet, we try not to press those very few centimeters of the allowance.
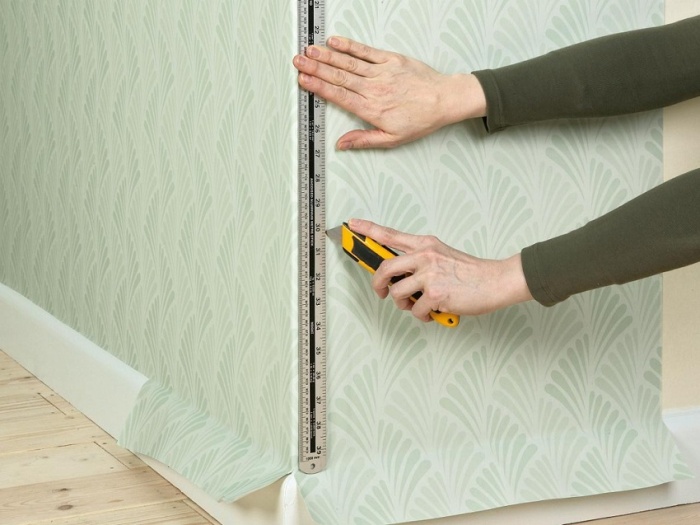
- We don’t need two layers of wallpaper, they will stand out, so we attach a long ruler to the corner and cut the layers along it with a construction knife. Then remove the excess top coat.
- Raising the top layer, remove the lower segments, coat its edge again with glue and press it tightly against the wall, squeezing out the air. This method allows you to get a very even butt joint.
Wallpapering in outer corners
To wallpaper outer corner, you need to calculate the width of the canvas so that the sheet, bending around the ledge, passes to the adjacent wall by 2–5 cm. Having measured the required width of the canvas, cut off the excess part. Remember that when using too wide a strip, we will inevitably get folds and wrinkles.
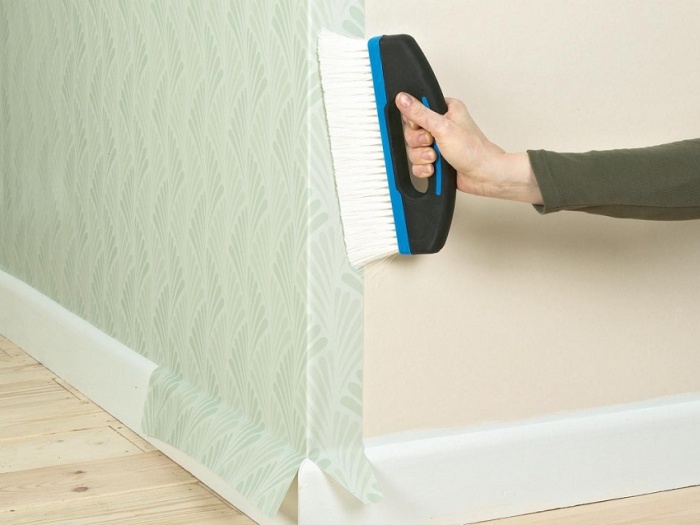
- We apply glue both on the wallpaper and on the wall. We apply the sheet to the ledge so that the canvas wraps around it, as in the next photo. If the material is dense, you need to make small cuts for good contact with the corner.
- We press the sheet in its upper part. At the bottom of the excess canvas we make an incision. If the material for gluing is smooth, smooth it with a roller, press the embossed one with a cloth. The part of the strip that has gone around the turn can be cut off, leaving a small edge.
- We take the next sheet or the remainder of the previous one and paste it in the same way on the adjacent wall. The canvas should overlap on the first layer. Using a plumb line, we check the verticality of this strip, if necessary, we combine the pattern. Carefully smooth out the fabric.
Date: 05/13/2017
A lot of people who decide to make repairs in an apartment or house with my own hands, believe that high-quality wallpapering will not be difficult for them. Yes, to some extent this finishing material is quite practical, but only on flat areas walls, which cannot be said about the corners. And how to glue wallpaper in the corners? This is the question faced by people who have begun repairs without professional help.
It is in the corners that gluing is a laborious process, which makes it difficult and calls into question the quick completion of the repair. So you should approach this issue with all seriousness and study with scrupulousness all the nuances of such an operation, because poor wallpapering in the corners can generally ruin the whole look.
How to glue wallpaper in the corners
Wallpaper is and remains the most popular material for finishing any kind of premises, whether it is a room in an apartment, an office, or a beauty salon. The quality of the wallpaper varies, and you can meet absolutely every taste, color scheme and cost.
Sometimes cheap nondescript wallpapers transform a room so much that they seem almost as good as expensive ones, i.e. now on the construction market the range of wallpapers is different, and there is a high-quality and at the same time cheap material- two in one.
Today, in order to paste wallpaper, you do not need to have professional skills, but you need to know the pasting system. The walls must first be aligned along the perimeter, in the corners, and from here problems begin for non-professionals.

Wallpapering in the corner
It is not recommended to glue a single strip of material. In the presence of uneven corners, the strip lies in folds and does not converge with the other. We recommend leaving a protrusion around the corner by 1.5 or 2 centimeters and then the strip will lie flat. Having chosen a wallpaper with a high density, use a plumb line. Glue part of the cut wallpaper with a small overlap on the adjacent wall so that it is as vertical as possible.
If there are switches, sockets in places of corners or in proximity to them, it should be before gluing and any construction works turn off the power supply and remove the covers. Fully stick the material on the convex parts, and only then carefully cut it out by making small cuts.
When starting to paste over the wall near the door, it is important to know that the strip of wallpaper must be cut vertically before the beginning of the frame. Then it is attached along the edge of the wall. Wallpaper protrusions should be cut off.

Non-woven wallpaper - how to glue wallpaper in the corner
Wall preparation
Wallpapering should be carried out in accordance with the existing technology, observing the sequence of processes, which applies not only to the corners, but in general to the entire procedure for pasting walls with flashing.
List of the sequence of stages of finishing work for wallpapering:
- Clean the walls of oil paint;
- If there is whitewash, then clean it off;
- Remove deep irregularities, especially in corners;
- Carry out the preparatory work. Surface primer.
It is better to prime the surface with professional tools that are sold in containers. different prices, but it can also be primed with diluted glue, but not particularly welcome. A special roller or a wide brush will help you prime the surface. Due to the fact that pasting is especially difficult in the corners, there is such a nuisance as a pattern shift. On the walls, the geometry of the drawing was preserved, but in the corners everything went wrong and now spoils the general background. Therefore, most responsibly approach the inspection of the corners, whether there are irregularities, eliminate them if any.

Preparing walls for wallpapering
Stage alignment of the corners of the wall
After you have pasted over all the smooth surfaces of the walls, you have to move on to the corners. Now inspect, and noticing irregularities, proceed to grinding - carefully puttying. After the putty is completely dry, it is necessary to clean the entire surface with sandpaper to achieve a perfect smooth surface so that the wallpaper does not peel off in the future.
Now the corners need to be coated with a primer. If you do not have the skill of puttying, then there is a way out, just buy the same type of wallpaper, or with a simple pattern that does not require further joining (paper). So part of the question of how to glue wallpaper in the corners can be considered disclosed.
The stage of applying glue in the corners
After leveling the surfaces in the corners, we proceed to the application of glue, it must be distributed with all care along the height of the walls, and in the corners most conscientiously, because in these places the wallpaper is most often peeled off. With a roller, we distribute the glue along the entire length and with a brush in hard-to-reach places.

Applying glue to wallpaper and walls
How to glue wallpaper in the corners
Finally, we moved on to the important part of the issue of gluing in the corners. The pros of this business recommend gluing a piece of canvas in the corners, even if the whole piece is perfectly straight. This can be explained by the fact that there is a high probability of distortions in the corners, and the subsequent sheet does not fit at all, and after drying, folds can be found. Room decorating professionals advise cutting wallpaper canvases so that the side side goes to the next wall by 50 mm. Below is a picture of wallpapering in the outer and inner corners.
Did you know: a nuisance for beginners in this matter is the curvature of the gluing areas. Such a defect in the surface of the eyes cannot always be detected, therefore, on help will come list of tools: a plumb line and the same building level. They measure the corners before wallpapering.
If there is a quite serious "blockage", then it is better to come to the method of "cutting" in these places. This method is used for thick wallpaper - vinyl.
According to this method, the material is passed 50 mm to the adjacent wall around the corner, and the next sheet is glued with an overlap.
The next step: in the middle of the corner, a vertical cut is made with a special construction knife under the level or ruler in the direction from top to bottom through two layers of wallpaper.

The scheme of wallpapering in the corners
During the whole process, the iron ruler must fit snugly against the corner and be pressed strongly so that there is not the slightest movement. Otherwise, a shift along the cut sheet is provided. Masters recommend using a long metal ruler, building level, which has more weight and produces a wonderful press that interferes with movement.
We glue wallpaper in the inner corners
To avoid the appearance of wrinkles in the inner corners, these canvases should be divided into two parts before wallpapering. The first step is to stick the material to the corner of the room, then you need to accurately measure the distance from the last piece of wallpaper pasted to the corner bend, and add 10-12 mm to the resulting figure. Next, one prepared part is glued to the wall with a cut edge at an adjacent corner. Adjust the edges as usual, be it top or bottom.
Now, using a brush or rag, press the wallpaper into the inner corner of the room. If irregularities occur, such as warping of the material, then take a special knife and make cuts, while pressing the wallpaper into the wall. Then glue the next part with an overlap on the glued material, pushing it tightly against the wall with a brush. Finally, cut off the remains at the bend with the same knife.
Tip: If your corner inner and middle parts have small bulges, and the bottom is littered a little inward, it is better to press the cut edges with an overlap. When pasting a room with thick (vinyl) wallpaper the best way- this is the use of glue with a transparent base at the junction, such glue is suitable for dense materials.
Methodology for pasting the outer corners of the room
Gluing the outer corners of the room requires pre-calculating the length of the wallpaper, and so that the canvas is not only enough, but it can go around the convex part of the wall from 21 to 25 mm. When gluing dense quality wallpaper, be sure to make light cuts to smoothly lay the strip.

How to glue wallpaper in the corners correctly
So, on dense wallpaper, using an iron ruler and scissors, excess strips of material are cut off, leaving a minimum of an edge, the visibility of which will not be visible under the subsequent canvas. On top of everything, a subsequent strip is glued with an overlap of 5-6 mm. If you have chosen smooth wallpapers, then immediately iron them with a roller, and with a convex pattern, voluminous ones can be very slightly passed with a rag.
Wallpapering with a pattern in the corners
The vertical pattern of the wallpaper makes it difficult to stick in the corners, because in these places distortions are especially noticeable. A pattern with a horizontal position is no exception, for example, after gluing it can be completely skewed. To avoid such incidents, it is necessary to make a small overlap on the wall in the neighborhood and hide the joint at the top of the corner.
Tip: the difficulty of wallpapering corners is to follow the rule - the edge lay flat on a plumb line, and the other should be cut along the edge of the corner.
It is not possible for a non-professional to glue wallpaper and at the same time without pattern shifts without experience. The main thing is to make it less noticeable using the instructions provided above.
Repairing an apartment, house or office takes a lot of time and effort, as well as money, if you decide to turn to hired workers for help. But thanks to the instructions given to you above and following them exactly, you can proceed to self finishing, giving attention and time to the study of wallpapering in the corners. Pay attention to the presence of defects, whether your walls are even, and spend preparatory work to eliminate irregularities. In addition, radiators and pipes often pass in the corners, interfering with the pasting process, turning repairs into a hassle.
If you approach this task responsibly, taking into account all the recommendations and rules, then you will expect quite a wonderful result, no worse than if the gluing was carried out by a professional team of craftsmen. By doing the finishing work with your own hands, you will save a lot of money. Good luck, and have a good completion of repairs in your home!
How to glue wallpaper in the corner - video review
Gluing modern wallpaper is a simple matter. Even a beginner in the repair business will cope with this. But, if mounting canvases on smooth walls is easy and simple, then you will have to tinker with the corners. It is the corners that become the stumbling block that slows down the whole process and requires a lot of effort. More often than others, non-woven wallpaper or non-woven vinyl canvases are used in repairs.
Material Features
The wallpaper, which consists entirely of non-woven fabric, is easy to install and durable. They are made of non-woven cellulose with the addition of synthetic components. The cellulose component gives the wallpaper elasticity and breathability, while synthetics add strength. Such wallpaper is much more difficult to tear than paper-based vinyl, for example. In addition, they do not crumple at all, there are no bends on the surface.
Non-woven vinyl wallpapers have the same properties. The only difference is that the canvases do not “breathe”, since vinyl does not let air through. Therefore, before gluing them to the walls, it is necessary to treat the surfaces with antibacterial primer or use glue with fungicidal additives. These measures will prevent the appearance of mold and mildew.
Non-woven wallpaper has a number of advantages over other coatings:
- Their feature is good adhesion with glue and with any wall material. Such canvases do not need to be treated with an adhesive, it is applied only to the walls. The same applies to non-woven vinyl.
- A useful quality of non-woven fabric is its resistance to stretching. The material does not shrink after the glue dries, the dimensions of the canvas do not change. Thanks to this, the joints do not diverge, and the seams between the strips remain invisible. This feature is especially useful for wallpaper intended for painting, as painting makes all wall defects even more noticeable.
- Interlining cannot be washed, but can be dyed. But cellulose-based vinyl can even be cleaned. detergents, it also lends itself well to dyeing.
- Due to the volume of cellulose fibers, such wallpapers align the walls, hide small irregularities. Durable synthetic components are resistant to tearing, this allows non-woven wallpaper to reinforce the walls. They do not allow cracking, holding the plaster.
- Wallpaper on non-woven base can be easily removed, their two-layer allows you to leave the substrate on the surface and use it as the basis for new coatings.
Installation of wallpaper on the walls
There are several ways to glue wallpaper (it is easy to see them from a photo or video). One of them involves the initial pasting of all smooth walls, and then the corners. Other masters advise starting from the most noticeable corner in the room. There is no consensus on this issue - everyone can glue at their own discretion.
Wall preparation is a must for any method. The old coating must be carefully removed, the cracks must be puttied. Then the walls are covered with a special primer or wallpaper paste. Only after complete drying of the primer proceed to pasting the walls.

In place of the reference point, a vertical line is drawn; this should be done with a plumb line or a building level. The first strip is cut from the roll, the length of which is equal to the height of the wall plus 5-7 cm. The wall is carefully coated with glue and wallpaper is applied. Level the canvas with a plastic spatula or wallpaper roller, focusing on the vertical.
Advice! It is better to use a special glue with a color indicator - in liquid form, such a composition has a pink tint, and after drying it becomes colorless. This allows you to evenly apply glue to the wall, leaving no "gaps".

At the plinth and under the ceiling, the wallpaper is cut with sharp scissors or a construction knife. Move on to the next lane.
How to glue wallpaper in the corners
In order to qualitatively paste over the corners, you first need to deal with their types. Angles are:
- Internal - each room has at least several of these corners (four in the standard layout). A very important factor is the correctness of these plots. If the angle is uneven, has drops, “sinks”, the wallpapering method will differ from the standard one.
- External corners in apartments have become more common with the advent of drywall - a variety of niches, arches, columns and others decorative elements. This also includes door and window slopes, unless, of course, it is provided to start wallpaper on these areas.
The easy way
The easiest way to paste over a completely flat corner. Unfortunately, these are quite rare. These are either drywall constructions, or walls prepared for painting (plastered perfectly smooth and even).

In this case, both in the inner and in the outer corners, the wallpaper is glued in the same way - they simply turn into a single piece of wallpaper. The main thing is not to stretch the coating, after drying it can return to its original size and shape. If there are small wrinkles on the wallpaper, it is allowed to make several horizontal cuts in the corner. This will help even out the coating, and cuts after drying will not be noticeable.
Important! No matter how even the corner is, it is better not to use the method of gluing it with a solid canvas if it fits with outer wall. In the corners located near the outer walls, condensation appears more often - the wallpaper can peel off and deform.

Standard Corner Taping Method
It is more reliable to glue wallpaper in the corners using the "overlap" method. Its essence is as follows:
- After gluing the adjacent wall at three points, measure the distance to the corner.
- According to the largest of the three values \u200b\u200bobtained, a strip is cut off - its width is equal to the largest figure plus 2-3 cm for overlap.
- The wall is well coated with glue, especially paying attention to the corner (it is better to use a brush).
- The prepared piece of wallpaper is applied to the corner, combining the joint with the previous canvas.
- The overlap formed on the adjacent wall is carefully pressed, tucking the wallpaper into the corner with a plastic spatula.
- For a tighter fit, the edge of the wallpaper can be trimmed - short horizontal cuts are made every 5 cm.
- Trim the bottom and top edges of the wallpaper using a metal spatula and a sharp knife.
- From the narrowest point of the overlap, they recede about one centimeter towards the corner, make a mark.
- Focusing on the mark, draw a vertical line in this place using a plumb line or level.
- Prepare the next strip (if necessary, select a pattern).
- A strip is applied to the wall smeared with glue, aligning its edge with the previously drawn line in the corner.
- Level the strip, expelling air and excess glue. Cut under the ceiling and near the floor.

Corner done! They proceed to pasting a flat wall to the next corner - the procedure is repeated. In this way, you can glue the outer corners with diverse wallpaper
Advice! Given the considerable thickness of non-woven wallpaper, the overlap may be too noticeable.
In this way, you can paste over those corners that furniture or curtains will hide, and choose another way to finish the rest. You can also try cutting off only the top layer of wallpaper.

Slopes do not have to be glued with wallpaper, the video shows how they can be beautifully trimmed at the corners:

Corner cutting method
If the walls are supposed to be painted, there should not be any overlaps on them. The paint will make the thickening of the wallpaper too noticeable, here you need another way. This method is suitable for both internal and external corners.
The work is performed in the following sequence:
- The first seven points from the previous instructions are repeated - the strip is glued with an overlap on the next wall. Only in this case, the overlap is made larger - 5-7 cm.
- A distance equal to the width of the roll minus one centimeter recede from the corner.
- Using a plumb line or level, draw a vertical line at this point.
- A strip is cut off from the roll and applied to the wall smeared with glue, aligning the edge with the drawn strip.
- The second edge is applied to the previous strip with an overlap, the wallpaper is pressed and leveled.
- Carefully push the wallpaper into the corner with a spatula, leveling everything again.
- In the middle of the overlap, a metal ruler is vertically applied, a very sharp knife is taken and a line is drawn without interruption along the edge of the ruler. It is very important that the line is drawn in one motion.
- They remove the trim of the upper canvas, bend the edge of the lower one and also remove the excess.
- Both edges are smeared with glue and folded end-to-end. You can pull the canvas a little in the right side so that there is no gap or overlap.
- Rolled with a roller for joints.
This method helps to make the connection of the canvases invisible. It works well on external corners, in niches and on slopes.
Advice! It is better to use a small metal spatula 10-15 cm instead of a ruler
Due to the unevenness of the corners, the ruler may not fit snugly against the wall, the cut will turn out to be crooked. The spatula must be moved along with the knife, avoiding breaks in the cut line. How to properly trim the wallpaper in the corners, you can see in the video:
It takes ~2 minutes to read

Save
Another plus in favor of choosing wallpaper is the ability to independently perform simple work, getting savings and enjoying the result. However, the surface of the walls is uneven and many are stopped by the question: how to glue wallpaper in the corners?
The pasted canvases repeat the unevenness of the walls, hiding some of them. But the corners are different. Even non-woven wallpaper, which is easily stretched like fabric, when dried on uneven corners wrinkles, folds, distortions appear. Later they peel off in these places. To prevent this from happening, you should know how to glue them correctly.
Preparing wall corners

Save
Even if the walls are plastered according to the beacons and puttied with high quality, this does not mean that everything is in order with the corners. Small depressions and grooves are unacceptable, they are puttied. Ideally, when puttying and subsequent sanding inner corner the minimum radius of curvature is given.
This will allow you to completely remove excess glue and air when pasting. When preparing the outer corner, the use of a perforated corner is mandatory. This will help create straight lines and properly wallpaper, protect the plaster from collapsing during light impacts that occur, for example, when furniture is skidded.
When applying a primer to the walls, a roller is used. For thorough priming of corners, use a brush. Choose the order in which you want to label the sheets, and decide where to start. It may be more convenient to start at the edge of a window or doorway. To begin with, choose a wall with a less visible corner, such as where a cabinet will stand.
Pick up a narrow strip of wallpaper, cut off the width of the roll. Walk with her along the selected wall, trying out options for the layout of the sheets. Choosing the option of how to properly glue the corners with wallpaper, strictly follow the rules:
- joints of sheets in the corners are unacceptable;
- no matter how even the corner may seem, do not plan to paste over it with a single sheet;
- instead of an overlap sticker, apply an overlap sticker followed by a double cut.
By shifting the starting point, select on the wall such an arrangement of the first panel, so that approximately the middle part of the next panel falls on the corner walls. Using a plumb bob and a sharpened pencil, mark a vertical line on the wall. Not required to be carried out solid line, which may later become noticeable.
You can make barely noticeable marks a centimeter long every 20–30 cm and draw a line not from the very junction, but, say, one centimeter to the left or right, so that later this line closes. Such an inconspicuous line will serve as a reliable guide and will not be revealed later at the junction itself, as sometimes happens.
Pasting the first sheets
Recall the sticker sequence:
- Open the wallpaper with or without pattern selection (according to the instructions on the roll).
- Apply glue to the walls, canvas, or walls and canvas (according to instructions).
- If the canvas is glued, then fold it so that the glue does not dry out prematurely.
- Stick the canvas on the wall from the ceiling down, focusing on the vertical mark or on the extreme edge of the already pasted canvas, aligning the pattern.
- Carefully remove the remaining air with a roller or brush, smoothing from the center to the edges.
- Using a wide spatula with a clerical knife, cut the top and bottom of the panel, smooth again with a roller, if necessary, grease with glue and smooth again.

Save

Save
Save
How to hang wallpaper: inner corners
- We cut out a strip from a single panel, 5 centimeters wide than the distance from the last canvas to the corner (we measure at the ceiling, in the middle and at the floor, we take the largest), the remaining piece will be glued after the first one.
- We coat with glue (according to the instructions for the wallpaper) and paste the prepared canvas, smoothing it with a roller or brush, first on the wall, then in the corner and then a strip on the next wall, removing excess glue and air.
- In places where the wallpaper wrinkles noticeably, we make horizontal cuts 5–10 cm apart.
- Using a plumb line, we draw a vertical line to stick the remaining piece of canvas so that it overlaps by 2 cm on the previous canvas in its narrowest part.
- We coat and glue the remaining canvas, combining a smooth edge with the applied vertical line, smoothing out the remaining glue and air.
- We prepare the knife, for this, before each cut, we break off the tip of the knife along the marks on the blade.
- Using a knife and a wide spatula, we cut without separation, in one step, both layers of the canvas so that the cut runs a centimeter from the edge of the second strip.
- We remove the cut off excess, if necessary, bend the edges and smear with glue, roll with a roller.
After double trimming, an imperceptible joint remains. If it didn’t work the first time, remove the glued strips and repeat with great diligence. It will turn out for sure, and you will know how to properly paste the wallpaper in the corners.

Save
Pasting the outer corners of the room is carried out in the same order and in compliance with the same rules: we mark up so that there are no joints and do not try to paste over with a solid canvas.
After gluing the first corner piece of the canvas, the wrapped part of the wallpaper should be at least 5 cm. The next canvas should be glued according to the marking so that the overlap in the narrowest part is at least 2 centimeters. Save
Useful tips from experts
- If found air bubble and it does not smooth out, pierce it, remove the air, pour a little glue with a syringe and smooth it with a roller.
- Sometimes, when cutting from above, below, or at the window and door opening, the wallpaper chews up. Let them dry a bit and cut again. Perhaps the knife has dulled and it's time to change the blade.
- Do not allow drafts in the room, this can lead to premature uneven drying and flaking of the canvases.
- De-energize the sockets and switches in the room in advance and remove the frames from them. You can return it to its place immediately after pasting.
- When gluing on problem areas, add 10% PVA glue to water when preparing the glue.
- If old wallpaper does not remove well, wet it with primer using a paint roller. Remove immediately before primer dries.
Video: how to glue wallpaper in the corners of a room
Usage roll materials for facing surfaces - this is a popular and sought-after solution that allows you to achieve high-quality results in a short time. But the finishing technology has some nuances. It is especially difficult to glue wallpaper in the corners: the resulting coating must be free of distortions and defects. The most suitable method is selected depending on the situation.
Existing varieties have a certain order of wall cladding, which allows you to achieve the best result.
Vinyl
The technology for working with this option is not very difficult if you perform all the processes correctly.
Step-by-step instruction:
- The place is being prepared. For convenience, the material is rolled out on a clean floor or a table of a suitable size with a pattern down.
- Trimming is carried out taking into account the allowance of 100 mm. If the coating has a complex pattern, then the scheme specified by the manufacturer is used.
- The canvas is treated with glue and folded in half for better penetration.
- The composition is applied to the wall with the capture of areas that extend beyond the width of the roll.
- The strip is laid on the base and smoothed out well.
- It is taken into account that standard and meter vinyl wallpapers on a non-woven base, you can only glue it end-to-end, the overlap will ruin the look.
 The vinyl layer on the canvas is strong enough, so the wallpaper can be safely smoothed with a wallpaper spatula without fear of damaging the integrity
 On a note! In the absence of experience and the need to adjust a complex pattern, it is better to prepare: for this, the strips are placed on a horizontal surface, aligned with each other and the size of the necessary adjustment is noted.
Paper
Sticking this variety is rarely accompanied by difficulties. For the process, you can use any glue, including those prepared by yourself.
Action algorithm:
- According to the width of the roll, marking is carried out using a level and a plumb line.
- The material is dissolved into strips, depending on the pattern. For this, a technology similar to working with a vinyl version is used.
- The canvases are well smeared with the prepared composition and rolled up.
- After surface treatment, pasting is carried out. The excess is cut off.
- Most often, paper products are overlapped, but strips can also be joined. It is taken into account that after drying the canvas will become narrower, so a special paper tape is placed under the seams. This rule applies to other types of wallpaper as well.
 It is impossible to tighten the web at the junction by force, the connection is leveled exclusively with a rubber roller
 All processes, especially smoothing, are carried out with care, because even multi-layer products are very easily damaged.
non-woven
To glue this variety, a special version of glue is used, since the material is quite heavy. The preparation of the binder is carried out strictly according to the instructions and is applied only to the wall.
Process diagram:

It is important to properly impregnate the base: do not leave dry areas. Be sure to affect places that go beyond the width of the canvas.
Advice! To speed up the process, it is better to apply the composition with a roller.
In addition, we suggest watching a video where the process of gluing non-woven wallpaper is considered.
How to properly wallpaper corners
The technology of laying sheets on the outer and inner corners has differences.
External
These areas are the most visible, so they must be glued with special care. The easiest way is if the angle is perfectly even, but this is quite rare.
In the presence of defects, the process is complicated. If the corner is littered, then it will be necessary to trim the canvas along the bend line in order to impose one section on the adjacent one. This method is not suitable for varieties with complex patterns.
There is another way:
- The strip is glued to a section of the wall.
- Using a special spatula, the material is carefully smoothed under the existing bend, a transition is formed.
- If required, part of the laid canvas is torn off, after which the excess is driven up or down. There must be a margin on both sides.
- To adjust the pattern in case of skew, the next strip is overlapped until the pattern is aligned with an indent from the edge of 5–10 centimeters.
- With the help of a ruler, which serves as an emphasis, the superimposed canvases are cut exactly according to the pattern.
- If required, the joined sections are additionally coated with the composition.
 Docking the outer corner with trimming on one of the adjacent planes is considered the most effective way arrangement
 This method does not completely correct the skew, but facilitates further sticker and fitting.
Interior
The technology for working with such a site is almost identical to the previous process, but has some nuances:
- All sides are well treated with wallpaper glue. If the composition is also applied to the canvases, the impregnation must also be sufficiently thorough.
- Laying begins with the wall from which the movement is carried out. The first fragment is aligned with the previous one, smoothing into a corner is carefully performed. To do this, with a rubber spatula, the waves are driven in one direction.
- The part that falls on the adjacent wall is slightly pressed.
- The next steps depend on the situation. Most often, it is required to cut off the existing bends in the middle and put the excess on top of each other.
- To achieve better alignment, the edges are shortened and smeared, after which the segment is located on the main part of the canvas.
 Technically, joining an internal corner is not much different from similar work on external structures, but this process is considered easier, since internal corners are visually less noticeable.
 This technology makes it possible to glue different types products, but if the corner does not involve cutting, laying is carried out in a standard way. To do this, the joint of both sides is carried out with a margin in order to level the unevenness by fitting and trimming at the place of alignment. This will take longer, but will get rid of the overlap in the corner.
Video tutorial: how to glue wallpaper with trimming in the corners
Docking wallpaper with a pattern
Work technology:
- The strip is laid on the initial part of the wall and gradually distributed over the surface. Waves are driven towards the corner.
- The material is carefully fixed on the inner fragment and smoothed from top to bottom. It is taken into account that the canvas should be cut off with a significant margin, since trimming of the lower and opposite edges will be required.
- The part that falls on the perpendicular wall is distributed. The areas at the skirting boards are adjusted.
- If the side is uneven, then it must be pasted over with the next strip, which lies completely in the vertical plane. The offset must affect the matching pattern.
- A ruler is set exactly along the line, with the help of a clerical knife, the excess is cut off.
- The second strip moves to the corner, the gap needs to be additionally glued.
If there are no problems, you can dock directly along the inner corner, but this will require a certain level of skill.
 Wallpapers with a pattern are joined according to the same principles as without a pattern, but if you stick a horizontal mark from masking tape on adjacent canvases in advance, then it will be easier to combine the ornament
 What to do if the joints are crooked
Perfectly even corners in rooms are rare, so to eliminate various problems, you can use the recommendation that many designers use - a combination. It is necessary to seal the transition from wall to wall with wallpaper with a pattern or with bright colors. Part of the pattern should go to the adjacent side, where it is cut at a right angle and combined with a solid material. The docking line will turn out to be even, and the existing shortcomings will not be evident.