Ceiling in the bath - choose the optimal type of construction and build. Do it yourself: high-quality ceiling for a bath Construction board for the ceiling of the steam room
Even the good old school course in the basics of physics convincingly proved that when heated, the air rushes up and that its main losses occur through the upper ceilings. It is in the bath that heat leakage is highly undesirable, its unreasonable consumption affects operating costs. In addition to heat, the upper floor is constantly affected by wet fumes, due to which the structures require periodic repairs. This means that the ceiling in the bath should be equipped with special care, must retain heat, practically do not react to moisture, do not collect condensate and please the owners with strength and accuracy.
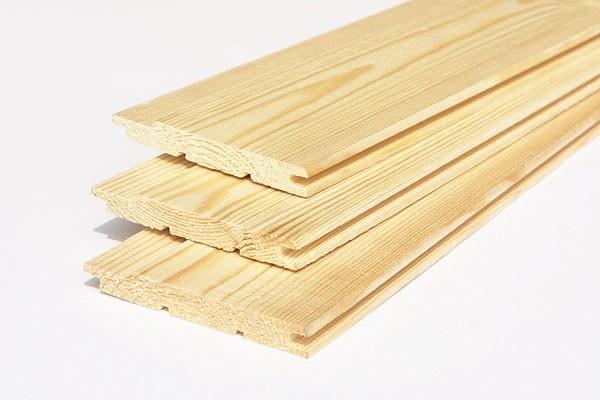
The traditional, most technologically advanced and easy-to-process material for the ceiling in the bath is wood. It is also good for health, and it easily transfers the onslaught of hot steam, does not deform and does not collect condensate. The optimal choice is a tongue-and-groove board made of aspen that does not emit resinous volatile components. To increase insulation and facilitate work, the grooved elements are equipped with profile recesses and ridges of the tongue and groove type. It is possible to replace aspen lumber with spruce; it is recommended to refuse from excessively resinous pine.
The video will acquaint you with the rules for choosing material for the construction of bath structures:
To begin with, let's decide on the priority type of construction of the bath ceiling.
Types of ceilings for bath structures
In the list of listed tasks, the solution of all items is available to the most complex expensive structures with a multilayer structure. However, there are economical options for the implementation of which you need a minimum of funds and labor efforts. The owner will lay the foundation for money or priorities for exploitation, he chooses for himself. And we will describe in detail how to make a ceiling in a bath, focusing on design features facilities, budgetary opportunities and labor costs.
Inexpensive false ceiling
The basis for its construction are wooden beams from which the ceiling is made. All other components of the multilayer cake are attached to them on both sides. From the side interior spaces the ceiling is sheathed with a tongue-and-groove or edged board. From above, in a kind of pallets formed between the beams and the sheathing, first a vapor barrier layer is laid, then a heater is laid and covered with a waterproofing film. At the end, from the side of the attic, flooring is made of edged or unedged boards.
Note. It is recommended to install a double layer of vapor barrier over steam rooms and washrooms.
The generally recognized advantages of false ceilings are:
- simplicity of design, the installation of a bath ceiling according to this scheme can be performed by a home master without special carpentry skills;
- the ability to use the attic space, move along the upper flooring without fear of damaging the insulating layers;
- maintainability, the ability to change a failed component at any time.
There are disadvantages - this is the use of high-quality expensive materials: boards with a thickness of at least 50 mm with a length sufficient to fully cover the span between the bearing walls.
It can be called a “lightweight” analogue of a hemmed construction with a reduced number of layers. It consists of boards joined together, the ends of which can only be supported by load-bearing walls. After rolling, the gaps between the boards are sealed with clay from the side of the attic or the ceiling is completely covered with a layer of crumpled clay of 1.50-2.00 cm. From above, the flooring is covered with a layer of vapor barrier, followed by a layer of insulation.
If the owner decides to use expanded clay as a heater, moistened cement mortar sawdust or a mixture of peat and earth, before laying the vapor barrier film, it will be necessary to make a copy of a small fence around the perimeter. The laid layers are covered with a croaker with an approximate step of half a meter. 
Regardless of the fundamental differences in the structure, the height of the ceiling in the bath is determined by the position of the upper shelf. In a sitting position, a person should not touch the ceiling plane with his head. With slight deviations, the height value usually varies around the standard mark of 2.20 meters.
The advantages of this option are:
- This is the most the simplest ceiling- the owners will be able to build an elementary structure with their own hands without assistants and without experience in construction.
- The device will require a minimum of not the most expensive materials.
- Installation takes a minimum of time.
The disadvantages are the prohibition of people moving around the attic, suitable only for storing bath brooms. The repair process will also be very difficult, as the insulating "layers" will inevitably be damaged.
The flooring option is used mainly for arranging compact bathhouses with a single or gable roof without an attic. The flooring can only rest on load-bearing walls. An internal partition cannot be used as a support if it is not a main wall between the steam room and the rest room. There can be no more than 2.5 meters between the supports, since under the influence of gravity the boards will corny “sag”.
Panel ceiling and its specifics
Most labor effort will require a panel type of ceiling structure. It is assembled from panel elements, each of which is made separately. The finished panel resembles a pallet with insulating layers and layers laid in it. Since the component of the panel ceiling turns out to be quite weighty and it is difficult to lift it up, all layers do not fit into it initially.
Panel ceiling assembly
Work order:
- Before mounting the panels on the walls of the bath, at the points of contact with the timber, a sealant is laid. 5 cm of the panel should rest on the beam, 10 cm of the beam is left for the installation of the truss system.
- When installing panels between them, due to the presence of laps, a "pocket" should form. A vapor barrier layer and insulation are laid in it. The panels are not connected with ties, the ends resting on the beams are not nailed. To connect them, cross-laid boards are used.
- Heat-insulating material is placed in shields with vapor barrier installed tightly to each other. Most often it is mineral or glass wool.
- Equipped with insulation "boxes" are fixed with the help of transverse boards. The starting board should cover the entire width of the ceiling. Nail the transverse boards to the bars of the panel boards.
- Next, you can nail a few short transverse boards, then again a long board. This interleaving also contributes to savings by reducing the consumption of long lumber.
- The joint lines are closed with overhead boards.
The ceiling assembled from panels is ready, but most often the work does not end there. If not too presentable leftovers were used to make shields, you will need interior decoration bath ceiling. But it will need to be done after the modernization of the truss system.
Changes in the truss structure
According to precisely verified dimensions in the rafters, it is necessary to choose angular recesses so that the leg can lean on the upper crown. The recesses made will somewhat reduce the bearing capacity of the roofing system. Reinforcement will be required by installing two vertical pillars with a horizontal crossbar. To install the support bar, it will be necessary to cut a notch and install a support in it. The rafter legs will need to be attached with capercaillie screws to the upper lintel and to the crown in the area of the sawn corner. Screws fix the point of intersection of the crossbar and the support, and the intersection of the crossbar and the rafter leg.
 Three ways to install a bath ceiling are distinguished by technology, load-bearing capacity, and the cost of lumber. The owner of a small family bathhouse with a shed roof is likely to be satisfied with a simple flooring. But the owner of a solid bath facility has a choice: hemming and panel type. The first variety will help save effort and time, the second - financial investments.
One of the most crucial moments in the construction of a bath is the creation of a ceiling. Not only the comfort in this room, but also the service life of the entire building will depend on how correctly and efficiently you do it.
To create a ceiling needs to be correct, such an indicator as the height of the room is also important. Despite the fact that for the construction of the ceiling in the bath, you must have certain knowledge and skills, any home craftsman can do the indicated work with his own hands.
A feature of the washing and rest rooms in the bath is that although in these rooms and high humidity , but air temperature is low, in comparison with the steam room, therefore, for finishing the ceiling, one of the best options is plastic lining.
Main advantages plastic lining:
- such panels do not require additional treatment with antiseptics;
- they have the correct geometric shape;
- light weight;
- there are various color solutions;
- after installing such a lining, it is not necessary to periodically paint it, as is the case with wooden materials;
- do not rot;
- low cost, which allows you to save money.
In case of use plastic panels, them installation is the final stage of finishing work.
In the washing room, water enters both the walls and the ceiling; plastic panels, due to their tight fit to each other, reliably protect against moisture.Installation of plastic lining on the ceiling of the washing carried out after the device and the draft ceiling, in the following sequence:

When using glossy panels, please note that they are very easily damaged, so The protective film must be removed from them at the very last moment.
To prevent sagging of plastic panels, the distance between the beams or laths of the crate should be no more than 60 cm.
Usually the length of the panels is 6 meters, which greatly complicates their transportation. Experts recommend immediately determining the required length and cutting the panels in the store.
 For a washing room and for a rest room in a bathhouse, it is better to choose seamless panels, since in the presence of a decorative seam, moisture and dirt will accumulate in it, which spoils the appearance of the ceiling.
Caring for such a coating is very simple, but it is best to use gentle detergents. The color of the panels is recommended to choose a calm, this will allow you to better relax and unwind, it is better not to use contrasting solutions in the bath.
Plastic panels have good thermal insulation characteristics, as they have a cellular structure, in addition, a large number of partitions makes them strong enough.
Since plastic does not let steam through, it is necessary to provide good ventilation in the room so that the ceiling and walls can dry out normally.
The device of the ceiling in the steam room

The steam room is the smallest room in the bath, but due to the fact that it has high temperature and humidity, the requirements for the ceiling will be high. Making mistakes when creating the ceiling in the steam room not only reduces the comfort of visiting the bath, but can also lead to rapid damage to the building and you will have to make repairs.
The choice of material for sheathing
For sheathing the ceiling in the steam room wooden lining is used. Usually the one made from conifers not used, since when heated, resin can be released from it, so they use panels from alder, aspen, linden, but oak or ash is best suited.

Instead of lining, you can use grooved boards, since there is practically no difference between them. But still, it is better to use a lining that has a non-linear surface, and during its drying, a gap will not form on the ceiling, as when using boards.
The width of the lining should be 9-10 cm, if the slats are narrower, then they will take longer to mount, and if wider, then they warp and crack more.
If there is a rough floor in the attic, then the lining can be taken from 12 mm thick, if it is not, then its thickness should be from 18 mm. To create a flat ceiling, it is necessary to take a lining with a thickness of 25 mm, since it will be subjected to a large load. 
The differences between ordinary lining and the euro is that the latter has longitudinal grooves on the inside to improve ventilation, and its surface is smoother, so if funds allow, then it is better to buy eurolining for the ceiling in the bath.
 Since the cost of eurolining is higher, then the geometry of the strips must be strictly observed, there should be no knots on the panels, you should pay attention to this when buying it.
Well, when there is an opportunity in the warehouse to check if the lining has not led, for this you need to dock two planks, if this happens freely and without gaps, then everything is fine.
Mounting
There are three types of ceiling: floor, panel, hemmed. 
Consider how to make a log house in a hemmed way:
- Floor beams are treated with a protective compound.
- Given the location of the stove-heater, a metal passage box for the chimney is mounted between the beams.
- Attach foil or hydro-vapor barrier membrane to the underside of the beams with a construction stapler, leaving wall overlap 30 cm, between themselves, the foil is glued with aluminum tape.
- If the distance between the beams is large, then you need to additionally make a crate and already mount the lining on it, the crate is made with a beam of 20 by 40 mm in increments of 400 mm.
- Carry out the installation of lining, fastened with screws or nails, but kleimers can also be used. When using nails, they can be hammered into the front part, into a tenon or groove. In the first case, the hats will be visible, and in the second and third, the fastening is invisible.
- From the side of the attic between lags(mineral stone wool, expanded clay or clay with straw)
- We close the heater with a hydro-barrier(diffuse membrane), it will protect the insulation from moisture from above and freely release water vapor from the bottom.
- Laying attic floor boards.

When fixing the planks through the front part, the hats are visible, but the fastening is reliable, the fixation through the spike or groove is imperceptible, but a small part of the board is captured, therefore, when the lining is expanded, it is likely that it will turn out or tear off.
When fastening with nails, there is a possibility that the panel may burst, this is especially unpleasant when expensive material is used. To avoid this, it is recommended to first drill a hole, and then fix the bar with nails, although this is longer, but the material does not crack.
For fixing in the face, finishing nails are used, since they have a small hat. The attachment points are covered with putty, to which wood dust is added, and after it dries, this place is polished.
Required Tools
To finish the ceiling in the bath, you will need the following tools and materials:
- lining, which can be plastic or wooden;
- vapor barrier;
- insulation;
- waterproofing;
- stapler;
- electric drill;
- screwdriver;
- a hammer;
- doboynik,
- mallet;
- wooden block;
- building level.
How to install a pipe in a bath through the ceiling?
The place where the pipe passes through the ceiling must be determined at the time of design. When marking the hole, it must be taken into account that it corresponds to the vertical axis of the pipe. From the edge of the pipe, the ceiling beams should be at least 130 mm.
 The gap that exists between chimney and ceiling, must be insulated, for this you can use asbestos, basalt wool or fiberglass.
The thickness of this layer should be not less than 50 mm so that the insulation does not fall, the bottom of the hole around the pipe is hemmed with a sheet of stainless metal.
It is not recommended to hem a hole around the pipe with galvanized iron, since when it is heated, harmful substances will be released.
If you are finishing the ceiling in the steam room, washing department and relaxation room with your own hands and doing it for the first time, then in order to get a good result, the following expert advice should be taken into account:
- all finishing work in the bath should be started from the floor, then the ceiling is made and only then the walls are sheathed;
- when creating a false ceiling, the attic space can be used for storing and drying brooms, but for this, provide for a hatch and a retractable ladder;
- when installing the first lining panel, you need to be very careful, since the laying of all other elements depends on it;
- in order not to damage the panels, it is necessary to use a mallet and a wooden block, which will help to evenly distribute the shock load created;
- if the distance between the beams is up to 60 cm, then you can attach the lining directly to them, in other cases you will have to make a crate.
Conclusion
In the bath, the ceiling is the most vulnerable place, since the maximum amount of heat escapes through it. To prevent this, you need to properly for the steam room it is wooden, and for the washing and rest rooms it is plastic lining.
All installation work are performed carefully and carefully, then you can independently carry out high-quality thermal insulation of the ceiling and make it beautiful, safe and durable.
Useful video
Installation of lining in the steam room, video:
In contact with
Proper arrangement of the bath includes the installation of the ceiling. For this purpose, the material, technology and finish option are selected. So you can create a reliable and efficient design for comfortable operation of the bath.
Bath ceiling design
The ceiling in the bath is a surface that is resistant to temperature loads and humidity. The design includes several layers, each of which performs a specific function. Insulation and finishing sheathing are required, but vapor and waterproofing layers are also necessary. Wherein top part the roof is presented in the form of an attic or attic. This ensures additional heat preservation inside the bath, because the equipped attic acts as an air gap that performs the function of thermal insulation. The place where the pipe exits through the ceiling is equipped with fire-resistant material, which will make the bath safe.
All elements of the ceiling structure are made of high-quality and safe materials. This requirement is relevant both for a room with an attic and without it. In each case, insulation is carried out, laying of hydro and vapor barriers.
Bath ceiling: types and features
For the steam room, three main types of ceiling structures are used. Any option can be done with your own hands, having previously mastered the installation technology and knowing the features of the coating.
A false ceiling is expensive, but it is a reliable option. The design involves the installation of a shield of boards, on which vapor barrier and insulation are laid, and then a layer of waterproofing is placed from the side of the attic. Next, the ceiling is sheathed with unedged or edged boards. Each layer is laid sequentially, which will ensure the functionality and quality of the structure.
The floor-type structure is created using boards, the thickness of which should be at least 50 mm. In this case, the distance between the walls cannot be more than 2.5 meters. A vapor barrier film is laid on the wood shield, and then loose insulation, which can be replaced with mineral wool. When using bulk material, small sides are built around the perimeter of the attic space.
Ready-made shields are needed to create a panel ceiling in the bath. The elements are load-bearing bars with layers of steam and thermal insulation materials as well as interior lining. At the same time, the ceiling in the bath is made up of such panels, and in some cases, the fastening occurs without ceiling beams. Shields are prepared in advance by calculating their number and size.
The basic rule for choosing a particular ceiling option is that the weight of the roof and ceiling structure should be optimal for bearing walls building. For example, in frame bath it is best to make a light false ceiling. Log buildings withstand various loads.
Advantages and disadvantages
All types of ceiling structures for a bath differ in the installation method, materials and appearance. When choosing, the pros and cons of each option are also taken into account. These features are listed in the table, which allows you to make the best choice.
Table: pros and cons of different ceilings for a bath
Preparation: materials, their calculation, tools
The bath is a room that is characterized by high humidity and significant air temperature. As a result, many artificial materials release harmful components into the air. Therefore, when constructing the ceiling and arranging the bath, you need to use only high-quality, safe and environmentally friendly structures. For example, mineral wool is optimal for insulation, accompanied by a layer of vapor barrier.
The ceiling in the bath will provide comfort, given the following points:
- the ceiling height should be at least 2.2 m, but it all depends on the height of the users;
- a small bath is economical when heated, but does not allow you to comfortably bathe;
- all layers are mounted sequentially;
- you can not paint the ceiling and use substances that are not intended for finishing the bath;
- all wooden surfaces must be well treated.
Creating a drawing is necessary for a ceiling that has a complex design or has an original decoration. In other cases, the drawing is optional.
Materials and calculation of their quantity
The high quality of the ceiling in the bath depends on careful preparation. It is important to calculate the amount of material and create an electric lighting scheme. To determine the amount of material, for example, insulation sheets, you need to multiply the length of the room by the width. The result obtained is increased by 5–7% (unproductive inevitable waste).
Before making a calculation, you should determine the materials for the ceiling. Internal cladding is often carried out using boards made of wood of the same species from which the shelves are made, wall decoration. For insulation, both loose expanded clay and mineral wool are used. A mandatory requirement is the naturalness of all materials. Be sure to lay a vapor barrier film that protects the insulation from damage and loss of properties, retaining heat in the bath.
Tools for the job
Do-it-yourself ceiling in the bath is simple and without the use of complex equipment and devices. The main requirement is to comply with the rules for laying materials, as well as the high quality of all layers.
To create a false ceiling with your own hands, you need the following tools:
- building level, tape measure and knife;
- wood saw, jigsaw;
- sticky shiny tape for vapor barrier;
- screws and nails, screwdriver and hammer.
All tools and materials, fasteners must be of high quality and reliability. Screws or nails with an anti-corrosion coating are the best option.
Ceiling in the bath: step by step instructions
After choosing and preparing everything you need, it is easy to create a ceiling in the bath with your own hands. To do this, you need to study the layout of the layers of materials, which will greatly facilitate installation. The main stages of work are as follows:
- A vapor barrier film is attached to the ceiling joists from the inside of the room. The edges of the sheets are laid with an overlap of about 10 cm and fastened together with a sticky film. Along the perimeter of the wall, mounting bars are fixed, which are necessary for a tighter fit of the material.
- The vapor barrier film from the inside of the room is sheathed with clapboard. Then, insulation boards are laid from the side of the attic, ensuring a thorough fit of the material to the logs. The height of the insulation layer should almost correspond to the height of the lag, but an air gap of about 50 mm should be left. This is necessary for air circulation and extending the life of the insulation.
- A waterproofing film is attached to the logs, but an air gap should be left. After that, you need to mount the attic floor boards, which are also attached to the logs with screws.
- The area around the chimney pipe must not be equipped with combustible materials. To organize this zone, a hole should be made in the ceiling, the edges of which are at least 25 cm from the pipe. Wooden elements are attached to the ceiling boards, with the help of which a box is created. It should fall asleep non-combustible insulation, and trim all edges with metal plates.
Processing and care
The ceiling in the bath is often made of wood, which is environmentally friendly and safe for health. The material is not sufficiently resistant to moisture and mechanical stress and requires special processing. For this purpose, special compositions are used, and conventional paint and varnish components cannot be used. Under the influence of heat and humidity, they release harmful substances into the air, causing harm to health and not protecting the wood.
To maintain the performance and aesthetic appearance of the ceiling, the following rules must be observed:
- the new ceiling is treated with antiseptic liquids for wood. The compositions prevent the growth of bacteria and the decay of the material;
- tinted antiseptics make the process convenient, since already treated areas are immediately visible;
- special bleaches for wood, designed for baths and saunas, help to whiten the boards;
- acrylic protective compounds not only prevent damage to the material, but also give a beautiful appearance.
Ordinary varnishes are not used to treat walls in a bath. Only special compositions can extend the life of the finish. They are safe and easy to use, for example, the solution is easy to apply with a brush or foam rubber.
Video: do-it-yourself ceiling in the bath
The ceiling in the bath is an important structure, on which the speed of heating the room depends. Effective operation of the steam room is possible only when quality device all surfaces.
When designing a bath, it is necessary to take into account the nuances of operation. These include high humidity, a sharp temperature drop and a high coefficient of thermal insulation of the materials used. Most often, problems arise when trying to make a ceiling in the bath with your own hands. A step-by-step guide with photos and videos will allow you to perform work efficiently and in accordance with applicable requirements.
First you need to familiarize yourself with the microclimate in the steam room and dressing room. In the first case, high temperatures affect the surface of the walls and ceiling, and the humidity level can reach 80%. These conditions place special demands on the materials used.
Based on this, it is possible to form the basic requirements for the materials and construction of the ceiling in the bath:
- Minimum coefficient of thermal expansion. Between layers of protective or decorative material no gaps should appear.
- Providing thermal insulation. This is especially true for the steam room, where temperature regime should not change due to heat loss.
- Ventilation. It is necessary for the flow fresh air and humidity control.
- Fire safety. Flame retardant coating must not be used. Exception - wood paneling. But it is also pre-treated with special compounds.
The ceiling in the bath has the maximum effect of temperature and moisture. Therefore, it is necessary to carefully approach the purchase and processing of protective and decorative coatings.
Material selection
The arrangement of the ceiling directly depends on its design. It may consist of wooden rafters with two layers of plank covering or be a reinforced concrete floor. For each option, an individual scheme and coating materials are selected.
Most often do wooden floor. It should consist of the following layers, starting from the inner.
- Clean lining.
- Ventilation gap.
- Vapor barrier.
- Insulation.
- Second ventilation gap.
- Plank covering attic.
For the proper arrangement of the ceiling in the bath, it is necessary to select the appropriate materials.
Fine lining of the steam room and dressing room
Despite the emergence of new decorative and protective claddings, the choice is often stopped on a wooden lining or board. They have optimal performance characteristics, after treatment with flame retardants, the risk of fire is reduced, subject to the manufacturing technology, thermal expansion and moisture absorption are minimal.
- Reliable tongue-and-groove connection compensates for thermal expansion and does not affect the insulating properties of the layer.
- Air channels to remove moisture reduce the chance of wood swelling.
- Good appearance.
- Ease of installation and replacement of individual elements.
thermal insulation
The most important component of arranging the ceiling in the bath. Immediately it is worth abandoning polymeric heaters - polystyrene foam, polystyrene foam and polyurethane. Despite the affordable cost and ease of installation, they lose their properties under the influence of high temperatures and are combustible materials. In addition, the lack of a vapor-permeable effect will cause the concentration of moisture on the wood flooring.
- fireproof effect. Can withstand temperatures up to +1100°C.
- The best indicators of thermal insulation.
- Ease of installation.
- Flexibility. After strong compression, it restores its original shape. It is convenient for installation.
- Passes water vapor, but at the same time the coefficient of absorption is minimal.
It is necessary to choose models without a protective layer, as it will nullify the effect of moisture removal. Additionally, you need to purchase a vapor-permeable film. It is mounted on the primary decorative coating of wooden lining.
Work order
Before starting the process of arranging the roof, you need to develop a scheme for installing materials. To do this, you need to take standard drawings and adapt them according to the properties of the bath room. The diagram shows the recommended dimensions of the ventilation gaps and the heat-insulating layer.
The sequence of work.
- Bars are mounted on the beams to fix the insulation. If the distance between them is large, an additional crate is made.
- Installation of lining. When connecting the boards, compensation gaps must be left. The distance from the lining to the bars should be 12-14 mm.
- Installation of vapor barrier film. The joints are overlapped with adhesive tape.
- Heater installation. Its thickness should be 50-100 mm. The presence of gaps is unacceptable.
- Installation of waterproofing film.
- Arrangement of wooden flooring in the attic.
The minimum height from floor to ceiling must be 2200 mm. Ventilation ducts must be made, special sleeves are mounted in the places where the chimney pipes pass, protecting the wood and the heat insulator from high temperatures.
When building a bath, it is impossible to ignore the question of how to build and insulate the ceiling. Despite the fact that this process It seems very complicated at first glance, everything is extremely simple.
For a wooden bath or foam block bath, the ceiling structure can have three mounting options:
- hemmed;
- Grazing;
- Panel.
hemmed
The design of the false ceiling for the bath consists in creating a frame base from floor beams, on which all the constituent elements are fixed. During the construction process, the beams are sheathed with tongue-and-groove or edged boards. A material for vapor and thermal insulation is laid on a shield of boards, which can be used as plates mineral wool, sawdust, shavings or expanded clay. From the attic side, the insulation is covered with waterproofing, and then sheathed with cut or uncut boards (see Insulation for the bath ceiling).
Such ceiling device it is better to use it when building a bath with an attic, since in this case the whole process can be carried out by one person, without resorting to the help of specialists. However, this is the most expensive type of flooring, since long boards and massive beams require considerable investments. This design is used in the construction of a block log house.
Grazing
Decking ceiling laid directly on the surface of the walls. In this case, the distance between the walls should be from 2.5 m, and the thickness of the boards should be from 5 cm. The laid boards are covered with a vapor barrier and mineral insulation. The next layer is waterproofing, and only then a wooden flooring is made. In the presence of a panel ceiling, the manufacture of each sector must be performed according to a separate template. Do-it-yourself installation of panel plates is rather complicated due to the large mass, therefore, the plates themselves are first installed, and only then they are insulated and insulated. However, even in this case, the help of several people is needed.

The installation process of the flooring should not cause difficulties, but it can only be used when arranging baths small size(no more than 2.5 m wide) and a small ceiling height. The construction of this ceiling does not require large financial, labor and time costs.
Because in this variant thermal insulation finish is not protected, it is only suitable for structures without an attic. There is also one significant drawback: in the case of repairs to ceilings or rafters, the heat insulator will have to be completely dismantled.
Panel
To make your own panel ceiling you need to stock up on shields in advance. What shields consist of: load-bearing beams, inner lining, vapor barrier, external ladder, thermal insulation and waterproofing. To insulate such a ceiling, it is better to use mineral wool or glass wool slabs. Thus, you will reduce the mass of the shield itself and increase the energy-saving qualities.
One condition must be met - wooden bath the insulation layer should not be less than 100 mm. To protect the ceiling from heat loss, a moisture-resistant and heat-saving sealant is laid between the shields. As a rule, foil insulation is taken for this, or felt protected by foil. When using shields, for the manufacture of the frame of which bars with a cross section of more than 5 * 10 cm were used, installation can be carried out even without the use of ceiling beams. This is due to the strength of the frame itself. After the process of installing a bath ceiling is completed, measures can be taken to insulate it. This is done by laying a vapor barrier material on the waterproofing.

Having finished with laying the waterproofing and insulation, a wooden flooring is made on top of them from boards, fixing them with nails to the ceiling beams. At the junction of the panels, a material is laid that prevents the penetration of steam and cold. To fasten the panels, you must use boards, or fix them on the upper beams of the log house.
According to professionals, hemmed construction is the best option, so we recommend that you take this advice into account before deciding how to make the ceiling in the bath. Despite the high cost, its operational life is much longer than other options. Panel overlap is inferior to it due to the complexity of installation and subsequent repair.
See short video, which shows how the ceiling in the bath should look like at the initial stage of construction:
Ceiling vapor barrier
Since the bath is dominated by hot steam, which tends to rise up, the ceiling is made with this feature in mind. Provision must be made for steam isolation through openings in the ceiling. Installation of the flooring is carried out in the following order: insulation; measures to protect against moisture ingress into the attic; materials that contribute to the accumulation of hot steam at the top of the room. To achieve this result, you need to follow the following step-by-step instructions:
- If the bath is built from logs, boards and blocks with a thickness of at least 6 cm can be used for ceiling cladding. A vapor barrier is laid on top, which is aluminum foil, wax paper or thick cardboard impregnated with drying oil;
- Soft clay is laid on the vapor barrier layer, on top of which a heater spreads;
- Anyone can act as a heater suitable material(expanded clay, sawdust mixed with clay solution, sand or mineral insulation). At the same time, the thickness of the insulating material should not be less than 15 cm and do not forget about the chimney;
- A screed of cement and sand is arranged on the insulation. However, in the case of using the attic as a living space, it is necessary to use durable floorboards for the flooring.
To make the finishing lining of the ceiling, you can use natural wood (coniferous trees, larch or aspen) by looking at a few a photo and choosing suitable option decor. However, the boards must be carefully processed and not have knots, cracks on their surface, be well dried and treated with protective agents. By following these recommendations, you can significantly increase the service life of not only the ceiling itself, but the entire structure as a whole.