How to make a village house out of cardboard. How to make a cardboard house for a child. options. Folding cardboard house
Quick article navigation
We are convinced that only home-made can be better than a purchased dollhouse. After all, it is very interesting to “build” and decorate it to your liking for both parents and children. Moreover, everyone can make a house for dolls with their own hands, this will require only a few tools, simple materials and creative inspiration.
Master class 1. How to build a house in half an hour from a cardboard box
A cardboard dollhouse is good because it is done quickly and from improvised materials. It can be very beautifully designed and periodically completed - add new rooms, floors and entire buildings.

Materials and tools:
- A large cardboard box that will hold one to three floors for dolls 25-30 cm tall (Barbie, Monster High, Bratz, Winx, etc.).
- Scissors and cutter.
- Scotch tape in a contrasting color (does not include painting) or masking tape (if you want to paint the house later). In this master class, bright green tape is used, and the house itself is not painted.
- White paint.
- Decorating materials (optional): scraps of wallpaper, wrapping paper, paint, brushes, etc.
Step 1. First, cut the box in half and cut off the top flaps from both halves.


Step 2. We put the resulting pieces of cardboard into action: cut out the triangular gable of the roof from one part, and make a small hole in the other - this will be the second floor with access to the stairs. Next, glue the parts into place with tape and / or glue.

Step 3. From the unnecessary part of the box, cut out the slopes for the roof and another floor for the attic, and then glue the parts onto the adhesive tape. Do not forget to cut a hole for the stairs in the attic floor.

Step 4. Now we cut out the windows and the front door on the first floor with a clerical knife, having previously drawn the markup. Then we cut out stairs from the remnants of cardboard and glue them to the floors.

Step 5. Hooray! The frame of the house is ready, now you can proceed to the "finishing". In this master class, all the details from the tiles on the roof to the steps of the stairs were drawn with a white marker.

As soon as the "repair" in the house is over, you can start creating furniture.


You can come up with your own house design - paint the house and the roof from the outside, draw window frames, paste over the walls with “wallpaper” made of fabric or scrapbooking paper, and finish the floor with linoleum or laminate. In the next selection of photos, you can get ideas for decorating a doll house miniature and cardboard furniture.


And here is an example of a cardboard house for dolls, upholstered in fabric, or rather, scraps of old dresses and pillowcases.

And finally, we offer you to watch a video review of a dollhouse for Monster High dolls, made by hand from several large boxes.
Master class 2. How to make a doll house from a bookshelf or rack
Do you want to make a stronger house without fiddling with blueprints and a jigsaw? Then use a small shelving unit or, say, an old bookcase as a base. With the help of the simplest steps, you can turn an ordinary piece of furniture into a wonderful house for dolls.

- Best for "construction" is a cabinet with a depth (25-30 cm), which has a back wall. So, for example, in this master class, Ikea's Billy shelving unit is 30 cm deep and 106 cm high (pictured right). In such a house, you can equip three floors, quite suitable for 25-centimeter Barbies or Monster High. The price of Billy's rack is 2000 rubles.


Materials and tools for reworking the frame:
- Cabinet, chest of drawers or shelving;
- Plywood, MDF or boards 25mm thick, 30cm wide and at least 120cm long (these are measurements for Billy's closet, but you can get shorter or longer/wider boards depending on your closet dimensions);
- hardboard sheet, wall panel PVC or MDF (for making/replacing rear wall and the manufacture of partitions in the rooms);
- Bar 5x5x20cm (a pipe will be made from it);
- Several small photo frames that will become trim for windows;
- Decorative molding of small width (polyurethane can be used);
- Screws and screwdriver;
- Carpentry glue or liquid nails;
- Drill and drill.
Decoration materials:
- Wood putty (optional, but desirable for masking fasteners and joints);
- Primer (optional, but desirable for better paint durability);
- Acrylic paints of desired colors;
- masking tape;
- Brushes and / or spray gun;
- Scissors;
- Materials for lining the walls of rooms (paper for scrapbooking is best);
- Popsicle sticks to create a lattice fence;
- Roof tiles material.
Step 1. Painting the rack
This step is optional if you are satisfied with the color of the selected shelving or cabinet. For example, white or plain colored furniture will look great even without painting.
- If the cabinet is old or has a too “furniture” look, then it definitely needs to be repainted. To do this, we act according to the following scheme: sanding and grinding - primer (until dry) - a layer of paint (until dry) - a second layer of paint (before drying) - a layer of matte varnish.
In this master class, the dollhouse will not only be painted, but also decorated with brickwork. If you like this decor idea, then prepare the following accessories:
- Cellulose sponge;
- Gray paint;
- Acrylic paint (our instructions use a mixture of two paints - the colors of red brick and chocolate).
So, first we paint the entire rack with gray paint. As soon as the last coat of paint dries, we begin to create brickwork. To do this, we cut out a rectangle about 3.5 × 8 cm in size from a sponge, which will become a template for painting.

Pour the paint into the container, soak the sponge in it and, starting from the bottom of the cabinet, print the bricks - first one row, then the second row in a checkerboard pattern. Do not forget to maintain indents between bricks of about 5 mm. Paint about 1/3 of the house this way.
Step 2. Making windows
This step is also optional, but if you want to create a realistic miniature of the house, then it's better not to skip it. In order to cut windows, you first need to measure the window "frames" (if any) and draw markings on the cabinet walls from the outside.
Once the markings of all windows are ready, you can start cutting. To do this, use a drill to make holes in the corners of the markup inside the border to create a starting point for the jigsaw blade. To make the edges of the windows look neater from the inside, you need to glue the masking tape on the inside of the cabinet along the marking contour. In the photo below you can see the process of work.

To give the windows a more finished look, putty and paint the "window niches", remove the tape, and glue the frames on the outside of the house.
Step 3. Mounting and decorating the roof
In order to make a roof, you need to cut 2 boards from plywood (or other lumber) 30 cm wide, but of different lengths - 61 cm and 59 cm.

Now we join the end of the shorter board at a right angle with the edge of the 61-cm board and again drill holes, but only at the end of the short board, passing the drill through the three holes made earlier on the edge of the long board. This stage is clearly shown in the next photo.

Glue two boards together, then fix with screws. If desired, the joint can be sealed with putty.

Next, we move on to finishing the roof. It can either be painted in 2 layers, or pasted over with “tiles” from improvised materials, for example, from cardboard or cork sheets. And finally, on the ends with front side roof glue 2 parts of the molding.

Step 4. Creating and installing a pipe, installing a roof
It's time to turn wooden block size 5x5x20 cm into the chimney. To do this, simply saw off one of its corners (45 degrees) and paint according to the principle described in Step # 1. When the paint is dry, we fix the chimney to the roof with screws.

Well, that's all, the roof is ready, it remains only to fasten it to the cabinet in inside corners as shown in the photo.

Step 5. Replacing or installing the back wall
The next step involves equipping the rack with a wall, if it is not there, replacing the existing wall with a prettier one (for example, under a white lining) or simply installing the missing wall for attic floor. We perform the following actions: we make the necessary measurements, cut out a blank from the hardboard / wall panel and fasten it on the back side with cloves / screws / glue.

Step 6 Install Partitions to Create Rooms
Cut from any material (hardboard, wood, MDF, plywood) interior partitions, then cut doorways into them and install with glue or screws. Woo-ala! The doll house is built, you can proceed to the most exciting part of the work - the decor and filling the rooms with furniture.


If you add a rack with wheels, the house will turn out to be mobile
And here is an example of equipping a dollhouse with lighting, which can not only create comfort in it, but also play the role of a night light.

Master class 3. How to make a plywood dollhouse
Making a dollhouse out of plywood or wood is somewhat more difficult, but it will look better and last so long that in the future it can even be inherited. To create such a house does not need to have special skills. It is enough to have tools, clearly follow the drawing and the following video instruction, from which you will learn how to make a dollhouse with your own hands for 25 cm Barbies and other dolls 25-26 cm tall.
Need a unique gift wrap? Do you need a craft in the form of an architectural structure? If you like to be creative with children, you can make a house out of cardboard together. The execution technologies will be similar, but choose the size and design in accordance with your individual idea.
Beautiful houses: options and ideas
Cardboard house can be made in the following versions:
- A play structure for children of such a size that they can go inside (an alternative to expensive plastic complexes).
- small architectural form for dolls with a removable or missing front wall and detailed room interiors.
- Crafts on a New Year's theme, for example, Santa Claus's house.
- Gift box of an unusual shape.
As you can see, there are several possibilities. Choose suitable option. Make the game of children more interesting and developing by available means.

What will be required
To make a house from you need to prepare the following:
- Cardboard (corrugated for the frame, decorative for decoration).
- Parts templates, diagrams and sweeps.
- Pencil.
- Ruler.
- Eraser.
- Scissors.
- Glue or heat gun.
- for decoration.
- Textile.
- Paints.
- Brushes.
- Markers.
- Suitable decoration elements (pebbles, flowers, beads, beads).
The set and quantity of materials will depend on what kind and for what purposes you will make the house. For a growth structure, you need strong frame, and thin cardboard or thick paper is also suitable for packaging. Packaging design can be completely developed on a computer or printed out a ready-made template. Big house will have to be done by hand.

How to make a diagram
If you want to make a small house out of cardboard with your own hands, it is better to use ready template, which can be printed directly on the sheet for the product. On thick cardboard it would be better to draw a blank. It is easy to build a small house like a box from a whole sheet of cardboard with fold lines.

If you are going to make a large house for kids, it is better to cut out all the parts separately, although if the dimensions of the material allow, it is easy to make the workpiece also in the form of a sweep, as for a box. The scheme is quite suitable as an example little house. It is enough to increase the size of the constituent elements proportionally. If there is a big box right size, good to use it. Then you just need to cut out doors, windows, perhaps strengthen the structure, build a roof on top (more conveniently gable) and, of course, decorate the frame.
Manufacturing technology
This section contains the general sequence of steps. Each case will have its own nuances. So, to make a house out of cardboard with your own hands, work as follows:
- Prepare the base material and draw on it a diagram of the house or its constituent parts.
- Cut out the elements.
- If there are fold lines on the workpieces, draw along them with the corner of a ruler or other similar object. So, you will make grooves that will help you fold the thick cardboard evenly and neatly along the line.
- Make folds.
- Tape the seams.
- If interior partitions are supposed to be inside the house, glue them with a thermal gun (hot glue can be applied to the ends of cardboard blanks) or ordinary glue. In the second case, it is better to use additional connecting parts in the form of strips bent in half. One edge of such a paper tape will go to the right joining wall, the other to the left.
When the whole structure is assembled, proceed to decorating. Internal walls, especially if the docking elements are visible, it is better to cover with decorative paper or cloth. The outer walls of the house need to be painted.

Although you can lay out the lower part from pebbles or appliqué elements (paper parts). In a word, arrange all the decor at your discretion. The main thing is that it should be appropriate, and it is important to secure it securely so that during the game the house does not immediately lose its attractive appearance.
from cardboard
The manufacturing technology of the frame will be similar to that already described. The only difference is that the façade wall is either not made at all or is made to open like a hinged door. This can be done on tapes, cardboard strips. When creating a game room, it is important to make it in proportions suitable for the dolls, proportionate to them, so that they fit there and feel comfortable (sitting, standing).

Particular attention is paid to the organization and design of the internal space. Be sure to make several partition walls between rooms. They will also serve as a supporting structure. It is important to make furniture (or place the purchased puppet). Pay attention to the decoration of the walls. If everything is properly thought out, the house will turn out to be very realistic, and the design process itself will turn into an interesting activity for young craftswomen.
Christmas houses made of cardboard
This option will have some features. If you are just creating a craft for a contest or decorating an interior, it is enough to make it based on a cardboard box. Such a product may not be opening, and the design (windows, doors) will be drawn or made in the form of an application.
If you want to make a gift box, like a cardboard house, the layout of the product should be such that there is an opening part. It should be convenient to get the contents of the gift, while the packaging should not be deformed. The roof can be removed from the box-house, one of the roof slopes can be opened, the base can be removed or shifted.

So, you can make a beautiful house out of cardboard with your own hands both for game purposes in a natural size that is comfortable for the child, and as a souvenir gift (packaging or dollhouse).
Every child dreams of their own fortress, a private place where they can play and hide from adults. To do this, you do not need to buy expensive children's play houses, because making such a house is easy and cheap with cardboard, scissors and glue. How to make a house out of cardboard and how to decorate it? We have collected diagrams of a cardboard house that you can do with your own hands, and also picked up interesting ideas for dollhouse.
How to make a big cardboard house
It should be understood that for such a large cardboard house you will need a box not from under shoes, but larger - like from washing machine or other major household appliances. It is very simple to make the basis of the house, but it is worth entrusting this activity to an adult or an older child. But you can decorate it with your baby. How to make a house out of cardboard?
We'll need
- big box
- Scissors
- Stationery knife
- Scotch
- Glue moment or glue gun
- Pencil
- Ruler

Also, the house can be made much more spacious by gluing several boxes together and cutting a wall between them. But you need to evaluate the housing space, whether such a large house will fit in a nursery or living room.
How to make a folding cardboard house
If you really want to make a cardboard house with your own hands, but there is not much space for it in the nursery, then you can make it foldable. The advantage of this cardboard house is that you can take it with you to nature, to the country house and just play in the yard with other children.

We will need:
- large box
- Scissors
- Stationery knife
- Scotch

Here are some ideas on how to decorate a cardboard house:

You can draw an alphabet on the house so that the child sees it more often and remembers the letters. Do the same with numbers. The house can be painted white or painted in bright colors.

A very simple version of the house for cunning parents. But the entrance is very interestingly decorated with leaves and ribbons, like a door to a cave in the jungle. You can take this idea to decorate your house.
DIY cardboard house for dolls
Every little girl (and not only a little one) dreams of a dollhouse, but you can make it yourself from cardboard. For this you need carton boxes and clear instructions for action. How to make a house for dolls with your own hands?

We'll need
- Middle box
- Scissors
- Stationery knife
- Scotch color
- Jewelry (optional)
- Cut the box in half. Cut off the top pieces of each piece.

- From scraps we form a roof and a floor. Mark a triangle at the top and cut it out as shown in the photo below. From the cut off part it is necessary to make a floor. Cut a hole in it for the stairs. Attach the floor to the wall.

- Cut a roof out of cardboard and stick it on with tape. Under it, attach another sheet of cardboard to the walls, this will be the floor of the second floor of the house. Also make a hole in it for the steps.

- Use a utility knife to make holes for the window. The frame can be painted with white paint.

- From the remaining scraps, make steps. Cut through the doors. The basis of the house is ready, decorate it or not - the choice is yours.
- Ideas on how to decorate the house can be seen below.

- The ribbon makes this house much cozier and more comfortable.

- If the dollhouse is painted in pastel colors, it will look much more interesting.

- It is very easy to make such a house. It is enough to take two boxes, cut them in half and glue them together - you get 4 full-fledged rooms. You can ask your child to draw wallpaper for the house on their own.

- A house of six very different and colorful rooms. Would your child love this?

- You can add coziness to the dollhouse by gluing it with pieces of bright fabric and filling it with furniture, which can also be made of cardboard.
Make according to the layouts in the image cardboard house on a tree, decorate the foliage, decorate with flowers or vines.

Treehouse made of cardboard for toys
Another way to make a cardboard house is to use a cardboard cup. Cut holes in it for windows and front door, wrap with parchment paper, repeat the window and door cutouts.

To make a cardboard cup house beautiful and complete, decorate it with green twigs, shrubs or grass. From toothpicks you can make a ladder.

House - cardboard accordion
The house is an accordion. Take cardboard and cut out your favorite front. These can be English houses or Italian facades, the main thing is to decorate the windows with shutters, make sills, you can attach green decorations to the windows, hang curtains or stick awnings. Any decoration is a space for the development of your baby's creativity.

Every little girl dreams of her own dollhouse. Nowadays, you can find a lot of them in stores, but they are all of the same type and expensive. From this article you will learn how you can make an original dollhouse without spending a lot of money. Such a house will be unique, the child will be able to furnish it the way he wants. Your whole family can have a great time creating their own masterpiece.


Popular master classes
There are many different workshops for making dollhouses. At the same time, a variety of materials are taken: wood, plywood, drywall, laminate, boxes, bookshelves, folders for documents. It's still far from complete list offered materials.

8 photos
The front wall of the house is either not made at all, or made in the form of an opening door. This is necessary for the convenience of the game. We suggest you choose what is right for you and get to work.
plywood, laminate
The option of making a dollhouse for girls from wood is one of the most popular. The undoubted advantages of such a house are its strength and durability. It is easy to decorate both from the outside and from the inside. However, for making wooden house male help is required.


If the house is built with high quality, it will not be distinguished from the purchased one. You can make drawings for building such a house yourself, or you can use ready-made ones. You can attach wheels to such a house and then it will become mobile.

What will be needed:
- Laminate or plywood, it is better to choose a thickness of at least 7 mm;
- jigsaw;
- glue - carpentry, PVA;
- self-adhesive film, which we will paste over the floor in our house;
- wallpaper, they are useful for pasting walls in rooms;
- simple pencil;
- roulette.

Step-by-step instruction:
- We cut out the walls of the house from plywood sheets, according to the dimensions in the drawing.
- We mark where the windows and doors will be located, and cut them out.
- Using wood glue, we assemble the structure as shown in the figure. You can use small nails for the reliability of the design.
- Make a roof. Paste it with corrugated cardboard and paint it, imitating tiles.
- Glue the finished house onto a piece of plywood that is larger than the floors in the house. This will give it more stability. On the plywood that remains on the sides of the house, you can make a lawn.
- Now we paste over the walls in the rooms with wallpaper, the floors with film.
- We arrange furniture.
- We decorate the interior with the help of textiles: curtains for windows, rugs, tablecloths for furniture.


Mastur class for making a plywood dollhouse, see the following video.
See the required drawings from the video below.


From drywall
Many of us after repair have pieces of drywall that are no longer needed. Why not use them to please your little princess? From it you can make a wonderful house for dolls.
A drywall house has a lot of advantages, including: ease of working with it, its lightness. Even if you do not paint the walls of the house after assembly, they will still look neat thanks to its white color. A significant disadvantage of such a house is its fragility. It is worth a little pressure on any part of the house, as it will immediately break.
In order to make a drywall house, you can use the scheme above, or you can simply make cruciform partitions to save space in the nursery. These partitions will divide the rooms among themselves, external walls and there will be no roof.


From large sheets of drywall, you can make a full-fledged beautiful house. Watch the master class in the next video.
Styrofoam
If you have sheets of packing foam lying around your house, you can build a house from them. For work you will need:
- foam sheets;
- glue gun;
- toothpicks;
- wooden rulers;
- bamboo sticks;
- corrugated cardboard;
- wallpaper pieces;
- acrylic paint;
- foam sponge;
- pieces of ceiling plinths;
- necessary accessories for the interior: pieces of carpet, curtains, furniture and everything that your imagination is capable of.

Step-by-step instruction:
- First you need to think about what your house will be like and make a drawing. To save space in the apartment, the house can be built in height.
- We cut the foam in accordance with the drawing. It is convenient to do this with a hot knife, so the foam does not crumble.
- Considering where you will windows and doors, you can make a staircase between floors. Cut out the necessary openings.
- Let's start building the house. W we break the cleaning pieces in half. We will need them to create a more durable structure. We glue the foam sheets with a glue gun, after connecting them with the help of halves of toothpicks.
- We use bamboo sticks to strengthen the floor and ceiling. from Chinese napkins. We glue the sticks to the foam sheets as beams. After that, the sheets intended for the floor-ceiling can be glued to the side walls.
- We glue the interfloor stairs separately. It can be made from foam or wooden rulers. We use toothpicks as a railing. After that, we glue the finished staircase.
- The roof can be glued with foam or corrugated cardboard. Tiles can be imitated by cutting cardboard into small pieces and gluing it, and then painting it.
- On the outer wall you can make a balcony. We glue it from polystyrene foam, we use bamboo sticks as railings
- Outside coloring the house acrylic paints with a regular sponge.
- We cover the walls of the rooms with wallpaper, we cover the floors with carpet. From ceiling plinth cut out skirting boards and window sills, and glue them. We create coziness with the help of curtains on the windows.
- We arrange furniture which can also be glued from foam, and we invite new tenants.

Home decoration can be very diverse. You can use a transparent plastic box, make printouts of the underwater world and put an aquarium in your house. You can print pictures, lay tablecloths on tables, add toys to dolls. Let your imagination run wild and you will get the most wonderful dollhouse for girls.
From a bookshelf / rack
You can make a great dollhouse out of a bookshelf or shelving unit. Making it is very simple, because you already have a ready-made base. To decorate the house, use cardboard, wallpaper, self-adhesive paper, and wrapping paper is also suitable.

Include your daughter in this creative process as well. She will be able to act as a designer for her dollhouse.
If the house is located permanently against the wall, then you can make the roof of the house with black electrical tape, gluing the contours. Glue in the same way chimney. If necessary, rearrange the house to another place, the electrical tape can be safely peeled off without damaging the wallpaper in the room. You can buy ready-made furniture for dolls or show your imagination and make it yourself.

From an old locker or chest of drawers
Your daughter asks for a dollhouse, and an old chest of drawers is gathering dust in the garage? You can breathe a second life into old, already unnecessary furniture. Treat your child by making a dollhouse out of an old locker or chest of drawers . Such houses are very convenient for those whose children play with large or tall dolls.
First of all, you need to know the height of the dolls. This is necessary so that the dolls can be placed in full-length rooms. You may have to combine 2 shelves by removing unnecessary partitions. Work carefully so as not to break inner walls cabinet or chest of drawers. In place of the partitions that we removed, a void that we do not need will appear. It can be glued with thin slats that fit in size.
After waiting for the glue to dry completely, treat the walls of the chest of drawers with a thin layer of putty. After that, the chest of drawers must be sanded, then it will become even and smooth. Using a jigsaw, you can cut windows.

The last step will be the decoration of your house. The outside can be painted. You will most likely have to paint it in several layers in order to cover up the old color of the chest of drawers. The walls inside can be pasted over with wallpaper, colored, packaging or self-adhesive paper. And you can also just paint them. We arrange furniture, hang pictures and mirrors on the walls, curtains, spread carpets and invite dolls to housewarming. Now the dolls in your daughter's room will always be tidied up!
From cardboard
Budget option Making the dollhouse is corrugated cardboard. With it, you can create a wonderful toy that will delight your girl for a long time.
We will need:
- corrugated cardboard for the frame of the house;
- decorative cardboard for decorating a house;
- detail templates that will depend on the size of your future house; sweep;
- stationery: pencil, ruler, eraser, scissors;
- knife, paints, brushes, felt-tip pens;
- glue gun;
- colored, packaging and self-adhesive paper;
- the cloth;
- decorative elements - beads, rhinestones, stones, artificial flowers.


Let's start making a house:
- If you have a large sheet of corrugated cardboard, then you can apply a scan on it. Choose the dimensions based on the size of the house. If there are no large sheets, then each part must be cut out separately. The front wall does not need to be done.
- In order to make it convenient to bend the cardboard, it is necessary to make a groove at the place of the fold by drawing a ruler along it. If all the details are cut out, glue them at the joints of the cardboard.
- Cut and glue interior partitions. In such a house, they are simply necessary. They will perform a supporting function.
The structure is assembled. You can start decorating.
Inside the walls it is better to paste over with decorative paper or cloth. So you hide the seams in the places of gluing. Outside, the walls can be decorated to your taste: paint, paste over. Decorate your home with beads, rhinestones, pebbles or other items of your choice. Pay attention to the fact that the decor elements hold well on the cardboard, otherwise the house will lose its attractiveness during the games.
Arrange the furniture and invite the child to play.

Master classes on making a cardboard dollhouse, see below.
Out of the boxes
Very easy to make dollhouse out of boxes. For him, you will need to choose the right size boxes. The size will depend on the height of the dolls for which this house is made. The number of boxes will depend on the number of rooms you are going to make. One box, one room. Such a house can be made multi-storey by gluing the boxes one on top of the other. This will save space in the room.
It is necessary to fasten the boxes together so that its top is on its side, opening the interior of the room to the eye. It can be done different ways: using a stapler, glue, double-sided tape. Cut out windows. We decorate the house according to your taste. We furnish the furniture and delight the girl with a new toy, for which you spent a minimum of money and effort.


Watch the following master class, which shows in detail the process of making a beautiful dollhouse out of a box.
A great box house is easy to make! See the following videos for more details.
From document folders
If there is very little space in the children's room, you can make a folding dollhouse.
For such a house, we need 4 folders for documents. We glue each folder inside with beautiful paper - this will be wallpaper for the walls. Decorate the clip of the folder with a cloth, making a kind of curtain out of it. Print out interior items on the printer and stick on the walls. The house is ready. It remains to open the folders and put them vertically. Add the necessary furniture.

Today we will tell you about how to make a New Year's house out of cardboard with your own hands. In this we can step by step master class, scheme and template, which can be downloaded (see below).
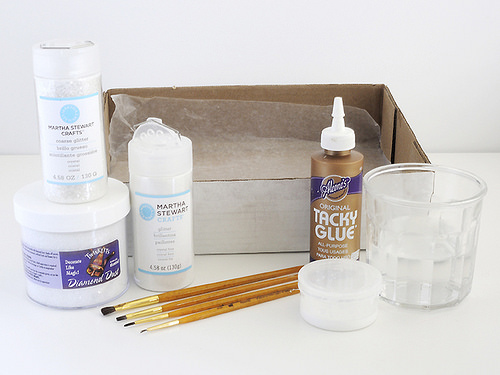
Tools and materials Time: 4 hours Difficulty: 7/10
- 1 sheet of designer cardboard of a suitable size for the house (you can use cardboard in two colors: one color for the walls, the other for the roof and window and door decoration) and 1 more sheet for the base on which the house will stand;
- a piece of transparent film to simulate glass in windows;
- a template for a New Year's house made of cardboard (you can draw it yourself or download a drawing);
- scissors;
- glue;
- white small sequins;
- flat and round brush;
- artificial snow.

Now you can even find ready-made kits for making these cute jewelry on sale, but it’s much more fun to do everything yourself from start to finish, attracting the help of kids who will definitely like this activity.
Step by step master class
Step 1
Draw or print out a template and cut out a blank for the house (walls, roof and chimney) from cardboard.
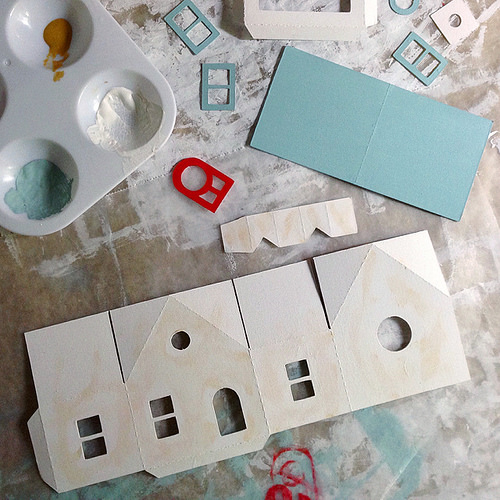
Step 2
We bend the cardboard blank along the fold lines and glue it. To make window shutters and doors look more voluminous, it is better not just to draw them on the walls, but to cut them out. additional details the required form of cardboard and stick. From within window openings sealed with a film imitating glass.
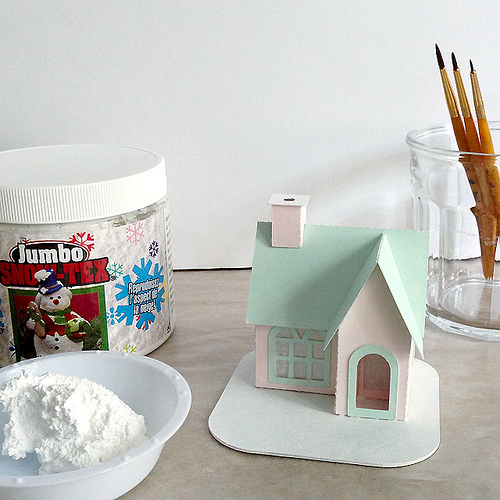
Step 3
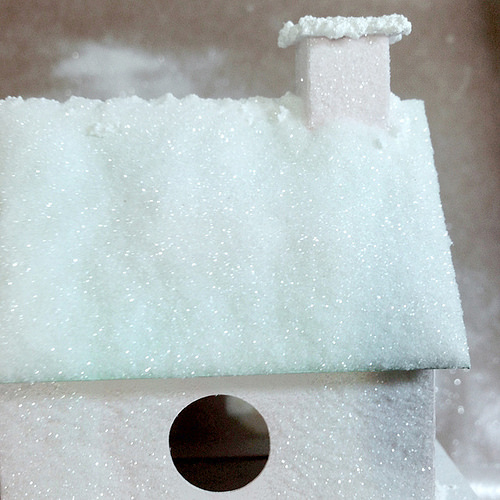
Let's get started with the snow. A jar of artificial snow can be purchased at any craft store. In places where we will have snowdrifts, we apply a little glue and put snow in piles on top of it with a round brush, giving a realistic volume. Remember how the roofs of houses look in winter, and this will help you in your work.


Step 4
When the work with snow is completed, let the product dry thoroughly, after which we proceed to create a shining ice frost on the walls of the house. To do this, in turn, each wall with a flat brush is completely smeared with glue and evenly sprinkled with a thin layer of white sequins. Blow off excess glitter powder.

Our fabulous house-decoration is almost ready. It remains to decorate the shutters and doors to your taste, as well as glue the craft to the cardboard base.

Alternatively, the house can not be glued, but simply put on top of the base, additionally decorated with homemade trees. And in the evenings, try to light it inside LED candle on batteries. It looks amazing and really looks like a fairy tale!