Sliding bookcases with their own hands. Do-it-yourself bookcase: features and varieties. The use of furniture boards
Buying a bookcase is a rather expensive process, and besides, it is not always possible to find the model in the store that will fully satisfy all the needs of a book lover. Self-manufacturing bookcase helps not only to save money, but also opens up new possibilities for designing an individual model of the right size. Learn about the features and methods of making a bookcase with your own hands.
DIY bookcase: features and varieties
Before starting the manufacture of a bookcase, we suggest that you familiarize yourself with its varieties. In relation to the design features, open and closed models are distinguished:
- open bookcase - provides an opportunity to select a book without opening the cabinet door, however, in this case, the products absorb dust and moisture from the room, eventually losing their presentation;
- closed bookcases - more bulky and less aesthetically pleasing, such designs perfectly protect books from external irritants.

In addition, there are:
- vertical;
- horizontal bookcases.
This embodiment is determined by the availability of free space in the room, its dimensions, and the style of interior design.
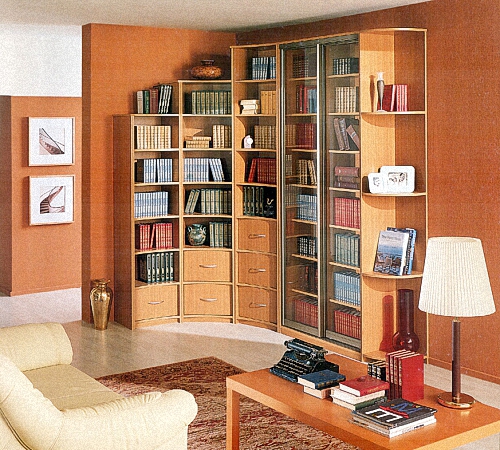
Case-type bookcases are quite popular both in apartments and in private houses. They differ in a variety of shapes and configurations, in relation to the design, the number of shelves, the presence or absence of doors, the material for their execution are individually selected.
Modular designs are a combination of individual elements from which it is possible to obtain a cabinet of various shapes, heights and widths. This cabinet is versatile and perfectly adapts to the various parameters of the rooms in which it is installed.
Built-in type bookcase is a sliding door system, the main structural parts are fixed on the ceiling or on the walls.
The corner bookcase is a great solution for small spaces. The design fits well into any interior, is characterized by large capacity, compact size, optimal use of corner space, easy accessibility of books.
Do-it-yourself drywall bookcase
Drywall is an excellent material for making various furniture at home. To work, you need a minimum of skills and tools. A drywall bookshelf or bookcase must have a certain strength, so it is recommended to build a high-strength frame and use several layers of drywall.
To obtain perfectly even internal and outside corners, use a special steel profile for additional reinforcement. If the bookcase will be located next to the kitchen or bathroom, use a moisture-resistant drywall option. In order to fill the internal space of the shelves and avoid dull sounds when hitting the structure, install a heater inside, for example, mineral wool.
It is possible to manufacture a combined bookcase, the walls of which are made of plasterboard, and the shelves are made of glass or wood.
Before starting work, make drawings for the bookcase with your own hands. The scheme of the bookcase is determined by the place of its installation and the dimensions of the structure. Determine the thickness of the shelves, their number.
- level;
- plumb;
- paint cord;
- pencil
- square.

It is possible to supplement the design with a built-in lamp. Wiring is done before installing drywall. In relation to the marked lines, install the guides using dowel nails. After the construction of the frame part, the profiles are fixed using a suspension or special self-tapping screws. The transverse bar gives additional rigidity to the structure. The strength of the structure determines the installation step of the profiles.
There are two options for the frame for drywall:
- metal;
- wooden.
The first option is used more often, as it is characterized by maximum strength and good performance. wooden frame prone to shrinkage, collapses under the influence of a humid environment. In any case, after installing the frame structure, the process of plasterboard sheathing follows.
In relation to the load, sheathing is carried out in one or two layers. All sheets are fixed in a checkerboard pattern. The following is the process of finishing the previously designed cabinet:
- separating tape is glued to the joints between the planes;
- seams are puttied with reinforcing mesh or tape;
- perforated corner joints are installed on the corner sections;
- the entire surface is puttied and painted.
If there is lighting in the cabinet, pre-build holes for the lamps. Their installation is carried out at the final stage.

DIY bookcase made of wood
Solid wood bookcases are expensive and belong to the elite class. Such furniture needs enhanced care in order to avoid loss of presentability. Wood is a living material that is prone to absorb moisture and odors. It is forbidden to place mugs with hot water, or sharp objects.
Among the advantages of bookcases made of natural wood, we note:
- environmental safety - the material "breathes", the furniture is characterized by zero toxicity, with high humidity in the air, it absorbs it, and when it is low, it gives it back, thus regulating a healthy atmosphere;
- long service life - proper wood processing ensures its long-term use in everyday life;
- natural and aesthetically pleasing appearance- another indisputable advantage wooden furniture, the room, with the help of such a cabinet becomes more comfortable.
DIY bookcase photo:
Allocate various varieties wood for the manufacture of bookcases, softer and more pliable are linden with alder, cedar, linden. Materials with medium hardness include birch, oak, mountain ash woods. Birch, acacia and pistachio are considered the most durable and hard.
Before you start working on a bookcase, decide on its dimensions. This is followed by the process of calculating the amount of wood, fittings and fasteners. As additional materials for finishing use slats, curb elements, metal or glass connections.
If you have no experience in making bookcases, we recommend using cheaper types of wood. After selection suitable material decide on the model. The basic elements of bookcases are:
- side panels;
- shelves;
- upper and lower sides;
- facial patches;
- additional shelves.
These components vary according to the cabinet type. After defining the model, the process of acquiring materials and preparing the tool for work follows.

Among the standard tools for working on a wooden bookcase, we highlight:
- electric drill;
- jigsaw;
- roulette;
- screwdriver;
- furnishing components.
On the initial stage work, prepare the parts and process them on special equipment. The following is the process of assembling the frame part. The most difficult option is a corner-type bookcase. There are several options for such structures:
- triangular;
- trapezoidal;
- g-shaped;
- five-walled.
In order to avoid distortion or deformation of the structure during operation, it is not recommended to build too complex models. The ratio between the height and width of the cabinet is five to one.
Initially, the frame part of the cabinet is assembled; for these purposes, you will need a screwdriver, previously prepared parts and fasteners. Using a level, check all connections for evenness. After building the frame, install the shelves. The back wall is recommended to be made of plywood in order to save material.
The finished structure is covered with a primer, moisture-proof material and paint or varnish. Additionally, front doors made of glass and fittings are installed to decorate the finished structure.

Do-it-yourself bookcase from chipboard
The optimal depth for a home wardrobe is 40 cm. The dimensions of a home wardrobe are 20x80x40 cm. Such dimensions are optimal for storing books and magazines. Optimum - inexpensive and easy to process material for the construction of a bookcase - chipboard.
In the process of work, you will need a tool in the form of:
- shooter;
- confirmation drill;
- tape measure and pencils;
- self-tapping screws.
In addition, prepare fasteners in the form of confirmations, furniture corners, thrust bearings. Before starting work, make drawings or use ready-made options. For sawing and veneering parts, use highly professional equipment or contact specialists.
When using a jigsaw to cut parts, be careful as there is a risk of damaging the appearance of the chipboard. For the manufacture of rear wall cabinet, use plywood or fiberboard white color, at least 3 mm thick.

After preparing the parts for work, the assembly process follows, which is consistent with the drawings. Initially, the frame part is assembled in the form of a rectangle. For these purposes confirmations are required. Install the confirmation and fix it with a screwdriver. All ends must be connected flush, check the evenness of the connections with a level. Check the diagonals of the structure.
This is followed by the process of fixing the back wall of the cabinet, for this, use self-tapping screws or nails, in relation to the material of the part. The minimum mounting step for self-tapping screws is 10 cm. Additional rigidity of the structure is provided by confirmations installed in the places where the shelves are fixed. To close the hats, use special caps, matched in color to the cabinet. Set the shelves in relation to the bookcase project. Install decorative overlays on the front of the product. Install overlays, fittings, if necessary, make a door to the bookcase.
Making a bookcase with your own hands
We offer the option of making a bookcase with your own hands with glass. Among the advantages of such a design, we note:
- attractive appearance;
- ease of manufacture;
- protection of books from high humidity and dust;
- availability of materials for manufacturing.

It is more difficult to build such a bookcase than a regular shelf, however, this design has protective properties that protect books from the damaging effects of external factors.
In standard bookcases, the interval between the shelves is about 22 cm, and the depth of the shelves is 35 cm. Bookcases of standard variations consist of two compartments - upper and lower. The upper part is designed to store large books, and the lower part is a blank facade.
The main elements of the bookcase are:
- upper, side and lower sidewalls, from which the frame of the structure is constructed;
- face pads of vertical and horizontal type;
- shelves;
- doors with glass inserts;
- the back wall, most often made of plywood or fiberboard.
To fix the shelves, brackets with corners are used, thus improving the aesthetic appeal of the structure. For milling grooves, use a special nozzle on the drill.
Assemble the frame part of the cabinet in relation to the drawings, and then install the shelves on the sides. Additionally fix the shelves with glue for working with wooden surfaces. Drying time of the structure is at least one hour. Use self-tapping screws to secure the top of the cabinet. The following is the processing of the bookcase paintwork materials. Additionally, we recommend using impregnation with moisture resistant characteristics. Previously, all the details of the cabinet are subjected to grinding.

To keep books on the shelves, install face plates on them, which perform not only a practical, but also an aesthetic function. Glass, for a bookcase, choose tempered. We recommend cutting it in advance, using the services of specialists. It is possible to decorate the cabinet with multi-colored glass or mosaics.
It is more difficult to build a corner bookcase with your own hands, such designs are distinguished by good capacity and save usable space in the room. The success of obtaining a quality product is correctly constructed drawings that determine the nature of further work.
Books are not only a source of knowledge that teaches life, relationships and communication culture. For people who are passionate about literature, a book is an object of reverent worship, a friend and comrade.
And despite the fact that modern world offers a lot of opportunities to have a lot of books in electronic form, which is much more convenient and affordable than the paper version, anyway, every home should have a library. Let it be small, but filled with classical and modern literature in a traditional, familiar form.
Of course, we know that it is best to store books in bookcases specially designed for this purpose. But if you are a young family, have recently bought a home and have not yet acquired the necessary furniture, then a bookcase will probably be at the bottom of the shopping list. However, there is a great way out - to make a wardrobe with your own hands.
Types of bookcases in the interior, their advantages
Now designers offer many solutions for the interior:, unusual bookshelves. There are many options, and often among them there are simply unimaginable, but surprisingly simple in execution. Let's look at the simplest, but at the same time beautiful and interesting option a bookcase that is easy to make yourself.
Traditionally, bookcases come in two varieties: open and closed.
- Closed cabinet more convenient for storing paper books, as it does not allow sunlight, moisture and dust to penetrate inside. The disadvantage of books is that they absorb dust and moisture very strongly, and this deteriorates, which subsequently negatively affects human health. On the other hand, a bookcase closed with solid doors has a rather bulky appearance and does not look very nice in a small room . This can be avoided if the doors are made of glass. Shaded glass will protect books from the harmful effects of sunlight.
- open bookcases they look light and airy, they fit well into a room with a small footage. Usually they are narrower than closed cabinets, and are intended, in addition to storing books, for things and objects that play a role in interior design. If you opt for an open bookcase, then you will need to constantly maintain a certain climate in the apartment: humidity , temperature, purity level. But on the other hand, such a cabinet gives easy access to books, which is very important if you like to read. In addition, open cabinets are very easy to assemble, and it is easy to model them as fantasy tells.
Bookcases are also made in horizontal and vertical versions, and in shape - rectangular, corner or shelving. Before choosing the cabinet that suits you, take into account factors such as free space in the room, its size and interior style.
The most popular and common cabinets designed for storing books and other things are cabinets. Such cabinets are available in a wide range of models, and you can easily choose how it will look according to your preferences: without doors or with doors of any kind - hinged, sliding, accordion, glass or deaf.
The modular design of the bookcase allows various combinations of elements. Thus, you can get a cabinet of any configuration, width and height. This type of bookcase is versatile, because different variations are easy to adjust to any room - both large and small.
The built-in bookcase is a kind of system sliding doors. All parts of such a cabinet are attached to the walls, ceiling and floor. There are a lot of design options, but the most common are side partitions without a cover and a bottom and walls of the room as boundaries.
If you have a small apartment and a lot of books, then corner cupboard will be the best solution. This design is very roomy, compact and fits well into any type of interior.
We make the cabinet ourselves: the necessary materials and tools
There are a lot of materials used for the manufacture of furniture now, and they will form the cost of your cabinet. Models of an exclusive nature are made from expensive materials, such as natural wood, solid wood or veneer. But for more affordable cabinets, materials such as chipboard or MDF are used, with a laminate, polymer or melamine coating. MDF - more modern material, it differs in the increased durability and environmental friendliness. It is produced in the form of plates by dry pressing of small chips when exposed to high pressure and temperature.
So, to make a cabinet with your own hands, you will need:
- Milling machine;
- Sander;
- Sandpaper;
- Hacksaw, drill and screwdriver;
- A hammer;
- Nails and screws with washers;
- Roulette and pencil;
- Joiner's glue;
- Lacquer and stain;
- Shelf blanks made of furniture board;
- Sheets of plywood for racks, support covers and back wall;
- Beams from a natural tree for legs.
What to consider when drawing up a cabinet drawing
- First of all, decide on the model of the cabinet and the place in which it will stand. Divide the cabinet drawing into several constituent parts carefully drawing every detail. Good assistants in this matter for you will be such specialized computer programs as Basis Furniture Maker or AutoCad. When creating drawings, take into account any little things, even the plinth on the floor of the room, which can easily eat five centimeters from the closet, and besides, it will not allow you to move it to the wall. In this case, the bevel of the vertical edges from the side of the plinth will help. Also, the skirting board can be completely removed.
- Now determine the exact dimensions of the cabinet. This means not only the width and height, but also the number of shelves, as well as the distance between them. The smallest depth of a shelf for books is 20 cm, for deeper shelves - 30 cm. The thickness of the shelf should be at least 2.5 cm with a length of 1 m, this will help to avoid sagging.
- Be sure to decide on the color of the furniture in advance. There will be no problems with this, since modern industry offers a large selection of colors and shades.
Preparing cabinet details
After all the drawings are prepared, start preparing the cabinet parts. Sawing parts is a rather complicated job, so it is better to entrust it to specialists. A chipboard sawing machine is quite expensive, and it does not make sense to buy it for the sake of making one piece of furniture. You can use a jigsaw, but the work will be, firstly, very long, and, secondly, not of sufficient quality. It is best to order chipboard sawing at the place of purchase.
We take as a basis for the production of a standard rectangular open-type cabinet. For it we will use chipboard veneered with oak and oak itself. You can paste over the rectangular ends of the panels with veneer, or prepare oak slats in advance, which will be glued to the ends, and rounded off towards the end of the work.
- Take a width of 30 cm and a length of 3 m, and cut them into blanks 1.6 m long. After that, you need to fit the size of the rail. Here you will need a template for leveling the board, a sawing machine and a guide. The dimensions of the template are as follows: length 1500 mm, thickness - 20 mm, width - 250 mm. When sawing, place the template under the board.
- Prepare the required number of rails. They will need to be passed through the planer, while being careful: both sides should be parallel to each other and absolutely even. Also, the rails should be sanded so that the surface is perfectly smooth.
- The slats are completely ready, and now they need to be attached to the chipboard with glue. At this point, you will need a clamp. To prevent the workpiece from being squeezed when clamping the clamp, place a piece of plywood of a suitable thickness under it. When glue comes out of the seams of the parts when clamped, carefully wipe it with a rag, or remove it with a chisel after drying. The slats should be joined at an angle of 45 degrees.
Edge milling and cabinet back
End milling is not a difficult and lengthy job, but it still requires accuracy and thoroughness. It is necessary to choose the right cutters for the relief and clearly set the desired overhang; when feeding the workpiece into the milling cutter, it is necessary to observe smooth movements and avoid deviations to the sides.
Before starting work, check the performance of the cutter on excess trim. After the desired size is set, start processing the rails.
When the milling is completed, check the contact of the workpiece with the working part. If there are gaps and crotches between them, remove them with 150 grit sandpaper. Such differences will be noticeable after you open the finished cabinet with varnish, so you need to eliminate them immediately.
The back wall of the cabinet is an inconspicuous side, so it does not require special processing and finishing. But exactly how well you install it depends on the overall reliability of the entire structure. The back wall is the connector of the entire cabinet, on which all other parts are attached.
Most often, sheets or pieces of plywood are used for the back wall of furniture. Such material is very easy to process, and its installation will not take much time. Using a sawing machine or electric jigsaw, cut off the pieces of the desired size, and remove the chamfer from the saw cuts with sandpaper.
If you need a more durable, strong back wall with high wear resistance, make it from chipboard, which is much heavier in weight. But remember that such material is much harder to process, and requires both special fasteners and certain fastening methods.
Getting Started with Cabinet Assembly
Now you have all the necessary details ready, and you can start directly assembling your bookcase. It must be done on the most even surface in order to prevent distortions.
Attach the side walls to the top, for this, use the corner to prevent uneven corners at the joints. Drill holes for fasteners; use a drill with a diameter smaller than the diameter of the connecting element. Now pull the parts together with fasteners. Highly a good option- confirmation, it is convenient to use and practical. Buying it, you also get a hex key, which will facilitate the clamping moment.
After you have fixed upper part cabinet, go to the bottom, while not forgetting to use the corner when adjusting the joints. Having connected all these parts, begin to mount the shelves. Do not rush to fix the back wall, without it, the installation of shelves will be much easier and more convenient. Since bookcase shelves are constantly subjected to loads, it is not worth making them removable. It is easier to fix them with the same confirmation, and it is best to make 3-4 fasteners for each of the side walls. Thus, not only the shelves, but the whole will receive additional stability and reliability.
So, we have come to the final stage - the installation of the back wall. In the event that you opted for chipboard, a construction stapler, self-tapping screws or nails will serve as fasteners.
Video about assembling a bookcase with your own hands
Well, now you have an original bookcase in your apartment that you assembled yourself. As you can see, this work is not only simple, but also does not require large financial costs. Now in your interior there is an exclusive piece of furniture that cost you much cheaper than store counterparts. And if you have any questions, you can ask them in the comments, we will be happy to answer them.
Furniture - an element that surrounds a person everywhere: at work, at home, in catering establishments (cafes, restaurants), in public institutions and show business establishments. The ergonomics and aesthetics of furniture directly affect the labor and personal efficiency of a person, the general mood and much more.
Its convenience should be both functional and aesthetic.
Functionality or ergonomics directly depends on ease of use, on compliance with certain technical parameters that can be expressed in terms of height, width, number of shelves, maximum load, the ability to change height, width.

For a home office, bookcases are a must.
Aesthetics cannot be expressed in numerical terms, but at the same time it is an equally important component. How organically the proposed solution looks in terms of the situation in the room, how it meets the expectations and preferences of a person, directly affects his mood, a sense of satisfaction and harmony.

Such a rational use of space will give you the opportunity to arrange literature on the shelves so that it is always at hand.
One of the attributes that affect the aesthetic, intellectual, emotional condition of man are books. For some, it is a status symbol, for others it is part of the decor, for others- element of worship, for fourth- way to diversify your leisure time. Therefore, the literature must be stored somewhere. For any person whose needs are slightly higher than physiological and security needs, the question will be important not only where, but also how to place books.

One of best options The solution to the problem is to create a bookcase with your own hands.

The bookcase will be located in a room with certain dimensions, which, most likely, already has furniture, and the bookcase itself will be designed to accommodate existing or planned to purchase literature.

The bookcase should be in harmony with the room, furnishings and books.
- Wardrobe and furniture.
They must form a single composition. If the furniture is made of MDF, then the cabinet should be made of this material to maintain a single composition.

The materials must be of the same type.
- Design.
The bookcase and furniture should be made in the same style. If the room is formed classic interior, then a Hi-Tech bookcase will look unnatural in it.

Books in a room can dramatically transform the interior of a room.
- Wardrobe and room.
Naturally, it cannot be higher than the room. In addition, the bookcase should organically “fit” into the room and not interfere with movement around the room and give access to other areas and furnishings. An example for understanding: place a cabinet with outward-opening doors near front door would be an unfortunate solution, since the doors in the open position will prevent entry or exit from the room.

Bookcases and bookcases filled with books create a special atmosphere.
- Wardrobe and books.
The number and depth of shelves directly depend on the type of books. If the owner has real tomes, the shelves should be higher and deeper. If the library is represented by standard volumes, it is better to make niches smaller.

Books can add both seriousness and gravity, for example, in the study, and have a relaxing touch, filling the atmosphere with calmness.
Drawing
When drawing up a drawing, you need to pay attention to two nuances. You should use the level to check how horizontal the floor in the room is. If this is not taken into account, it is possible that the shelves will be located at an angle to the surface. If there is a slope, a decision should be made as to which is easier - to level the surface of the room itself or to take into account the slope in the structure and compensate at the base of the cabinet?

Bookcase drawing.
It looks like this: if the slope is 2 mm per 1 m of distance, then the height of the legs should compensate for this. If the cabinet is 1.5 m long, then in the direction of the slope, the first leg should be 3 mm less than the second.

The level must be checked both along the wall and perpendicular to it.
Pay attention to the presence of a plinth in the room. If it is, you should either take this into account in the design, which will involve a large amount of work in preparing the drawing and manufacturing the structure.

Or you will need to remove the plinth in the place of the intended location of the bookcase.
Tools and equipment
- Screwdriver.
- Level.
- Milling machine. Designed for the manufacture of grooves for shelves, which gives the structure a more aesthetic appearance. A certain skill is required. In the absence of such, or it is impossible (inappropriate) to purchase a milling machine, an alternative would be to mount using brackets, which will simplify manufacturing, but will make ready product less attractive.
- Drill, chisel, hammer.
- Brushes for painting, fabric cloth for removing traces of varnish and stain.

Tools for making a bookcase with your own hands.
materials
If there is little experience in making joinery with your own hands, it is advisable to take an MDF board as the main material.

The optimal combination of aesthetic characteristics, reliability and ease of processing.
You will need:
- D for the sidewalls, two sheets of MDF 198 * 40 * 2 cm; Top 100*40*2cm;
- P olki (also MDF) - 7 pcs. 97*40*2 cm (the back can be made from chipboard material – 200*100);
- To MDF frame 2 cm wide and 8 mm thick. 2 slats of 2 m and 2 of 1 m;
- With wood glue for woodworking (it is advisable to take glue Moment of installation is a super strong plus);
- 2 corners;
- Sh urupy;
- Morilka;

Materials for making a bookcase.
In order not to cut on your own, when buying chipboard and MDF, it is advisable to ask to cut the materials in the store.The edge, MDF, stain for chipboard should be matched in one color composition.
For those who don't know how to make a bookcase with your own hands , we suggest using a simple instruction.
- We apply stain on a chipboard sheet and let the sheet dry.

Wood impregnations are primarily used to protect wood from damaging external influences.
- On the inside of the side parts, we mill grooves 2 cm high and 5 mm deep. The first groove is at the level of 9 cm, then we make 6 more grooves with an interval of 25 cm between the edges of the groove.

MDF waste can be used as guides.
- We apply glue to the grooves. We put the side part horizontally on the floor with the grooves up, insert the shelves into it and insert the second side part from above.

Let the glue dry for 1 hour.
- We put the product vertically. From above, we connect the upper part with the main one with screws. To give the structure stability, we additionally fasten 2 corners in the inner part.

The top and bottom of the rack, which are adjacent to the ceiling and floor, can be finished with a wooden plinth.
- We attach with screws at the back chipboard to the bookcase.

We fix the back wall.
- We edging the edge of MDF. You can use screws, which is more reliable, but less attractive. You can use glue, which looks more aesthetically pleasing.

Bookcases are usually installed in the living room, but if there is space, they can be located in the bedroom or hallway. This piece of furniture can have different sizes and characteristics, and also has a different capacity. Many people love to read books, so optimal storage of their library requires a cabinet that has the right dimensions and other features. If you can’t find the optimal model, then it is possible to independently make a bookcase with your own hands from different materials.
Before direct work related to the formation of a bookcase for books with your own hands, you need to determine which model will be created. Designs should be well suited to the style of the room, its color scheme and other parameters of the room.
Bookcase models can be:
- open - they consist of open shelves, so there are no doors. The creation of such a cabinet is simple work, for which you do not need to buy a lot of expensive materials. The disadvantages include not too presentable appearance;
- closed - such models are considered the most optimal for structures designed to store books. This is due to the fact that they are equipped with doors, so the books are reliably protected from direct sunlight, dust or possible ingress of moisture. For a more attractive appearance of such a cabinet, glass doors are used, but glass is used for this, which has high strength.
By design, do-it-yourself bookcases can be:
- vertical;
- horizontal.
For selection optimal design it takes into account what dimensions the room itself has in which it is planned to install the piece of furniture. Additionally, you need to remember about the style of the interior and the availability of free space in the room, since too bulky design in a small living room will visually reduce its size and adversely affect its attractiveness.
Additionally, there are types of cabinets:
- cased - chosen by many people most often for convenient location a large number books, newspapers or magazines, as well as many other small items. The filling of such a cabinet is chosen by the direct users, so it can be equipped with hinged or sliding doors, and it can also be made without facades;
- modular - consists of a large number of different modules, and they can be combined and rearranged, which allows you to always effectively change the appearance of the cabinet. Due to this unusual option, you can embody original design ideas for each room and style. If the room where you plan to install the cabinet has small size, then several modules are removed to save space;
- built-in - usually this design is formed by connecting a different number of sliding doors. A feature of this option is that all walls are fixed directly to the walls of the room, as well as to the ceiling and floor;
- corner - is chosen for small rooms. Occupies a certain corner of the room, so significant space is saved. It is well suited for different interiors, it is compact in size, has excellent capacity and creates easy access to books.
If a built-in version of a bookcase is chosen, then it is desirable to form it in a certain niche of a particular room.

built-in

L shaped

Classical

Tools and materials
Before directly creating a structure, you should decide what materials will be used for this. It is allowed to apply different materials, but wood cabinets are considered the most suitable for different rooms. For this, different types of wood can be used, for example, cherry or oak, birch or walnut.
You can buy solid wood or veneer, any option is of high quality and beautiful appearance.
If it is not possible to spend a lot of money on the purchase of such an expensive material, then MDF or chipboard is chosen, as well as other lumber, on top of which there is a high-quality polymer coating. MDF is considered an ideal choice for an inexpensive and acceptable quality cabinet. It is produced by dry crimping and is characterized by high strength and environmental friendliness.
Additionally, you need to decide what the doors will be made of. They can also be made of wood, but it is allowed to use plastic or glass for this. Glass doors are considered the most interesting and unusual, so they are chosen quite often, but you need to make sure that high-strength tempered glass is used.
Of the tools you will need:
- screwdriver;
- Grinder;
- sandpaper;
- a machine designed for high-quality milling;
- drill and hacksaw;
- tape measure with a pencil;
- wood glue and varnish;
- fasteners;
- blanks intended for the formation of shelves and created from a high-quality furniture board;
- plywood used for the back wall and cover;
- material for the legs, and small wooden elements made of oak are considered optimal.
The design made of high quality wood will last for many years, and will always please with an unusual appearance, and such models are suitable for any interior.

MDF boards are perfect for a bookcase
Before the direct process of creating a structure, preparatory steps are performed:
- a specific model is selected, which will be created by oneself;
- the entire cabinet is visually divided into separate constituent elements, after which a drawing is formed for each part;
- to simplify the process of forming a drawing and diagram, you can use modern and easy-to-use computer programs;
- it is decided what dimensions the cabinet will have, and the main parameters are: width, height and distance between the shelves;
- according to the drawings, sawing of parts that are the main elements to obtain a full-fledged and high-quality cabinet is carried out;
- if chipboard is used, then it is advisable to order a cut from specialists, since if specialized equipment is not used, then uneven cuts, chips and other shortcomings are obtained;
- if it is necessary to make rectangular ends of the panels, then for this they are easily and quickly pasted over with veneer.
During the preparation of parts, it is necessary to constantly check with the existing drawings and diagrams, since there is a high probability of creating low-quality elements that cannot be used in the future.

Cut out curly pieces

All parts must be sanded

Bookcase Parts
End milling
This procedure does not differ in particular duration and complexity, but it will have to be given a lot of attention, since without this process a not very attractive result may turn out. For perfect work, the rules are taken into account:
- cutters are correctly selected, designed to form a beautiful and optimal relief;
- a departure with the necessary parameters is clearly and competently set;
- high-quality and modern milling equipment is used.
The main features of milling include:
- securely fixed and prepared by the milling cutter;
- during the feeding of the workpiece to it, it is not allowed that it deviates or moves to the sides, as this guarantees a poor work result;
- when performing the process, it is necessary to ensure that all movements are smooth and careful;
- before work, it is recommended to make sure that the equipment is working, for which milling is performed on a small unnecessary element;
- processing of rails should be performed only after setting the optimal size;
- after work, the place where the workpiece touched the working part of the tool is checked;
- if there are small irregularities, they are carefully cleaned with sandpaper, since if this process is not performed, then after coating the elements with varnish, irregularities will be clearly visible.
Thus, milling is easy if you follow the basic steps and rules, as well as use high-quality and modern equipment.

End milling

Slot milling
Back wall
In the photo of various bookcases, it is almost impossible to see the back wall, so it is usually well hidden. This allows for its creation to use inexpensive and easy-to-process materials. Usually a standard chipboard sheet is used for this.
Although the back wall cannot spoil the appearance of the cabinet, the reliability of the entire interior item depends on the correct fixation of it, since it acts as a connecting element.
To form the back wall, a sheet of chipboard or plywood is most often used. These materials are considered easy to process, so it will not be difficult to cut out the necessary parts from them. Cutting can be done with an electric or manual jigsaw, and a special sawing machine is often used. Before cutting, it is necessary to mark the sheet to get a perfectly flat back wall that has the desired dimensions. The chamfer is removed with the help of the skin.
If you want to get a fairly reliable back wall, then it is recommended to use chipboard instead of plywood. This material has more weight, and it is also quite simple to mount it. It can withstand various loads, so it is considered an ideal choice for a cabinet that will hold a lot of heavy books.

For the back wall of the bookcase, chipboard is most often used.
Cabinet assembly
How to make a bookcase with your own hands? After performing numerous preliminary works, the direct assembly of this design begins. This process is divided into successive steps:
- initially, the place where the work will be performed is selected, and it should be represented by a flat surface, since in the presence of distortions various irregularities may appear in the final structure;
- side walls are attached to the upper part, and a corner is used to check the evenness of the elements, and only after the measurement is fixed, and this approach will prevent unevenness at the joints;
- holes are drilled for fasteners, for which a drill is used, and its diameter should be slightly smaller than the selected fastener;
- the parts are securely and firmly pulled together with fasteners, and the best choice for this process is a confirmation that is twisted with a hexagon;
- after fixing the upper structural element, the fixation of the lower part begins, and before that, much attention must also be paid to quality measurements using a corner;
- then the back wall is attached, for which a pre-cut sheet of plywood or chipboard is used, and for this you can use nails or even a construction stapler;
- the fastening of the shelves begins, and they will be affected by a really significant load due to the use of a large number of books, so it is not advisable to make them removable;
- it is advisable to fix the shelves with a confirmation that ensures the reliability and durability of the elements;
- doors are installed using hinges if the structure being created is formed with facades.
Thus, the bookcase can be done by hand. In this case, the ideas of future users are embodied, and a really interesting design is obtained. The best materials for this are wood or MDF. During the process, much attention is paid to the creation of a drawing, the selection quality material, correct measurements and reliable fixation.
Books are a source of knowledge and inspiration, a teacher of the life and culture of society. Despite the fact that today many have switched to electronic versions, paper ones are still in price. There are people who buy them, read them, store them, exchange them, give them away. Just like that, you need to have a stylish bookcase in your apartment, where you can store all the most valuable and informative copies.
If the apartment has a study, then such furniture will find its use in it - it’s good to use it for storing documents, printer paper, folders, etc. Modern furniture stores offer a wide variety of bookcases, but can they compare with those what is done with your own hands, where the soul, imagination and strength are invested.
Varieties
Divide cabinets into open and closed. The latter are more convenient
 though they take up a lot of space. There are also subspecies:
- Vertical and horizontal version.
- Corpus.
- Modular.
- built-in.
- Angular.
It should be noted that the corner view is great for a small room or office, as it can store a lot of books, magazines and other printed materials. It allows you to easily reach books, does not take up much space and combines stylishly with other furniture.
What material is better to use
 You can make a bookcase from any material, but, of course, the most win-win option is wood, which is always valuable, lasts a long time and does not lose its original characteristics. However, it is quite expensive to make furniture from natural wood, so not everyone can afford to buy it.
So, MDF or chipboard is suitable as a replacement. These are durable and environmentally friendly materials that are comfortable to work with and do not deteriorate over the years. You can also make your own bookcase from other improvised materials. But it is important that they are strong and reliable.
Tools for the job
Do-it-yourself bookcase is difficult, but you can learn if you want. It is advisable to first watch a few video tutorials and read special literature so that the product turns out to be of high quality, durable and functional. First of all, you need to prepare the following tools:
- screwdriver;
- hacksaw;
- grinder;
- milling device;
- a hammer;
- roulette;
- pencil;
- nails and screws;
- wood glue and varnish;
- blanks for construction.
 You should start with these steps:
- Consider where exactly the furniture will be located and what size it is planned to be. It is important to remember that the locker should not be bulky, but at the same time it must be built roomy.
- Draw up all the necessary drawings, which schematically depict the details of the product, their dimensions and the amount of materials.
- Decide on the color of the furniture. If the room is small, then it is advisable to give preference to light shades, if it is spacious, any color will do. The main thing is that it harmoniously combines with other furniture.
Concerning optimal sizes, then it’s suitable if the cabinet has a depth of 20-30 cm, a shelf thickness of 2-3 cm, a length of at least 1 m. The height of the furniture itself can be 150-170 cm, and the width is 130-140 cm.
More about future work
To build a bookcase with your own hands, you must first make blanks from the selected material in the sizes that you prefer. You can cut them with a jigsaw or other tool, and then you need to perform milling. The last procedure is complex, so it is advisable to entrust it to professionals. Only when all the kit is assembled, you can start
 assembly.
Its stages are as follows:
- First you need to find the most even surface in order to prevent distortion.
- After that, you can begin to attach the side walls to the top. Before fixing, it is necessary to correct all the irregularities in the joints with a special corner.
- Next, holes for fasteners are drilled with a drill, the diameter of which is smaller than the diameter of the connecting element.
- Then the parts are fastened together with fasteners. Confirmat is very convenient and practical. It comes with a hex wrench, which is more convenient to make a clamp.
- After fixing the upper part, you can move on to the lower one.
- In a bookcase, the shelves are designed for a heavy load, so you do not need to make them removable. It is better to attach the shelves with the same confirmation.
- At the end, the rear wall is installed. Fasteners can be ordinary screws or nails.
When the design is ready, it's time to start finishing. Do-it-yourself ready-made bookcase can be painted in the desired color, painted with original images, or simply varnished. Here the choice depends purely on the preferences of the owner. If you would like to have a unique stylish model, you have the right to make it with glass doors. Frosted glass will look especially beautiful. The main thing is to firmly fix all the structural elements so that it serves for a long time and regularly.