Characterization and installation of interior sliding doors. Installing sliding doors: step-by-step instructions How to properly install a slide on a compartment door
It is difficult to imagine our life without doors. Their purpose is to freely let us through the walls, limiting this opportunity for outsiders if desired: people, animals, smells or bad weather. Present in every home, these guards of comfort and safety, as if in payment for their work, often limit the useful area of \u200b\u200bthe room due to the opening radius, and the wider the opening blocked by the door, the greater these losses. Recently, the principle of “free planning” has been actively used in construction, when the room inside is an empty box, without bearing walls and other barriers. This method is beneficial both to the developer (due to the reduction of the deadline for the completion of the object) and the end user, allowing you to equip an apartment or office to your taste and color. At the same time, the question of rational and aesthetic zoning of the premises inevitably arises.
An apartment for people, not for doors
An excellent solution in this case would be the installation of partitions, sliding doors, roller shutters or accordion doors, allowing, in addition to the lightness and functionality of the structure, to significantly increase the usable area. In turn, for standard small-sized apartments, in conditions of limited free space, this way of dividing rooms can almost become a panacea. In addition, the installation of glass sliding doors with a mirror base will visually expand the space, and thanks to the reflective effect, it will make the room brighter.
How it works?
In the slider system (also called: on rollers, it slides along one or two guides fixed along the wall, hiding behind one of its sides when opened. At the same time, both for installing a single-leaf sliding door and in the case of two door panels, the installation technology remains the same and depends only on the length of the guides and the availability of space for placing door leaves.A widespread option is when the door goes inside the wall, into the so-called door pocket or pencil case.This method, despite the additional complexity of installation, allows you to ensure the integrity of the design of the room and protects the surface of the door from accidental damage.

Advantages over competitors
In addition to saving space, a big plus of slider mechanisms, in front of the same accordion door, is the ability to use a leaf similar to conventional swing doors, with their huge range (both in appearance and in material). In this aspect, only a rotary door can compete with a slider system, but it is much more expensive and more difficult to install, and it also takes up more space when opened.
If the walls, floor and doorway have an ideal geometry, then the process of installing do-it-yourself sliding interior doors, in a certain sense, is even simpler than traditional installation, which is explained by large tolerances when mating surfaces. As mentioned above, two methods of arranging doors are used: along and inside the wall. Let's dwell on each of these options, having dealt with the installation process step by step.
Instructions for installing a sliding door along the wall
The first step is to free the opening from the old door (if installed), including the trim and the box. Regardless of the mounting method preparatory stage installation, you need to perfectly align the walls around the doorway.
Preparing the doorway
The opening for the door must have a clear geometry: the side slopes correspond to the vertical, and its upper part must be parallel to the floor and the horizon (use a tape measure, a building level and a plumb line to check). The permissible difference both horizontally and vertically is no more than 5 mm along the entire length of the opening. Then, with the help of self-tapping screws or liquid nails, additional strips are attached, on which door trims are mounted. The resulting size of the opening must completely, without gaps, overlap with the hung door leaf with roller mechanism. The height is selected so that, after installation, the distance between the bottom of the door and the floor is 5-6 mm, which is important to improve sound insulation.
Using the long rule, you need to make sure that the wall (in the direction of opening the door) is in the same plane as the opening being blocked.
Placing rails and assembling the slider system
Now we proceed to install the sliding door mechanism, which is a set consisting of a metal profile, a pair of roller carriages, a lower guide, movement limiters and fasteners. The choice of a quality sliding system is very important for the smooth and durable operation of the entire door unit.
In the case of moving the door along the wall, as a rule, one (upper) guide rail is used, the length of which should be at least twice the width of the door leaf (and it is better to exceed it by 100-150 mm). Manufacturers offer profiles of 2, 3, 4 and 6 meters in length, which are often provided with notches that determine the required size of the guide to fit one or another standard door width.
- At a distance of 60 mm, parallel to the upper slope of the opening, brackets are installed on the wall for attaching the profile, the role of which can be played by a remote gasket, which is pine timber cross section 50x70 mm, equal in length to the guide profile. It is necessary to fasten the supporting elements securely, as they will hold the entire structure. In order to avoid distortion and jamming of the door, it is extremely important to ideally observe the horizontal level of the brackets (remote laying) and their strict parallelism to the floor.
- The guide profile is fixed with self-tapping screws to the lower part of the beam at a distance of 5-10 mm from the plane of the wall (platband).
- At the upper end of the door leaf, using self-tapping screws, rollers for sliding doors are installed. They are placed on both sides at a distance of 100-110 mm from the edges to the axis of attachment of the moving part.
- The lower guide gives the door additional stability and, depending on the configuration, may look like a C-bracket or a brand. In the second case, using a milling cutter or drill and a chisel, it is necessary to select a groove along the entire length of the lower end of the door, a couple of millimeters greater than the thickness of the guide flag.

Hanging and finishing the door
- After that, the movement limiter and the rubber shock absorber are installed in the aluminum guide, which can move freely along the rail and is rigidly fixed after hanging the door leaf.
- Then, if there is free space along the wall, the roller carriages are brought inside the profile, holding the door attached to them in a hanging position. Installation is completed by installing a reciprocal shock absorber and a plug. Before hanging, it is necessary to thoroughly clean the guide from debris and other foreign objects that prevent the free movement of the carriages.

- With limited space, the profile is attached to the spacer (brackets) immediately together with the door leaf and movement limiters. In this case, for high-quality fixation of the structure, it is better to work with an assistant, achieving perfect observance of the horizon and uniform indentation from the wall along the entire length of the profile (for which it is convenient to use a template from wooden blocks prepared in advance).
- After that, the ease of sliding of the door along the wall is checked, and in case of uneven progress or slight skew, with the help of adjusting screws located on the roller carriages, the position of the door leaf is fine-tuned to an ideal state. To avoid loosening of the fasteners (after adjusting the door), it is recommended to treat the trim screws with adhesive or sealant.
- At the next stage, it is necessary to install the lower guide bracket, placing it in the middle of the working stroke of the door so that in any position of the door leaf the guide is always engaged with it. In any case, the attachment point must be outside the doorway (next to the slope towards which the door opens).
- Now you can install handles, a lock (if necessary) and a decorative bar that closes the slider mechanism, which must be removable to allow maintenance and adjustment of roller carriages.
Hiding doors in the wall
For the second installation method (using a “door pocket”), we will get acquainted with the installation instructions, which differ from the first option only in an additional, albeit very serious, volume. construction works. The fastening of the slider mechanism itself is similar to the process above.
First you need to decide on the principle of forming a "door pocket", and here, depending on a number of factors, there are two options:
- The design is created on the site of a large doorway, at least twice the width of the installed door (allowing you to place a door leaf and a pencil case in it). In this case, a hollow frame is formed on both sides of the door, imitating a blank wall from the outside.
- An existing wall of sufficient width is used as one side of the "door pocket" design. But this does not at all mean saving materials and simplifying installation, since, in order to create a visual integrity of the wall, the frame will have to be mounted over its entire area both above the door frame and in the direction where there will be no pencil case.
The first method of forming a "secret shelter" for installing sliding interior doors with your own hands is preferable, as it allows you to make the frame less massive, indistinguishable in thickness from ordinary wall, and is used most often in new buildings, especially in conditions of "free planning".
To break - not to build, or the nuances of expanding the doorway
If you are an adherent of the principle of beauty, which requires sacrifice, then you will have to work hard, expanding the doorway to the desired width. The main thing is to pay attention to some important aspects:
- Capital is a wall or just a partition. In the first case, additional measures will need to be taken to strengthen the bearing capacity of the expandable opening (but it is safer to use the option of a pencil case attached to the wall).
- To avoid additional problems make sure that there are no electrical, plumbing or other communications inside the removed section of the wall (check the house plan, use a wire detector if necessary).
- Decide whether you will need an electrical, network or antenna socket on the wall with a door pocket, if so, then the wiring must be prepared in advance.
Do-it-yourself door frame arrangement
The material for creating the frame can be galvanized building profiles or a wooden beam of the appropriate size, which are attached along the perimeter of the future "door pocket" in two parallel rows. When using an existing wall, one row will be required, but it will have to be mounted over its entire area, minus the doorway. The technology of erecting a false wall frame is similar to creating a plasterboard partition and involves the installation of vertical racks with a pitch of 400-600 mm, fastened together by jumpers in order to increase the rigidity of the structure. For not very heavy doors (up to eighty kilograms), if it is necessary to form the upper part of the opening, a beam with a side width of about 50 mm is used, and with a higher load, the frame is made welded (which is hardly justified in a private house or apartment).
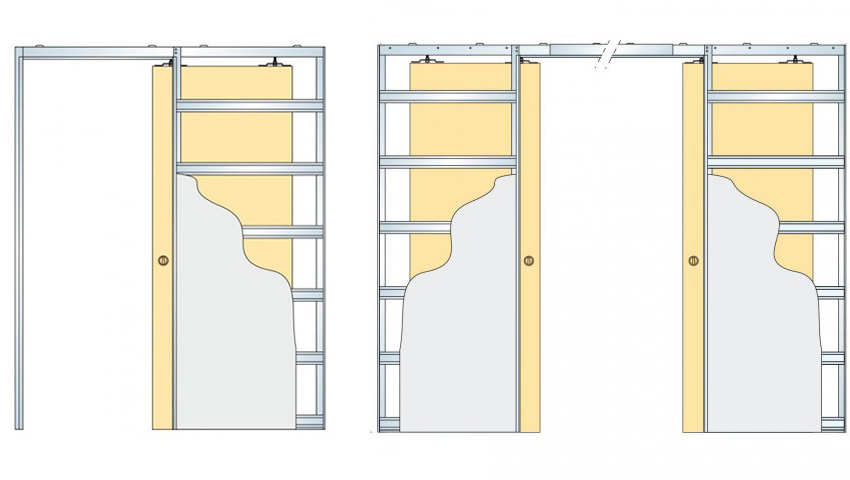
The space between the rows must guarantee unhindered movement of the door leaf and, as a rule, is arranged 20 mm wider than the thickness of the door. The depth of the niche should correspond to the width of the sash hidden in it with a small margin (5-10 cm).
Do not forget to provide a place and make a frame to hide the sliding mechanism as well. This will require either increasing the height of the opening, or using a shorter door leaf.
Next, you should mount the slider mechanism and install the sliding door in the same way as the recommendations above. The only difference is that the guide profile must not be attached to the spacer or bracket, but directly in the middle and along the top of the door opening slope or support beam.
Checking, adjusting and fine-tuning the operation of sliding doors is carried out before the wall is sewn up with drywall, since then, without dismantling the coating, this will be impossible.
Then handles and locks are mounted, mounted on the frame facing material and carry out finishing walls.
Installation of the finished case for the door
Specialty stores offer complete solutions for sliding systems, including both a sliding mechanism and a built-in unit. Its installation is almost identical to the installation of a conventional door frame, and comes down to rigid fastening of the finished case to the wall or installing it in the doorway, observing the strict positioning of all components of the kit. As a rule, fastening is carried out using polyurethane foam with a small expansion. Then install guides, door leaf, handles, lock, drywall and further down the list.
Do not create an idol for yourself: what to expect from sliding systems
When installing sliding doors, it is possible to use two sliding systems, which, being located in parallel, support the door leaf from above and below. This installation method allows to withstand significant loads and is used, as a rule, with a significant weight of the door (more than 80 kg). However, for high-quality sliding in such a system, the ideal symmetry of both guides is required, and the lower rail, in order not to stumble when walking, will have to be sunk into the floor, being on the same level with the floor covering. In addition, the inevitable debris and small objects, getting into the lower profile, can easily damage the rollers and disable the entire opening mechanism.

Sliding door systems require an ideal wall surface and high precision when installed, they are less reliable than classic swing doors, more noisy when opening, protect the room from extraneous smells and sounds worse.
Nevertheless, scrupulous installation, the use of high-quality sliding mechanisms, the installation of additional seals at the junctions are able to largely level these shortcomings, and thanks to high ergonomics and stylish design, sliding door systems have earned recognition and are widely used around the world.
In most cases, the installation of sliding interior doors with your own hands is carried out without any problems. Manufacturers have tried to simplify as much as possible this process, selling complete kits that allow installation in a matter of hours. Next, we consider the main nuances of this procedure.
Before you start installing sliding interior doors, you should decide on the type of construction. There are several classifications.
By type of canvas material:
- Wooden.
- Glass.
- Metal-plastic.
- Combined.
According to the main mechanism:
- Non-threshold. Installation of a sliding door system is carried out from above on the guide. This is the most common option, which we will discuss below.
- The fabric is fixed at the bottom. In this case, a threshold appears (it is also a guide). Its presence can create inconvenience. However, the threshold can be drowned in the floor, but this is a rather difficult operation.
- Combined (two profiles - from below and from above). This mounting method is the most reliable and easy to use. The only downside is the higher cost.
It should be noted right away that the price of the kit to a greater extent depends on the material of the canvas and the quality of the fittings. Saving on the second aspect is undesirable, because these elements are responsible for the life span of the structure.

Dismantling and preparation of the opening
The first aspect that our sliding door installation instructions will consider is the removal of the old canvas. There should be no problems here, but still pay attention to some recommendations:
- First of all, remove the old canvas from the hinges. If they are solid, then turn off the screws. If this cannot be done (for example, the thread is broken or the metal is rusted), you can simply tear out the canvas with effort.
- The second step is to remove wooden box. First, we withdraw cash. In most cases, it is fixed with glue, so it can be torn off with something thin without any problems. If problems arise, use a hammer and chisel (or something similar).
- Jambs can be removed with a crowbar (pull). First, make a deepening with something sharp. If the box sits tightly, you will have to use an ax. However, try to damage the wall as little as possible.
In order for the installation of the sliding door to turn out to be of high quality, the initial surface should be leveled. First of all, beat off the falling pieces of concrete. Then using cement mortar align the gap. We throw it with a spatula or manually, and level it with a rule. It is necessary to achieve perfect evenness, so it is advisable to make several layers. The floor must also be perfectly horizontal. Therefore, if necessary, we align it.
Tip: the cement mixture should have the consistency of rustic sour cream.
As a rule, coupes are made to order, so you will need to take measurements. Keep in mind that the length of the guide will be 2 times the width of the canvas.

What to buy
We will need the following materials:
- Handles (they must be recessed into the canvas).
- Rack.
- Fittings - sliding mechanism, rollers, etc.
- guide profile.
- Bar 5 × 5 cm. It should be the same length as the guide.
- The door leaf itself.
- Two extras.
- Fasteners (nails, self-tapping screws, anchors, etc.).
- Platbands and lining for the opening. The recommended option is a special false box.

Preparing for installation
The first step is to install the guide for the sliding door. The performance of our design will depend on the correctness of its implementation. So, we do the following:
- We apply markings on the wall above the opening - we designate the installation location of the profile. The height should correspond to the length of the door + 1 cm. Do not forget that on the one hand (where the door will go) it will be extended by the width of the canvas. The control point in our case is the bottom edge of the guide. Horizontalness must be checked with a level.
- We attach the rail to the beam, so we retreat from the drawn line 5 cm (if it has a size of 50 × 50) and make one more line.
- On it we mount the bar on long self-tapping screws. First, with a drill for wood, we make through holes in it, and then with a puncher in the wall. The more screws we use, the better.
- We fix the wooden element as firmly as possible - it should not stagger from the efforts applied to it.
- Next, from the bottom we fix our sliding mechanism to the fasteners from the kit. Here you will need a screwdriver.
- Next, we install staples with rollers in the canvas - they provide adhesion to the rollers. They must be fixed strictly in the center. The rest of the installation depends on design features. As a rule, an instruction is attached to the kit, which describes in detail the process of assembling the elements.
- Then we insert the handles and locks into the canvas. If you purchased a ready-made kit, then you only need to assemble all the elements. Otherwise, you will first have to drill through holes with a cutter.

Construction assembly and finishing
When all the auxiliary elements are installed, we assemble the structure, for this we need an assistant. We just put the rollers into the carriages from the side. We carry out a thorough audit - the canvas should walk smoothly without distortions. Adjustment is carried out by loosening (tightening the fasteners). If you were accurate in the previous steps, this is not needed.
After making sure that the assembly is correct, we finish the opening. It can be trimmed MDF panels, plastic, plaster and other materials. The best option is a ready-made box, but in this case it will be necessary to repair the joint that has appeared. There are other options for installing sliding doors. The technique depends on the variety you choose.
One of the tasks that each of us solves in the process of redevelopment, repair in the house is to achieve the most rational use of the area of \u200b\u200bany premises. It can be solved in several ways, in a complex way, including by placing in the openings interior doors retractable type. In addition to the fact that they allow you to free up additional square centimeters, such models have a number of significant advantages. For example, the possibility of developing own project and fairly simple installation.

reference Information
Sliding doors are often confused with sliding doors. In many ways, they are similar, since they have almost the same systems that allow you to move the sashes along the wall, which is what frees up usable space in the room. But there is a difference between them, and quite significant. Mechanism sliding door It incorporates supports in the form of small wheels, which ensure its ease of movement and smoothness. Plus, such models are more durable, easier to operate, they are not threatened with distortion (jamming), they do not create noise during the opening / closing process, which can be automated if desired.
But sliding doors move along the guides, in the profile of which they are installed without additional support (sometimes these are ordinary rollers). Such models are always only double-leaf, while retractable counterparts are shifted to either side, and therefore, as a rule, they consist of only one leaf. Even a child can manage it, which gives one more advantage to such models.
Retractable doors include:
- support mechanism (guides + wheels). The option with the installation of one "rail" (in the upper part) is much easier to implement, but there is a minus. It is that with a strong draft, the door leaf can “play”, since there is no rigid fastening to the supporting part. If the guides are on both sides of the sash (top and bottom, on the floor), then the installation of sliding doors becomes more complicated, although slightly. But in this case, there is no such drawback;
- stroke limiters. Without them, at the extreme position of the sliding door leaf, it can come off the guides;
- stopper. Its task is to fix the canvas in a certain position and prevent its spontaneous displacement;
- sash. In the simplest designs, it is alone. Although you can purchase or make your own models with two, and even three fragments. In fact, this is already a symbiosis of folding and sliding doors. Such options attract few people due to the increased cost, complexity of installation, and regulation;
- additional equipment. At the discretion of the owner, such models are equipped with automation elements (electric motor, blocker, closer, circuit remote control etc). Having installed the door, it is easy to understand what else is required, depending on the specifics of its operation.

Mounting order
Schema Design
The fact that when opening the door will not swing open, but roll back, is understandable. But the nuance is how the room is decorated in the opening area and what is planned in the future. In addition, the feature of the wall is also important. It can be either a full-fledged monolithic structure or a light partition consisting of a frame sheathed on both sides. In the first case, one cannot ignore its specificity. If the wall is load-bearing, then it is unlikely that it will be possible to make a legal redevelopment, and you will have to be content with what you have. That is why the sliding door is mounted so that its leaf moves along the wall.

The second option, if it can be implemented, is much more convenient. The cavity in the partition is empty, and if a heater is laid in it, then it can be partially removed. Therefore, when the sliding door is opened to the limit, its leaf will go into the wall. The advantages are obvious, since this solution allows you to decorate, furnish the area at the opening as you like. Not a single detail of the interior will interfere with a sliding-type interior door.

Installation process
With the option of shifting into the wall, it will be necessary to fix the guides either during the repair (re-planning) in the room, or after partial dismantling of the frame sheathing. Installing sliding doors with your own hands using this technology is much more troublesome. This is already a disadvantage of this method.
The project "along the wall" is easier to implement. They can be done at any convenient time, even after the completion of cosmetic repairs in the room. There will be no damage to the finish, if care is taken, there will be no.

Action algorithm:
- Door equipment. All necessary fittings can be installed later. But the wheels are attached immediately. This will allow you to more accurately determine the difference in height between the top and bottom rails. When choosing a scheme with only one rail, the task is simplified.
- Determines the position of the top guide. Basically, many home craftsmen prefer to mount it on the ceiling. Depending on the height in the room, the door leaf is also selected. Fixing the rails on the wall is more convenient in a certain way, but here you will have to correctly calculate the installation locations for the brackets. They must be on the same level, and the interval between them must be chosen correctly, taking into account the weight of the sash.

It is worth considering the tightness of the sliding door to the wall. The base should not interfere with its free movement, at the same time, the gap is made minimal. Otherwise, drafts cannot be avoided, but we are not talking about sound insulation at all. By the way, this is one of the shortcomings of models of this type, which is noted by both experts and users.
To do everything accurately, you will need an assistant. You will have to take the canvas and literally try it on in place. Fastening the guide, taking into account the load, only with self-tapping screws (screws) with dowels. Alternatively, small anchors.
- Bottom rail attachment. Here, too, in advance, even at the stage of drawing up the scheme, it should be determined how best to put it. Directly on the floor - faster and easier. The downside is that it will become a kind of threshold, which is easy to stumble on.
- Canvas installation. If everything is done correctly, there is no error in the calculations, then the sliding door is mounted simply - the support wheels are placed on the guides, the sash moves, and the travel stops are attached.
- Additional activities. All that the owner considers necessary is the installation of a handle, a lock, automation elements and decor.

In fact, all the work on installing a sliding door with your own hands comes down to competent calculations of the linear parameters of its leaf (with its self-manufacturing) and places of fastening of guides. And the possibility of choosing options allows you to install a model of this type in almost any room. And most importantly, without the involvement of specialists.
The popularity of sliding doors is due to numerous factors. Their installation can be carried out both by specialized companies and independently. The first method is more reliable. This is the simplest option, which is resorted to by many residents of our country. However, if you study the rules for installing sliding doors, then you can do all the work yourself. There is nothing difficult in this. How to install a sliding interior door yourself and will be discussed further.
The interior sliding door looks very impressive and at the same time significantly saves space, which is very important for small spaces.
What will you get as a result?
- Space saving. There is no need to waste useful space on closing and opening the door, which can be observed in the case of a swing structure. It can be used for some additional purposes.
- The ability to easily open the sash without making any effort.
- They can easily be left open. No wind flow is able to spontaneously close them.
- Easily amenable to automatic regulation, that is, it is possible to automate the control system without problems.

It also carries negative aspects that you have to put up with:
- The low degree of thermal and sound insulation limits their use. They cannot be used as entrance structures and those that are installed between the corridor and the bathroom.
- There is no possibility of mounting standard locks. Here special options are used, which cost much more than ordinary ones.
A sliding interior door should not encounter any obstacles in its path. It should be easy to open, because this allows you to reduce the process to the application of minimal effort. No switches or sockets should be installed on the wall. They can be a big problem when opening an interior sliding door.
Now you can talk directly about the installation, but before that you should think about buying all necessary tools and materials.
Tools and materials
Installation of sliding interior doors involves the purchase of the following:

- pencil;
- door leaf;
- guide bar;
- wooden beam;
- self-tapping screws;
- screwdriver;
- carriages with rollers;
- rubber shock absorbers;
- staples;
- decorative casing;
- measuring tool.
This is quite enough to carry out the installation of sliding interior doors with your own hands.
Instructions for self-assembly
To begin with, it is worth attaching the door leaf to the wall where the interior door is supposed to be installed. A mark should be made on the wall, which will indicate the height of the future structure. If the floor is uneven, then the same operation must be done on the opening.
The next step is to use a pencil and a ruler. At a distance of 70 mm from the line that was drawn earlier, one more should be noted. This is where the guide bar will be installed. In this case, do not forget about an additional check of horizontality using building level. This tool should always be at hand during construction and repair work.

Now you can move on to attaching the beam at the very place where the line was previously drawn. This refers to the upper bar under the guide. The length of the bar should be 2 times the width of the opening. It must be fixed in a strict horizontal position. In this case, self-tapping screws are necessarily used. they must be long enough to make the mount really high quality. The distance between them in each case is selected individually. The most important thing is that the beam sits perfectly in its rightful place.
Now you can proceed to install the guide bar. It is attached from the lower end of the beam, which was screwed earlier. It is worth determining the location of the mounting hole. For this, a length equal to half the door leaf is retreated. Approximately 3-5 mm is added to this value, and then fastened with a self-tapping screw. To begin with, it must be loose. Next, the same measurements are made, and fastening is made from the opposite side. Before you finally put it on self-tapping screws, you must definitely check that there is a sufficient distance between the door leaf and the wall, which will allow it to move easily and simply.

Next, you can move on to the carriages. First you need to collect them and test their course. They are assembled quite easily by means of a bolted connection. Then they must be brought into the guide bar to make sure that the movement is smooth. In this case, it is not necessary to lubricate the bar.
Now it's time for travel limiters. They are installed with rubber shock absorbers inside.
In the lower end of the door leaf, it is imperative to make a groove. To do this, an indent is made from 2 edges of the door leaf by 15 mm. Next, 2 holes are drilled in the middle. This can be done with a drill or with a conventional screwdriver. Then a groove of a certain depth is made in the middle of the sash. It is necessary so that the interior door can easily move along the bottom bar, made like a knife. You can make a groove using a manual router or grinder. However, it is not always possible to achieve high-quality hole making at home. In this regard, many prefer not to cut anything, but simply use 2 rails, connecting them into a single whole. They will form a groove.
Carriage mounts are installed on the wall. They must be mounted in such a way that the nuts look inward, that is, towards the wall.
Now you can move on to hanging the door leaf itself. For this, the efforts of one person will not be enough. It is better to invite an assistant. First you need to aim correctly. The bolt of the right carriage is connected to the cutout on the right bracket. Further, the brackets on the edges of the carriages are fixed with a bolted connection. You don't have to tighten them all the way. Next, while holding the door, it is necessary to place the lower part so that it coincides with the cutout of the door leaf and the guide.

Next, you need to determine the distance that will determine the location of the door leaf relative to the opening. Here you should bend the canvas from below. Then it must be removed, and after that, the lower guide, made in the form of a knife, is fastened. It will be easier to select the distance if the mounting holes for the knives are oval. This will help to correctly orient the door in space.
The bolts of the carriages are brought into the target.
However, they do not twist completely. When a gap of approximately 3-5 mm is reached, the bolts can be finally fastened with nuts. In this case, it is very important to hold the bottom of the fastener in order to get a really high-quality connection. If the floor in the place where the installation is made is uneven, then it is necessary to adjust the position of the canvas. Otherwise, unpleasant distortions of the structure may occur, which will be very problematic to eliminate.
Completion and debriefing
The final stage of work related to the installation of sliding interior doors will be the installation of a decorative trim. In this case, the distance from its lower edge to the door leaf must be at least 5 mm. Its design should be such that, if necessary, it can be removed without any problems.
Access to the carriages must always be open. It needs to be adjusted to the overall interior of the room. For this, the platband is stained or wallpapered.
Now we can state the fact that the installation process is almost completed. It remains only to install the handles on the door, and it can be safely operated.
Interior design
To date, one of the most popular decorating techniques has been the use of sliding doors in the interior. How to independently make the installation, and will be discussed in this article.
Sliding doors have become very popular in last years, they are installed even where there is no need to save space. People are attracted by their functionality and the ability to give the interior an elegant look and mobility. Therefore, today the installation of interior sliding doors is a rather demanded service. However, this work does not require any special knowledge, skills in the use of construction tools or physical strength. You can install it yourself.
Advantages and disadvantages
Before deciding to manufacture and, you need to carefully study all the pros and cons. To begin with, it should be noted that such structures are, perhaps, the best option for small rooms where the installation of ordinary ones is difficult and impractical.
In addition, this is a great option for lovers of unconventional interior solutions.
So, the list of obvious advantages:
- Allows you to significantly save space;
- The shutters open easily, without effort;
- Such models are fashionably easy enough to automate;
- They do not close and do not slam under the influence of drafts;
- In most cases, no thresholds are required.
These are positive points that speak in favor of using products of this type.
However, to be objective, it is necessary to say about the shortcomings:

Varieties and designs
The designs we have today vary appearance. But those who want to know how to make a sliding door themselves should take into account that their design remains unchanged in all cases, and consists of a door leaf, guides and a roller mechanism.
The principle of operation is also the same for all types of sliding doors.

Main elements
The rollers move along the guides, and the roller mechanism itself is attached to the door. The number of rollers may vary depending on the model.
In addition to the main elements listed above, the design of the sliding door also includes decorative panels (they are designed to close the mechanism), various fittings, extensions and trim (see).
Main types of products
Among the variety of models, the main, most common types can be distinguished:
- radius;
- sliding;
- sliding;
- one, two, three and four doors;
- cascading.
Sliding doors - the design is rather unusual, therefore, the fittings for them require special, belonging to a certain type.
Handles and locks are noticeably different from conventional fittings. characteristic feature handles for this type of door is that they are recessed into the door leaf. This design, of course, is not accidental - the handles recessed into the door leaf do not interfere normal functioning door system.
The same applies to castles - they are not quite ordinary. Locks for this type of door work on the principle of vertical latching.

In most cases, fittings are sold complete with a sliding door. However, if the question arose of how to make sliding products yourself, when purchasing accessories, it is better to consult with specialists or select items by catalog number.
Mechanisms
It's obvious that sliding doors got its name due to the principle by which opening and closing occurs. It depends on the type of construction, the material from which the canvas is made, and the number of wings, which roller mechanism and guides will need to be selected.
Different types of interior sliding doors have different weights, and therefore create an excellent load on the entire structure as a whole. For example, if we compare a double-leaf construction made of glass and the same door made of MDF, then, obviously, the latter will weigh much less. This means that for its installation it will be necessary to choose a lighter and simpler mechanism.
The installation of some types of interior sliding doors requires special attention to the choice of guides and roller mechanism. This is especially true for such types of doors as accordion, coupe and cascading sliding doors. Cascading doors require the installation of two roller mechanisms for each leaf and, accordingly, guides with two chutes.
When installing compartments and cascading products, you need to pay attention to the following point: for each door leaf, one chute must be installed in the guides.
When studying how to make a structure with your own hands, it should be remembered that the reliability of the structure depends mainly on the reliability of the roller mechanism and guides. To ensure reliability, some types of doors (for example, glass) require the installation of two rails (one at the top and bottom).
What needs to be provided for the design of structures
If you purchase the door itself separately from the sliding mechanism, be sure to consider the total weight of the canvases. Based on this, the required minimum number of rollers is calculated - the main structural elements that carry the weight of the door and allow it to move easily.
It is enough to install two rollers on a canvas weighing 30-35 kg, and they will easily cope with their task. For heavier rollers, the number of rollers should be increased.
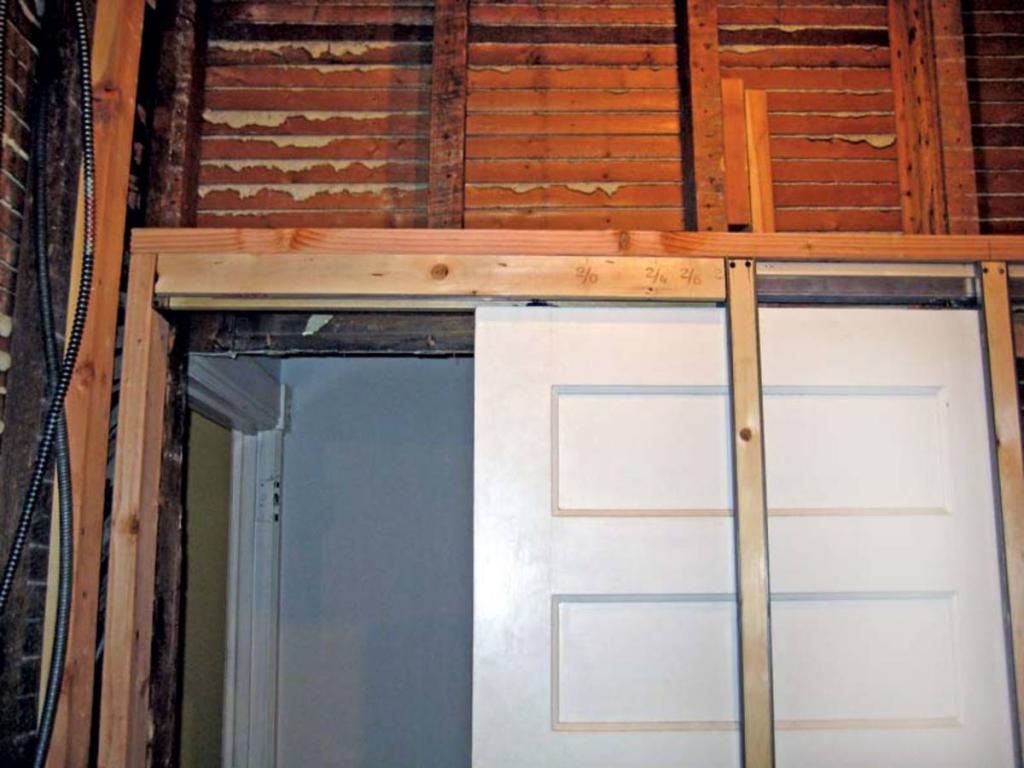
If you are planning sliding interior doors - installation in a plasterboard partition - then at the stage of arranging the opening in it, lay a solid wooden beam above it, to which the guide will subsequently be attached.
Important! Direct installation should be carried out after completion of all rough work and laying floor covering. In the case of a false wall, a metal guide is installed in it before facing with plasterboard.
Preparing for installation
Before buying a door, you need to determine its dimensions. To do this, use a tape measure to measure the opening in length and width and add 5-6 cm to the obtained values. If it is not possible to purchase finished canvases of a given size, they can be made to order or cut in a specialized workshop.
Attention! When installing doors not in the opening, but as a sliding partition in the room, the height of the leaf is calculated based on the ceilings minus the thickness of the supporting beam and structure.
If sliding elements are purchased separately from the canvas, use the help of a specialist when choosing them, since it is quite difficult to determine the required number of rollers on your own.

You will need:
- guide rail, the length of which should be equal to twice the width of the opening (or a little more).
- Rollers with carriages.
- Stoppers(rubber shock absorbers) or plugs inserted into the ends of the guide.
- Anchor bolts for fastening to the wall of the bearing beam.
- Self-tapping screws.
- - handles, locks.
All this can be purchased as a set or separately - in the construction markets and in large stores. Buy everything you need there decorative finishes openings: racks for the box, platbands (see), extensions, finishing nails.
In addition, you will need a strong square bar 50x50 mm, the length of which is equal to the guide metal rail.
As well as a set of construction tools:
- Building level and plumb
- Roulette
- Screwdriver or drill
- Chisel (if any) milling machine, chisel is not needed)
It remains to make sure that the slopes of the opening are in a vertical position in order to begin installation - the interior sliding doors are ready for installation.
markup
In order for the assembly of products with your own hands to be correct, you must take this stage very responsibly. You may need a diagram, because the sliding mechanism is not so simple.
There are two ways to make markings for installing a carrier bar:
- Measure the height of the door with a tape measure. Add to it the gap between the door leaf and the floor (10–15 mm) and the height of the guide with the assembled roller mechanism. Set aside the resulting size on the wall above the opening at two or three points and draw a straight horizontal line through them.
- Substitute the canvas to the opening, placing a lining of the desired thickness under it, and draw a line on the wall along the upper edge of the door. Set aside the height from it sliding mechanisms with guide.
Attention! To ensure that the retractable structure does not arbitrarily move in one direction or another after installation, make sure that the marking line is strictly horizontal. Use the building level for this.
Guide rail installation

Depending on the design features, the guide can be attached in different ways:
- Dowels directly to the wall.
- To the bottom edge wooden beam fixed on the wall.
- on special brackets.
- To the ceiling.
Regardless of the installation method, the upper horizontal plane of the guide should be located along the marking line, and the gutter should be set apart in relation to the wall so that the moving canvas does not touch its protrusions, bumps or elements.
Attention! The length of the guide should be twice the width of the opening plus a few centimeters of spare travel.
Installation of sliding mechanisms

After the guide is fixed, assemble the roller carriages, insert the fixing bolts into them, with which they will be connected to the door leaf, and insert the assembled mechanisms into the guide.
Install the brackets on the upper end of the canvas, stepping back a few millimeters from the edge on each side. The number of staples must match the number of roller mechanisms. For normal wooden structure Or two is enough.
Installing the canvas
Place the door under the rail, lift it up and screw the carriage fixing bolts into the brackets. This job is easier to do with two people. To install the product in a horizontal position, tighten the bolts and check the level.
To fix it in a vertical position, a leash is screwed to the floor at one of the walls of the opening - the lower guide in the form of a roller or a knife. It is inserted into the groove in the lower end of the leaf and does not allow the door to deviate to the side during movement.