Where to find drawings of yew computer tables. How to make a computer desk with your own hands? Universal desk for computer
The computer now occupies far from the last place in the life of almost every person. And, despite the popularity of mobile laptops, personal computers still remain no less significant. They are more powerful, in some cases they can perform much more serious tasks, but they also take up much more space. And if you can work on a laptop while sitting on the couch, then a personal computer requires a certain place for itself - a special one. A computer desk with shelves and drawers for storing various necessary little things can be purchased at the store, or you can do it yourself. Moreover, this is a fairly simple task.
Computer table with shelves and drawers
Why homemade tables remain relevant?
Right now in furniture stores you can find computer tables for every taste and any color, large and small, the simplest and those with a lot of complex elements. It would seem that come and choose, but in reality everything is not as easy and simple as it seems at first glance. So, in some cases, the selected table option may not fit the apartment in size or it will turn out to be completely the wrong style or color that you would like to see. So, whatever one may say, sometimes it is self-made tables that become the best option.

Undoubtedly, in order to make good and high-quality, as well as, you need to own at least the basic tools, but in general, even a beginner, if desired, will be able to make the simplest version of the table. And the rest of the benefits homemade furniture are as follows:
- the opportunity to produce an exclusive and unique product;
- it is possible to adjust the dimensions of the table to the exact millimeter free space;
- it will be easy to take into account all the wishes of the master regarding the number of shelves, drawers and table configuration;
- you can save a lot of money;
- the table can be made of exactly the material and color that are needed;
- you can take into account the layout of the apartment and ensure that the table exactly matches the interior style.

The main disadvantage of all homemade things is the need for time costs, as well as the fact that everything will have to be done independently. Of course, a table can be made to order, but it is important to understand that such a product will most likely cost a round sum - rarely does a master make furniture for less money than a finished table in a store costs.

Variety of table models
Computer tables, commercially available or handmade, may have a different configuration. Of course, it meets the basic requirements for the installation site of a personal computer, but despite this, there are a great many varieties of tables. In general, they can be divided into three main types, if you lose sight of the presence additional elements and all kinds of add-ons.
Table. Types of computer tables.
| Type | Description |
|---|---|
 | This is a classic, the easiest option. Looks like a standard desk and, by the way, sometimes desks perfectly replace computer desks in everyday life. Usually such tables are installed near a window or along a wall. The monitor is located on the tabletop, and the system unit itself can be installed under the table on a stationary or mobile stand. Such tables are popular, but do not always meet all requirements. Usually installed in small rooms or offices, as they do not take up much space. |
 | Also a popular option, but larger than the standard straight table. It is convenient if the room has a free corner where you just want to install a computer. Suitable for those people who spend a lot of time in front of the monitor - work or play. As a rule, such tables have a large number of shelves, drawers, convenient for storing various small things, books, etc. This model is not difficult to make, but it is still easier to make a simple straight table. The main advantage is the ability to use a corner that has not been used in the room before. These tables look best in a room with a minimum of furniture. |
 | This option is the most difficult to manufacture and the most massive, it takes up a lot of space. It is a combination of the first and second types. It has a lot of storage space, but is not suitable for installation in a small room, as it is able to "grab" the lion's share of free space. |

Advice! Even before starting work and purchasing materials, it is worth deciding on the size and model of the future computer desk. It is important to take into account all the nuances, but first of all - the size of the room and the free area where furniture is planned to be installed.

The choice of place for the table is also of no small importance, and this is mainly due to the peculiarities of operating the computer. So, it is important that there are sockets next to it so that the equipment can be connected to the mains. It is also desirable that there is a window nearby - it will allow natural light to be used during the day, which is especially important for those who work at a computer.

Next to the table there should not be heating radiators or massive household appliances, constantly working - these aspects can adversely affect the operation of the computer itself. It is best not to plan the arrangement of any decorative items above the table, as well as indoor plants. In the first case, it will not be possible to make an add-on over the table, and in the second, there is a risk of equipment damage due to accidentally spilled water for irrigation.
A little about drawings and diagrams
Having taken all the necessary measurements, you can begin to create a drawing. It is the presence of a diagram indicating all dimensional parameters that will provide the ability to accurately calculate the necessary materials and help to finally decide on appearance future furniture. When creating a diagram, it should be borne in mind that as much free space as possible should remain on the table. This will ensure comfortable work for the PC.
Important! If the table is placed in the child's room, then you should think about the fact that the baby will do homework, draw or read also in the same place. So it is important to equip the table with a large work surface.

The keyboard can be placed directly on the table, or you can make a small pull-out shelf under it, which, if you need to use the table for other purposes, can simply slide under the table top. It is also important to pay attention to the installation location of the desktop computer itself. Ideally, if the unit is installed as high as possible from the floor, then it will draw less dust into itself and require less cleaning. Just like that, you can’t just put the system unit on the floor. Also, if you already know what configuration its body will be, you should also take into account the location ventilation holes opposite coolers - they should not be covered by furniture parts. This aspect will help decide whether the left or right right side table to organize a stand.
computer desk prices
computer desk
Advice! If it is not possible to determine the place of installation of a stationary stand in advance, then the easiest way is to make a small mobile stand on wheels, which, if necessary, can be moved right under the table and position the computer in a way that is convenient for the user in accordance with the operating conditions of complex equipment.
Dimensional parameters
If we talk about dimensions, then we will have to rely on the availability of free space in the place where the table will be installed. But do not forget that the furniture should be as comfortable as possible. So, as for the length of the table, it should not be excessively small. The permissible minimum that should be free for a person, excluding the monitor and keyboard, is 60-70 cm. The place where the system unit will stand must have dimensions of at least 25 cm wide, and much will depend on the size of the case.

If we talk about the fact that the table will have drawers and shelves, then more space will be needed. Of course, the shelves can be placed higher, above the table, in the superstructure, but in the case of small furniture, the same drawers simply cannot be equipped, otherwise there will be no legroom. The depth of the table is usually about 45-60 cm. Moreover, the minimum option is acceptable if there is no add-on above the table. If it is planned to do it, then the minimum depth should be 60-70 cm. If you want to make drawers, you should make sure that the depth of the table is also at least 65 cm.
On a note! The depth of the corner tables is greater, its minimum for models of this configuration is 85 cm.
As for height, the countertop is usually located at a distance of about 75 cm from the floor. Then the table will be convenient to use. If the height of a person is small, then the table can be made smaller. The superstructure can be quite high, but it is desirable to make it such that at least the lower shelves can be reached without getting up from the chair.
The table may or may not have a monitor stand. It can be in the center of the table or be shifted to the side. They do it, however, not always. But if it is made, then its height should be about 12 cm, length - about 50 cm, and depth - about 30 cm. Then you can safely put a monitor on it without worrying that it will fall.

The keyboard shelf can be slightly larger than the keyboard itself, but it's still better to make it so that you can freely place the mouse pad next to it. If this recommendation is neglected, then in many cases it will be inconvenient to use the shelf.
Table materials
It is very important to choose high-quality material for creating a computer desk. Such options as a furniture board, plywood, chipboard, MDF, natural wood are perfect. Drawer bottoms can be made from fiberboard to be lighter in weight.

Perfect option It is, of course, natural wood. Eco-friendly material, strong and durable, it is best for making a computer desk, especially for kids room. But the tree is not cheap, and therefore it is often replaced with the same plywood or furniture board - derived materials from wood. They are not much worse in their performance, but they are easy to work with, and they are not expensive.
You can also purchase chipboard or MDF. But it is important to understand that these materials contain adhesive components in their composition and it is better to take them only if a person is not allergic to a number of substances. However, with regard to strength, it is very quality materials, and the table of them will serve for many years without complaints.

Do not forget about accessories. You will need handles for drawers, as well as metal corners for attaching shelves. Self-tapping screws, small nails will come in handy. It is not necessary to fasten all the details of the table to nails, since such connections are not reliable - the table may loosen over time. But the same fiberboard can be nailed to the bottom of the box with the help of just small carnations.
Sandpaper or a grinder, a drill, a jigsaw, a mallet and other tools will also come in handy, without which to take on independent production table is not worth it. You may also need wood glue or PVA glue to connect individual parts, clamps for their screed.

On a note! By the way, a computer desk can be made even without the use of self-tapping screws. Everything will depend on which option for connecting elements the master chooses.
Building a simple computer desk
Let's look at a specific example of how you can make a simple and convenient computer desk with your own hands. In this instruction, the master demonstrates how you can assemble furniture without a single screw, with the exception of fixing the door hinges. The table will be made from furniture board.


Step 1. First you need to buy everything necessary materials and make the necessary marking of parts on the furniture board according to the drawing, then cut the boards into elements of the required sizes.

Step 2 Now let's see how to make table elements connections without using self-tapping screws using the example of creating a table drawer. At the end of one of the side parts, you need to make 4 holes with a diameter of 8 mm at an equal distance from each other. These holes will be needed to install wooden dowels. The depth of the holes is 3 cm.

Step 3 AT drilled holes you need to insert special metal markers for dowels, which have a small spike that can leave a mark on the tree in the right place.


Step 4 Two parts that need to be aligned with each other at a right angle must be set as they will be connected later, aligned, and the end of the part into which the markers are inserted must be hit several times with a mallet. On the second part, in the places of its contact with the markers, traces of the spikes of the markers will remain.

Prices for a computer desk with shelves and drawers
computer desk with shelves and drawers

Step 6 Thus, it will be necessary to make holes for dowels in all parts that require connection with each other.

Step 7 Now you can see the process of connecting parts using dowels. So, you need to pour a little glue into the holes, also grease the dowels themselves with glue, insert them into the holes and hammer deeper with a mallet.


Step 8 Next, you need to glue the end of the part from the side of the dowels with glue, combine the dowels on one part with the holes on the other and hammer the part. Glue between the elements can come out - this is an indicator that it is enough for gluing. The remaining glue must be removed, and then it is worth pulling the parts to be glued together with clamps, placing an unnecessary piece of wood under them so as not to damage the part itself. In this state, you need to leave the parts until the glue dries. Clamps can be removed after 30 minutes.


Step 9 The creation of a drawer for the table continues. Next, you need to glue the bottom to the glued sides of the box. By the same principle, you need to install the central shelf in the box, and the rest of its parts.


Step 10 The box is ready, and you can make a stand for the system unit using the same principle. This is a design of two side and one bottom part.

Step 11 Now you can do the countertop. It will have a small cutout in the middle. First you need to draw the line of this cutout with a pencil, and then cut it out with a jigsaw.


Step 12 Next, you can connect the table top with drawers and make legs from two pieces of furniture board on the second side. To do this, you need to make exactly the same connections as described above - using dowels and glue, and combine the table top and cabinet with drawers and legs.


Step 13 Then, according to the same scheme, you need to attach the shelf for the system unit to the table from the side where the legs are.


Step 14 Now on the back of the table you need to fix the wooden ties. They will ensure the strength and stability of the table and will not let it loosen over time.


Step 15 This is the design that should be obtained after removing all the clamps and screeds.

Step 16 Now you can make a drawer door. On the workpiece, using a Forstner drill, you need to make notches for the loops.


Step 18 Now the door needs to be screwed into place. The main thing is to immediately install it evenly and correctly.


Step 19 All uneven edges in the area where the jigsaw was previously worked must be sanded.
Prices for popular models of screwdrivers
screwdriver

Step 20 The table needs to be varnished so that it is more resistant to moisture and retains its original appearance for many years. Lacquer can be applied with a brush. After it dries, the table can be used for its intended purpose.


Video - Creating a corner table with your own hands
Video - Table with superstructure
This is how you can make a computer desk for your home. As a rule, home-made products last much longer than those purchased in a store, as the master does everything honestly and “for himself”. The main thing is that everything works out. And the key to success in creating a table on your own will be only diligence, patience, accuracy and the desire to do everything as it should.
Drawings of a corner computer desk. Dimensions.
According to the preliminary design project, the MFP is installed on a retractable console, which is attached to the top and side of the cabinet. One of the sidewalls of the cabinet simultaneously acts as a support for the tabletop, transferring the load to the legs. The reason why the role of the support is assigned to the inner sidewall is visible from the design itself, in this form, access and work with the MFP can be carried out from almost all sides.
- Corner Computer Desk Project .
- Scheme and detailing of a computer desk .
- Accessories for the manufacture of a computer desk .
Cabinet with drawers and a panel under the MFP.
Underframe.
The height of the underframe is equal to the overall height of the cabinet (740 mm), the length and width of the underframe is free and is calculated according to the dimensions of the tabletop (see section above).
To the curbstone, the inner sidewall of which is the support for the tabletop, is adjacent to the main underframe with one more, the farthest support and the rear vertical wall. The back wall performs three functions: it is a connection between the table supports, a vertical spatial structural rigidity element and an additional support for horizontal shelves. The back wall is attached with a gap between the tabletop, i.e. she does not rest against her upper end. Thus, we provided a place for the free passage of computer electrical cables.
Between the table supports in the underframe, two horizontal shelves were placed that can be used for various needs. For example, it is convenient to put your feet on the lower shelf when you want to lean back in your chairs and watch a movie from the monitor screen. Above all, these shelves, together with back wall perform the role of an element of spatial rigidity of the entire table.
The tabletop-bearing side of the underframe is mounted on mortise adjustable supports. .
Keyboard shelf.
You can make a keyboard shelf yourself to fit your size or use a special component for computer desks - a ready-made factory keyboard shelf.
The advantages of the finished shelf - you do not need to make it yourself, the disadvantages - it is used only for the keyboard.
Advantages - can be made any individual sizes.

A frame is made of two sidewalls and two connected planks. The shelf itself is installed on full extension ball telescopic guides.
Installation of the keyboard shelf is extremely simple, it is screwed with 4x30 self-tapping screws through the bonded strips under the bottom of the tabletop, directly into its place.
If you plan to use a corner table for a desktop computer, and not for a laptop, it becomes necessary to place the system unit. In order not to fence under the countertop additional structures and make the system unit not tied to a specific place, we will make a stand for the system unit. You can use a ready-made accessory from the factory, but we like to do everything ourselves and will make it so that it harmonizes in design with the whole table.
Add-on for a computer desk.
Looks like a complex design. In fact, its structure is quite simple and minimal tool handling skills are required - cutting chipboard and screwing screws. Moreover, even cutting can be entrusted to specialists in a hardware store.
First of all, you need a table project. This may be a finished drawing found on the relevant site, and with suitable sizes, and maybe a personal project that takes into account all the features of the premises and your own needs. In any case, the future table must comply with sanitary standards and ergonomic requirements.
From the materials for the computer desk you will need:
- Chipboard or MDF, the first will be cheaper. Of course, a do-it-yourself wooden computer desk will look much more interesting, but it will also cost significantly more;
- melamine edge - more convenient than PVC trim, as it is easily fixed with a hot iron;
- glue and furniture wax;
- confirmations, dowels and self-tapping screws.
Of the tools needed are the following:
- hacksaw or circular saw, if the material is supposed to be cut independently;
- electric drill and screwdriver;
- you will need a jigsaw if some parts have a curvilinear shape;
- grinder;
- hex key for confirmations, chisel, square, tape measure and ruler.
And the edges are matched to the interior. The number of add-ons is determined by the needs and experience.
Photo of a stylish do-it-yourself computer desk
How to make a computer desk with your own hands?
According to the finished project, the required amount of materials is calculated. When buying, it is recommended to increase the volume of chipboard and fasteners by 15%, based on a possible marriage and defects during assembly.
Straight
The prototype of a direct computer desk is written, but zoned in height and depth according to the requirements for equipment. Therefore, its parameters must satisfy not only the size of the room, but also the position of the operator and the dimensions of the equipment.
The optimal dimensions of a model for a PC without complex peripherals are:
- depth - 60 cm, or 50 cm if the monitor is on a stand;
- the length of the tabletop consists of an operator's seat - 60 cm and not less, the width of the compartment for the system unit - 25 cm, the width of the cabinet, if any - 40 cm and tolerance. As a rule, this is 130 cm. But if at least a scanner appears, and add-ons are not made, then the length of the countertop increases;
- height - 75 cm or a little more, depending on the height of the user. The exact formula is: the product of the operator's height and 75 cm is divided by 175, and the result is the recommended countertop height;
- The height of the monitor stand determines the viewing angle. It is 0-20 degrees from direct view. With large screen sizes, the need for it may not arise;
- the height of the keyboard shelf is 50-70 cm below the best line of sight. The position of the keyboard is unacceptable, in which the operator is typing with his elbows hanging by weight and his wrists raised;
- the combined computer-desk dimensions will be large, as it should, in fact, include one more operator's seat - the same 60 cm of free space.
Of the mandatory devices, there should be a sliding shelf for the keyboard - especially if the depth of the table is small, and the compartment for the system unit - there is nothing worse than constantly bumping into it with your feet. A straight table necessarily includes such an element as the rear crossbar, as it provides rigidity to the entire structure. Its width is at least 1/3 of the height of the table, the thickness should be as large as possible. It is made from the most ordinary chipboard.
If, in addition to the columns, it is necessary to place other equipment - a printer, scanner, MFP, you cannot do without add-ons. Moreover, most devices are simply inconvenient to place at the bottom. So from a variety of lower shelves, which also interfere with the operator, you must immediately refuse.
- According to the drawing, patterns are made or the pattern is immediately transferred to chipboard sheets. Details are cut with a hacksaw or saw. A jigsaw is used to cut curved elements.
- The ends, if necessary, can be pasted over with PVC film.
- Collect or a deaf compartment for a curbstone. The box consists of 3 walls, a bottom and a facade. The walls are assembled into a kind of box for confirmations, for which holes are pre-formed at the attachment points. The bottom is a thin sheet of fiberboard, simply put on top and fixed to the ends of the product. Then the workpiece is set aside.
- They assemble a cabinet - sidewalls and bottom, also for confirmations. If not boxes are provided, but shelves, then they are screwed to the sidewalls. If boxes are being built, then rails and guides are fixed to the sidewalls at the right distance from each other. Better Kulkov balls, not rollers.
- In the same way, they mount the compartment for the system unit: they assemble the sidewall of the table, the compartment and the bottom. Then the finished compartments are fastened together with a rear cross member.
- Guides for a sliding shelf are fixed on the sidewalls with self-tapping screws. Kulkov ball guides or metaboxes are better - the latter are more expensive.
- Cut out the countertop and shelf. Their ends are pasted over with a melamine film. The tabletop is fixed to the ends of the vertical parts on the dowels, as the confirmations will protrude above the surface of the table. Nagels are installed on glue.
- Drawers are finished either after mounting the countertop, or before that. The fact is that for the correct fixing of the facade, the box must be in the finished cabinet. The facade is fixed after "fitting". To do this, tape is fixed on its edge of the facade, a ruler is placed on the bottom of the cabinet, and the panel is applied to the ends of the walls of the box. Then the ruler is transferred to the upper edge of the semi-finished box and the same procedure is repeated with the upper one. This ensures that there is a gap between the facades, and when pulling out the drawers, there are no difficulties.
- If everything is in order, the facades are fixed from the inside with self-tapping screws. The handles on the facades are fixed before installation.
- If the project includes add-ons, then their installation is started after the manufacture of the table. The design is first assembled for confirmations, and then it is already fixed on the countertop.
The assembly is not so much complicated as lengthy and requires accuracy, especially when drilling the ends. Also, in the absence of experience, difficulties may arise with wooden dowels. You can use plastic, although their service life is less - 5-7 years.
However, you can make such furniture in more simple version- from the old table you have. How to make a computer desk with your own hands, the video below will tell:
Angular
A small triangular table is even more popular than a straight one. Firstly, it takes up less space, and secondly, it is more stable and does not require structural reinforcement, and thanks to its large depth it makes it easy to place speakers.
However, a closed corner leaves a person alone with virtual reality, and from a psychological point of view, this solution is unsuccessful. The operator literally has nowhere to take his eyes, which contributes not to concentration, but, on the contrary, to rapid fatigue. The presence of open space in front of the eyes is much more useful, especially when working for a long time, for 8-9 hours.
- The standard size of the corner model is the length along the outer edge of the tabletop is 120 cm. Such a table is cut literally from one sheet of chipboard, since there are enough scraps to cut out the sidewalls and even shelves. Increasing the edge to 160 cm gives a big advantage: there is room for elbow support and free space for a shelf with a scanner, for example, or a narrow pedestal.
- The system unit is installed on a shelf or even on furniture corners, although the first option is more reliable. The guides for the sliding shelf are fixed with screws to the countertop.
- Otherwise, the assembly of the angular model is no different from the straight one. Self-tapping screws and dowels are used for installation.
An L-shaped corner table will require more lengthy calculations, and its design is more complicated. Here you will need both additional support and a rear cross member.
A photo do-it-yourself corner computer desk

Little
The small table differs not so much in its simple design as in its size.
- The depth of the countertop is reduced to 50 cm, or even less.
- Width - up to 70 cm, the compartment for the system unit is excluded, especially the cabinet. For the system unit, you can make a mobile stand on rollers, which during operation can be placed on the outside of the sidewall.
- Whether or not a monitor stand is needed is determined based on sanitary norms and screen size. If the conditions are met when placing the monitor on a tabletop, a stand is not needed.
- A pull-out shelf is a must.
To increase the functionality of the model, it is often made in the form of a combined table-rack. In this case, the main part is a shelving box 1.3–1.5 m high and always with a back wall, or rather, the third component of the frame. The third wall is made from the same material. Rollers are often attached to the base. The countertop, in fact, is a protruding deep shelf. A monitor stand is most likely needed here. An upper shelf appears - for a scanner or printer, possible side external shelves for speakers, for example.
The installation of the product is carried out in the same way. But here they immediately begin to assemble the case, and then install the shelves. In principle, the system unit can be located on the base, but if it is an inconvenience during operation, it is still advisable to rearrange it on its own stand.
To know how to make a corner, simple straight or small computer desk with your own hands, you should look at the drawings and diagrams presented below.
Do you still have chipboard trimmings and have a great desire to make a computer desk on your own? Then watch the following video carefully:
Drawings, diagrams and photos
It is difficult to overestimate the value of a drawing when assembling furniture, especially in cases where an incorrectly calculated value can lead to a complete non-functionality of the item.
Drawings can be found on construction sites, and are quite detailed and even indicate the appropriate fasteners for each part. More informative will be diagrams with photographs of each stage of assembly. In such work, an image is more useful than text.
More difficult is the assessment of how suitable the found drawing is. To do this, you need to correlate the height of the main user and the dimensions of the monitor. Only on condition that the distance from the eyes to the screen is sufficient, that the angle of inclination is appropriate, that the operator’s hands do not turn out to be too high when working with the keyboard, that there is room to stretch his legs, and so on - only if all these requirements are met, it can be recognized suitable model.
Drawings and diagrams of computer tables
 Corner small
  Angular wavy
  straight with drawers
 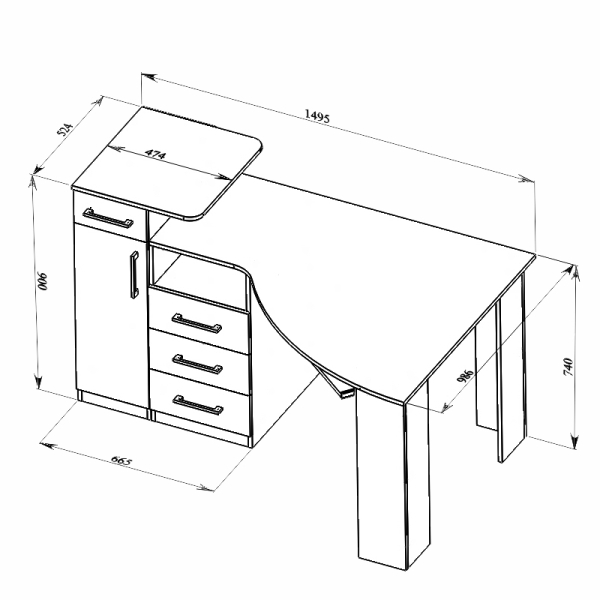 Angled R
A computer desk is not only a place where the system unit, keyboard, mouse, printer is located, it also has other functions. There is a need to store discs, notebooks, and other stationery in it. An important factor is how it fits into the overall interior of the room with its size, shape, design. In stores it is difficult to find a model that meets all the parameters.
This type of furniture is not one of the most difficult to make with your own hands. A simple, but meeting all the requirements option is done literally in a day. And if a person has skills, models are available to him that are in no way inferior to branded ones. The advantages are obvious: if you need to pay from 400 to 700 dollars for a cool computer desk, then a home-made one will cost a maximum of 3 thousand rubles.
- compliance with ergonomic requirements;
- frequency of using a PC for work;
- window placement;
- affordability of materials for manufacturing.
- the keyboard drops an average of 60 mm down from the point where the user sees best - this is 23–35 cm;
- the display is located in relation to the eyes at an angle of 0–20 °;
- the project should provide for the location of the elbows on the table - during prolonged work, hanging hands provoke diseases of the musculoskeletal system.
- place to place the monitor;
- retractable keyboard stand;
- shelves in the table for small parts and above it with books, speakers, flowers;
- cabinet for storing papers and other things.
- 1. Using the drawing, draw all the details on the material and cut them out. Non-laminated board is treated with an antiseptic.
- 2. Assemble the racks. Section on the right large sizes. If it is planned to place drawers in it, then on inner walls pre-fix the guides.
- 3. Mount the corner support. A rectangular frame is installed on it, a place is provided for a sliding shelf where the keyboard is located.
- 4. Drill holes: 2 are required for the sidewalls, and one on each side of the corner support. Answers are made in the countertop.
- 5. Dowels are lubricated with PVA glue and installed in racks. Mount the cover. The sections at the back are covered with fiberboard walls.
- 6. Make drawers, install in place. If shelves are planned, then they are closed with a door.
- be invisible;
- allow the possibility of tightening;
- allow multiple disassembly and reassembly.
- create an effort that compensates for shrinkage;
- compact the material, and do not cut it like screws;
- easily unscrewed, you can tighten, disassemble and assemble the structure up to five times;
- do not require installation on glue.
Show all
Which model to choose - the right choice
If we consider finished products, it is noticeable that all computer furniture comes down to three types: corner table, straight and combined. Choose based on the following considerations:
The right choice of location in the room plays an important role in the health and longevity of the monitor. Almost no one has monitors similar to a TV set, which put a lot of pressure on the psyche with their glare and buzz, planted vision. Modern flat screens are much more convenient in this regard, but their usability and durability suffer significantly from direct sunlight. Then it is difficult to see something, and the phosphor of the display burns out several times faster, surpassing even the old tube ones in this respect.
The location next to the window on the north side of the building is also not an option - there is not enough light for work not related to a computer. The best place when natural light comes from the west. Avoid rooms oriented to the south. Even the rays caught by peripheral vision are no less harmful than glare on the screen.
Variety of computer desks
The corner table is ideal when the PC is mainly used for entertainment. Even a person who has encountered this for the first time, but who knows how to work with tools, can make it. You will need a little material, you will have to spend two times less money than for more functional options- in the region of 1.5 thousand rubles. It occupies a very small space, suitable even for south-facing rooms if curtains and blinds are installed on the windows.

For people for whom a computer is not entertainment, but work, such a design is not suitable. There is room in and out of the desk to set up everything you need, but you need to place not only the PC and basic equipment, but also a lot of extras.
The corner computer desk is inconvenient in this regard, you constantly need to watch, no matter how you catch something. Resting is also problematic - it is difficult for a person who is passionate about work to tear himself away from the monitor, and besides him, he sees nothing else. An unequivocal conclusion is that it is harmful for children, schoolchildren and even first-year students to work in such conditions.

A straight table is a writing desk, modernized for a computer. It is zoned in different ways: the display is installed so that direct light does not fall on it, or a multi-level model is created. Production is advisable when the Internet is used occasionally or when it is not required to enter a lot of data. Materials will be needed twice as much as compared to the corner.

The ideal option is to use a computer-desk, subject to proper placement. This is an indispensable model for freelancers and anyone whose main job is related to the PC. Convenience is directly proportional to costs: it costs 40 percent more than the previous one. Accuracy is required, the use of special tools: electric jigsaw, manual milling cutter.
When choosing drawings of a computer table for making your own hands, pay attention to important points ergonomics :
Placement of additional devices
The convenience of using a computer depends on how conveniently the peripherals are located. Therefore, when choosing a project, you should start with it. The keyboard is usually located on a sliding board. But since wireless models have become widespread, it’s not necessary to think out much where to place it - move it aside, if there is no need, and work on. Regarding the little things (modem, router), the top shelf of the table is the most convenient place for it.

Copiers and printers are located where their service is available. If the printer is located somewhere in the corner under your feet, then working with it is very problematic - you can’t really fill the paper or pick up the finished documents. On the table, such devices are also not really needed, because they are not used very often. So the way out is bedside tables with a shelf. For homemade table there is always a piece of chipboard or plywood.
With a scanner, it’s a little more complicated: a device towering above everything is also not needed. For him, they make a special niche in the cabinet so that the lid of the apparatus is at the same level as the countertop. Convenient, does not take up space and is always at hand. Another a good option– sliding shelves on good rails. To prevent the gadget from accidentally flying off, it is installed on double-sided tape.

So that the table does not look like a rough home-made, it should be decorated. There are many execution techniques, everyone chooses what is available. A simple way is painting, but there are others besides it, including those that allow you to give an original look: decoupage, pasting with multi-colored tape, special film, veneer trim.
Classic rectangular table - step-by-step production
After the person has decided on the basic requirements, a sketch is made. To create it for yourself, you do not need great talent - it should show the general appearance and details of the structure. Next, the allotted space is measured, all the parameters of not only the table, but also the room are marked on paper. Then drawings are created - not necessarily at a professional level, but simply sketches with dimensions.

Ergonomics of a computer desk
On finished projects, a standard height is usually indicated: 75 cm. For a tall person, this is not very convenient - the parameter is increased. To know how much, use the formula: height × 75/175. For example, if a person is 185 cm, the calculations look like this: 185 × 75 / 175 = 79. The product drawing provides:
Next, the necessary materials are calculated: how much chipboard, plywood, boards, bars, handles, fasteners and other fittings are required. What the computer desk will be made of does not play a special role: it all depends on the taste and capabilities of the person. Wood is the most reliable and durable, but at the same time expensive. Therefore, various boards based on wood or plastic are used. If the design requirements are increased, choose metal and glass. Working with them is extremely difficult, so for making your own hands this is not a very suitable option.

The scheme of a computer desk of a classical form is shown in the figure. It is available for manufacturing even to a person without experience. You will need furniture panels, a board 12 × 120 mm, plywood, sandpaper and varnish. To assemble the structure yourself, you will need to purchase 3 handles for installation in boxes, 50 screws 5 × 60 mm, dowels and a set of guides 400 mm in length. More reliable telescopic. Common tools: hacksaw, drill, screwdriver, square, tape measure.
Bottom frame - blanks and assembly
They start by sawing out the main details: countertops, bottoms, bedside table covers, three vertical walls. The latter are subjected to additional processing: they cut off the front upper corners 2 × 2 cm, which are then rounded with sandpaper, and the rear ones to the size of the plinth.
On the edge behind the central wall, a sample is made of 20 cm with a depth of 18 mm. From the floor, it is located at a height of 265 mm. A chipboard cross member will be installed here, which will stiffen the structure by connecting all three racks. It is screwed to the side walls with self-tapping screws. Holes are drilled in the blanks, then the lower frame is assembled.

Then they take up space for the system unit. A small sidewall is cut out, at which the upper corner is cut off (rounded with sandpaper) and the lower one under the plinth. A shelf is attached to it. Everything is fixed together on a large wall and a rear cross member. Openings at the bottom are closed plinth panels using dowels as fasteners.
Superstructure - measurement accuracy matters
First, the side elements are cut out, the front corners are rounded from above. For even fixing on the countertop, a template is made of the same material. Holes are drilled in the ends. It is applied to the lid and the attachment points are correctly marked. Through holes are made in the countertop, and blind holes are made in the sidewalls. To make it even, use a square, checking the geometry of the structure with it. They climb under the table and screw the screws through the cover through into the lower ends of the sidewalls for secure fixation.
Two parts are made from the shield: an upper shelf 315 mm wide and a transverse rib for additional rigidity. The table must be strong so as not to crumble. The middle vertical wall is screwed to the lid in the same way as the side ones. Using a template, holes are marked, drilled and screws are screwed from below through the cover into the end. Do not forget about the square, controlling the location of the elements with it.

After installing the central vertical partition on the sidewalls, a rear rim is installed. The upper shelf is laid on the end of the middle element, aligned and screwed. Now the setting has a frame, and the whole structure has begun to take on clear outlines. The left shelf is placed at such a height that it does not interfere with working with the printer, scanner or MFP standing under it.
How to make boxes
For the walls, a board 12 × 120 mm will fit. 4 blanks are twisted with self-tapping screws from below, thin plywood is sewn on the bottom. Width and depth are chosen depending on internal dimensions bedside tables, parameters of guides.
Their fastening starts from the bottom: it is more convenient to determine the further location of the boxes. The offset from the front edge of the side walls is equal to the thickness of the furniture board - 18 mm. It is needed to fix the decorative panels on the front wall. The guides are screwed, adhering to the required distance and symmetry.

In the cladding, holes are made for the screws fastening the handles, which simultaneously connect facade panel and the front of the box. All details are installed in the opening of the nightstand. To correctly determine the location, wedges are inserted between them.
Through the holes in the front walls with an awl, marks are made on the front board of the boxes. The stock screws sold with the handles do not fit. They are not designed to mount through the front panel and front board - you need to buy a longer one. Additionally reinforced from the inside with self-tapping screws.
Corner design - product features and installation
The location of such a model requires adhering to the recommended parameters. Going beyond the limits causes inconvenience in work.
The overall dimensions are calculated based on the above. If the optimal dimensions are chosen, then the depth of the corner where the person is located is 50–60 cm.

The following instructions describe the manufacturing procedure:
To make high-quality models at home, special attention is paid to fasteners. It must meet the following requirements:
Self-tapping screws are usually used, but they are not very reliable: over time, the fixation is weakened. To prevent this from happening, the assembled model is disassembled, the parts are cleaned. Carpenter's glue or PVA is applied to the screws, twisted. This method makes it impossible to lift.
AT modern furniture confirmations are used that have the best properties:
Confirmate is screwed into pre-made holes - they are with a blunt tip. It is important to choose the correct diameter of the drill, as well as the depth - exactly the size of the screw. When screwed into the end of the board, an array with a thickness of 1.2 times the diameter of its neck is required on both sides (indicated by D1).

Make sure that the material under the head does not become loose. It is covered with a decorative plastic overlay, which is noticeable. But this is the only drawback of confirmations, which does not play a significant role.

Ball guides
Roller guides are unreliable, soon break. It is recommended to use ball Kulkov - the box runs smoothly, the closer works clearly. They are a little more difficult to mount.
Today the whole world is moving away from physical labor and smoothly adjoins mental labor. The list of professions has been replenished with such specialties that do not require the employee to be directly at the workplace in the office. Now, many people work remotely, sitting at their computer and doing the work of the customer. But, you can not refuse a personal workplace, where everything you need for comfortable work will be stored. Therefore, many husbands and fathers try to find convenient table options for their wives and children. After all, you can make a computer desk with your own hands. This takes time and a lot of desire. In this article, you will learn how to make a table.
Computers are in every home today. Convenient and affordable access to the world. But, they have one problem. Many were rather annoyed by the presence of endless wires, a large system unit, and I would also like to install a printer. Of course, all these things are visible. They tend to spoil the impression and the overall picture of the room. The advantage of homemade computer tables is that everything is in your hands. Only you know what is convenient for you and what is in the way, what height of the computer desk you want and how many cabinets should be retractable, it’s up to you to decide where to hang the shelf and where to refuse it.

Do you have a small room and many children? A do-it-yourself corner computer desk or a transforming table will help you retire and devote your time to work. There is another version of the table, which is attached directly to the wall and can be folded. To make such a table yourself is as easy as shelling pears, but how much benefit it will bring to you and your family. You can drink tea or put a laptop on it at any time, as well as free up space that the table occupied a minute ago. Design variations can be an infinite number. You can add your imagination and wishes to this list, which will make it even longer.
What shape to choose?
When you decide to make such a design, you need a plan on how to make a computer desk with your own hands. First - calculate the place and size of the future table. Here you will be helped by a list of varieties of types of furniture designed for work:
- angular;
- combined;
- straight.
The corner version of the computer desk can be implemented between two walls, at the junction of the wall and the window, or only on one side to contact the wall. Here, the dimensions must be controlled depending on the purpose of the table and the dimensions of the room itself, or its free space.

The direct version can be equipped with shelves and cabinets for small items. If you use a computer, then this option will suit you. Then you can hide a powerful system unit, highlight a pull-out shelf for a keyboard and mouse, set the monitor up, and make room for other gadgets. If you use a laptop or other gadget without wires, then you can use more modern version table for the computer. By attaching good tabletop against the wall, do not use legs, your workplace win over everyone who enters the room. This move is very profitable and requires minimal cost. You can always buy separate shelves or make your own. In addition, the fewer lockers, the less unnecessary things will overwhelm your life.

The ideal option, according to psychologists, is a combination of the first two. It should be large, combine angular and straight countertops. Work at such tables is usually also combined. A person should have somewhere to turn around and where to put Required documents. Such a table with an add-on and lockers will take up a lot of space, but will make you love your job. After all, sitting at such a table is a pleasure.
If you still couldn’t come up with the placement of a computer desk, then here are a few useful tips. They usually work during the daytime. Sitting at the corner table near the window, the work will go along with the sunlight. So, together with the natural clock, a person will quickly concentrate and complete the tasks in the evening. Set the table upside down front door so as not to be distracted by incoming calls. Depending on the type of activity, select the size and shape of the cabinets. Consider whether they will be built into the table or placed separately from it. If, in addition to working with equipment, you need to record something, then the table should perform the function of a written one.
Training
At the end of the fantasies and desires drawn on the preliminary sketches, you should have a finished drawing and diagram. To implement the table with your own hands, the drawings are available on the Internet. If you have not found a suitable one, you need to know some standards that comply with the rules and laws of ergonomics. The height of a straight or corner desk must be at least 75 centimeters. For a tall person, its parameter should be multiplied by 75 and divided by 175. As a result, the resulting value will be ideal for him. The depth of the working area of the countertop should reach an average of 70 centimeters. But, if space allows you, the figure can be increased. In cases where a monitor stand is planned, the depth of the tabletop can be reduced to save space in the room. These values are chosen for the convenience of work, but your wish plays a more important role.

A computer desk with your own hands can be made only if you have the necessary tools. You will need:
- screwdriver;
- jigsaw;
- chisel;
- drill or drill;
- grinder,
and don't forget the standard items: pencil, tape measure, ruler. A jigsaw will help cut off all the curved parts on the sheet. For cutting parts, you will need a saw or a hacksaw.

Now decide on the material. A wooden table will look luxurious. Noble and expensive material will decorate the room. If you are new to the issue of design, then it is better to start making a do-it-yourself desk from chipboard. The material is much cheaper and more affordable than natural wood. In addition, here you can find a wide selection of colors and experiment. The most affordable will be a plywood table that will fit into modern, country or loft style. Today, a fashionable move is a countertop made of sawn across the growth of a tree, in which all the insides of the trunk are visible. It must be unprocessed. You definitely won’t want to overfill such a force of nature with extra lockers. But it will certainly please the eye.
Next step
When with preparatory work over, the question arises of how to make and assemble a table with your own hands. The scheme is not complicated: you need to cut the material into parts of the required dimensions in accordance with the drawing and combine them into one. If you don't have necessary tool for cutting chipboard sheets, you can always ask for help from furniture companies that will be happy to make blanks for you. In addition, this option will be done not only quickly, but also qualitatively. Indeed, without much experience in this matter, you can easily spoil the material or make a mistake with the dimensions. Moreover, if the scheme of a computer desk with an add-on or a corner drawing with additional drawers is complex, then such a design is definitely beyond your power.

For the main parts, buy chipboard with a thickness of at least 16 millimeters. For boxes, 10 millimeters is suitable. Corner cuts of the material need to be processed. To do this, use a special edge tape, which is first heated with an iron, and then carefully laid out along the cut. The contact between the iron and the tape is not direct, be sure to put plain paper between them, as the tape can easily deteriorate under the influence of high temperature. If the tape is wider than you expected, you can always cut it off.
Pay special attention to fasten the strips for drawer cabinets. Here it is better not to make mistakes, and before the final fastening, check all the marks several times. In addition, such a system is made for a sliding keyboard. It should glide smoothly and not go astray.
How to assemble a table
Always start work with the supporting parts of the table. You need to analyze which of the parts play the role of a support and proceed to assemble them. If you have made a quality drawing, it will not take much time to decide on the order of assembly. In addition, for inexperienced people who want to do something with their own hands, it is better to transfer the drawing in natural size to cardboard or paper. Thus, the probability of making a mistake will decrease. For sliding shelves, be sure to screw the guides. All parts are fastened with self-tapping screws.

After they are assembled, you can mount the countertop. Determine the place of attachment of the upper part with the support ones, and drill holes. This must be done carefully so as not to drill through the material. To do this, you need to set a limiter that will protect you. Remember that all holes must be made strictly at 90 degrees to the floor or countertop. Then, when connected, the entire structure will be firmly fastened. Otherwise, the table may differ in its instability. In all nests and holes, for a more durable and lasting result, you can add a small amount of PVA glue. Furniture wax can be used instead of glue.
After fastening the main parts, the structure must be fixed. This is done with screeds. Then, you can disassemble and assemble your table again or improve it. Sometimes special holes are cut out for wires, then the eternal web will not interfere with you under the table. This assembly scheme is suitable for all types of tables. As you can see, this is not very difficult to do.
Conclusion
A computer desk is a necessary furniture set because it is not just a surface where a laptop is located, but also a work area. So, a person can keep on it all the necessary gizmos and items that he uses in the work process: office, copier, fax, telephone, and other elements.