Homemade snow chains with quick installation. How to learn how to make car snow chains with your own hands Chains on truck wheels with your own hands
Why are they needed?
Dramatically increase the patency of the machine on surfaces with a solid base. On chains, a Zhiguli is almost a Niva, a Niva is almost a UAZ, a UAZ is almost a tractor. Didn't try further.
Maybe not needed?
If you think so, then either you haven’t tried it or you don’t know how to use them correctly. A third option is possible: You are extremely lazy to spend half an hour putting on chains. But on the other hand, you will have to wait half a day for a tractor that will pull you out lazy. Nothing further for you to read What are there?
- bourgeois. Either rubbish suitable only for tying a dog, or a well-known company and, accordingly, money is not small. Haven't tried it myself.
- Domestic. They differ in design.
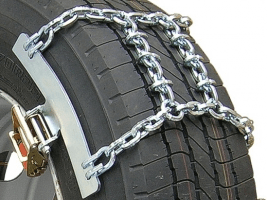
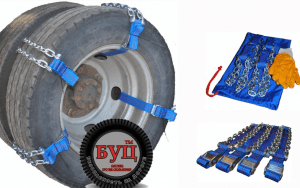
Instructions for putting on chains. (UAZ 31514)
- We spread the chains in front of the wheels of the car exactly along the axis of movement. Locks forward and position outwards. So that the hook is on the inside. Spread neatly Treadmills". The procedure for the front and rear axles is identical. The sequence of the front or rear axle is not important. It must be done in sequence - first 2 wheels of the front axle, then 2 wheels of the rear axle.
- We drive with wheels on a chain, stopping 20-30cm from the end of the chain. We start most of the chain on the wheel. We hook the hook from the inside.
- Then, having straightened all the links on the wheel, we start and hook the lock. The lock must be fastened to the link furthest from it. In case of difficulty, you can use a flat screwdriver. After all the chains are dressed and the lock is fastened, it is useful to drive 5-10m. After that, it is still possible to move the lock by one link (refers to "toothy" rubber, where by such actions it is possible to achieve a uniform distribution of chain links between the rubber lamellas)
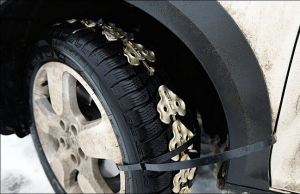
Tests of "honeycomb" circuits on UAZ.
More precisely, not “honeycomb”. And again, by mistake of the factory, a truncated “honeycomb” or a mixture of “herringbone” and “ladder” turned out.
We'll fix it soon. But this is also an indicator.
Due to the lack of those wishing to try out the chains on the Niva, only UAZ 31514 was used. Rubber Ya-192 215 / 90R15. Chains on all wheels.
- Krylatskoe 31/01/2002
More confident movement. Those. in the absence of jerks, the chance of digging is reduced.
Yes. Undoubtedly. There is no lateral drift of any axle of the vehicle.
Significant reduction in jerks during movement (the ladder has this effect due to its design)
Yes. Undoubtedly. COMPLETELY absent any jerks in the movement. There is a spillover effect. It is expressed in smooth onboard rolls by a not so significant amount. Approximately 45 degree speed bump.
Easier exit from the rut (due to the greater engagement of the chain itself on the ground)
Failed to try. There was no track J What was available simply did not cause difficulties. He turned the steering wheel and the car turned exactly to the angle of rotation specified by the steering wheel.
Increased reliability (use of a different chain material)
The material on these chains is the same as on the ladder. I couldn't tear or unfasten. Although he did not fix the lock additionally.
Who was in Krylatskoe, knows bulk hill. On the day of the test, the slide was rolled to the state of ice. It turned out to call on it in the 2nd lower gear, acceleration of 2-3 meters, on the second attempt.
On other climbs, I just put the car nose to the top, stopped and engaged in 1st low gear, drove up the slope. Feelings - dry asphalt under the wheels.
Descents from the slopes. Even on a bulk hill, it was possible to keep the car on the slope for an arbitrarily long time only with the brakes
General impression: The surface holds the teeth :). Or as if he put on another, very toothy rubber, or changed the coating under the wheels. I just couldn't get stuck anywhere. The car goes where the driver wants.
NEGATIVE: To my great regret, the factory made a mistake in the manufacture of chains. As a result, the middle “treadmills” dangled very freely on the dressed wheel due to the extra pair of links. The defect will be corrected in the near future. But this could not significantly affect the experiment.
It is somewhat more inconvenient to straighten more "treadmills" when putting a chain on a wheel.
More than 1.5 times the weight of the chain. But at low speeds, it can not affect in any way.
- Der.Vornovo. Vladim. region 120 km Gorky highway 03/02/2002
A similar car UAZ 31514. The same tires. Chains on all wheels. But this time each lock of the chain was fixed with Al wire dia. 3mm. I was afraid to lose the experimental sample in the snow. :) 
The temperature outside is about 0. Packed wet snow. Nast supported the weight of me as such. The depth may not be so significant, but I repeat, the crust is very strong. Snow packed. With such a depth of freshly fallen snow, even chains should not be worn.
1st low, front axle naturally ON. For a trip of 3 km, it was not possible to sit anywhere. In a straight line, the car goes slowly, punching a rut through the crust. When cornering, he tries to dig with an unloaded wheel. I gave it back a couple of times. There are simply no difficulties in moving along an already broken track. On climbs it is slower, but climbs. Without chains, the probability of driving through such snow, even on the Ya-192, is very small. Unfortunately, I did not have time to try to remove the chains and try without them. As a travel option, you can consider the use of a much wider rubber (let's say 12.5 "against 8.40" Ya-192). And drive through, trying not to fall under the crust.
Video from the 11th birthday of Uazbuki clearly showing the work of chains.
The basic scheme is an elementary structure, which consists of a set of steel links or reinforced wire. The uniform distribution of components over the entire area of the tire is the key to the successful operation of the product. Making snow chains with your own hands will not be difficult, and will bring moral pleasure. Passenger car snow chains are a replaceable tread pattern that transforms a typical road tire into an all-terrain wheel for off-road, icy, deep mud, snow, etc.
Varieties of design
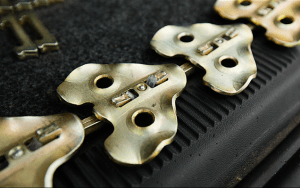
Snow chains differ in size and shape of the links. For their manufacture, a variety of materials are used (steel, aluminum, titanium, reinforced plastic, etc.). Depending on the conditions of use and capabilities, three main types of weaving are made: 1 . Ladder, in which the cables are connected by straight transverse pieces. This is a fairly simple, fairly practical and easy-to-implement system. However, it has a drawback - the car can move in jerks. 2 . A rhombus in which the connection is made obliquely, resulting in a pattern in the form of a web. 3 . Honeycombs. This design is slightly more complex, with longitudinal cables connected diagonally, resulting in an interlaced pattern.
What you need to make a chain on wheels for a car
Do-it-yourself snow chains are not so difficult to make at home, because they may be needed at the most inopportune moment. For this you will need: Bulgarian; Vise; Chain; Several dozen connecting links or carabiners; Hooks; Tension devices; Several hours of time.Manufacturing process
A simple instruction on how to make your own snow chains: 1 . First of all, you need to choose the right chain. Its links should be welded, not soldered, and long enough to braid the entire wheel.Important! Reinforced wire must be used for the chain, otherwise it may break and cause injury when driving at high speed or towing.
2 . Choose a chain design that suits you, such as a ladder. 3 . Cut the chain with a grinder into blanks of the required size. 4 . Put carabiners on the ends of the longitudinal blanks, you can fasten them with hooks or rings. 5 . Attach the transverse parts of the structure to the junctions of the longitudinal chain.Should be considered! The more crossbars are made, the better the machine's patency will be.
6 . Use a carabiner to hook the tension device to the side process, and put a hook on the other end. 7 . For the final connection of the system on wheels, use two tensioners.

How to put chains on wheels
Production of chains for rubber size 265-75-16
So, to begin with, we determine which chains we want to have. I mean the circuit diagram. It can be "ladder", honeycomb, diamond-shaped. The second type is considered the best - honeycombs. However, after thinking for a while, I decided to make a "ladder". There are several reasons: this is the easiest way, and the chains were planned to be used only to overcome a certain obstacle, and not for a long ride (this is about the fact that on chains with a "ladder" when slipping, the car pulls to the side). Next, choose the type of circuit. I bought a long link, with a bar diameter of 5mm. Then we apply a piece of chain to the wheel, we understand how long the bearing parts of our chain will have. To do this, it is not necessary to impose a chain around the wheel, it is enough to measure the diameter with the chain, multiply it by Pi (3.14). I got 48 links. Then we apply the chain from the middle of the rubber profile of the outer side to the middle of the rubber profile of the inner side, we get the length of the transverse parts - I got 13 links. After that, we determine how many transverse elements we need. I will say right away that I stopped at eight. Now we take the grinder in our hands, gain patience and begin to cut pieces of the chain.
Got 8 pieces of chain for crossbars
It is most convenient to cut the link, clamp it in a vise, saw it at the place of factory welding, and unbend it with pliers. Each piece should have half-bent links along the edges. Next, cut off the long parts of our ladder.

We count how many links it has. Subtract 8 (these are the links to which the crossbars will be attached), divide the remaining by 8 - find out how many links between the crossbars in order to evenly place them over the entire diameter of the wheel. I got 48-8=40, 40/8=5. It turns out that we fasten the crossbar, count five teeth, fasten the crossbar to the sixth, and so on. Collecting chains.

The kit is almost ready.
After that, you need to boil all the links you cut. I used a 2mm electrode.

This is how we weld each cut link. By the way, connect the minus to the vise, it's much easier.
Looking ahead, I’ll say that when testing my chains, it turned out that the factory welding of the links does not stand up, so you need to be more patient and weld all the links of the transverse parts of the chain, you can not cut them, but weld them directly to the place of factory welding.

Welded cross bar.
Castle making.
The chains are ready, but they must somehow be fastened to the wheel. Special metal locks are made on factory chains. I did not bother and came up with 2 options. Both have been tested and shown to be successful. On the inside of the chain, we use an ordinary Rapid carabiner for connection. Option 1. On the outside we use a piece of rope, 8mm in diameter will do. After dressing, the chain is tied with a rope. Just learn how to knit a special knot that can be easily untied after loading. Option 2. The same Rapid carbine is installed on the outer side of the chain. But to tension the chain, you need to make such a simple device.
Device for tightening the chain so that you can fasten the carabiner.
How to use it, I hope it is clear. If it's not clear, here's a photo:

We tighten the edges of the chain with a lever, put on a carbine.
That's it. The chains have been tested in mud and snow. Worked out 100%.


Winter is coming, not to mention that already now there are quite a lot of puddles and mud outside the city. To overcome such obstacles, you need a good SUV, or you can make snow chains for your car and carry it with you.
The main problem of such devices can be considered that it is problematic to quickly put them on a car, especially in winter, when you need to work in snow and frost. But after passing through the problem area, the chains must also be removed, since driving on them for a long time is harmful to the tires, and it is forbidden to drive along the highway.
It occurred to one author to attach snow chains using rubber bands with hooks. Now you don't need chains to install spanners And so on. For structural reliability, instead of rubber, it is best to use springs.
Materials and tools for homemade:
From materials:
- steel chain (length and thickness will depend on the diameter of the wheels);
- elastic bands with hooks or steel springs for fixing chains;
- a pair of carabiners for quick connection of chain links.


From tools:
- grinder (or other tool for cutting the chain;
- roulette;
- whetstone and other common tools.


Manufacturing process of snow chains:
Step one. Measuring tire circumference
First of all, you will need to make two rings from the chain, in diameter they should be such that they lie about half the width of the tire, well, or further to the center. The author connects the rings with threaded carabiners.
These rings are needed for attaching the transverse elements, which engage with the road.


Step two. cross links
At this stage, the transverse elements of the chains are made and attached. First of all, you need to determine their number. The more there are, the better the wheel will engage with the road. There should be at least 4 of them, if there are fewer, the work of the hooks will not be effective, the wheel will simply burrow into the ground. The author decided to use 8 transverse parts.


Well, then you need to cut the required number of chains of the desired length. The length should be such that the chains are well tensioned on the wheel, otherwise they will fly off. Here they are adjusted depending on the width of the tire and the location of the side rings.
Step three. final assembly
Now all the parts are interconnected, forming one-piece caterpillars. Everything is connected with the help of good strong carabiners. Well, after that, the tracks must be installed on the wheel, and in order to tension the chains, you will need metal springs or, in extreme cases, rubber. For ease of attachment, the author installed hooks at the ends of the rubber strips.
If the car is not designed for off-road assault, but clean asphalt is required for normal movement, then it will not be possible to do without anti-skid means.
In the foreseeable history, there are no reliable facts of the first cases of using an anti-skid chain to increase patency. Most likely, the first analogues appeared on trucks operating in a column in muddy mud or snow. And the experience of using anti-skid chains for trucks was attempts to wrap the wheels of tractors and light-duty tugs on the roads of the First World War with pieces of chains and cables. Of course, most of what belonged to the first snow chains was made by hand.
Today, a large part of motorists makes various options do-it-yourself snow chains, captures the process on video and puts it on the Internet.
Designs of anti-skid chain devices
The effect of increasing the car's cross-country ability is based on increasing the grip of the wheel tire with a ground or snow base, making it more reliable. Chain links act as lugs with a large coverage area of snow or mud mass. On the other hand, under the weight of the wheel and the car, the pressure of the chain links on the road surface - ice, snow or muddy soil - increases hundreds of times, due to which the supporting surface is compacted and adheres to the wheel. A simple anti-skid device allows you to make the movement of the car controllable and double the traction.
The working area of the anti-skid chain is a tape of interconnected fragments of 15-20 links, forming a diamond-shaped, ladder or diagonal pattern. A denser pattern may simply make the fixture unbearable. Depending on the design, the fastening of the tape is carried out by two cables or wire rings, which tighten the ends of the fragments on both sides of the wheel, thereby ensuring the fastening of the working surface on the tire tread. To fix the tension, a frame lock or latch is usually used. The effectiveness of the pattern in anti-skid is evaluated differently.
The most important characteristics of snow chains:
- the strength of the links, the high quality of the metal and welding, the presence of a protective coating capable of minimizing corrosion;
- make the least number of manipulations during installation, the chain must be fixed by closing one or two locks;
- the absence of elements that can damage the suspension units, calipers or tire rubber of the wheel.
Sometimes, to increase the anti-skid effect, links can be made from a bar or wire not round section but square or rectangular.
Homemade snow chains
If you look closely at the snow chain in the photo and carefully study the tension system, it becomes clear how to make snow chains with your own hands, especially if there is a video of the manufacturing process. Simply put, it is necessary to make a kind of grid of chain segments according to the size of the tire, with a system tension mechanism. Usually, for manufacturing, the dimensions of the sidewalls and transverse sections are measured with a margin of 1 link and the length of the cable is determined, with which it is supposed to stretch the chains on the wheel. In the very simple version chains, you can use an ordinary household chain, with a bar diameter of at least 5-6 mm, with securely welded links.
A pair of M10 or M12 bolts is used as a tensioning device. As a side mount, you can make a wire arch, or you can use a cable from the car's handbrake drive, having previously made loops at the ends for threading the tension bolt. Sometimes homemade snow chains are made from different materials, for example, belts made of Kevlar and polyamide fibers are used for fixation and tension.
Differences in anti-skid devices manufactured industrially.
Unlike homemade options, made with my own hands, industrial designs are forced to compete in the market, which means that they need to be made more convenient and reliable through the use of:

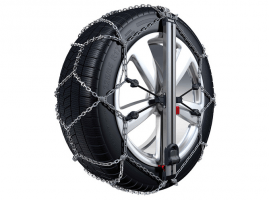
As an illustration, we can cite products - classic anti-skid chains from Pewag, one of the oldest in Austria, or trackers - Mita anti-skid chains. The latter are installed in the tread groove, fastened individually, all operations can be done with one key. The efficiency is not worse than the classic version, but the cost of a kit weighing 9 kg is about three times more expensive.
One of the most famous brands was the classic Thule snow chains. The design uses a diamond-shaped pattern with external asymmetry, which makes it possible to effectively provide traction on ice. Mounting on the wheel is carried out using a special arched device and a central aluminum rack, which provide automatic tension of the fragments and quick withdrawal in several movements. To prevent possible damage to the disk, a protection made of synthetic wear-resistant material is additionally installed.
Which is better - chains or anti-skid bracelets
Except unusual idea Mita trackers, among the anti-skid devices, anti-skid chain bracelets stand apart. The idea of a unitary device, cheaper, more versatile and easier to use, has long demanded its implementation. What are the advantages of the anti-slip bracelet scheme.
First - universality and flexibility of application. The bracelet is easier to put on the wheel, you can easily adjust the amount installed devices, the wheel rubber suffers much less.
Secondly, they are made on the basis of high-strength rubber, Kevlar fibers, wear-resistant polymers and, as a result, are much lighter than steel chain devices. The bracelet is easier to repair and maintain, the rubber pad studded with high-strength ceramic-metal or carbide spikes is easier to repair than if it were an all-metal construction.
Among the disadvantages of bracelets, one can note a higher cost and the danger of making sharp turns at a speed of more than 20-25 km / h, in any case, after overcoming snow or mud obstacles, they must be dismantled.
Classic chain devices have a longer service life, are cheaper and harder to use. For classic off-road the best way.
Do-it-yourself snow chains for trucks
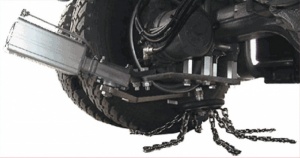
Everything that allows you to deal with the slippage of trucks will make its work more reliable. Wide application found both conventional classic anti-skid chain devices and original ideas- automatic snow chains for trucks. One of the representatives automatic devices, ONSPOT VBG, is controlled remotely, the design allows you to make a connection using a pneumatic actuator controlled from a remote control in the driver's cab. Used at speeds up to 50 mph. The performance of the machine and its reliability are slightly lower than conventional snow chains for trucks, but the machine will make the application safer.
In order to make a chain anti-skid device with your own hands, you should:
- correctly measure the length and width of the wheel tread along the circumference of the tire;
- make two blanks of ring mounts for the wheels. They will be located on both sides of the disk. One of the fasteners is detachable with a lock - for tensioning and fixing the chains from the outside of the wheels. The second mount is also detachable, but instead of a lock, hooks are made at the ends of the ring blank, allowing you to close the mount into a ring;
- we cut blanks - 8-9 pieces of chains of transverse chain segments and thread the wire of ring fasteners through the last links;
- to facilitate the installation of an anti-skid chain with our own hands, we replace one of the chain segments with a piece of wire with a diameter of 7-8 mm, bend it in the form of an arch and weld the ends to the ring wire fasteners .
How to put on snow chains with your own hands
Dressing her is not particularly difficult, but requires work, accuracy and attention. First of all, the chain is unfolded in front of the wheel, the locks on the outside and the hooks of the back of the chain on the inside of the wheel. We run over the device so that from the end of the unfolded device along the track to the point of support of the wheel on the snow or ground is about 20-25 cm. We throw the rest of the chain system onto the wheel and carefully straighten all the elements. Next, a hook is hooked on the inside of the wheel and the outer lock is closed. If the chain has a tension adjuster, everything must be done to increase the tension and remove the slack.
Video how to install snow chains:
There are several ways to increase the cross-country ability of a car, but the most common was and remains a method involving the use of special snow chains. AT winter period When a decent amount of snow has fallen outside the window, many drivers prefer to use metal chains, as they cope more effectively with snowdrifts and slippery roads. However, the issue of patency can arise not only in winter, but also in the spring and autumn, when the snow has already melted, but slippery porridge still remains underfoot. In such cases, the use of standard metal snow chains is highly undesirable, because, having traveled on asphalt, there is a real chance to ruin the rubber. It is for such cases that manufacturers have come up with soft chains. You will learn about what they are and how they can be made at home by reading this article to the end.
1. How to make rubber snow chains yourself
Soft chains are products made of wear-resistant reinforced rubber, plastic or more. modern material called polyurethane. Since rubber is used most often, the name "rubber snow chains" has taken root in everyday life. For high-quality traction with the ground, lugs are used in such chains, presented in the form of additional studded pads made of the same materials. A rubber band is responsible for the tension force and uniform distribution of the structure along the wheel, and links from the aforementioned material provide lateral fixation, although sometimes they are replaced with an ordinary metal chain.

The advantage of rubber chains is that they can be installed on any rubber, evenly entangling the wheel. In addition, they do not destroy the tire tread, and in winter they retain their elasticity.
In soft chains, the crossbars are the "lugs" described above, while on rigid structures, the connection occurs with the help of link elements. Also, the division of all snow chains can be based on the type of pattern, among which the most common are "ladder" and "diamond" (or "honeycomb"). In the "ladder" drawing, the connections between the longitudinal cables are made in the form of straight lines that are located across, as in a rope ladder. In the case of the “diamond” (“honeycomb”) pattern, the connections are made diagonally, as a result of which an interlaced structure emerges.
The main advantages of rubber (soft) chains are:
1) The ability to move on a dry road at a speed of 60 to 80 km / h, however, the manufacturer usually recommends limiting yourself to small runs - from 20 to 40 kilometers.
2) A high level of ride comfort, which is achieved through a smoother ride and less stress on the suspension.
3) Comparative safety for all components of the car body: rubber products cause less injury to the fender liner and, in the event of a break in the fastening, will not cause serious damage to the paintwork.
 Naturally, the issue of exploiting soft chains is not limited to only positive aspects, which means that there are also negative aspects. First of all, such products are less effective in terms of increasing the potential cross-country ability of the car, Secondly, they are less durable than their steel counterparts, and third, the use of rubber chains is recommended only for owners cars who do not practice driving on serious off-road. "Runners" on all-wheel drive vehicles are better off choosing traditional steel chains.
It is no secret that both types of snow chains today are not so cheap, so many car owners prefer to make them on their own. We will now describe a few options completion of this task.
Option 1. In this case, the rubber anti-skid chain is presented in the form of a flexible structure made of durable reinforced wire, the parts of which are connected by rubber crossbars and evenly braid the wheel around the entire circumference. The device of this design is as follows: two longitudinal cables or steel chains (internal and external) pass along the tire rim, and the elements of "lugs" made of rubber act as connecting crossbars between them.
The very process of creating such chains involves the performance of certain actions:
 1)
First, take the chain and cut four fragments of about 83 links each from it (but it’s better to try them on specific wheels first) - these will be our longitudinal branches. For transverse branches, the aforementioned "grousers" should be used, on both sides of which small hooks are attached, necessary for subsequent connection with longitudinal chains.
1)
First, take the chain and cut four fragments of about 83 links each from it (but it’s better to try them on specific wheels first) - these will be our longitudinal branches. For transverse branches, the aforementioned "grousers" should be used, on both sides of which small hooks are attached, necessary for subsequent connection with longitudinal chains.
2) Now we fasten the individual parts: the first of the transverse fragments is attached approximately to the sixth link of both longitudinal chains, and all other branches are attached to every tenth link. For connection, instead of hooks, you can use small rings.
3) At the ends of all the longitudinal branches of the chain, carabiners with a diameter of 5 millimeters should be installed, and somewhere after the fourth crossbar, on one of the longitudinal branches, a small segment of the chain is additionally fixed. A tension device is attached to the free end of this segment with the help of a carabiner, on the second end of which a hook is put on, which is necessary for subsequent fixation.
Option 2: This is makeshift fixture significant efficiency and ease of use. In fact, this is the same rubber snow chain, but you need an old rubber tire to create it.
The manufacturing technology of this version of snow chains is as follows:
1) Take an old tire as a blank, and it can be absolutely “bald”, but the main thing is that its sides are strong;
 2)
Then, on the treadmill, taking into account the markings made in advance, with a sharp knife (or even better, a scalpel), you need to cut out the “windows”. In order for the cuts to be clean and even, a punch is made at the corners of each such window. round holes, and the knife (scalpel) is lubricated with vegetable oil or soapy water. It is categorically not recommended to use mineral oil for these purposes, since the substances included in its composition will destroy rubber. Also note that the speed of work will increase if the tire is completely immersed in a tank of soapy water.
2)
Then, on the treadmill, taking into account the markings made in advance, with a sharp knife (or even better, a scalpel), you need to cut out the “windows”. In order for the cuts to be clean and even, a punch is made at the corners of each such window. round holes, and the knife (scalpel) is lubricated with vegetable oil or soapy water. It is categorically not recommended to use mineral oil for these purposes, since the substances included in its composition will destroy rubber. Also note that the speed of work will increase if the tire is completely immersed in a tank of soapy water.
3) After that, both sides of the tire are cut in a circle, thereby removing the wire rings vulcanized into the sides. There remains an openwork and rather elastic lattice ("chain"), which is subsequently pulled over a whole, but not a new tire, previously removed from the disk. It must be said right away that this work is not easy and is carried out with the help of mounting blades, wooden wedges or any other devices, and preferably with an assistant.
4) Once the "chain" is on the wheel, you can install it in place.
5) The result should be such a two-layer tire, with a sufficiently deep tread, which will ensure the movement of the car in difficult road conditions. To move along particularly difficult sections of the track, you can further increase the patency with the help of small sections of the channel, slipped under the jumpers. Having passed such a section, the channel must be pulled out, and the rubber “chains” of anti-skid themselves can also be used when driving on paved roads. Cutouts in the "chain" can have a very different shape, because it all depends on your imagination.
 Option 3. Suitable for those who have not taken care of the use of snow chains in advance and are already “stuck” on a slippery surface. In this case, an alternative to such devices is a rubber cable, which is simply wrapped around the tire, for which holes in the rim are used. True, this option is an extreme measure and can only be used on cars with drum brakes, because otherwise there is a real chance to damage the elements.
I would also like to describe separately the method self-manufacturing tensioner for snow chains. To do this, you will need an expander cord (d = 8 mm), about 1 meter long; two-bolt clamp for ropes; 5 pieces of screw carabiners (5mm).
The creation of the tensioner is carried out in the following order: the expander cord is twisted into a ring and clamped in a two-bolt clamp for contacts, the excess ends of the bolts are cut off with a hacksaw and riveted so as not to damage the tire. Then 5 carbines are put on in a circle. The main advantage of such a tensioner is that it evenly tensions the chain and is easily installed on the wheel.
2. Materials for making rubber snow chains
Depending on the option you choose, a certain amount of tools is required, which in each case is somewhat different.
 If you decide to create rubber snow chains, guided by the first described method, then for this you will need: 2-3 meters of steel chain (maybe you need less, but it’s better to leave an extra one), elements of “lugs” (they can be made from old tire), a sharp knife, wire cutters, hooks for connecting crossbars with longitudinal branches, carabiners with a diameter of 5 mm, a tensioner with a hook (home-made is also suitable). Also, as in any other case, a standard tool case will not interfere.
The implementation of the second option will require you to have a blank tire, a sharp scalpel, a punch, mounting blades (or wooden wedges), a soap solution (or vegetable oil), as well as a section of the channel, which, although it is not installed immediately, you still need to choose it correctly. As for the third option, it's even easier here, since to create such "chains" you only need to have a rubber cable. But remember - this is an extreme measure and rather an alternative to the above methods of creating rubber snow chains.
3. Installation of rubber snow chains
Any anti-skid chains, be they rubber or steel, are mounted on the drive wheels of the car, and if you are the owner of an all-wheel drive SUV, you will have to “dress” all four wheels. There are two possible ways fulfillment installation work- with and without a jack. The choice of one or another option depends on the skills of the driver and weather conditions. If you buy a ready-made set of chains, then there should be no problems with this at all, since it usually comes with instructions for installing and operating them.
In the first case, when there is a jack in the garage, vehicle must be raised in the same way as you do to change a wheel, and the machine must be fixed with a parking brake and stops. The chain should be evenly tensioned and the locks snapped into place.
 To perform installation without using a jack, find a flat and clean area of the road and place the chains in front of the wheels of the car. The main thing is to make sure that the locks are located on the outside, and the knots and links remain even and do not twist. Next, you need to slowly run over the chains, about 0.4-0.5 meters, which will allow you to throw their main part onto the wheel. In this way, it will be easier for you to stretch and straighten all the links.
Having installed snow chains, the tires should be “run in”, for which it is enough to drive 20-50 meters. This is done so that they are evenly placed over the entire area of \u200b\u200bthe tires, after which it will be possible to tighten the locks. Before installing chains, make sure that they will not come into contact with body parts, brakes and sensors. The described mounting method, which does not require a jack, was given using the example of installing steel chains, but mounting rubber products is no different. Let's look at all the steps in order:
1) Having aligned the soft anti-skid chain, you need to spread it on a flat surface and drive the drive wheels over the edge;
2) Fix the vehicle so that it cannot budge (for this, use the handbrake and props for the rest of the non-driving wheels);
4) The transverse fragments (rubber branches) are straightened so that they can be evenly spaced around the circumference of the tire;
 5)
In one of the links located at the end of the longitudinal chains (tail fragment), you need to thread the locking hook and, turning it in the direction of the locking ring, connect the parts. If the chain is a little loose, it can be tightened by moving the hook to the next links of the tail branch.
5)
In one of the links located at the end of the longitudinal chains (tail fragment), you need to thread the locking hook and, turning it in the direction of the locking ring, connect the parts. If the chain is a little loose, it can be tightened by moving the hook to the next links of the tail branch.
6) Before leaving, make sure that all fragments (both longitudinal and transverse) tightly cover the wheel. In the case when you have and you do not want to play with such "hits" on the spread chain, the installation procedure has a different look:
First, we fix the vehicle with the help of the "handbrake";
Then, under the front wheels (if the car is rear-wheel drive), we install supports;
We raise the desired wheel 2-3 centimeters above the surface;
We put the chain on the wheel as described in the previous method. We fix and straighten all the branches.
Removal of the device is carried out in reverse order.