Support arch of the vault 7 letters. Support arc from the boards. See what "circling" is in other dictionaries
A do-it-yourself greenhouse is not only useful for a country or personal plot building, but also an excellent opportunity to apply your knowledge, experience and skills of working with various materials and tools in practice. The most important part of the greenhouse is the frame, the quality of which determines the strength and durability of the building. It consists of a set of straight and rounded elements connected by welding, bolts or self-tapping screws. Consider the most difficult elements to manufacture - arcs for a greenhouse.


First, consider the advantages of the arched design of greenhouses, where the same arcs are used as the main frame element.
- Efficient Light Diffusion at any time of the day and at any angle of the sun to the horizon - this is the main advantage.
- Reduced consumption of materials for sheathing and frame - an arched greenhouse will cost much cheaper than a gable one. This applies to purchased options, and various homemade products.
- From the previous dignity of arched structures, the following follows - light weight, and therefore no need for a powerful and expensive .
- Another advantage of low weight - ease of transfer of the building to a new place.
- If necessary, an arched greenhouse can be easily extended, connecting the new arcs and horizontal ties with the previously installed frame.
- Due to their shape and height, greenhouses assembled from arcs and securely fixed to the foundation or ground have high resistance to wind load.
- Greenhouse shape allows you to clean it from snow in winter without any problems.

Important! If you are unable or unwilling to visit regularly country cottage area in the period from December to March, only to clear the greenhouse of snow, make the structure not semicircular, but lancet, as in the image below. In addition to the unusual appearance, the construction of this form does not allow large masses of snow to accumulate on the skin.

But in addition to the advantages, a competent craftsman must also be aware of the shortcomings of the design that he will do. Firstly, glass cannot be used as cladding for greenhouses assembled from arcs - yes, theoretically it can be bent into semicircular sheets, but this is too complicated and expensive, and practically impossible at home. Secondly, for such a building, it often becomes necessary to equip additional supports and braces - a lighter and cheaper design is also weaker. Thirdly, in itself, the manufacture of arcs for a greenhouse is a complex and time-consuming process.
An arched greenhouse is an indispensable assistant for any gardener, both experienced and beginner. An arched structure is assembled (both factory-made and self-made) from arc-shaped elements, which you can make yourself if you wish. What are, from what they can be made with your own hands?
Prices for arcs for a greenhouse
arches for a greenhouse
Arcs for a greenhouse - varieties and materials used
Now let's find out what arcs for a greenhouse are and what they are made of. From a constructive point of view, there are two main types of arches - solid and composite.
One-piece arcs for the greenhouse, as the name implies, are an inseparable semicircular structure made of one piece of material, whether it be wood, plastic or metal. On the one hand, this provides increased strength of this structural element, since there are no weak points in the form various compounds, fasteners and seams. But at the same time, it is much more difficult to make such an arc, especially if it needs to be made of wood. In addition, the complexity of transportation increases - in most cases, the arcs for the greenhouse have a width of 2.5-3 m and a height of 2-2.5 m, so you will have to use a truck to transport them.

Composite arches for greenhouses are the exact opposite of the previous ones. They are a set of several (from 2-3 to 15 or more) individual elements, which, when combined, give a finished arc. Much easier to make, since you will be required to cut or bend individual and relatively short parts. Also, for their transportation, if necessary, enough trunk or rear seat passenger car. But at the same time, the strength of composite arcs for greenhouses in some cases may be inferior to their solid counterparts.
Both of the above types of arched structures are made of the following materials:
- metal;
- wood;
- plastic.

Let's consider them separately. Metal arcs are characterized by high strength, average weight. They are made from many types of profiles, some of which are presented in the table below.
Table. The main materials used for the manufacture of metal greenhouse arcs.
| Name, photo | Description |
|---|---|
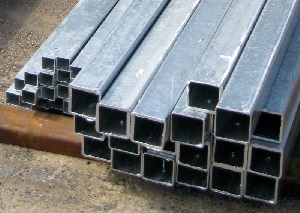
| Rectangular metal product, which is a steel beam with rounded corners, treated on the outside with an anti-corrosion coating of zinc or powder paint. |
| L-shaped metal product with sufficiently thick walls. In some cases, it has an anti-corrosion coating. |
| A piece of metal commonly used for façade or roof cladding. Galvanized for increased corrosion resistance. In some cases called a U- or W-profile. |
| U-shaped metal product used for the installation of plasterboard structures. Galvanized, has grooves and protrusions in its design, playing the role of stiffeners. In turn, it is subdivided into many subspecies of the profile, differing in their function. |


Important! When choosing a profile for greenhouse arcs, be sure to pay attention to the thickness of the metal walls. If it is small, then the resulting arches will be weak and unreliable. In addition, choose only those metal products that have corrosion protection, or purchase additional powder paint or cold zinc (in the form of an aerosol) for them.
Unlike metal, wood in the manufacture of arches for greenhouses at home is exotic - it is possible to bend a straight board or a set of rails into an arch, but it is quite difficult, this requires experience and relevant skills. But if they are not enough, there is always the opportunity to make a composite arc from many individually sawn planks. Later in the article you will learn how to do this.

Very often arcs for agricultural buildings, especially greenhouses or small greenhouses, are made of plastic or PVC pipes or profiles - these materials are flexible, cheap and easy to process. But the flip side of the coin is the low strength of the resulting structure - in most cases, greenhouses with plastic arches are temporary structures with polyethylene sheathing, dismantled in the fall and assembled back before the start of the next summer season.
Important! Separately, it is worth mentioning the presence additional structures for fasteners. The simplest arc for a greenhouse may not have them and be connected to other parts of the frame using welding, corners and self-tapping screws. But skilled craftsmen attach “branches” to some arches, with which you can securely fasten the arc and ties by inserting one into the other and fixing it with bolts and nuts. An example of such a design is shown in the image below.

Production of arches from a profiled pipe
The execution of arches from a greenhouse from a profiled pipe of square or rectangular section requires some skill and skill - it is necessary to observe at least approximate dimensions in the absence or imperfection of special measuring instruments. In addition, you need to be careful not to allow the formation of dents on inner wall arcs, violations axial symmetry profile and divergence of the weld. In this section, we will consider two methods for manufacturing arcs from metal that do not require heating of workpieces - using a home-made or purchased pipe bender and manually, using a template.

The pipe bending machine is a mechanism consisting of two fixed elements and one movable one. The latter is lowered or raised using a jack or an adjusting screw. Due to this, the radius of curvature, which is attached to the profiled pipe on the machine, changes. The latter is driven by a manual drive or an electric motor - the workpiece is pulled along the rollers several times until the desired shape is reached.


Advice! Work on a manual pipe bender can be simplified with a toothed chain. It is stretched between large stars on fixed rollers and a small one on manual drive. As a result, it is possible, with little effort, to impart a significant torque to the machine mechanism.

You can learn how to make your own pipe bender from the videos presented in the following sections of the article. Here we will consider how to use it and how to make strong arcs for a greenhouse with an arched frame.
Step 1. Determine the length of the future arc and the radius of curvature. This can be done either with the help of mathematical formulas, or by making a blank of the appropriate shape from the wire. By the way, in the future it will be needed as a kind of template.


Step 2 Prepare profiled pipes - cut the blanks you need along the length, clean them from rust, if any.
Step 3 Prepare the pipe bending machine for work, check its completeness and operability.

Step 4 Using the adjusting mechanism of the machine, select a slight bend, put a straight profiled pipe on the rollers and make one roll.


Step 5 Unfold and insert the workpiece into the machine with the other side, roll it over the rollers again.


Step 6 Repeat steps 4 and 5 until the curvature of the profiled pipe stops changing.
Step 7 Check the resulting product with the template. If the shape does not yet correspond to the desired one, set a larger radius of curvature on the regulating mechanism, insert a curved profiled pipe and repeat the three previous steps until the arc acquires the desired shape.

Important! Please note that the first few arcs are trial ones, with their help you will gain the necessary experience and skills in working with the machine. Since the message to the profiled pipe of the desired shape occurs gradually, mark intermediate curvature values on the adjusting screw or jack with a pencil or chalk.

Making an arc manually in a cold way is allowed only for profile pipes with a small wall thickness and a cross section of 20x20 mm or less.
Step 1. Determine the length of the arc and the radius of curvature.
Step 2 Assemble from wood, plywood or angle profile pattern. To do this, you will need a flat and large enough area or workbench.

Step 3 Fix the template and one end of the pipe attached to it on the platform or workbench with clamps.
Step 4 Grab the other end profile pipe(for convenience, you can put another pipe of a larger diameter on it, which in this case plays the role of a lever) and slowly, carefully bend the workpiece along the pattern. Be prepared to put in a lot of effort.

Step 5 Upon completion of the bending process, compare the parameters of the resulting arc with a wire template and inspect for defects. If they are not serious or are completely absent, then the resulting part is suitable for the frame of the greenhouse.
Step 6 Repeat the previous steps to make the rest of the arcs.
Video - How to make a pipe bender at home
Video - Arc to the greenhouse in 2 minutes
Making metal arcs using cuts
This method of manufacturing metal arches for a greenhouse is mainly used for plasterboard profiles, less often for rectangular and square steel pipes. The reason lies in the fact that such a method in itself is very laborious, in addition, the strength of the finished arc will be lower than when using a pipe bender or hot bending. In any case, this method is also worth considering.

Step 1. Cut a straight section of drywall profile or rectangular pipe to match the length of the arc.
Step 2 On the drawing, mark the points for making cuts. For most greenhouses, they are applied at intervals of 150-250 mm. Transfer the markup to the metal with chalk.

Step 3 Set the workpiece to workplace, clamp it in a vise or clamps.
Step 4 Use a grinder to make cuts. Be careful at the same time - the saw blade should not touch the outer side of the future arc. If work is carried out with a drywall profile, it is advisable to use metal shears instead of a grinder.


Step 5 Clean the cuts from the remnants of the metal.
Step 6 Bend the profile to the desired state. For details large sizes it is advisable to use a template pre-assembled on the ground.
Step 7 If the arc is made from profiled square or rectangular pipe, close the cuts by welding, clean the seams and coat them with paint or zinc to prevent corrosion.

Important! By a similar principle, you can make arcs of wood - make triangular cuts in it, bend a board or beam along them and close the cuts with a glued rail on the inside of the arch.
Prices for a metal profile for drywall
metal profile for drywall
Arcs for greenhouses made of PVC pipes
As mentioned above, arcs for plastic greenhouses are easy to manufacture and cheap material, but at the same time relatively low strength compared to wood or metal. To begin with, consider the simplest manufacture of an arch from PVC pipes suitable only for temporary structures covered with polyethylene.

Step 1. Cut a straight pipe to the desired length.
Step 2 Make supports - pieces of metal reinforcement stuck into the ground and coming out of it by 25-30 cm or more.

Step 3 If an arc is being made for the end wall of a film greenhouse, assemble the inner frame from boards and plywood (in the form of a trapezoid).
Step 4 Bend the pipe slowly at both ends. Given its great length, you will need an assistant.

Step 5 If the arc of the PVC pipe is end, pull it over the frame assembled in step 3 and secure it with wood screws.
Step 6 Then “put on” the ends of the PVC pipe on the pieces of reinforcement sticking out of the ground. If the structure has a foundation knocked down from a bar, fix the arc with a metal bracket and self-tapping screws.

Step 7 Repeat the previous operations with the rest of the arcs and then proceed to cover the frame with plastic wrap.

The following method of manufacturing arches from a PVC pipe involves the use of special equipment and some Supplies. As a result, you will get a sufficiently strong arc on which you can fix not only a plastic film, but also 4 mm thick.

Step 1. Cut two PVC pipes half the length of the greenhouse arch.
Step 2 Prepare supports for them in the form of pieces of reinforcement driven into the ground, protruding 25-30 cm above ground level.
Step 3 If an end arch is being made, prepare a T-fitting whose inside diameter is the same as the outside diameter of the PVC pipe. For intermediate arches, use cross fittings.

Step 4 Clean the upper ends of the pipes and degrease them, and then make a small chamfer on them. It is also necessary to clean the fittings from dirt, moisture and grease.
Step 5 Apply special glue to the outer surface of the pipe ends and the inner surface of the fitting. The composition used is a fairly powerful "cold welding", which will ensure a reliable connection of all PVC elements.

Step 6 Insert the pipe into the fitting, turn it 90° and fix it in this position for 30-60 seconds - during this time the adhesive will seize and connect both PVC elements.
Step 7 Repeat the previous operation, but with a different pipe and the opposite end of the fitting.
Step 8 Start bending the resulting structure, while being careful. Slowly place it on the metal pins and secure it to the greenhouse foundation with perforated metal tape and screws.


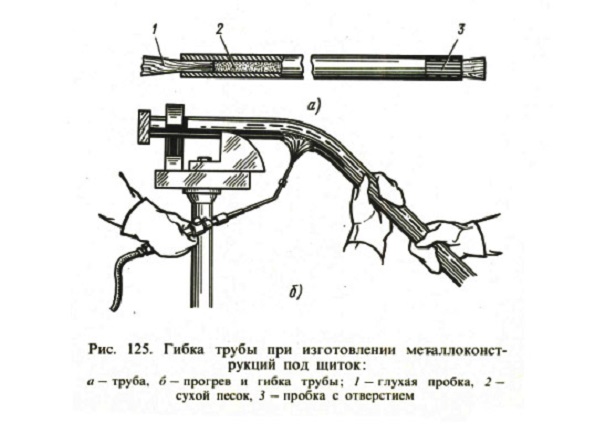
Important! Instead of using glue, the junction of the pipe and fitting can be heated up to 180-260°C (depending on the material used). Also using high temperatures it is possible to bend solid arcs from plastic pipes and profiles - the inner side of the arch is heated with a building hair dryer, the material softens, a fold is created at this point.
Making wooden arcs for a greenhouse
It is possible to create such parts from wood, but it is very difficult - in order not to break the workpieces during the bending process, some experience and skill are required. Therefore, as an alternative, there is another way to make a wooden arc for a greenhouse - a composite element assembled from many trapezoidal planks. Let's consider both methods in succession, let's start with bending the wood according to the pattern.
First, let's talk about the source material. The wood for the arch must be of very high quality, without a large number knots and traces of decay. In addition, it should not be too dry (this can be corrected by soaking). Having chosen the wood, you need to start assembling the stand-pattern. It consists of a platform made of plywood and a set of bars or other protruding elements that play the role of limiters that give the workpiece a rounded shape. Examples of such products are shown in the images below.
 Stand for bending arcs

Now let's proceed directly to bending the arcs. For this, slats or boards with a thickness of 15-20 mm are used.
Reference arc from boards
First letter "k"
Second letter "r"
The third letter is "u"
The last beech is the letter "o"
Answer for the clue "Support arc from boards", 7 letters:
circled
Alternative questions in crossword puzzles for the word circled
Support arch (usually from boards), along which a stone vault is laid out
In the construction business: a device for laying stone vaults in the form of an arc of boards or metal
Tavern before
Drinking house, tavern
Rotating potter's wheel
Catering company
Wooden support bar
The definition of the word circled in dictionaries
New explanatory and derivational dictionary of the Russian language, T. F. Efremova.
The meaning of the word in the dictionary New explanatory and derivational dictionary of the Russian language, T. F. Efremova.
cf. A device for laying stone vaults in the form of an arc made of boards or metal (in the construction business). cf. Rotating potter's wheel. cf. obsolete Drinking house, tavern.
Dictionary Russian language. D.N. Ushakov
The meaning of the word in the dictionary Explanatory dictionary of the Russian language. D.N. Ushakov
circled, cf. A device for laying stone vaults, in the form of an arc from boards (special). Rotating potter's wheel (special). In the old days in Russia - a drinking house, a tavern (historical). He would still stagger around the circles, and play grain with the boyar children. May.
Examples of the use of the word circled in literature.
The third - on the coal tower, bypassing the other two with the same cannons and cores - on the coal tower, which is towards the settlement, in the middle battle, the copper squeaker is short in a machine on wheels, in circled the core is two hryvnias, and to it the core is one hundred and fifty-two.
The fourth - on the Red Gate, which from the Kremlin to the Volga, in the tower a copper squeaker in a machine on wheels, in circled the core is two hryvnias, to it one hundred and twenty-five cores.
Lipped small of circled with a cry he fell between the karbas and the boat, and when Ryabov pulled him out of the water, his eyes turned white with fear - he recognized the feeder.
Among them are such systems as the Slavic-Goritsa wrestling, buza, skobar, forest warrior, colo, trizna, fierce battle, circled, cheldon, butt and others.
AT circled, - Dokuka said with dignity and, looking around, lowered his voice in concern: - And who caught it?
CIRCLE
CIRCLE
CIRCLE, circled, cf.
1. A device for laying stone vaults, in the form of an arc from boards (special).
2. Rotating potter's wheel (special).
3. In the old days in Russia - a drinking house, a tavern (source). “He would still be wandering around in circles, and playing grain with boyar children.” May .
Explanatory Dictionary of Ushakov. D.N. Ushakov. 1935-1940.
Synonyms:
See what "KRUZHALO" is in other dictionaries:
Tavern, tavern, cellar, drinking establishment, arc, drinking house Dictionary of Russian synonyms. circled, see tavern Dictionary of synonyms of the Russian language. Practical guide. M.: Russian language. Z. E. Alexandrova ... Synonym dictionary
circled- CIRCLE, arch. - A tavern, a drinking establishment. - Many service people first received a small deposit for food and clothes and took a walk in the sovereign's circle (1. 47). Sl. RYa XI XVII 8. 82 83: circled (in 8 m meaning) “the same” (XVII century) ... Dictionary of the trilogy "The Sovereign's Estate"
- (a. support master frame; n. Lehrgerust, Lehrgezimmer, Lehrring; f. cintre; and. cercha, cerchon) a template for erecting a stone or concrete (reinforced concrete) lining of a curvilinear shape in horizontal, inclined, vertical horns. ... ... Geological Encyclopedia
CIRCLE, ah, cf. 1. Support arch (usually from boards), a stone vault is laid out along the cut (special). 2. In the old days: a drinking establishment, a tavern. Explanatory dictionary of Ozhegov. S.I. Ozhegov, N.Yu. Shvedova. 1949 1992 ... Explanatory dictionary of Ozhegov
- (Ball caliber) (old) a device for calibrating shells. Samoilov K.I. Marine Dictionary. M. L .: State Naval Publishing House of the NKVMF of the USSR, 1941 ... Marine Dictionary
circled- Horizontal beam connecting sliding formwork panels and absorbing pressure concrete mix. [GOST R 52086 2003] Formwork topics ... Technical Translator's Handbook
circled- - an auxiliary device for temporary support of the formwork during the construction of stone and reinforced concrete structures curvilinear shape (arches, vaults, domes). [Great Soviet Encyclopedia. Moscow: Soviet Encyclopedia. 1969… … Encyclopedia of terms, definitions and explanations of building materials
In circles. Prost. Obsolete A straight line around the head (cut, etc.). F 1, 265 ... Big dictionary of Russian sayings
circled- 105 circling Horizontal beam connecting panels of the sliding formwork and perceiving the pressure of the concrete mixture Source: GOST R 52086 2003: Formwork. Terms and definitions original document ... Dictionary-reference book of terms of normative and technical documentation
Auxiliary device (mainly made of wood) for temporary support of the formwork (See formwork) during the construction of stone and reinforced concrete building structures curvilinear shape (arches, vaults, domes) ... Great Soviet Encyclopedia
Books
- Methodical manual "From words to deeds". Part 2 "Whirl". Part 3 "Hello", Sergey Demin. The manual gives practical exercises for the development of flexibility and coordination of movements according to the Kruzhalo and Zdrava systems ...
A fence denoting the boundaries of a personal plot, as well as other buildings on it, may have enough original design. Stone fences with gates and wickets on the front side are distinguished by a particular complexity of execution.
It is the openings that are main theme our article, which will give instructions and offer a video. After reviewing them, you will learn how to make a gate out of stone and other materials stylized as it.
First of all, you need to take into account that the style of the fence, of which the gate is an integral part, should duplicate the architecture of the house. Only in this case they will look organic.
Although the stone is both natural and decorative, according to appearance goes well with almost many types of materials: wood, brick, plaster and even siding (see).
What can we say about the fact that the stone fence gives the impression of solidity and impregnability of the structure. As a rule, it has both a gate and a gate - the height of their wings usually does not exceed 180 cm. The gate consists of a pair of wings and has a total width of 3-3.5 m. The width of the gate leaf usually varies from 0.95 to 1.2 m.
Design features
If the length of the front part of the fence does not allow you to install both, you have to manage only with a gate. A legitimate question arises: “What if you need to drive vehicles onto the site?”.
So:
- In such cases, it is possible to provide for a dismantled span of the fence, which makes it easy to remove and also simply and quickly install it in place. A stone fence is, of course, not the case when something can be easily dismantled - after all, this structure is capital and cannot be dismantled.
- Therefore, before you build it, you need to calculate everything in advance. One gate can be completely dispensed with when the site is small and the house is located in close proximity to the fence. Then, in case you have to bring bulky things into the yard, you can provide for a wide gate - you can even, as in the photo below, double-leaf (see).

- It is clear that the wicket doors cannot be made of stone. Here, the palm is for wood (see) and metal, but today you can increasingly see both fences and gates with wickets sheathed with a composite board (decking), as well as a profiled steel sheet, the surface of which is stylized as masonry.
Stone as a structural material is used only for the construction of the foundation of the fence, supporting pillars, including those framing the passages.
The greatest difficulty is the arched vault above the gate, but it must be said that it is not an obligatory element. Much depends on the height and design of the fence: if it is low, of a columnar type, it is quite possible to do without an arch above the gate.
Stone fence with opening
A self-built stone gate allows you to get significant savings, because the laboriousness of the process dictates the cost of the services of hired specialists, and it is quite high. The price of a stone depends not only on the breed, but also on the way it is cut and processed.
There's nothing you can do about it - what there is enough money for is what is given preference. In some regions with predominantly rocky soil, stones for the fence are not a problem at all, they can be collected, as they say, in the garden - do not use valuable rocks for this.
Note! The construction of the fence, like any other, must begin with a drawing. In this case, it should indicate the length and thickness of the fence, the location of the reference points and passages, the distance between the supports, as well as the width of the gate and wicket openings. This approach will help to determine with the greatest certainty how much and what material will be needed, as well as calculate the cost of this structure.

- The technology of building a fence and, accordingly, a gate in it is selected depending on the shape and size of the stone, the intended aesthetics of the building. The easiest way to work with sawn stone, as it has flat edges and regular geometric shape. But this option for fences is practically not used.
Why buy an expensive stone if you can get the same result using a cheaper stone imitation brick? Moreover, boulders or river pebbles can often be collected for free.
For the construction of fences, the so-called "torn" (wild) stone is often used. These are various sedimentary rocks: sandstone, dolomite, marl - not processed, but having a shape predetermined by nature.
The erection of supports
The arrangement of the fence, like any construction, begins with the preparation of the territory and the marking on it. First of all, you need to outline the line of the fence, hammering pegs at those points where the supporting pillars will be located.
If the fence will be built on strip foundation with a shallow depth, a trench is digging along the markings. Then, as expected, formwork is placed, reinforcement is laid, concrete is poured.

- If the construction of the fence is made with rubble stone, then it can be used not only for the construction of the ground part of the pillar, but also for its foundation. Ragged stone is used only in the ground part of such a structure and often only for laying out front sides. Inner part such a fence can be filled with anything: broken bricks, large rubble, stone fragments, sand-cement mixture.
The strength of the column-type fence is given by vertical metal posts, embedded in concrete. If the fence is solid, a mesh is stretched between the posts, to which stones are attached with anchors. But even in this case, in the place where the gate is located, there should be two supporting pillars on which the wings will be hung.
Foundation part
The technology for erecting columnar supports is as follows. A hole is dug in the ground, corresponding in size to the cross section of the support - a depth of 70-80 cm is enough.
Of these, 25 cm will be spent on preparing the foundation: 10 cm - a compacted sand cushion and 15 cm - crushed stone dumping. Next, a metal rack is installed in the hole, and free space filled with concrete.

So that the cement milk from it is not absorbed into the soil, the recess is first lined with polyethylene. Concreting is carried out to the level of the ground surface, after which the foundation of the column must be given at least a week for a certain set of strength. The verticality of the rack is verified immediately, until the concrete has hardened, so its position can be easily corrected.
Ground part
Further actions depend on what type of stone will be used for masonry. If this is a booth, which, as you know, has a rounded shape, it is necessary to make such a formwork around the rack, as shown above.
Stones are laid along the perimeter of the formwork, and the middle of the column is simply filled with concrete. This method called "laying under the bay."
So:
- The height of the formwork should not exceed 30 cm. It is removed after a few days, when the masonry mortar has hardened properly, and rearranged higher in order to pour the next row. This method of laying stone takes a lot of time, but at the same time it is the least laborious and does not require a high qualification of a bricklayer.

- If the stone is hewn, that is, it has at least two parallel faces, the masonry will be more stable and can do without formwork. The way it is laid is called "under the shoulder blade". In this case, the stones are selected by size, tried on dry, after which they are laid on the bed from the solution. In this case, it is necessary to ensure that the seams between the stones do not coincide, but are arranged in a checkerboard pattern.
- They must be filled with high-quality mortar both outside and inside. For external filling of joints, you can prepare a separate solution by adding a colored tint there. In order not to disturb the masonry, the internal cavity of the column is poured after the masonry mortar has hardened.

- By the way, for laying poles it is not at all necessary to use a natural stone. On sale there are such three-dimensional elements of concrete, stylized as masonry, which you see in the photo above. They are stacked on top of each other, replacing both formwork and stone, which greatly simplifies the work.
Their cavity is reinforced in the same way with a metal frame and filled with a solution. This design closes with a beautiful head and looks in ready-made neat and respectable. But if you want an arched gate, you still have to use natural stone.
Arched gate vault
The opening under the gate in a stone fence can be formed not only by two separate pillars. Thanks to an ordinary jumper, it may look like the letter "P", but a rectangular opening does not look as interesting as a wedge or arched one. Curvilinear jumpers are equipped along the formwork, which must have the appropriate shape.
- The arch is laid out from an odd number of bonded rows of bricks or stones having a similar shape. Why an odd number? The fact is that the central row should be located strictly at the central point of the opening, and the outer rows (heels) should be based on columnar supports.

- The formwork of the arched lintel is made according to a given radius and is supported by supporting arcs, which are called circles. The stone should be wedge-shaped and, if necessary, it is trimmed. It is very difficult to lay an arch out of a rubble stone, and it does not look so elegant, so an arched brick lintel may well be present in a stone fence.
- By the way, for this purpose, a brick with a wedge-shaped section is made. The stone can also be cut into a wedge shape by the manufacturer, but it is much easier for the craftsman to hew the one from which he builds the fence. The layout of the arched vault is made evenly on both sides, from the heel to the top. A brick or stone of a similar shape is placed on a narrow edge. Accordingly, the thickened edge will be at the top.

- The seams between the elements of the arched lintel must be qualitatively filled with mortar. The pattern of dressing the seams, as well as the correctness of their direction, should be given special attention. Control is carried out using a cord and a special template made in accordance with the radius of the arch.
Its arch is laid out as quickly as possible, the masonry mortar should not harden until the circle is weakened. The formwork is removed no earlier than a week later, provided that it is warm and dry outside. Otherwise, it will take much more time.
Support in the bed metal Opifer Nousutuki (Support for getting up "Opifer") 18122821AK
Product Description: Opifer Nousutuki (Rising support "Opifer") for a tubular metal bed. The model is attached to both edges of the bed, lift-turn function, open support bar with three fixed positions.
Product order code: 18122821AK
Model: Basic model for tubular metal bed, bed width (total) 65-115 cm. For use by people weighing no more than 120 kg.
Functions:
Support in the bed metal Opifer Nousutuki (Support for getting up "Opifer") 18122811NK


Product Description: Opifer Nousutuki (Support for getting up "Opifer") for wooden or metal beds, lift-turn function, triangular support bar with three fixed positions.
Product order code: 18122811NK
Model:
Functions: It is attached to both edges of the bed, the support arc can be slightly raised and rotated into three different positions. Helps people with limited mobility get out of bed and move safely around the bed.
Support in the bed metal Opifer Nousutuki (Support for getting up "Opifer") 18122811AK


Product Description: Opifer Nousutuki (Support for getting up "Opifer") for wooden or metal beds. The model is attached to both edges of the bed, lift-turn function, open support bar with three fixed positions.
Product order code: 18122811AK
Model: Basic model for wooden or metal beds, bed edge height 6 - 18 cm, bed width (total) 65 - 115 cm. For use by people weighing no more than 120 kg.
Functions: It is attached to both edges of the bed, the support arc can be slightly raised and rotated into three different positions. Helps people with limited mobility get out of bed and move safely around the bed.
Support in the bed metal Opifer Nousutuki (Support for getting up "Opifer") 18122840AKYPK

Product Description: Opifer Nousutuki (Support for getting up "Opifer") for wooden or metal beds. The model is mounted on one side and attached to both ends of the bed, lift-turn function, open support bar with three fixed positions.
Product order code: 18122840AKYPK
Model: Special model for wooden or metal beds, bed edge height 6 - 18 cm, bed width (total) 65 - 115 cm. For use by people weighing no more than 120 kg.
Functions: Simplified installation method. Mounted on the bed on one side and attached to both edges, the support arc can be slightly raised and rotated into three different positions. Helps people with limited mobility get out of bed and move safely around the bed.